- Title: Warhammer 40000: Gladius - Relics of War
- Release Date:
- Developer:
- Publisher:
Information about Warhammer 40000: Gladius - Relics of War is still incomplete. Please help us fill the details of the game using this contact form.
This comprehensive manual delves into the strategies of playing as the Adeptus Mechanicus faction and optimizing your economic development within the game.
Introduction
Within this guide, you will acquire a comprehensive understanding of how to effectively engage with the Adeptus Mechanicus faction and proficiently construct your economic infrastructure in the most efficient manner possible. The knowledge and techniques presented here are universally applicable and can benefit players across all factions in the game. Even if you hold no particular affinity for the Adeptus Mechanicus, I strongly advise all players, regardless of their faction preference, to peruse this guide at least once to gain insight into the art of sound economic development.
It’s important to note that this guide is tailored for standard game pacing. All the data and statistical information provided within this guide have been collected from standard-paced games.
Faction Overview
The distinctive characteristics that define the Adeptus Mechanicus faction are encapsulated by four key elements:
- Expanded Building Capacity: Adeptus Mechanicus has the unique ability to erect an additional building on each tile, surpassing the norm.
- Building Synergy: Homogeneity in building types on a tile bestows advantageous bonuses, while divergent structures result in penalties.
- Adjacent Building Bonuses: Buildings situated in proximity to one another grant additional benefits.
- Power Surge Ability: Adeptus Mechanicus possesses the formidable “Power Surge” ability, providing a substantial 35% boost to all structures on a tile for a duration of 6 turns.
These four distinctive features collectively grant the Adeptus Mechanicus the coveted status of having the most robust economy in the game. Consequently, they also claim the title of being the preeminent endgame faction. It is not an exaggeration to assert that the Adeptus Mechanicus’s economic prowess is nearly double that of typical factions. By direct assessment, an endgame Adeptus Mechanicus faction yields approximately 40% more raw resource income and loyalty compared to other factions, culminating in a staggering 96% resource surplus in comparison. If you aspire to play as the most formidable endgame faction, the Adeptus Mechanicus is undoubtedly your choice.
Furthermore, delving into the lore of this faction unveils its intriguing aspects. Initially, the extensive use of lobotomized humans for various purposes may seem excessively cruel. However, it’s worth noting that they possess the capability to cultivate blank humans in vats and program them without resorting to lobotomy, offering a more humane alternative. Their Skitarii units can also exhibit this duality, being either lobotomized humans or vat-grown blank humans.
In terms of demeanor and ethos, Adeptus Mechanicus units stand out as more mechanically inclined than their robotic counterparts in the game, the Necrons. While the Necrons revolve around concepts of honor, beasts, gods, and traditions akin to ancient Egyptian warriors, the Adeptus Mechanicus centers its discourse around science, technology, and knowledge. Thus, in the realm of Warhammer 40k, the Adeptus Mechanicus could be considered the true embodiment of a robotic faction, a distinction that may resonate with certain players.
The faction’s lore extends further, encompassing abilities such as matter conversion and the remarkable capacity of their knights to fabricate bullets seemingly out of thin air. Additionally, Tech-priests are immune to the ravages of old age, adding to their mystique.
This overview offers just a glimpse into the multifaceted nature of the Adeptus Mechanicus. For those intrigued by any of these elements, embarking on a journey with the Adeptus Mechanicus is a compelling choice.
Map Settings and Game Overview
In a typical Gladius game, the initial phase is predominantly focused on economic development, with little to no combat. However, as time progresses, the AI opponents will locate your position and unleash their amassed armies, marking the most challenging phase of the game. After successfully repelling this onslaught, the AI’s effectiveness diminishes, and they primarily send periodic waves of units, signifying the commencement of the cleanup phase.
The key factors in map settings primarily influence two crucial aspects of the game: the timing of the full-scale conflict and the size and potency of the AI’s military force. Therefore, your choice of settings depends on your preference for early or late-game warfare and the degree of low-tier unit combat you wish to engage in.
In my assessment, these four map settings hold the utmost importance: Map Size, AI Count, Wildlife Density, and AI Difficulty.
Map Size, AI Count, and Wildlife Density largely dictate when the full-scale war will erupt. A larger map and denser wildlife populations delay the onset of conflict, while a higher AI Count accelerates it. For instance, selecting a huge map with only one Impossible AI and Very High Wildlife may delay contact with the AI even beyond 200 turns, allowing ample time for amassing an endgame army. Conversely, opting for a tiny map with a single Impossible AI and Very High Wildlife will result in earlier contact. However, this setting’s consistency can vary; sometimes, you may encounter the AI as early as turn 50, while in other games, it might be as late as turn 100.
The primary distinction between Ultra-Hard and Impossible Difficulty lies in tech speed. While the Impossible difficulty level throws more units at you, this might not be immediately noticeable due to the already substantial unit presence on the map in Ultra-Hard mode. However, what you will undoubtedly observe is the significantly faster tech progression of Impossible AI. In some cases, an Impossible Chaos AI may deploy a Defiler as early as turn 55, while an Impossible Necron AI can have an Obelisk ready by turn 59. Conversely, with the Ultra-Hard AI, you are less likely to face a T9 unit before you can produce one yourself.
For those seeking early confrontations with AI, I recommend playing on Ultra-Hard because, while you can hold your ground against an Impossible AI’s horde of low-tier units, overcoming a high-tier unit is nearly impossible with low-tier forces. If the AI deploys a high-tier unit like an Obelisk before you, you may be compelled to sacrifice your entire army to stall for time until you can field your own high-tier units. This often leads to an economic collapse and eventual defeat due to severe numerical disadvantage. So, if you desire early warfare around turn 30, Ultra-Hard is the way to go. If your aim is to expedite the acquisition of endgame units, opt for Impossible Difficulty.
My preferred game settings involve either a free-for-all scenario with me and 9-10 Ultra-Hard AIs on a small or medium-sized map or a 1v1 duel against an Impossible AI on a Tiny map. I adjust the Wildlife Density to modulate the game’s difficulty to my liking. I tend to avoid placing 9-10 AIs on a tiny map, as it restricts the room for creating multiple cities, preventing Ultra-Hard AIs from reaching their full potential.
I do not recommend playing against AIs lower than Ultra Hard. In my extensive experience, Very Hard AIs rarely deploy their endgame units. In my 1v1 Impossible games, I have achieved nearly a 100% win rate, even when restricting myself to a single city. After digesting the insights in my guide, I am confident that anything below Ultra Hard will provide minimal challenge.
In my encounters, the Ork AI stands out as the most formidable. They have emerged victorious in approximately 90% of the free-for-all games, consistently presenting the endgame stockpiled army I had to confront.
Following closely, the Astra Militarum AI claims the second spot in terms of strength. When the Orks didn’t secure victory in free-for-alls, it was often the Astra Militarum that prevailed.
Conversely, Eldar, Tau, and Tyranids appear to be the weakest AIs in my experience. Eldar struggle to expand due to their inability to create new cities, and AI opponents excel at neutralizing their webway gates swiftly. Tau’s utopia mechanic adversely affects all economies in the game, including the AI Tau faction, making them one of the least effective AI-controlled factions. The Tyranids’ ineffectiveness surprised me, but it appears to stem from AI inadequacies rather than inherent faction weaknesses. In some cases, an Impossible Tyranid AI has lost to Ultra Hard AIs, highlighting their AI’s frailty.
Other factions exhibit relatively balanced AI performance, with Space Marines, despite being confined to a single city, often reaching the endgame. However, their limitations place them toward the lower end of the spectrum. Similarly, Necrons face challenges in expanding without clearing large swathes of wildlife or incurring the wrath of multiple AI factions.
These insights offer a comprehensive overview of map settings and AI factions, aiding players in making informed choices for an engaging Gladius experience.
Unit Overview
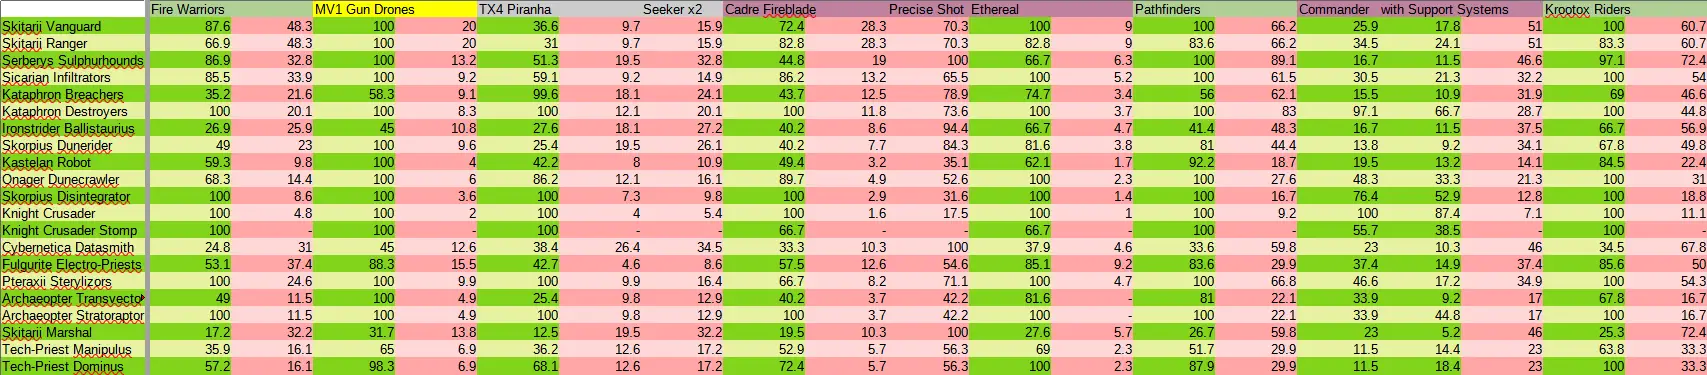
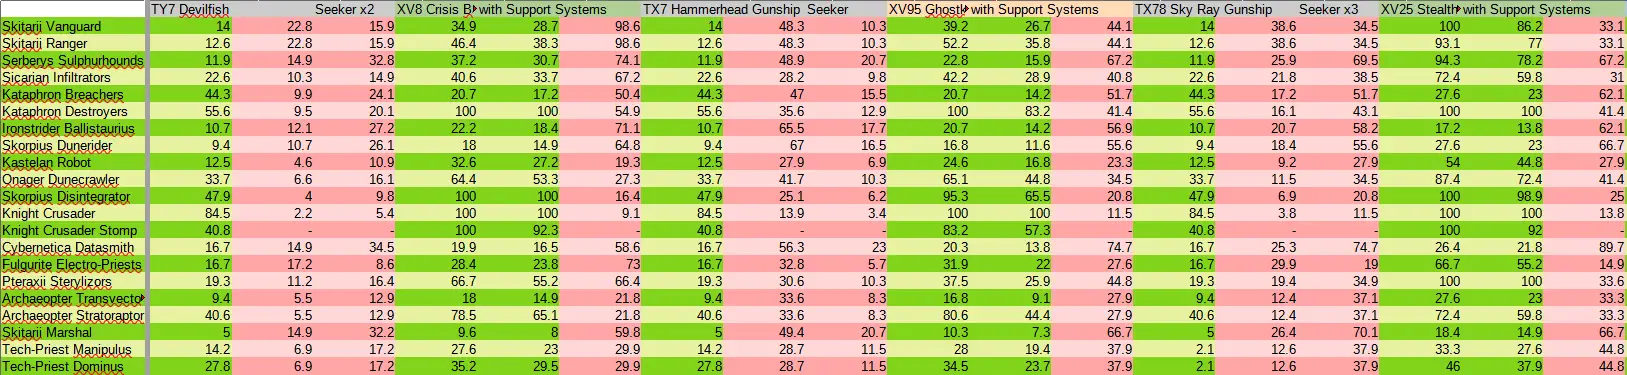
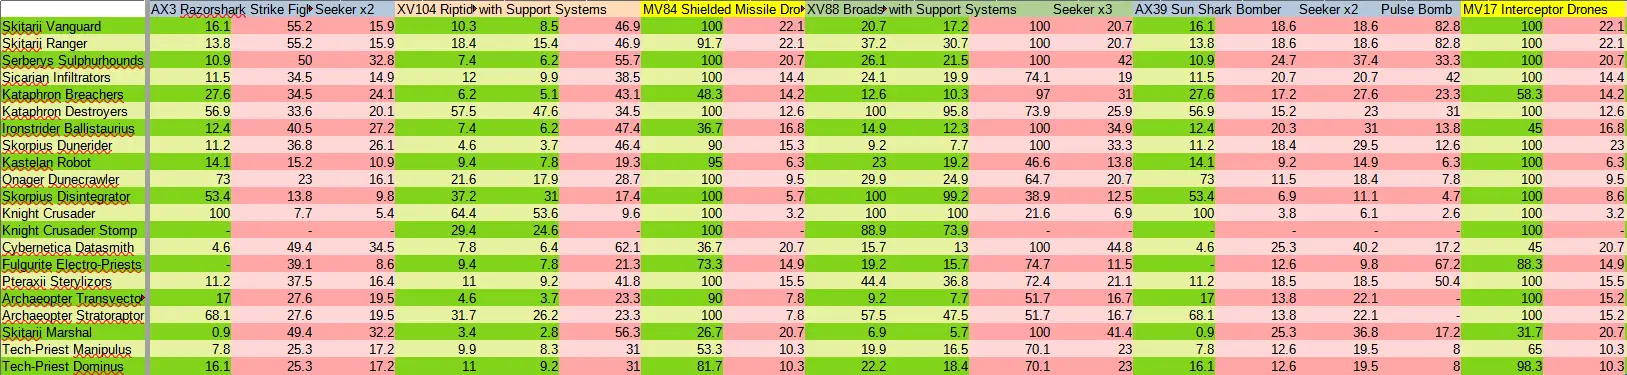
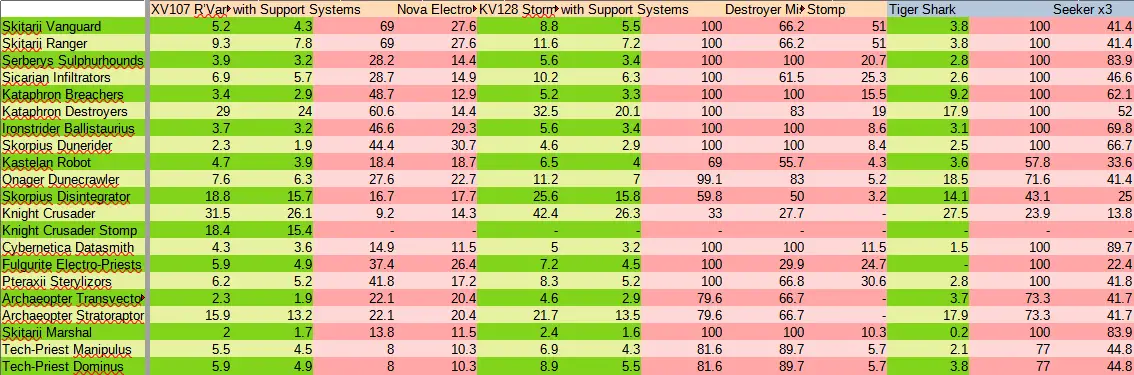
In this section, we’ll delve into an analysis of Adeptus Mechanicus units, with a focus on their performance against Tau units, who offer a diverse array of Infantry, Vehicle, and Monstrous Creature types. This comparison allows us to gauge how well each Adeptus Mechanicus unit fares against different unit types, both low and high tier.
Please note that the numerical values provided represent the percentage of a unit’s maximum health that an attack would deplete. For instance, a value of 100 means the unit would be eliminated in a single hit, while a value of 5 signifies that only 5% of the unit’s health would be lost.
The green sections of the spreadsheets illustrate your unit’s damage output against Tau units, while the red sections denote the damage inflicted by Tau units against your Adeptus Mechanicus units. Some units have an additional column in green, indicating the damage your Adeptus Mechanicus units would deal when equipped with as many defensive battlesuit support systems as possible. Conversely, some units feature multiple red columns, signifying the damage potential of their abilities against your units.
It’s worth mentioning that all units used in this testing were at level 10, maintained maximum morale, and had all available technologies researched.
Infantry vs. Vehicle
Adeptus Mechanicus Infantry units are designed as formidable anti-units with a glass cannon nature. Each of these units excels at dealing extremely high damage against specific unit types but struggles when faced with other unit categories. Additionally, they tend to have fragile defensive capabilities.
Conversely, Adeptus Mechanicus Vehicles are known for their durability and versatility. These units are capable of absorbing substantial damage while dealing consistent but not exceptional damage across all unit types.
The primary advantage of Adeptus Mechanicus infantry builds lies in the timing of acquiring Kataphron Destroyers. No tier 1-6 unit in the Adeptus Mechanicus roster stands a chance against high-tier units. Therefore, obtaining Kataphron Destroyers a whole tier earlier than their vehicle build counterparts is a significant advantage. The transition from tier 7 to tier 8 is a time-consuming process, and infantry builds can amass a full army of Kataphron Destroyers before vehicle builds can even produce their first Skorpius Disintegrator. Hence, if your strategy involves initiating an early war against an Impossible AI, the infantry build is the way to go.
The primary benefit of Adeptus Mechanicus vehicle builds lies in their synergy with the Knight Crusader. The Knight Crusader is, by far, the most powerful unit at your disposal, and once you unlock it, there is virtually no reason to build anything else, even if you initially chose an infantry build. The Knight Crusader, like other Adeptus Mechanicus vehicles, utilizes ore for upkeep, making it convenient for a vehicle build to shift its production focus solely to Knight Crusaders. However, infantry builds cannot make this transition seamlessly. Due to the Gladius economy mechanics, infantry builds will continue producing Kataphron Destroyers even after unlocking the Knight Crusader, resulting in a suboptimal economic strategy. This inefficiency can significantly hinder your overall growth.
A secondary advantage of Adeptus Mechanicus vehicle builds is their resilience in maintaining damage output. As single-model units, vehicles can operate effectively even at extremely low health, continuing to deliver their full damage potential every turn. In contrast, infantry, as multi-model units, experience diminishing damage output after sustaining even minor damage. This means that Knight Crusaders and Skorpius Disintegrators can hold their ground on the frontlines until they are severely damaged, while Kataphron Destroyers are forced to retreat for healing after just a single hit.
It’s not advisable to mix both infantry and vehicle builds. Building additional unit production structures for both types increases early-game resource demands, which can strain your economy. Moreover, the playstyles of these unit types vary significantly. Adeptus Mechanicus Vehicles thrive on reaching a critical mass of units and employing focused firepower to eliminate targets at range, while Adeptus Mechanicus Infantry prefer hit-and-run tactics, unleashing their high damage payloads before retreating for healing, with another infantry unit taking their place on the frontline. Mixing these two approaches can prevent you from achieving the critical mass of vehicles and hinder your ability to replace wounded infantry effectively.
Infantry Units
Skitarii Vanguard:
- These units serve as the cornerstone of any infantry-focused build. They offer remarkable cost-effectiveness and remain relevant even at tier 6.
- Skitarii Vanguard are arguably among the best low-tier units in the game.
- However, they are vulnerable to overwatch, so it’s advisable to employ them defensively rather than offensively.
Skitarii Ranger:
- Skitarii Rangers are less effective against infantry compared to Vanguard but perform better against monstrous creatures.
- They possess a range of 3 but come at a higher cost, making them less economical than Vanguards.
- Consider building Rangers once you have a sufficient number of Vanguards to fill your frontline and replace wounded units until they recover.
- Like Vanguard, they are more suitable for defensive roles due to reduced damage output when moving.
Serberys Sulphurhounds:
- In your assessment, this unit appears to lack utility. It operates essentially as a melee unit, costs more, deals less damage, and necessitates research.
- Given the significant number of techs that Adeptus Mechanicus requires, prioritizing this unit may not yield a commensurate return on investment. It’s advisable to skip it.
Sicarian Infiltrators:
- These melee units come at a cost twice that of Vanguards but offer only marginal improvements in durability and damage output.
- Their primary advantage lies in their ability to bypass overwatch, but given their cost, you may prefer sacrificing a Vanguard to absorb overwatch shots for your other units.
- While this unit represents an upgrade over the Vanguard, the research required competes with four other essential techs, making it potentially less appealing.
Kataphron Breachers:
- Kataphron Breachers are your initial anti-vehicle unit, boasting even greater damage against vehicles than Onager Dunecrawlers.
- They are a crucial addition to your infantry build, as your other infantry units lack the capacity to harm vehicles, including the tier 6 Pteraxi Sterylizers.
- A well-balanced force featuring Breachers, Rangers, and Vanguards ensures effective coverage.
Pteraxii Sterylizors:
- These units are jump infantry and represent an upgrade over Vanguards but may not exhibit impressive overall performance.
- Despite their higher cost, they don’t offer increased durability compared to Vanguards and still suffer from overwatch damage.
- Consider building Sterylizors only if you have surplus resources to spare.
Kataphron Destroyers:
- Kataphron Destroyers are the crown jewel of infantry builds and the primary reason to pursue this path.
- They are your earliest access to units capable of engaging high-tier opponents, and their anti-everything capabilities make them indispensable.
- Keep in mind that they are relatively fragile, so maintaining a Tech-Priest Manipulus nearby at all times is crucial to maximize their effectiveness.
In summary, while each infantry unit serves a purpose, the choice between them depends on your overall strategy and resource availability. Skitarii Vanguard and Kataphron Destroyers stand out as essential units, while the others may be considered based on specific circumstances and priorities.
Vehicles Units
Ironstrider Ballistaurius:
- This tier 1 unit is a strong contender for the most potent in its category.
- With a range of 3, excellent mobility, durability as a single-model unit, and no penalties for moving and shooting on the same turn, it excels in various scenarios.
- On flat maps where multiple Ironstrider Ballistauri can focus fire on a single target, they become nearly impervious.
- Building a considerable number of them is viable, as they are often as cost-effective as Onager Dunecrawlers, if not more so.
- However, their effectiveness diminishes on maps where they can only engage targets directly in front of them.
Skorpius Dunerider:
- These units serve as transport vehicles but are not typically used for ferrying infantry.
- Their primary role is to safeguard wounded infantry from perishing or impeding the progress of healthy infantry units.
- Against Ultra Hard and Impossible AI, where an offensive strategy hinges on amassing Knight Crusaders, it’s advisable to skip this unit.
Kastelan Robot:
- Kastelan Robots are cost-effective for defense, comparable to or even superior to Ironstrider Ballistauri.
- However, their damage output is similar to that of a single Ironstrider Ballistaurius against most targets, except low-tier infantry.
- One drawback is their need for energy both to purchase and as upkeep, unlike other vehicle units.
- Focusing on energy growth early in the game can be challenging, given the resource demands of other buildings.
- Kastelan Robots are primarily recommended for those who have a particular affinity for robotic units or when planning to employ Archaeopter Stratoraptors to win the game, as they also utilize energy as upkeep.
Onager Dunecrawler:
- Onager Dunecrawlers are a direct upgrade from Ironstrider Ballistauri and also serve as decent anti-air units.
- They maintain cost-effectiveness similar to Ironstrider Ballistauri, making them a suitable choice.
- Keep in mind that they struggle against high-tier units, so consider this limitation when using them.
Skorpius Disintegrator:
- Skorpius Disintegrators are your first units capable of engaging high-tier opponents.
- However, they enter the game slightly later, with Knight Crusaders looming on the horizon.
- It’s advisable to shift your production to this unit once it becomes available because you urgently need a solution to high-tier threats.
- This unit represents a straightforward improvement over the Onager Dunecrawler, offering better tankiness and damage cost-effectiveness.
Knight Crusader:
- The Knight Crusader is the ultimate unit for Adeptus Mechanicus, backed by the faction’s formidable economy.
- While it may not be the most potent endgame unit in the game, the Adeptus Mechanicus economy allows you to outnumber other endgame units by at least a factor of 2.
- With no particular weaknesses and effectiveness against all unit types, once researched, it is recommended to focus exclusively on producing Knight Crusaders.
In summary, the choice of vehicle units should align with your overall strategy and priorities. The Ironstrider Ballistaurius and Knight Crusader are standout units, while others can be considered based on specific circumstances and preferences.
Other Units
Cybernetica Datasmith:
- This unit plays a crucial role in city development, tile clearing, and non-hero healing.
- In vehicle builds, allocating excess food towards Cybernetica Datasmiths can be a wise strategy.
- They are particularly valuable in the late game when you have numerous Knight Crusaders and need to clear terrain while simultaneously healing your units.
Fulgurite Electro-Priests:
- This unit seems to have a singular purpose: achieving the Adeptus Monotonous achievement.
- There appears to be no compelling reason to choose Fulgurite Electro-Priests over Skitarii Vanguards or Ironstrider Ballistauriuses for regular gameplay.
Archaeopter Transvector:
- This unit appears to be less effective in combat compared to the Kastelan Robot, despite having the same cost.
- At tier 7, you should be prioritizing Kataphron Destroyers, which are less suitable for transport due to their bulkiness.
- As such, it’s recommended to skip this unit in most circumstances.
Archaeopter Stratoraptor:
- While this unit is decent, it faces competition from the Skorpius Disintegrator, which shares the same tier but lacks the drawbacks associated with the Stratoraptor.
- The Stratoraptor incurs energy upkeep and requires a separate production building, making it less favorable.
- There may be situations where you consider building it, but the Skorpius Disintegrator generally outperforms it in various aspects.
Skitarii Marshal:
- This unit provides a 17% damage boost to all nearby infantry and can significantly increase the damage of a single infantry unit every 2 turns.
- However, its status as a hero comes with a notable influence cost, which may not be ideal for Adeptus Mechanicus, given their preference for avoiding influence buildings.
- Consider prioritizing a second Tech-Priest Manipulus over this unit, as the 17% damage aura may not provide enough value to justify the cost.
Tech-Priest Manipulus:
- Regarded as the best hero in the Adeptus Mechanicus roster, the Tech-Priest Manipulus offers a game-changing 24 HP per turn heal.
- Investing 100% of your influence in this unit can be highly beneficial.
- While early to mid-game may only allow for 1 or 2, the late game will see you accumulating a substantial amount of influence, enabling you to deploy multiple Tech-Priest Manipuluses.
- With a robust Knight Crusader army backed by these units, the Adeptus Mechanicus becomes a formidable force.
Tech-Priest Dominus:
- This unit provides a 35% damage boost to your vehicles but has a limited range of 1 tile, affecting only 2-4 units at most.
- The choice between having a 4th vehicle unit or 3 units buffed by the Dominus depends on your preferences and strategy.
- Keep in mind that by level 6, the Dominus can pay for itself with 12 research and 12 influence per turn, while costing 4 food and 8 influence.
- The decision to build this unit depends on whether you specifically want a combat hero equipped with Jokero Encampment gear, as Tech-Priest Manipuluses are generally considered a more valuable option for their healing capabilities.
Gladius Economy
In the Gladius Economy, the primary constraint affecting all economies is the rate of population growth. This implies that factors like construction time and the cost of individual buildings are not as crucial. The most efficient approach to developing your economy involves ensuring that each building you construct results in the maximum gain. This strategy is essential because population growth speed serves as the limiting factor for your economy.
For instance, let’s consider that each resource building boosts your income by 6 while also decreasing it by 1 (due to upkeep) and 1% (due to population loyalty). On the other hand, each additional loyalty building increases your income by 6% and reduces it by 2 (upkeep) and 1% (pop loyalty). The question arises: when is it more advantageous to construct a resource building, and when should you opt for a loyalty building?
To answer this question, we can begin by formulating the problem as an equation with just two variables:
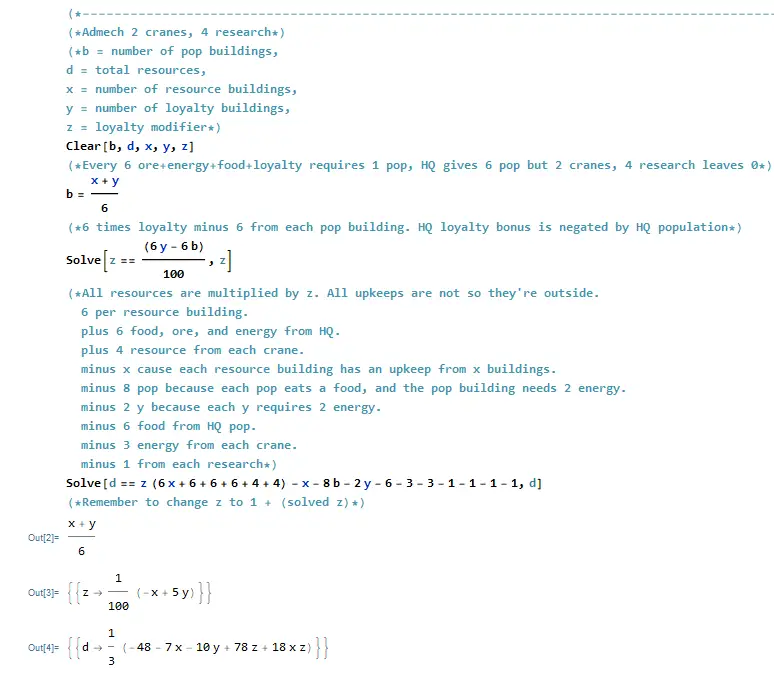
I’ve observed that you haven’t taken into account factors such as adjacency bonuses, monolithic building effects, or power surge bonuses in your calculations. This omission is because you’re unsure of how to incorporate them. It’s worth noting that based on your direct testing, the exclusion of these bonuses doesn’t significantly impact the outcome. Even without including these bonuses directly in the equation, following your recommended ratio of resource buildings to loyalty buildings remains either the most optimal or very close to it.
You’ve also mentioned that you’ve combined all the food, ore, and energy buildings into one category. Initially, you attempted to separate them, but the resulting equation became overly complex. However, the advantage of this simplification is that you can apply these equations to all factions, including Tyranids.
In your analysis, you haven’t considered influence because you personally don’t prioritize it. Instead, you prefer to allocate resources to building more ore buildings rather than investing in additional Influence buildings, especially considering how Adeptus Mechanicus functions. This strategic choice aligns with your preference for having more ore buildings over an extra Tech-Priest Manipulus.
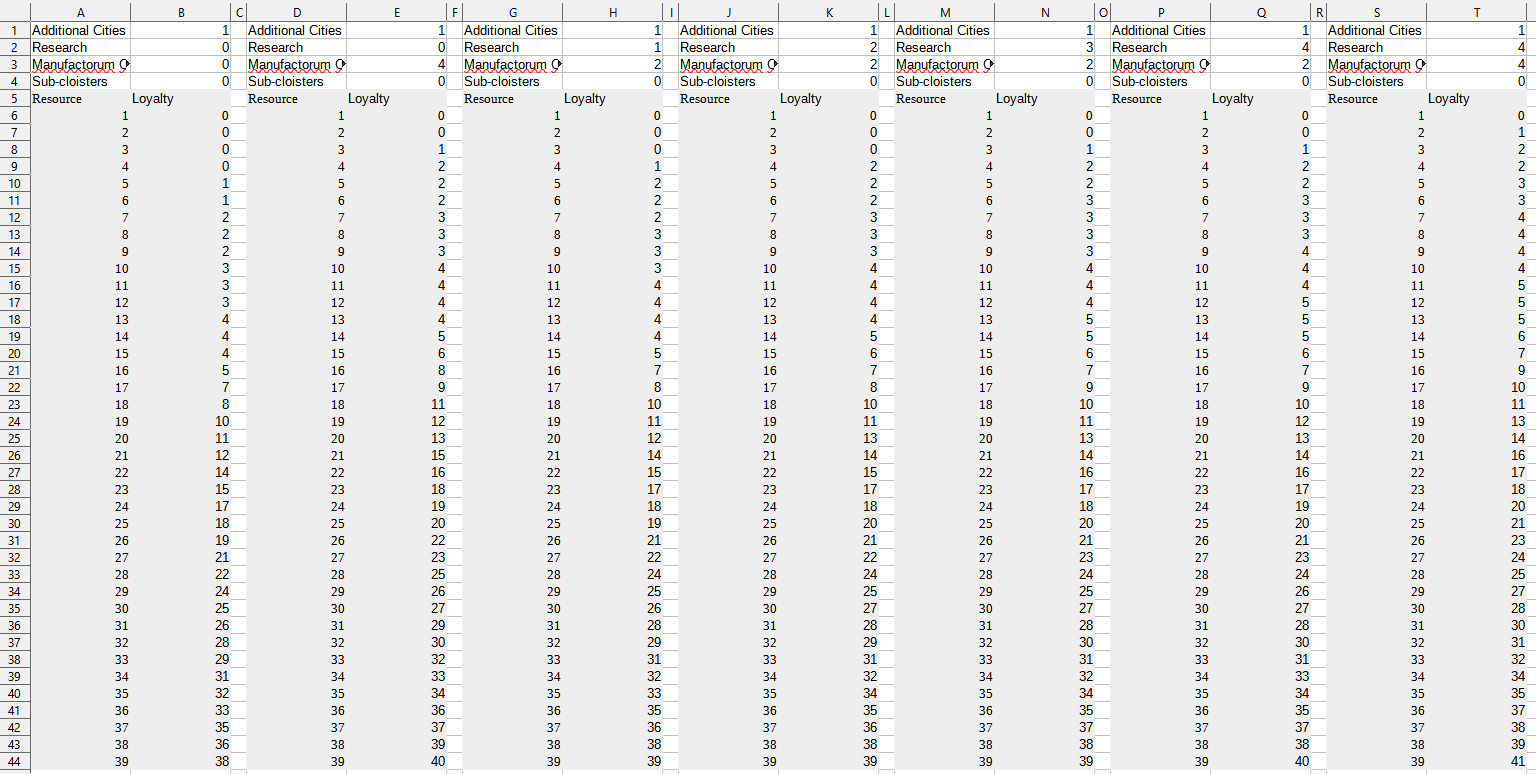
Your approach involves using Excel to systematically explore the results and highlight the most optimal growth strategies.

It’s quite evident that when you reach 15 resources and 4 loyalty, the most efficient growth strategy follows a recurring pattern of maintaining a 5:7 ratio between resources and loyalty. In simpler terms, after constructing 15 resource buildings and 4 loyalty buildings, the optimal approach for economic growth is to ensure that for every 5 resource buildings, you have 7 loyalty buildings. So, when you reach 20 resources, you should have 11 loyalty, at 25 resources, aim for 18 loyalty, and with 30 resources, maintain 25 loyalty.
Now, let’s consider some additional factors. What if you have multiple cities? Or multiple Manufactorum Cyberneticas and Genetor Caropraediums? How about multiple Sub-Cloisters or fewer than 4 research buildings?
To address these various scenarios without creating separate spreadsheets, I’ve developed a calculator. I’d be happy to share it with you, along with the upgraded formulas I’ve implemented for these calculations.
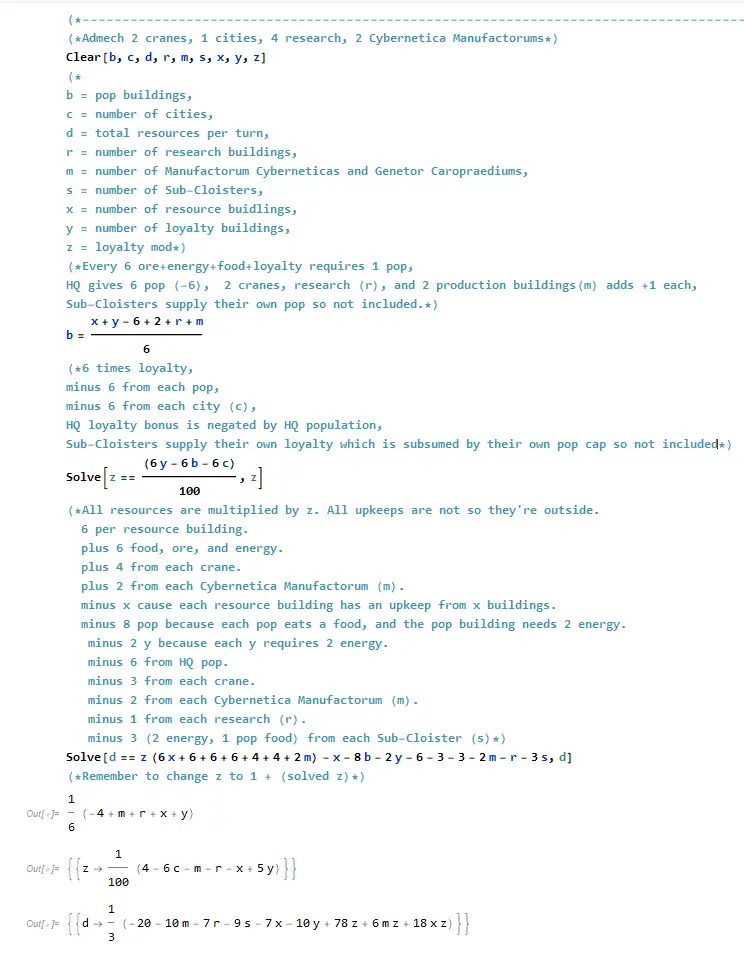
Create the following image in exact replica on the Excel program of your choice.

And then enter this calculation EXACTLY on the marked tile B7.
=IF((78*(1+IF((4-6*$B$1-$B$3-$B$2-($A6+1)+5*($B6+2))>0,1,2)*(4-6*$B$1-$B$3-$B$2-($A6+1)+5*($B6+2))/100)+6*$B$3*(1+IF((4-6*$B$1-$B$3-$B$2-($A6+1)+5*($B6+2))>0,1,2)*(4-6*$B$1-$B$3-$B$2-($A6+1)+5*($B6+2))/100)+18*($A6+1)*(1+IF((4-6*$B$1-$B$3-$B$2-($A6+1)+5*($B6+2))>0,1,2)*(4-6*$B$1-$B$3-$B$2-($A6+1)+5*($B6+2))/100)-20-10*$B$3-7*$B$2-9*$B$4-7*($A6+1)-10*($B6+2))/3>(78*(1+IF((4-6*$B$1-$B$3-$B$2-($A7+1)+5*($B6+1))>0,1,2)*(4-6*$B$1-$B$3-$B$2-($A7+1)+5*($B6+1))/100)+6*$B$3*(1+IF((4-6*$B$1-$B$3-$B$2-($A7+1)+5*($B6+1))>0,1,2)*(4-6*$B$1-$B$3-$B$2-($A7+1)+5*($B6+1))/100)+18*($A7+1)*(1+IF((4-6*$B$1-$B$3-$B$2-($A7+1)+5*($B6+1))>0,1,2)*(4-6*$B$1-$B$3-$B$2-($A7+1)+5*($B6+1))/100)-20-10*$B$3-7*$B$2-9*$B$4-7*($A7+1)-10*($B6+1))/3,$B6+2,IF((78*(1+IF((4-6*$B$1-$B$3-$B$2-$A7+5*($B6+1))>0,1,2)*(4-6*$B$1-$B$3-$B$2-$A7+5*($B6+1))/100)+6*$B$3*(1+IF((4-6*$B$1-$B$3-$B$2-$A7+5*($B6+1))>0,1,2)*(4-6*$B$1-$B$3-$B$2-$A7+5*($B6+1))/100)+18*$A7*(1+IF((4-6*$B$1-$B$3-$B$2-$A7+5*($B6+1))>0,1,2)*(4-6*$B$1-$B$3-$B$2-$A7+5*($B6+1))/100)-20-10*$B$3-7*$B$2-9*$B$4-7*$A7-10*($B6+1))/3>(78*(1+IF((4-6*$B$1-$B$3-$B$2-($A7+1)+5*$B6)>0,1,2)*(4-6*$B$1-$B$3-$B$2-($A7+1)+5*$B6)/100)+6*$B$3*(1+IF((4-6*$B$1-$B$3-$B$2-($A7+1)+5*$B6)>0,1,2)*(4-6*$B$1-$B$3-$B$2-($A7+1)+5*$B6)/100)+18*($A7+1)*(1+IF((4-6*$B$1-$B$3-$B$2-($A7+1)+5*$B6)>0,1,2)*(4-6*$B$1-$B$3-$B$2-($A7+1)+5*$B6)/100)-20-10*$B$3-7*$B$2-9*$B$4-7*($A7+1)-10*$B6)/3,$B6+1,$B6))
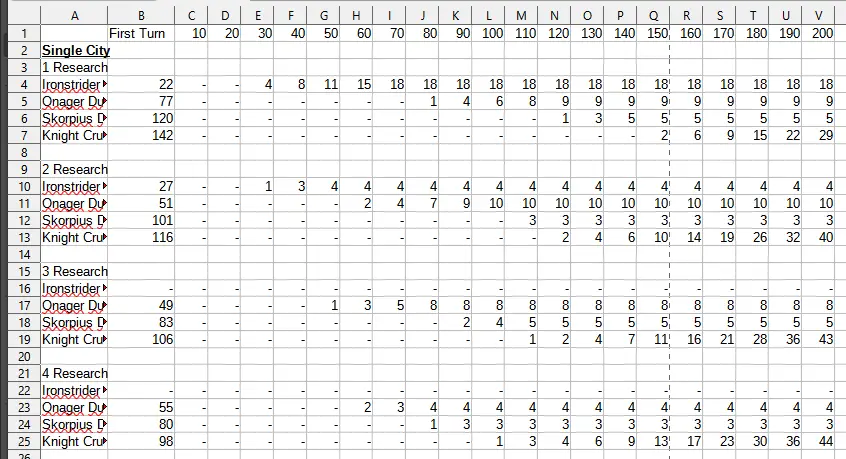
For those who may not have access to Microsoft Excel, I will provide the most pertinent tables based on my experience in the following section. I won’t furnish every conceivable table, as that would be overly extensive.
It’s worth noting that loyalty buildings do not, in fact, entail a higher cost compared to resource buildings. Resource buildings require 30 units of resources and take 2 turns to construct. On the other hand, loyalty buildings necessitate 50 units of resources and 3 turns for completion. However, since the limiting factor here is the speed of population growth, the additional turn required for loyalty building construction is inconsequential. When we calculate the cost efficiency, 50 divided by 3 equals approximately 16.7 ore per turn, while 30 divided by 2 equals 15 ore per turn. This means that both types of buildings consume roughly 15 ore per turn. In practical terms, loyalty buildings do not impose a greater economic strain compared to resource buildings.
Economy Tables
These are the most helpful tables in my opinion.
0 Research
0 Manufactorum Cyberneticas
All of your second and third towns will adhere to this table until your economy exceeds +165 ore per turn.
0 Research
4 Manufactorum Cyberneticas
At the end, all of your cities will adhere to this table. When you have completed all of your important research, you should shut down your four research buildings in your first city, and once your turn-to-ore ratio reaches +165, you should construct four Cybernetica Manufactorums in your other cities.
1-4 Research
2 Manufactorum Cyberneticas
To make it simpler to check up these tables, I first built all of my Cybernetica Manufactorums in just my first city, which also happens to be the only one with research.
For the duration of my early game, I have 2 Manufactorum Cyberneticas, and I don’t add any more until I have 4 research.
Single City Tables

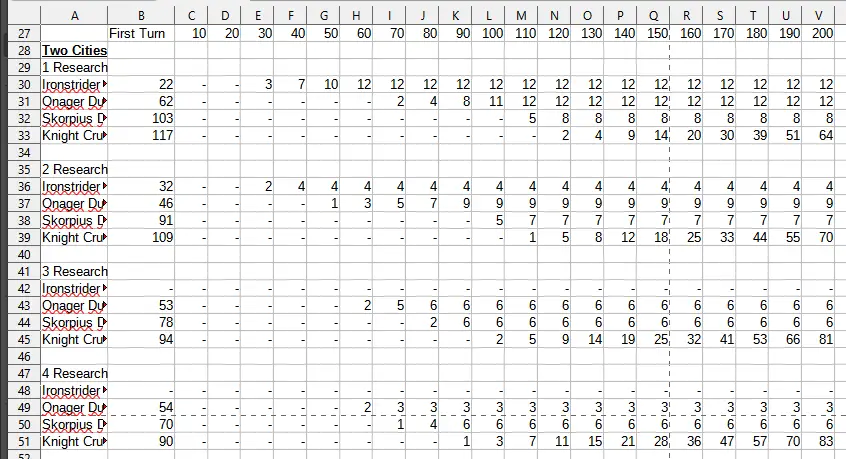
Two Cities Tables
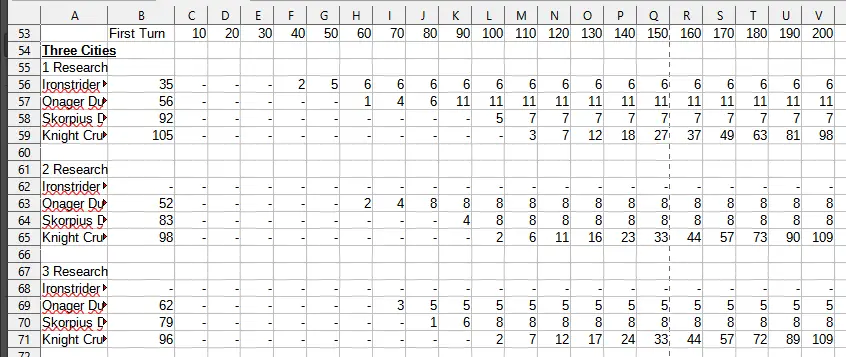
Three Cities Tables

Here are some suggestions to make it easier to reference these tables:
- Specialize Cities: Designate one city for energy and food production, while the other cities focus solely on ore production.
- Bulk Building: Initially, follow the table closely until you’ve built 15 resource buildings. After that point, consider constructing multiple buildings at once. For example, if you need one more loyalty building, build four at once. Similarly, if you require one more resource building, construct four simultaneously.
- Set Targets: Decide to start with 15 resource buildings and 5 loyalty buildings, then progress to 40 resource buildings and 40 loyalty buildings. Memorize these milestones to streamline your gameplay and reduce the need to consult tables. Here are the key pairs of numbers to remember:
- 15:5
- 20:12
- 25:19
- 30:26
- 35:33
- 40:40
- Consistency in City Building: Maintain a consistent number of cities in every game and memorize the associated tables to minimize the need for reference.
- Print Tables: Consider printing out the tables and keeping them next to your monitor while playing. This physical reference can be helpful for quick consultation.
It’s important to note that these strategies apply to all factions, not just Adeptus Mechanicus, making them universally applicable.
Build Order
Here’s a breakdown of your city build order and research priorities for your strategy:
General 1st City Build Order:
- 1 research (2 if going for more cities)
- 1 ore (2 if planning for 3 cities)
- 0-3 additional research buildings based on your objectives.
- Subcloister if expanding beyond 1 city.
- 0-2 Manufactorum Cyberneticas if possible.
- Energy or Shelter (choose based on necessity).
- Aim for a total of 5 buildings by this point, with a population reading 6/6 (6 required). This may vary if you opt for 4 research buildings.
- 1 Artisan Constructorum.
- Additional Shelter and Energy buildings to stabilize your economy.
- Build until you have 2 Manufactorum Cyberneticas.
- Increase Shelter to reach a population cap of 18.
- Expand your economy until you can support 2 Manufactorum Cyberneticas building Onager Dunecrawlers without interruption. This requires +35 ore per turn for a single city, +50 for two cities, and +65 for three cities.
- Build up to 4 Research buildings.
- Continue to grow your economy.
- Build up to 4 Manufactorum Cyberneticas.
- Keep expanding your economy.
- Build up to 4 Manufactorum buildings in your 2nd and 3rd cities.
- Continue expanding your economy.
Additional Cities Build Orders:
- 1 Artisan Constructoroum. If not affordable, stall unit production but not building production.
- 3 resource buildings.
- Shelter.
- 2 more buildings.
- Shelter.
- Focus on growing your economy.
Power Surge Priority:
- 4 Ore.
- 4 Loyalty.
- 3 Ore.
- 3 Loyalty.
- 2 Ore.
- 1 Artisan Constructorum.
Research Order for Vehicle Builds: Your research order for vehicle builds focuses on economic development and vehicle production efficiency. It’s designed to ensure that your economy can sustain your vehicle production. You prioritize ore over research due to your economic bottleneck.
You also adjust your research priorities based on whether you want early or late-game military presence. Early-game prioritizes Tech-Priest Manipulus, while late-game delays it until Onagers are researched.
Notably, you avoid Stygian Enlightenment in favor of Triplex Necessity, but this can be flexible based on your specific needs.
Overall, your strategy involves careful balancing of economy and military development, adapting to the situation, and optimizing for vehicle production efficiency.
Please note that these strategies are based on your provided information and may require adjustments depending on in-game circumstances and balance changes.
As you can observe, the number of research buildings you decide to construct during the third step of my algorithm greatly influences the outcome of the game. If you aim to bolster your early army, opt for fewer research buildings at this stage. Conversely, if your goal is to obtain endgame units more swiftly, consider constructing a greater number of research buildings during step 3.
Select a specific build, configure the map to initiate engagement with the AI when your chosen build is at its peak effectiveness, and enjoy the game. Personally, I prefer to go with just two cities. This choice is based on several factors: a single city cannot support a Tech-Priest Manipulus, and it faces significant economic difficulties when you must construct an Artisan Constructorum and a Hab Fane consecutively. Moreover, managing three cities can become overly cumbersome, lacks an early game army, and amassing 100 Knight Crusaders seems excessive and unnecessary.
Miscellaneous Tips
Here are some additional tips and insights for your Adeptus Mechanicus gameplay:
1. Beating 1v1 Impossible Difficulty:
- On a tiny map with very high wildlife, focus on building 4 research buildings and power surging them until you can produce Knight Crusaders. This strategy is highly effective and difficult for the AI to counter.
- If the AI continues to engage you before turn 80, consider increasing the map size. On a huge map, even after 200 turns, your strategy should keep you relatively untouched.
- You can also achieve the Chapter Approved achievement by playing with a single city Adeptus Mechanicus build, which can beat any Impossible Difficulty AI if left undisturbed for 80 turns.
2. Adeptus Mechanicus Quest:
- You mention playing with Quests off, as the AI doesn’t pursue quest victories. This allows you to focus on engaging AI factions rather than dealing with quest-related challenges.
- Following your guide should make the quest objectives much easier to accomplish.
3. Adeptus Monotonous Achievement:
- Achieving the Adeptus Monotonous Achievement might be a bit of a challenge, but there are guides available to help you.
- The general strategy involves facing off against 1v1 Eldar on a tiny map with very high wildlife, very low Webway Gates, and a minimal landmass.
- Use the Debug Console to remove the fog of war, allowing you to memorize the AI’s position and the locations of Kastelan Robots.
- Rush to acquire Cybernetica Datasmiths and Kastelans as early as possible.
- Ensure that the AI does not establish a second city to increase your chances of success.
Remember that achieving these objectives may take some practice, but with dedication and strategic planning, you can enjoy a successful Adeptus Mechanicus campaign. Thanks for sharing your guide and tips!
That's everything we are sharing today for this Warhammer 40000: Gladius - Relics of War guide. This guide was originally created and written by CuddilyWuddily. In case we fail to update this guide, you can find the latest update by following this link.