This manual explains how to move forward in Cyberpunk 2077. It tells you which qualities to pick, which cyber enhancements to add, which weapons to wield, how to earn a bunch of eddies, and ways to excel in the level 60 endgame with any style of play you prefer.
Introduction
I’ve got a question for you: do you want to be the ultimate legend in Night City? If you aim to build a reputation, rise to the major leagues, become wealthy, wield top-notch weapons, gather a fleet of cool vehicles, and handle the Cyberpunk endgame effortlessly, allowing you to stick to one playstyle or switch it up like changing clothes, then this guide is perfect for you.
Let me be clear about different playstyles here. I’m talking about switching between various operating systems for your cyber enhancements (Cyberdeck, Sandevistan, and Berserk) and achieving outstanding performance in each playstyle. You can even specialize in any weapon category you like, all within one build where you won’t ever have to adjust your attribute points again!
Now, this is for when you hit level 60. If you’re not there yet, let’s assume you’re starting a new playthrough from scratch. We’ll cover how to kick off a new playthrough, progress economically through it, identify the best weapons in each category, allocate attribute points wisely by level 60, and then delve into the endgame phase, tweaking the build to support and enhance different playstyles.
New Playthrough

When beginning a new playthrough, I suggest assigning your initial attribute points during character customization like this:
- 5 BODY
- 4 REFLEXES
- 5 TECHNICAL ABILITY
- 4 COOL
- 4 INTELLIGENCE
Right from the start, you gain access to all the basic starter perks from the five attributes. Enhance early open-world accessibility by investing an extra point each in Body and Technical Ability. When V levels up, resist the urge to immediately spend attribute points. You won’t unlock more perks until reaching level 9 and then level 15 in any attribute. The bonuses per level are minimal, so there’s no tangible benefit in spending points right away. Unfortunately, in version 2.0, CDPR implemented scaling attribute checks, meaning requirements may increase as V levels up.
Given this, it’s wise to save spare attribute points until encountering attribute checks in dialogue or the open world before spending them. While most dialogue checks inform you of insufficient points, some invisible checks won’t be an option without the necessary points. The good news is that you can boost the attribute mid-conversation, and the missing dialogue option will reveal itself upon exiting the menu.
If you aim for V to level up quickly, prioritize main missions and side jobs. Speeding up your level increase allows you to notice higher-tier weapons, items, and cyberware appearing in Night City sooner. By level 40, vendors will begin selling tier 5 versions of their goods.
Attributes
While we’re discussing this, it’s crucial to establish our ultimate goal early in the playthrough, ensuring V is fully prepared and versatile by level 60. In Cyberpunk, you can change cyberware, weapons, clothes, vehicles, and even perks as much as you want. However, in a single playthrough, you only have one opportunity to change your attributes if you’re dissatisfied, and once that change is made, you can’t go back. So, dealing with attributes first sets our direction. Here’s my strong recommendation:
- 15 BODY
- 15 REFLEXES
- 20 TECHNICAL ABILITY
- 16 COOL
- 15 INTELLIGENCE
I’ve extensively theorized and tested how to allocate attribute points optimally for the endgame phase in Cyberpunk, regardless of playstyle, and it consistently comes down to this loadout. You might wonder why only one attribute is maxed out at 20, missing out on access to some capstone perks. That’s because overall efficiency and versatility peak when you unlock access to all Phenom level perks, requiring at least 15 points in each attribute. Phenom perks make a more significant difference than Legend level capstone perks.
The majority of capstone perks at Legend level offer minimal quality-of-life improvements at best in the grand scheme of things. Trying to unlock as many as possible diminishes V’s potential in other areas and risks making the playthrough less accessible and complete overall. Let’s delve into each attribute for a closer look.
Body
Body should definitely be set at 15 without a doubt. While there’s a slight risk of not meeting certain dialogue checks based on your Body count, the main advantage of having 20 Body is tackling any physical obstacle in the open world with a Body check. Even with just 15 attribute points, you can still bypass 20 Body checks by equipping tier 5 Gorilla Arms.
At 15 Body, you gain the benefit of using Adrenaline Rush, a key perk for defensive capabilities. Whether you prefer shotguns, LMGs, Gorilla Arms, or the best blunt melee weapons, all relevant perks up to the Phenom level cover your needs.
For those investing in shotguns and/or LMGs, it’s advised not to waste a perk point on Bullet Ballet due to a bug that causes it not to function as described. Although Rip and Tear is one of the better capstone perks, it’s not essential. The glitch where you can’t fire your shotgun again during Sandevistan after a quick melee attack makes it less practical.
Onslaught, benefiting LMGs, is not a significant loss as LMGs receive minimal attention in Cyberpunk. The capstone perk’s 20% magazine refill draws ammo from your reserves, offering only a minor quality-of-life increase for an unpopular weapon category.
Pain to Gain, providing a 20% recharge of your health item while Adrenaline Rush is active, is a good capstone perk but not worth investing all the way to 20 Body. Survival in Cyberpunk’s toughest challenges can be achieved for extended periods without relying on Pain to Gain.
Finisher: Savage Sling, while a cool capstone, is more of a luxury feature than a necessity. Additionally, all (bladed and blunt) melee weapons, including Gorilla Arms, automatically get finishers when using Berserk cyberware, making this capstone less essential.
Reflexes
Reflexes is a definite 15, even more so than Body! The unmatched boost to defense and quality-of-life in general movement with both dash and air dash is too valuable to miss. Investing in bladed weapon perks for melee DPS is crucial, and Sharpshooter, along with its relevant perks, greatly benefits assault rifles and SMGs. Attribute checks in Reflexes are mostly found in blue dialogue lines, with 15 Reflexes generally being sufficient for options. Pushing all the way to 20 Reflexes doesn’t offer worthwhile open-world benefits. Now, let’s look at the capstone perks:
Are we missing out on Salt in the Wound? Ultimately, no. This capstone perk exclusively benefits assault rifles, and the range of iconic assault rifles in the game is not particularly impressive. While there’s one iconic assault rifle that pairs well with the capstone, it requires completing the final story mission and consistently landing shots on the same target for bonus damage. The circumstantial nature of the capstone, located at the end of an attribute with no open-world incentive for maxing out to 20, makes it less appealing.
Are we missing out on Submachine Fun? Your SMGs might say yes due to extra fire rate and skipping reloading, but your ammo reserves will thank you. Reliance on two different SMGs in a long battle can deplete ammo rapidly, potentially leading to a switch to a different weapon type. Additionally, the capstone perk can impact performance negatively if you have the wrong SMG for the situation.
Are we missing out on Tailwind? Truthfully, you never needed it in the first place. While the description makes it sound appealing, testing reveals that the quickest way to navigate Night City on foot involves specific dash, jump, and air dash movements, recovering stamina by the time you land. If you can do this without Tailwind indefinitely, then Tailwind is unnecessary.
Are we missing out on Slaughterhouse? In terms of DPS, not at all. The vast melee damage potential makes bleeding damage somewhat insignificant. While the extra stamina boost from finishers may be appreciated with a specific playstyle, it’s not a compelling enough reason to spend 20 attribute points on Reflexes.
Technical Ability
If you’ve allocated 15 points to every attribute, it’s crucial to max out one of them to 20 with the remaining points, and it should ALWAYS be Technical Ability! Unlike Body, which benefits from bonus points for open-world attribute checks with Gorilla Arms, Technical Ability doesn’t enjoy the same benefit from any cyberware. Therefore, there’s a strong incentive in the open world (and for key dialogue options) to max out this attribute to bypass any technical issues.
Not only that, but it houses Edgerunner, which is the absolute number one capstone perk in the game! Despite the 25% reduction in max health, it’s a worthwhile trade-off to push the cyberware capacity to 50 beyond the default limit. Cyberware capacity is arguably the most precious resource and is quite limited. The quality and synergy of your cyberware pieces make the biggest difference, surpassing the impact of any weapon. Since we’ve maxed out Technical Ability, we have access to the other capstone perks, eliminating the risk of missing out!
Cool
Similar to Reflexes, Cool is definitely a 15, with no dialogue or open-world incentive to push it to 20. The additional point making it 16 is for bonus crit damage per attribute point invested in Cool. While it leans towards stealth and specific weapon types, it’s better to boost the overall utility and versatility of the build rather than sacrificing it for very circumstantial capstone perks. Crouch-sprinting is a cool extra to have!
Are we missing out on Nerves of Tungsten-Steel? Yes, a little. It’s one of the best overall capstone perks, targeting three different weapon categories with two DPS buffs. However, a specific pistol in the game benefits from Focus and Deadeye, outperforming any other weapon with the same benefits. Unfortunately, pistols get zero benefit from this capstone perk.
Are we missing out on Run ‘N’ Gun? No, even with the best pistol in the game. It’s a very minor quality-of-life increase at best. The best pistol fires a guaranteed crit shot with the first bullet and can be equipped with a legendary XC-10 Cetus silencer, providing guaranteed crit hits while undetected.
Are we missing out on Style Over Substance? It depends on your approach. If you want to create mayhem, it significantly benefits the best throwing weapon in the game. However, if you prefer stealthy takedowns, guaranteed crits with the best throwing weapon might not be wise, forcing you to downgrade to avoid raising alarms. The means of triggering guaranteed crit hits make the capstone perk a bit convoluted to put into practice, and it further constrains you into using Sandevistan, the best operating system for throwing weapons.
Intelligence
Until patch 2.02, having 20 Intelligence was worthwhile for a netrunning playstyle. However, the total quickhack damage potential has been nerfed in the latest patches, making it more reasonable to put 15 points into Intelligence like every other attribute. Even if netrunning isn’t your primary playstyle, starting the playthrough with 15 Intelligence is useful for key dialogue options, attribute checks, and hacking access points and devices.
Sacrificing the options provided by 15 Intelligence for more circumstantial capstone perks isn’t recommended. You need 12 Intelligence to use tier 5 cyberdecks and quickhacks, and at least 15 Intelligence to unlock Overclock, a crucial skill for effective netrunning in the endgame.
Investing in Intelligence for a netrunner build can consume a significant number of perk points. Some perks are unnecessary or bugged, such as Warning: Explosive Hazard, which doesn’t increase explosive damage. Counter-A-Hack and Copy-Paste are decent but redundant if you have specific cyberware in your frontal cortex.
Queue Prioritization is bugged and doesn’t work as stated. Data Recycler, while partially functional, is a waste of a perk point. With patch 2.02, its potential has been nerfed, and it skips over the next quickhack in the queue, providing no benefit for netrunning strategies. Given the limitations of not having Queue Mastery, which allows only three quickhacks in the queue, and the need for precise sequencing for effective netrunning, Data Recycler becomes ineffective for the desired netrunning outcomes.
For a netrunner build with enough quickhack damage potential in the endgame, certain perks can be omitted without sacrificing effectiveness. These include Proximate Propagation, Encryption, Subordination, Icepick, Shadowrunner, and System Overwhelm. Almost all perks relevant to Overclock are crucial in a serious netrunning build, except for Power Surge. Activating Overclock before quickhacking and engaging enemies ensures you are at full health, and in most scenarios, correctly playing and using the best combat quickhack will keep Overclock running without the need for reactivation.
Are we missing out on Queue Mastery? Before patch 2.02, yes, as queuing four quickhacks was efficient due to a loophole with the Data Recycler perk. However, CDPR closed this loophole, making Data Recycler refund the actual costs, and queuing three quickhacks is now more efficient in terms of RAM and health during Overclock.
Are we missing out on Spillover? It might feel like you’re missing out, but not entirely. Spillover can hurt netrunning strategies if employed stealthily, as non-covert quickhacks could spread and allow enemies to trace you. Even without Spillover, one-shotting standard and elite enemies is achievable, whether stealth is involved or not.
Are we missing out on Smart Synergy? It’s not bad but lacks a significant purpose. Enemies must be under the influence of quickhacks for smart weapons to gain a bonus 25% damage. However, if you have the opportunity, RAM, and health to quickhack enemies, it’s quicker to kill them with quickhacks alone. Additionally, there are only two smart weapons worth using in the endgame, and they aren’t the best source of DPS against tougher enemies. Therefore, Smart Synergy becomes somewhat redundant.
Economy

Different players may have varying opinions on the best approach to progress through Night City and reach the major leagues. By adopting a more economical playthrough strategy, even with the difficulty set to Very Hard, you can significantly ease V’s life. Following the steps laid out here should lead to amassing a substantial amount of wealth by the endgame. This goes beyond basic knowledge, such as selling junk for 500 eddies each.
In my current playthrough as of writing this, reaching the endgame without glitches or cheesy exploits but by playing the game normally, my V has rented every apartment, collected every vehicle for sale from El Capitan’s Autofixer, and purchased every piece of clothing available from every vendor in Night City. Despite these expenses, I still have well over 5 million eddies in my bank account, and I haven’t completed all the side jobs or NCPD scanners yet. So, how is this level of financial success possible?
- Prioritize Cyberware Spending: Invest your eddies primarily in cyberware. The choice and quality of cyberware make a significant impact on V’s capabilities in any playthrough. Early on, spend money only on essential cyberware and when it’s mandatory in main missions or side jobs.
- Luxury Purchases – Cars and Apartments: Cars and apartments are considered luxury purchases. You don’t need to buy them early in the playthrough. V’s Megatower H10 apartment in Little China has a convenient fast travel point, and some of the best vehicles can be obtained for free or at a discount later on. Hold off on buying anything from El Capitan until you can access Dogtown and take on vehicle contracts to get a discount for the Autofixer.
- Only Purchase Iconic Weapons: Make an exception for iconic weapons that can only be acquired by purchasing them from specific vendors. Never waste money on non-iconic weapons. The highest-tier weapons (tier 5++) can only be found in the open world or dropped by enemies. No vendor sells weapons at this tier, making it pointless to buy them.
- Disassemble Unwanted Weapons: Instead of selling unwanted weapons, disassemble them. This might seem counterintuitive, but it provides crafting components, a more valuable resource than eddies. Crafting components are essential for upgrading iconic weapons and cyberware. Disassembling also grants bonus XP for your Engineer skill.
- Utilize the Chipware Connoisseur Perk: While you may not need this perk in the endgame when you have fully upgraded cyberware, it is invaluable during the upgrading process. When upgrading cyberware, the Chipware Connoisseur perk provides more options for bonus stats, allowing you to customize V’s capabilities. Buying cyberware at lower tiers and using the perk gives you a wider range of options and can save you eddies in the long run.
- Upgrade Tier 4 Crafting Components Wisely: Save upgrading tier 4 crafting components until after you’ve fully upgraded all the cyberware and iconic weapons you plan to use in the endgame. Reserve tier 1 components for crafting ammo when needed, as they hold more value in this regard. In the endgame, legendary crafting components become more crucial, and excess tier 2 and 3 components can be used to craft extra weapons for selling.
- Embrace Netrunning for Eddies: The Intelligence attribute is not just about quickhacking; it’s also a lucrative way to make eddies. Upgrade your cyberdeck and use the Forcekill Cypher perk to maximize your money-making potential. Even if you’re not a fan of netrunning, investing in it early in the playthrough can significantly boost your eddies, quickhack crafting components, and quickhack crafting specs.
- Craft and Sell Quickhacks for Profit: Crafting and selling quickhacks is a highly profitable venture in Cyberpunk 2077. It not only earns you a considerable amount of eddies but also provides bonus XP for both the Netrunner and Engineer skills. Unlike standard crafting components, it’s unwise to upgrade quickhack crafting components. Instead, focus on crafting as many quickhack copies as possible, regardless of their tiers. Tier 4 and 5 quickhacks, especially ultimate ones like Cyberpsychosis and Suicide, can fetch significant amounts, with each copy potentially earning you at least 25,000 eddies.
Free Vehicles
If you really like collecting cars and bikes in the game, it’s best to go easy on using too much gas to gather your own set of vehicles while playing. It’s a good idea to wait until you have a lot of spare eddies before focusing on growing your collection. Some vehicles won’t cost you any eurodollars at all, and a few are even free right after completing the Heist mission. I’ll tell you about four of them: two cars and two bikes. Two are great for roads, and the other two are awesome for off-road adventures. The best part is, they won’t cost you a single eddy, and I’ll also tell you where to find them.
The first vehicle is the “Murkmobile,” a Rayfield Caliburn that belonged to Murk Man, Night City’s version of Batman. Besides being painted black, this specific model doesn’t have any unique stats or performance features. But that’s okay because it’s the fastest car in Night City, reaching speeds well over 200 mph! You don’t need any eddies to add this beast to your collection. However, you must finish the Ghost Town main mission and raise your Street Cred to 50. After that, it becomes available through a side quest in the same mine tunnel that Panam drives through during Ghost Town when searching for Nash.
The Quadra Type-66 “Hoon” is like a free version of the Wingate. Although the Wingate performs a bit better, arguing over these small details doesn’t make sense when one costs a lot of eddies, and the other is just waiting for you in an old warehouse in Northside, Watson. No need to worry about spoiling the story here. The Hoon, dedicated to rally driver and Youtube star Ken Block, is in memory of him after he sadly passed away in January 2023. This rally car is fantastic on all terrains, especially useful for off-road adventures in the Badlands.
Now, let’s talk about Jackie’s ARCH, one of the top-performing bikes in the game. I won’t give away any story details on how you get it, but after the Heist, you can obtain it by completing the side job called Heroes. If you chose the Nomad life path and have a high enough Technical Ability, during The Pickup main mission outside the All Foods plant, V can suggest to Jackie that he tweaks the exhaust. The bike then becomes Jackie’s Tuned ARCH, a bit heavier but with extra horsepower.
If you’re a big fan of bikes and need something for off-road action in the Badlands, Scorpion’s Apollo is your best bet. Without spoiling any story details on how you stumble upon this dirt bike, all you have to do is finish the main mission Life During Wartime.
Cyberware
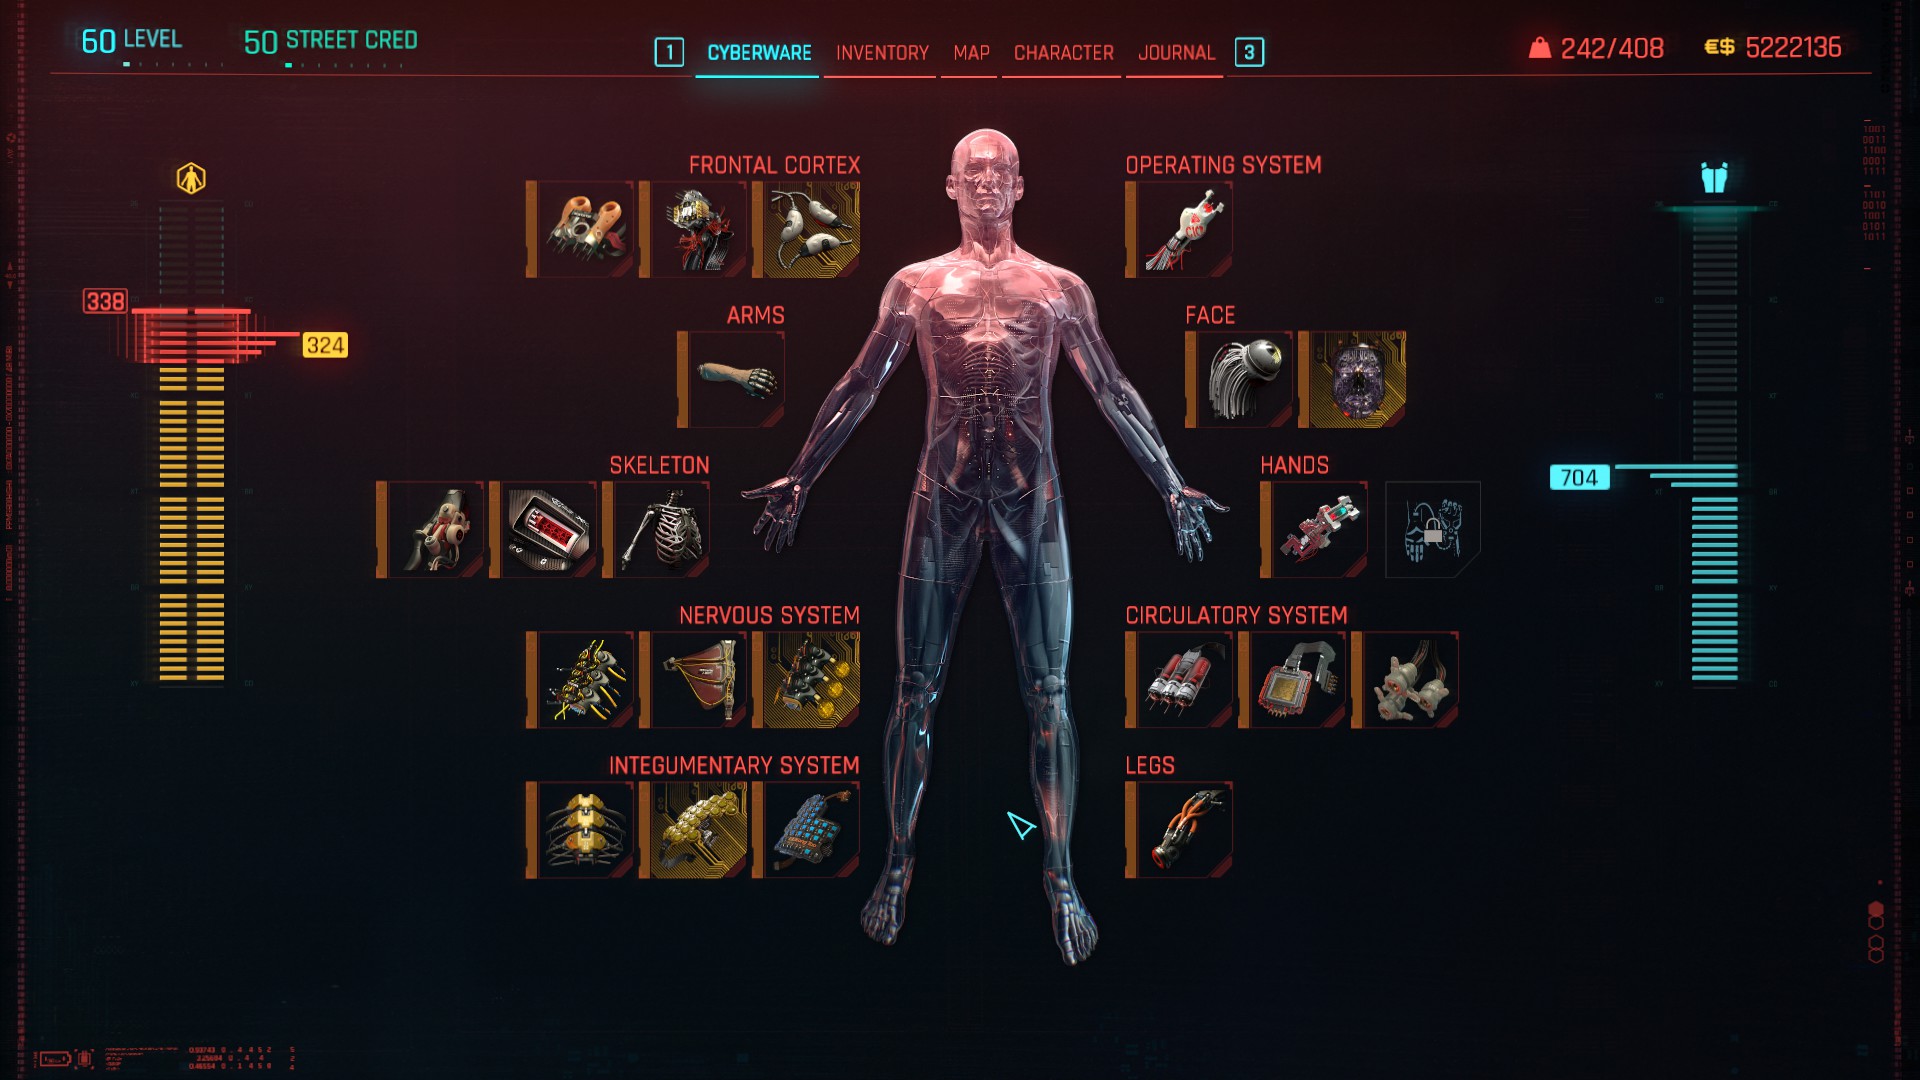
Let’s dive into the importance of cyberware capacity and how you can enhance it. The default cyberware capacity starts at 24 when you’re at level 1. As you level up, you gain +3 cyberware capacity per level, reaching 177 at level 60. The Engineer skill progression adds another 15, and there are various shards that contribute:
- Tier 2 shard: +2 capacity per shard, 14 shards in total = 28
- Tier 3 shard: +3 capacity per shard, 8 shards in total = 24
- Tier 4 shard: +4 capacity per shard, 4 shards in total = 16
- Tier 5 shard: +6 capacity per shard, 2 shards in total = 12
Additionally, the Renaissance Punk perk can give you a max value of 20, and the Edgerunner capstone perk provides 50 spare capacity beyond the limit. The Tier 5++ Chrome Compressor can add 70 for your Operating System.
While the Chrome Compressor can theoretically take your capacity above 400, it comes with a trade-off. You won’t be able to use a Cyberdeck, Sandevistan, or Berserk, leading to a more ‘naked’ playstyle. The true maximum capacity for this build can reach up to 366, but there’s a glitch where, after reaching level 60, no more shards drop, limiting your cyberware capacity growth. This was supposed to be patched in version 2.1, but beware, as the issue may persist.
Without considering glitches or mods, the lowest cyberware capacity observed was 300 before shards dried up, while the highest recorded capacity in another playthrough reached 340.
It’s crucial to be mindful of your cyberware capacity, especially when equipping essential pieces for all playstyles. The total cost of compulsory cyberware sums up to 269 capacity, leaving two slots open. You’ll also need an Operating System and a free slot for the Nervous System, requiring specific cyberware based on your desired endgame playstyle. Notably, cyberware choices aren’t solely for maximizing armor, focusing instead on the unique benefits each piece brings to your character. If possible, filling all slots, even with cheaper pieces, is worthwhile for the Cyborg perk’s reduced cooldown. However, prioritize saving spare capacity for endgame operating systems and their corresponding key cyberware.
Frontal Cortex
Axolotl comes with a substantial cyberware capacity cost, but its benefits are worth the investment. Each time you take down an enemy, it reduces the cooldowns on all your cyberware and extends the duration of your operating system, regardless of your chosen playstyle.
For a more secure netrunning experience, consider (48) Self-Ice. This affordable cyberware makes life difficult for enemy netrunners by blocking quickhacks like Cyberware Malfunction, Reboot Optics, or Weapon Glitch. Although it operates on a cooldown, this is less of a concern when paired with Axolotl.
Another cost-effective choice is the (5) Mechatronic Core, installed in your frontal cortex. When fully upgraded, it provides a remarkable 40% extra damage against mechs, drones, robots, and turrets. While encounters with such enemies may be less frequent than human foes, the 5 cyberware capacity cost for a 40% damage boost is a generous offer.
Arms
While the Electrifying Gorilla Arms may not win any beauty contests for your hands, they stand out as one of the best choices for arm cyberware. At tier 5, these arms offer exceptional versatility by providing a +6 bonus to Body for attribute checks related to physical objects. It’s worth noting that this bonus doesn’t extend to dialogue checks. However, with these arms and a Body attribute of 15, you gain the ability to physically overcome any obstacle, even those requiring a hefty 20 Body. The electrifying variant of these arms further enhances their effectiveness against mechs, robots, and drones, making them a well-rounded and powerful choice for cyberware. The cost for this upgrade is (8).
Skeleton
The Epimorphic Skeleton, although pricey in terms of cyberware, outshines other skeletal options that heavily prioritize armor, eliminating the need for alternatives like Para Bellum or Rara Avis. Apart from offering a substantial amount of maximum armor, it provides a noteworthy bonus to maximum health, helping compensate for the deficit imposed by the Edgerunner capstone perk.
For melee enthusiasts, the (32 with All Things Cyber perk) Dense Marrow is a compelling choice, potentially granting up to +27% melee damage when fully upgraded. This boost is significant, especially in confrontations with formidable opponents like MaxTac and bosses. Despite the 20% stamina penalty, effective perk and skill management should alleviate stamina concerns. When paired with Berserk, which incurs zero stamina cost during activation, Dense Marrow becomes a cyberware with purely positive effects and no downsides.
While the (13 with All Things Cyber perk) Spring Joints may not be the most popular or obvious choice, it offers nearly 20% damage reduction equivalent. As you become accustomed to frequent mitigation use, you’ll find that the increased mitigation strength justifies Spring Joints as a staple in this particular build.
Nervous System
Neofiber might not immediately strike you as valuable, but trust me when I say that any enhancement to mitigation strength is genuinely worthwhile! Even the modest mitigation chance it provides plays a crucial role, as you’ll soon discover.
Next on the list is the (12) Kerenzikov, an essential component of this build. Its activation, even if limited to dodging or dashing while aiming down sights with ranged weapons, proves crucial. The key here is its remarkably short cooldown, allowing for frequent use. When combined with Neofiber and Spring Joints, the synergy between these cyberware pieces becomes apparent.
Integumentary System
Defenzikov is an underrated powerhouse and a vital component of our versatile build! When Kerenzikov ends, it grants a remarkable +90% mitigation chance (from the tier 5 version of this cyberware) for a few seconds. By the time this duration concludes, you’re essentially ready to activate the Kerenzikov combo again. Remember when I mentioned the useful role of Neofiber? Combine its 10% mitigation chance with Defenzikov, and you can achieve almost constant 100% mitigation chance while using ranged weapons. Adding Spring Joints to the mix brings your mitigation strength to about 80%. Investing 55 cyberware capacity in these four pieces, offering powerful synergy in defense, is possibly the wisest choice you could make!
Next up is (16 with All Things Cyber perk) Optical Camo, a crucial gadget that becomes the best-equipped quickslot item. The Relic perks from the Phantom Liberty DLC provide it with enhanced utility. Having Optical Camo in your quickslot allows you to potentially exit the combat state, providing various strategic options. You can disengage and re-engage in combat with stealth damage bonuses, craft more ammo if low, or use the +150% health recharge speed from the Health Freak perk when health is low or empty.
Following that, we have (16 with All Things Cyber perk) Peripheral Inverse, offering substantial damage reduction when up close with a melee weapon and unable to maintain a 100% mitigation chance. Fully upgraded, it provides up to 45% damage reduction from any attacker within 3 meters. While less critical when using Berserk, it proves invaluable when facing a close MaxTac squad. If struggling for cyberware capacity, consider downgrading to the Proxishield, offering a respectable 20% damage reduction under the same conditions for a third of the cost.
Our journey continues with the cyberware costing (24 with All Things Cyber perk).
Face
The Kiroshi “The Oracle” Optics, although not the most affordable cyberware for a pair of eyes, offer a unique advantage—they provide information on everything within your eyesight range, even if obstacles like walls and ceilings are in the way. While eyes may not offer a wide range of options overall, these optics are quite useful and tend to offer better bonus stats when upgraded. The cost for this cyberware is (10).
Hands
While the Smart Link comes with a cyberware capacity cost, unlike the Tyger Claw Tattoos, it grants you the freedom to use smart weapons at your discretion. There are two particular smart weapons in the game that prove especially valuable, particularly if you transition into a Netrunner in the endgame. Unlike the tattoos, you can also upgrade the Smart Link to provide various bonus stats, including melee damage, which is always a useful addition. The cost for this cyberware is (4).
Circulatory System
The Blood Pump is a game-changer; once you experience it, ordinary health charges won’t suffice. Why bother with MaxDoc or Bounce Back when there’s a cyberware that combines the best of both worlds and activates instantly, eliminating the need for the health item animation?
For optimal synergy, pair the (15) Biomonitor with the Blood Pump. The Biomonitor automatically activates the Blood Pump when your health drops below 35%, enhancing its effectiveness. A small chance of still dying exists if the last damage you sustained was exceptionally high, but with constant mitigation, this becomes a non-issue. The primary advantage is that you can set your health management to autopilot, reducing the need to focus on your health bar.
Another essential cyberware is the (14) Microrotors, significantly boosting melee DPS with up to a 25% faster attack speed when fully upgraded. If you have a penchant for katanas, this cyberware is non-negotiable in my opinion. The cost for this cyberware is (12).
Legs
Reinforced Tendons is a remarkable quality-of-life cyberware for your legs that’s hard to beat. The double-jump feature not only grants you more verticality but also synergizes well with dash and air dash, enabling surprisingly rapid on-foot travel from point A to B. The additional potential for parkour is evident, allowing you to effortlessly vault over enemies, access high ground beyond their reach, or leap over walls and rooftops to evade pursuing law enforcement. The cost for this versatile cyberware is (8).
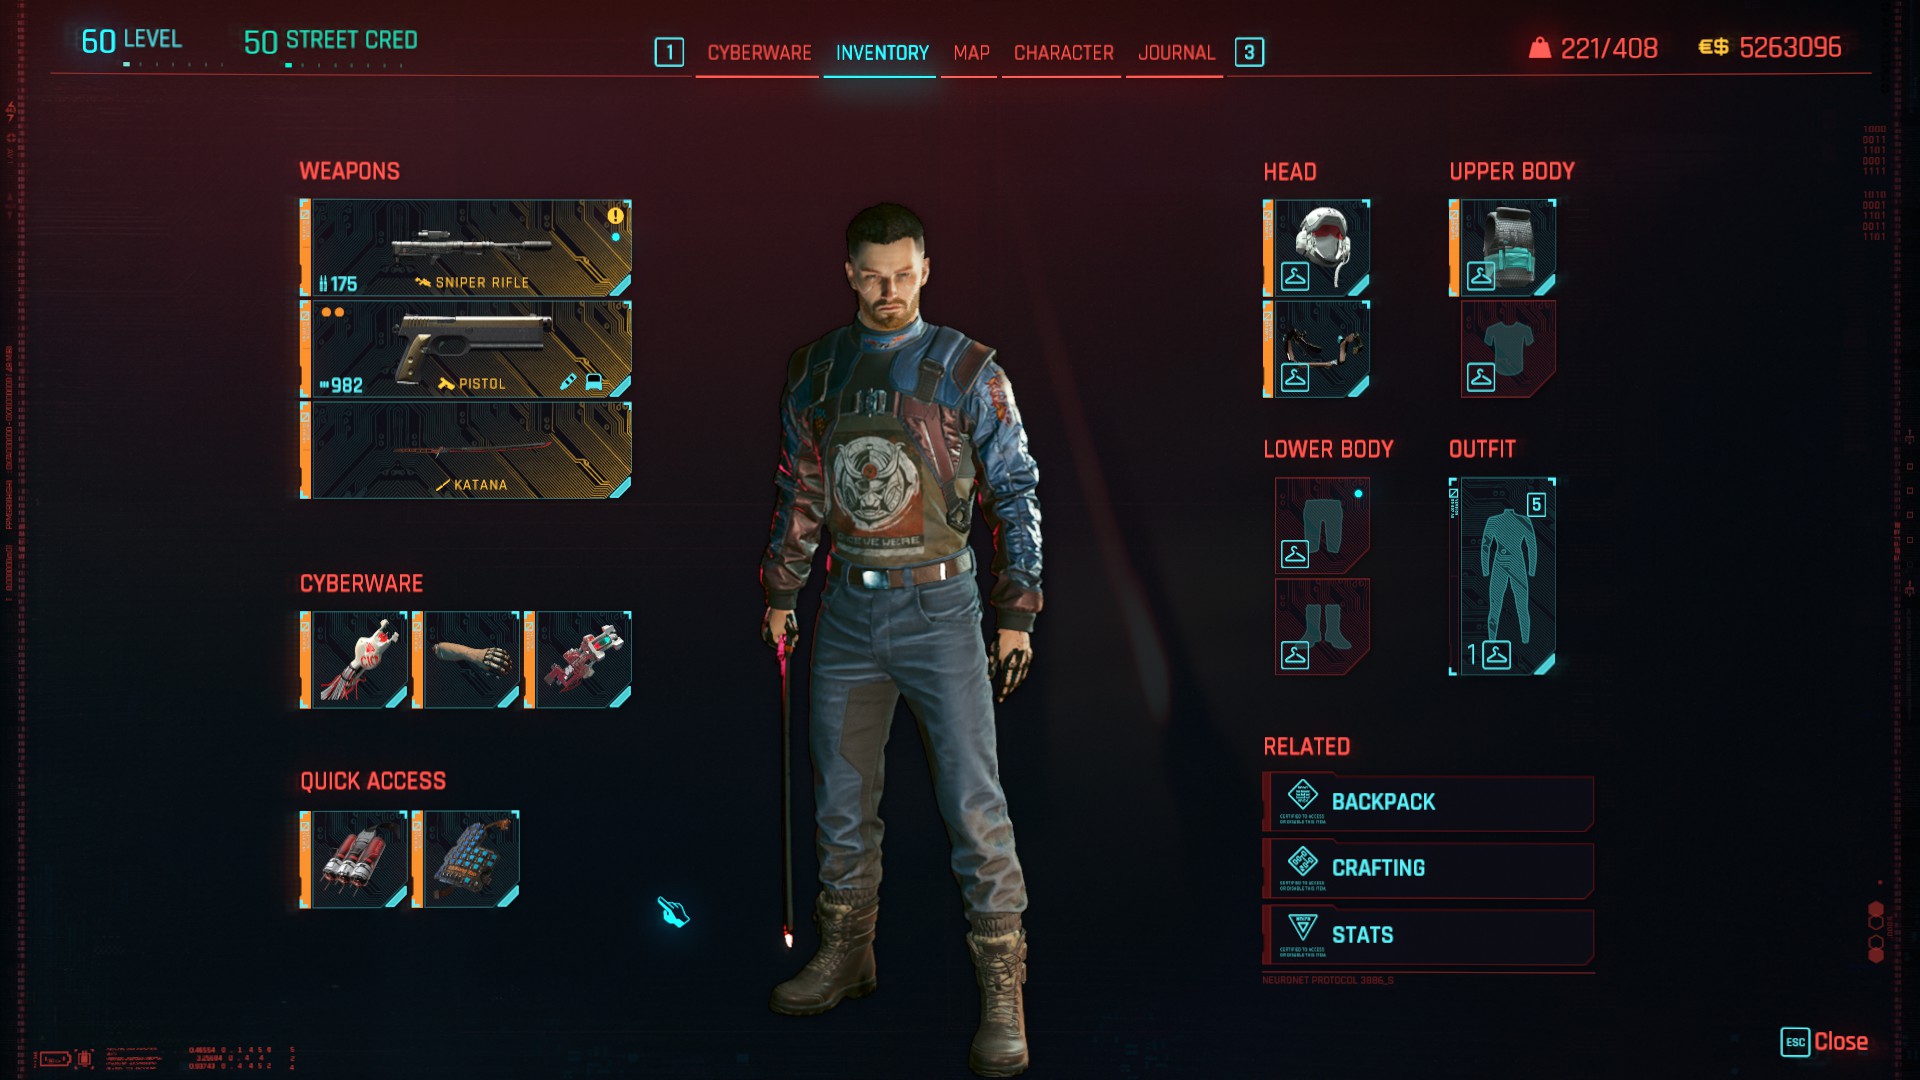
Weapons
I’ve tested many weapons to find the top choices in each category. Each category refers to weapons that benefit from specific perks. For instance, shotguns and LMGs gain advantages from the same perks. However, we’re focused on identifying the one weapon in each category that excels the most, offering optimal usage and synergy with a versatile build.
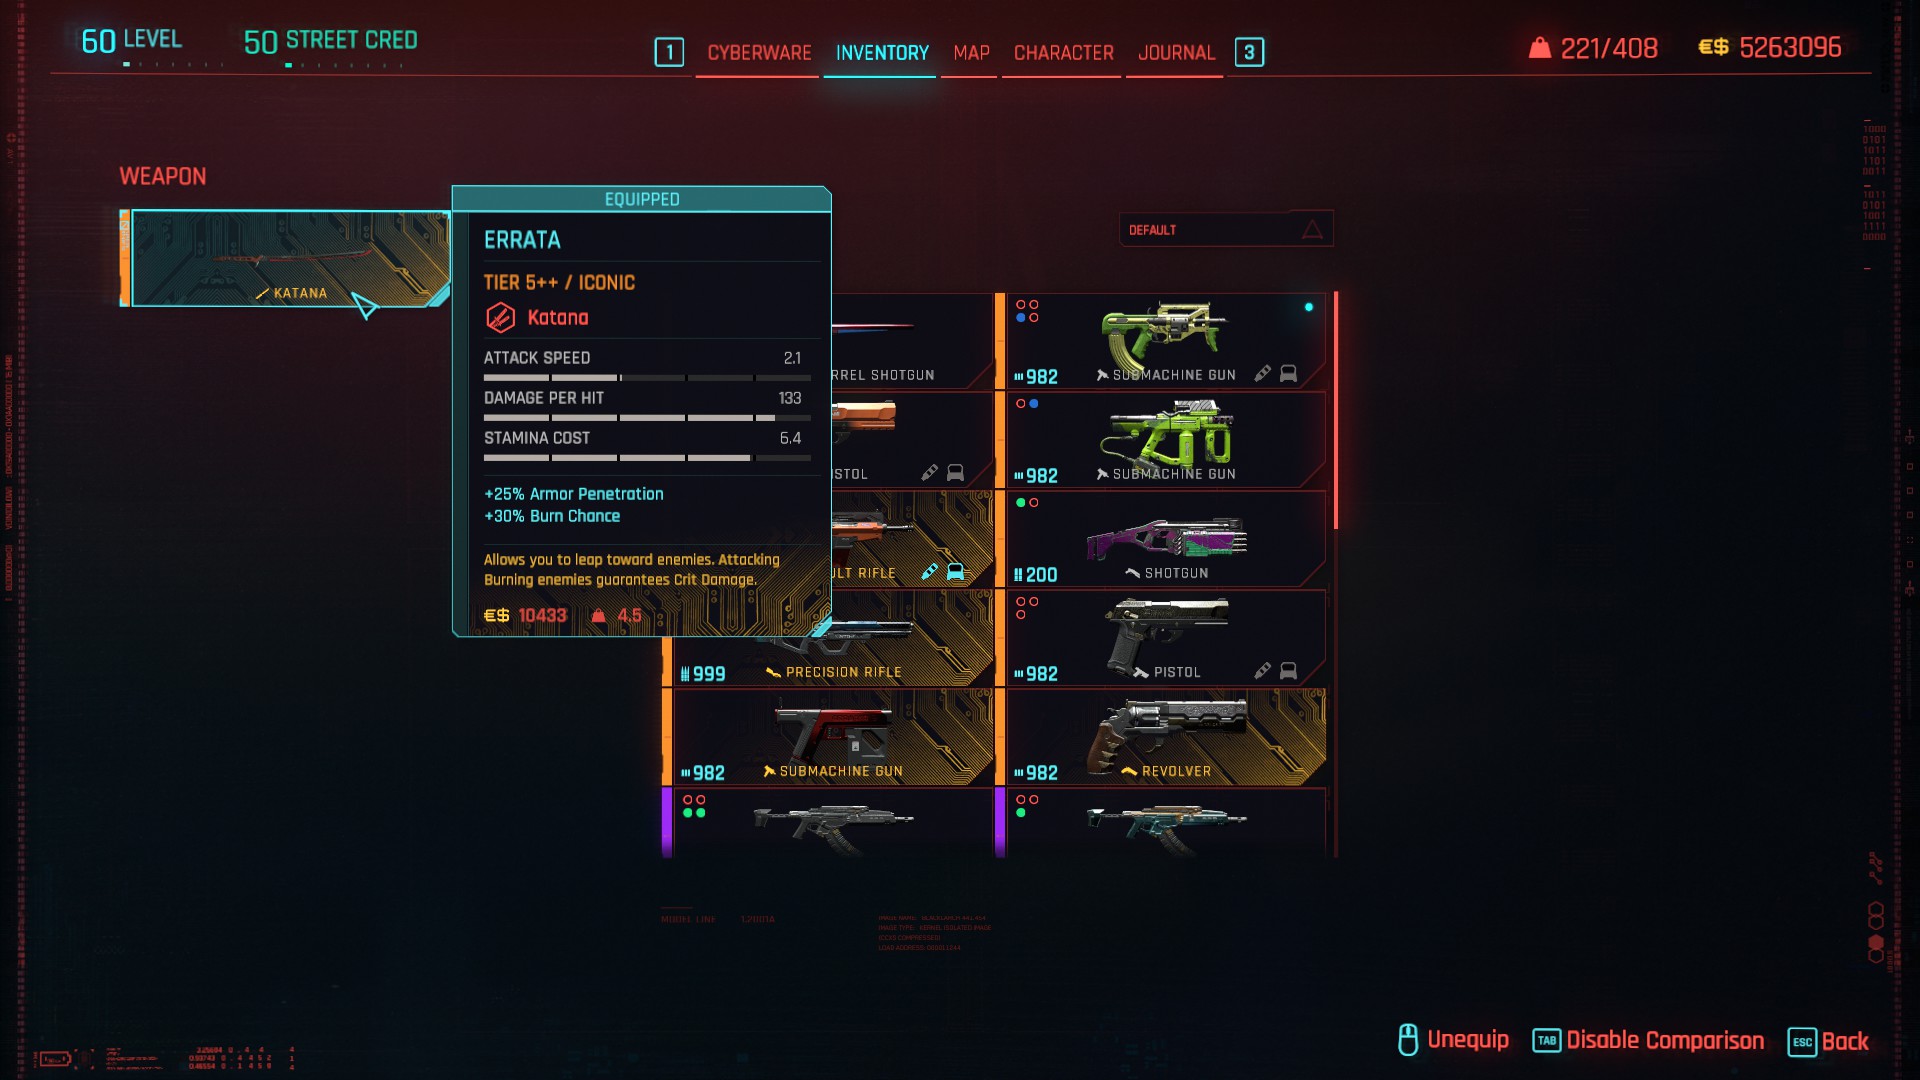
In my honest opinion, Errata stands out as the ultimate winner in the fiercely contested category of bladed weapons. It easily adapts to any playstyle, proving effective against both individual enemies and crowds. In Cyberpunk 2077, focusing on methods or weapons that guarantee critical hits is the key to achieving optimal DPS and performance. This approach surpasses relying on stacking crit chance, which often doesn’t combine as effectively as assumed. Despite Errata having slightly lower base damage compared to other katanas, the Chipware Connoisseur perk can cleverly address this. What sets Errata apart is its ability to ignite enemies and secure guaranteed crit hits during the burning process, giving it an advantage over other katanas. The effectiveness of Errata increases significantly with additional boosts to bonus crit damage. While Byakko enthusiasts may have a different perspective, the reliance on a temporary buff and a momentum-based playstyle makes it more circumstantial compared to Errata. Byakko may struggle when facing a single enemy or, worse, a lone boss. Additionally, unless using Sandevistan, the Scalpel isn’t worth discussing.
You can find Errata in the forge of the Electric Corporation power plant, most easily obtained during the main mission Disasterpiece.
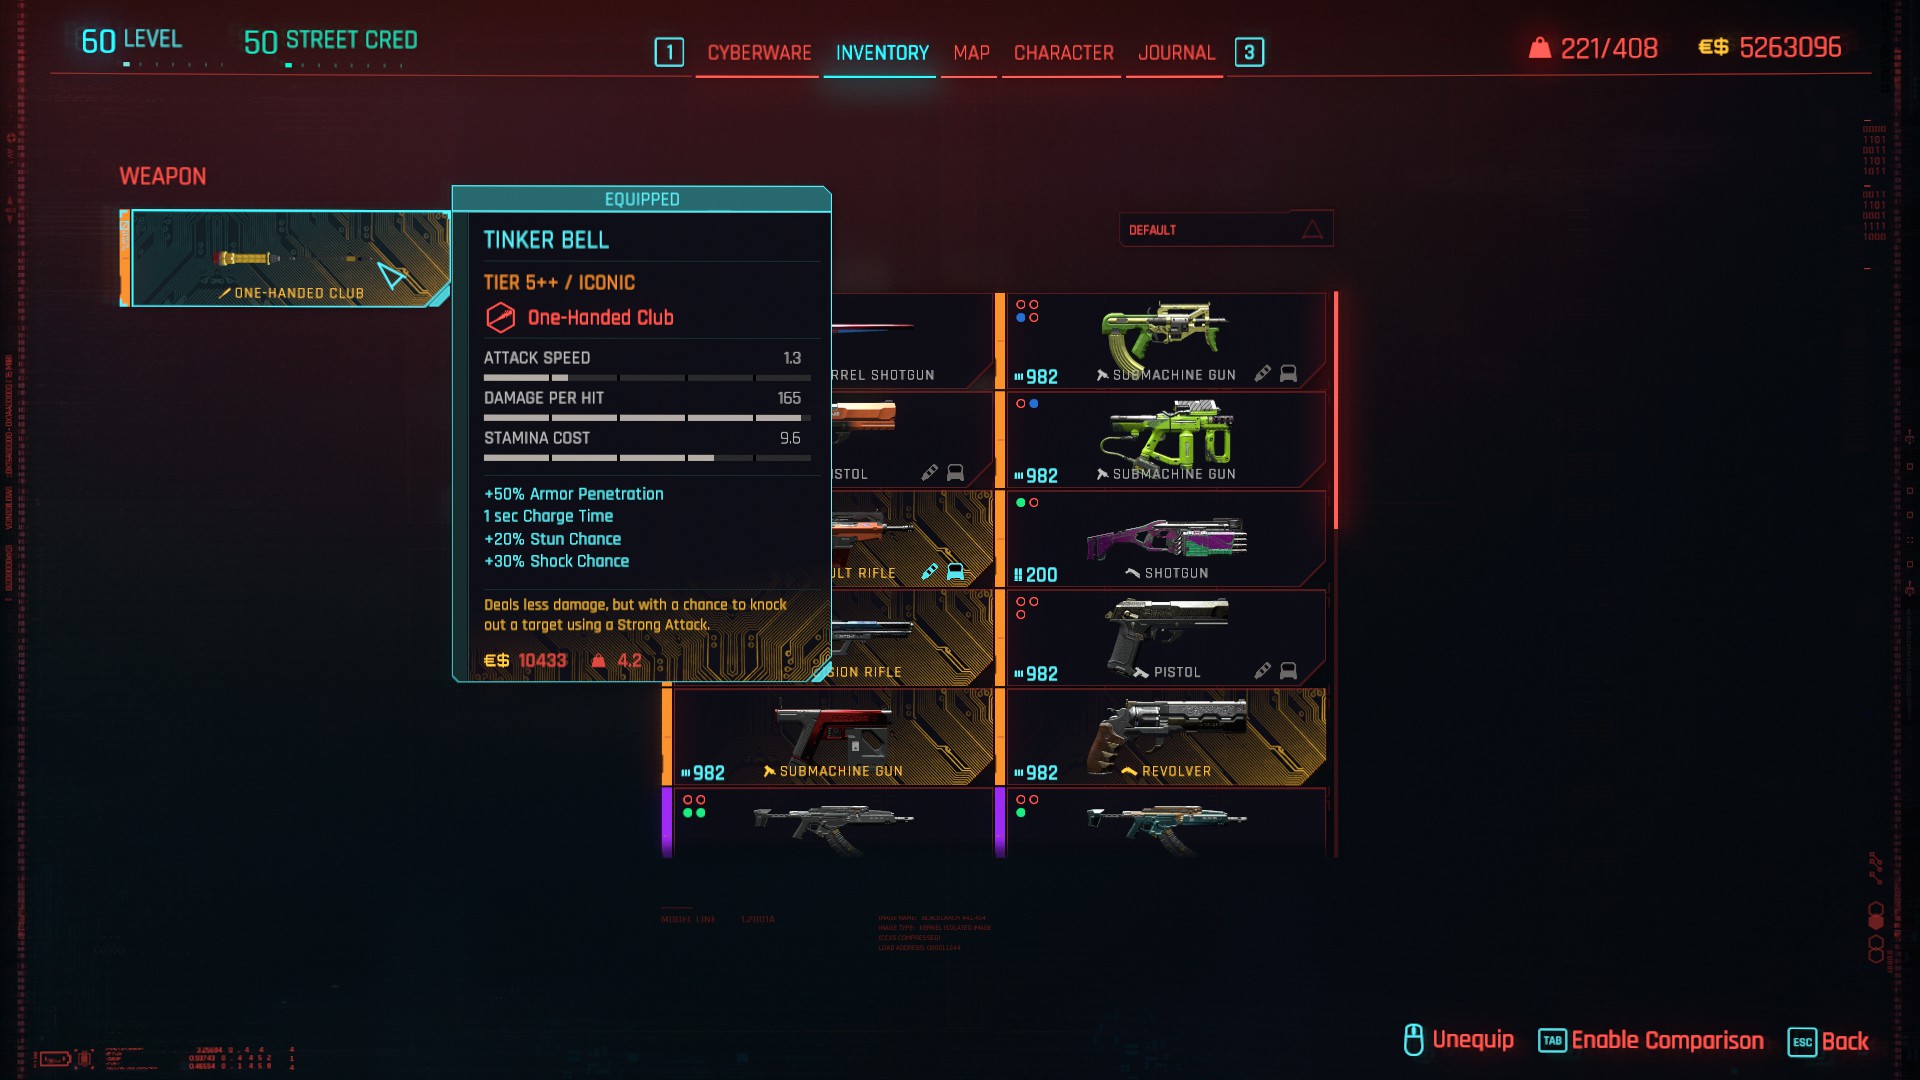
Tinker Bell might seem like a weapon born from memes, and indeed, it proudly carries that label. However, I’m dead serious when I tell you that if you’re considering any other blunt melee weapon, you’re essentially wasting your time compared to this legendary cattle prod. Forget Sasquatch’s Hammer, disregard the Baby Boomer, and power down Sir John Phallustiff because Tinker Bell is so absurdly effective that MaxTac might just die from embarrassment! Imagine witnessing a MaxTac agent’s health plummet from 100% to zero in a single hit – Tinker Bell gives you a 20% chance to achieve exactly that if the RNG gods favor your powerful strikes. Even if luck isn’t on your side, this iconic melee weapon can still stun MaxTac agents long enough for you to sneak behind them and perform a neck snap. If, for some reason, you have an odd dislike for katanas or bladed melee weapons, Tinker Bell is THE melee weapon to get and carry with you everywhere. Need I say more?!
You can find Tinker Bell in the control room of the house at Edgewood Farm, belonging to Anthony Harris, obtained during the side job The Hunt.
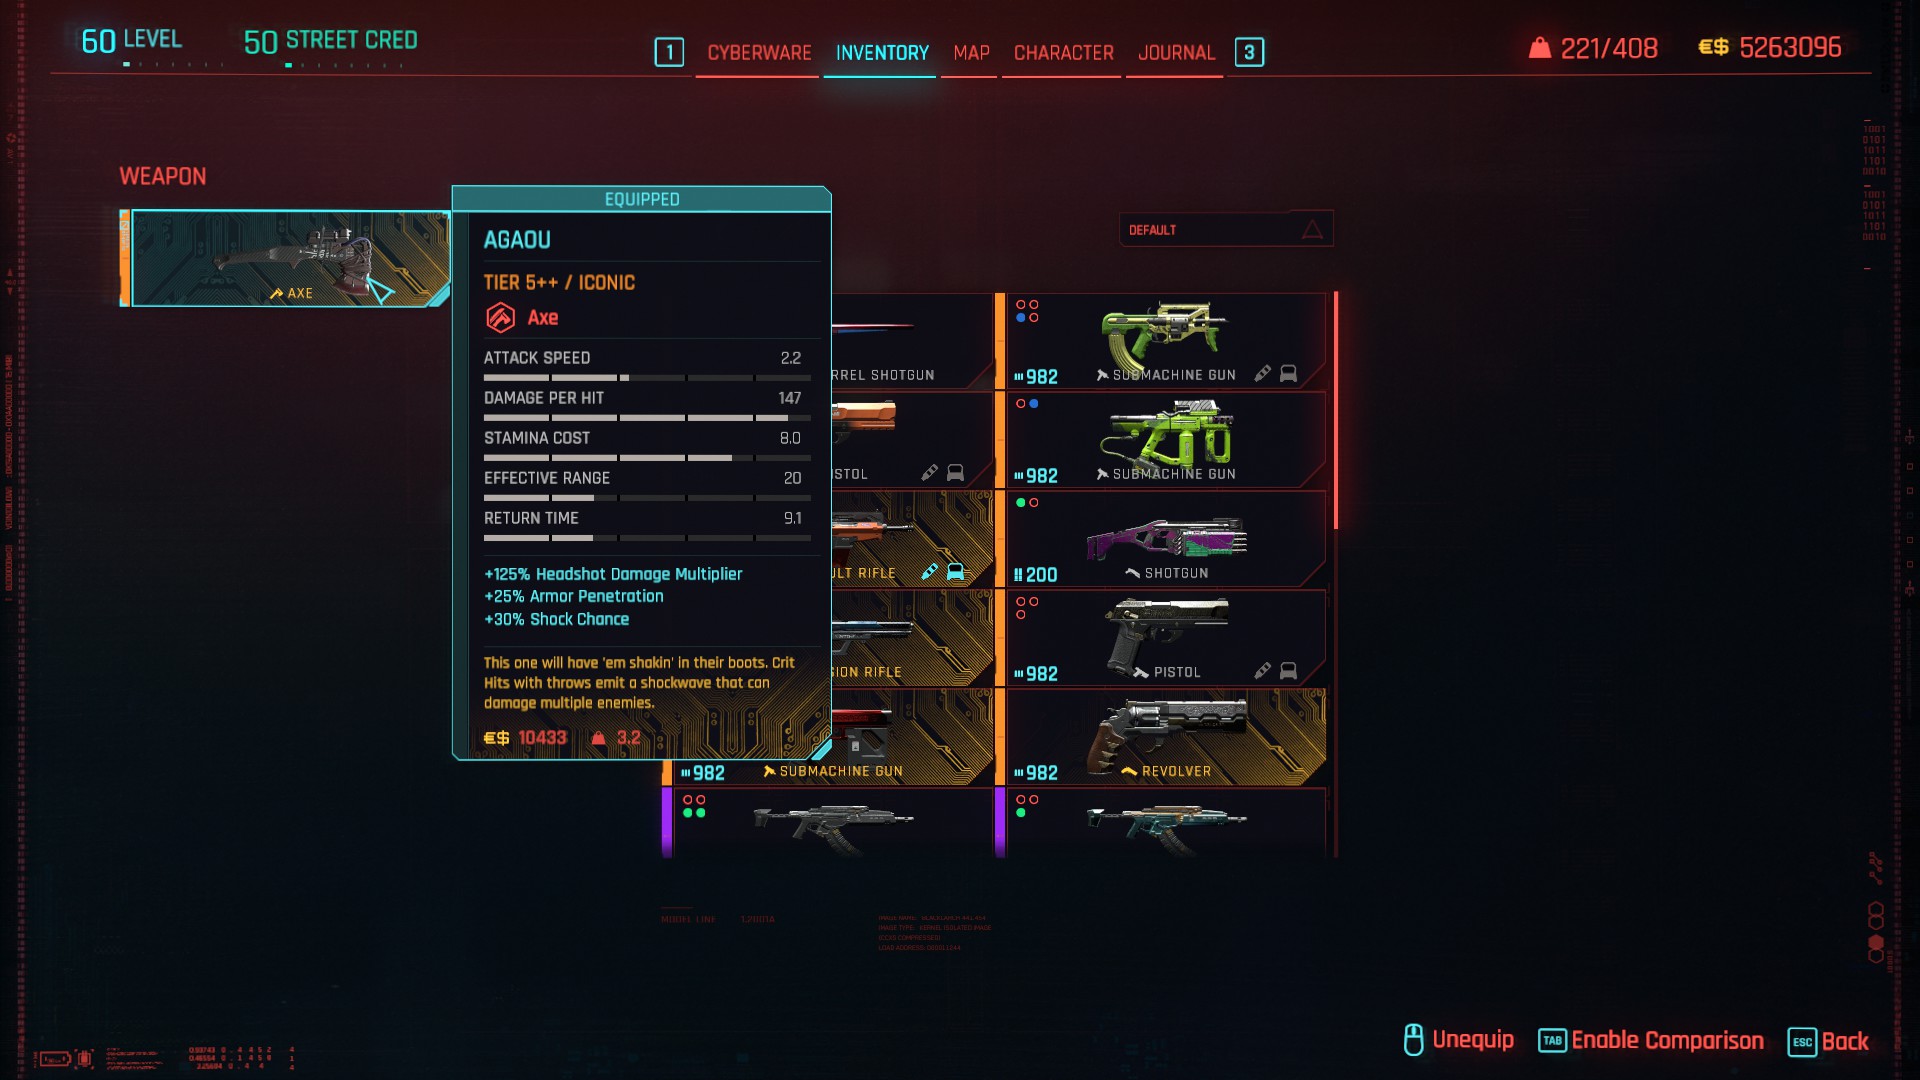
Agaou is your go-to for fulfilling all your throwing weapon DPS needs, except when it comes to stealth. If stealth is your preferred approach, I’d suggest also grabbing the Blue Fang. However, in a category dominated by knives, it’s the iconic Tomahawk that steals the spotlight and excels overall. Boasting higher damage and crit chance compared to most throwing weapons, the Tomahawk stands out. Critical hits with this iconic weapon trigger shock explosions capable of affecting multiple enemies. While this explosive feature enhances its combat performance, it may pose a challenge in maintaining stealth during certain situations.
You can find the iconic Tomahawk in Dogtown, dropped by Ayo Zarin during the Increased Criminal Activity: Voodoo Boys mission.
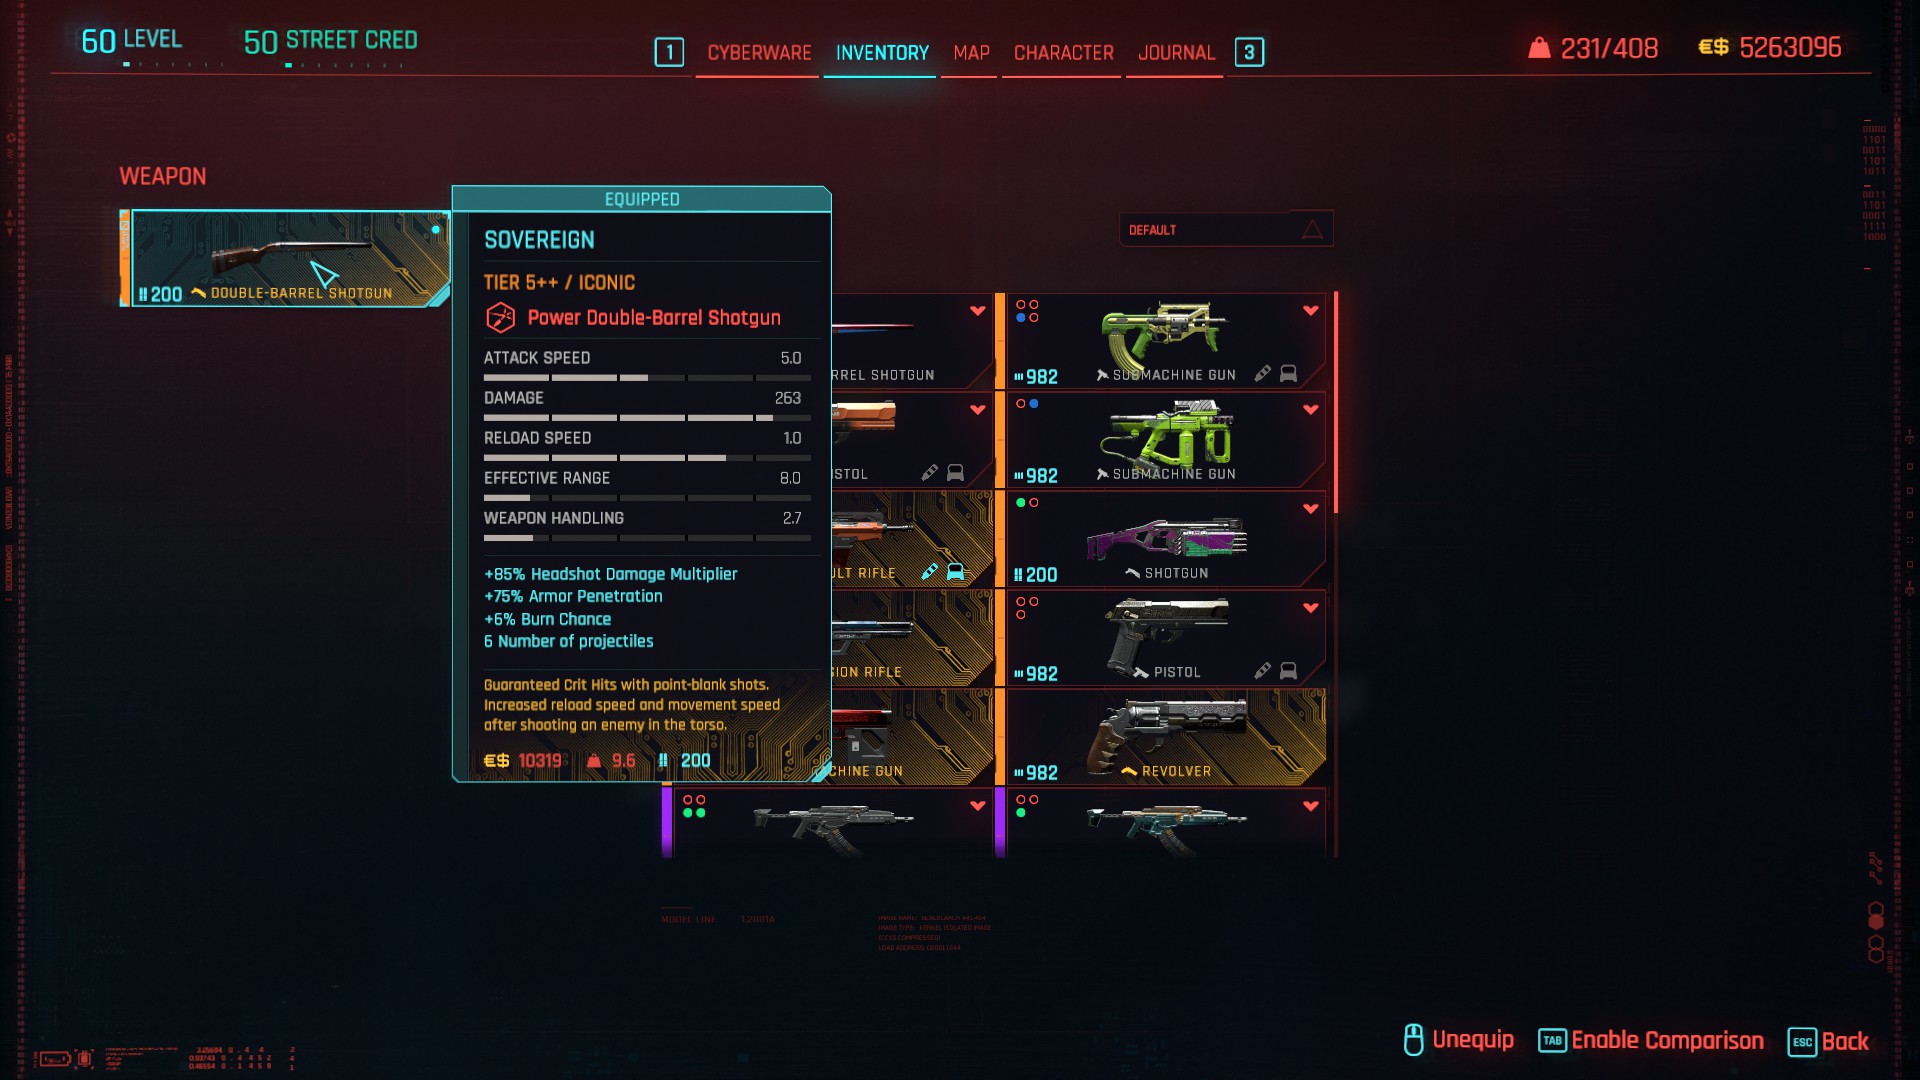
Sovereign stands out as an exceptional choice if you have a fondness for shotguns, fitting seamlessly into any build that encourages close-quarters combat. While its base damage may seem less impressive compared to other iconic shotguns, it’s intentionally designed for firing point-blank shots that guarantee critical hits. Notably, Sovereign is a double-barrel shotgun, allowing you to unleash two shells simultaneously. The unique perks don’t end there – landing shots on an enemy’s torso grants you bonus movement speed and reload speed. This is particularly valuable as shotguns are typically slow and cumbersome to reload. In a landscape where other iconic shotguns like Dezerter cause burns, the Order suffers from a frustratingly long charge time for a tech weapon, and single-shell-firing shotguns require individual shell reloading, Sovereign emerges as a reliable, user-friendly option with substantial potential for DPS.
You can find Sovereign in Japantown as a crafting spec or as a drop from Shinobu Amai during the NCPD Scanner Hustle titled Suspected Organized Crime Activity: Modern Labor Market.
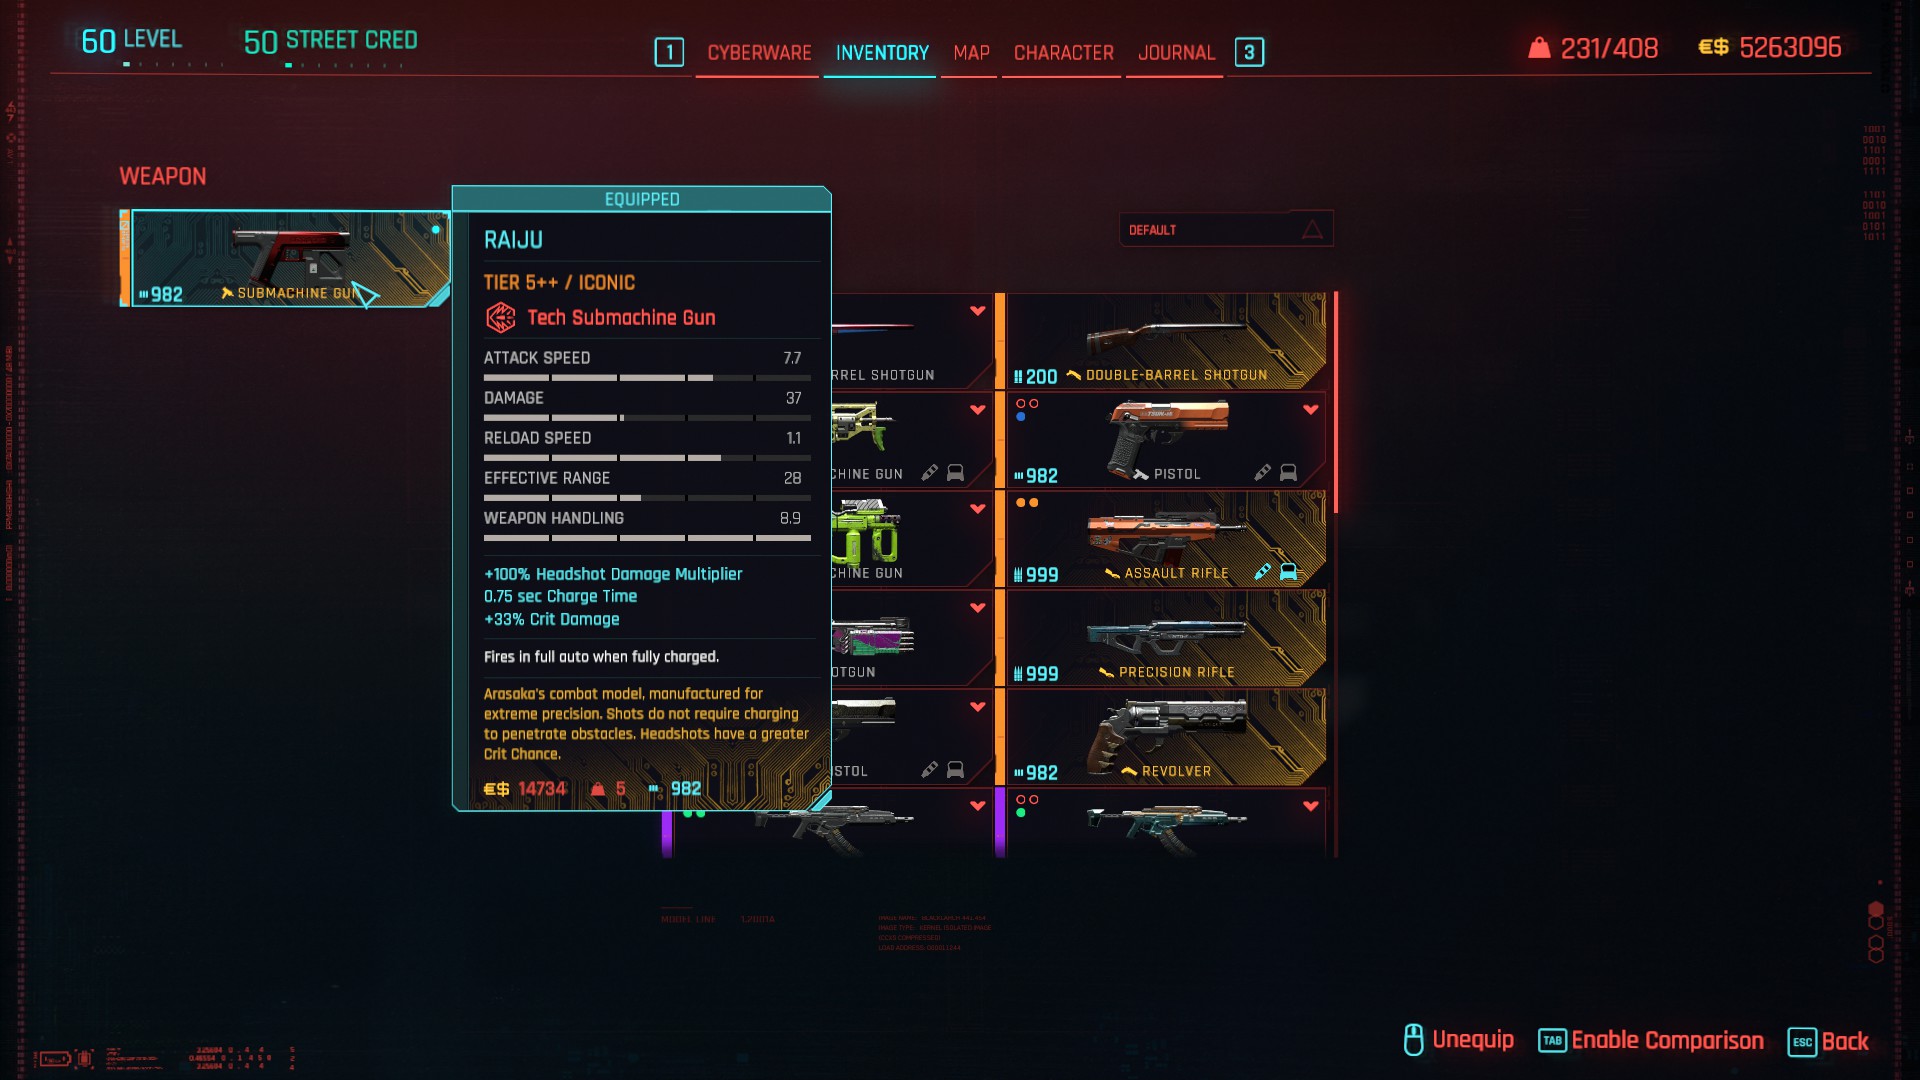
Raiju isn’t just the undisputed best tech weapon in the game; it’s arguably the top SMG overall, outshining even the likes of Yinglong, Fenrir, or Erebus. This powerhouse performs exceptionally well in any build you choose. Not only does it deal shock damage, but it also boasts a 33% increase in crit damage, a 33% extra crit chance for headshots, and the ability to penetrate walls and objects without needing a charge. When time slows down, Raiju truly shines, firing bullets as if unaffected by the slowdown effects. To elevate its already impressive DPS, you can unleash a constant barrage of Bolt shots, further enhancing it with the Chain Lightning capstone perk.
You can find Raiju in Dogtown, tucked away inside a locked cache. The key is dropped by Ross Ulmer during the Increased Criminal Activity: BARGHEST mission.
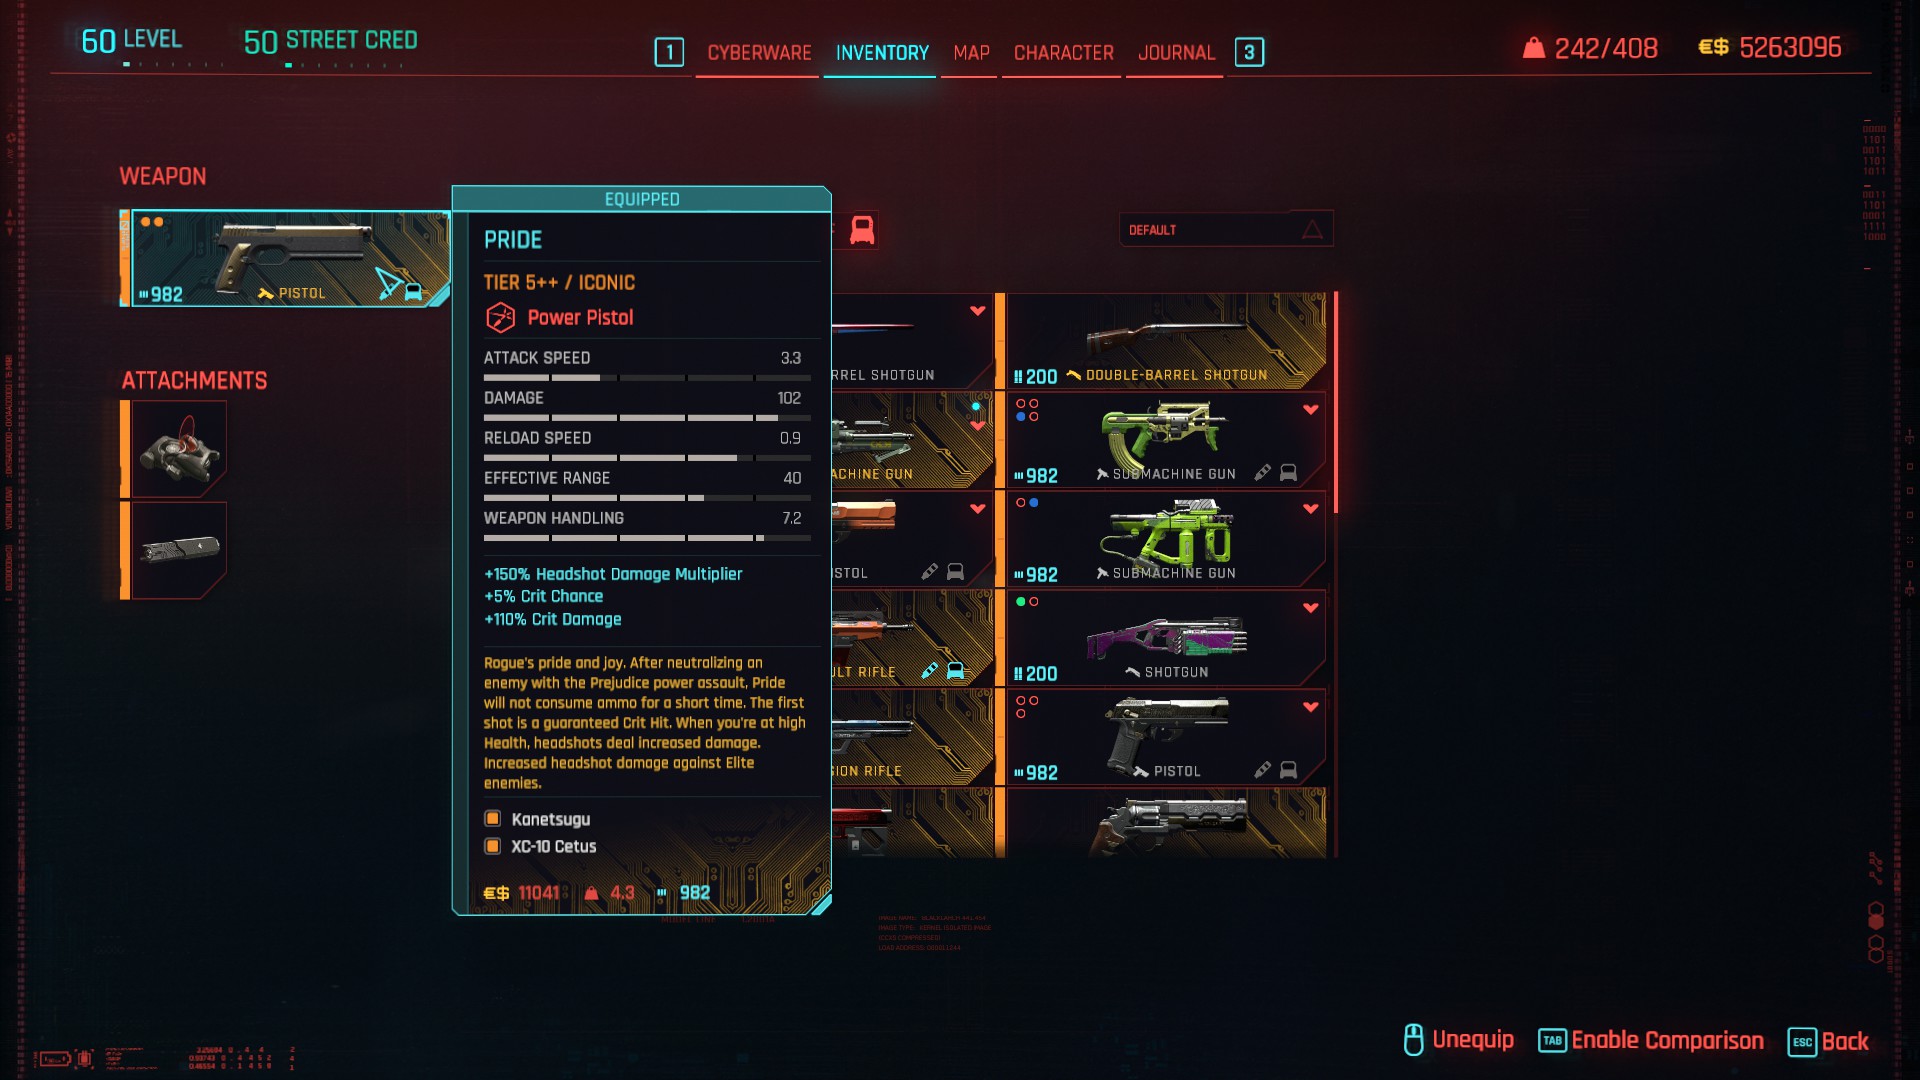
Pride, Rogue’s iconic pistol, becomes available at the end of the final story mission when you choose to side with her. To obtain it, complete the story this way, then reload from the ‘Point of No Return.’ This process is undoubtedly worth it if you’re aiming to wield a weapon benefiting from both Focus and Deadeye. As one of the Cool perk tree’s focal points covers pistols, revolvers, precision rifles, and sniper rifles, Pride proves more than capable of dominating across these categories. Notably, the first bullet fired from a fresh magazine guarantees a critical hit, and Pride boasts +100% crit damage, along with +10% headshot damage against elite enemies sporting skull icons. Still not convinced? When your health exceeds 75%, Pride grants an impressive 420% headshot damage. To top it off, you can equip this legendary pistol with an XC-10 Cetus silencer, turning it into the ultimate stealth weapon with 150% bonus damage and guaranteed critical hits as long as you remain undetected. In terms of single-shot damage, Pride outshines every other pistol, revolver, precision rifle, or sniper rifle available.
You can find Pride in Arasaka Tower, immediately after the final boss fight during the main mission Knockin’ on Heaven’s Door.
End Game
So, your V has hit the impressive level of 60, and your cyberware and weapons collection is thriving. Now, the quest is to craft the ultimate endgame build—something not only effective but flexible for various playstyles. The true test lies in tackling the major leagues, handling even five felony stars, and enduring relentless assaults from NCPD and MaxTac squads, a challenge unparalleled by any other enemy or boss, including Adam Smasher.
Through testing my V against waves of NCPD and MaxTac, noteworthy insights emerged. Relying solely on ranged weapons leads to an inevitable ammo depletion, regardless of the weapon variety or ammo types. Even with the option to craft ammunition using tier 1 trading components, the combat state blocks this action. The only recourse is to disengage from combat, evade the authorities, and then craft.
For dedicated netrunners dependent on quickhacks, a similar challenge arises with RAM limitations. Despite tools like Overclock and strategic tweaks to quickhack queues, upload order, and perks, the arrival of MaxTac introduces a stark reality. The DPS potential of netrunning has been significantly nerfed by the developers, making an all-in netrunning approach risky and less rewarding. Even with meticulous efforts, relying solely on netrunning to combat MaxTac is no longer a reliable strategy. While still feasible, it demands a different tactical approach.
Regardless of your preferred playstyle, when it comes to dealing with MaxTac or any formidable boss, melee damage emerges as the undisputed champion. Not only does it boast commendable DPS, but it also incurs no ammunition or RAM costs, only relying on stamina. Effective endgame builds prioritize perks that enhance performance and DPS for the chosen melee weapon. Any interest in ranged weapons takes a back seat when allocating spare perk points.
Moving on to defensive considerations, the focus isn’t on maxing out armor. In my view, armor is the most overrated defense in Cyberpunk. To test this, try getting a ripperdoc to install cyberware for maximum armor and see how quickly you still get taken down in a fight. If even 100% max armor doesn’t provide sufficient protection, it’s time to shift attention elsewhere.
The best form of defense? Mitigation. A hypothetical offer of 100% unconditional mitigation chance 24/7, even with zero armor, would be a resounding ‘YES’ because mitigation, when active, halves any sustained damage at a minimum. Mitigation covers damage types that armor doesn’t, including damage over time. Achieving as close to a 100% mitigation chance as possible, combined with high mitigation strength, allows for remarkable damage reduction. The 90% cap on mitigation strength prevents it from being excessively powerful.
While mitigation activation is easier with ranged weapons, it presents a challenge with melee weapons. This is where building versatility becomes crucial. Prioritizing mitigation (chance first, strength second) enhances the effectiveness of other defensive factors such as health regeneration and maximum health, contributing significantly to your survivability.
Netrunner
Given that the primary source of DPS in this build comes from melee damage, there’s a deliberate decision to downplay the emphasis on quickhack DPS. Overemphasizing it would be excessive and a misuse of cyberware capacity. Consequently, the COX-2 Cybersomatic Optimizer isn’t part of this build. Its hefty cost of 50 cyberware capacity, reduction of max RAM capacity, and limited overall value in this specific build place it in an undesirable middle ground. While it can deal significant damage to normal, weaker enemies, it falls short against formidable foes like MaxTac. Before delving into cyberware details, let’s first explore the quickhacks incorporated into this build.
Cyberware Malfunction serves a dual purpose, debuffing enemies for increased overall damage and allowing double-stacking to permanently disable an enemy’s cyberware. This strategy is particularly effective against tough enemies like those utilizing Sandevistan or Kerenzikov, including the formidable MaxTac. Since patch 2.1, regardless of stealth usage, this quickhack takes the lead in the queue order, making enemies more susceptible to bonus damage from the sole combat quickhack installed.
Synapse Burnout is the essential combat quickhack, effective even against non-human enemies. Its damage output increases with more RAM spent. With our chosen cyberdeck, queuing a non-combat quickhack immediately afterward provides a 40% damage boost.
Sonic Shock, the most RAM-efficient quickhack, is queued last in the order. As a non-combat quickhack, it grants a 40% damage boost to Synapse Burnout, which precedes it.
Cripple Movement may not see frequent use, but it offers a low RAM cost and proves useful against evasive or cover-seeking enemies.
Reboot Optics is included in the list but is handled by our Cyberdeck without RAM expenditure. Nevertheless, it needs to be equipped.
Weapon Glitch, another RAM-free quickhack with our specific Cyberdeck, can be handy in certain situations, especially against enemies with powerful weapons.
Tetratronic Rippler stands out as the overall best Cyberdeck, offering a substantial max RAM bonus, a circumstance for 40% bonus damage with Synapse Burnout, free usage of Reboot Optics and Weapon Glitch with Overclock, and bonus damage to smart weapons against enemies affected by control quickhacks. It’s also cost-effective in terms of cyberware capacity.
Revulsor, with a capacity requirement, is a game-changing cyberware if equipped. While this build doesn’t optimize for melee combat, activating Revulsor creates an opportune moment to unleash rapid melee attacks when time is momentarily in your favor.
Moving on to the Nervous System, which requires 35 capacity:

Yinglong is a strong contender for the title of the best smart weapon in the entire game, especially when focused on firing at single enemies. Notably, it boasts impressive bullet velocity for a smart weapon. Beyond its precision, Yinglong deals shock damage, and the EMP explosions it generates can stack up Pyromania. Additionally, being an SMG allows you to shoot enemies with it even while driving.
You can find the crafting spec for Yinglong in Wellsprings, Heywood, or obtain it as a drop from Denzel Cryer during the NCPD Scanner Hustle titled Suspected Organized Crime Activity: Living the Big Life.
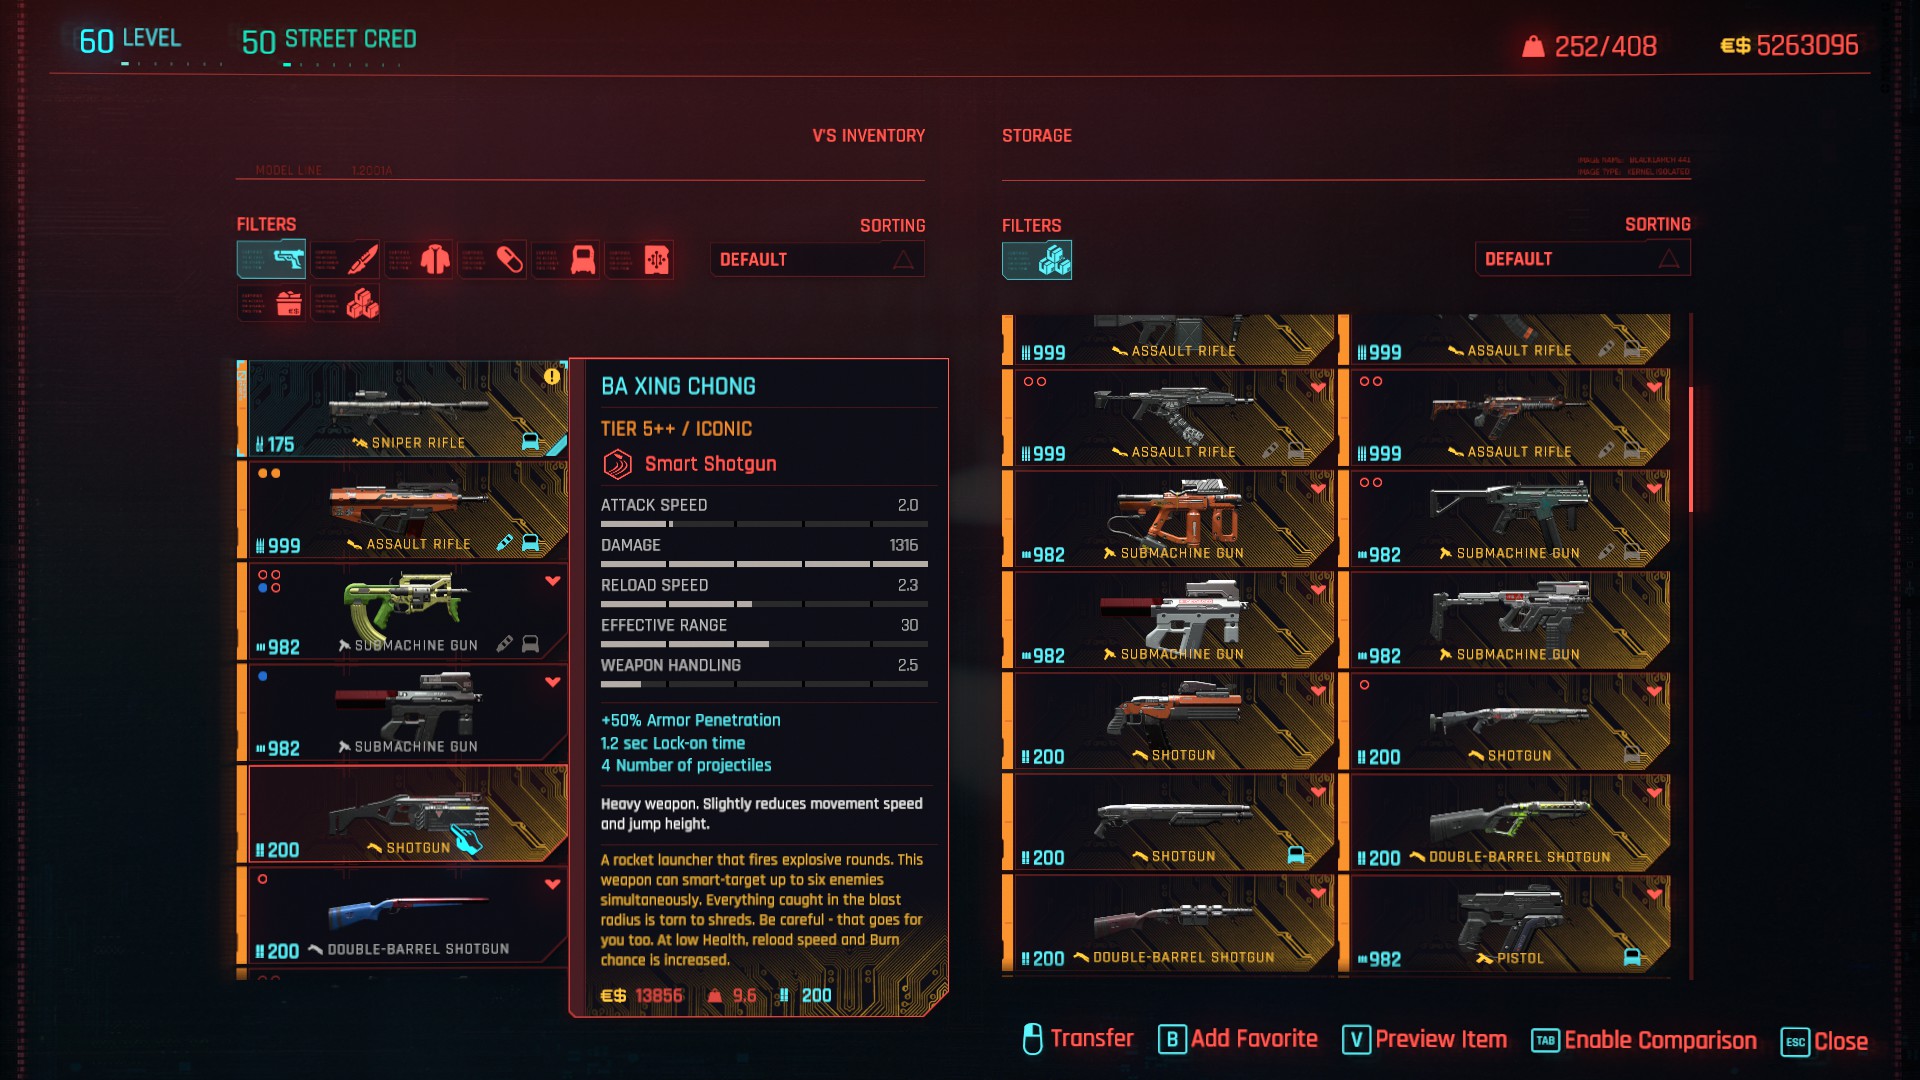
Ba Xing Chong excels at targeting multiple enemies simultaneously, thanks to its heavy base damage. While Yinglong might be preferred for faster enemy takedowns, Ba Xing Chong, being a smart shotgun, distinguishes itself by causing multiple explosions, swiftly accumulating stacks of Pyromania. This weapon serves well in refreshing stacks before engaging in melee combat.
You can find Ba Xing Chong aboard the Ebunike, accessible as a crafting spec only after completing the main story and reloading from the point of no return. The chest containing it is inside a locked room, requiring an Access Token looted at the end of the final story mission.
In encounters with multiple enemies, whether face-to-face or from the shadows, activating Overclock is crucial. Since patch 2.1 adjusted the damage potential of Synapse Burnout, the recommended quickhack queue order for picking off enemies with quickhacks is Cyberware Malfunction > Synapse Burnout > Sonic Shock, and/or using smart weapons. Incorporate Cripple Movement for particularly agile and evasive foes. Utilizing Synapse Burnout to neutralize enemies significantly aids in extending Overclock’s duration.
When facing MaxTac, prepare by activating a fresh Overclock for Reboot Optics and Weapon Glitch. Employ the Kerenzikov combo to achieve 100% mitigation chance as you approach them, then switch to Errata (or Tinker Bell) and activate Overclock. Double-stack Cyberware Malfunction on each MaxTac agent to enhance your effectiveness.
This playstyle spans a broad spectrum, offering ease against entire enemy squads with quickhacks alone, ensuring stealthy elimination. However, dealing with the NCPD, especially MaxTac, demands a more focused and strategic approach. This variation of the build poses a higher risk when confronting MaxTac but rewards those who play smart—a fundamental requirement for any ‘Intelligence’ build!
Speedster
Sandevistan stands out as the most popular and versatile operating system in Cyberpunk lore, well-suited for emphasizing ranged weapons, although it remains adaptable for melee use. Particularly beneficial for shotgun and throwing weapon enthusiasts, Sandevistan enhances the performance of both types. Slowing down time provides more than just a speed advantage—it enables tactical attacks, strategic retreats, repositioning, increased DPS, and evasion of numerous hits.
The Militech “Apogee” Sandevistan, despite being the most expensive operating system on the market, proves its worth. Its toggle capability, allowing frequent activation each time its duration concludes, is ideal for consistently triggering the Ticking Time Bomb capstone perk. With time slowed by 85% for everyone except yourself, you gain a sense of complete control over the battlefield.
The Adreno-Trigger operating system, requiring 44 capacity, offers bonus movement speed upon entering the combat state. Thanks to the 15 Reflexes in this build, you gain an extra 45 seconds to maintain this speed advantage. Given the inclusion of Sandevistan, there’s no need for the Revulsor or its non-iconic counterpart, the Reflex Tuner, making it worthwhile to maximize your speed even further.
Moving on to the Nervous System, which requires 20 capacity:
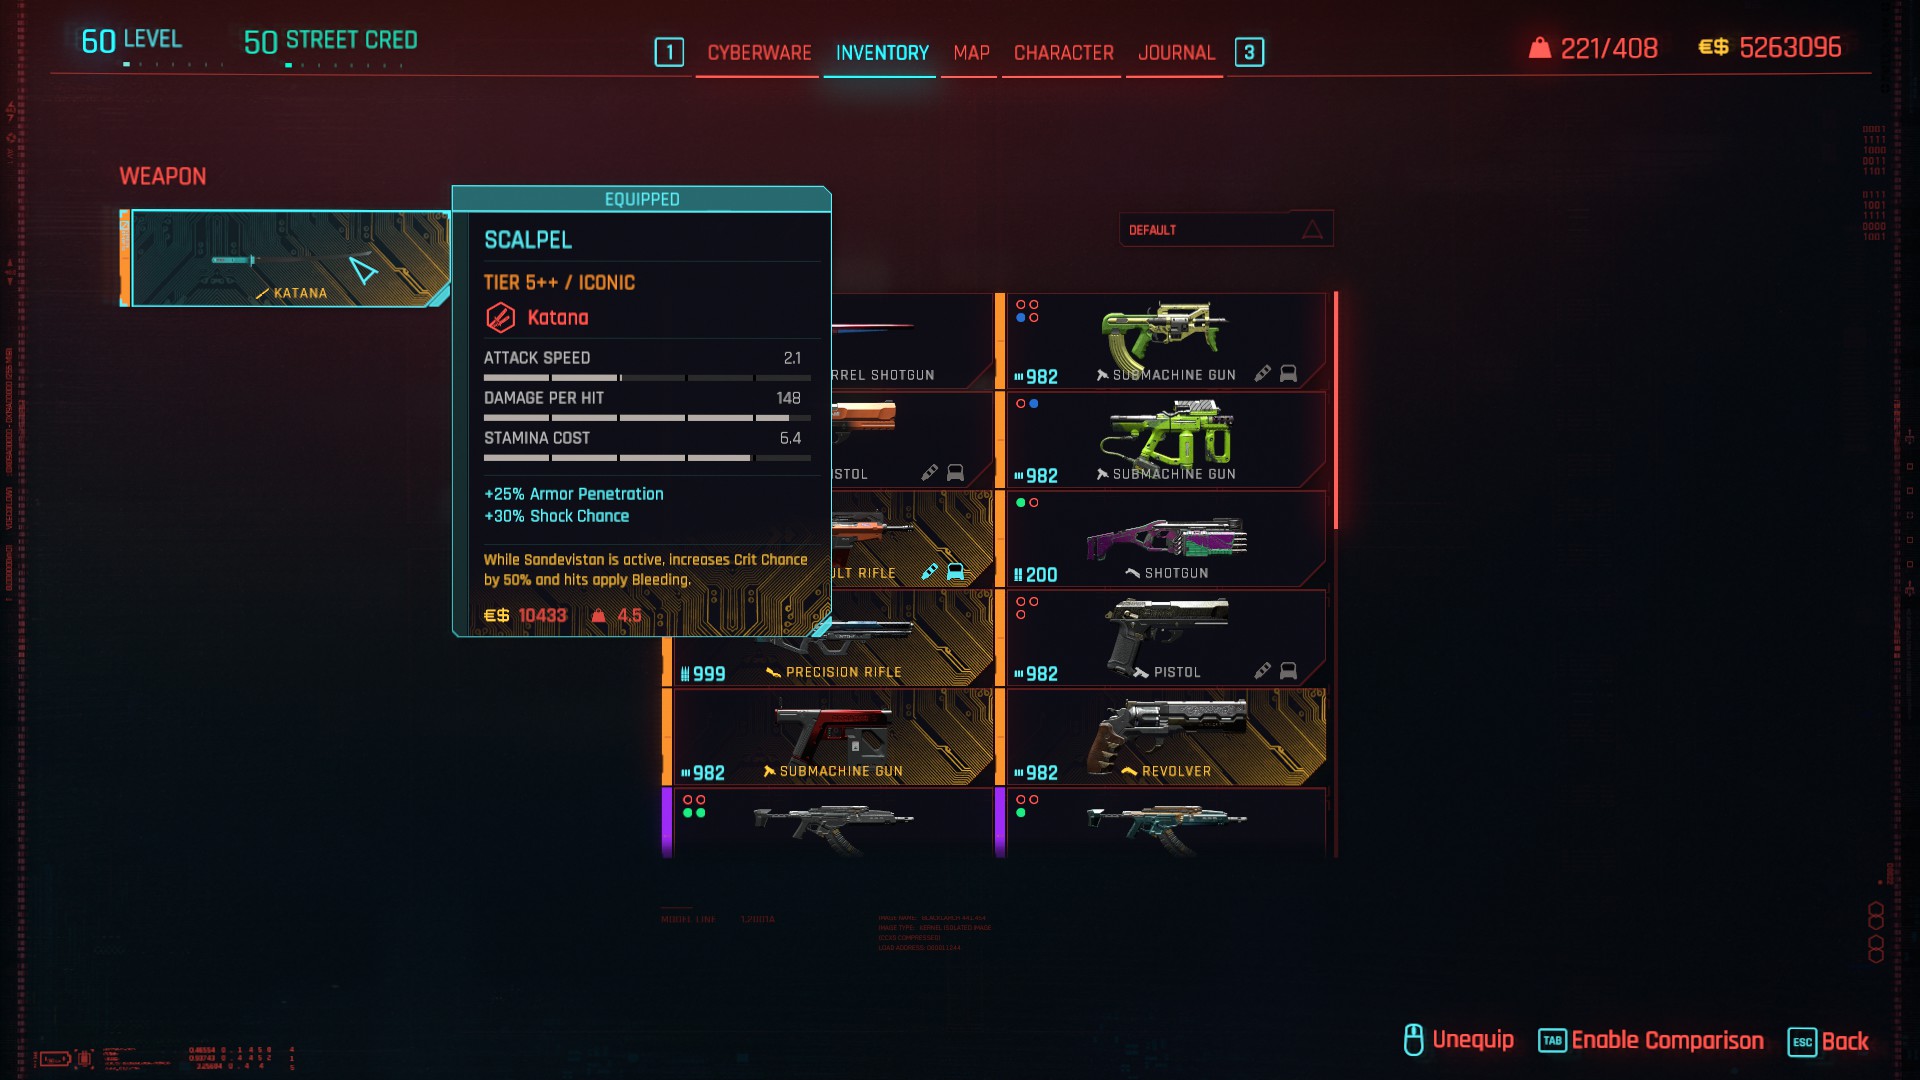
The Scalpel becomes a worthy consideration when utilizing Sandevistan. By default, it boasts a 30% chance to deal shock damage, a valuable attribute in various situations. While Sandevistan is active, this katana gains +50% crit chance and inflicts guaranteed bleeding. The choice between Scalpel and Errata hinges largely on your total crit chance. A practical way to decide is to enter combat with Scalpel, activate Sandevistan, check your inventory, and observe your DPS stats. If your crit chance seems notably high, such as 80% or 90%, sticking with Scalpel may be preferable. However, anything below 80% would likely lead to opting for the reliable Errata.
You can obtain the Scalpel as a reward from Dennis Cranmer for successfully completing the side job Big in Japan, located in Watson.
Given the flexibility to toggle the Apogee on and off at any charge rate, this playstyle offers numerous options for wreaking havoc with top-tier weapons, especially if you favor the Sovereign and/or Agaou. To enhance this build, consider two crucial tips. First, activate Kerenzikov first for 100% mitigation chance, but ensure you wait until it finishes before activating Sandevistan to avoid a glitch that slows you down. Second, when engaging enemies with your melee weapon and aiming to prolong its use, spam the Sandevistan key as it ends. This constant charging of the EMP blast from the Ticking Time Bomb capstone perk not only stuns and damages enemies but also grants a 50% reduction to incoming damage every three seconds. Be cautious, though, as unintentional harm to civilians may provoke NCPD involvement if you haven’t engaged them in combat already!
Berserker
The Berserk variation stands out as my personal favorite playstyle, and in my honest opinion, it emerges as the strongest among the three. While it confines you to using only melee weapons, it significantly boosts your melee damage potential, making it ideal for the toughest battles against bosses and MaxTac. During its active state, you become invulnerable, unable to drop below 25% of your max health, experience zero stamina costs, and enjoy a +30% increase in melee attack speed.
This playstyle cleverly circumvents the limitation of 100% mitigation chance only activating with ranged weapons during Kerenzikov. When you activate Berserk to engage in melee combat, you enter a demigod mode, rendering mitigation concerns obsolete. Even when Berserk is on cooldown, you can use Kerenzikov with ranged weapons to maintain 100% mitigation chance, compelling enemies to deal only 20% of their total damage, if they manage to hit you at all.
For the Berserk variation, the Biodyne Berserk is the preferred choice over the iconic Militech version. The Biodyne version offers 50% damage reduction and an impressive +100% bonus crit damage, creating synergy with health-related cyberware that operates autonomously. It proves superior for maximizing damage potential.
The Revulsor, while not a cheap iconic cyberware piece, proves itself more frequently active than indicated. In combination with the Berserk operating system, it becomes a non-OS alternative to Sandevistan. This allows you to enjoy the benefits of Berserk and Revulsor simultaneously, providing a unique and powerful gameplay experience.
While Sandevistan allows for efficient use of melee weapons, particularly Tinker Bell, there’s no denying that Berserk excels at general melee combat. Among the various katana builds tried, this one, specifically for the Errata, stands out for swiftly and efficiently taking down bosses and MaxTac. Unlike Sandevistan, which has a set duration, Berserk continues until its charge depletes completely. Axolotl can effectively extend Berserk as long as momentum is in your favor.
To recap, the Berserk variation allows you to activate demigod mode, dash and slice through enemies with zero stamina cost, leverage the Errata for 100% bonus crit damage on guaranteed crit hits, keep Berserk going indefinitely with Axolotl, enjoy Sandevistan simultaneously with Berserk when the Revulsor kicks in at low health, utilize any preferred ranged weapons with 100% mitigation chance when Berserk is inactive, and maintain the option to escape from the crime scene with Optical Camo. It’s evident why the Berserk build is my absolute favorite endgame variation in patch 2.0!
Final Thoughts
Ultimately, how you shape your V and navigate your own playthrough is entirely your choice. My recommendations stem from my comprehensive experiences across multiple playthroughs, leading me to the perception that many capstone perks are overrated compared to the continuous access to all Phenom level perks in all attributes. My particular approach, emphasizing 20 Technical Ability and allocating at least 15 points to every other attribute, offers a wealth of variety.
However, individual preferences vary. If, for instance, you decide that netrunning doesn’t align with your playstyle, and sacrificing the option of using Overclock doesn’t bother you, you can redistribute attribute points accordingly. Remember that you have only one chance per playthrough to refund and reallocate attribute points, so ensure you are certain about your choices.
Here’s a recap of my specific approach and the potential consequences of deviating from it:
- 20 Technical Ability: Grants access to open-world content requiring this level and provides the Edgerunner capstone perk, along with bonus cyberware capacity.
- 15 Body: Unlocks Adrenaline Rush benefits and ensures you don’t miss out on content requiring 20 Body, even if equipped with Gorilla Arms.
- 15 Reflexes: Offers a significant quality-of-life enhancement with Air Dash and expertise in using katanas as a blademaster.
- 15 Cool: Enables stealthy crouch-sprinting and proficiency with the best ranged weapon in the game across all ranged weapon categories.
- 15 Intelligence: Essential for efficient money-making, proper use of tier 5 Cyberdecks and quickhacks, and the imperative Overclock for effective netrunning in the endgame.
My tailored approach allows me to confidently face challenges like Adam Smasher post-patch 2.1 or handle waves of MaxTac and NCPD support, regardless of whether I adopt a Netrunner, Speedster, or Berserker playstyle. It exemplifies the pinnacle of solo prowess in Night City.

That's everything we are sharing today for this Cyberpunk 2077 guide. This guide was originally created and written by Dragon. In case we fail to update this guide, you can find the latest update by following this link.