Looking for a straightforward method to earn XP legitimately? I can demonstrate how I manage to earn between 150 to 2,000 units of XP in just 1 or 2-minute rounds, or sometimes even less time.
The Oversight of Custom Difficulty
Utilizing the Custom Difficulty feature in the game can inject some excitement into your gameplay, particularly when the Professional or Nightmare modes start feeling monotonous. It’s also a great way to have some fun with all seven cursed objects while playing with your friends. In this guide, we’ll be leveraging this feature to its maximum potential (or very close to it). By the time you’ve followed these steps, you’ll have an impressive multiplier of 9.85 applied to your game. And the best part? You’ll still have your life intact at the end, allowing you to claim that substantial bonus.
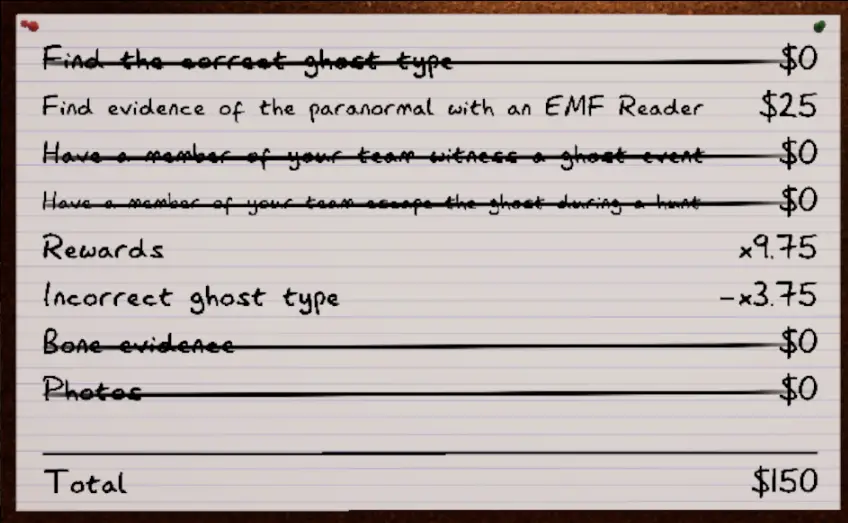
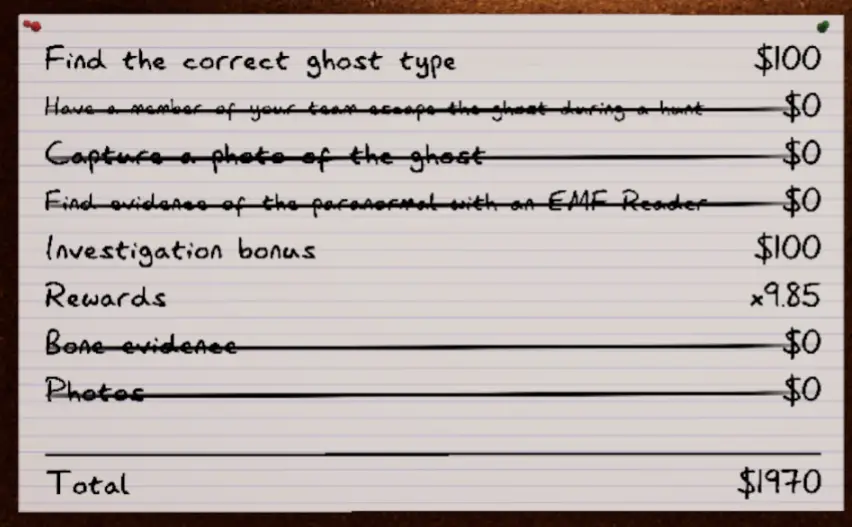
Once you’ve completed the process, your multiplier will stand at 9.85, causing objectives (even when you’re unaware of the ghost type) to yield around 150 XP or currency. Additionally, identifying the ghost type will earn you a substantial 1,970 points. Detailed information about both aspects can be found below!
How Much XP?!
In a game lasting approximately 1 to 3 minutes, you can easily accumulate at least 150 points, with the potential to earn as much as 2,000 points within the same time frame. The outcome largely hinges on the objectives assigned and the specific ghost you’re matched with. Let’s consider an instance:
Suppose you’re tasked with locating paranormal evidence using an EMF Reader, and you’re still unaware of the ghost type. In a recent experience of mine, I managed to complete this objective in just 45 seconds from the start to the finish.
The approach for this objective is quite simple. Just place a couple of EMF devices in a hallway, and then take cover or exit the area during the ghost’s hunting phase. I’ll provide more details on this strategy later on.
Now, let’s explore a scenario where you accidentally guess the ghost’s type, or it becomes evident from the ghost’s behavior during a hunt that it might be something like a Revenant. What actions should you take in this situation?
I’ll delve further into both of these scenarios and also provide additional information about the settings later in the guide.
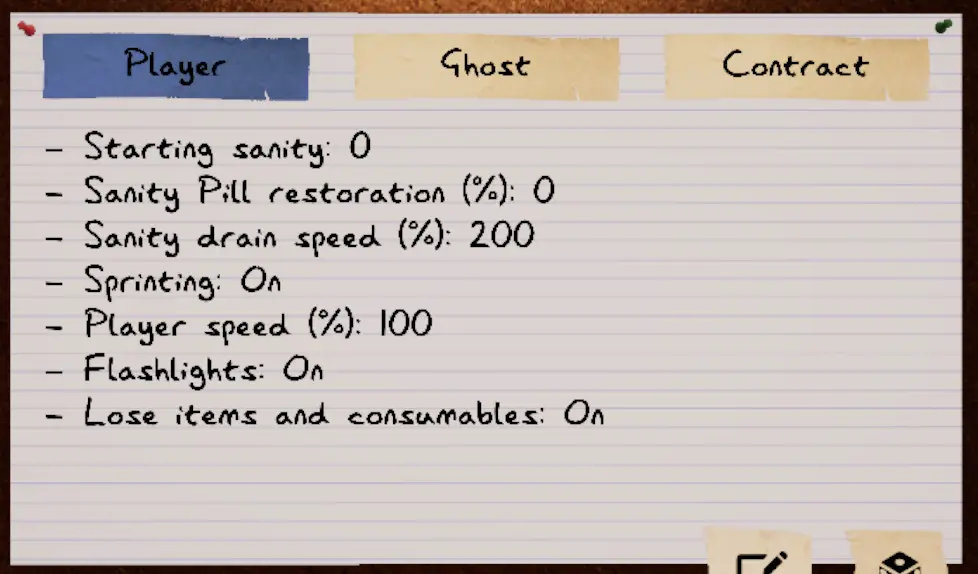
Custom Difficulty Settings: Player
In all of these situations, the approach remains quite straightforward. You’re essentially portraying a character who has been hired to locate a ghost in a house and happens to possess some eccentric tendencies. You could experiment with turning off flashlights or reducing your movement speed to 75% (or even down to 50% if you’re feeling particularly daring, although that might not end well). However, these adjustments won’t yield significantly higher rewards and could severely impede your progress if the ghost launches an immediate attack.
Maintaining a sprinting pace is essential—do not disable it.
Your ability to swiftly relocate to a hiding spot when the ghost becomes active is crucial. The brief cooldown period between hunts is your only window to exit the house for completing objectives or checking on your progress. Being unable to sprint places you at a considerable disadvantage during hunts, even when there’s a 3-second grace period.
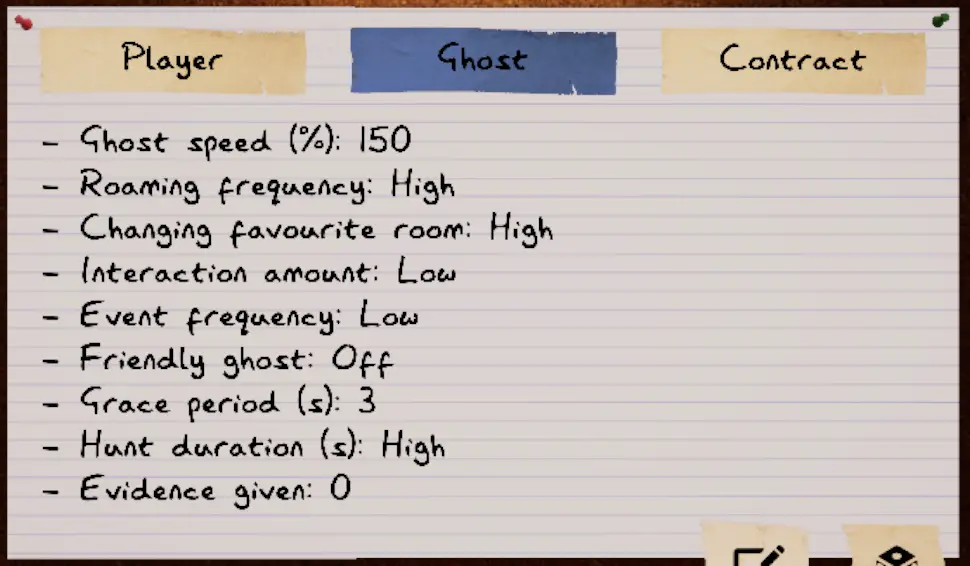
Custom Difficulty Settings: Ghost
Here are some essential points to keep in mind about these settings:
Before we proceed, it’s important to understand that this method won’t serve as your primary source of income and XP. While guessing the ghost type does grant a substantial reward of 1,970 XP or currency, it can be challenging to deduce the ghost type solely based on its movements, even for someone like me who considers themselves a “ghost feet expert.”
Ghost Speed: Why the Unusual Velocity?
An excellent question, budding investigator! This choice serves a dual purpose. Firstly, it significantly boosts your end-of-game bonus, assuming you manage to survive encounters with what seems like an energetically hyperactive spider monkey. Secondly, it allows you to infer certain ghost types by listening to their movements during their hunting phases. Take the Revenant, for instance, which I’ve illustrated in another screenshot within this guide. The Revenant typically moves at an extremely slow pace when it’s unable to locate you. By adjusting these settings, its hunting phase sounds more typical, unlike a ghost such as Hantu, which may toggle between normal and frenzied movements.
Grace Period: 3 Seconds
This setting holds significance. A 3-second grace period not only provides you with additional reward points but also offers a reasonable window to sprint to a hiding spot. While you can experiment with reducing it to 2 or even 1 second, I strongly advise against doing so. Once this 3-second period concludes, and if this ghost, now equipped with a 150% movement speed, locates you, the odds are high that your ghostly encounter won’t end well for you.
Evidence Given: 0
Opting for this setting ensures a commendable quantity of reward points. This is also why our primary focus will be on completing straightforward objectives rather than attempting to pinpoint the ghost type (unless you strike lucky). Given the other settings, striving to gather evidence often becomes futile, as the likelihood of your untimely demise increases significantly. This contradicts the principle of optimizing and maximizing your gameplay efficiency.
And remember, if you’re altering settings in an attempt to deduce the ghost type, you’re departing from the path of optimization and maximization, which contradicts the essence of being a true Min/Maxer. In essence, your objective should be to enter and exit the scenario with swiftness akin to a regrettable date and not prolong your stay to the point of an unfortunate separation (a.k.a. death).
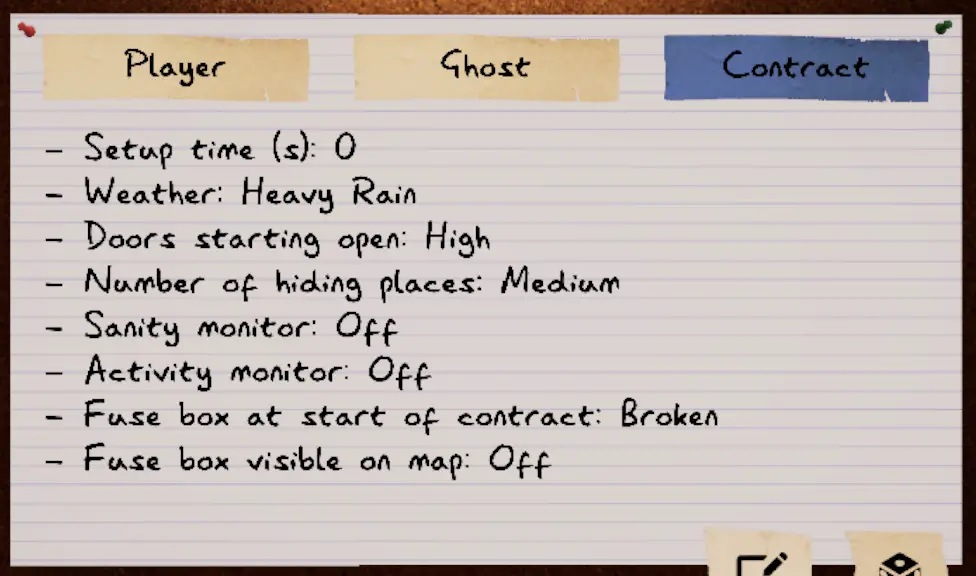
Custom Difficulty Settings: Contract
Only a couple more details require mention:
Number of Hiding Places
This strategy centers around utilizing the two smaller maps for the swiftest outcomes. Specifically, on Tanglewood Drive, setting this to “Medium” almost ensures the presence of two hiding spots near the front of the house. These spots encompass either of the two closets in the entrance or the one located in the boys’ blue bedroom (the bedroom visible from the window prior to entering). This aspect is crucial to evade the ghost’s clutches after it initiates a hunt, which often occurs shortly after you enter. Swiftly locating a hiding spot is imperative. You’ll possess just a fleeting instant to find refuge, and a few extra moments to depart the premises or set up objectives between hunts.
Weather Selection… for Uncertain Reasons
Opting for “Heavy Rain” in the Weather setting grants a modest point boost. Why, you might ask? To be honest, I’m a bit fuzzy on the exact rationale, and my interest is somewhat limited. However, among the available weather options, “Heavy Rain” provides the most substantial benefit.
With these considerations in mind, you’ll be well-equipped to execute this method effectively. Remember, speed and efficiency are the name of the game in this endeavor.
How-To: Tanglewood Drive
Let’s now focus on the specifics of your approach:
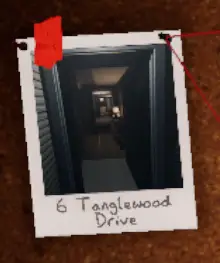
Main Map: 6 Tanglewood Drive
Our primary stage is set at 6 Tanglewood Drive, the classic Phasmophobia map where it all began. This map offers a compact layout, boasts several effective hiding spots, and provides a more manageable experience compared to the Willow or the two-story houses. In fortunate instances, you might even find that you can hide around a corner to escape the ghost’s pursuit during a hunt, or cleverly utilize a closet door for cover. Achieving success is integral to the Min/Maxer Mindset™️, and unfortunately, demise is not an option.
Items of Choice
In terms of item selection, I usually stick with the starter equipment alone. This minimizes the risk of encountering the hyperactive “crack-addled spider monkey” ghost and succumbing to its antics. However, if your aim is to ensure completion of all the straightforward objectives, consider carrying Candles or a lighter, a parabolic microphone, and motion sensors. Attempting to deter the ghost using a crucifix will prove challenging, and most other objectives may lead to swift demise. With just the basics or these added tools, you’ll be able to tackle relatively simple objectives. Here are a few examples:
1. Paranormal Activity with an EMF Reader
For true Min/Maxers equipped with a single EMF reader, place it on the side table upon entering the house. If you possess two readers, position one on the side table in the hallway to your left and the other by the basement door or in the kitchen. As you await the ghost’s hunt, be prepared to seek a hiding spot near the entrance. Once the hunt concludes, note the ghost’s direction if the EMF wasn’t triggered before the hunt. During the next hunt, you’ll have a brief interval to relocate the EMF to its active area. If the ghost’s active area is the basement or garage, prompt action is crucial. After deploying the EMF near throwable items, retreat to your hiding spot and wait for the next hunt. Listen for the EMF’s activity during the hunt, then leave and conclude the investigation. You can either select a random ghost or switch to another easy objective if it aligns with your hiding spot’s proximity to the exit.
2. Paranormal Activity with a Parabolic Microphone
This task is relatively easier, especially after encountering a hunt. Enter the house with the parabolic microphone and find a hiding spot within the entrance. When a hunt commences, observe the ghost’s spawning point or origin. Once the hunt ends, activate the microphone, aiming it toward the ghost’s last location. Remember that the ghost may shift its favored room. Repeat this process until you hear a distinctive ghostly sound. If your hiding spot is within the boys’ room rather than the entrance hallway, and if the ghost’s activity is centered in the kitchen, basement, or garage, completing this objective might pose a challenge. In such a scenario, step out of your hiding spot to listen using the microphone, then quickly return to hiding when the hunt begins. Continue this cycle.
3. Get the Ghost to Blow Out Your Candle
For this objective, ensure you have a lighter with you to relight the candle. Depending on your hiding spot, place the candle in the ghost’s favored room. Relight it until you observe smoke emanating from the candle, indicating the ghost has extinguished it. Once this occurs, you can proceed or exit as desired.
4. Maintain Sanity Below 25%
This objective may not even generate, considering your initial sanity begins at 0%. However, if it does, you might instantly pass given your initial sanity level. If you wish, you could set your starting sanity to 50% to endure a minor point reduction and increase your chances of encountering this extremely simple objective.
5. Detect a Ghost with the Motion Sensor
If you’re also tackling the EMF or parabolic objectives, prioritize those before this one. Nonetheless, bring the motion sensor during your initial entry. After a hunt and spending some time in hiding, you’ll have gained a general sense of the area the ghost prefers. If the ghost’s activity centers on the kitchen, garage, or basement, position the motion sensor on the basement door facing the garage, on the side closest to the living room. If the ghost is active in the living room, position the sensor on the basement door or in the entrance hallway leading to the living room. For the children’s bedrooms, place the sensor at the entrance to the hallway or just in front of the bedrooms. Following this setup, wait for the sensor to trigger, either during a hunt or as the ghost roams around. Thankfully, this objective functions during a hunt, reducing the time required for completion.
To maintain the Min/Maxer Mindset, refrain from attempting any other objectives, as they don’t align with the optimized approach. The ultimate responsibility for your gains or lack thereof rests with you.
How-To: 13 Willow Street
The primary difference lies in your hiding spots, which can be one of the following:
- Right next to the TV in the living room, concealed behind some boxes (a top-tier hiding spot).
- Behind a toolbox in the garage’s corner, to your left upon entry.
- A single hiding spot in the laundry room within the garage (ideal for achieving the parabolic objective).
- The bathroom across the entrance to the basement can also serve as a hiding spot.
- For the daring, you might attempt to duck behind the kitchen counter.
It’s important to note that, unlike Tanglewood, the hiding spots in Willow possess notable drawbacks that hinder completing your objectives as swiftly as possible. Furthermore, some spots might place you at a distance from the entrance, making a safe and quick exit challenging. While there may be other hiding spots, they either delve deeper into the house or increase the likelihood of detection by the ghost sprinting at a supersonic pace.
Remarks
Absolutely, the core concept of this method revolves around swiftly completing objectives within a time frame of 1 to 3 minutes. The optimal approach entails entering the game with one or two specific objectives in mind, accomplishing them as rapidly as possible within the confines of Tanglewood, and then promptly exiting. As you become accustomed to the layout and hiding spots within Tanglewood under these settings, your proficiency will increase. This proficiency allows you to efficiently achieve the objectives and yield rewards.
Once you’ve gained familiarity with Tanglewood’s hiding spots through this method, you’ll be able to execute runs with remarkable speed. On less favorable runs lasting around 1 or 2 minutes, you could earn a minimum of 150 points. On better runs lasting around 3 to 4 minutes, you might accumulate 300 to 450 points. And, if fortune favors you—similar to my experiences—you might accurately deduce the ghost type, securing substantially enhanced rewards and an impressive 1,970 XP or monetary boost related to the ghost’s classification.
Remember, practice and familiarity with the map and settings will be key in honing your approach and optimizing your rewards.
That's everything we are sharing today for this Phasmophobia guide. This guide was originally created and written by Mad Dragon. In case we fail to update this guide, you can find the latest update by following this link.
