- Title: Torchlight II
- Release Date:
- Developer:
- Publisher:
Information about Torchlight II is still incomplete. Please help us fill the details of the game using this contact form.
A basic guide to using the GUTS editor to edit the games .dat files to make simple mods and using the GUTS editor to merge (and potentially edit) existing mods.
Getting Started
This guide will explain how to make the most basic mods for Torchlight 2 using the GUTS editor, and how to use the GUTS editor to merge (and potentially edit) existing mods.
To start with, you will need to own Torchlight 2 on steam, have it installed, and run it at least once (create a character and obtain the first quest).
Next, you install the GUTS editor, located in Steam -> Library -> Tools -> Torchlight 2 GUTS.
Once GUTS is installed (along with its redists), run GUTS. It will proceed to extract the files of the game from their packaged state. This is a one-time action and will take a half-hour or so.
You will need a text editor, I recommend Notepad++, but so long as you can read the games .dat files you’re good
Now you’re ready to begin.
Creating a Basic Mod
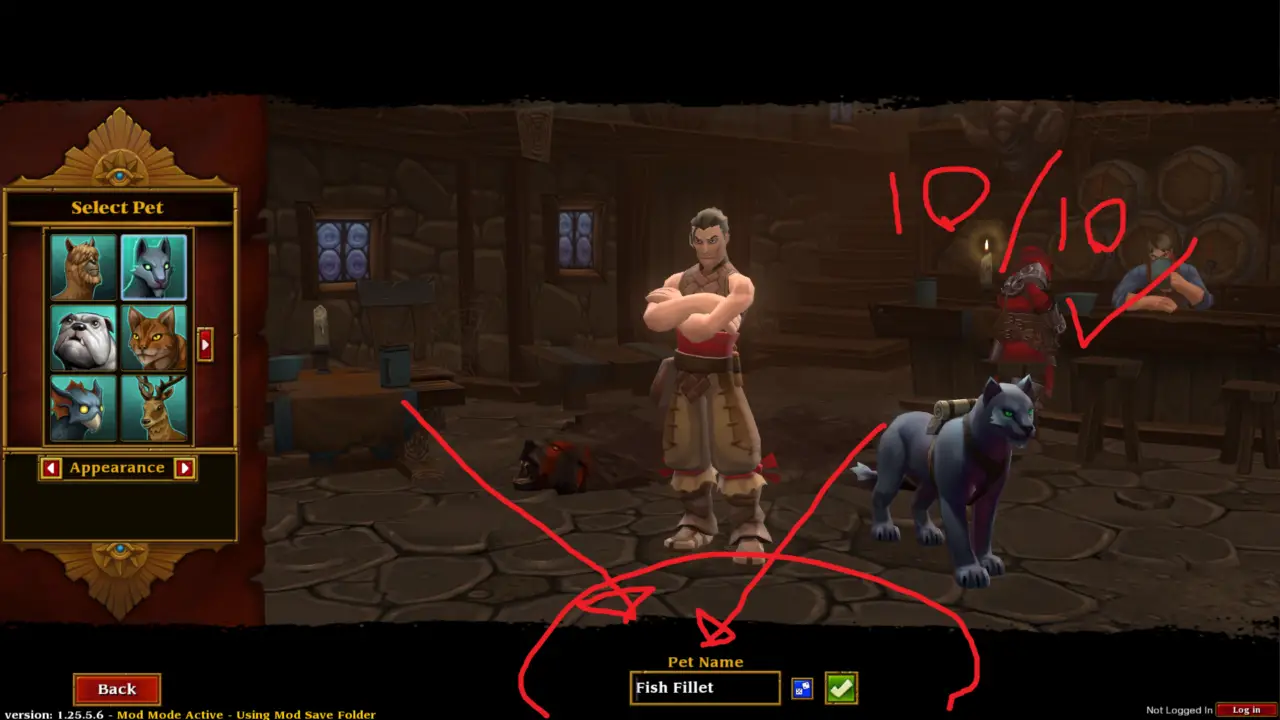
For this example, to make something easy to test, we will change the default names for pets. these are located in the global.dat file, along with numerous other settings.
Step 1: Find the Global.dat file (C:\Program Files (x86)\Steam\steamapps\common\Torchlight II\MEDIA or equivalent.) If the MEDIA folder does not exist, you should have followed this guide’s introduction, specifically, you need to run GUTS and let it complete its one-time file unpacking.
Step 2: Copy the Global.dat to your desktop, and put an additional copy aside as a backup.
Step 3: Open Global.dat with your text editor (I use Notepad++ which is free, but if the file’s contents are understandable, it will probably be fine)
Step 4: Global.dat has a whole bunch of settings and information, but for now we want the [PETNAMES] section, about 1/3 of the way down the file.
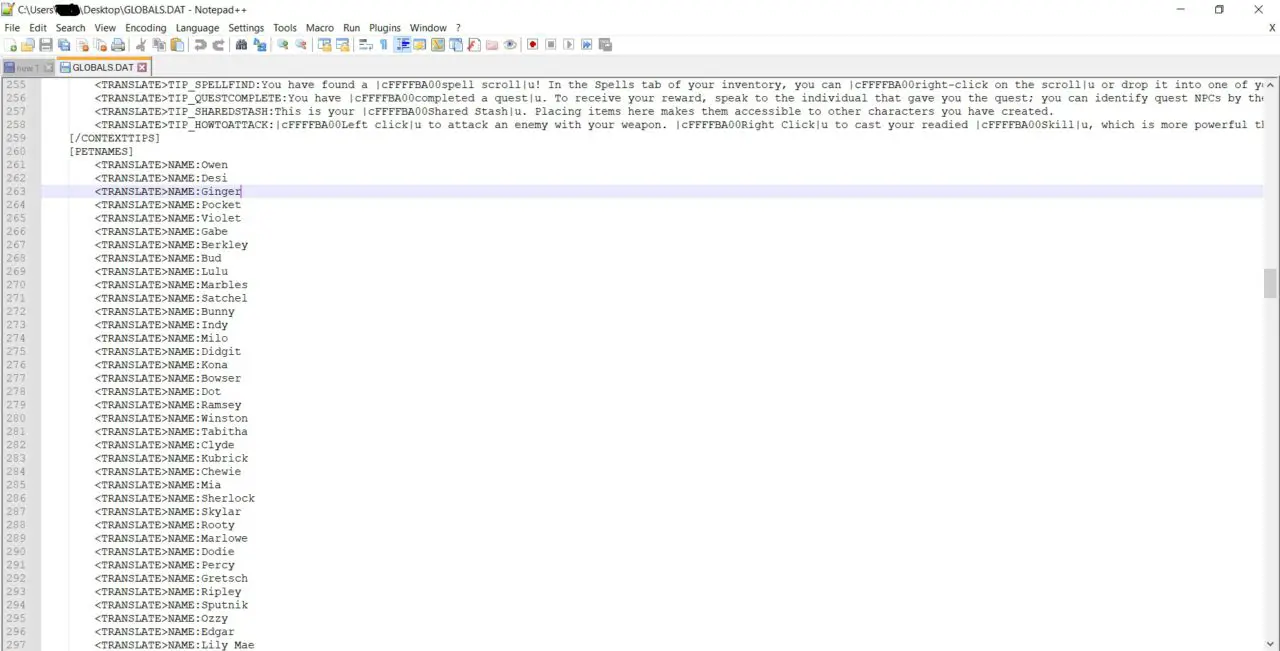
Step 5: Remove all but one of the <TRANSLATE>NAME:name lines, and put a name you like. Example: <TRANSLATE>NAME:Fish Fillet
Step 6: Save Global.dat, and close your text editor
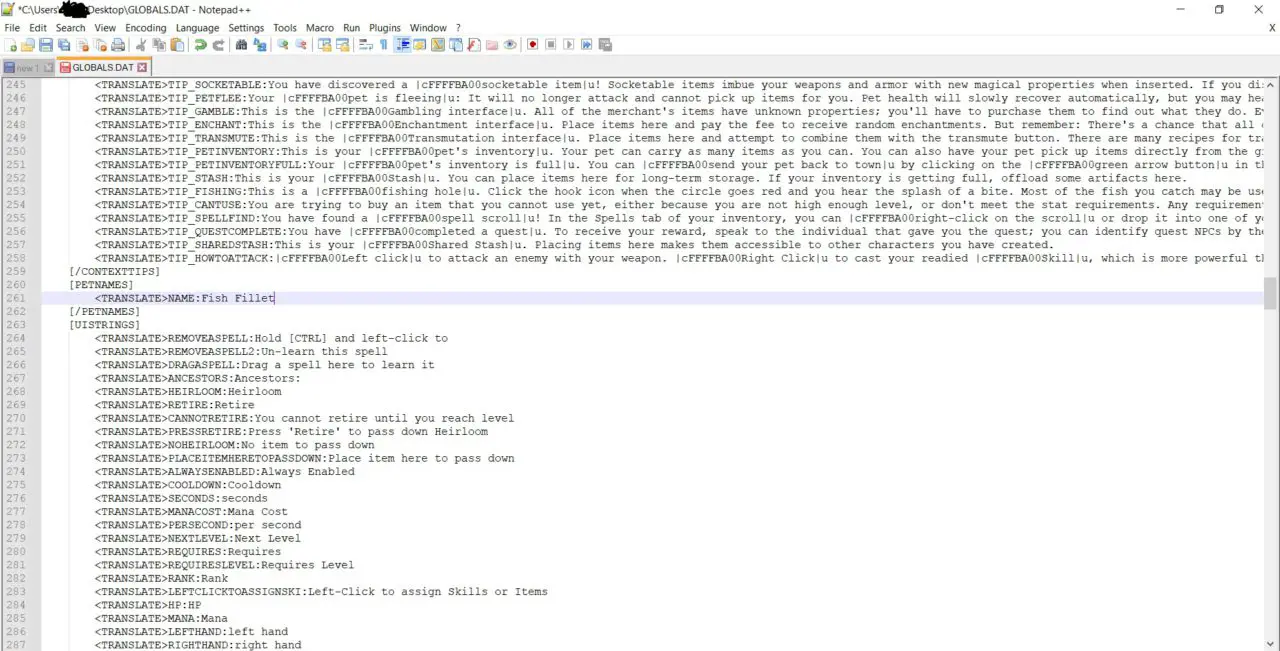
Step 7: Run GUTS, when it loads, it will present you with a dialogue box titled “Mod Selection”, click “New” and call your mod something like ‘Petname Test Mod’ or ‘woW this guide is taking forever’
Step 8: Once you’ve named your mod, select it and click “ok”, this will open GUTS proper, and boy is it an intimidating sight, but don’t worry, we’re only going to use like 1% of it.
Step 9: In the bottom right corner of GUTS, click the “Mods” tab, and once it is populated, click the “files” tab, then click “Refresh”
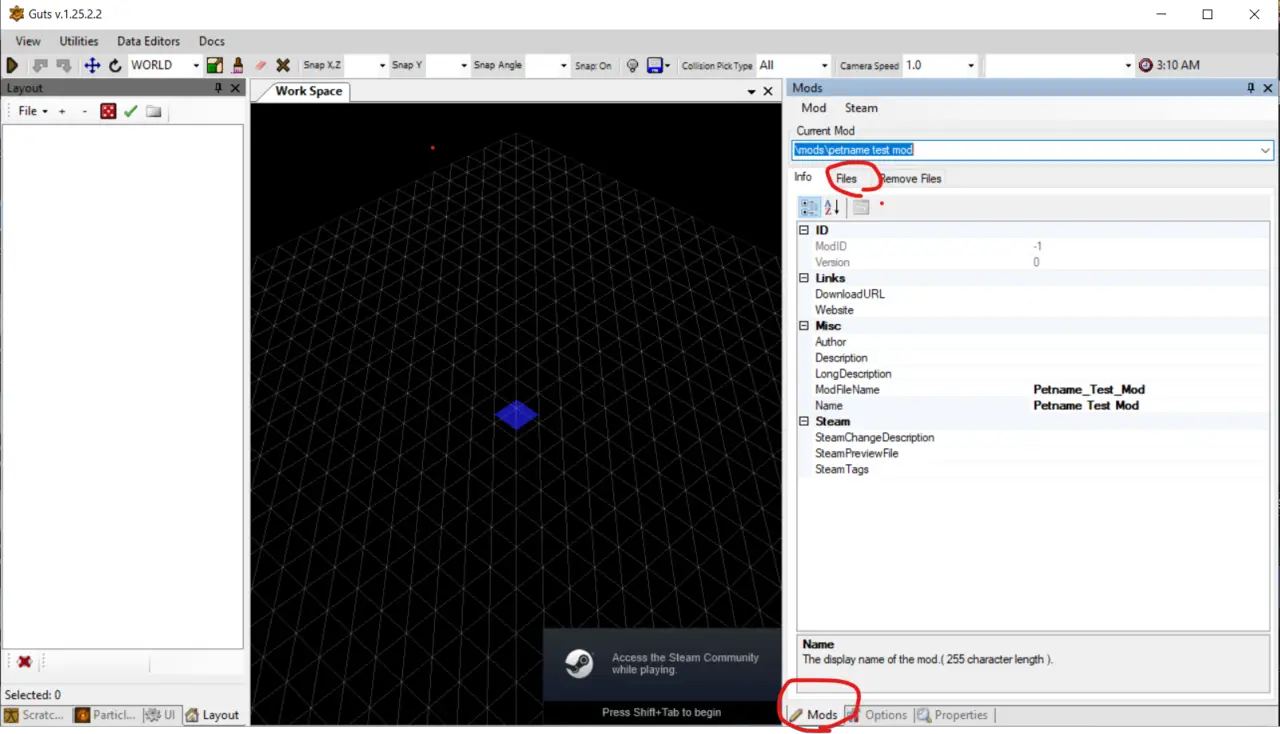
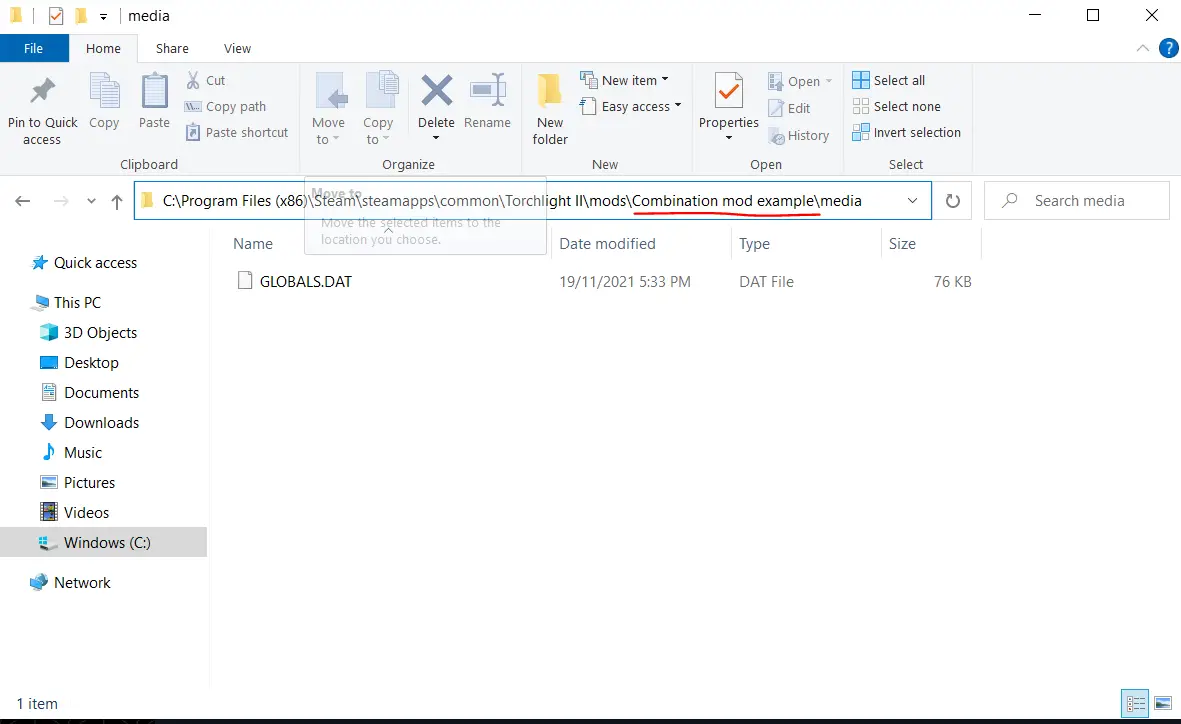
Step 10: Now that you’re here:
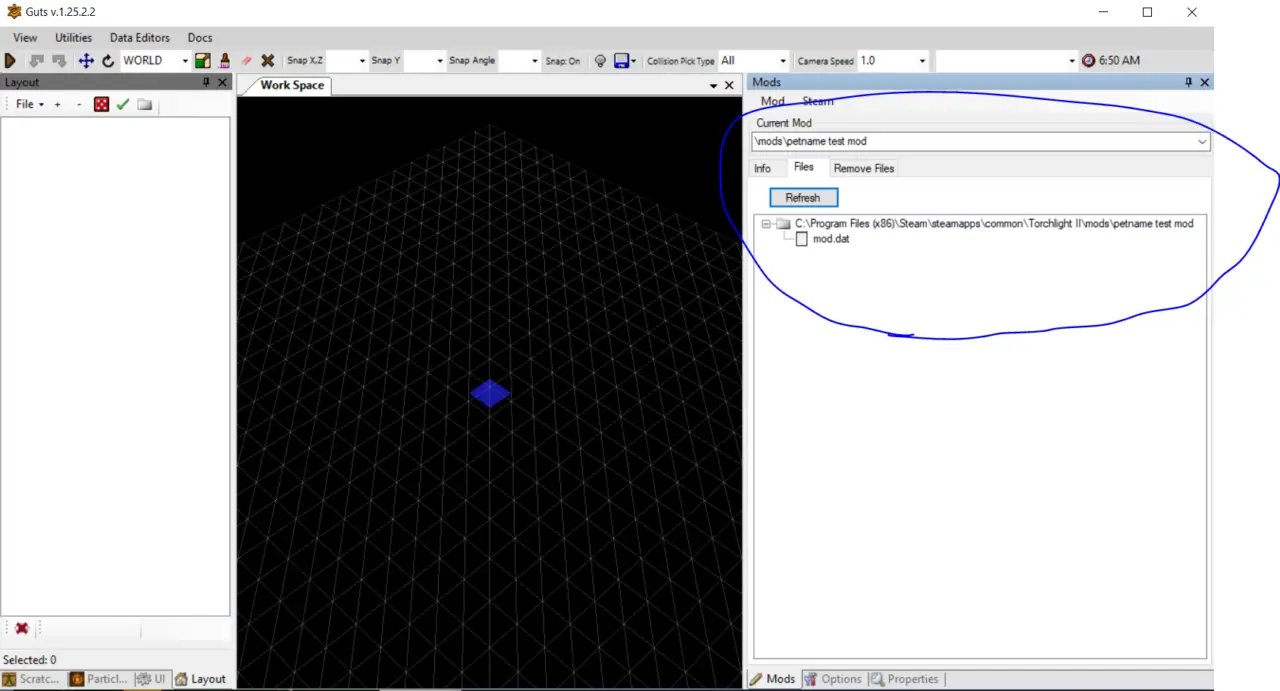
What your going to do is open Windows file explorer (or equivalent), navigate to the shown location, and place your Global.dat file from your desktop (the one you edited in step 5) into the media folder. if the media folder is not there, create it.
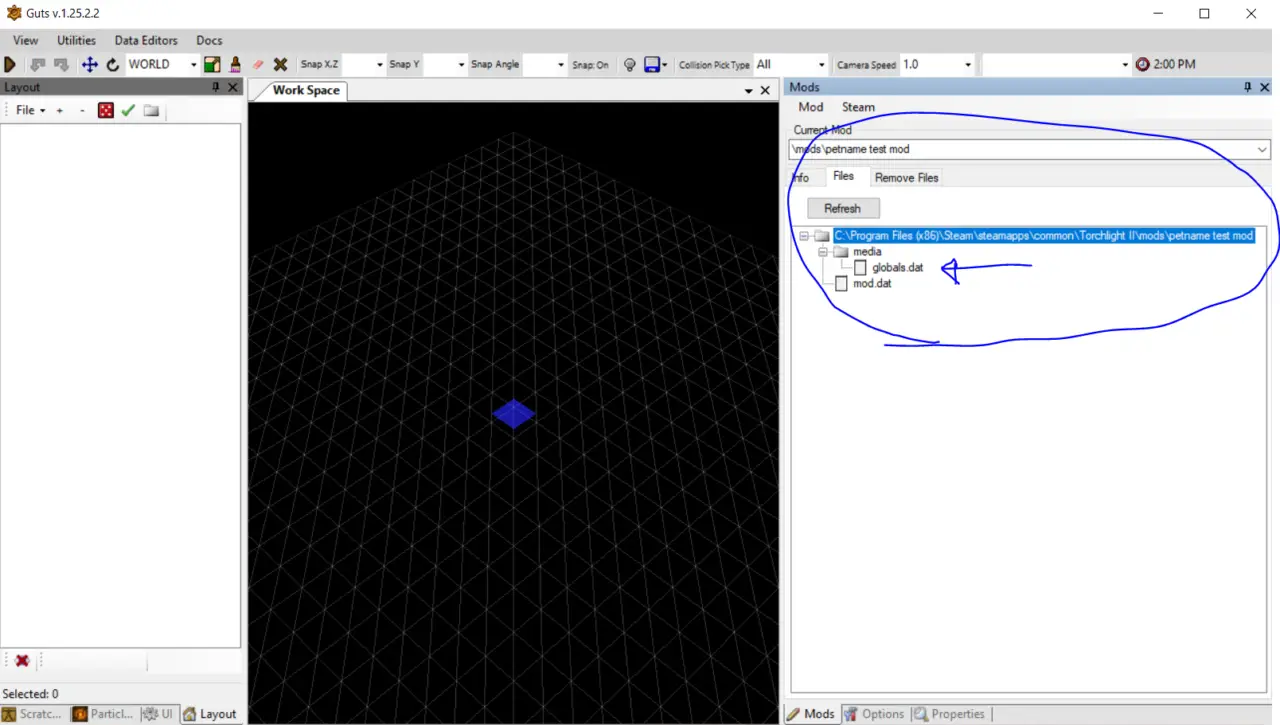
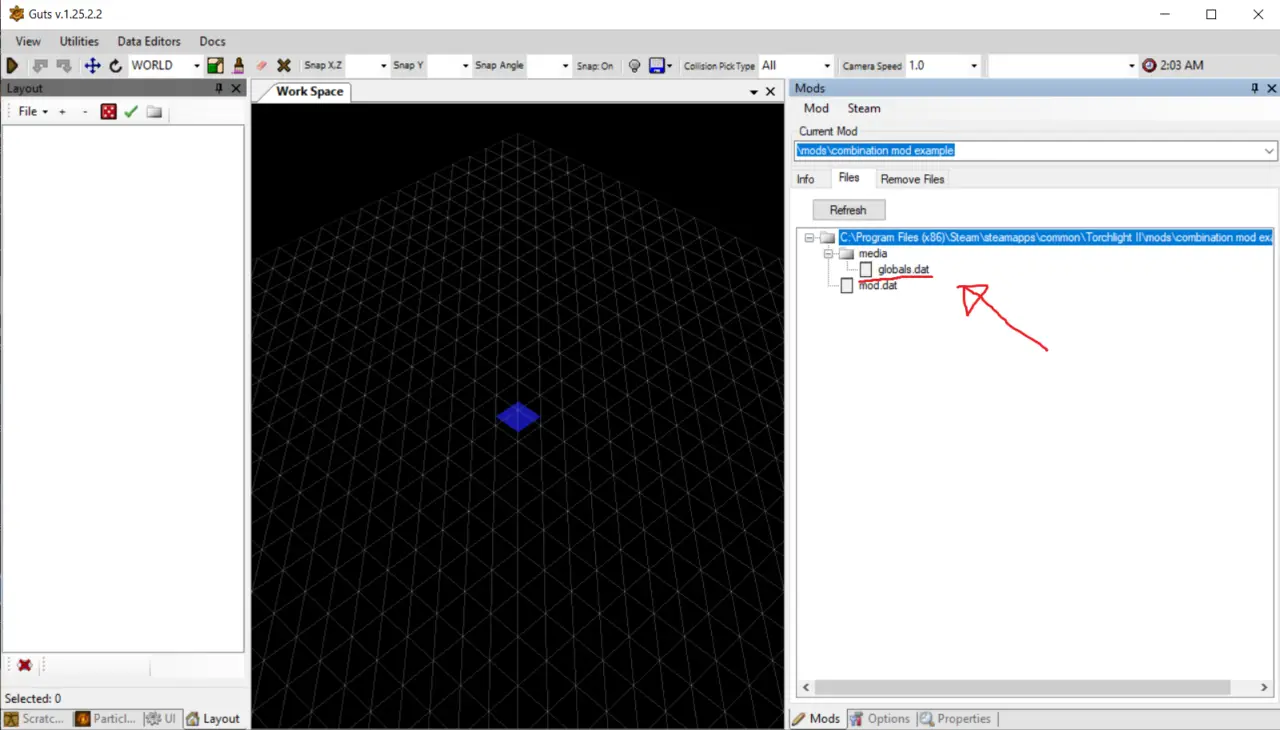
Step 11: Back in GUTS, click “Refresh” again, and it will display the media folder and global.dat as shown:
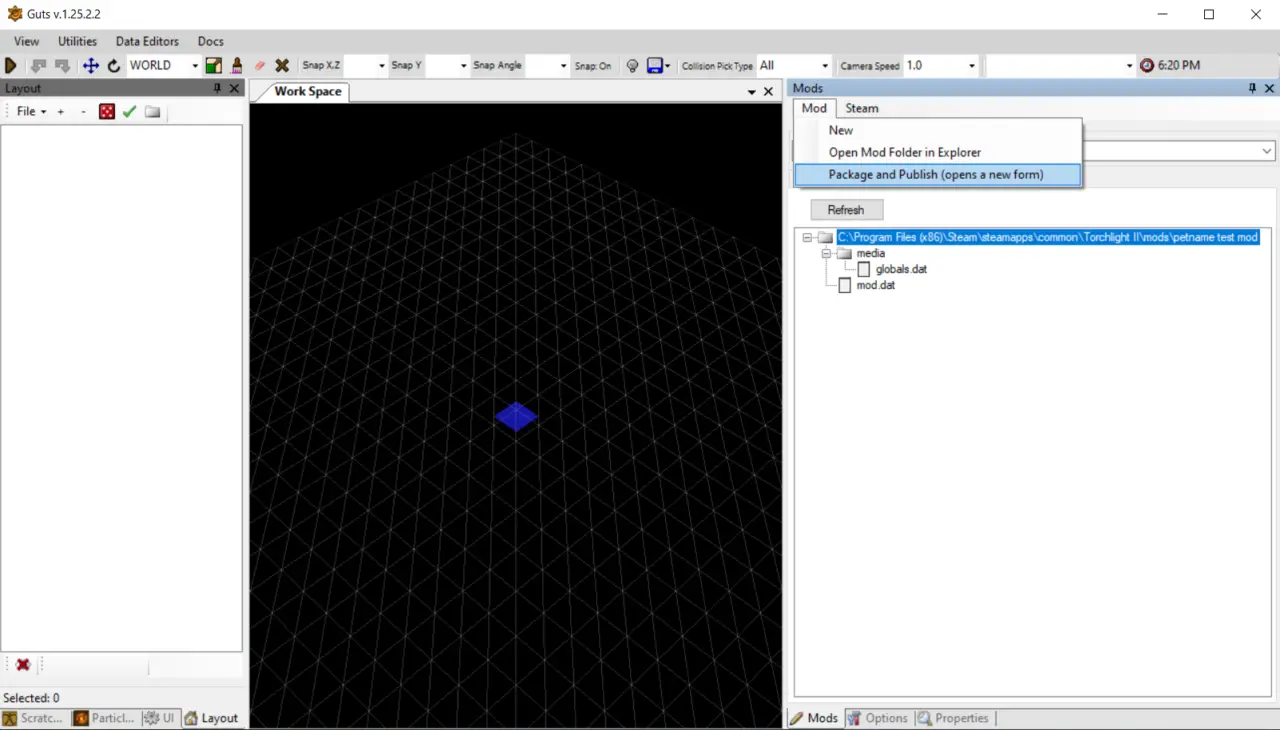
Step 12: It’s time to finish this mod. Click the mod tab, and then “package and publish”
Step 13: UNCHECK the “Publish to Steam” option. I mean it, the workshop doesn’t need 400 mods that change the default petname to ‘Nugget_Lad420’

Step 14: Click the “Build” button. The mod will compile into a .mod file, for a mod this small it will only take a couple of seconds.
And Done! you can close GUTS and play Torchlight 2 with your new mod (remember, because it edits global.dat it will conflict with any other mod that also edits global.dat, for testing purposes use only this mod, see next section for mod merging).
And there you have it, you can now use the title “Modder” when referring to yourself.
You can use this method to modify any of the .dat files in the media folder, just remember that if you found the .dat file in a subfolder of the media folder, you need to recreate the file structure during step 10/11.
Merging Existing Mods
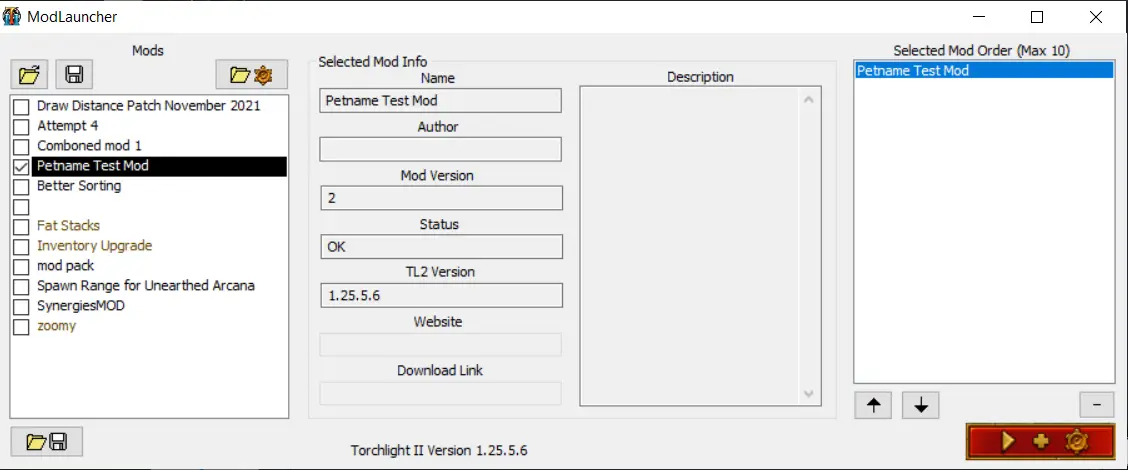
This section will convey how to merge two existing mods into one, for the purposes of reducing your overall number of mods to fit Torchlight 2’s 10 mod limit, or for using two mods that edit the same file at once.
This guide will be specific to the mod you might have made in the previous section “Creating a Basic Mod”, and the mod ‘Draw Distance Patch November 2021’ of which I am the author and thus have permission, and because both mods edit different sections of the global.dat file.
The same basic method applies to any .mod file, from the steam workshop, the nexus, or one you wrote yourself.
Step 1: Create an empty folder on your desktop or somewhere, call it “WORKSPACE”, put 2 folders in it, MOD1 and MOD2.
Open Guts and create a new mod, named something like ‘Combination mod example’
Refresh the mod’s file structure (See “Creating a Basic Mod” for details)
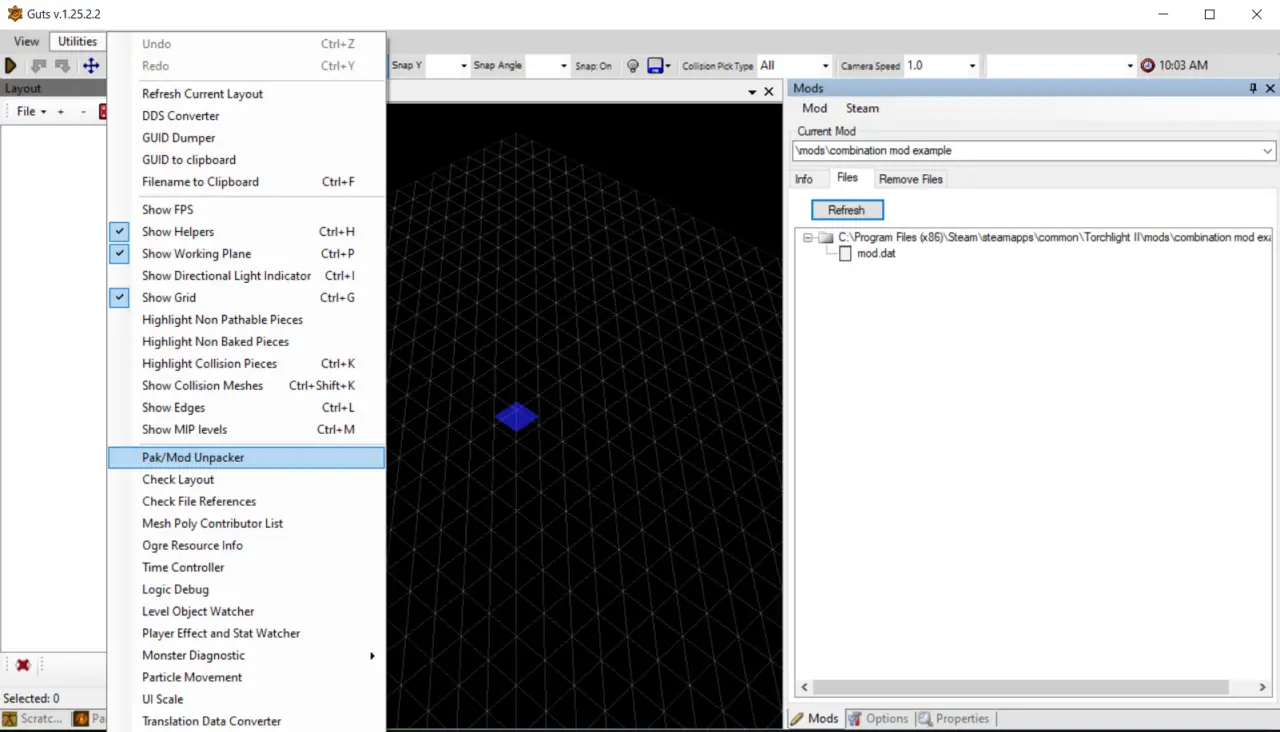
Step 2: In GUTS, open the unpacker in Utilities -> Pak/Mod Unpacker
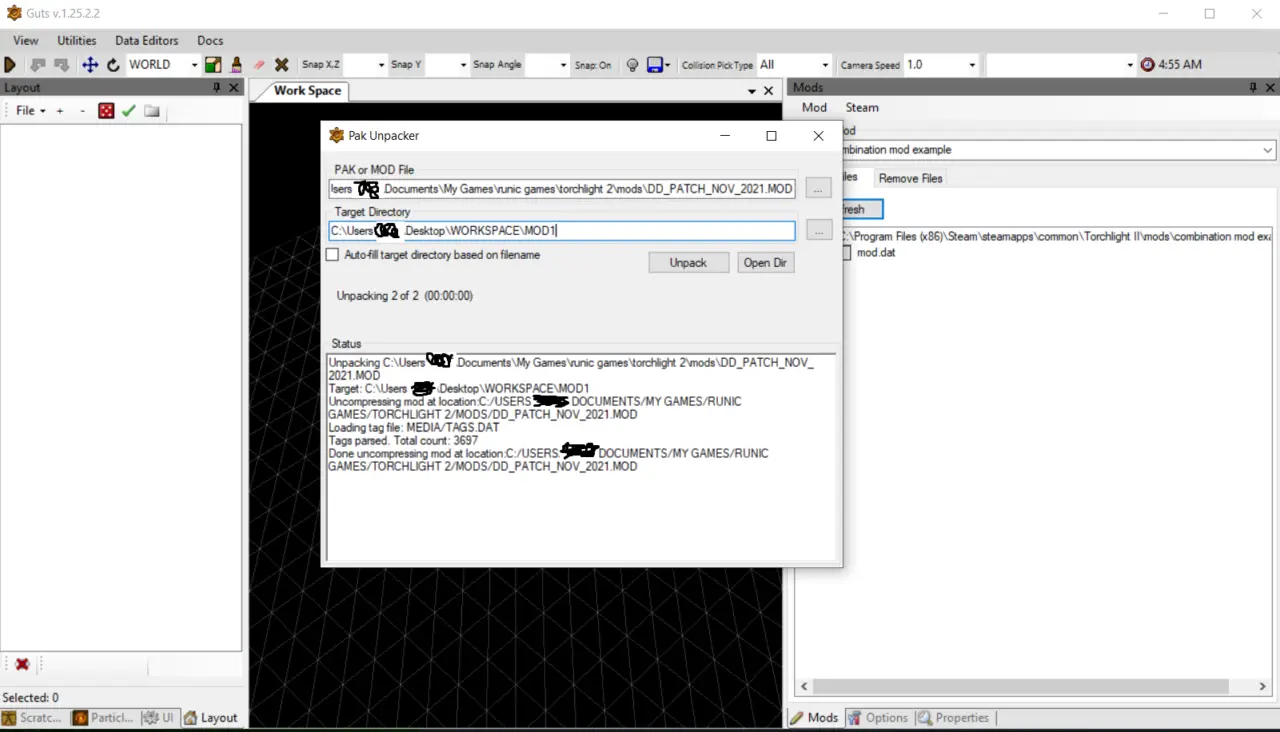
Step 3: Unpack the first mod (Draw Distance Patch November 2021) to MOD1
File location something like:
C:\Users\User Name\Documents\My Games\runic games\torchlight 2\mods\draw distance patch november 2021\DD_PATCH_NOV_2021
or
C:\Program Files (x86)\Steam\steamapps\common\Torchlight II\mods\Draw Distance Patch November 2021\DD_PATCH_NOV_2021)
Remember, the target is the .mod file
Step 4: Unpack the second mod (PETNAME_TEST_MOD) to MOD2
Step 5: Now, the idea is to put the relevant contents of MOD1 and MOD2 media folder into the ‘Combination mod example’ media folder, note that files with extension .BINDAT should be ignored.
In this case, both MOD1 and MOD2 use the file global.dat and only global.dat, so we need to use a text editor to compare the changes and merge them if compatible. It can be helpful to compare to the vanilla global.dat file to see what each mod is changing. In this case, Draw distance (left) has 5 values changed from vanilla, while petsname (right) has a section changed from vanilla.
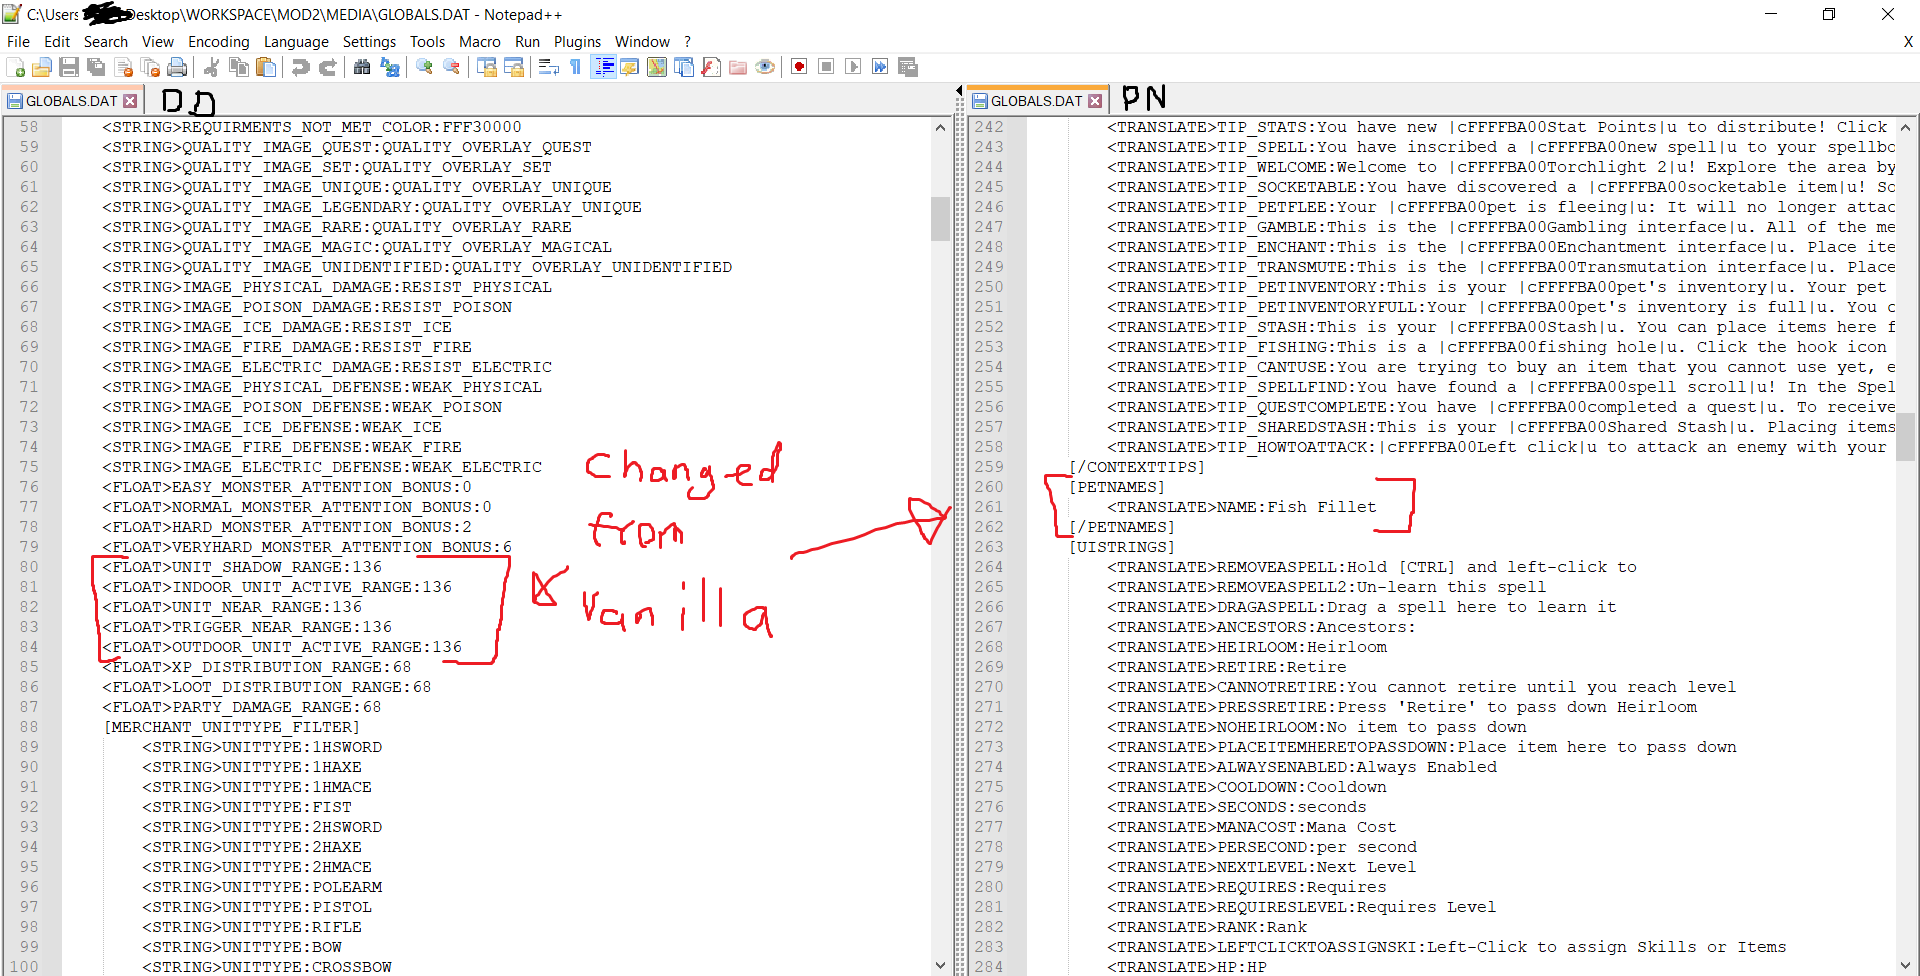
Copy the changes from Draw Distance (left) and apply them to petsname (right) changing the five values to 136 and save the petsname global.dat file. This file now contains the changes from both mods. Move it into the ‘Combination mod example’ media folder as shown:
Step 6: Back in GUTS, refresh the mod’s file structure again to reveal the combined global.dat that you made and moved in step 5.
Step 7: Publish the mod the same way as in the section ‘Creating a Basic Mod’
And done. You can use this method to combine multiple mods into a modpack, or edit mods to your preference, or even look at what an existing mod changes as a source of inspiration.
Best Practices/Notes
When publishing mods to the workshop:
- Be as clear as you can on what your mod does.
- Make sure it ONLY does what you say it does (keep track of what values you edit, especially when experimenting).
- Don’t publish a mod that already exists, unless the old version no longer works, in which case you should CLEARLY STATE that that is the case.
- Give warnings for mods that impact save data, especially mods that could cause item loss on existing saves.
- Remember that PC quality varies, while a mod that makes every map have 1000x as many monsters might sound cool, you’ll just crash your PC and the PCs of anyone who downloads your mod.
- Make one change at a time, test it, and when it works, BACKUP THE FILE(s) before you try to layer another change on top. It’s often better to make a few small mods that work than an amalgamation that doesn’t.
- Be prepared to be wrong. My first mod for Torchlight 2 started with over 10 changes, and I cut that by half before I released it, and it might need even less to do what I want it to. At the end of the day, it would take 1000’s hours to fully understand the games files and code structure, what depends on what, and so on. I once accidentally made the entire map aggro at once while trying to change how shadows display, and to this day I haven’t been able to repeat it.
Torchlight 2 Modding Quirks
So how it works, to my understanding, is that the files start as .dat, then GUTS encrypts them into .bindat, and then packages them into a .mod file. If your mod merges aren’t working, it is likely because you’re including .bindat files (don’t do that, GUTS will generate unique ones from your edited .dat files when you publish).
Between Steam Workshop and GUTS and the Nexus and experimentation, your files will get messy and version control is particularly difficult. When it becomes a problem, wipe it all out and work from backups. You’ll save time that you’d otherwise spend trying to decipher the 6 .mod files with the same/no names. This is also a good idea before you attempt to publish to the workshop, to help ensure you’re uploading the right files. Don’t be afraid to delete EVERYTHING and do a fresh install of Torchlight 2 and GUTS.
The Mods tab of the GUTS editor has a ‘Remove Files’ tab. I think, that this allows you to EXCLUDE any game file from your mod, including the mods only file (which will result in a mod that does nothing) or files from the VANILLA game. Steer clear of this, if you think you need this for your mod, your mod is likely a mess that needs to be restarted from scratch.
Modding Difficulty Tiers
Torchlight 2 modding has a relative difficulty of 2, because you can edit readable text files to change the game, but you have to compile them with an editor. an example of a game with a relative difficulty of 1 would be Hearts of Iron 4, as you can edit readable text files to change the game with no need to compile mods, and in some cases, you can do it while the game is running. Thus, if you’re completely new to writing mods, Torchlight 2 might not be the best place to start.
GUTS Minigame
There is a little hidden game within the GUTS editor that I found on accident, to find it, attempt to close the ‘Work Space’ tab, shown:
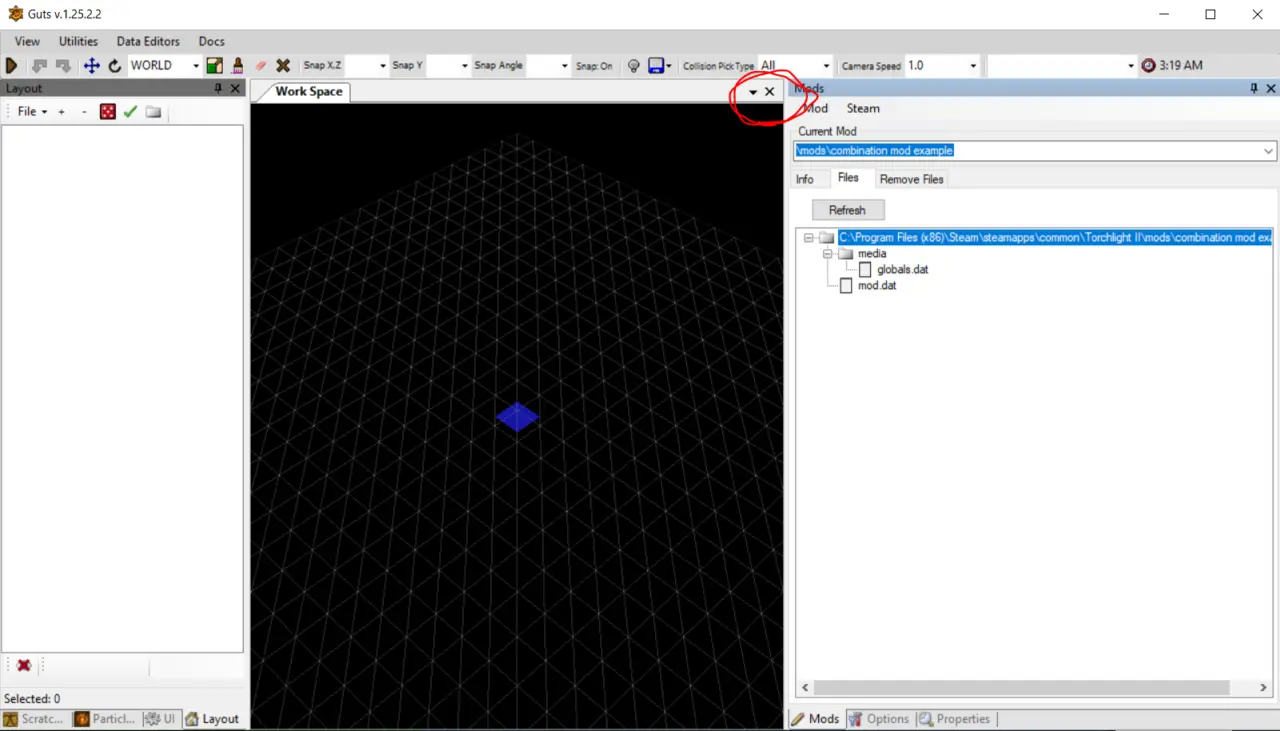
I gave it a couple of goes and got a Highscore of 2784. Its a good tool for when you’re getting frustrated at the Torchlight 2 modding process
That's everything we are sharing today for this Torchlight II guide. This guide was originally created and written by Candcg. In case we fail to update this guide, you can find the latest update by following this link.