The aim of this guide is to provide a comprehensive explanation of Tactical Bonuses and offer valuable insights and strategies for achieving high multipliers.
Introduction
Tactical Bonuses serve as experience multipliers that can be earned by completing specific actions during both Field and Command Battles. There are in-game achievements and rewards associated with reaching x3.0, x4.0, and x5.0 multipliers. These rewards include 500 Sepith Mass, a Carbuncle Quartz, and two Zeram Capsules, respectively.
The x4.0 multiplier is particularly enticing due to the Carbuncle Quartz it offers. While the Quartz itself has its merits (a 20% chance to absorb damage from Arts), its primary advantage lies in its ability to facilitate the acquisition of the ‘Arc Feather’ Shard Skill, thanks to its 5 Mirage elemental value.
This skill significantly enhances the performance of your casters by delivering an additional 7 hits after casting an offensive Art and having a chance to Delay all affected enemies. Early in the game, Feri stands out as one of the best candidates for this skill, given her Orbment’s exclusive Mirage slot, doubling its value.
Now, let’s delve into the details of all available Tactical Bonuses.
List of Tactical Bonuses
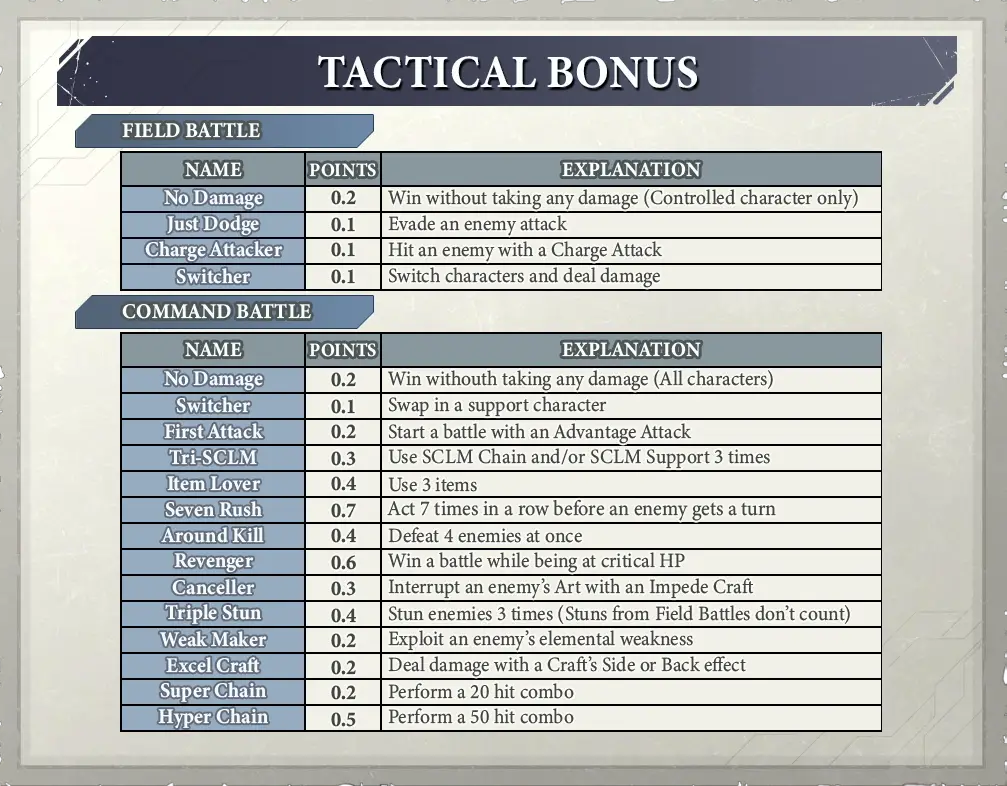
It’s important to note that unlike previous entries in the Trails series, these bonuses do not stack, and each bonus can only be obtained once. Additionally, I’m using literal translations of their Japanese names, which may differ in the localized version of the game.

Certainly, here are some additional notes that couldn’t be included in the image:
- While there are two different versions of No Damage and Switcher, it’s important to note that they do not stack. It’s advisable to focus on the Field versions of these bonuses as they are generally easier to obtain.
- Similarly, for Super/Hyper Chain, only the higher of the two counts towards your progress.
- When attempting No Damage (Command), it’s essential to keep in mind that it doesn’t take into account the damage dealt to Shields like Cobalt Curtain. Instead, it checks the character’s actual HP.
- Switcher (Command) becomes available only once you have more than four active party members.
- To achieve Revenger, you can set it up in advance by allowing enemies to hit your party in Field Battles until their HP reaches critical levels. During this pinch state, a different battle theme will play.
- Canceller is a highly situational bonus because the enemy must be capable of using Arts in the first place. In most cases, it’s best to ignore this bonus.
- Triple Stun can be challenging to obtain since it only counts stuns inflicted during Command Battles. While technically you could prepare the enemies’ stun gauge during the Field Battle, it’s generally not worth the trouble in my opinion.
Next, let’s discuss the recommended location for achieving this accomplishment.
Recommended Location

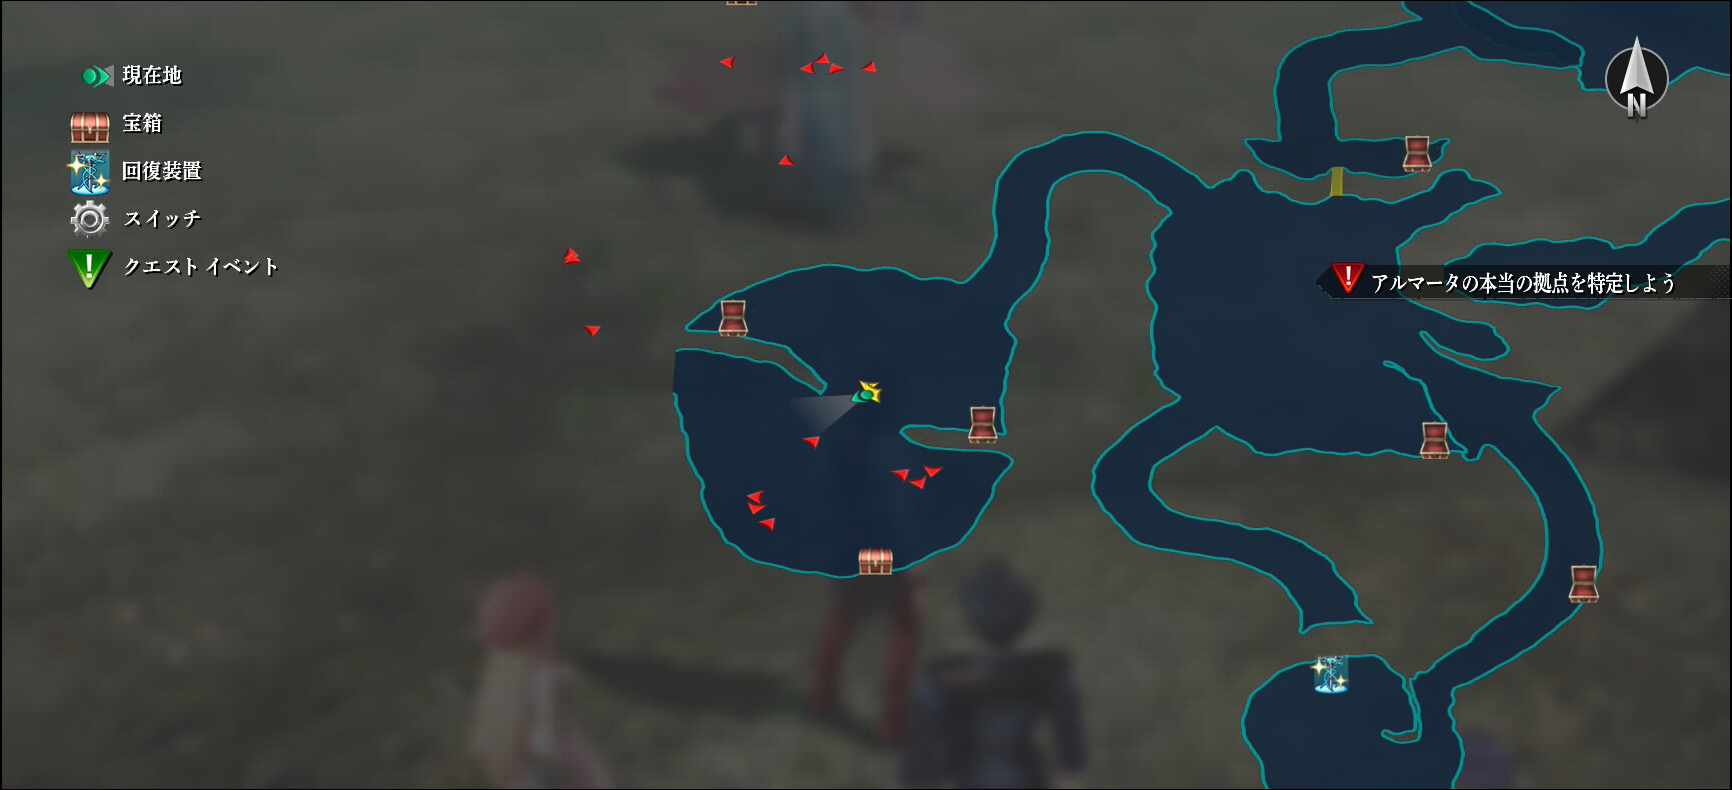
A highly recommended location to achieve a high Tactical Bonus multiplier, particularly the coveted x4.0 multiplier for the Carbuncle Quartz, is a room within the Seaside Cave during the second visit in Chapter 2. This room features seven enemies, including a giant fish, three large crabs, and three smaller, weaker crabs. It provides an ideal setting for attaining the desired multiplier.
While there are other areas where you can achieve this feat, I would argue that this location stands out as an excellent spot to secure the Carbuncle Quartz early in the game.
It is worth noting that it’s possible to obtain a x4.0 multiplier even before reaching this point in the story, including during Chapter 1. However, it becomes more challenging as you won’t have a full party and your options for Quartz and Arts Drivers are more limited at that stage.
Now, let’s proceed with a quick demonstration on how to easily obtain a x4.0 Tactical Bonus multiplier.
Video Demonstration
Go to 1:00 of the video:
Here are the steps to easily obtain a x4.0 Tactical Bonus multiplier:
Field Battle
- Begin by running around to attract the attention of every enemy and group them together. Ideally, you want all seven enemies to become aggressive.
- Focus on the big fish and start building its Stun gauge. Aim to achieve all four Tactical Bonuses available: Just Dodge, Charge Attacker, Switcher, and No Damage. While No Damage is the most challenging, don’t overextend yourself and stay attentive to the other enemies to be prepared for dodging.
Command Battle
- Utilize Van’s ability to act multiple turns in a row, thanks to his ‘Howling Spirit’ Craft, which makes it easier to achieve Seven Rush.
- Position Van strategically and use ‘Stun Slash’ or ‘Aerial Buster,’ preferably the former due to its decent range, to attain Excel Craft. Be mindful of Van’s CP, especially if you plan to use his S-Craft later.
- ‘Aerial Dust’ is an excellent Art for increasing the combo counter, delivering up to 10 hits per enemy. Have both Agnès and Feri cast it, targeting different groups of enemies to wear them down. Additionally, all crabs are weak to Wind, allowing you to obtain the Weak Maker bonus.
- Aaron’s ‘Hundred Flower Slash’ has a chance to Delay all enemies it hits, facilitating consecutive actions for your party.
- If you haven’t acquired Seven Rush yet, keep acting until you see “NEXT” under an enemy. Remember that you can interrupt an enemy’s turn with an S-Break (RT + D-pad).
- Using an S-Craft at this point should secure the Around Kill bonus.
By following these steps, you can achieve an exact x4.0 multiplier!
Additional Tips to Obtain a High Multiplier
Here are some additional tips to help you secure a high multiplier:
- Prioritize building Stun gauges in Field Battles to make Command Battles smoother.
- Pay attention to enemy weaknesses and select Arts and Crafts accordingly.
- Keep an eye on CP levels and plan S-Craft usage strategically.
- Use S-Breaks to interrupt enemy actions and maintain control.
- Coordinate your party’s actions to maximize combo opportunities.
These tips should enhance your chances of obtaining a high Tactical Bonus multiplier in the game.
Bonus Tips
Excellent tips to maximize your Tactical Bonus multiplier:
- Check Turn Order: Always use LT to check the turn order and plan your actions accordingly. This allows for better coordination and strategy.
- Tactics Menu: In the Tactics menu, consider setting your characters to converge around the leader and focus on the same target during Field Battles. This positioning will make it easier to activate SCLM Support/Chain once the Command Battle begins.
- Utilize Shard Skills: If your Van has the ‘Fatal Lancer’ Shard Skill equipped, take advantage of it. It will automatically finish off weakened enemies after the S-Craft. You can use this situation to your advantage and use three items for the Item Lover bonus if some enemies survive the initial onslaught.
- Start at Critical HP: If needed, begin the battle with your party at critical HP to secure the points from Revenger in case you can’t obtain other bonuses like Around Kill.
- Impede Quartz: Equip Van and Aaron with ‘Impede’ Quartz to give their attacks a small chance to inflict Delay on enemies.
- Cast Quartz: For Feri and Agnès, consider equipping a ‘Cast’ Quartz to slightly reduce their casting time, enhancing their efficiency in using Arts. Additionally, a ‘Wind Spirit’s Verse’ Quartz can be useful to reduce their Delay after casting Aerial Dust if you need extra turns.
- Achievement Opportunities: Since you’re grouping numerous enemies together, take advantage of this opportunity to pursue achievements tied to dealing a certain number of hits and defeating multiple enemies at once. It’s an efficient way to accomplish multiple goals in a single battle.
That's everything we are sharing today for this The Legend of Heroes: Kuro no Kiseki guide. This guide was originally created and written by ZekeBel. In case we fail to update this guide, you can find the latest update by following this link.