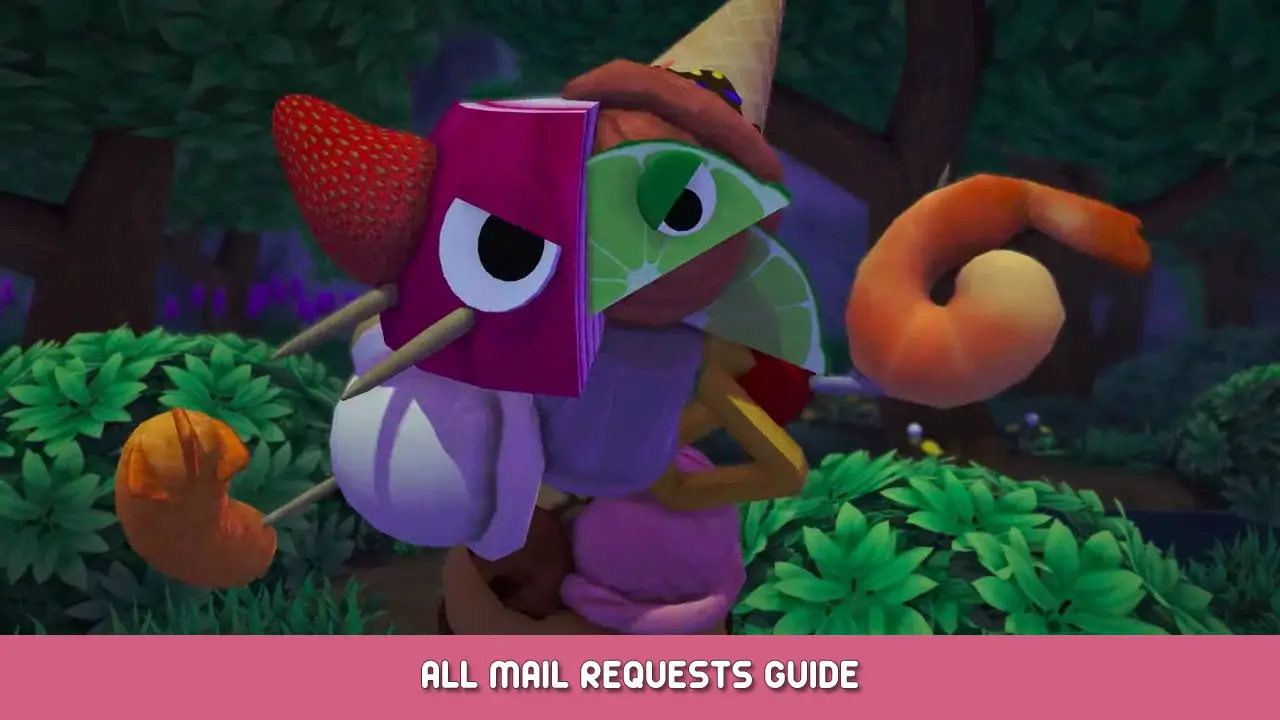
- Titel: Bugsnax
- Releasedatum:
- Ontwikkelaar:
- Uitgever:
Informatie over bugsnax is nog steeds onvolledig. Help ons alstublieft de details van het spel hiermee in te vullen contactformulier.
Details and rewards for the Bugsnax mail requests in Bugsnax.
Invoering
The mail and your hut were added with the Isle of Bigsnax update. In a new game, you’ll be introduced to your mailbox by Filbo after you do his first party (Filbo’s Cold Welcome), along with your new house. If you load an existing save that has made it past that point, Filbo will greet you for the introduction once you’re in town. As you finish quests and progress through the game, you’ll see an occasional mail delivery icon.
These involve various tasks: Catch certain Bugsnax, take a picture of very specific situations, things to do, et cetera. Most of them are simple – some you’ll even finish on accident and they’ll immediately be completed when you get the request. Others are somewhat difficult. Each time you complete a task, you’ll be rewarded with one or two new decorations for your home.
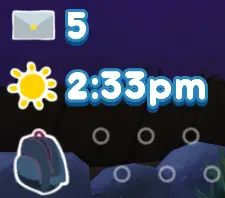
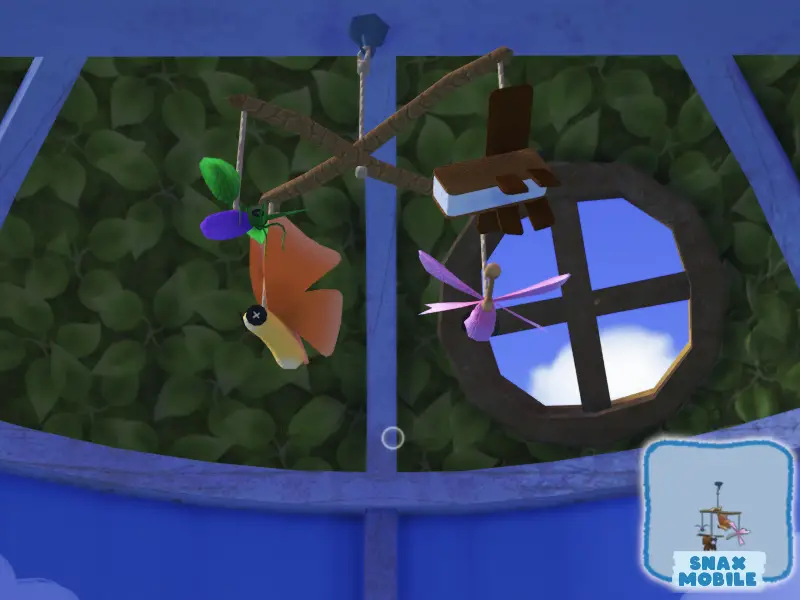
Some quests depend on you completing milestones in the game, anything from finishing quests to opening up new areas. Er zijn 110 mails total, and each one gives you 1 of 2 items for your hut, voor een totaal van 144 rewards. Whenever a new mail is available, you’ll see an icon on the bottom left of your screen, above the clock:
If you spot anything in here that’s incorrect or missing, do please let me know. I’ve tried to be as thorough as possible, but this whole thing was done by me alone, so any corrections would be welcome!
Bedden
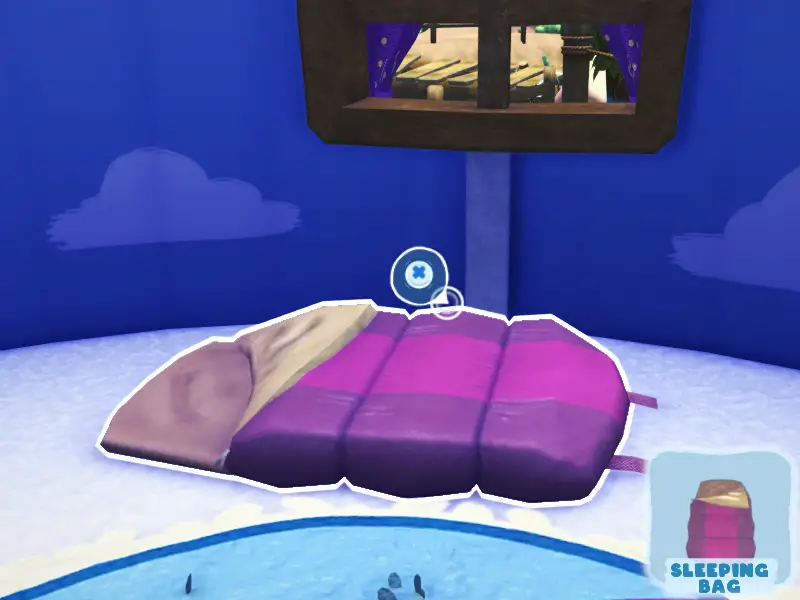
Naam: Sleeping Bag
Source: Return Beffica to Snaxburg.
Details: Default award, kan niet gemist worden.
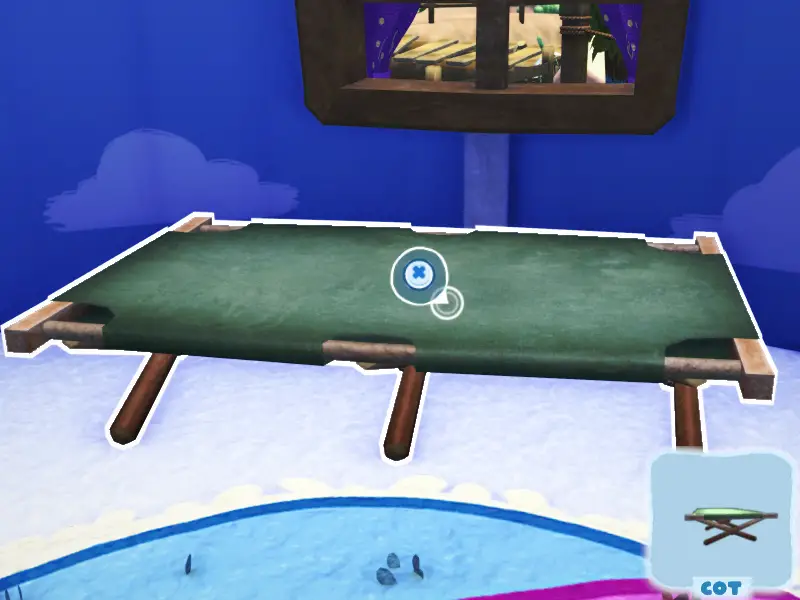
Naam: Cot
Source: Sleep in your airship cot.
Details: Secret reward, given from Filbo if you sleep on your airship.
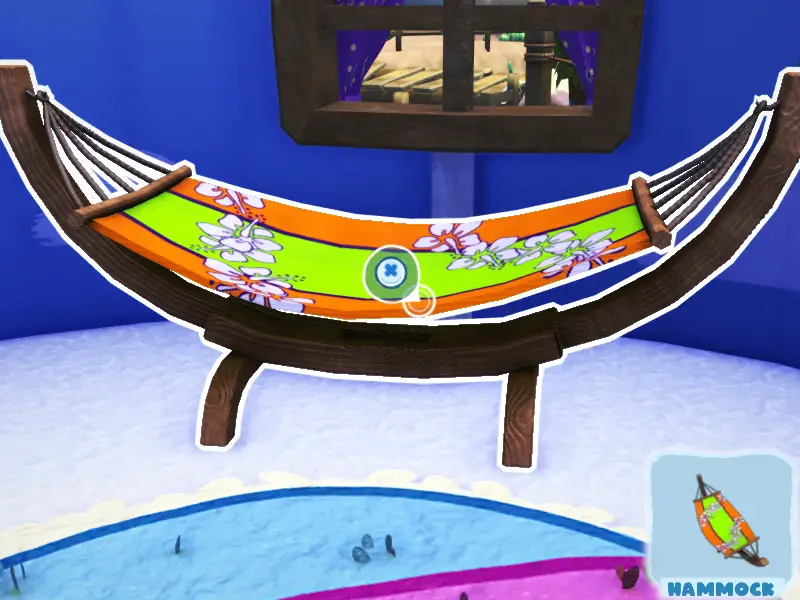
Naam: Hammock
Source: Feed a Baja Tacroach to the mystery grumpus.
Details: The grumpus is Chandlo. Tekst: “–Baja Tacroach — healthy — training –” Baja Tacroaches can only be found in Simmering Springs at night, around Wiggle’s old camp. They run when they see you, but you can catch them by launching your Snak Trap at them.
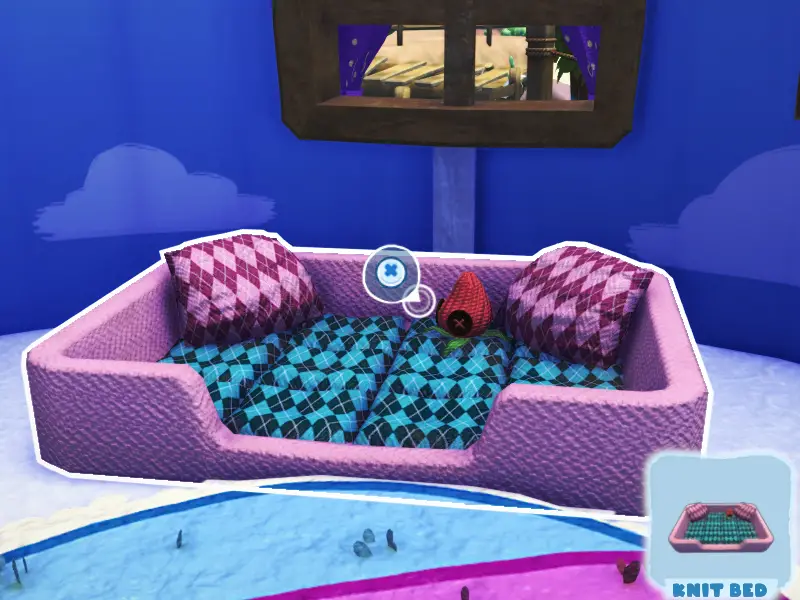
Naam: Knit Bed
Source: Donate the mystery Bugsnak to Gramble’s barn.
Details: ‘A Bugsnak that jumps from tree to tree in the forest.’ Cobhopper, in Garden Grove. Caught using the Trip Shot.
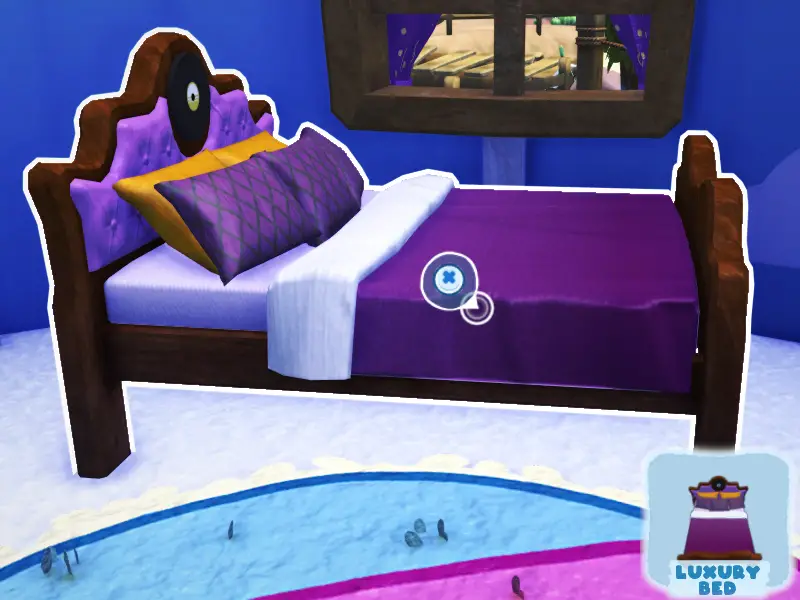
Naam: Luxury Bed
Source: Perform a Power nap.
Details: Secret reward from Wiggle, given along with Gilded (Buitenkant). Sleep less than 15 notulen. Bijvoorbeeld, go to bed after 4:45 AM and wake up at 5 BEN.
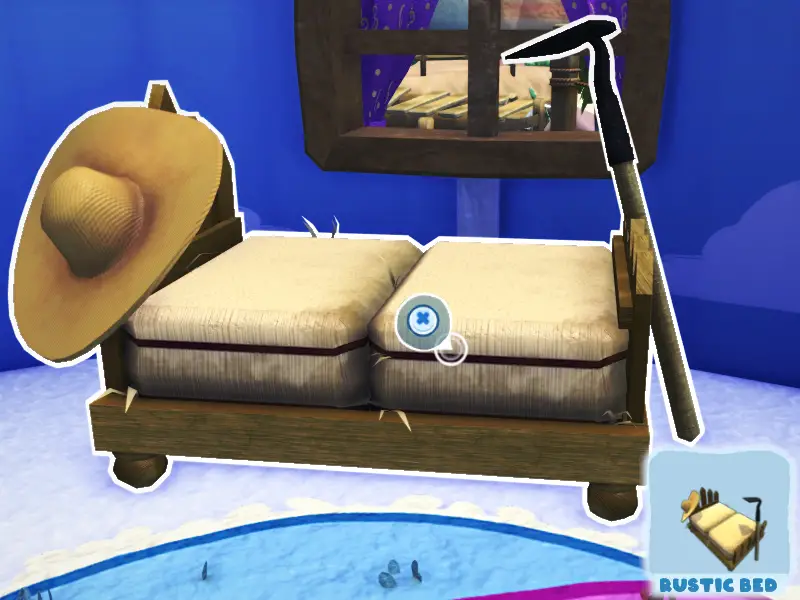
Naam: Rustic Bed
Source: Capture all Bugsnax in Flavor Falls.
Details: Er zijn 13 snax in total:
- Strabby
- Pink
- Rootle (6 P.M – 4 BEN)
- White Rootle (6 BEN – 4 P.M)
- Lollive
- Inchwrap
- Sandopede
- Sub Sandopede
- Ruby Peelbug
- Caramel Poptick – Must be raining
- Twisty Snakpod
- Wee Mewon – Accompanies Legendary Bugsnak
- Mama is winderig – Legendary Bugsnak, can only be found at the end of Chandlo’s side quests.
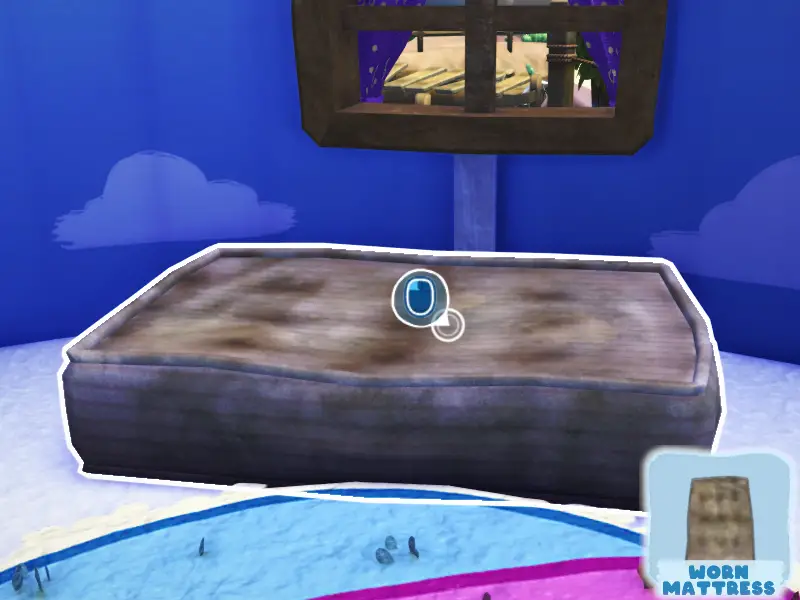
Naam: Worn Mattress
Source: Transform a Grumpus to show 3 different breakfast pastry snax.
Details: From Cromdo. Possible Bugsnaxt:
- Flapjackarak – Sizzlin’ Zand
- Sprinklepede – Sugarpine Woods – On the side of the watchtower. Catch it by launching your Snak Trap at it with your Lunchpad.
- Cinnasnail – Sugarpine Woods
- Waffstackarak – Sudderende veren, 4 BEN – 11 BEN, spawned by ringing the bell by Wiggle’s old camp.
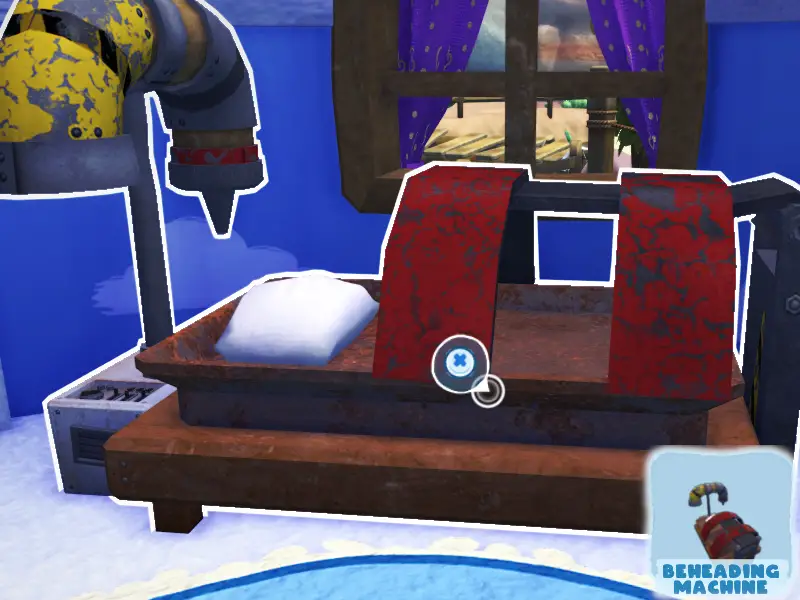
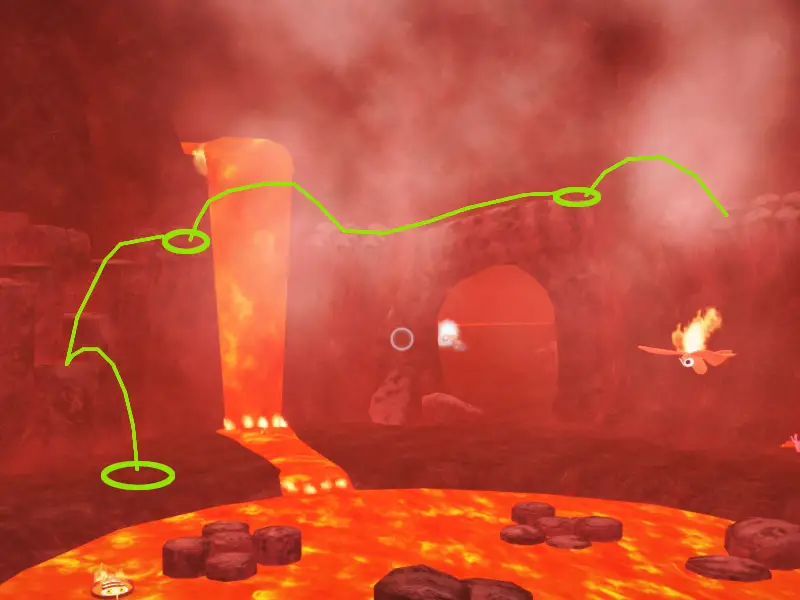
Naam: Beheading Machine
Source: Find a lost item for Floofty.
Details: Kookbaai, inside the volcano, the bag is on a ledge above a hot sauce plant. Place your Lunchpad where the ovals are to get across the gaps, starting on the left side. If you hit the lava fall in the middle, aim yourself at the wall to keep from running off the edge.
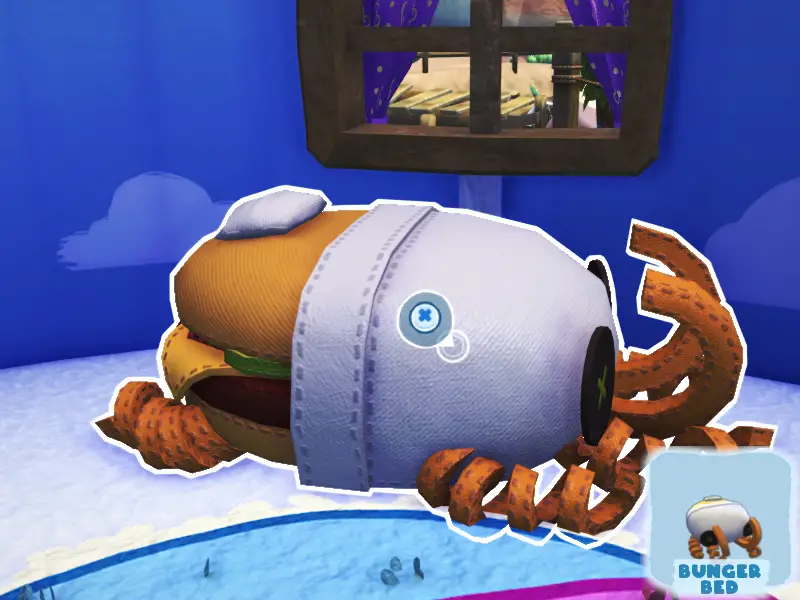
Naam: Bunger Bed
Source: Donate all four legendary snax.
Details: Return to the place where you fought each legendary snak, and you’ll find a statue you can interact with to repeat the fight.
- Smaak valt: Mama is winderig
- Kookbaai: Megamaki
- Sizzlin’ Zand: Mothza Supreme
- Frosted Peak: Daddy Cakelegs
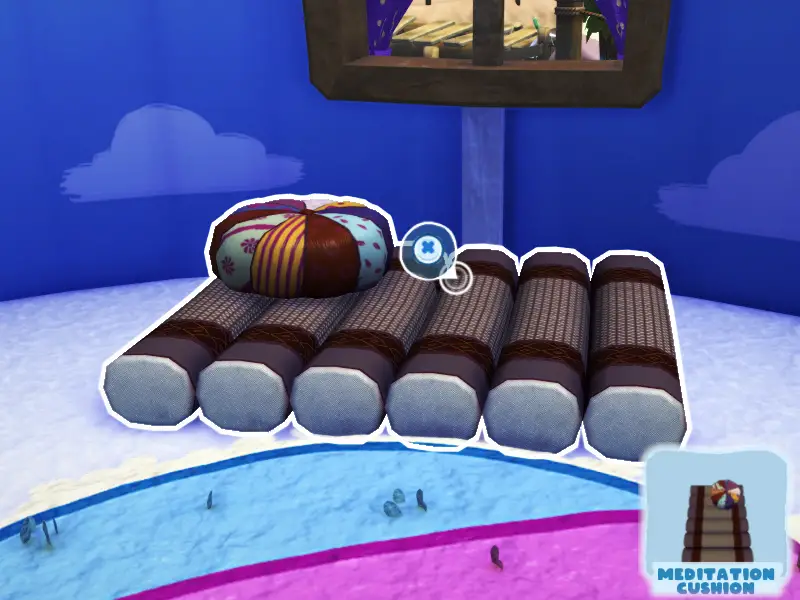
Naam: Meditation Cushion
Source: Purge a Loaded Spuddy.
Details: From Shelda, given along with Prairie Grass (Tuin). Tekst: “A warrior clad in golden armor… it carries a heavy load… yet it charges forth at all its foes.” Loaded Spuddy in Sizzlin’ Zand.
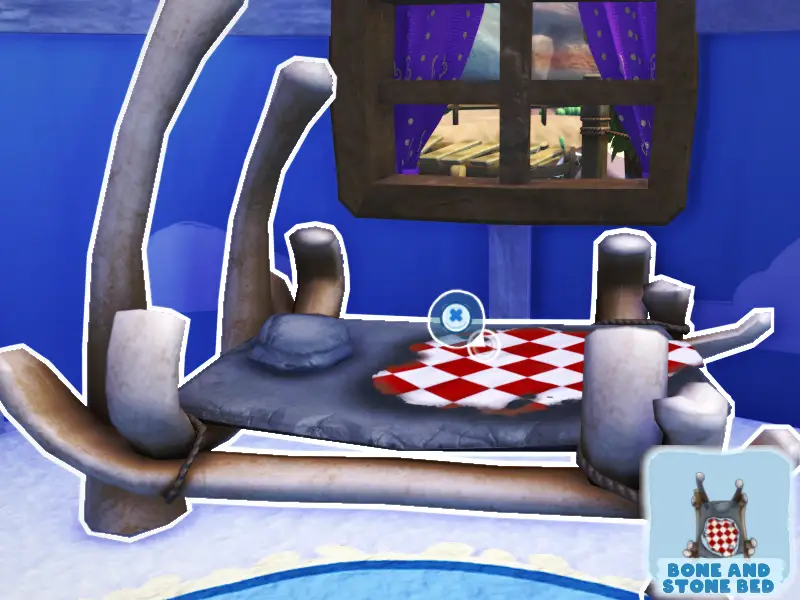
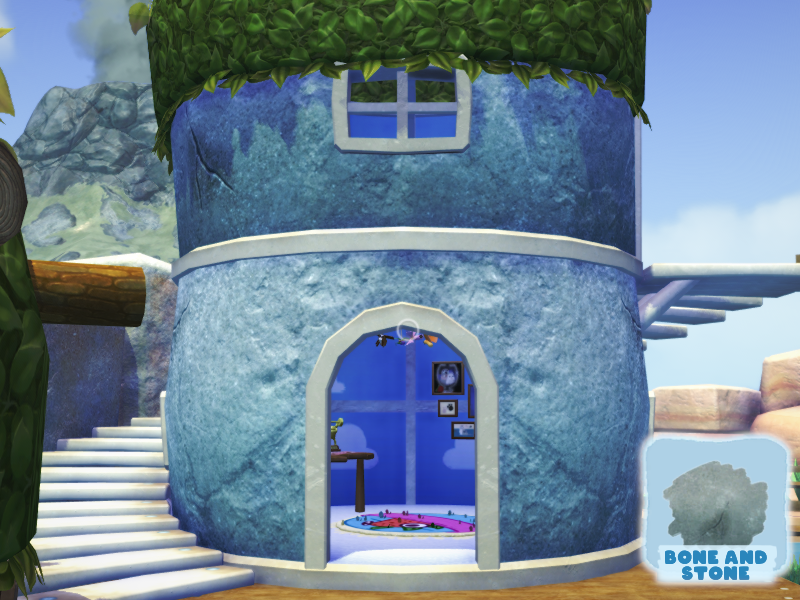
Naam: Bone and Stone Bed
Source: Scan a Pinkle wearing an Aggroll box.
Details: From Triffany, given along with Bone and Stone (Buitenkant). The only place to find both of these is in the cave on Frosted Peak where you first found Eggabell. Both Bugsnax are frozen in ice. The Aggroll you can thaw by using your Trip Shot on the closest flare, but the Pinkle is too far. Use the Lunchpad to launch the Stewdler at it instead. Use your Snakgrappler to steal the Aggroll’s box and toss it on the ground (I’d suggest catching the Aggroll to keep it from interfering). Take the Pinkle’s jar, but hold onto it. You can try to chase the Pinkle to get it to go in the right direction, if it helps. Once it claims the box, toss the jar aside, and scan the Pinkle.
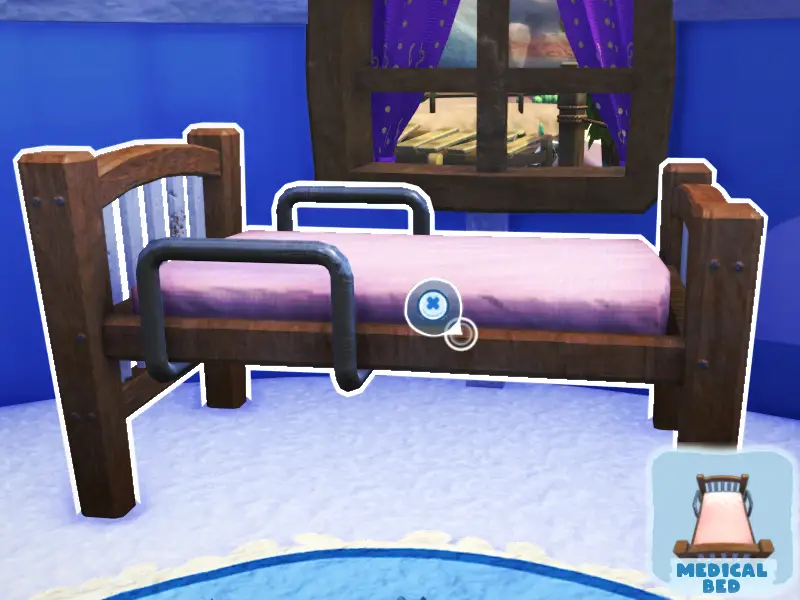
Naam: Medical Bed
Source: Feed a single grumpus over 25 different bugsnax.
Details: It doesn’t matter which snax you feed them, as long as they’re all different, but they all have to be fed to the same grumpus.
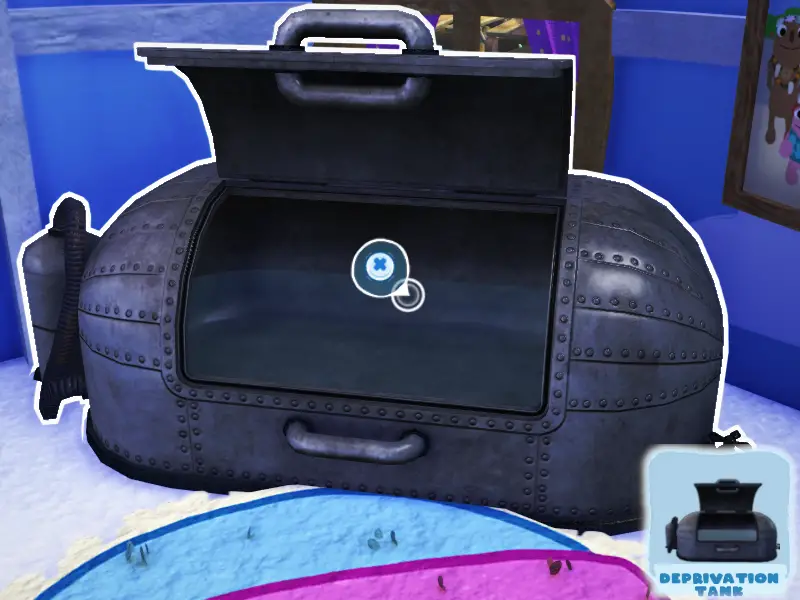
Naam: Deprivation Tank
Source: Catch 10 bugsnax in 90 seconden.
Details: From Snorpy. Given along with Bookshelf (Meubilair). I found Flavor Falls is the easiest, between the area’s small size, the Sandopedes covering four snax, multiple Snakpods in close reach, and easy-to-catch snax like the Pinkle, Lollive, and Strabby.
Meubilair
The ‘Furniture’ category is unique, in that (with a couple of exceptions) it has spots where the ‘Trinket’ category will sit. The Grumpy Baby Mayor was nice enough to model those locations for you. If you don’t see him, then the Furniture item doesn’t have a place for the Trinkets.
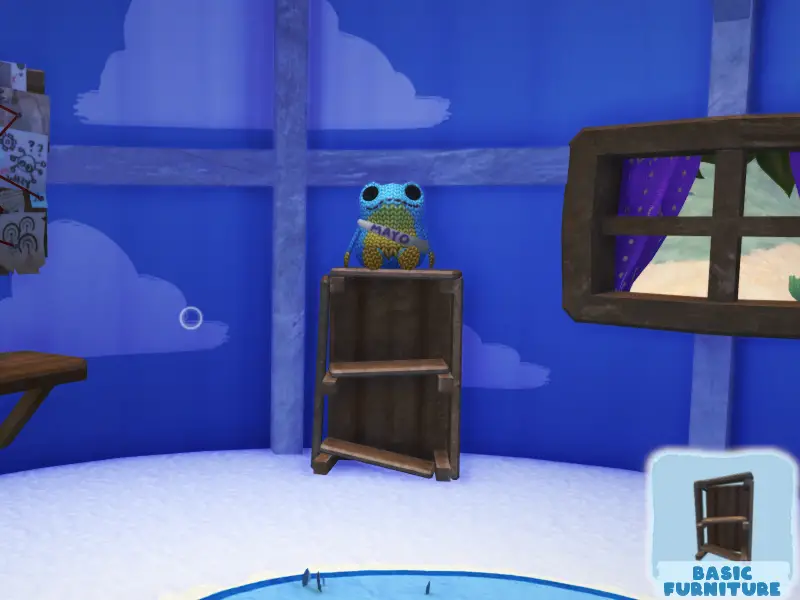
Naam: Basic Furniture
Source: Return Filbo to Snaxburg.
Details: Automatic gift; can’t be avoided. Given along with Dandelion (Tuin).
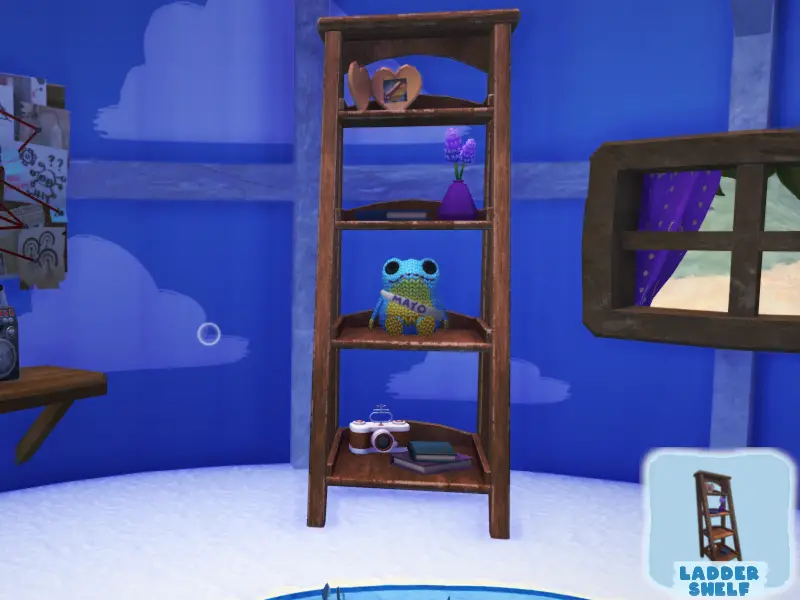
Naam: Ladder Shelf
Source: Capture all Bugsnax in Garden Grove.
Details: Given by Beffica. Snax required are:
- Bundel
- Fryder
- Shishkabug
- Sweetiefly (4 BEN – 4 P.M)
- White Strabby
- Dr Sodie
- Weenyworm
- Cobhopper (Opmerking: Requested for donation by Gramble in another mail.)
- Crispy Snakpod
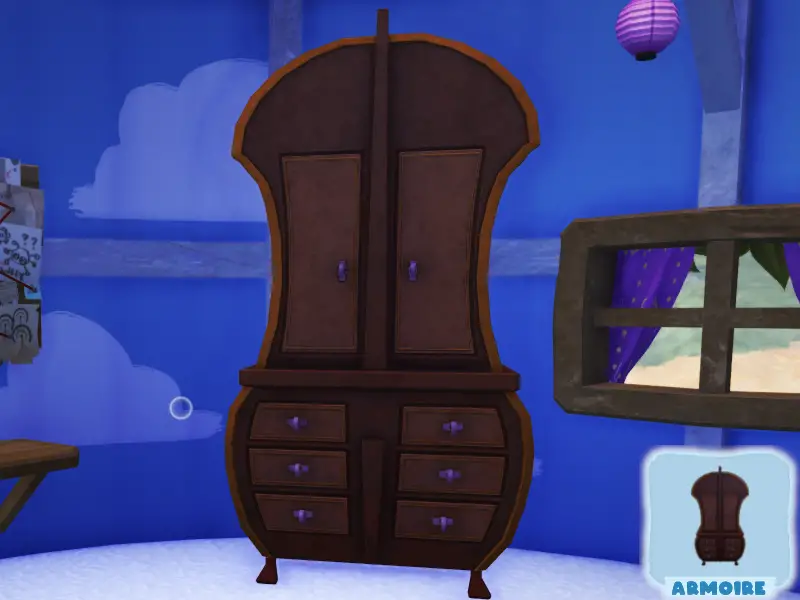
Naam: Armoire
Source: Transform a grumpus to show all 4 Sweetiefly variants.
Details: From Wiggle. Given along with Music Print (Interior). Required Bugsnax:
- Sweetiefly (Tuinergrove)
- Lovely Sweetyfly (Sudderende veren)
- Crystal Sweetiefly (Geschreven kloof
- Rainbow Sweetiefly (Sugarpine Woods)
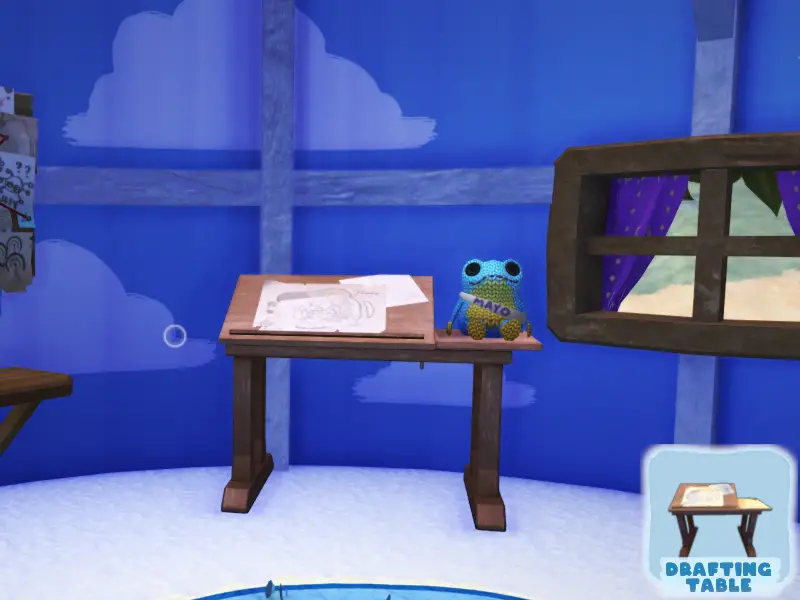
Naam: Drafting Table
Source: Scan a Shy Weenyworm with ketchup on it.
Details: Requested by Triffany. The Shy Weenyworms are in the second ruin you opened in Scorched Gorge, aan de linkerkant.
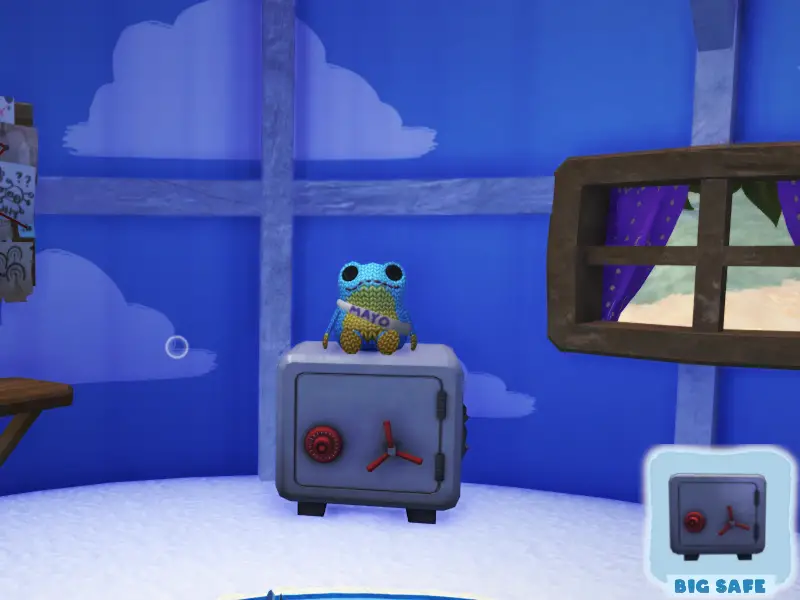
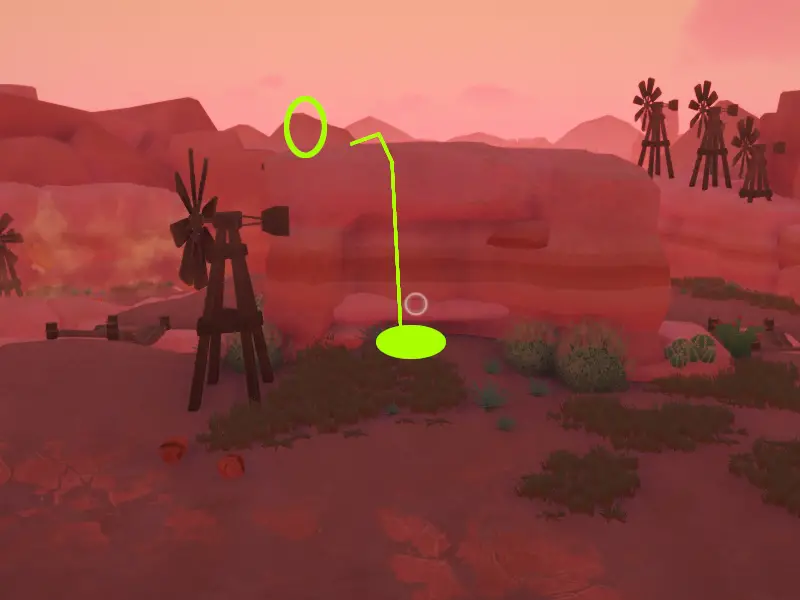
Naam: Big Safe
Source: Find a lost item for Cromdo.
Details: The sack is on the central pillar closest to the BBQ Bunger. The ground is a little higher directly behind the windmill with the Snakpod. Place your Lunchpad there, and launch yourself onto the rock. (It may be easier to catch the BBQ Bunger first, or launch it off the plateau, as it will likely charge you.)
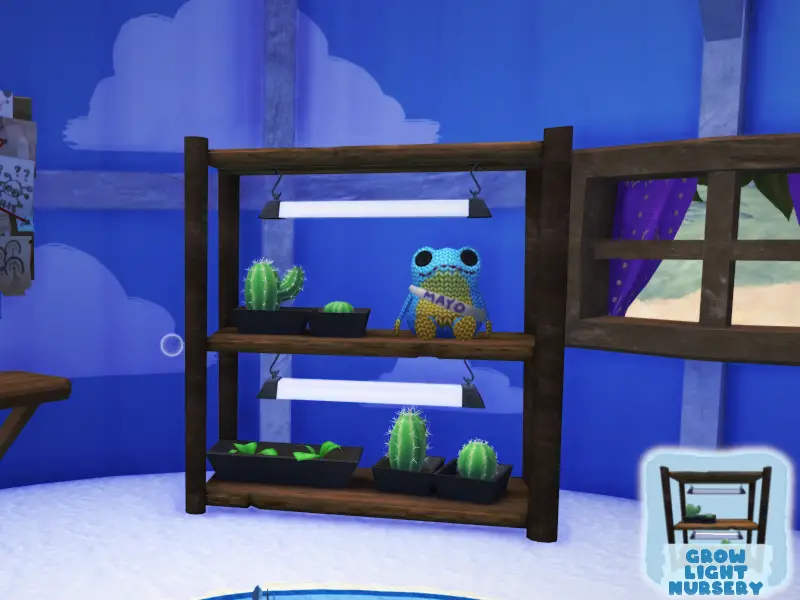
Naam: Grow Light Nursery
Source: Complete all sidequests for Wambus.
Details: Given along with Mini Cactriffy (Trinket). Side quest guide can be found here.
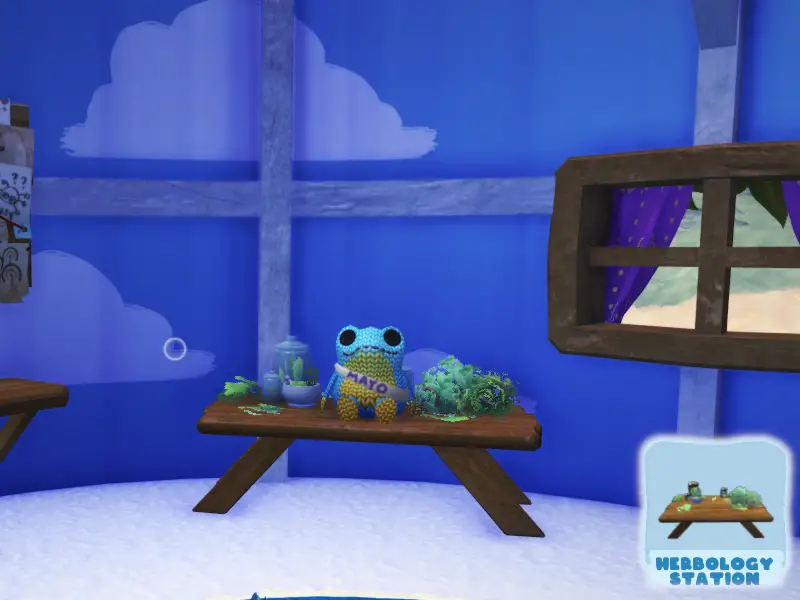
Naam: Herbology Station
Source: Purge a Green Crapple.
Details: From Shelda. Given along with Primitive Grass (Rug). Request text: “Scuttling beneath the surface…where fire meets water…emerald claws seizing buried treasures.” Simply catch it with your Snak Trap.
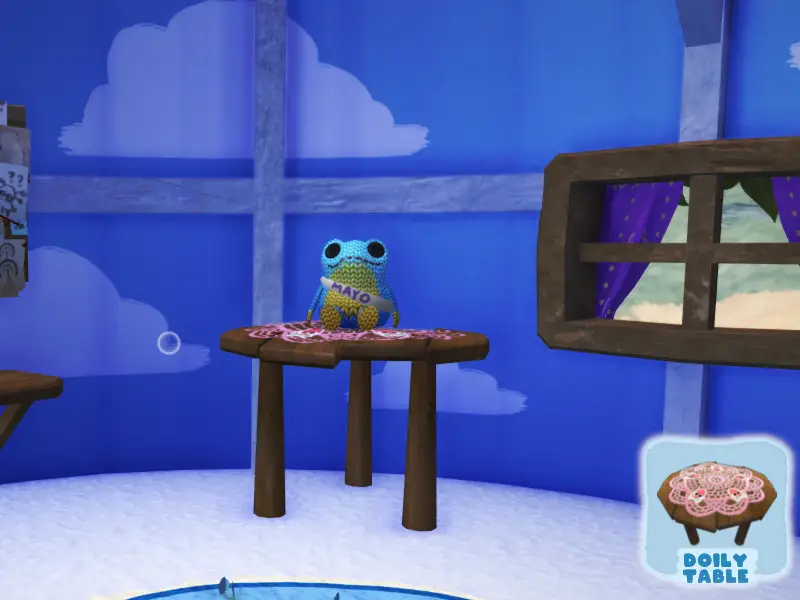
Naam: Doily Table
Source: Donate the mystery Bugsnak to Gramble’s Barn.
Details: Mystery snak: Golden Kweeble (Kookbaai). Catch with your Snak Trap. Request text: “I keep havin’ this nightmare where Chandlo picks me up, shakes me, and shouts ‘GO FOR THE GOLD’.”
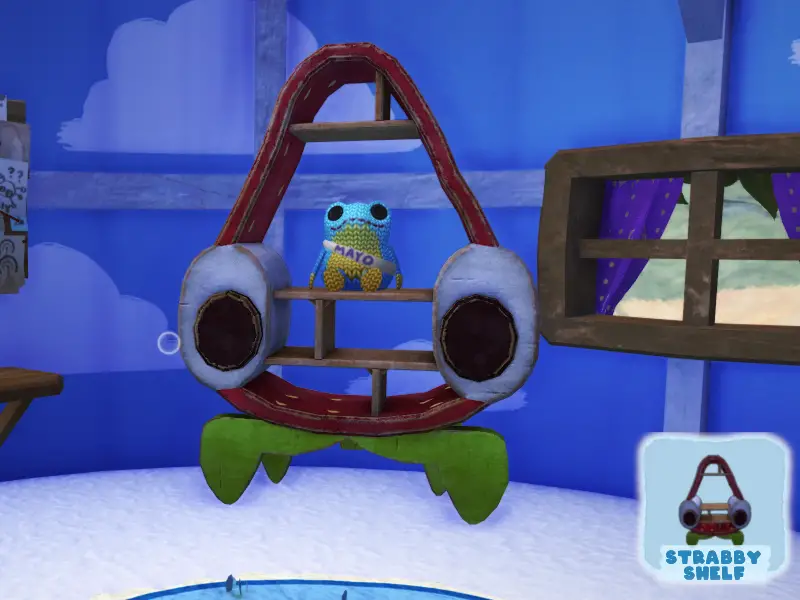
Naam: Strabby Shelf
Source: Watch the ‘founding of Snaxburg’ tape.
Details: From Lizbert, given along with Snax Print (Interior). Received after watching Tape #0 that Eggabell gives you after her true interview.
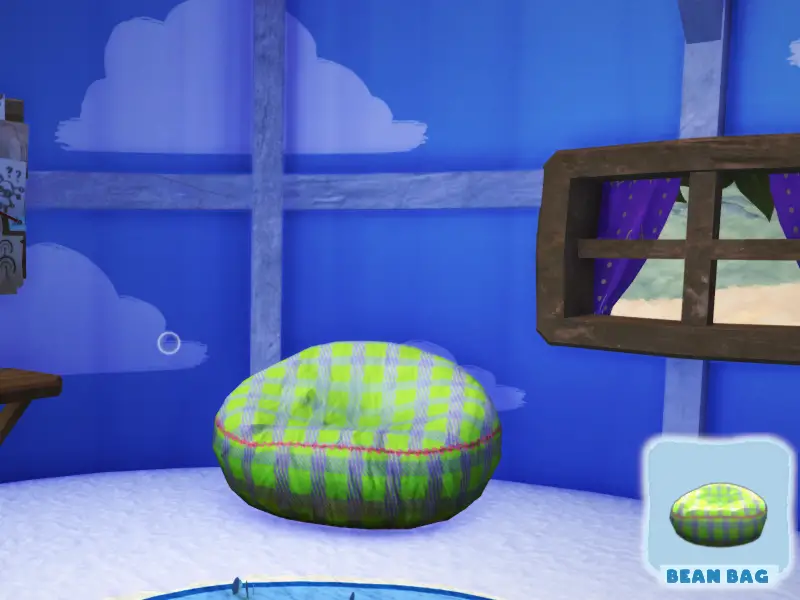
Naam: Bean Bag
Source: Catch 3 different types of Bugsnax at once.
Details: From Chandlo, given along with Orange Bloodroot (Tuin). One of the easiest attempts is in Simmering Springs, where you can lure Razzby, Crapple, Kweeble, and Green Grapeskeeto ('s nachts) with chocolate.
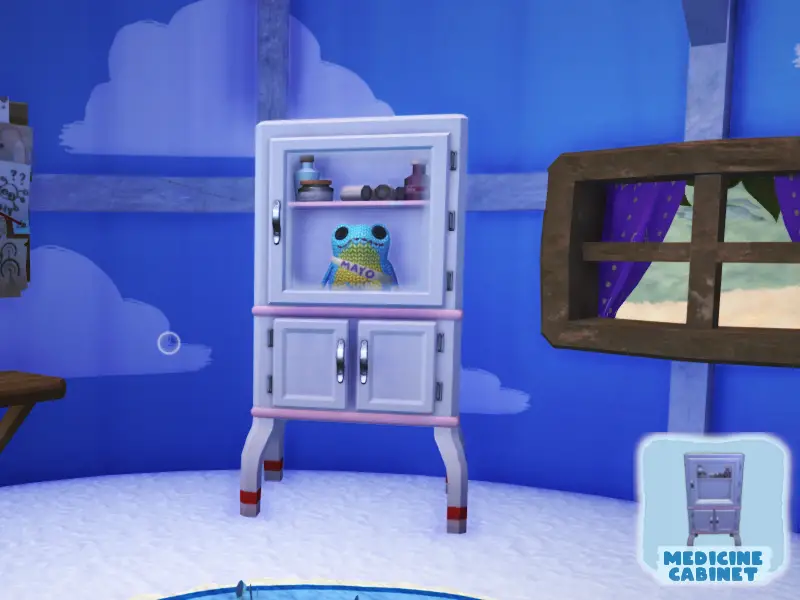
Naam: Medicine Cabinet
Source: Get knocked out of bounds by a bugsnak.
Details: From Eggabell, given along with Emergency Bell (Decor). Easiest place is where the Scoopy Banoopy paths near the edge of Frosted Peak. Just stand right on the edge near its path, and it’ll knock you off the cliff.
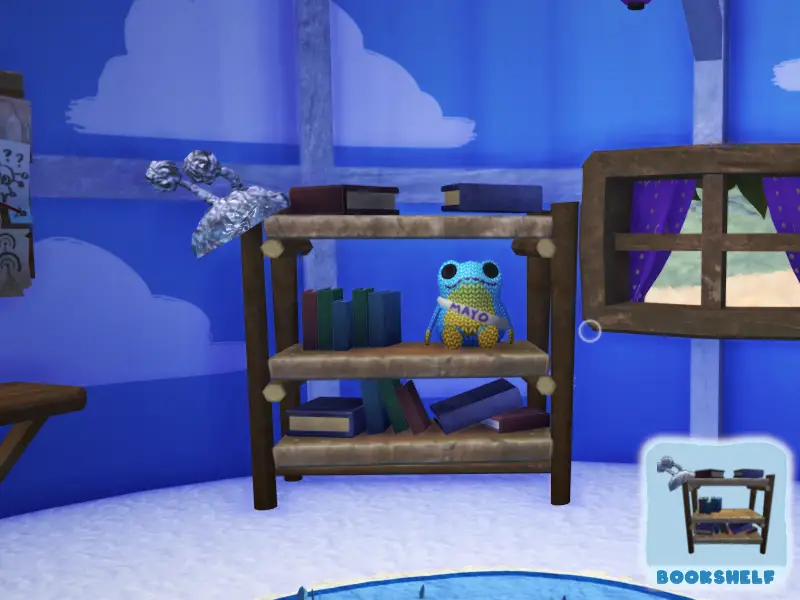
Naam: Bookshelf
Source: Catch 10 bugsnax in under 90 seconden.
Details: From Snorpy. Given along with Deprivation Tank (Bed). I found Flavor Falls is the easiest, between the area’s small size, the Sandopedes covering four snax, multiple Snakpods in close reach, and easy-to-catch snax like the Pinkle, Lollive, and Strabby.
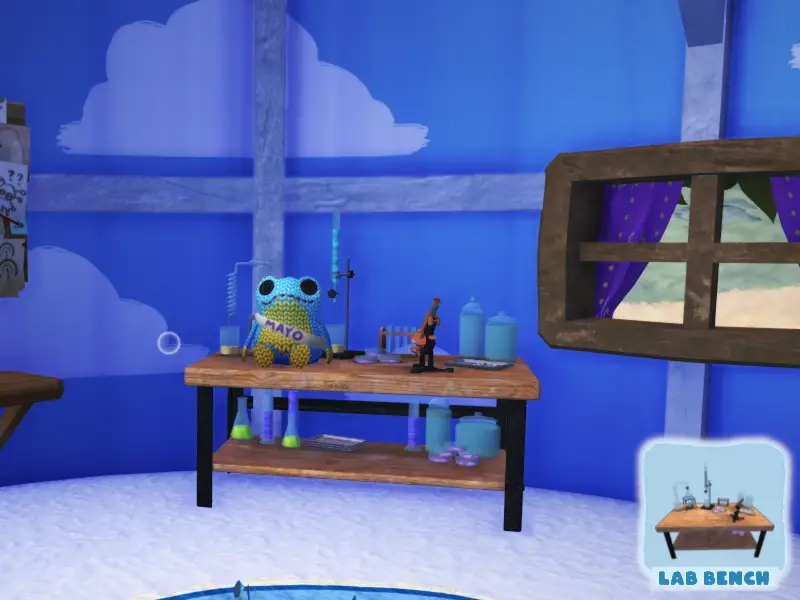
Naam: Lab Bench
Source: Catch the barn snax on fire.
Details: From Floofty. Two ways to do this. 1: Wait for evening, and run into the campfire. While you’re burning, jump into the snak corral, and set them ablaze. 2: During Snorpy’s side quest, ‘Get Lit!’, the first part has you extend a flaming Trip Shot across the corral. This should hit the snax. If it doesn’t, you can try again until it works.
Rugs
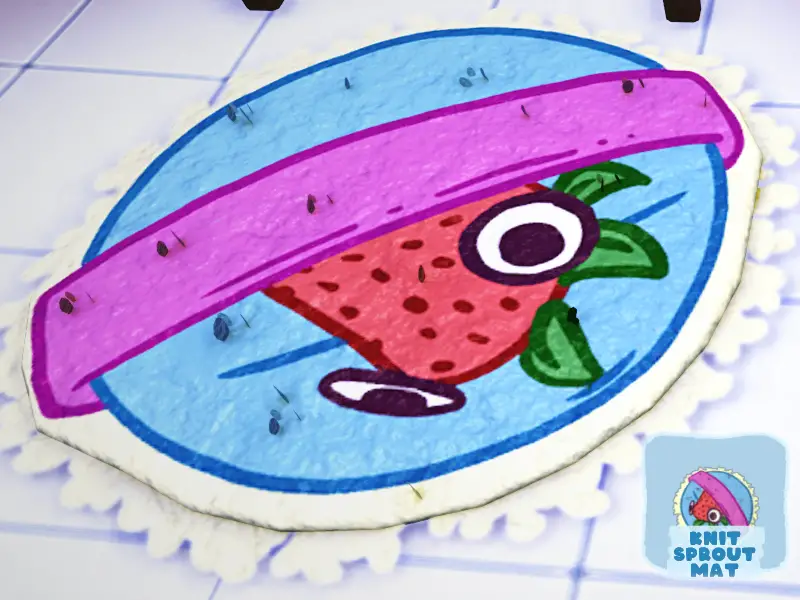
Naam: Knit Sprout Mat
Source: Donate the mystery Bugsnak to Gramble’s barn.
Details: text: “It’d be like a strabby, but different? Not a Razzby, that’s too different.” Snak: White Strabby (Tuinergrove). Catch in Snak Trap.

Naam: Loose Newspaper
Source: Return Snorpy to Snaxburg.
Details: Automatic reward.
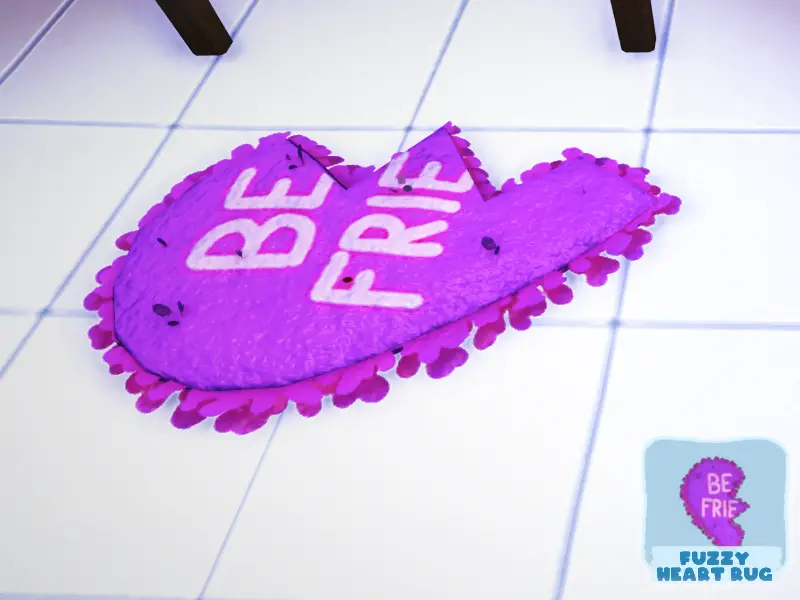
Naam: Fuzzy Heart Rug
Source: Find a lost item for Beffica.
Details: In Garden Grove. From Beffica’s cave entrance, climb over the rocks, and jump to the closest tree. Vanaf daar, hop to the ledge that makes up Beffica’s window. Set your Lunchpad down, and launch yourself to the next highest tree. Op dat moment, you can hop up to grab the bag.
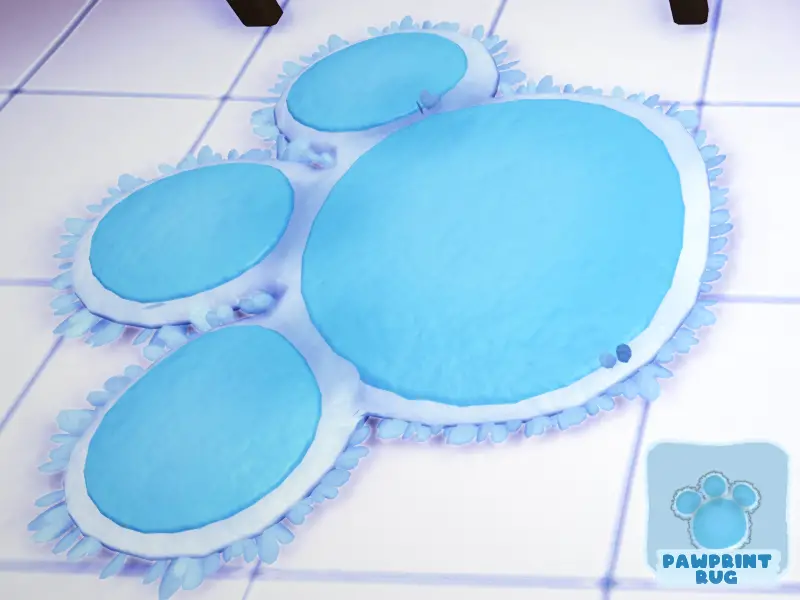
Naam: Pawprint Rug
Source: Find a lost item for Filbo.
Details: In Snaxburg. Go upstairs to the balcony on Lizbert & Eggabell’s house. Jump over the temporary ramp onto Filbo’s house, to the arch over the gate to Scorched Gorge, then to the top of the science tent. The bag will be on the peak close to Cromdo Mart.

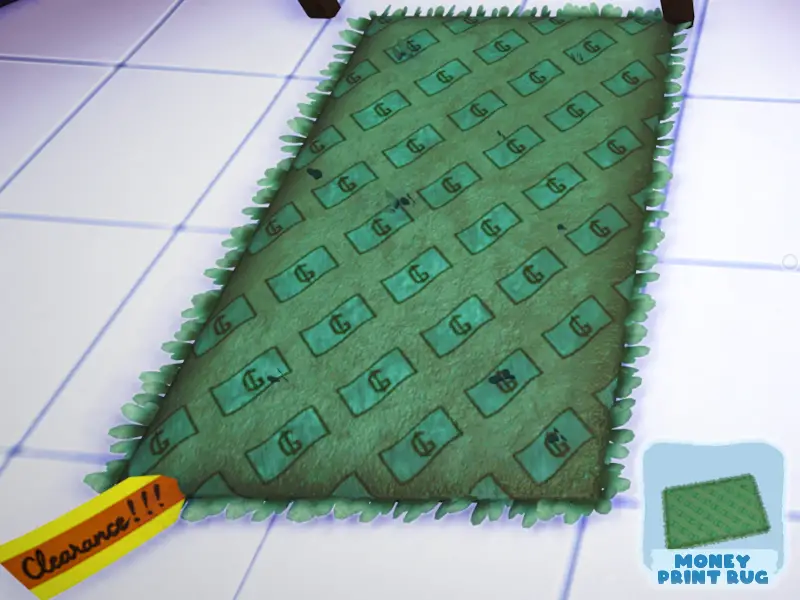
Naam: Money Print Rug
Source: Capture all bugsnax in Scorched Gorge.
Details: Required Bugsnax:
- BBQ Bunger
- Sweet Fryder
- Ribblepede
- Poptick (Must be ‘popped’ to catch)
- Spuddy
- Schorpioen
- Shy Weenyworm
- Cheepoof (6 BEN – 4 P.M)
- White Cheepoof (6 P.M – 4 BEN)
- Crystal Sweetiefly
- Groene peelbug
- Puffy Snakpod
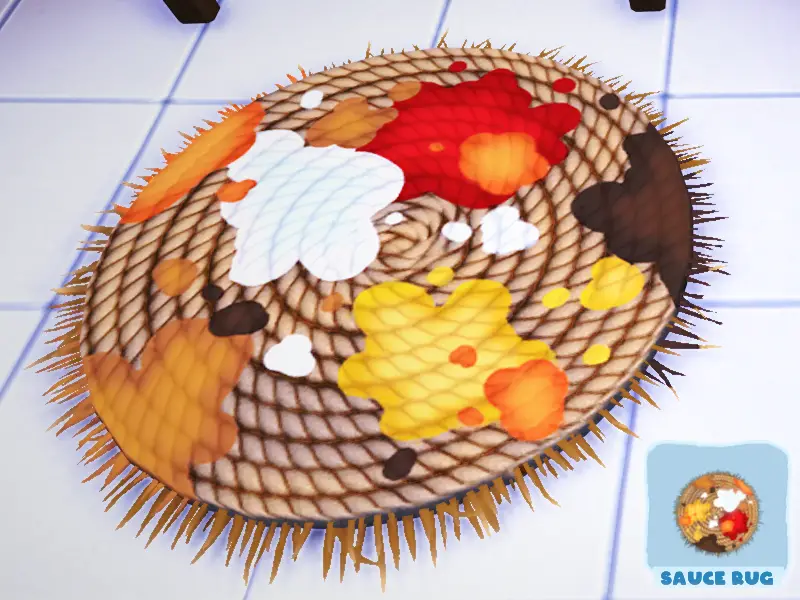
Naam: Sauce Rug
Source: Find all the sauces.
Details: From Wambus. Given along with Sauce Plant Seedlings (Tuin). Sauce flavors:
- Ketchup (Tuinergrove)
- Chocolade (Sudderende veren)
- Boerderij (Smaak valt)
- Hete saus (Geschreven kloof)
- Peanut Butter (Frosted Peak)
- Kaas (Sizzlin’ Zand)
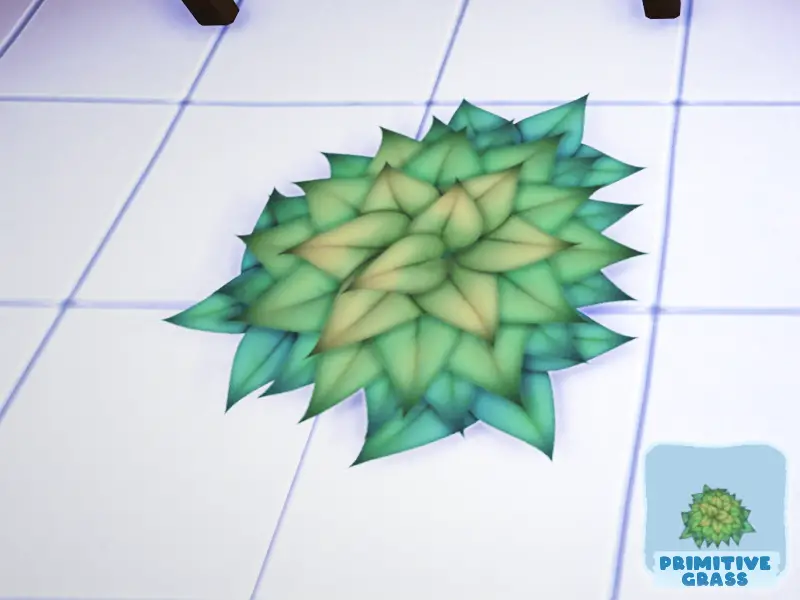
Naam: Primitive Grass
Source: Purge a Green Crapple.
Details: From Shelda. Given along with Herbology Station (Meubilair). Request text: “Scuttling beneath the surface…where fire meets water…emerald claws seizing buried treasures.” Simply catch it with your Snak Trap.
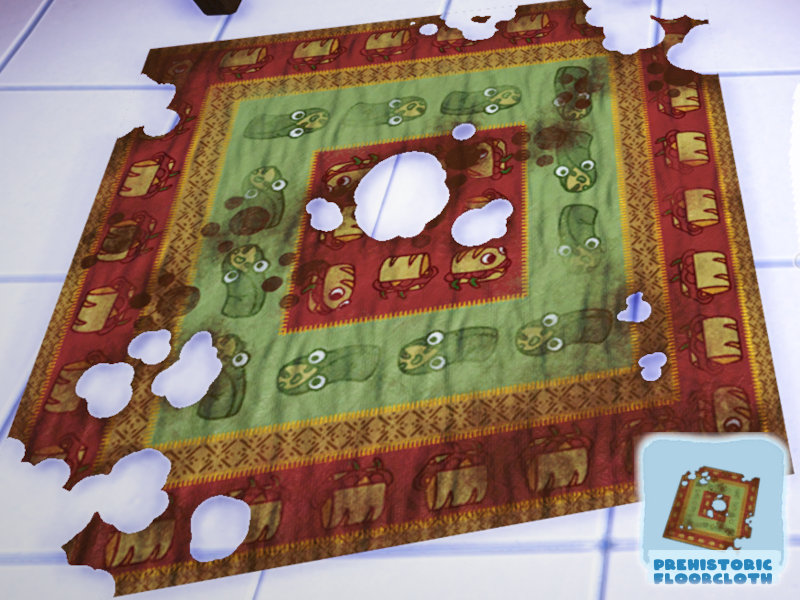
Naam: Prehistoric Floorcloth
Source: Scan a flaming BBQ Bunger.
Details: From Triffany. In Scorched Gorge, lure the BBQ Bunger close to the Scorpenyo by Triffany’s dig site (or launch it to the lower level with your Lunchpad). Cover it in hot sauce, and the Scorpenyo will set it on fire. Scan it with your Snaxscope.
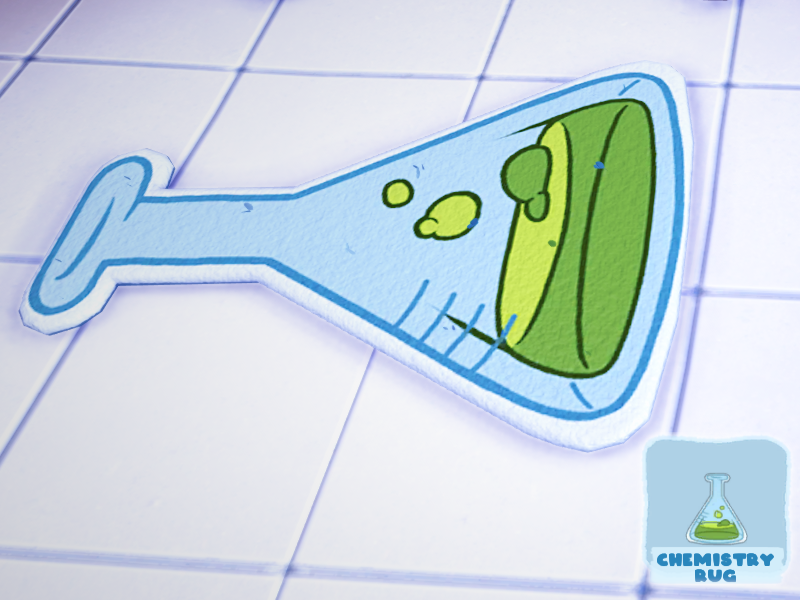
Naam: Chemistry Rug
Source: Transform a grumpus to show all 8 Snakpod variants.
Details: From Floofty, given along with Science Poster (Hanging). Every area except Snaxburg and Broken Tooth have a snakpod. I’ve posted a guide if you need help finding any.
- Crispy Snakpod (Tuinergrove)
- Twisty Snakpod (Smaak valt)
- Grumpy Snakpod (Sudderende veren)
- Fruity Snakpod (Kookbaai)
- Puffy Snakpod (Geschreven kloof)
- Meaty Snakpod (Sizzlin’ Zand)
- Nutty Snakpod (Sugarpine Woods)
- Melty Snakpod (Frosted Peak)
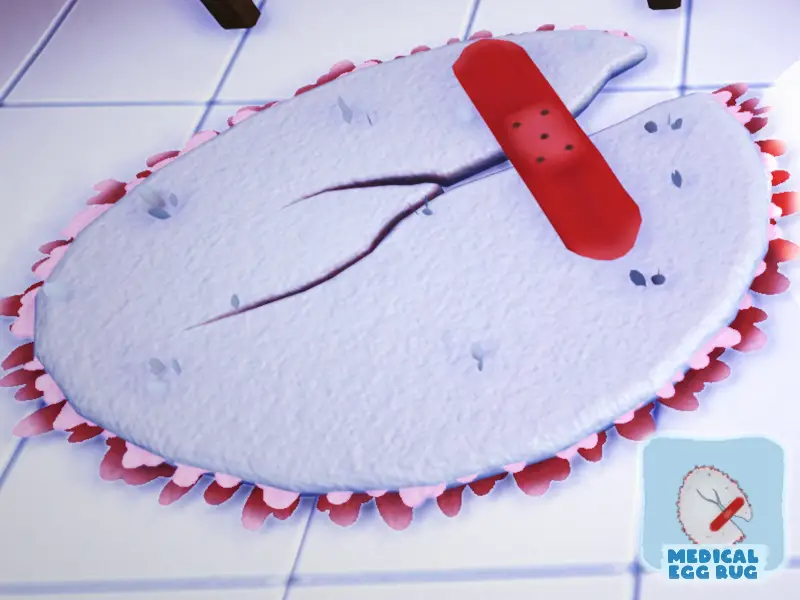
Naam: Medical Egg Rug
Source: Complete the interview with Eggabell.
Details: Given along with Eggshell Print (Interior) after doing Eggabell’s actual interview.
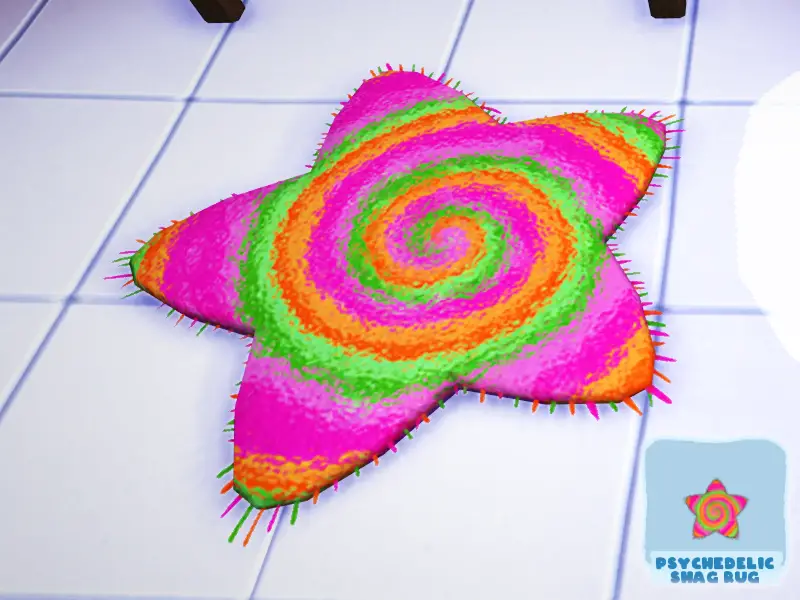
Naam: Psychedelic Shag Rug
Source: Transform a grumpus to show 13 different fruit-containing snax.
Details: From Wiggle. Given along with Rock Club Sign (Muur). There are quite a large number of fruity Bugsnax, including one Snakpod.
- Tuinergrove: White Strabby
- Smaak valt: Strabby – Ruby Peelbug – Wee Mewon – Mama is winderig
- Sudderende veren: Kweeble – Crapple – Pineantula – Orange Peelbug – Razzby – Groene druivenskeeto – Tropicabug
- Kookbaai: Groene crapple – Grapeskeeto – Gold Kweeble – Red Banopper – Fruity Snakpod
- Geschreven kloof: Groene peelbug
- Sizzlin’ Zand: Black Razzby
- Sugarpine Woods: Yellow Peelbug
- Frosted Peak: Banopper – Cheery – Scoopy Banoopy
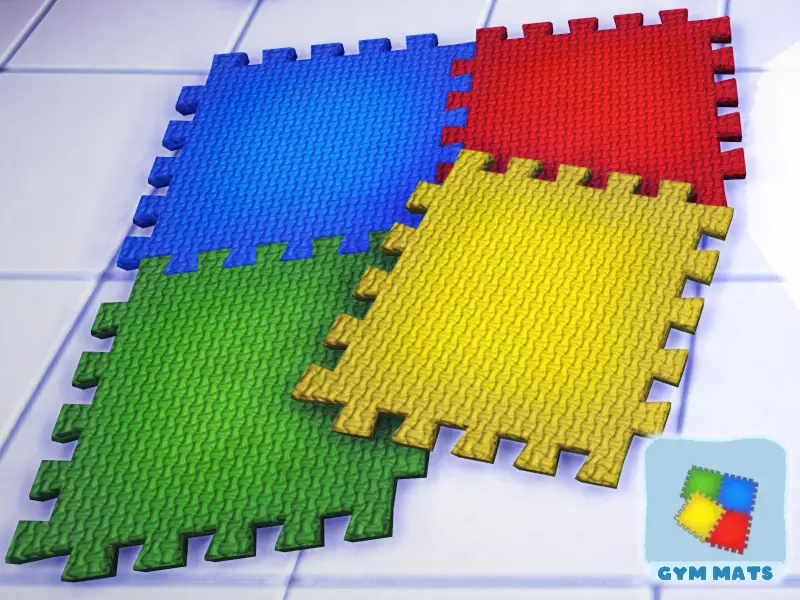
Naam: Gym Mats
Source: Find a lost item for Chandlo.
Details: On Broken Tooth, in the area in front of the temple entrance, climb up the coral staircase on the right side. Edge your way along the cliff (it narrows at one point, but you can make it through). At the far end, place down your Lunchpad, and launch yourself onto the top of the large mushroom coral. From the top of the loop, you can jump to reach the bag.
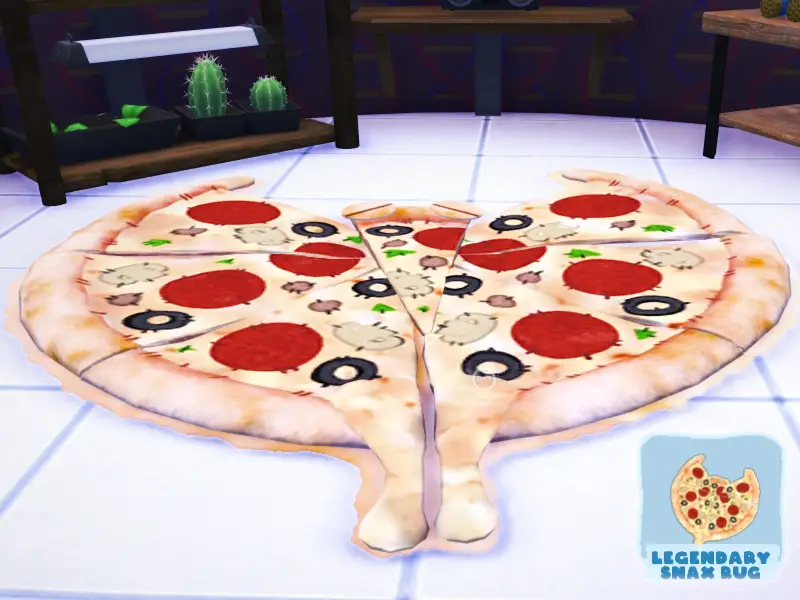
Naam: Legendary Snak Rug
Source: Pick up the Triangle Key.
Details: Secret reward from a mystery grumpus, given along with Eyes (Buitenkant). There’s a cave on Broken Tooth that takes a bit of work to open. See the Triplicate Space guide for full details.
Trinkets
Trinkets will sit on spots on the Furniture category, plus a permanent shelf on each floor, giving you the space to display up to six total. Every grumpus gives you a trinket when you finish their side quests, except for Filbo, Eggabell, and Lizbert — those three don’t have side quests available.
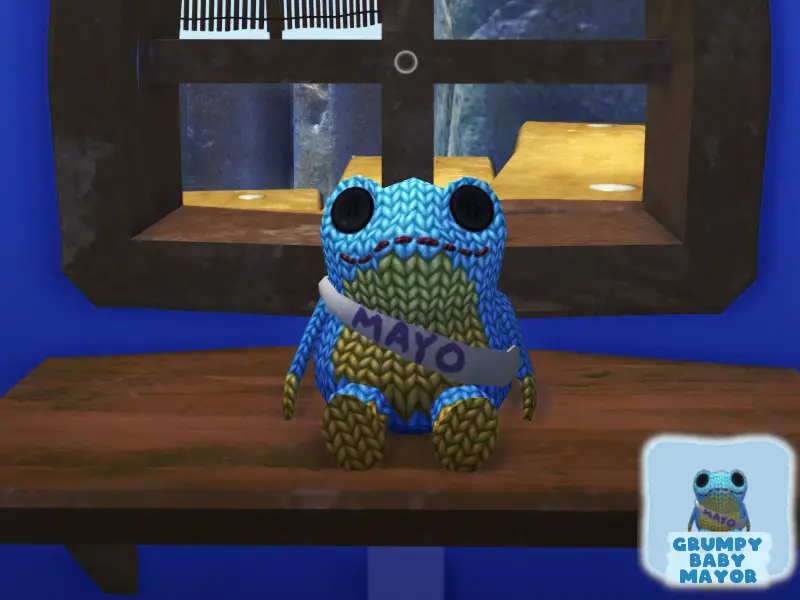
Naam: Grumpy Baby Mayor
Source: Tell ghost stories with friends.
Details: Automatic reward from Filbo, given after the ‘Snaxburg Gets Spooked!’ story quest, which becomes available once Triffany and Cromdo return to Snaxburg.

Naam: Strong Trophy
Source: Complete all side quests for Chandlo.
Details: Once you finish Chandlo’s final side quest, you’ll get this one in the mail.
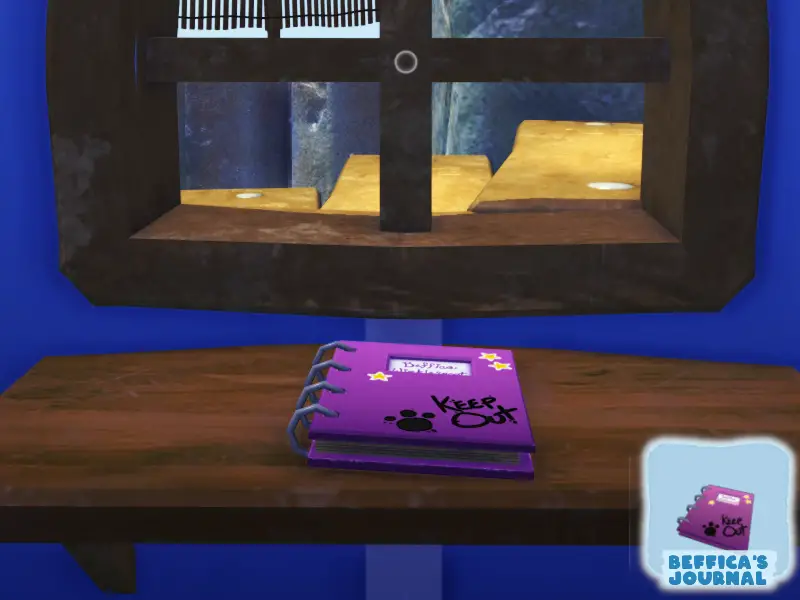
Naam: Beffica’s Journal
Source: Complete all side quests for Beffica.
Details: Once you finish Beffica’s final side quest, you’ll get this one in the mail.
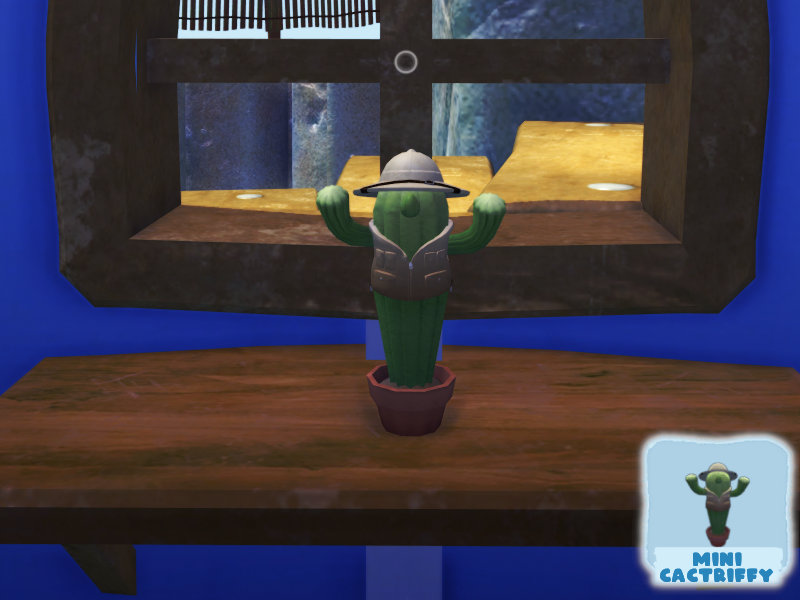
Naam: Mini Cactriffy
Source: Complete all side quests for Wambus.
Details: Once you finish Wambus’ final side quest, you’ll get this one in the mail.
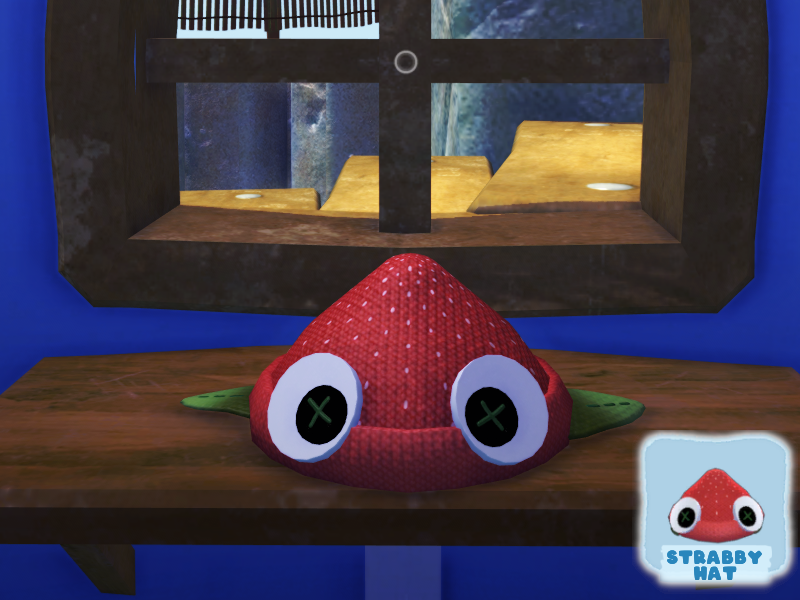
Naam: Strabby Hat
Source: Complete all side quests for Gramble.
Details: Once you finish Gramble’s final side quest, you’ll get this one in the mail.
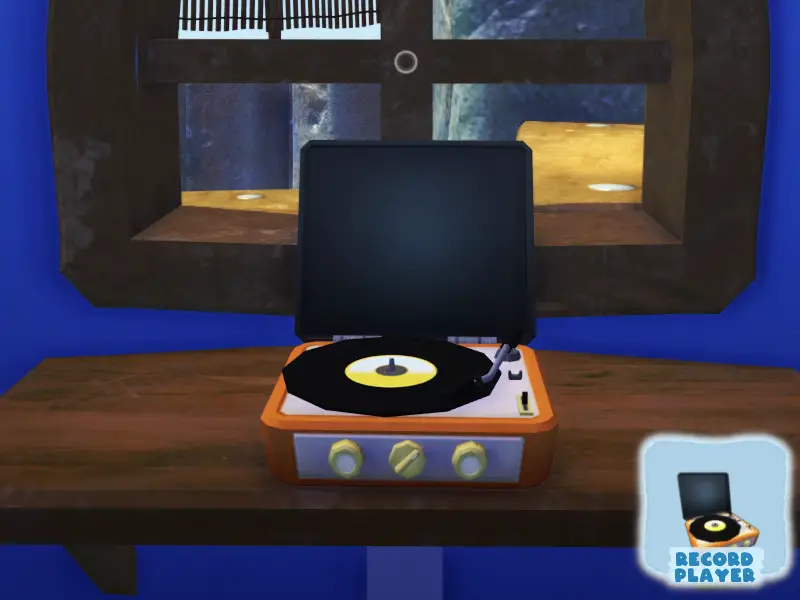
Naam: Record Player
Source: Complete all side quests for Wiggle.
Details: Once you finish Wiggle’s final side quest, you’ll get this one in the mail.
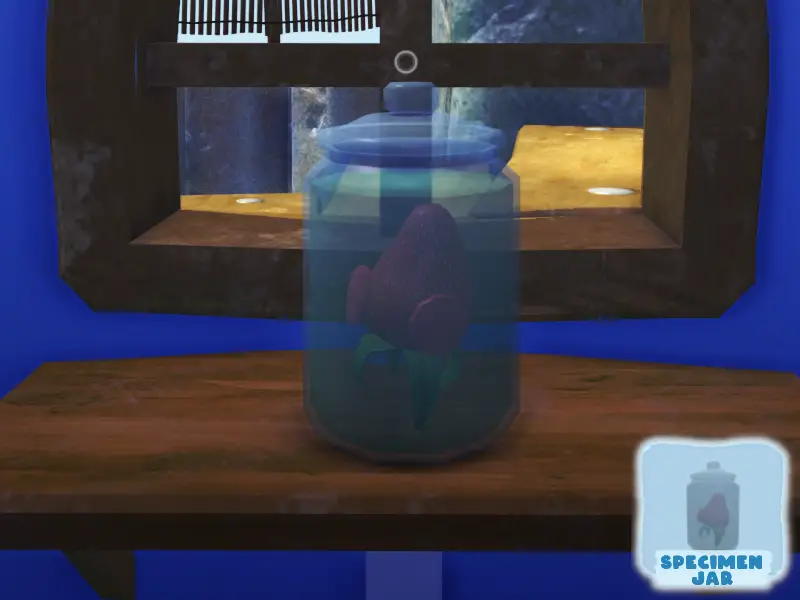
Naam: Specimen Jar
Source: Complete all side quests for Floofty.
Details: Once you finish Floofty’s final side quest, you’ll get this one in the mail.
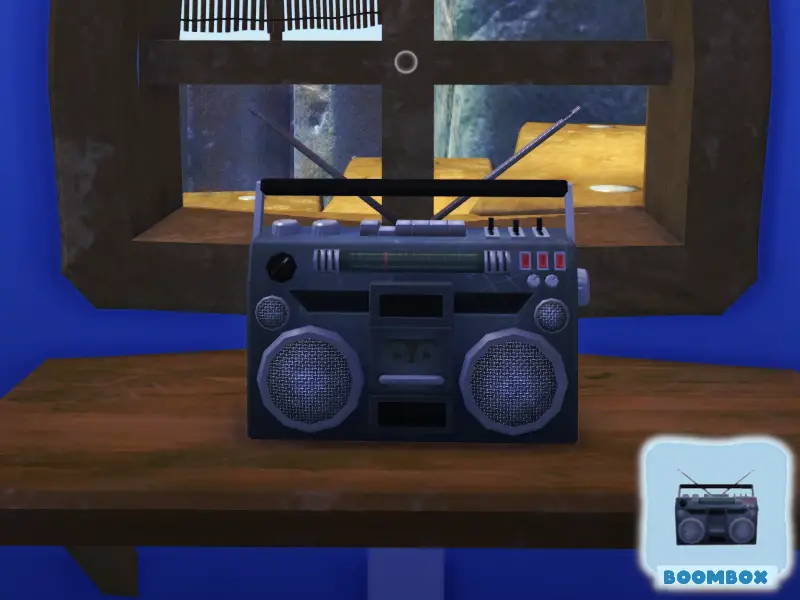
Naam: Boombox
Source: Complete all side quests for Cromdo.
Details: Once you finish Cromdo’s final side quest, you’ll get this one in the mail.
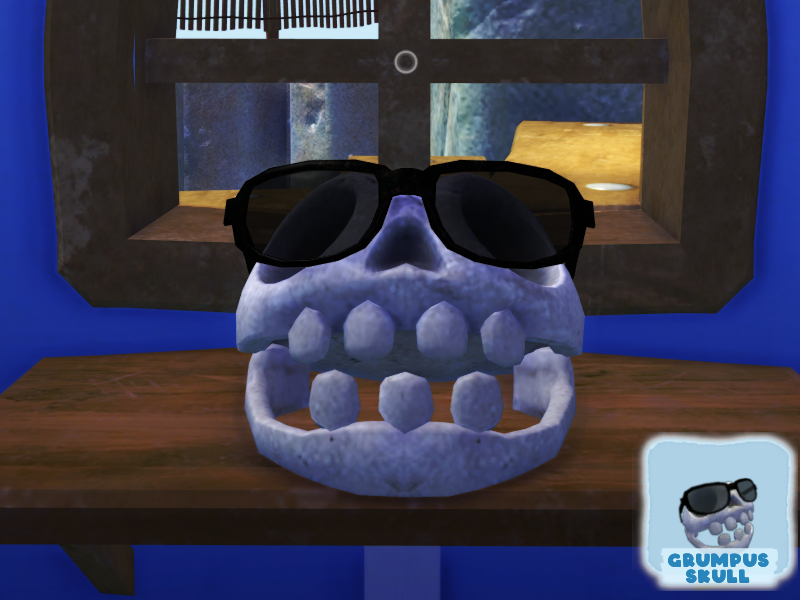
Naam: Grumpus Skull
Source: Complete all side quests for Triffany.
Details: Once you finish Triffany’s final side quest, you’ll get this one in the mail.
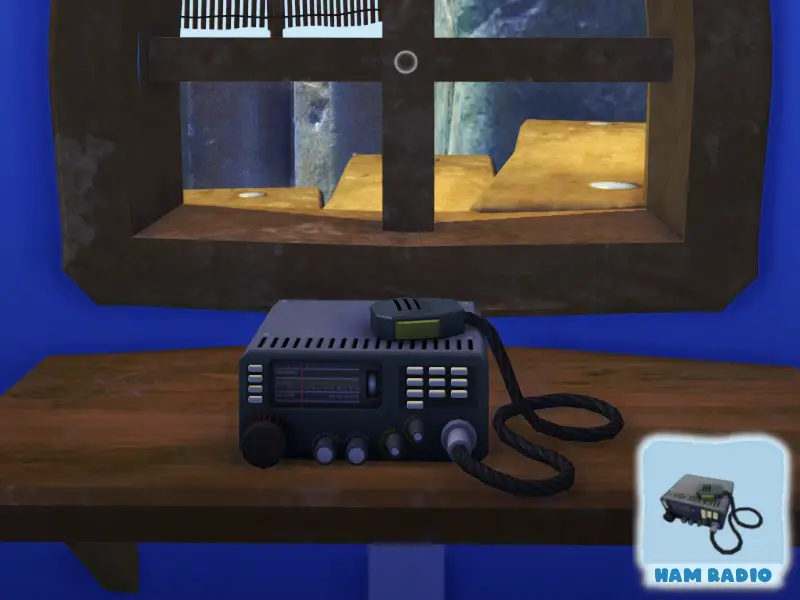
Naam: Ham Radio
Source: Complete all side quests for Snorpy,
Details: Once you finish Snorpy’s final side quest, you’ll get this one in the mail.
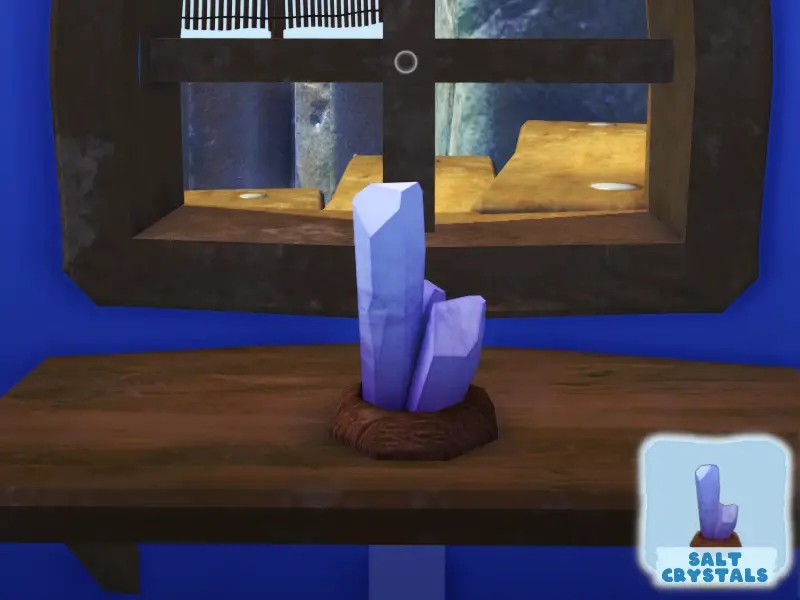
Naam: Salt Crystals
Source: Complete all side quests for Shelda.
Details: Once you finish Shelda’s final side quest, you’ll get this one in the mail.
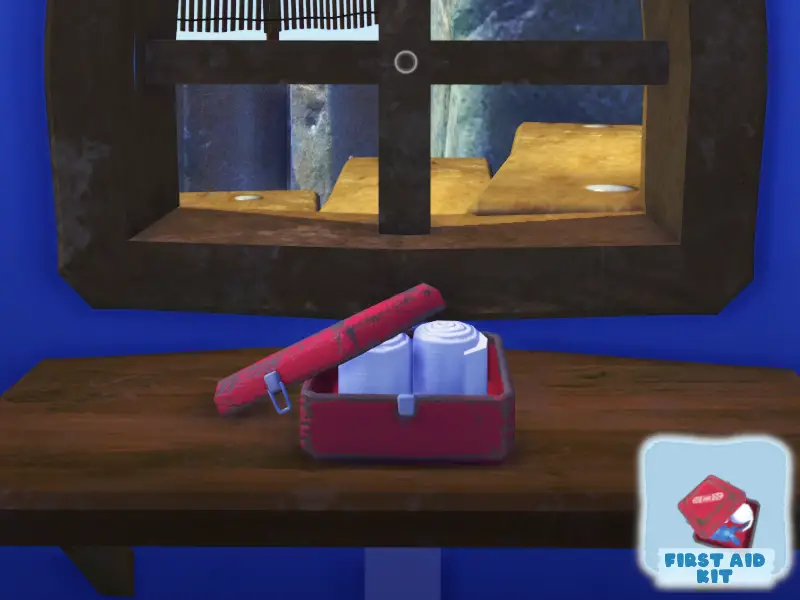
Naam: First Aid Kit
Source: Stay on fire continuously for over 30 seconden.
Details: From Eggabell, given along with Draped Fabrics (Ceiling). Easiest way to accomplish this is to go to Boiling Bay. Stand in one of the lava floes, and aim yourself at the wall behind the lava fall that feeds it. It’ll keep you from running around and getting extinguished.
Hanging
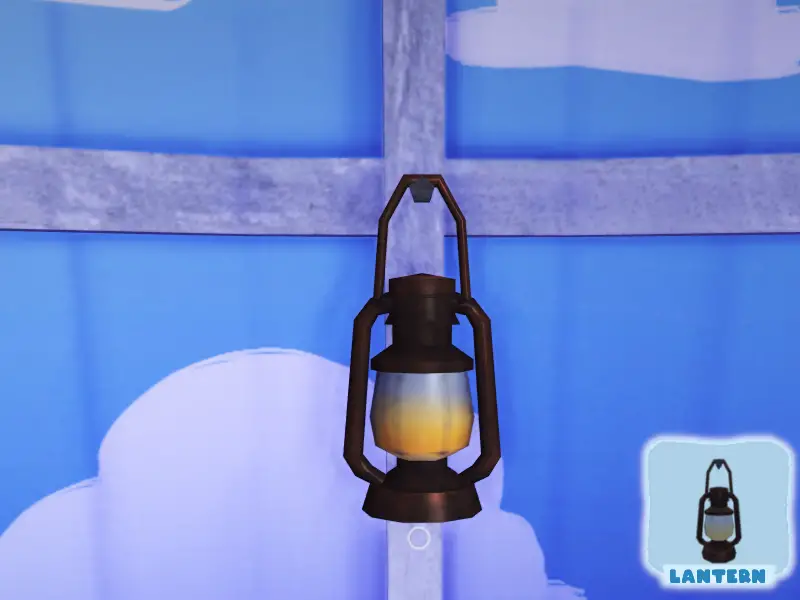
Naam: Lantern
Source: Return Gramble to Snaxburg.
Details: Automatic reward.
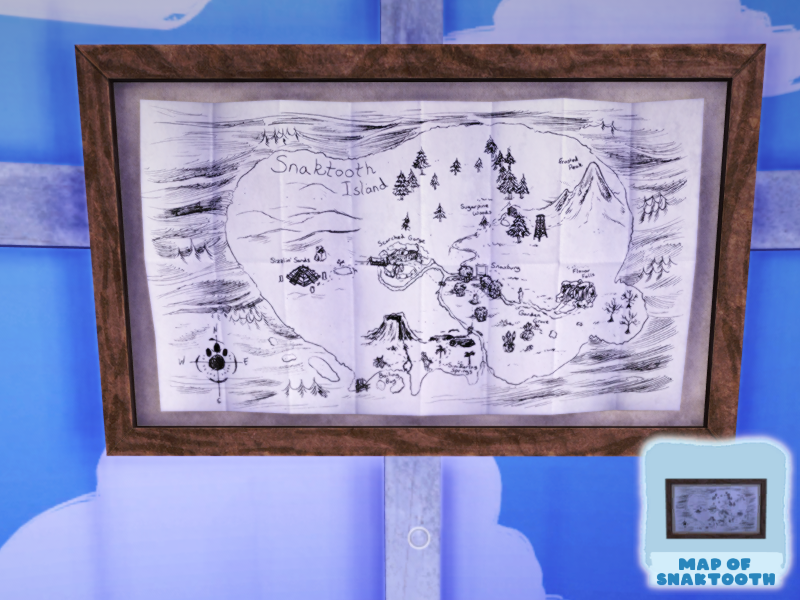
Naam: Map of Snaktooth
Source: Return Triffany to Snaxburg.
Details: Automatic reward.
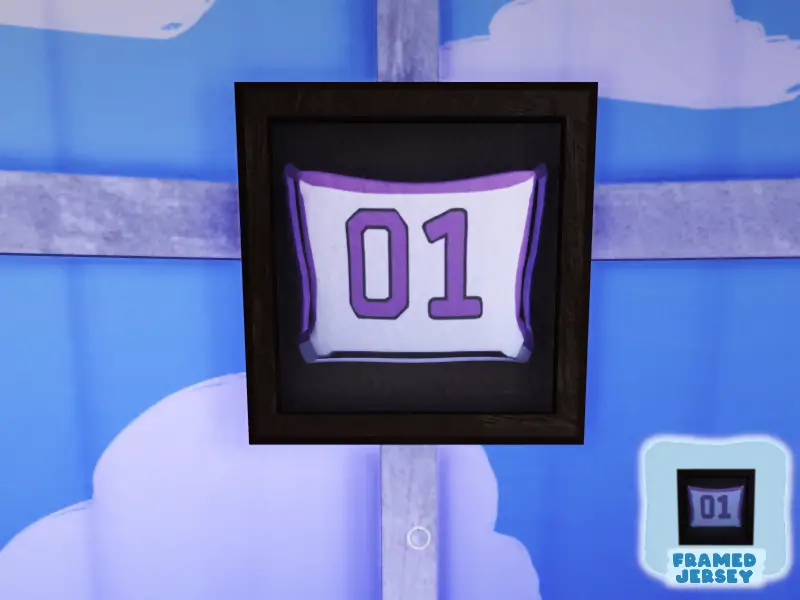
Naam: Framed Jersey
Source: Maken 2 basketball shots in Snaxburg without letting the ball hit the ground.
Details: From Chandlo, given along with Rock Climbing Holds (Muur). It’s easier than it sounds. The basketball net is behind the old mill where Chandlo and Snorpy live. Pick up a basketball and make a goal, catch the ball before it lands, and make a second goal.

Naam: Platinum Award
Source: Find a lost item for Wiggle.
Details: In Simmering Springs, on the pillar of rocks on the left. Place your Lunchpad on the ocean floor, launch up to the lowest rock, and jump to the next highest. Van hier, you can either sprint-jump to the left, or Lunchpad straight up. Op dit punt, you can grab the bag.

Naam: Conspiracy Board
Source: Catch 5 Snakpods in under 30 seconden.
Details: From Snorpy, given along with Blueprint Print (Interior). Every wilderness area on Snaktooth proper has five Snakpods that spawn.
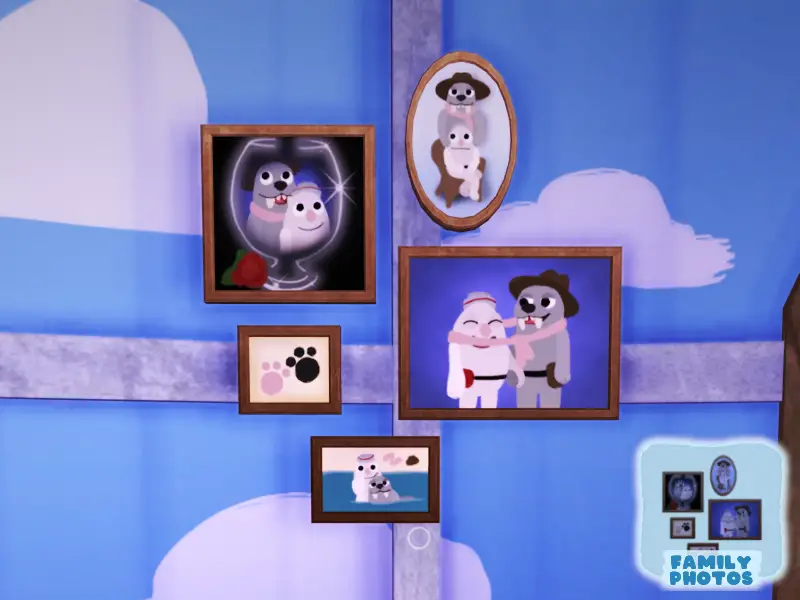
Naam: Family Photos
Source: Try to return Eggabell to Snaxburg.
Details: Automatic reward at the end of Eggabell’s first quest chain, after the point where Filbo joins you on Frosted Peak to help.
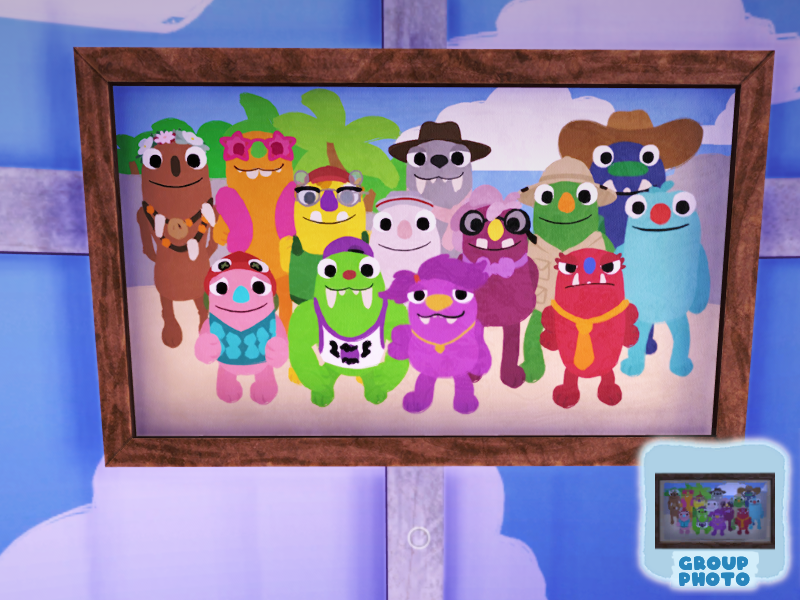
Naam: Group Photo
Source: Return all the grumpuses to Snaxburg.
Details: Automatic reward, given by Filbo along with Streamers (Ceiling), after the end of Eggabell’s quest chain.
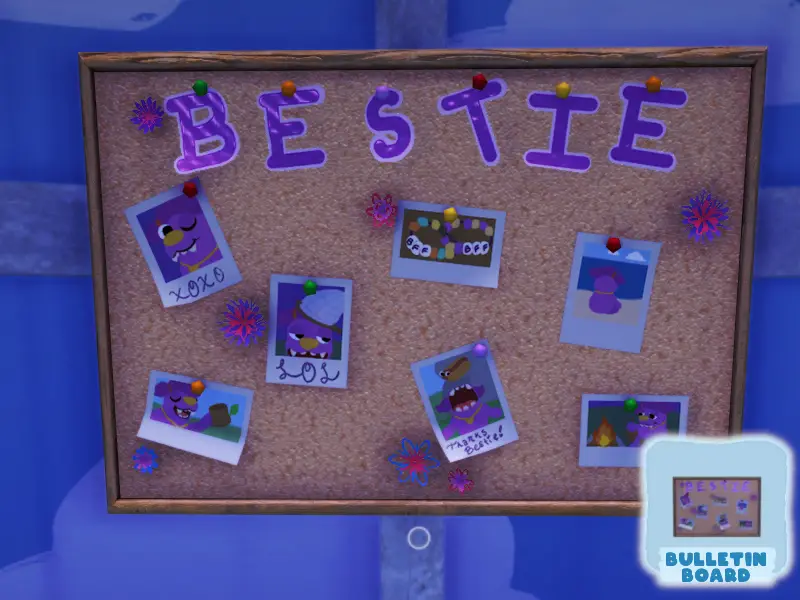
Naam: Bulletin Board
Source: Feed an Instabug to the mystery grumpus.
Details: Beffica is the grumpus. Tekst: “– leuk vinden — totes — instabug –” Instabug spawns in Frosted Peak, but hides in bushes and can’t be scared or knocked out. Set your Snak Trap next to a shaking bush, bring out your Snaxscope, and Instabug will come out and pose. You’ll have to quickly put away the camera and close the trap to catch it. (I found it easier to use the controller for the camera and the mouse for the trap.)

Naam: Science Poster
Source: Transform a grumpus to show all 8 Snakpod variants.
Details: From Floofty, given along with Chemistry Rug (Rug). Every area except Snaxburg and Broken Tooth have a snakpod. I’ve posted a guide if you need help finding any.
- Crispy Snakpod (Tuinergrove)
- Twisty Snakpod (Smaak valt)
- Grumpy Snakpod (Sudderende veren)
- Fruity Snakpod (Kookbaai)
- Puffy Snakpod (Geschreven kloof)
- Meaty Snakpod (Sizzlin’ Zand)
- Nutty Snakpod (Sugarpine Woods)
- Melty Snakpod (Frosted Peak)
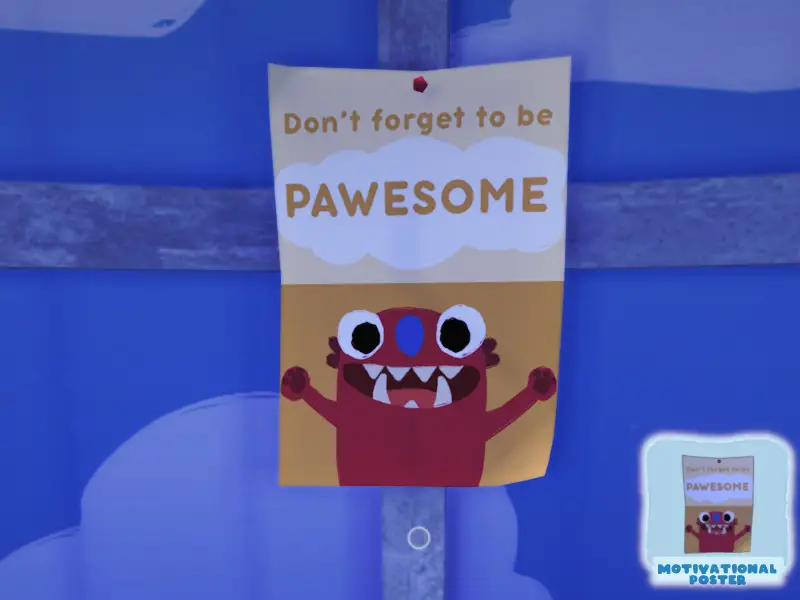
Naam: Motivational Poster
Source: Transform a grumpus to show 8 different chocolate-containing snax.
Details: From Cromdo, given along with Antique Print (Interior). Er zijn er maar 10 available snax.
Sugarpine Woods: Kwookie – Charmallow
Frosted Peak: Chippie – Chillynilly – Scoopy – Scoopy Banoopy – Melty Snakpod – Baby Cakelegs – Daddy Cakelegs
Broken Tooth: Chocolant
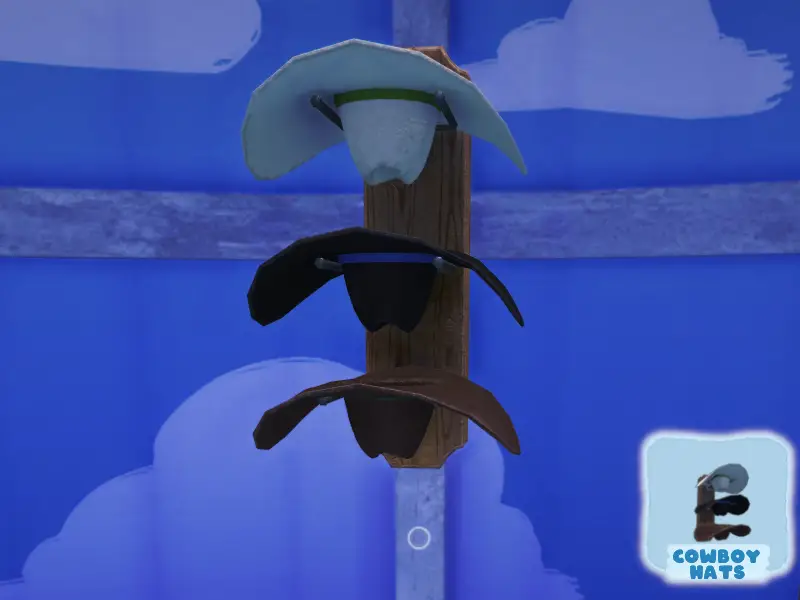
Naam: Cowboy Hats
Source: Pick up all of Cromdo’s discarded posters.
Details: From Wambus, given along with Ceiling Fan (Ceiling). A few days after the mail request from Cromdo asking you to put up advertisement fliers all over town, you’ll have to go around and clean them up again.
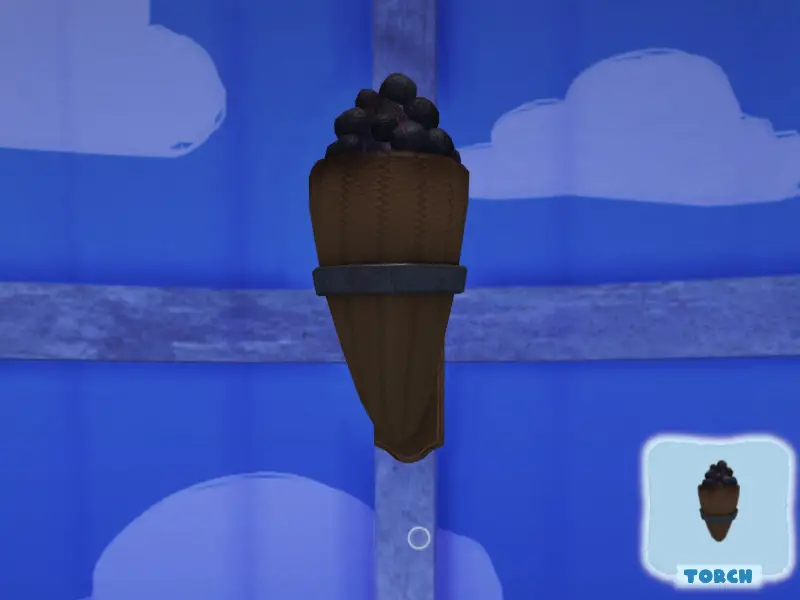
Naam: Fakkel
Source: Purge a Spaghider.
Details: From Shelda. Tekst: “In a land both ancient and yet renewed…it lurks above in tangled branches…its prey dangling by a thread.” Splash a Deviled Eggler or the Tikkada Masala with cheese to get the Spaghider to grab it. This will catch the Spaghider on fire, and it’ll fall off the tree. Toss a jar of Shrink Spice at it, then catch it in your Snak Trap. (If it climbs back into the tree, you can launch the Snak Trap with your Lunchpad.)
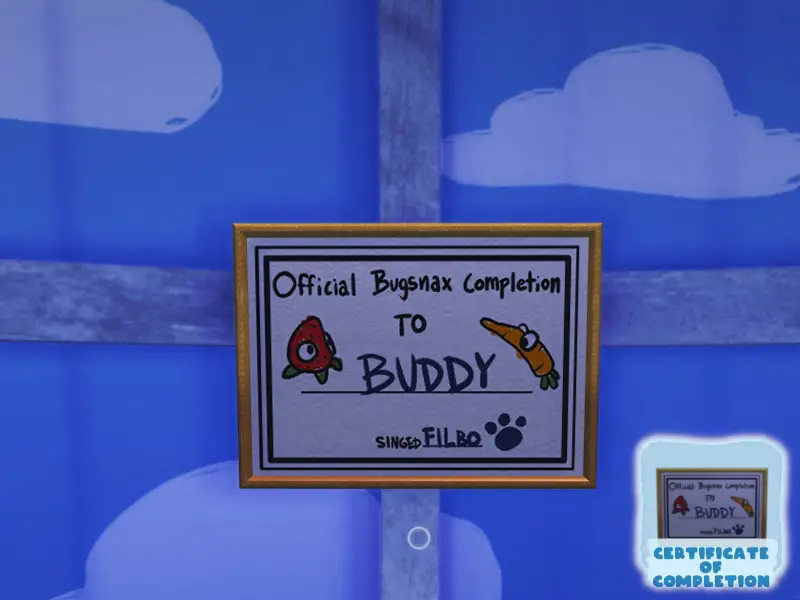
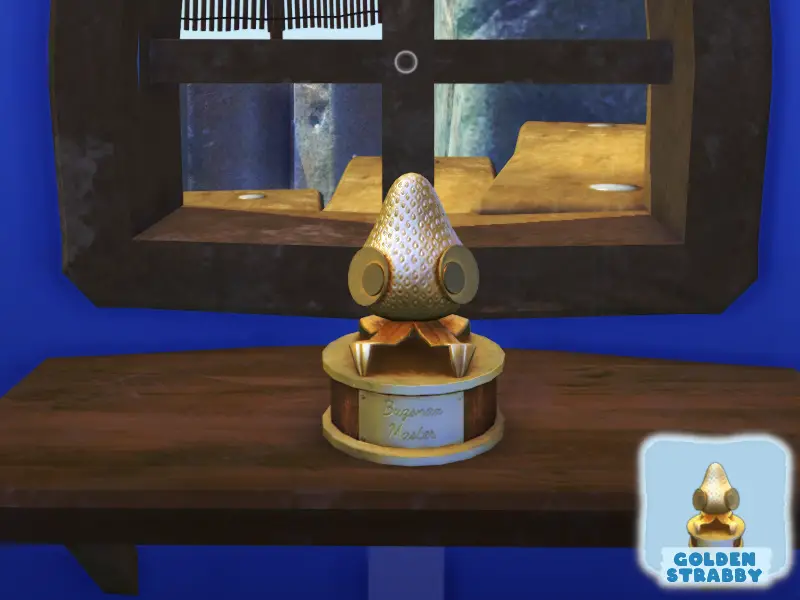
Naam: Certificate of Completion
Source: Catch all Bugsnax.
Details: From Filbo, given along with Golden Strabby (Trinket). Because there is a secret snak that isn’t counted in the total, you technically only have to collect 111 van de 112.
Ceiling
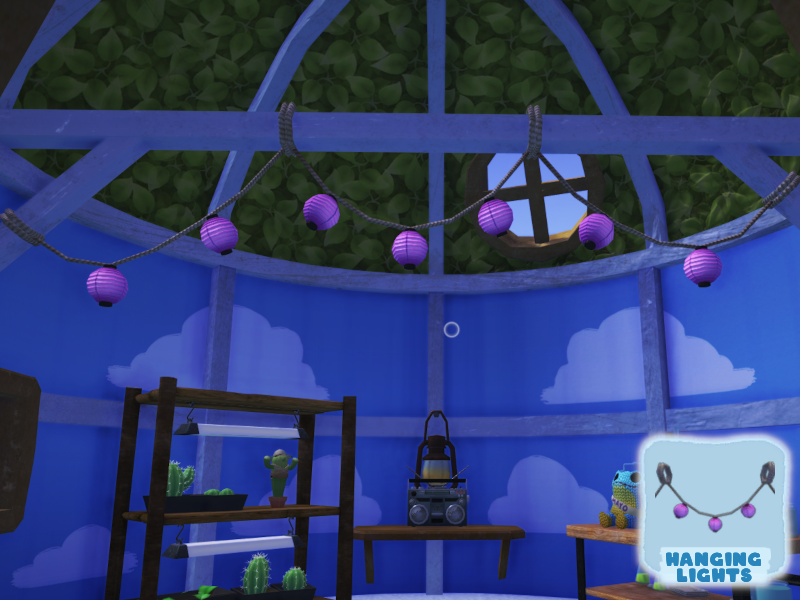
Naam: Hanging Lights
Source: Return Wiggle to Snaxburg.
Details: Automatic reward, kan niet gemist worden.
HTTPS://steamuserimages-a.akamaihd.net/ugc/1831288304595002214/1A67FAE29BBA2AB946F930CB7353433425C123A7/
HTTPS://steamuserimages-a.akamaihd.net/ugc/1831288304595002214/1A67FAE29BBA2AB946F930CB7353433425C123A7/
HTTPS://steamuserimages-a.akamaihd.net/ugc/1831288304595002214/1A67FAE29BBA2AB946F930CB7353433425C123A7/
HTTPS://steamuserimages-a.akamaihd.net/ugc/1831288304595002214/1A67FAE29BBA2AB946F930CB7353433425C123A7/
HTTPS://steamuserimages-a.akamaihd.net/ugc/1831288304595002214/1A67FAE29BBA2AB946F930CB7353433425C123A7/
HTTPS://steamuserimages-a.akamaihd.net/ugc/1831288304595002214/1A67FAE29BBA2AB946F930CB7353433425C123A7/
- Tuinergrove: Dr Sodie
- Kookbaai: La Sodieux
- Sizzlin’ Zand: Sodie D
- Frosted Peak: Mt Sodie
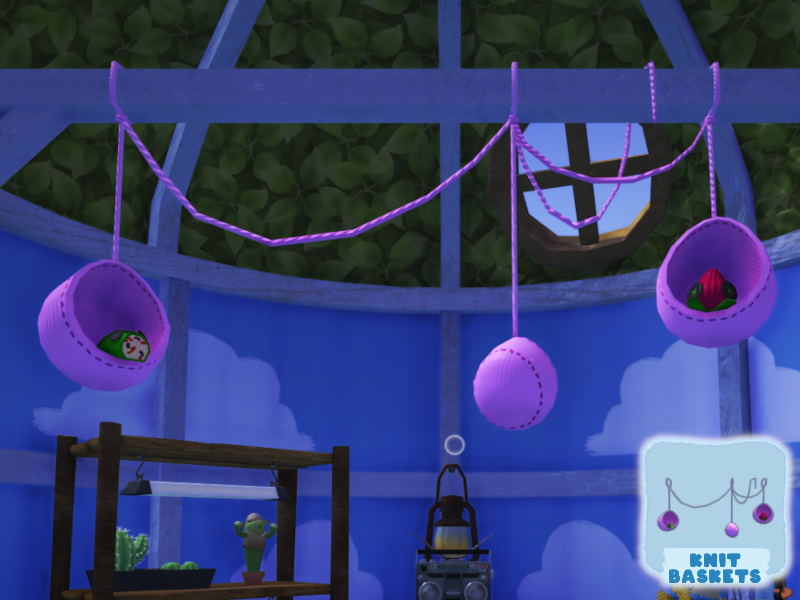
Naam: Knit Baskets
Source: Donate the mystery Bugsnak to Gramble’s barn.
Details: Tekst: “Something that flies around in the desert, but isn’t sweet, or meaty, or any kind of Cheepoof.” Black Lollive, from Sizzlin’ Zand.
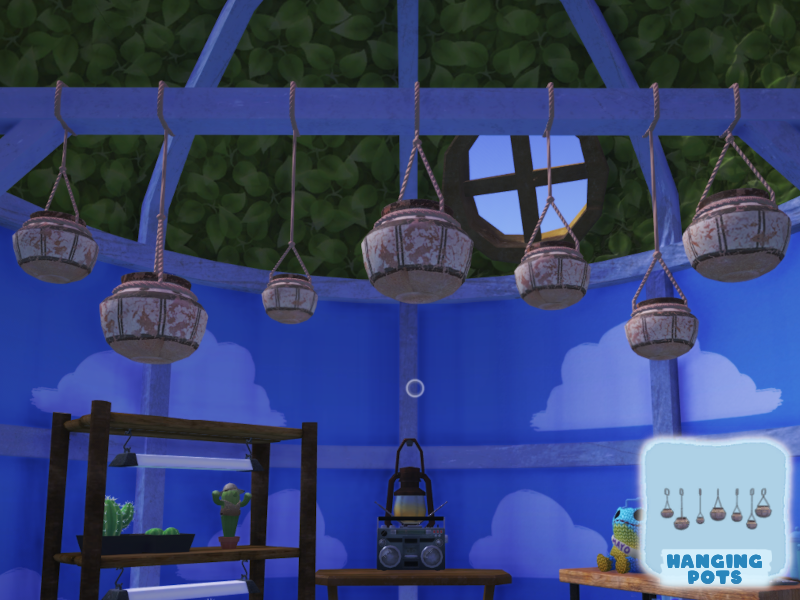
Naam: Hanging Pots
Source: Capture all Bugsnax in Frosted Peak.
Details: From Triffany. Required Bugsnax:
- Chippie
- Chillynilly (4 P.M – 4 BEN)
- Flutterjam (4 BEN – 4 P.M)
- Mt Sodie
- Stoofvogel
- Aggroll
- Banopper
- Scoopy
- Cheery
- Scoopy Banoopy
- Instabug
- Melty Snakpod
- Baby Cakelegs
- Daddy Cakelegs
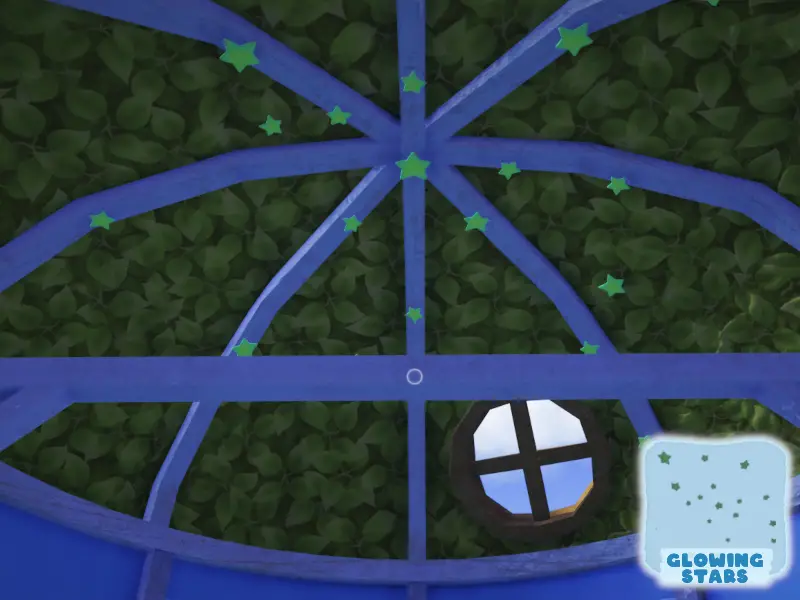
Naam: Glowing Stars
Source: Scan a Sandopede hanging from a Lollive.
Details: From Beffica. Splash a Sandopede with cheese, and the Lollive will pick it up.
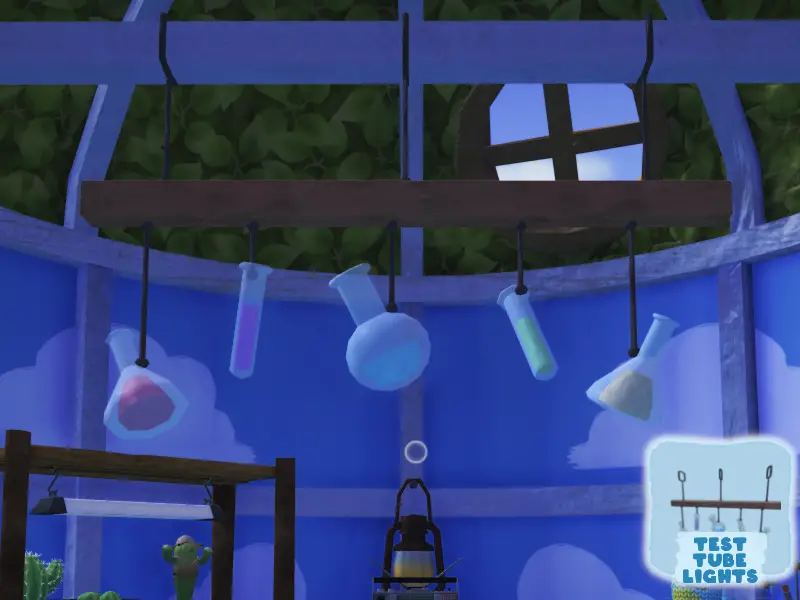
Naam: Test Tube Lights
Source: Transform a grumpus to show 3 different compound snax.
Details: From Floofty, given along with Science Print (Interior). Possible Bugsnax:
- Sugarpine Woods: Big Bopsicle
- Kookbaai: Paletoss Grande
- Sizzlin’ Zand: Prey Picantis
- Frosted Peak: Scoopy Banoopy
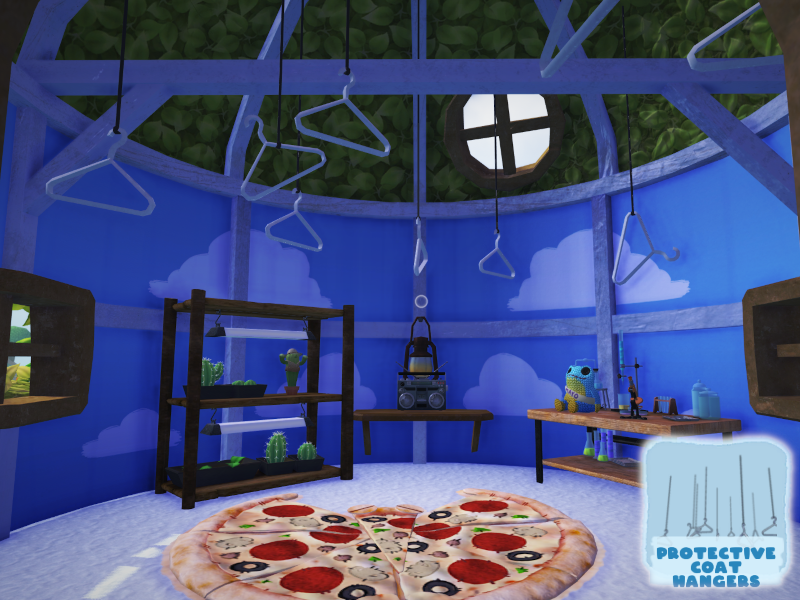
Naam: Protective Coat Hangers
Source: Catch 5 different bugsnax in under 60 seconden.
Details: From Snorpy. Probably easiest to do this in Flavor Falls.

Naam: Ceiling Fan
Source: Pick up all of Cromdo’s discarded posters.
Details: From Wambus, given along with Cowboy Hats (Hanging). A few days after the mail request from Cromdo asking you to put up advertisement fliers all over town, you’ll have to go around and clean them up again.
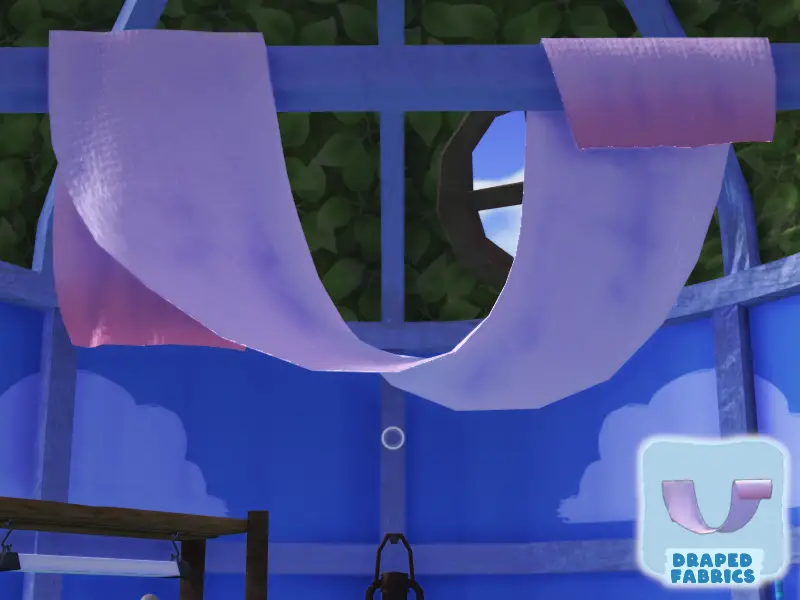
Naam: Draped Fabrics
Source: Stay on fire for over 30 seconden.
Details: From Eggabell, given along with First Aid Kit (Trinket). Easiest way to accomplish this is to go to Boiling Bay. Stand in one of the lava floes, and aim yourself at the wall behind the lava fall that feeds it. It’ll keep you from running around and getting extinguished.
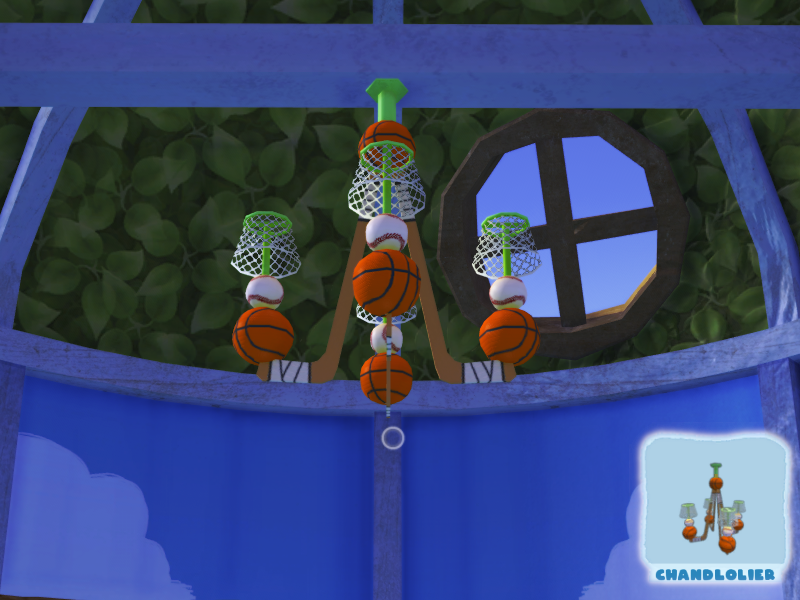
Naam: Chandlolier
Source: Capture all Bugsnax in Broken Tooth.
Details: From Chandlo. Required Bugsnax:
- Bunger Royale
- Cheddorb
- Millimochi
- Spaghider
- Clobsteroni
- Tikkada Masala
- Pielobite
- Chocolant
- Cellystix
- Deviled Eggler
- Cheddaboardle Rex
Naam: Snax Mobile
Source: Listen to all of the secret tapes.
Details: From Clumby, given along with Sodie Fountain (Lawn). The secret tapes are found in the Triplicate Space.
Interior (Wallpaper)
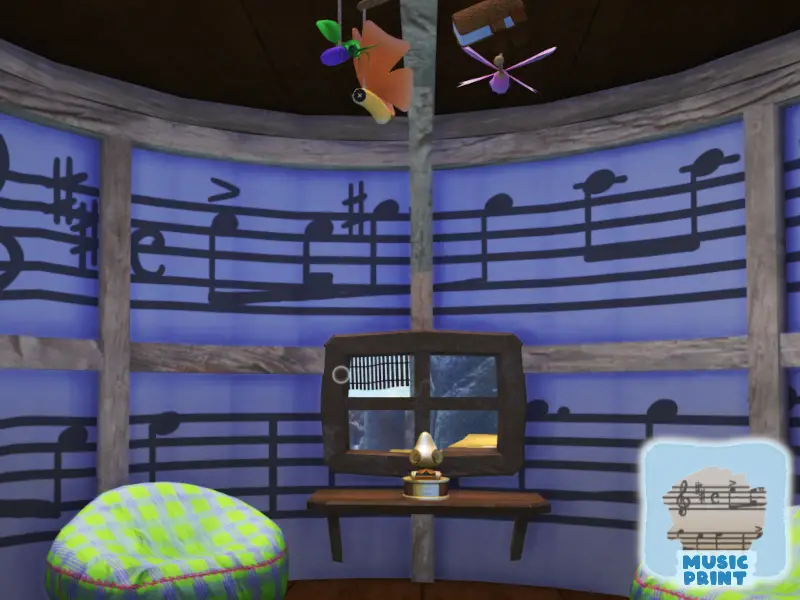
Naam: Music Print
Source: Transform a grumpus to show all 4 Sweetiefly variants.
Details: From Wiggle. Given along with Armoire (Meubilair(. Required Bugsnax:
- Sweetiefly (Tuinergrove)
- Lovely Sweetyfly (Sudderende veren)
- Crystal Sweetiefly (Geschreven kloof
- Rainbow Sweetiefly (Sugarpine Woods)
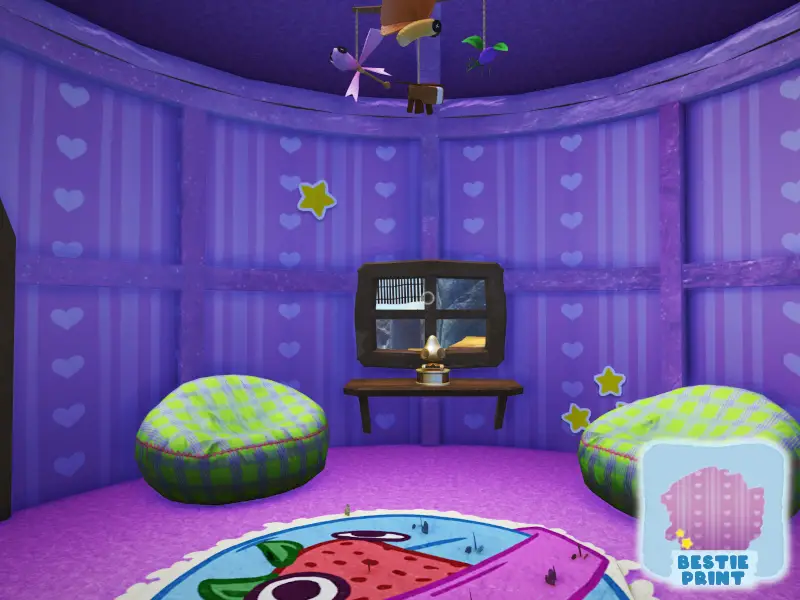
Naam: Bestie Print
Source: Scan a Hunnabee with a basketball stuck to it.
Details: From Beffica. In Sugarpine Woods, find one of Chandlo’s basketballs (the closest is on the cliff above the Big Bopsicle, use the Snak Grappler to retrieve it). You may find it easier to use the Lunchpad to launch the basketball at a Hunnabee as the targeting locks on it, while throwing it freehand won’t.
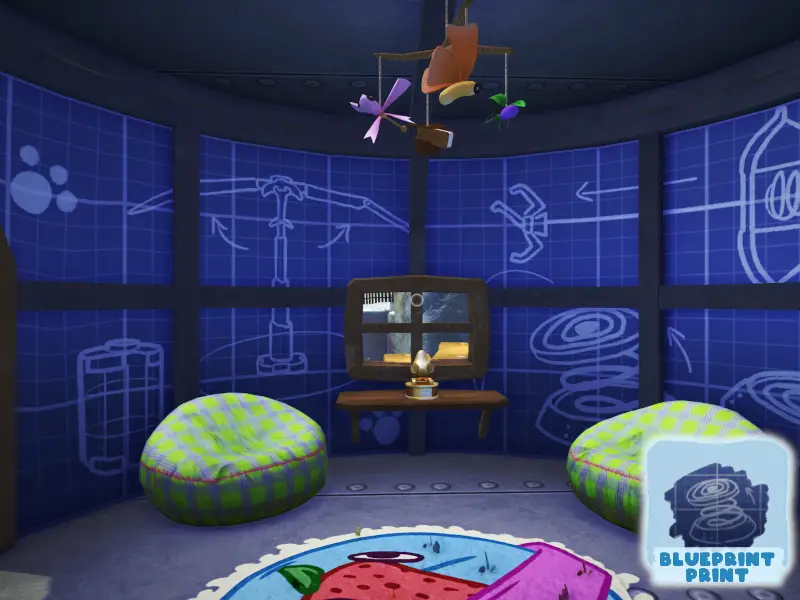
Naam: Blueprint Print
Source: Catch 5 Snakpods in under 30 seconden.
Details: From Snorpy, given along with Conspiracy Board (Hanging). Every wilderness area on Snaktooth proper has five Snakpods that spawn. See the Snakpod guide for all locations.
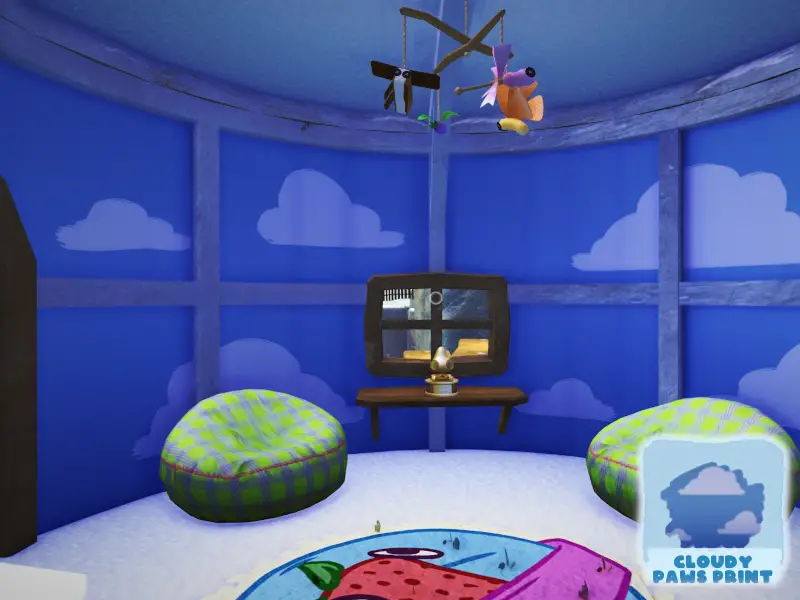
Naam: Cloudy Paws Print
Source: Investigate the intrusion at Snaxburg.
Details: From Filbo, given along with Painted Hut (Buitenkant). Automatic reward, kan niet gemist worden. Received after the ‘Snaxburg Isn’t Safe!’ story quest, which becomes available once Snorpy and Chandlo both return to Snaxburg.
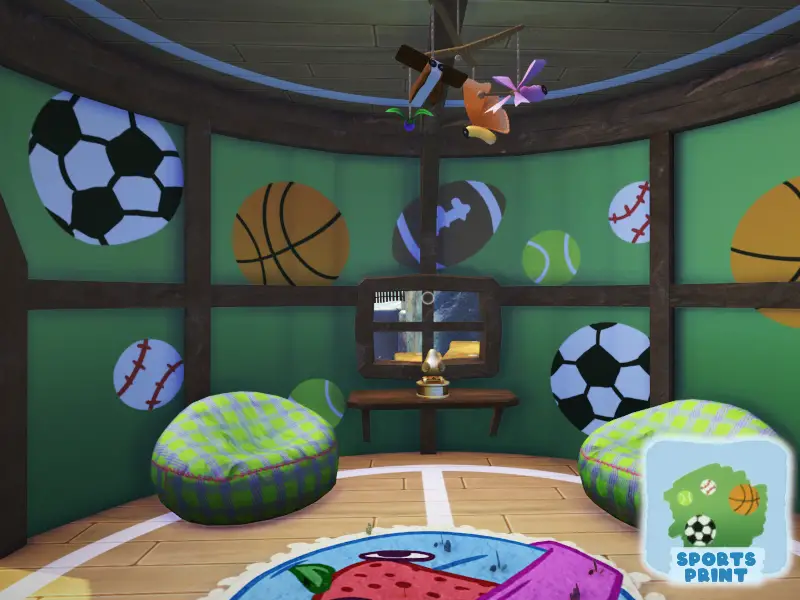
Naam: Sports Print
Source: Catch one too many snax with a fully expanded Snakpack.
Details: Secret reward from Chandlo, given along with Home Gym (Lawn). Donate at least 18 Bugsnax to Gramble’s barn to fully expand your Snakpack, fill it up with 18 Bugsnax, then try to catch another.
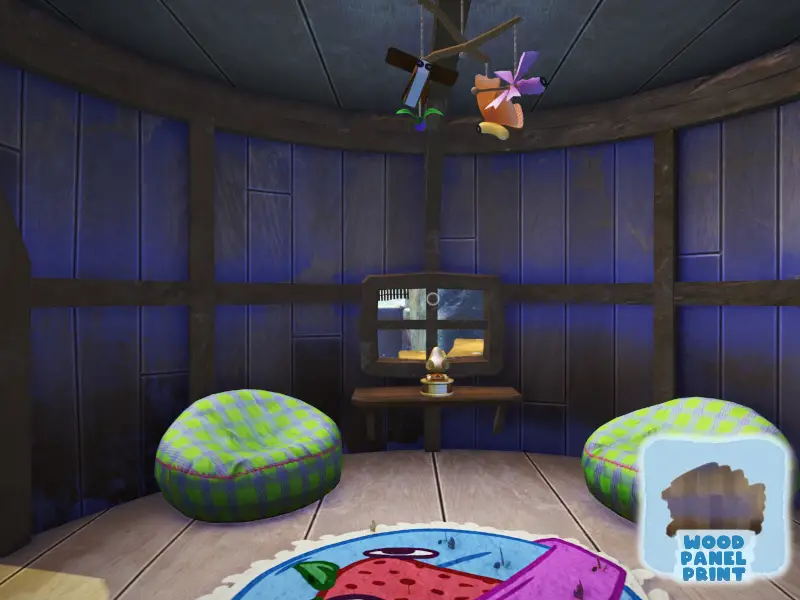
Naam: Wood Panel Print
Source: Feed a Caramel Poptick to the mystery grumpus.
Details: From Filbo, mystery grumpus is Wambus. Tekst: “– wrangle — Caramel Poptick — cactus–“. Caramel Popticks can only be found in Flavor Falls during rainy weather. From the entrance, follow the right wall, until the low cave where you have to duck under the roots. There will be three of them hopping around an area with a Pinkle and an Inchwrap. It may be easier to catch the Inchwrap to keep it from getting in your way.
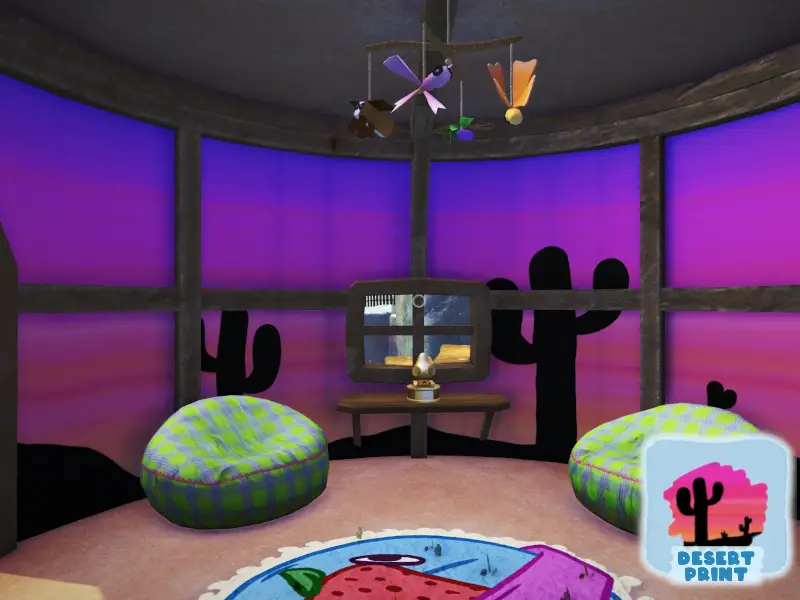
Naam: Desert Print
Source: Capture all Bugsnax in Sizzlin’ Zand.
Details: From Shelda. Requires breaking Preying Picantis into its composite snax, though the Cheepoof is not on the list, as it’s from Scorched Gorge. Required Bugsnax:
- Loaded Spuddy
- Tacroach
- Prey Picantis
- Black Lollive
- Buffelocust
- Eggler
- Flapjackarak
- Scorpepper
- Incherrito
- Black Razzby
- Sodie D
- Cheezer
- Meaty Snakpod
- Bombino
- Mothza Supreme
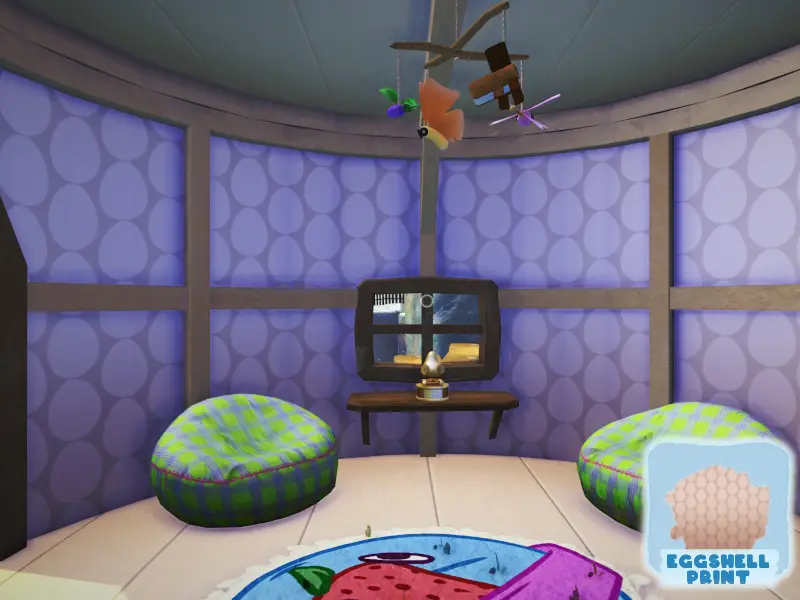
Naam: Eggshell Print
Source: Complete the interview with Eggabell.
Details: Given along with Medical Egg Rug (Rug) after doing Eggabell’s actual interview.
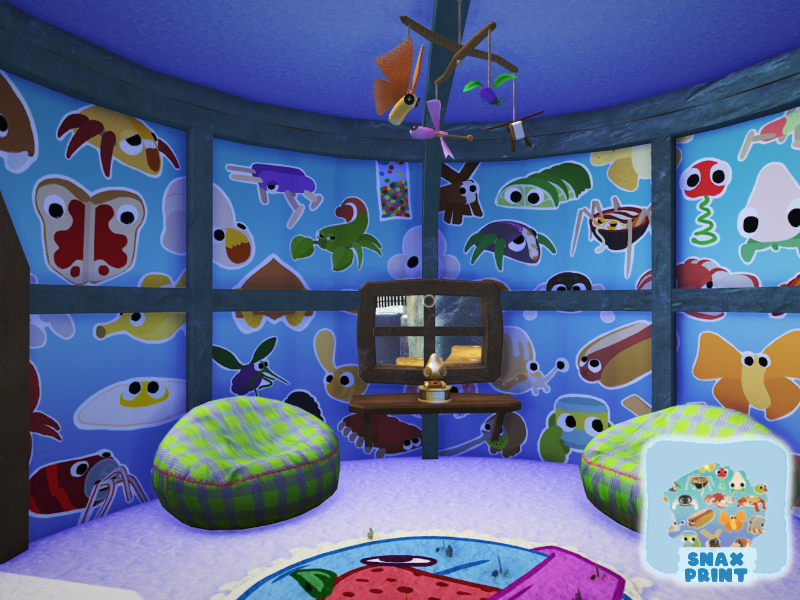
Naam: Snax Print
Source: Watch the ‘founding of Snaxburg’ tape.
Details: From Lizbert, given along with Strabby Shelf (Meubilair). Received after watching Tape #0 that Eggabell gives you after her true interview.

Naam: Science Print
Source: Transform a grumpus to show 3 different compound snax.
Details: From Floofty, given along with Test Tube Lights (Ceiling). Possible Bugsnax:
- Sugarpine Woods: Big Bopsicle
- Kookbaai: Paletoss Grande
- Sizzlin’ Zand: Prey Picantis
- Frosted Peak: Scoopy Banoopy
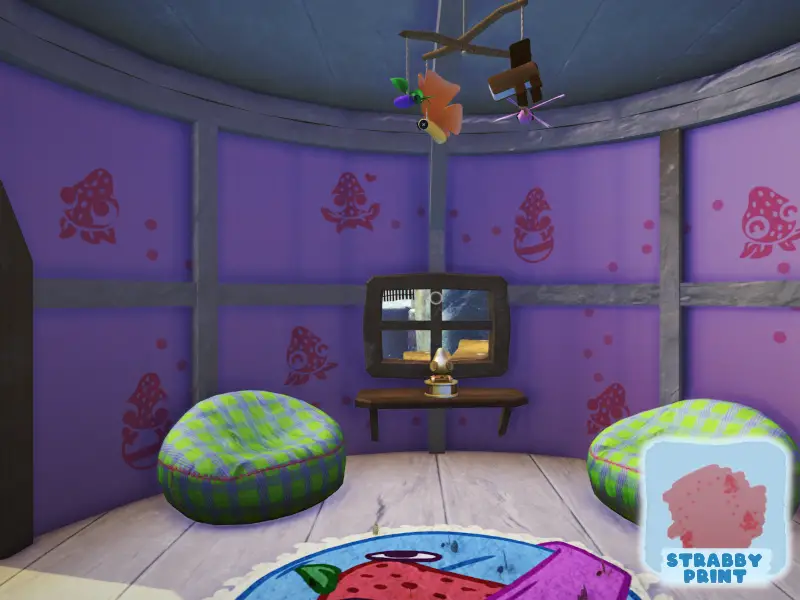
Naam: Strabby Print
Source: Donate the mystery Bugsnak to Gramble’s barn.
Details: Tekst: “I saw a Picantis lose a fight to a Flapjackarak, and a small Bugsnak popped out of it!” Required snak is Tacroach, which is found after breaking a Preying Picantis into its composite snax, by extinguishing its fire.
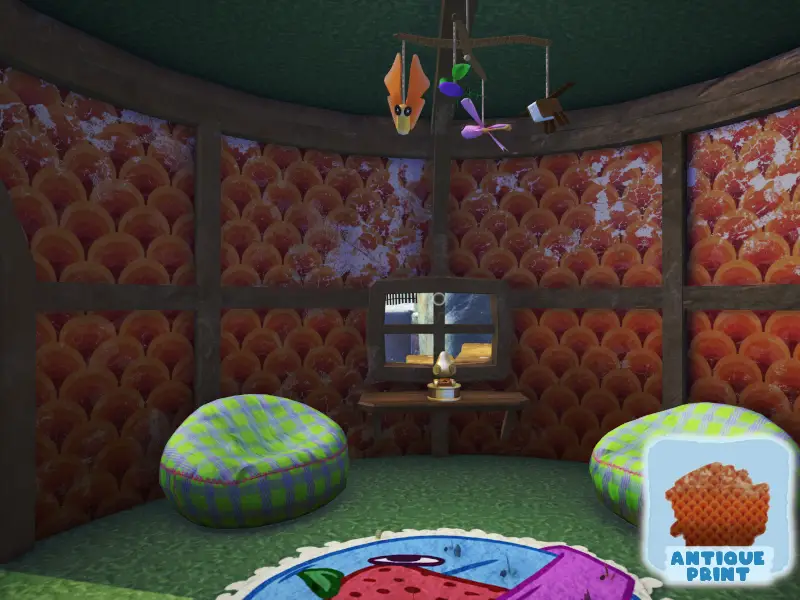
Naam: Antique Print
Source: Transform a grumpus to show 8 different chocolate-containing snax.
Details: From Cromdo, given along with Motivational Poster (Hanging). Possible snax:
- Sugarpine Woods: Kwookie – Charmallow
- Frosted Peak: Chippie – Chillynilly – Scoopy – Scoopy Banoopy – Melty Snakpod – Baby Cakelegs – Daddy Cakelegs
- Broken Tooth: Chocolant
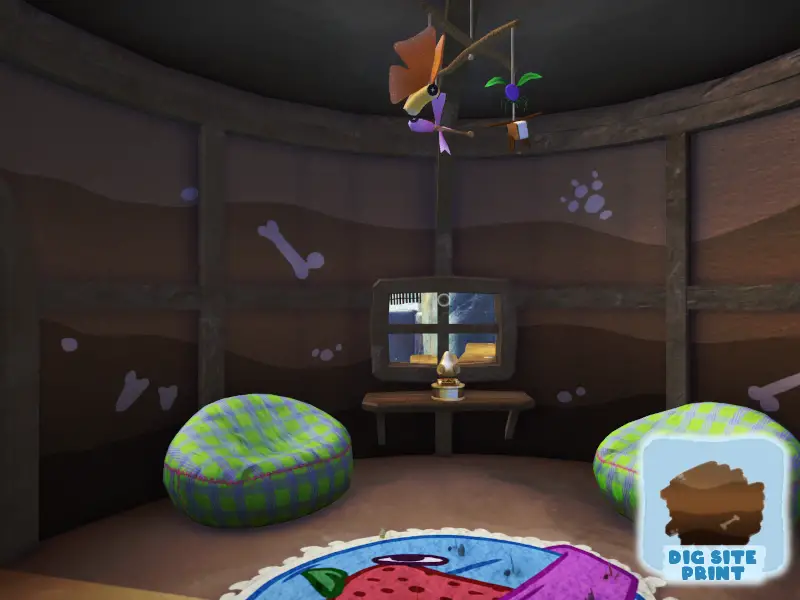
Naam: Dig Site Print
Source: Scan a Sodie watering Wambus’s old garden in Garden Grove.
Details: From Triffany. Place your Lunchpad in the stream in the Sodie’s path, and aim it over the fence. It may take a few tries to get it right. Once the Sodie is in the garden, it’ll settle into a circular path there. Splash one of the buried Bugsnax with sauce, and the Sodie will spray it.
Buitenkant (Paint)
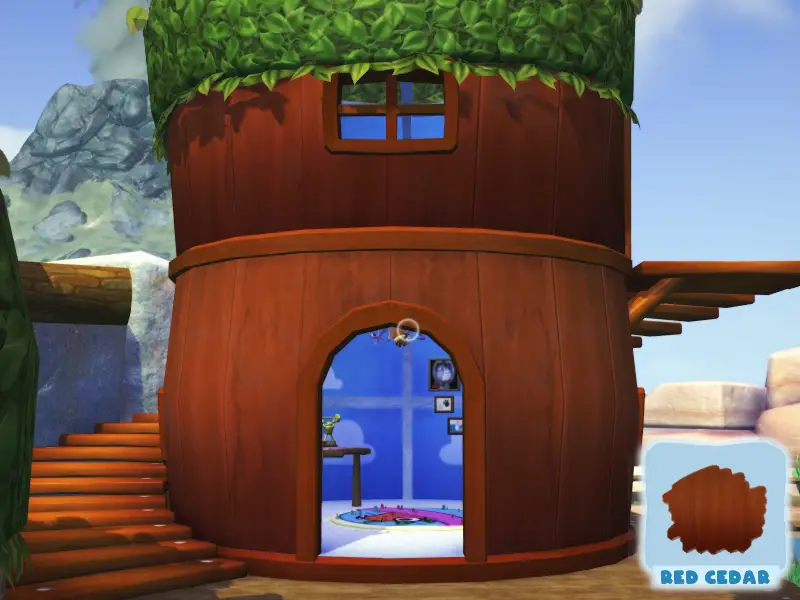
Naam: Red Cedar
Source: Return Chandlo to Snaxburg.
Details: Automatic reward, kan niet gemist worden.
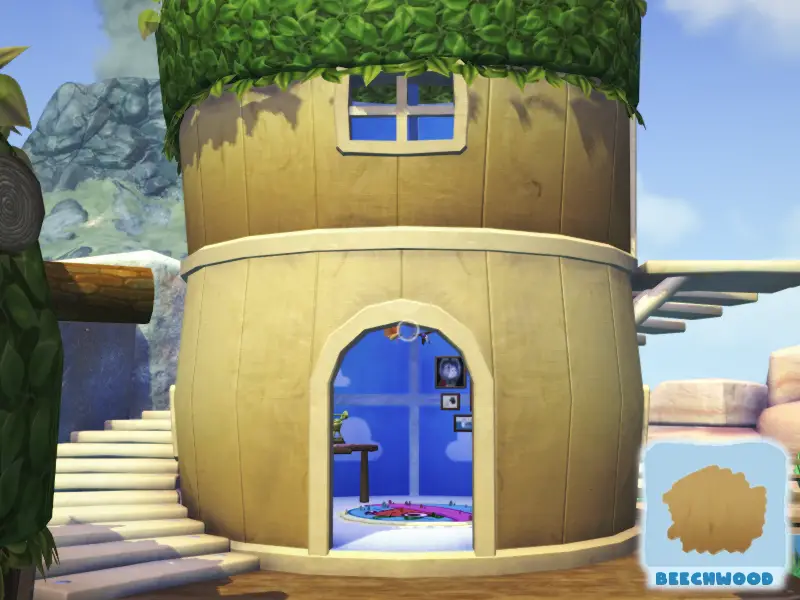
Naam: Beechwood
Source: Find a lost item for Wambus.
Details: In Flavor Falls, return to the nook where you woke up under the broken bridge. Place your Lunchpad at the bottom of the cliff, and aim it upwards. You can either spring straight up and grab the bag from there, or aim to land on the bridge if you have trouble with the timing. Hands down the easiest bag to get.
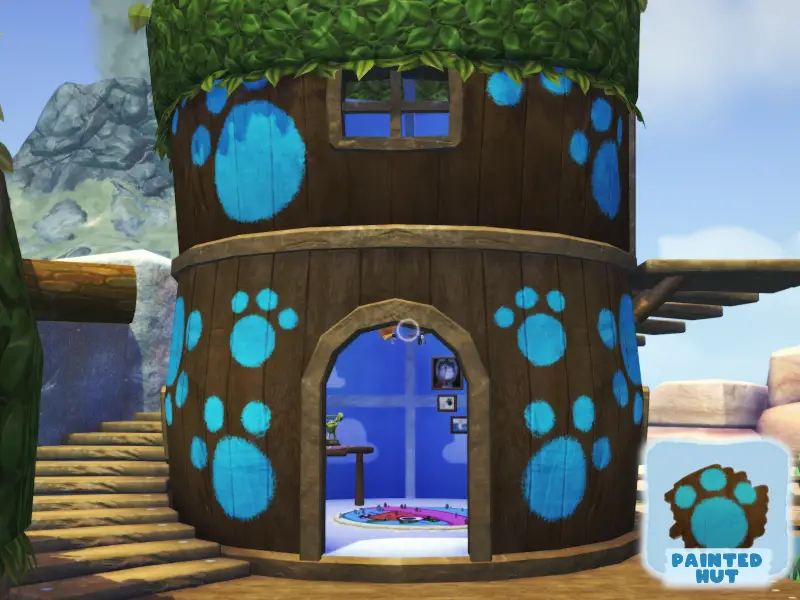
Naam: Painted Hut
Source: Investigate the intrusion at Snaxburg.
Details: From Filbo, given along with Cloudy Paws Print (Interior). Automatic reward, kan niet gemist worden. Received after the ‘Snaxburg Isn’t Safe!’ story quest, which becomes available once Snorpy and Chandlo both return to Snaxburg.
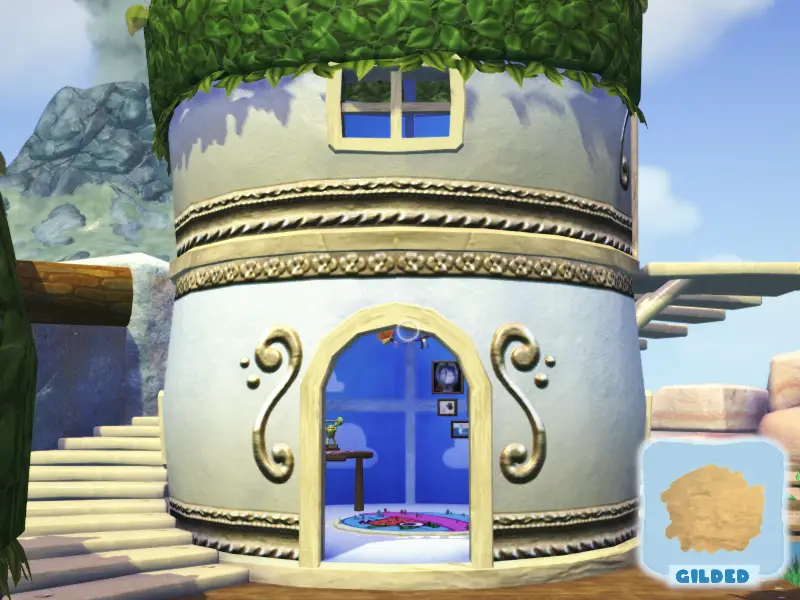
Naam: Gilded
Source: Perform a Power nap.
Details: Secret reward from Wiggle, given along with Luxury Bed (Bed). Sleep less than 15 notulen. Bijvoorbeeld, go to bed after 4:45 AM and wake up at 5 BEN.
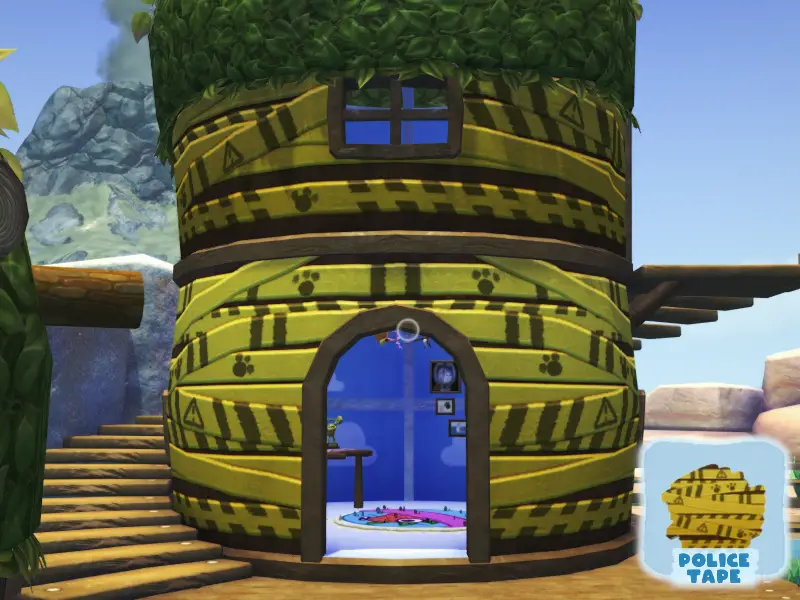
Naam: Police Tape
Source: Remove toilet paper from the outhouse.
Details: Secret reward from Cromdo. Take all the toilet paper out of the outhouse, and wait for a Grumpus to use it.
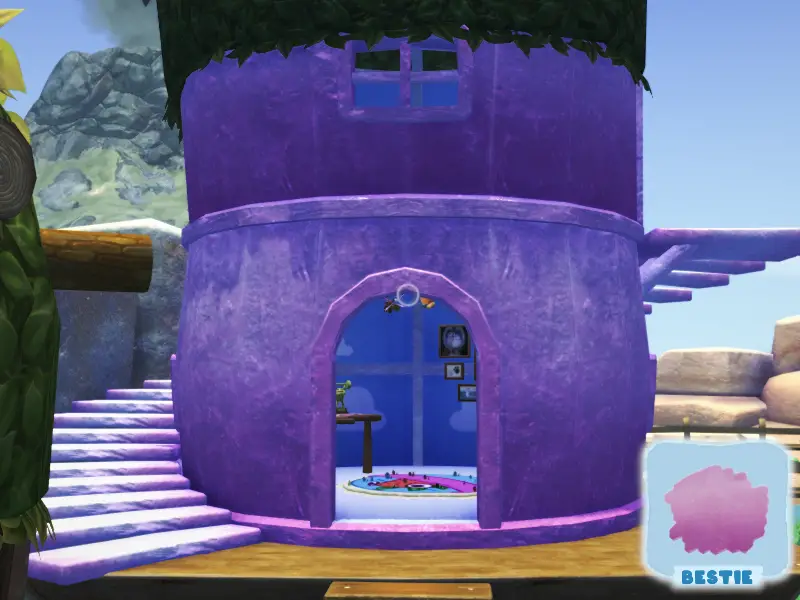
Naam: Bestie
Source: Scan a Crapple carrying another Crapple.
Details: From Beffica. In Simmering Springs, use chocolate (either a trail on the ground or coating your Buggy Ball) to lure a Crapple from one side of the beach to the other. Once both are on the same side, cover one of them with chocolate, and it’ll get picked up by the other.
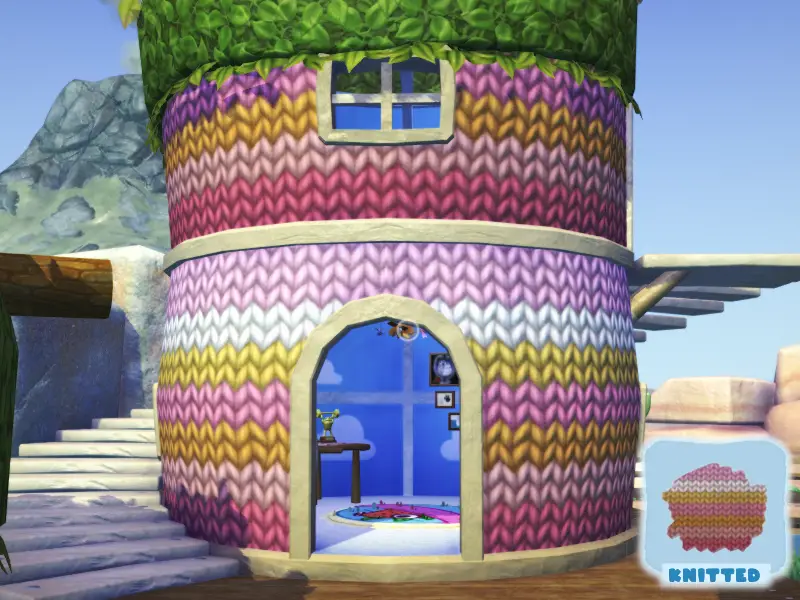
Naam: Knitted
Source: Donate the mystery Bugsnak to Gramble’s barn.
Details: Tekst: “A fruity Snak that loves the cold but isn’t frosty… and isn’t so evasive either.” The mystery snak is Cheery. You need to break apart the Scoopy Banoopy by setting it on fire and waiting, then catch the Cheery in your Snak Trap.
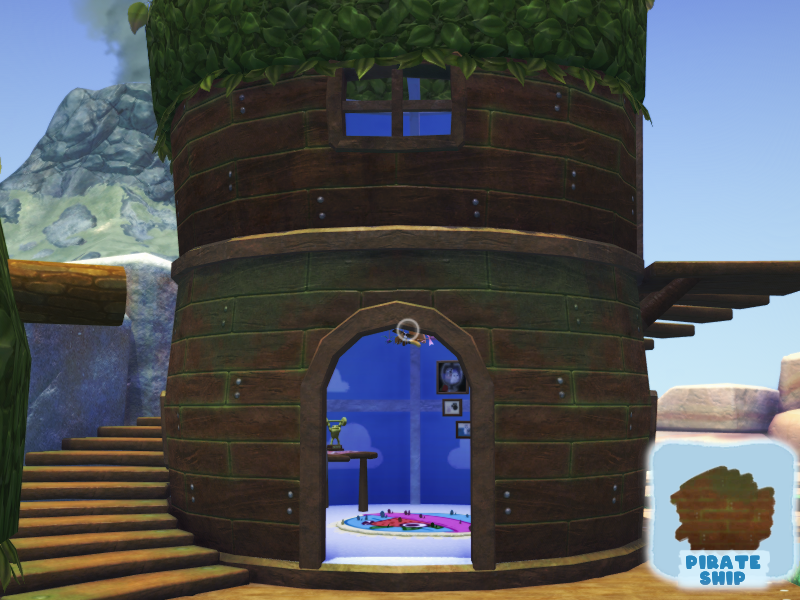
Naam: Pirate Ship
Source: Capture all Bugsnax in Boiling Bay
Details: From Floofty. Bugsnax required:
- Groene crapple
- Grapeskeeto
- Gold Kweeble
- Greater Cocomite
- Lesser Cocomite
- La Sodeaux
- Noedelder
- Paletoss
- Paletoss Grande
- Red Banopper
- Flaming Cheepoof
- Sherbie
- Fruity Snakpod
- Minimaki
- Megamaki
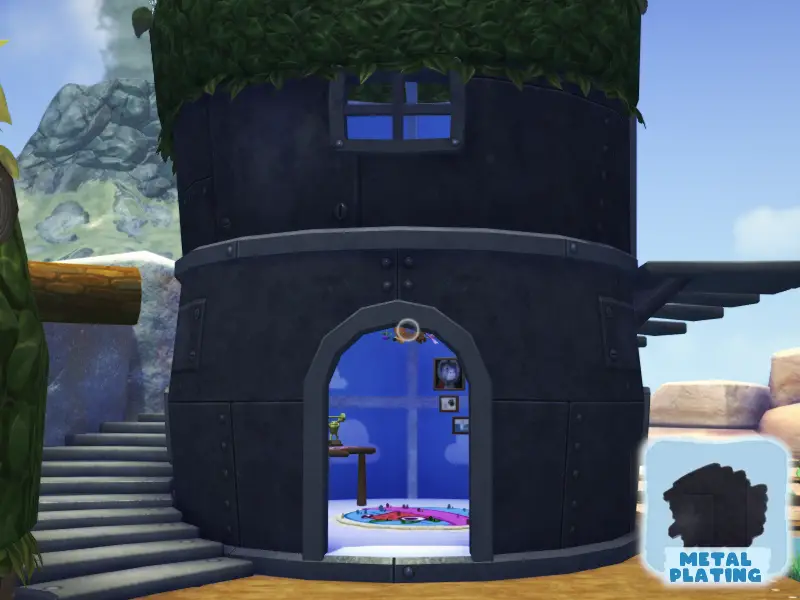
Naam: Metal Plating
Source: Feed an Aggroll to the mystery grumpus.
Details: From Filbo, mystery grumpus is Snorpy, given along with Metalworks Flower (Tuin). The only Aggroll is in Frosted Peak, frozen in ice in the cave where you first found Eggabell. Use your Trip Shot on the flare and aim it at the ice to thaw. Once the Aggroll is free, steal its ‘shell’ with your Snak Grappler to catch it.
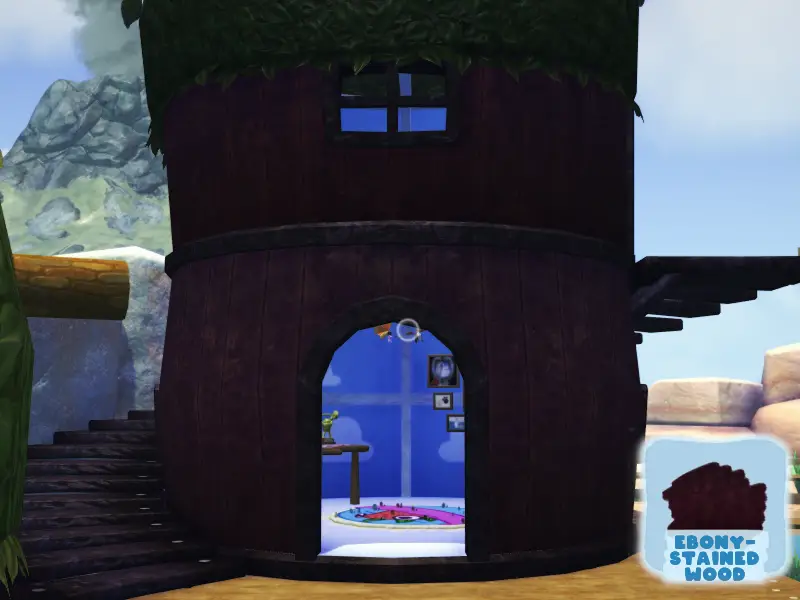
Naam: Ebony-Stained Wood
Source: Purge a Razzby.
Details: From Shelda. Tekst: “Red as rubies… a deviously adorable fruit… skittering across the sand.” Razzby is in Simmering Springs.
Naam: Bone and Stone
Source: Scan a Pinkle wearing an Aggroll box.
Details: From Triffany, given along with Bone and Stone Bed (Bed). The only place to find both of these is in the cave on Frosted Peak where you first found Eggabell. Both Bugsnax are frozen in ice. The Aggroll you can thaw by using your Trip Shot on the closest flare, but the Pinkle is too far. Use the Lunchpad to launch the Stewdler at it instead. Use your Snakgrappler to steal the Aggroll’s box and toss it on the ground (I’d suggest catching the Aggroll to keep it from interfering). Take the Pinkle’s jar, but hold onto it. You can try to chase the Pinkle to get it to go in the right direction, if it helps. Once it claims the box, toss the jar aside, and scan the Pinkle.
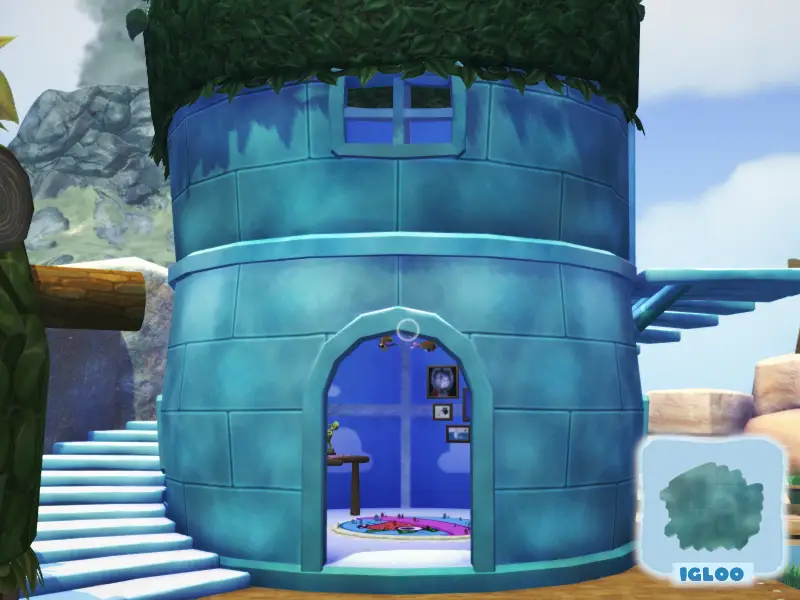
Naam: Igloo
Source: Fall from the uppermost levels of Frosted Peak to the bottom.
Details: From Eggabell, given along with Snow Grump (Lawn). In Frosted Peak, climb all the way up to the area with the abandoned camp. Sprint towards the edge of the cliff with the jelly splatters, and take a leap.
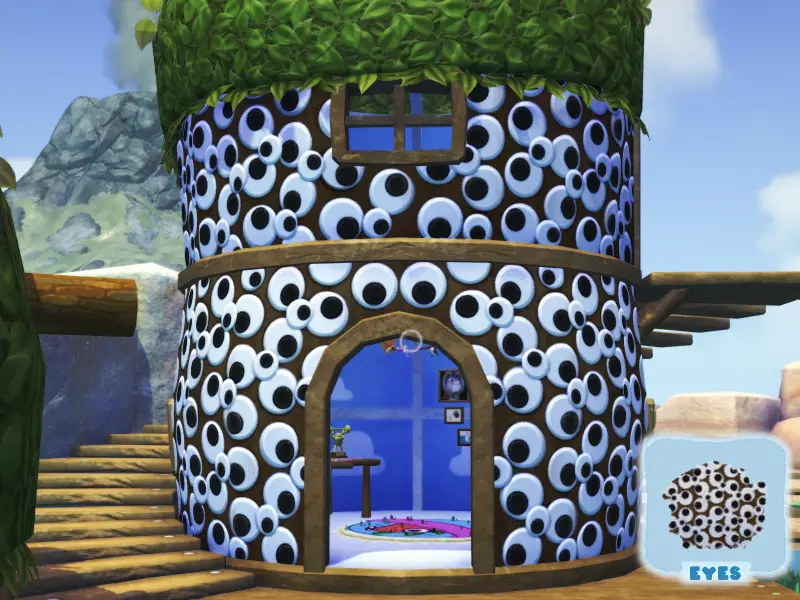
Naam: Ogen
Source: Pick up the Triangle Key.
Details: Secret reward from a mystery grumpus, given along with Eyes (Buitenkant). There’s a cave on Broken Tooth that takes a bit of work to open.
Tuin
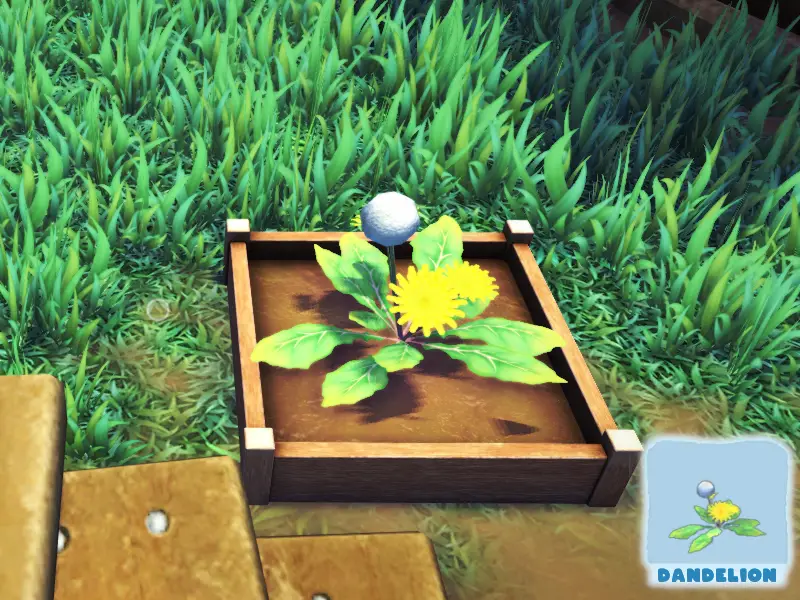
Naam: Paardebloem
Source: Return Filbo to Snaxburg.
Details: Automatic gift; can’t be avoided. Given along with Basic Furniture (Meubilair).
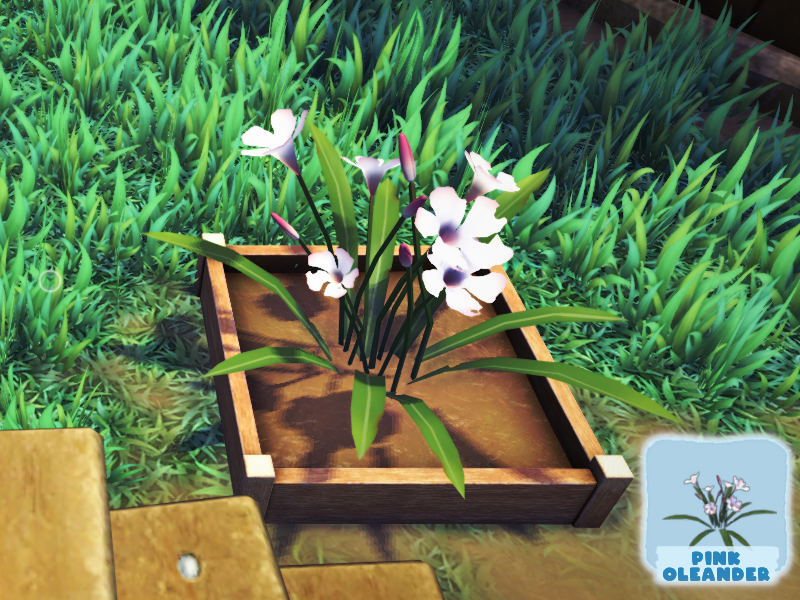
Naam: Pink Oleander
Source: Donate the mystery Bugsnak to Gramble’s barn.
Details: Tekst: “I don’t know what it was called, but it looked like a big heart flying in the sky!” The snak is Lovely Sweetiefly, in Simmering Springs. There’s one right in front of the gate to Snaxburg you can catch by putting your Snak Trap on the highest pool (watch for the Sweetiefly to land to see where).
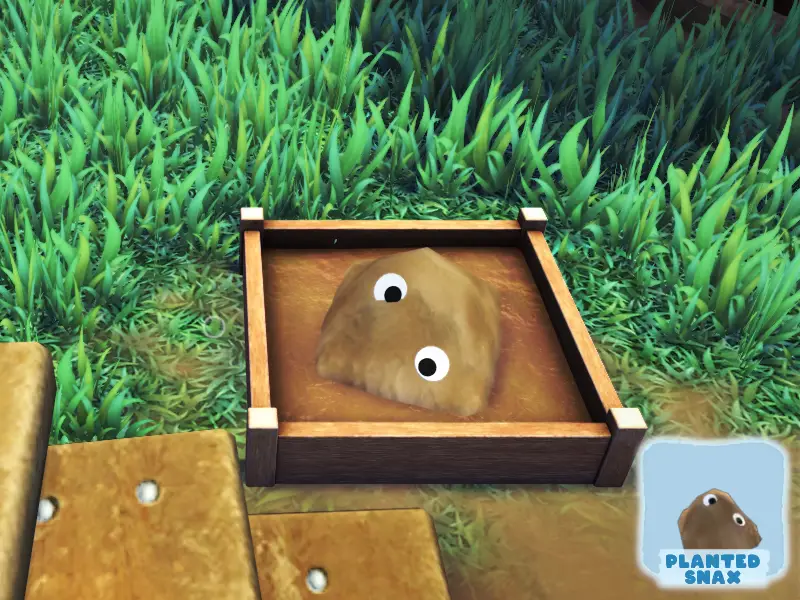
Naam: Planted Snax
Source: Catch Cactriffy out and about.
Details: Secret reward from a mystery ‘grumpus’, given along with Cowboy Hat Roof (Roof). Scan Cactriffy when she’s anywhere outside of Wambus and Triffany’s house, usually in the science tent or next to the sauce garden.
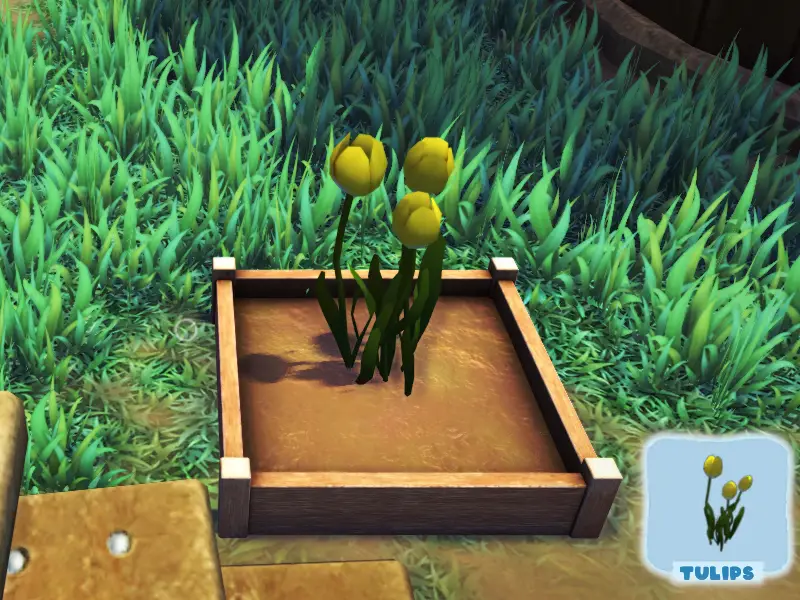
Naam: Tulips
Source: Return Cromdo to Snaxburg.
Details: Automatic reward, kan niet gemist worden.
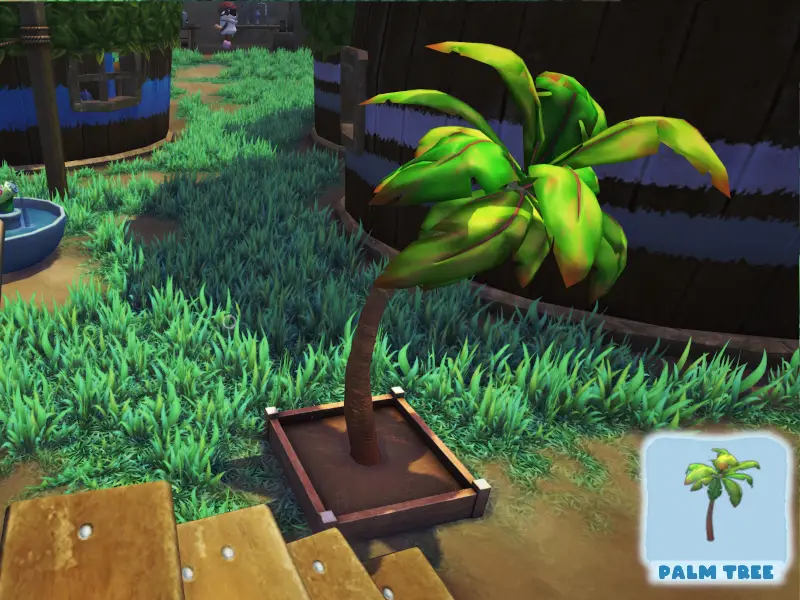
Naam: Palm Tree
Source: Capture all Bugsnax in Simmering Springs
Details: From Wiggle. Required Bugsnax:
- Kweeble
- Crapple
- Pineantula
- Orange Peelbug
- Razzby
- Grapeskeeto (4 P.M – 4 BEN)
- Snaquiri
- Tropicabug
- Lovely Sweetiefly
- Baja Tacroach (6 P.M – 4 BEN)
- Waffstackarak (4 BEN – 11 BEN, summoned by ringing Wiggle’s dinner bell)
- Grumpy Snakpod
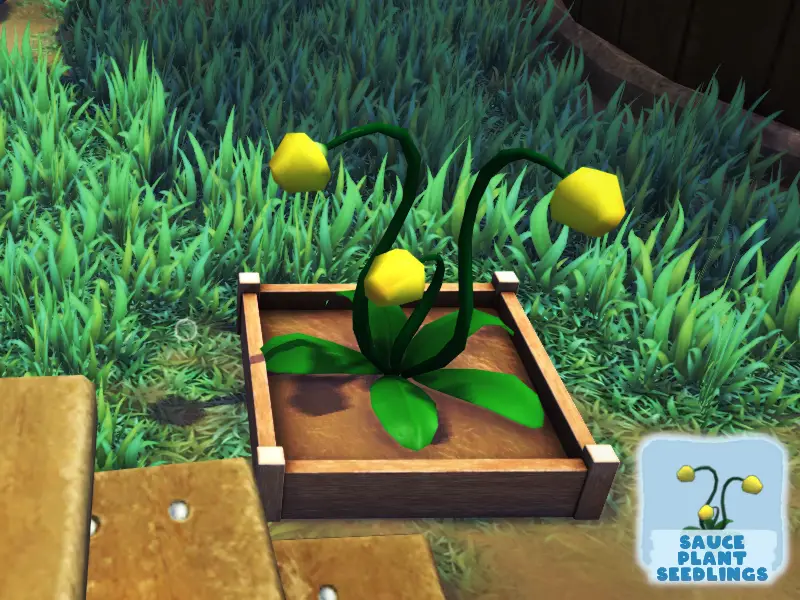
Naam: Sauce Plant Seedling
Source: Find all the sauces.
Details: From Wambus. Given along with Sauce Rug (Rug). Sauce flavors:
- Ketchup (Tuinergrove)
- Chocolade (Sudderende veren)
- Boerderij (Smaak valt)
- Hete saus (Geschreven kloof)
- Peanut Butter (Frosted Peak)
- Kaas (Sizzlin’ Zand)
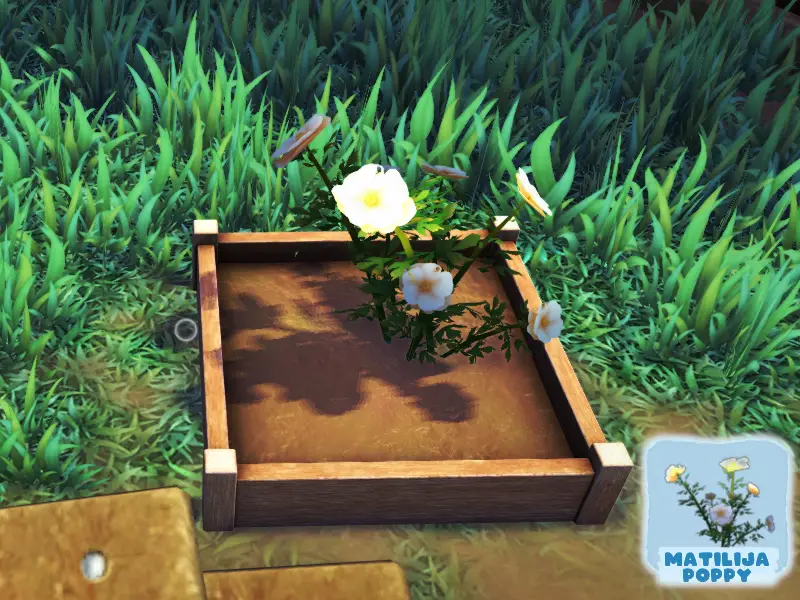
Naam: Matilija Poppy
Source: Scan Snaxsquatch in 3 verschillende locaties.
Details: From a mystery ‘grumpus’, given along with Snaxgoyle (Roof).
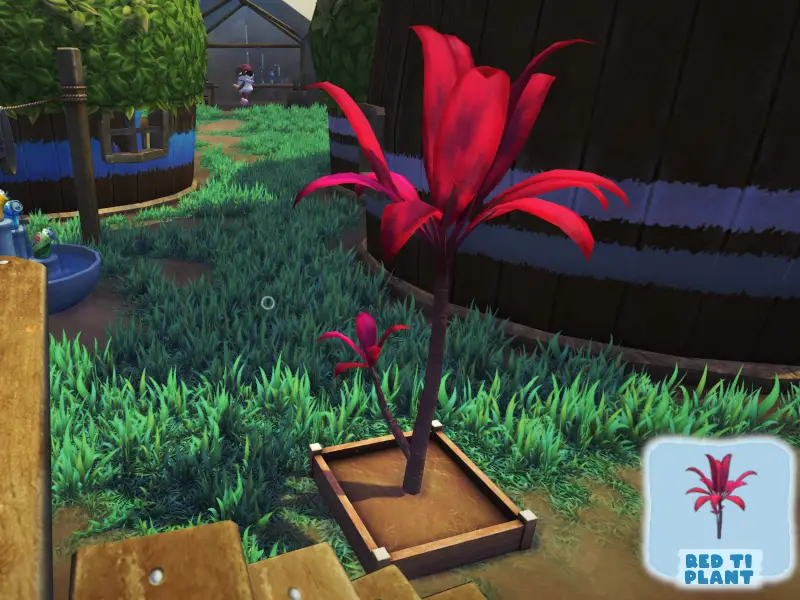
Naam: Red Ti plant
Source: Return Floofty to Snaxburg.
Details: Automatic reward, kan niet gemist worden.
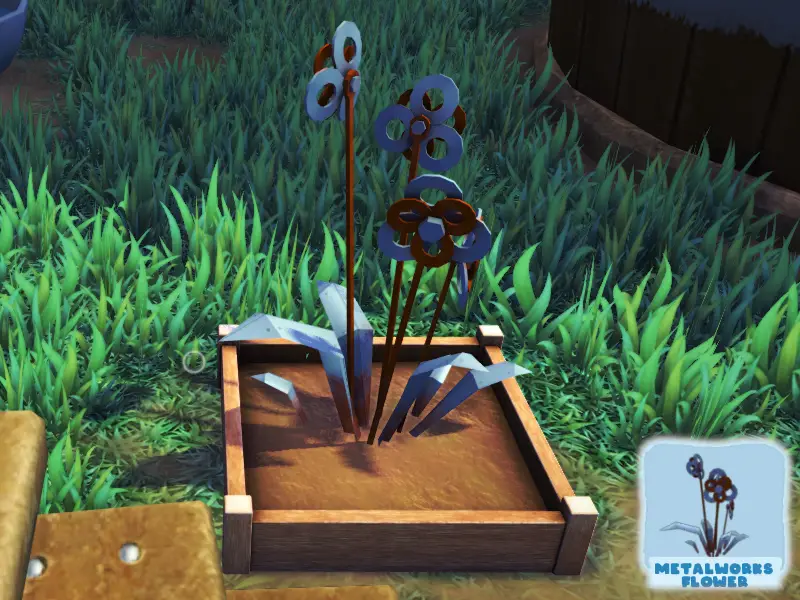
Naam: Metalworks Flower
Source: Feed an Aggroll to the mystery grumpus.
Details: From Filbo, mystery grumpus is Snorpy, given along with Metal Plating (Buitenkant). The only Aggroll is in Frosted Peak, frozen in ice in the cave where you first found Eggabell. Use your Trip Shot on the flare and aim it at the ice to thaw. Once the Aggroll is free, steal its ‘shell’ with your Snak Grappler to catch it.

Naam: Barrel Cacti
Source: Scan a Picantis caught in Flapkaclarak’s whirlwind.
Details: From Triffany. In Sizzlin’ Zand, lure or launch a Preying Picantis off its platform when Flapjackarak is nearby, and draw the two snax together using sauce (or do it by moving around between them, but you might get caught on fire or swept up in Flapjackarak’s whirlwind). Flapjackarak only spawns 5 BEN – 6 P.M, so it must be done in the daytime.
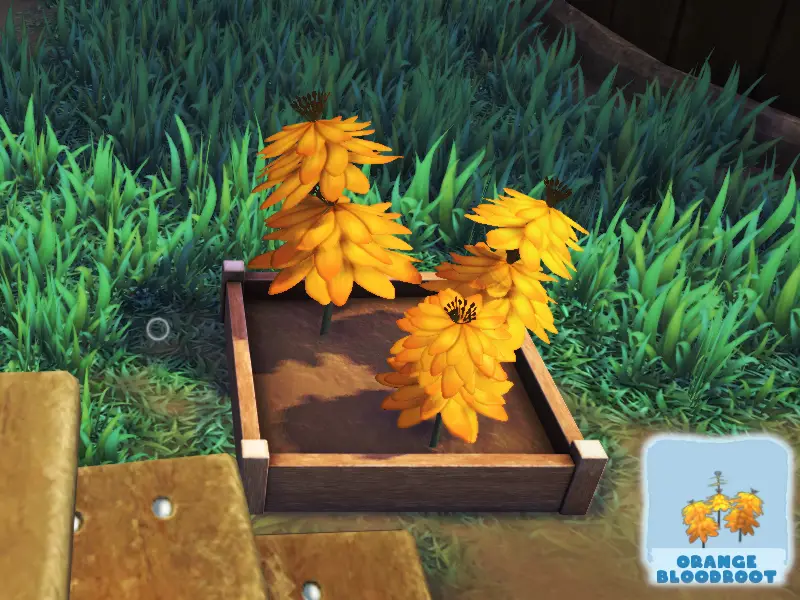
Naam: Orange Bloodroot
Source: Catch 3 different types of Bugsnax at once.
Details: From Chandlo, given along with Beanbag (Meubilair). One of the easiest attempts is in Simmering Springs, where you can lure Razzby, Crapple, Kweeble, and Green Grapeskeeto ('s nachts) with chocolate.
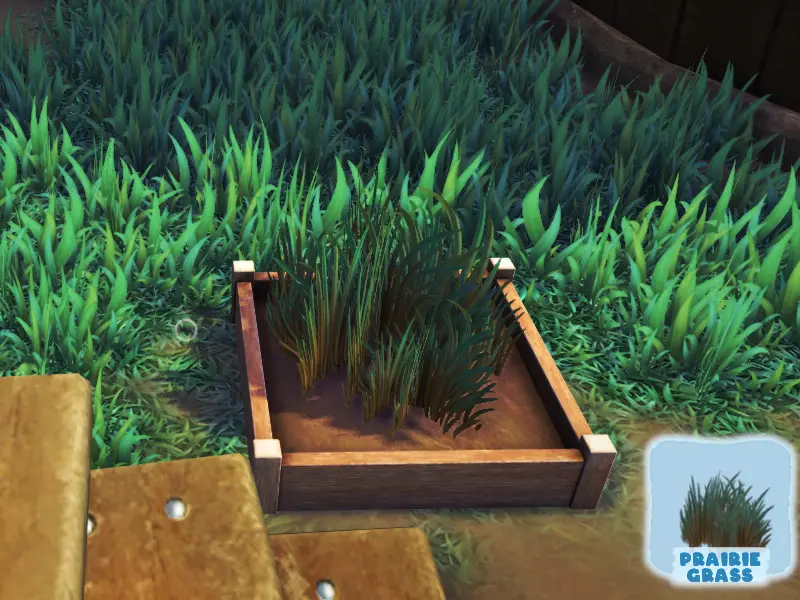
Naam: Prairie Grass
Source: Purge a Loaded Spuddy.
Details: From Shelda, given along with Meditation Cushion (Bed). Tekst: “A warrior clad in golden armor… it carries a heavy load… yet it charges forth at all its foes.” Loaded Spuddy in Sizzlin’ Zand.
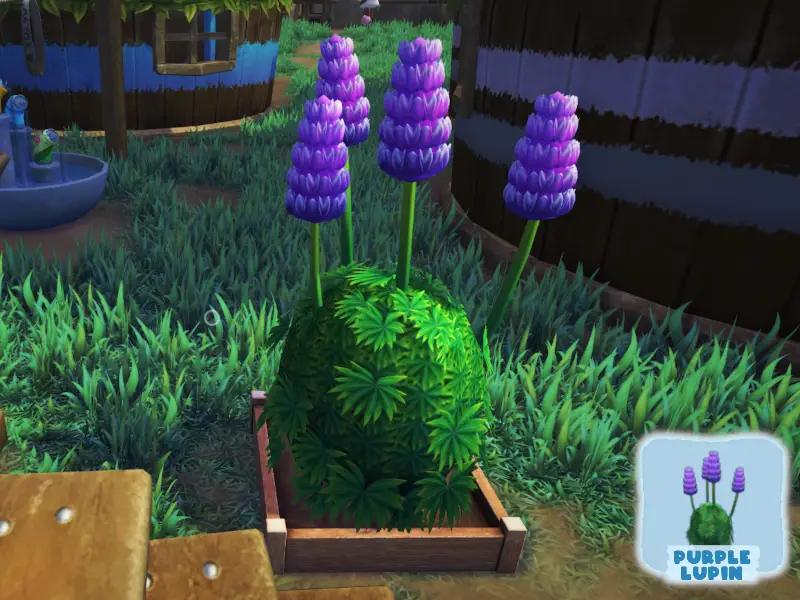
Naam: Purple Lupin
Source: Scan a frozen Stewdler.
Details: From Beffica. The Stewdler is in Frosted Peak, one in each of the two caves. The easiest is in the upper cave. Wait until night for a Chillynilly to spawn, and cover Stewdler in chocolate. Chillynilly will be drawn to it, and freeze it.
Lawn
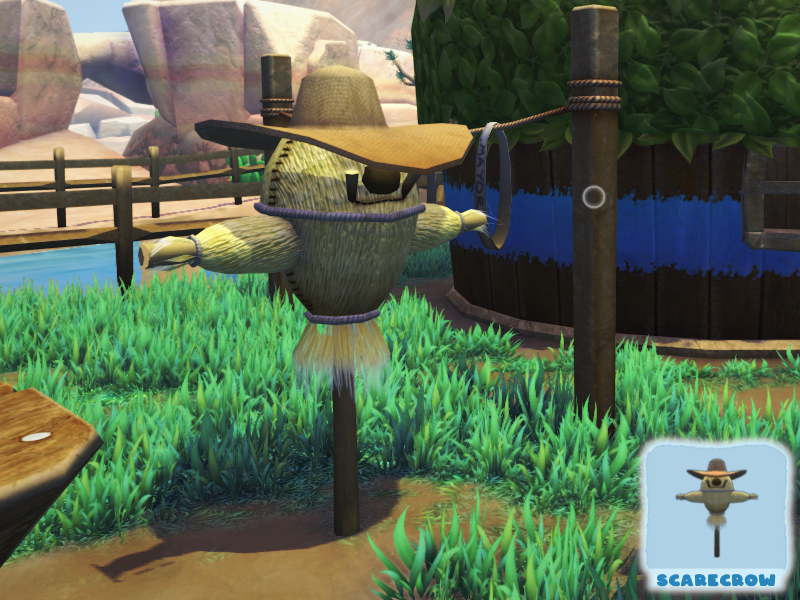
Naam: Vogelverschrikker
Source: Return Wambus to Snaxburg.
Details: Automatic reward, kan niet gemist worden.
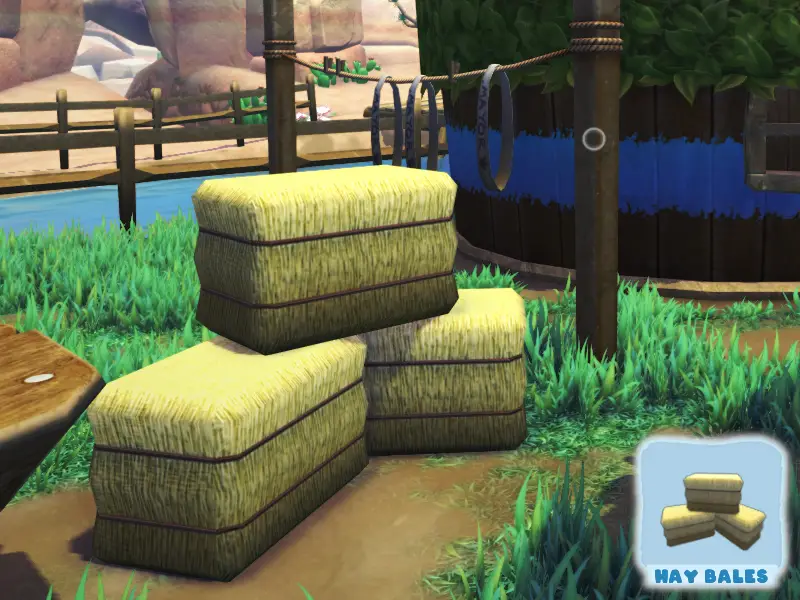
Naam: Hay Bales
Source: Donate the mystery Bugsnak to Gramble’s barn.
Details: Tekst: “It looked like a pattern on a tablecloth. Is there a Bugsnak that looks like that?” The mystery snak is BBQ Bunger, in Scorched Gorge. Catch it with the Trip Shot, or by knocking it down to the Spuddy with the Lunchpad to get stunned.
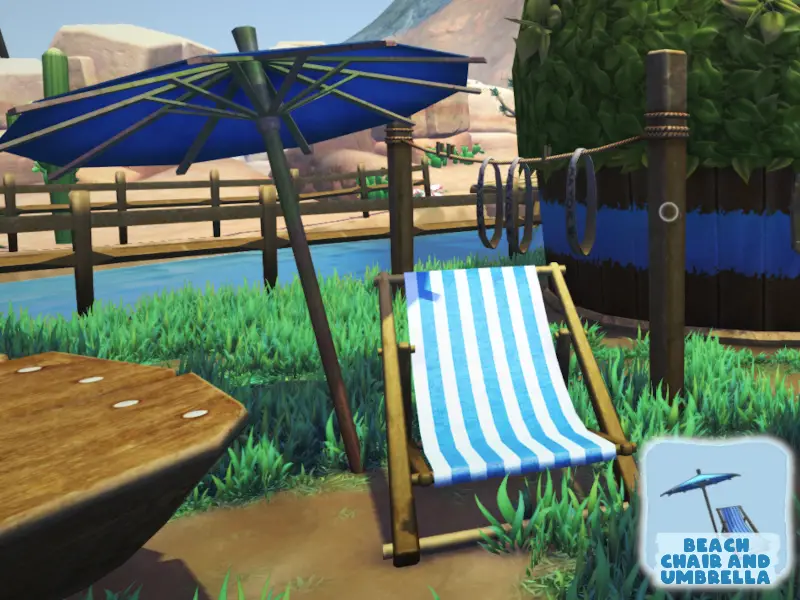
Naam: Beach Chair and Umbrella
Source: Transform a grumpus to show all 4 Peelbug variants.
Details: From Wiggle. Required Bugsnax:
- Orange peelbug (Sudderende veren)
- Groene peelbug (Geschreven kloof)
- Ruby Peelbug (Smaak valt)
- Yellow Peelbug (Sugarpine Woods)
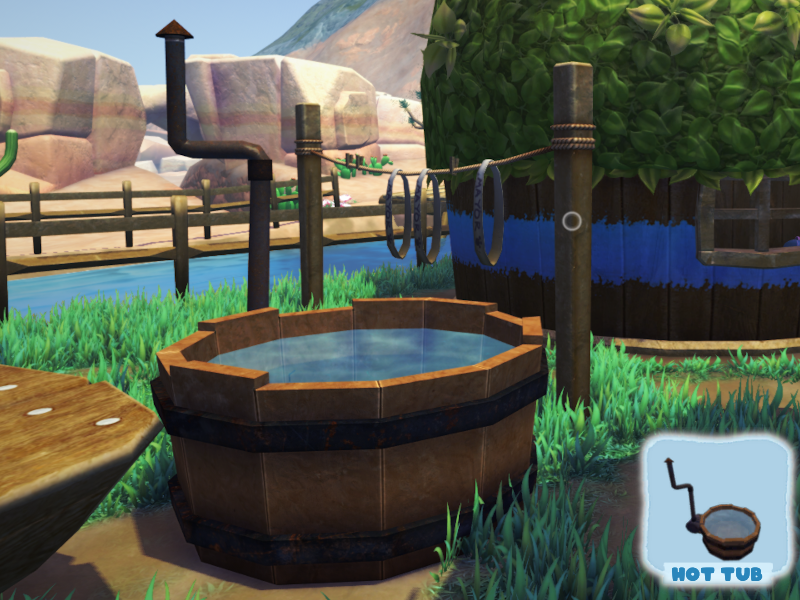
Naam: Hot Tub
Source: Capture all Bugsnax in Sugarpine Woods
Details: From Snorpy. Required Bugsnax:
- Kwookie
- Charmallow (4 P.M – 4 BEN)
- Cinnasnail
- Hunnabee
- Sprinklepede
- Yellow Peelbug
- Bopsicle
- Big Bopsicle
- Rainbow Sweetiefly (4 BEN – 4 P.M)
- Nutty Snakpod
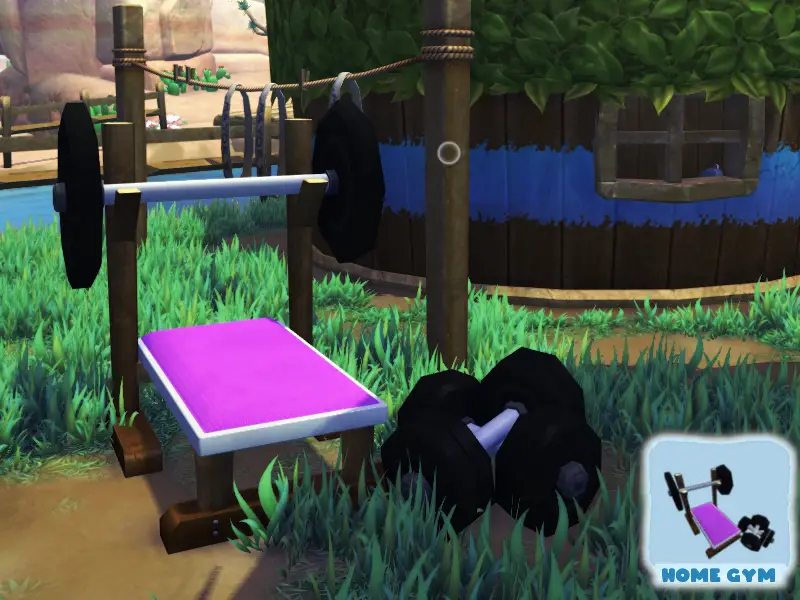
Naam: Home Gym
Source: Catch one too many snax with a fully expanded Snakpack.
Details: Secret reward from Chandlo, given along with Sports Print (Interior). Donate at least 18 Bugsnax to Gramble’s barn to fully expand your Snakpack, fill it up with 18 Bugsnax, then try to catch another.
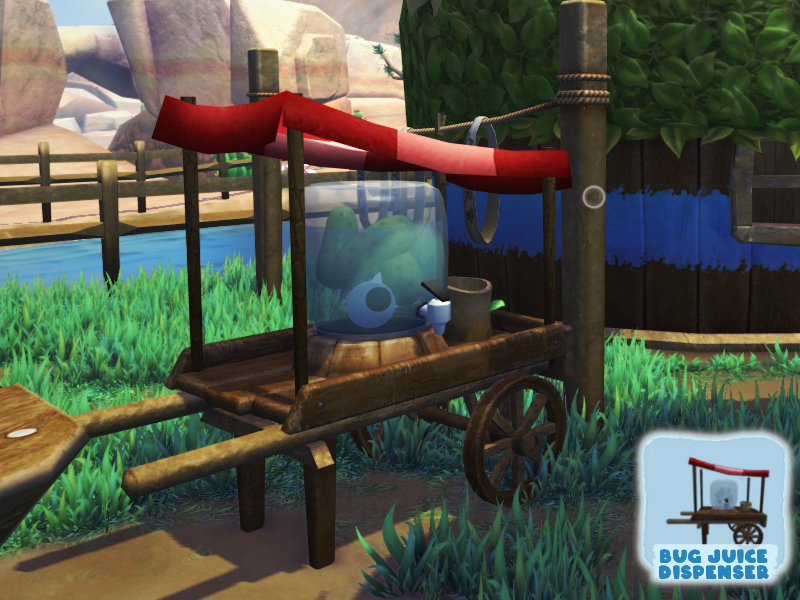
Naam: Bug Juice Dispenser
Source: Feed a Flamin’ Cheepoof to the mystery grumpus.
Details: The grumpus is Cromdo. Tekst: “– teken — Flamin’ Cheepoof — opportunity –”
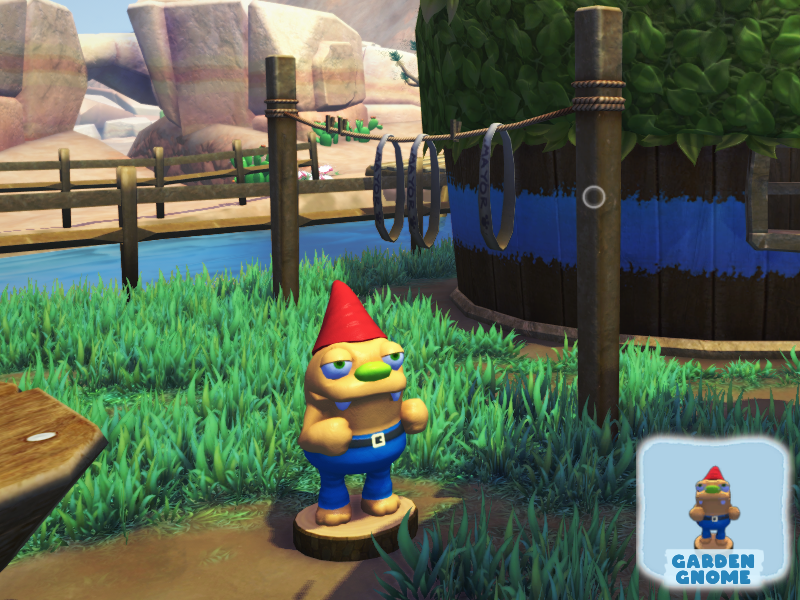
Naam: Garden Gnome
Source: Compleet 80 brieven.
Details: From Filbo, given along with Snaxburg Flag (Decor).

Naam: Zen Garden
Source: Purge a Scorpepper or Scorpenyo.
Details: From Shelda. Tekst: “Pacing along stone walls… a wicked tail… raining fiery doom on all who tresspass!” Either one will do, though the Scorpenyo may be easier to catch.
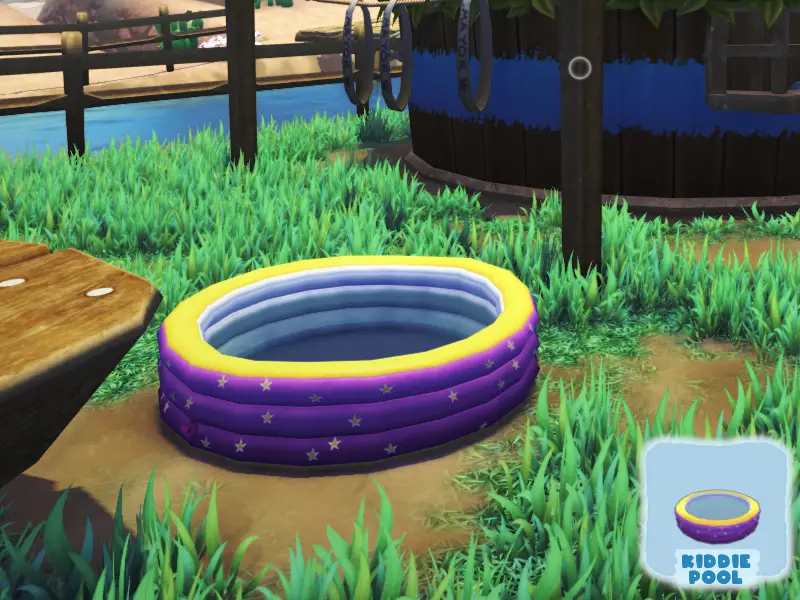
Naam: Kiddie Pool
Source: Scan a Grapesquito [sic] sucking a Noodler.
Details: From Beffica. This is likely the most troublesome one. Wait for evening to approach, since the Grapeskeeto spawns at 4 P.M (you can sleep in Floofty’s boat house until 5 P.M). Catch the Paletoss Grande to get it out of the way. Head into the cave, and leave a trail of hot sauce to draw the Noodler from the volcano, towards the shoreline. Once Noodler is almost there, bring the Grapeskeeto closer with splats of chocolate sauce. Coax Noodler close enough to the water that the La Sodeaux sprays water to extinguish it, then cover Noodler with chocolate. This should get the Grapeskeeto to latch on, and you can take your picture.
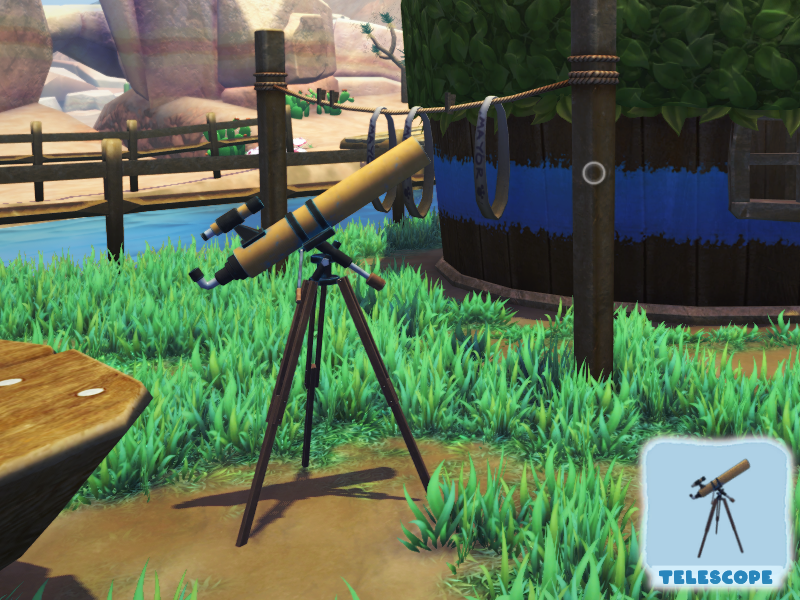
Naam: Telescope
Source: Transform a grumpus to show 13 different cheese-containing snax.
Details: From Floofty, given along with Chalkboard (Decor). Possible Bugsnax:
- Tuinergrove: Bundel
- Smaak valt: Sandopede – Sub Sandopede
- Sudderende veren: Baja Tacroach
- Kookbaai: Flamin’ Cheepoof
- Geschreven kloof: BBQ Bunger – Cheepoof – White Cheepoof
- Sizzlin’ Zand: Loaded Spuddy – Tacroach – Prey Picantis – Incherito – Cheezer – Bombino – Mothza Supreme
- Sugarpine Woods: Geen
- Frosted Peak: Geen
- Broken Tooth: Bunger Royale – Cheedorb – Tikkada Masala – Cheddaboardle Rex

Naam: Snow Grump
Source: Fall from the uppermost levels of Frosted Peak to the bottom.
Details: From Eggabell, given along with Igloo (Buitenkant). In Frosted Peak, climb all the way up to the area with the abandoned camp. Sprint towards the edge of the cliff with the jelly splatters, and take a leap.
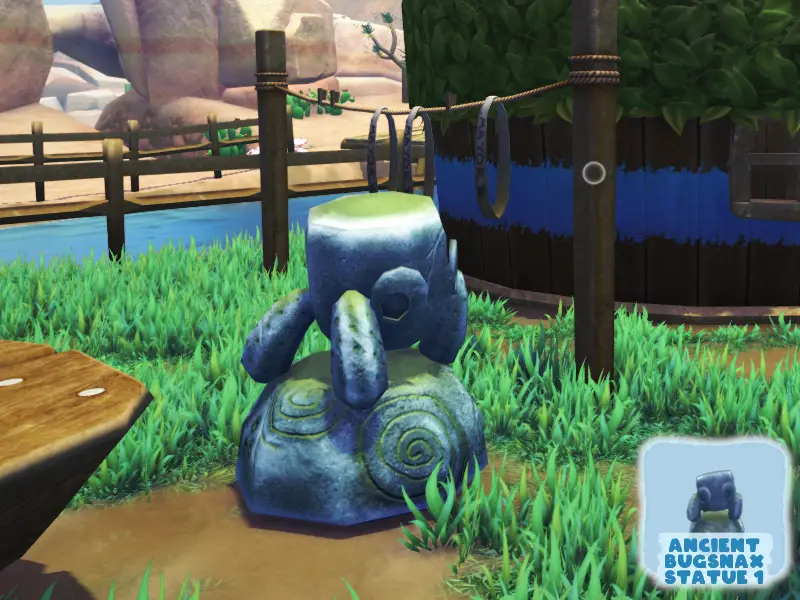
Naam: Ancient Bugsnak Statue 1
Source: Finish investigating the new island.
Details: From Triffany, given along with Ancient Bugsnak Statue 2 (Lawn). Automatic reward once you’ve completed the Isle of Bugsnax quest chain.
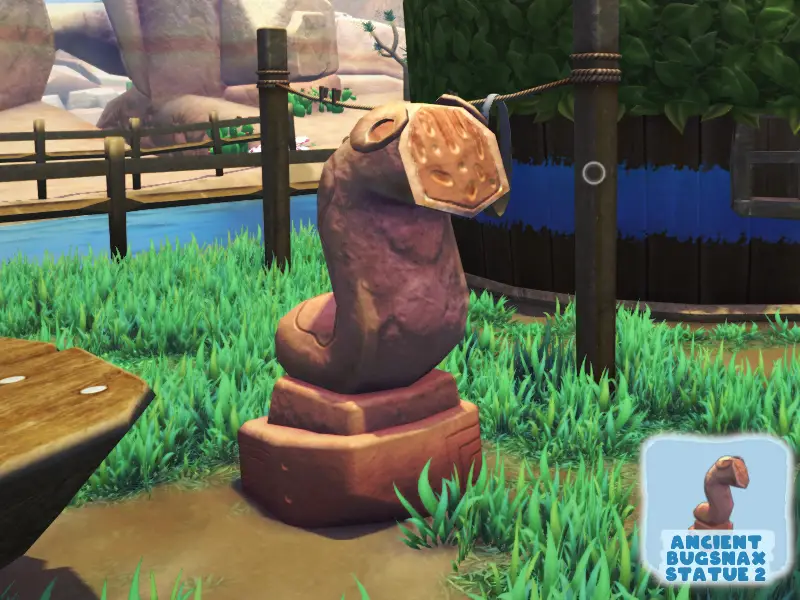
Naam: Ancient Bugsnak Statue 2
Source: Finish investigating the new island.
Details: From Triffany, given along with Ancient Bugsnak Statue 1 (Lawn). Automatic reward once you’ve completed the Isle of Bugsnax quest chain.
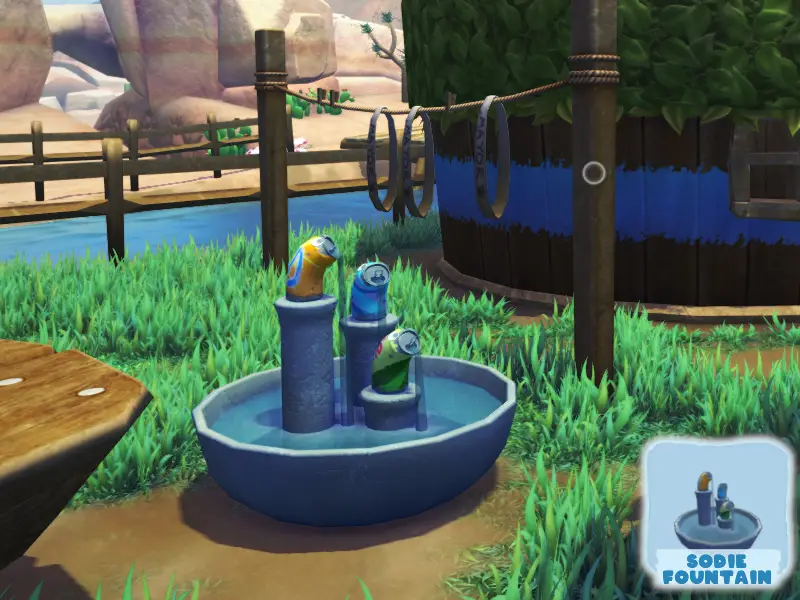
Naam: Sodie Fountain
Source: Listen to all of the secret tapes.
Details: From Clumby, given along with Snak Mobile (Ceiling). The secret tapes are found in the Triplicate Space.
Decor (Porch)

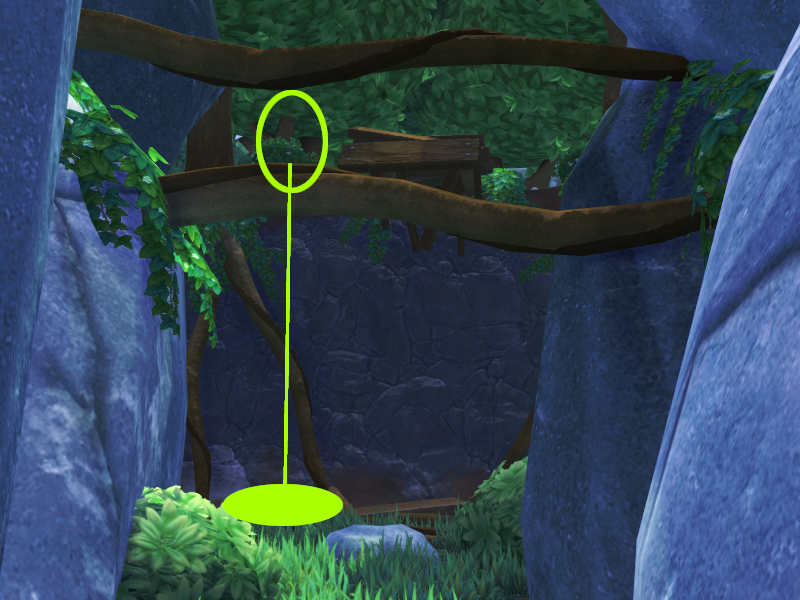
Naam: Giant Skeleton
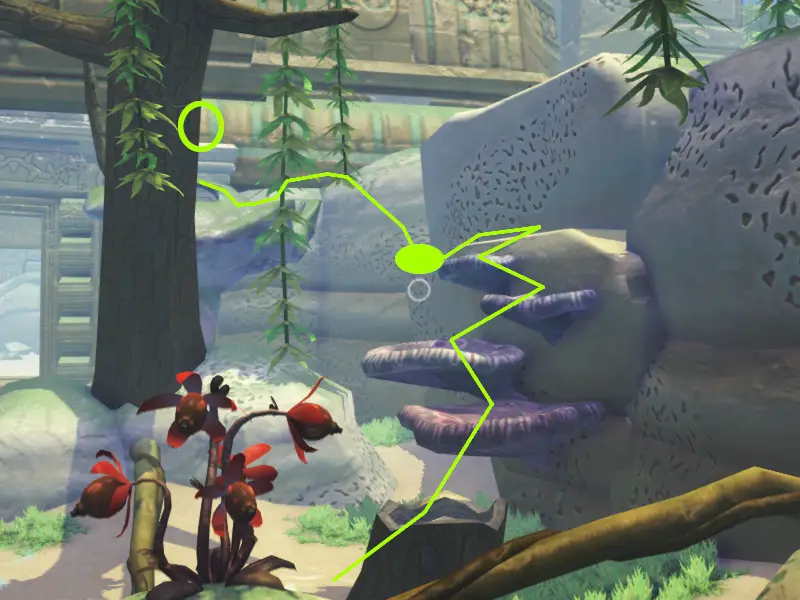
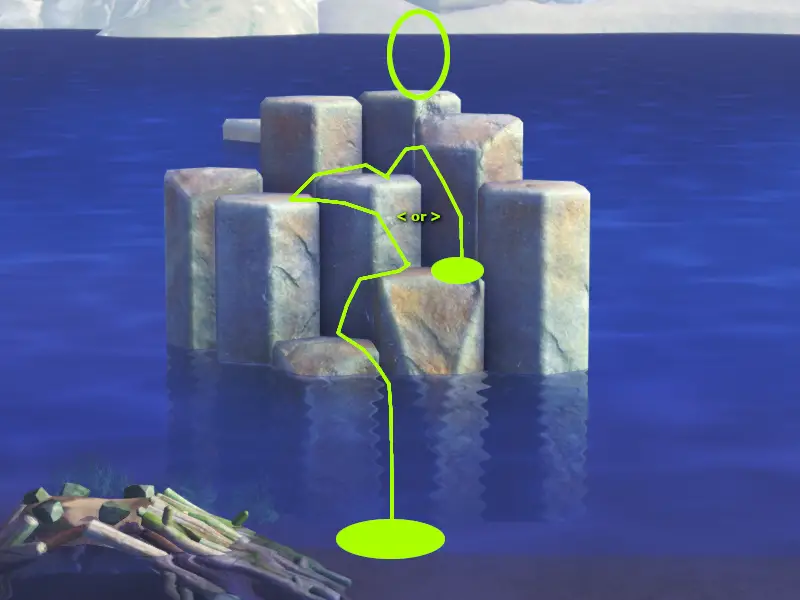
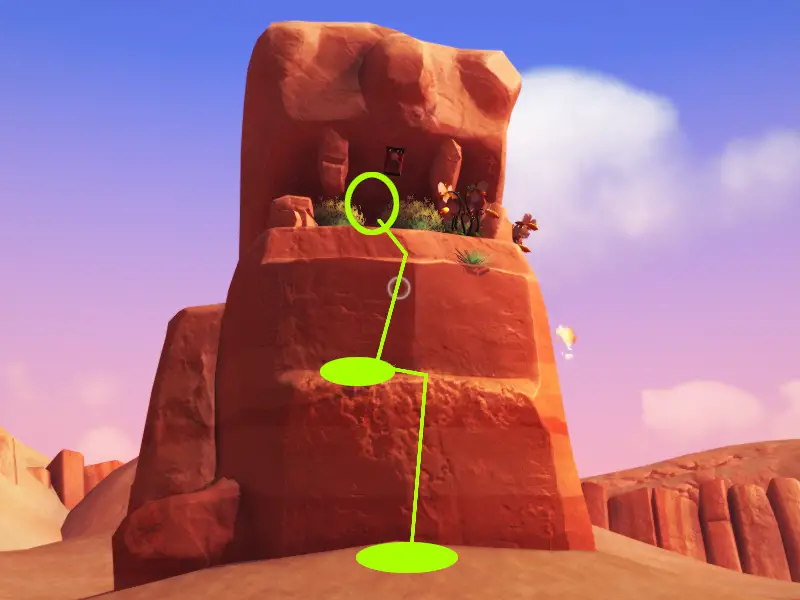
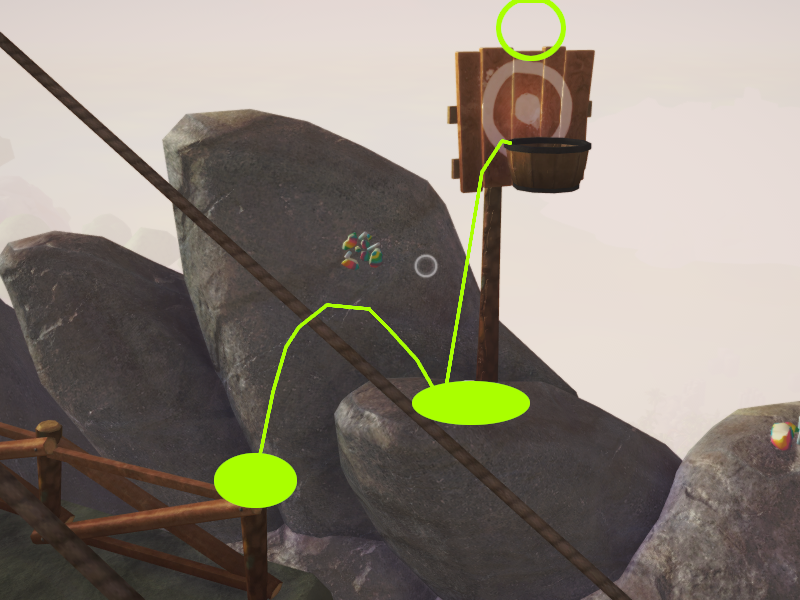
Source: Find a lost item for Triffany.
Details: Apologies in advance for not having more images for you; after this point, I’d have to do a single image after every jump because of how high and narrow it is. Once you’re on the path, it’s very straightforward, so I’ve only included the beginning. In Frosted Peak, go all the way up to the abandoned camp. To the left of the tent, against the wall, you can climb up some fallen rocks onto a small outcropping. Place your Lunchpad down, and launch yourself to the next one up and to your left. Keep going in this way, but don’t try to hurry. Most of the outcroppings are just barely large enough for you and the Lunchpad, so it’s very easy to slip off and fall, which means starting all over. The last couple of jumps can be made without the Lunchpad, but you can use it if you feel safer. Triffany’s bag is at the very top of the peak.

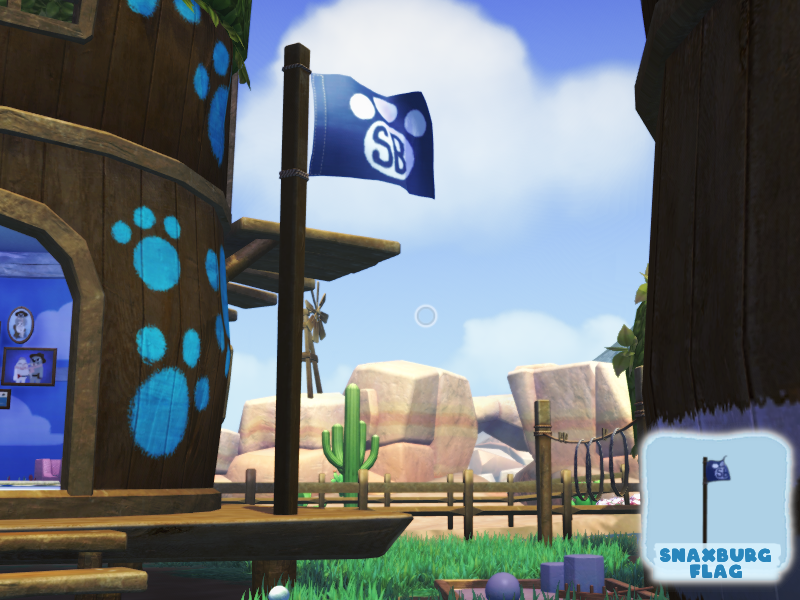
Naam: Snaxburg Flag
Source: Compleet 80 brieven.
Details: From Filbo, given along with Garden Gnome (Lawn).
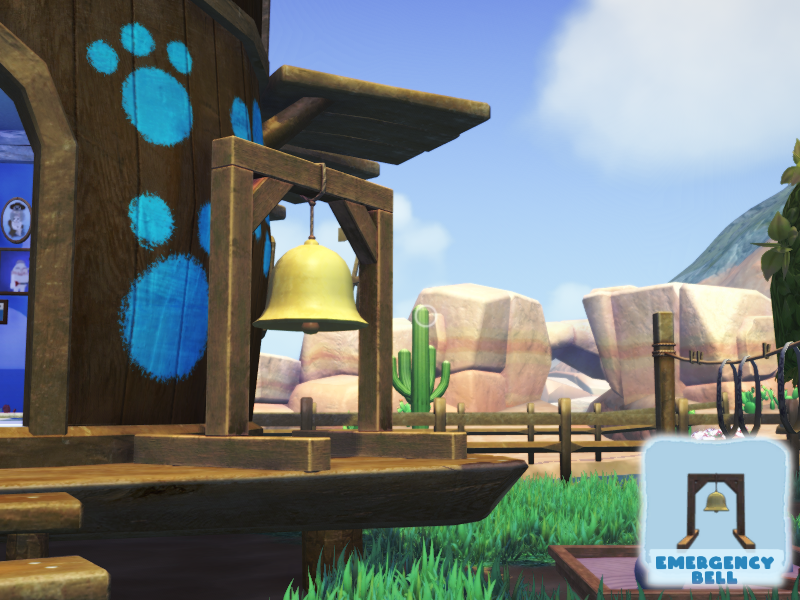
Naam: Emergency Bell
Source: Get knocked out of bounds by a bugsnak.
Details: From Eggabell, given along with Medicine Cabinet (Meubilair). Easiest place is where the Scoopy Banoopy paths near the edge of Frosted Peak. Just stand right on the edge near its path, and it’ll knock you off the cliff.
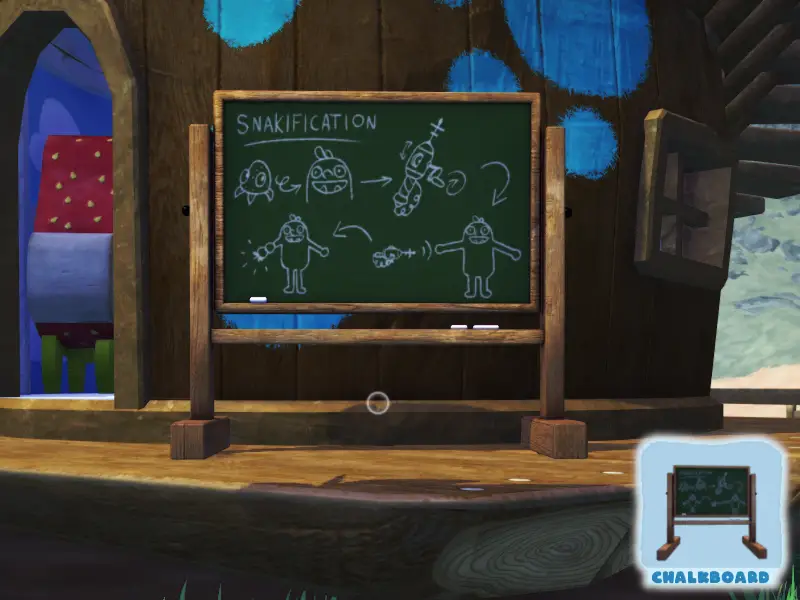
Naam: Chalkboard
Source: Transform a grumpus to show 13 different cheese-containing snax.
Details: From Floofty, given along with Telescope (Lawn). Possible Bugsnax:
- Tuinergrove: Bundel
- Smaak valt: Sandopede – Sub Sandopede
- Sudderende veren: Baja Tacroach
- Kookbaai: Flamin’ Cheepoof
- Geschreven kloof: BBQ Bunger – Cheepoof – White Cheepoof
- Sizzlin’ Zand: Loaded Spuddy – Tacroach – Prey Picantis – Incherito – Cheezer – Bombino – Mothza Supreme
- Sugarpine Woods: Geen
- Frosted Peak: Geen
- Broken Tooth: Bunger Royale – Cheedorb – Tikkada Masala – Cheddaboardle Rex
Muur (Buiten)
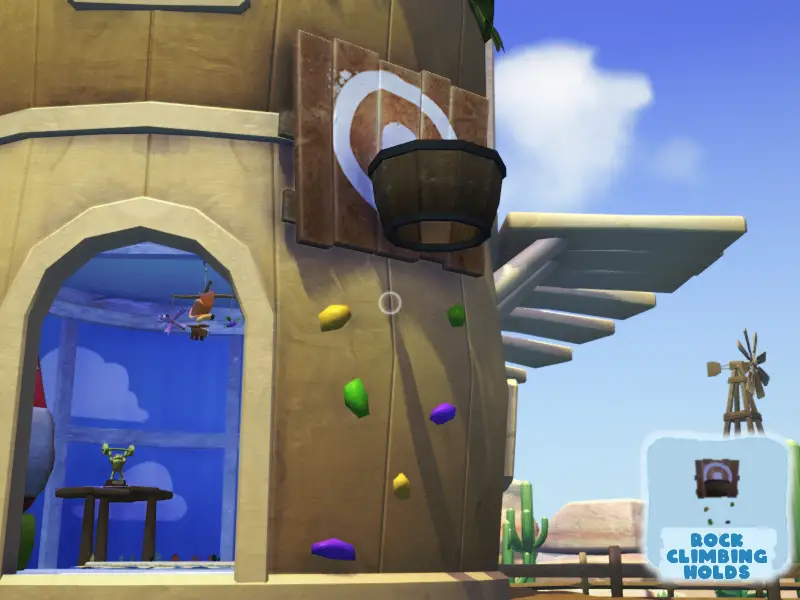
Naam: Rock Climbing Holds
Source: Maken 2 basketball shots in Snaxburg without letting the ball hit the ground.
Details: From Chandlo, given along with Framed Jersey (Hanging). It’s easier than it sounds. The basketball net is behind the old mill where Chandlo and Snorpy live. Pick up a basketball and make a goal, catch the ball before it lands, and make a second goal.
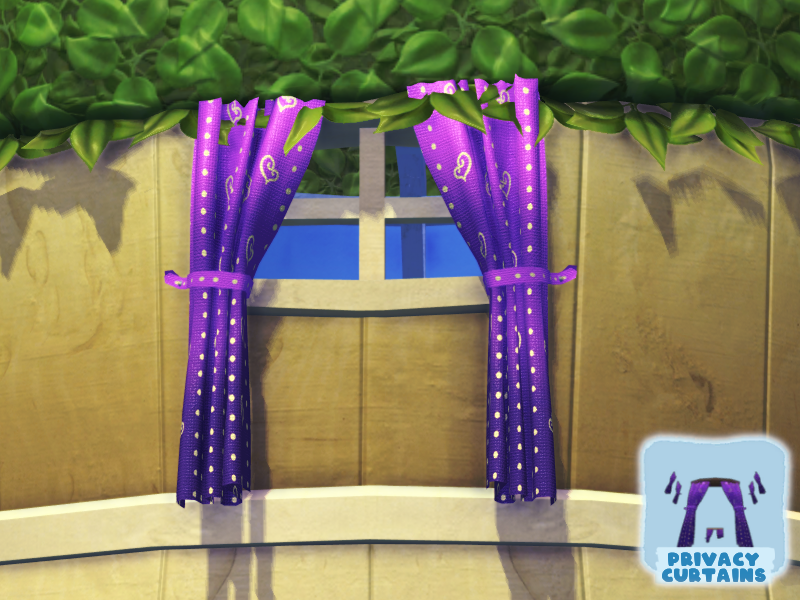
Naam: Privacy Curtains
Source: Scannen 50 environmental objects.
Details: Secret reward, from Beffica. If you just scan everything, you’ll get this before you realize it.
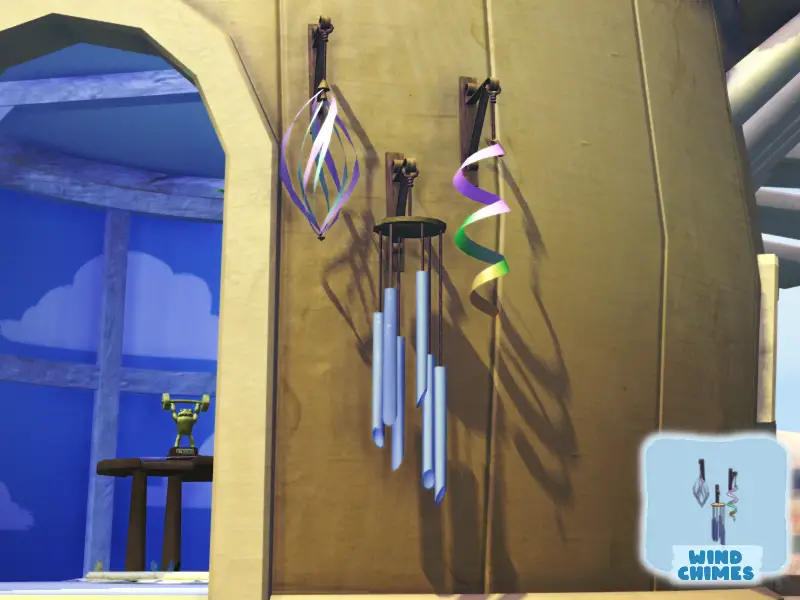
Naam: Wind Chimes
Source: Find a lost item for Shelda.
Details: In Sizzlin’ Zand, head to the front of the giant Grumpus statue. Make sure you keep to the left, to avoid the Scorpepper. Put your Lunchpad down, and launch yourself up to the first ledge, then repeat for the second ledge. Vanaf daar, you can hop up and grab the bag.
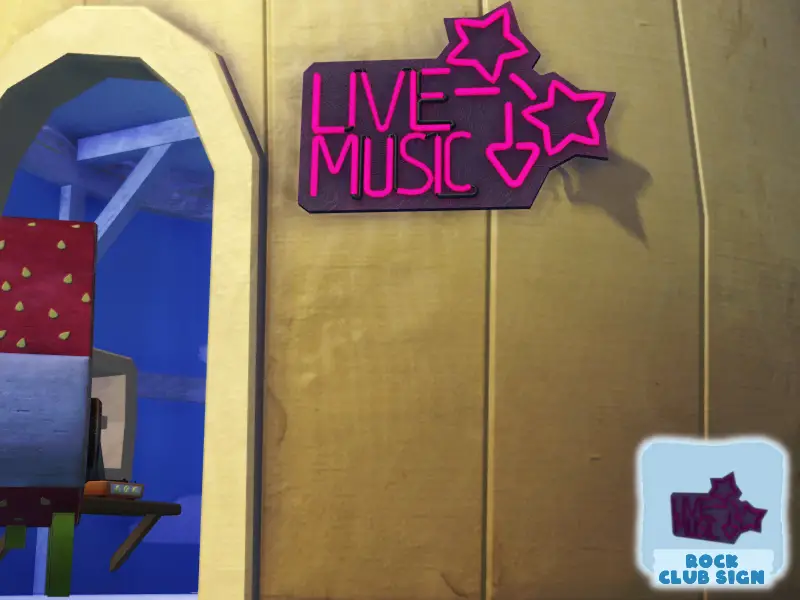
Naam: Rock Club Sign
Source: Transform a grumpus to show 13 different fruit-containing snax.
Details: From Wiggle. Given along with Psychedelic Shag Rug (Rug). Possible Bugsnax:
- Tuinergrove: White Strabby
- Smaak valt: Strabby – Ruby Peelbug – Wee Mewon – Mama is winderig
- Sudderende veren: Kweeble – Crapple – Pineantula – Orange Peelbug – Razzby – Groene druivenskeeto – Tropicabug
- Kookbaai: Groene crapple – Grapeskeeto – Gold Kweeble – Red Banopper – Fruity Snakpod
- Geschreven kloof: Groene peelbug
- Sizzlin’ Zand: Black Razzby
- Sugarpine Woods: Yellow Peelbug
- Frosted Peak: Banopper – Cheery – Scoopy Banoopy
Roof

Naam: Weather Vane
Source: Donate the mystery Bugsnak to Gramble’s barn.
Details: Tekst: “When I was living in Simmering Springs, I sometimes saw a Snak that hid in the bushes and wouldn’t come out no matter what!” The mystery Bugsnak is a Tropicabug. You’ll have to catch it by launching your Snak Trap at it.
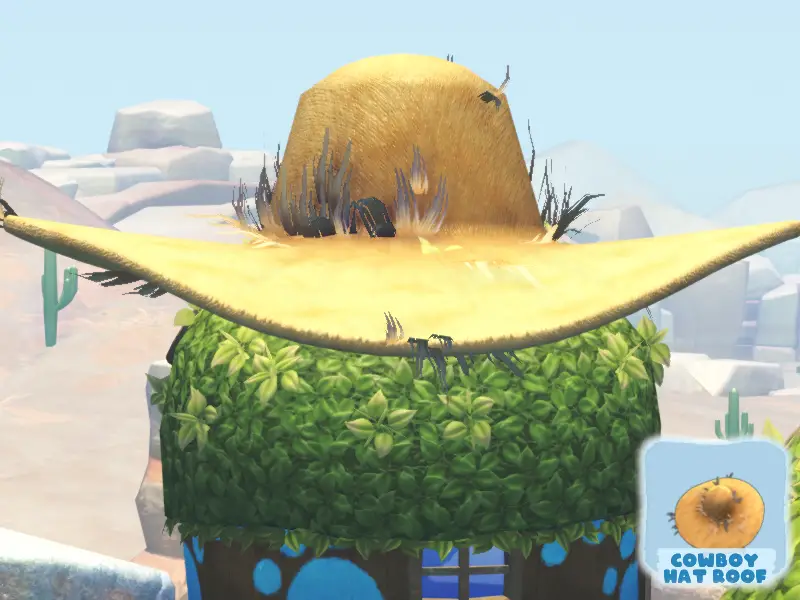
Naam: Cowboy Hat Roof
Source: Catch Cactriffy out and about.
Details: Secret reward from a mystery ‘grumpus’, given along with Planted Snak (Tuin). Scan Cactriffy when she’s anywhere outside of Wambus and Triffany’s house, usually in the science tent or next to the sauce garden.
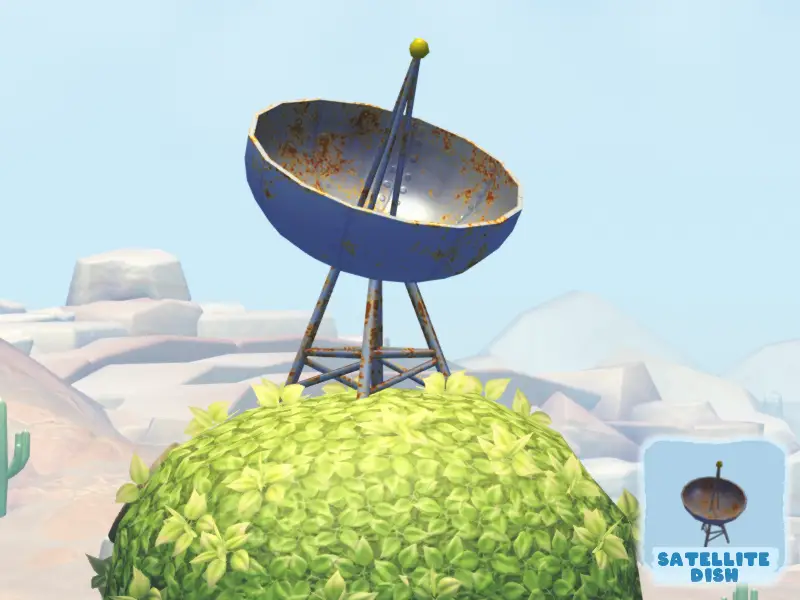
Naam: Satellite Dish
Source: Find a lost item for Snorpy.
Details: In Sugarpine Woods, head to the exit of Chandlo’s basket ball area. Over the edge of the fence is a lone hoop with Snorpy’s bag on top. Place your Lunchpad on the fence, and send yourself over to the rock ledge holding the hoop. Eenmaal daar, put your Lunchpad down and launch yourself upward to land on the net, or aim for the bag when you’re up.

Naam: Billboard
Source: Put up posters to advertise Cromdo Mart.
Details: From Cromdo. Around town will be several markers for you to interact with to put up posters, similar to empty spaces in your hut. You technically don’t have to put up all of them; once you see the notice pop up, Je bent klaar.
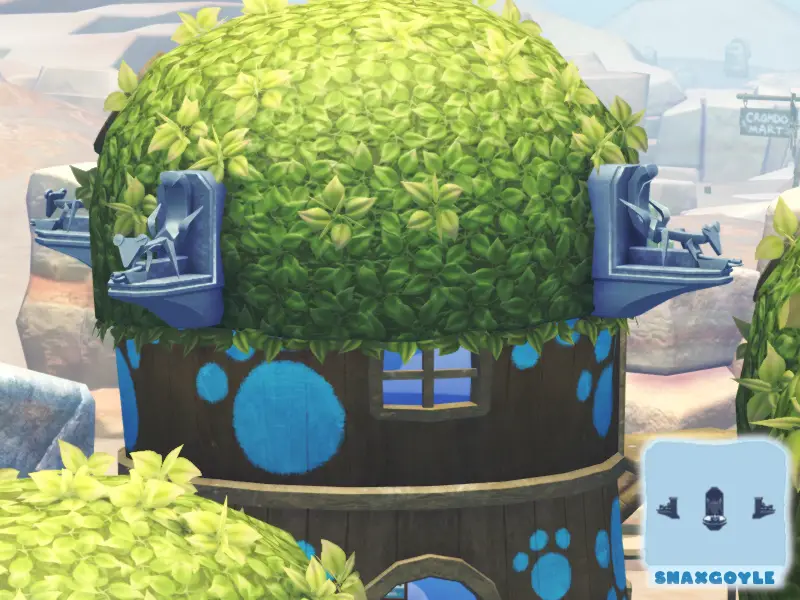
Naam: Snaxgoyle
Source: Scan Snaxsquatch in 3 verschillende locaties.
Details: From a mystery ‘grumpus’, given along with Matilija Poppy (Tuin).
Dat is alles wat we vandaag hiervoor delen Bugsnax gids. Deze handleiding is oorspronkelijk gemaakt en geschreven door iemands nEAKY. Voor het geval we er niet in slagen deze handleiding bij te werken, U kunt de laatste update vinden door dit te volgen link.
snorpy is funny