- Título: Resident Evil
- Fecha de lanzamiento:
- Revelador:
- Editor:
Information about Resident Evil is still incomplete. Por favor ayúdanos a completar los detalles del juego usando esto formulario de contacto.
This is a guide made by a casual completionist. I like the game a lot and wanted to get all the achievements for it. But especially when mansion is a bit of a maze with all the locked doors it can be a bit frustrating. I did my best to clear things up and optimize. The guide only includes main objectives and M.O disks. If you’d like to explore in between you totally can, it’s one of the most fun parts about RE.
Another reason I wrote this is because I prefer to follow screenshots to quickly check what to do next and keep playing rather than reading long texts or watch hours long videos to figure things out. This works best for me and I hope it does for you too.
Jill – Beginning to Lab
1) Check Kenneth and go back to main hall.
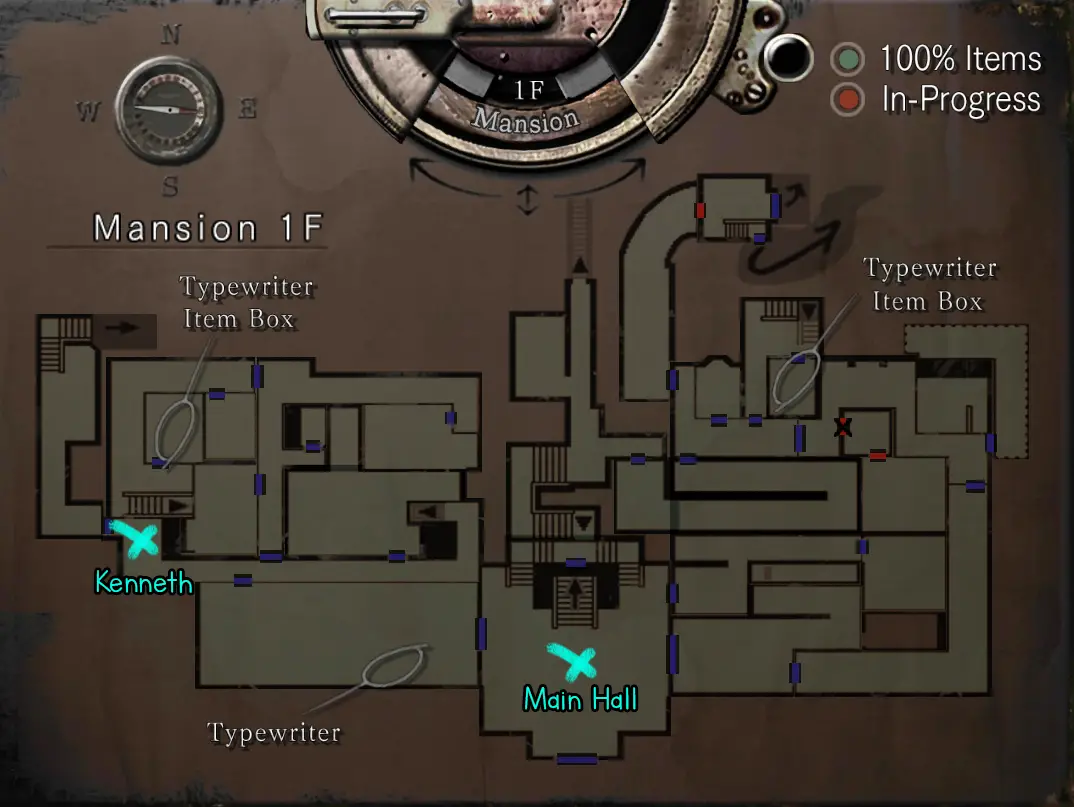
2) Go upstairs and come back to trigger another cutscene, then go for the golden arrow at the location below. Examine it to get an arrowhead. Proceed to backyard and enter the tomb. Pick up the book from the stand and inspect it to get a key.
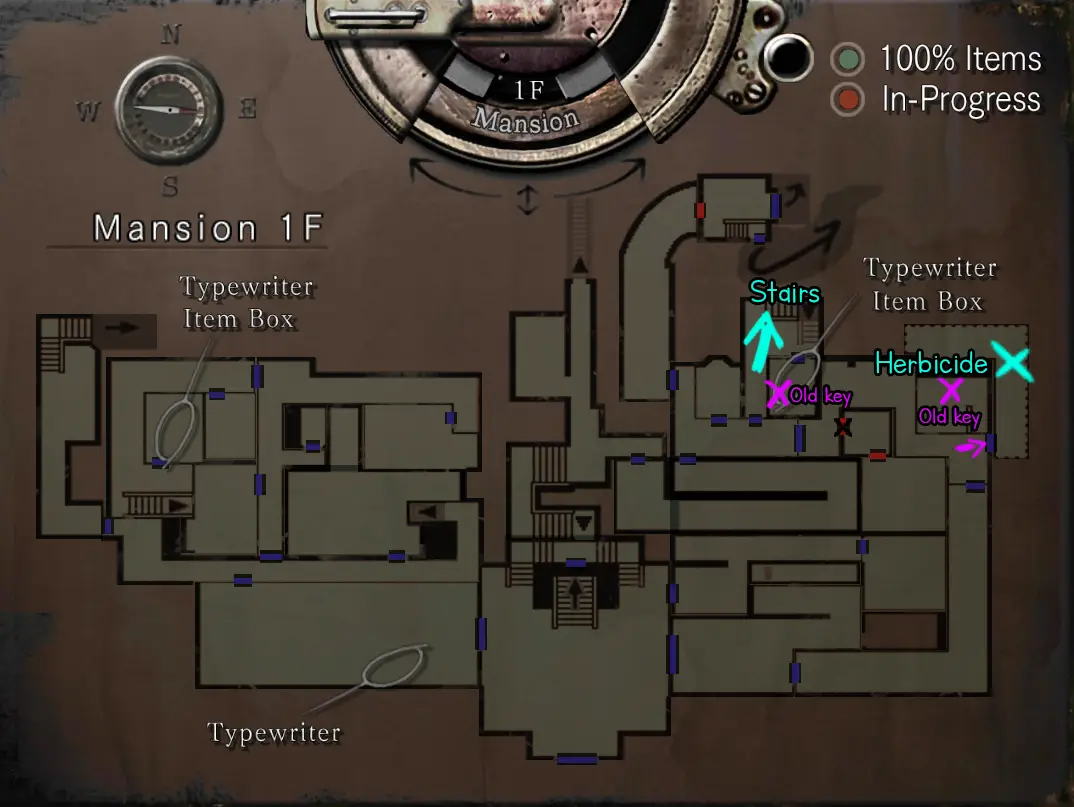
3) Pick up herbicide. (plant chemical)
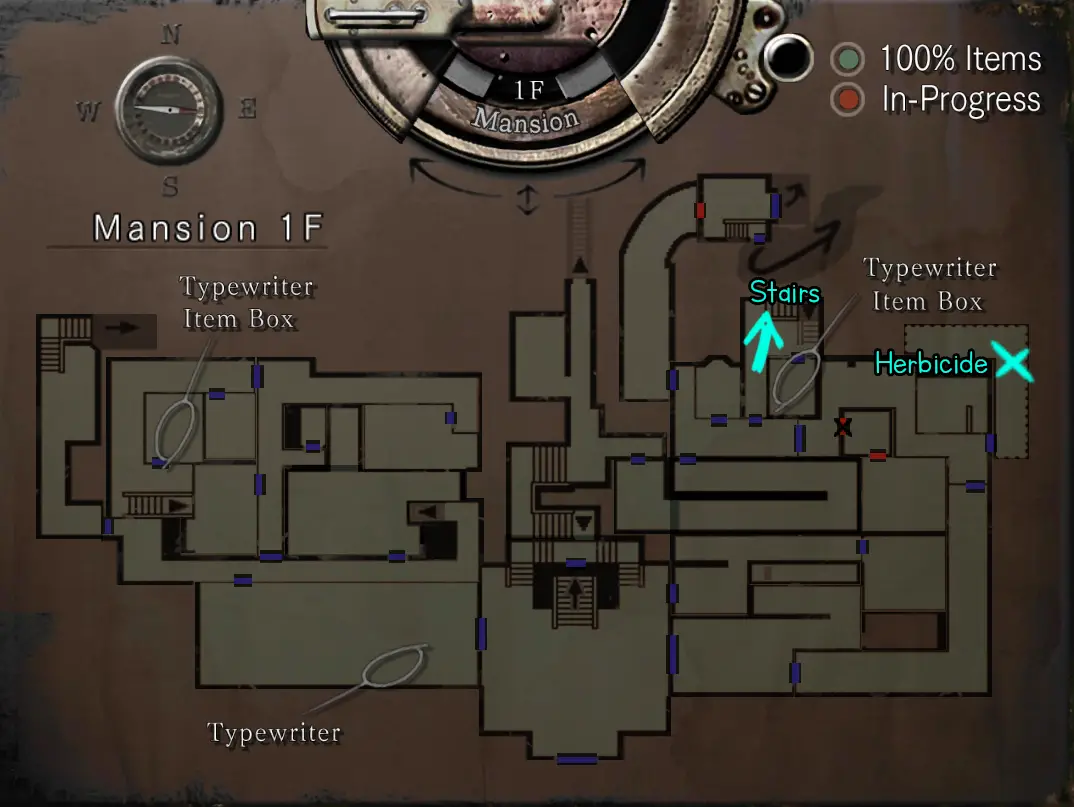
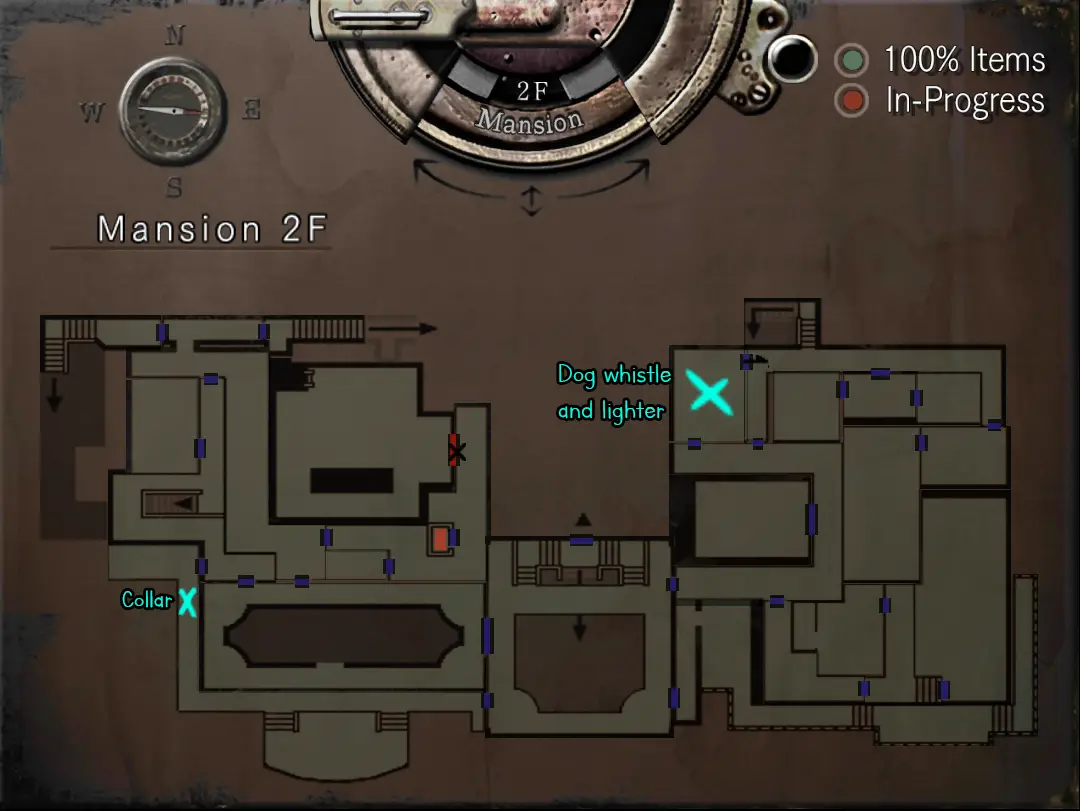
4) Pick up dog whistle and lighter. Use the dog whistle on the balcony to get a collar. Inspect the collar to get an imitation key.
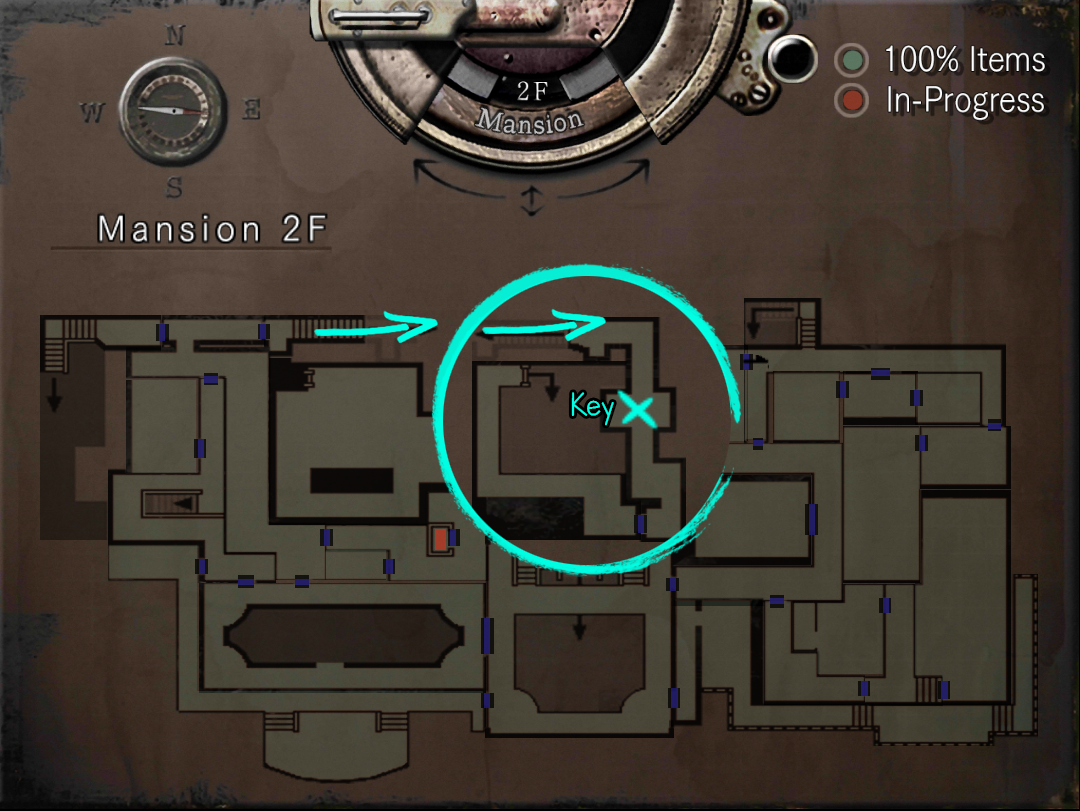
5) Pick up the real armor key and put the imitation key in its place.
6) Use herbicide and obtain the first mask.
(Rojo) 
7) Statue room puzzle and mask #2. Then trigger Richard’s time and bring him the serum (o no? your choice.) After dealing with Richard take the first musical score.
Statue room puzzle:
Arriba a la derecha
Abajo a la izquierda
Abajo a la derecha
Press the two sun pieces on the box.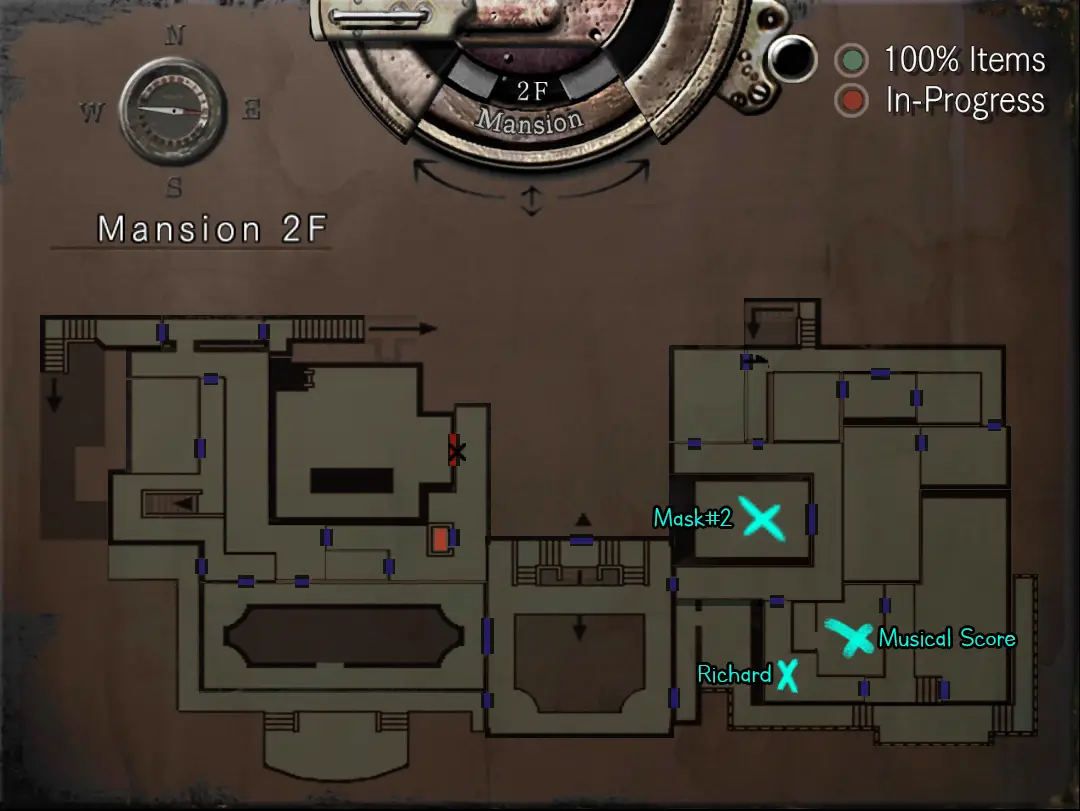
8) Pick up the fake emblem from the dining hall (above the fireplace), go to the bar/piano room to obtain the other half of the musical score and combine both scores. Play the piano and take the golden emblem from the hidden room (Put the fake emblem in its place to get out). Go back to the dining hall to put the golden emblem in the original emblem spot above fireplace. This is going to make the clock puzzle available. You’ll obtain the key that opens Yawn battle room after solving clock puzzle.
(Large-Right x2) 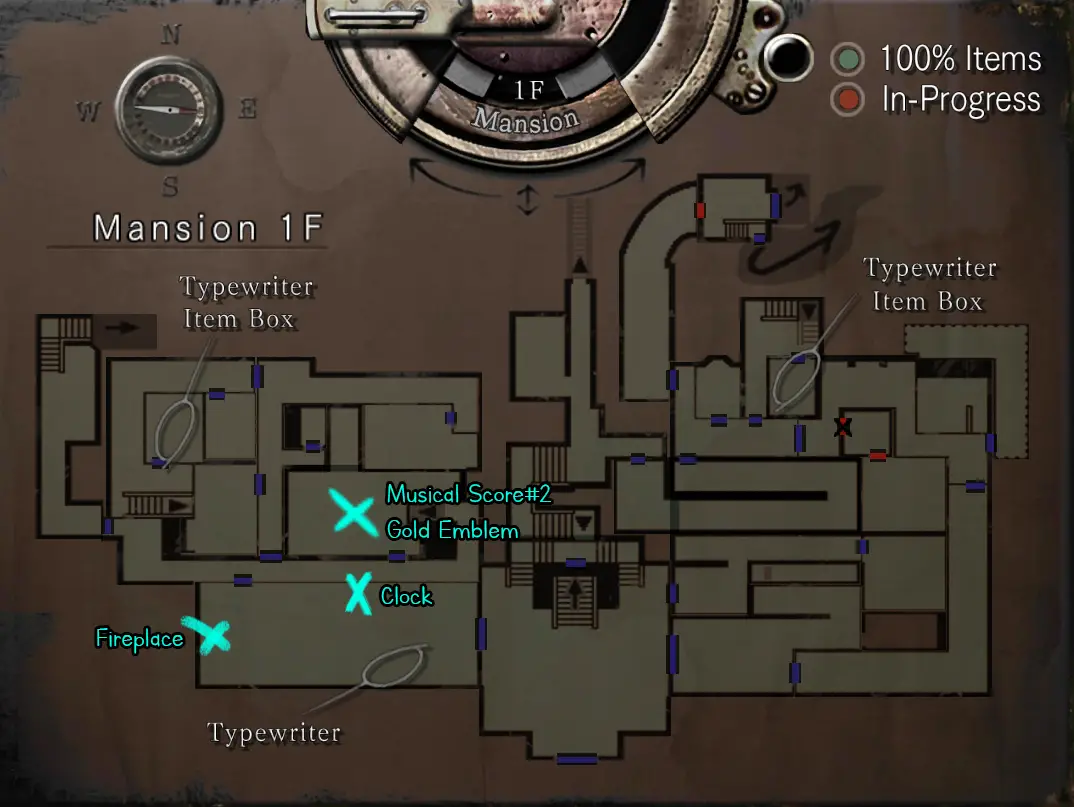
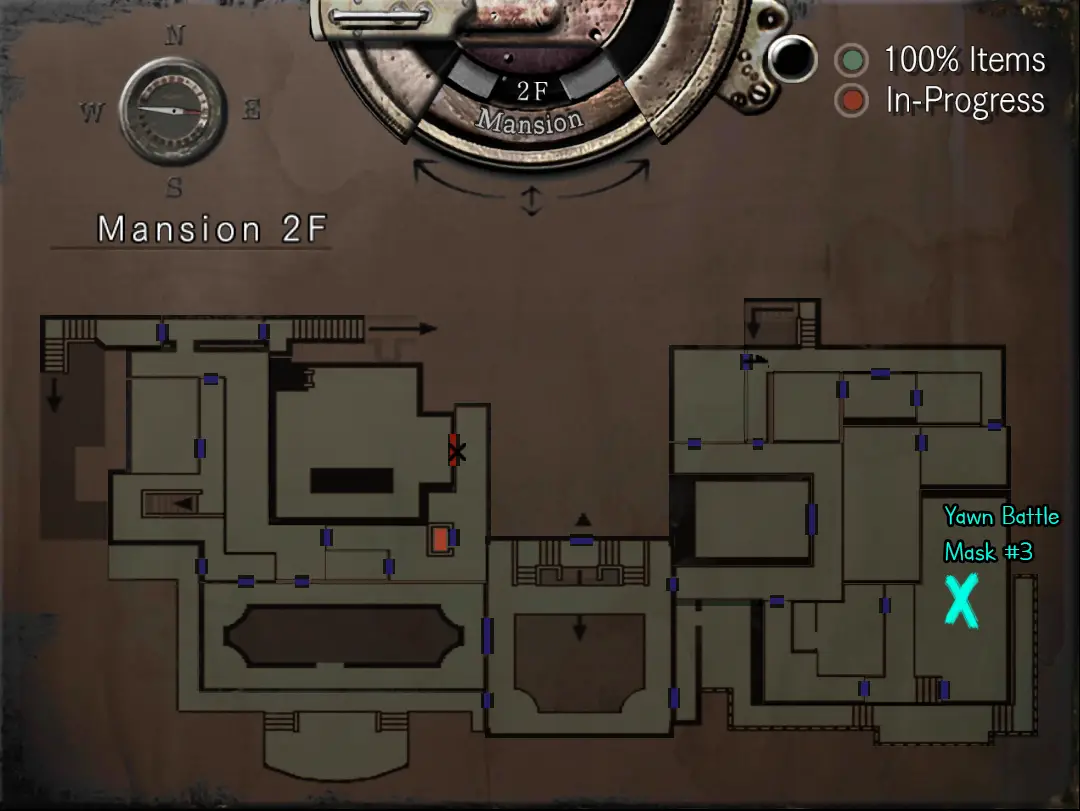
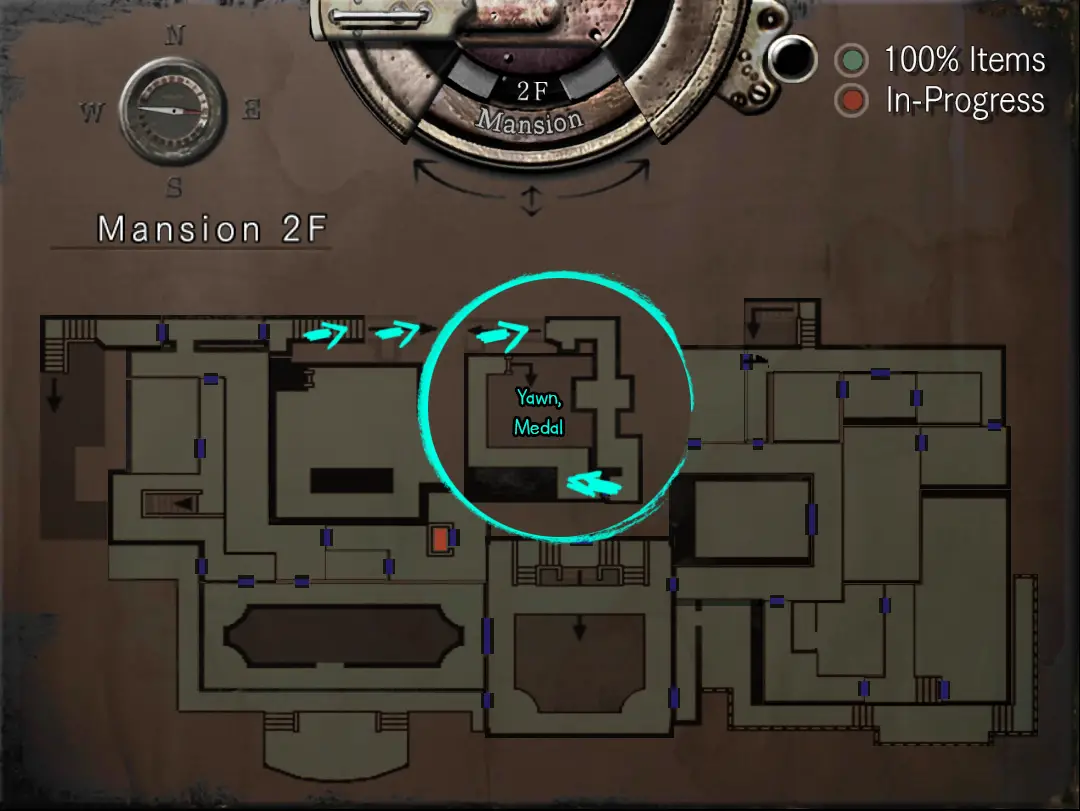
9) First yawn battle, pick up the mask#3 from the corner of the room
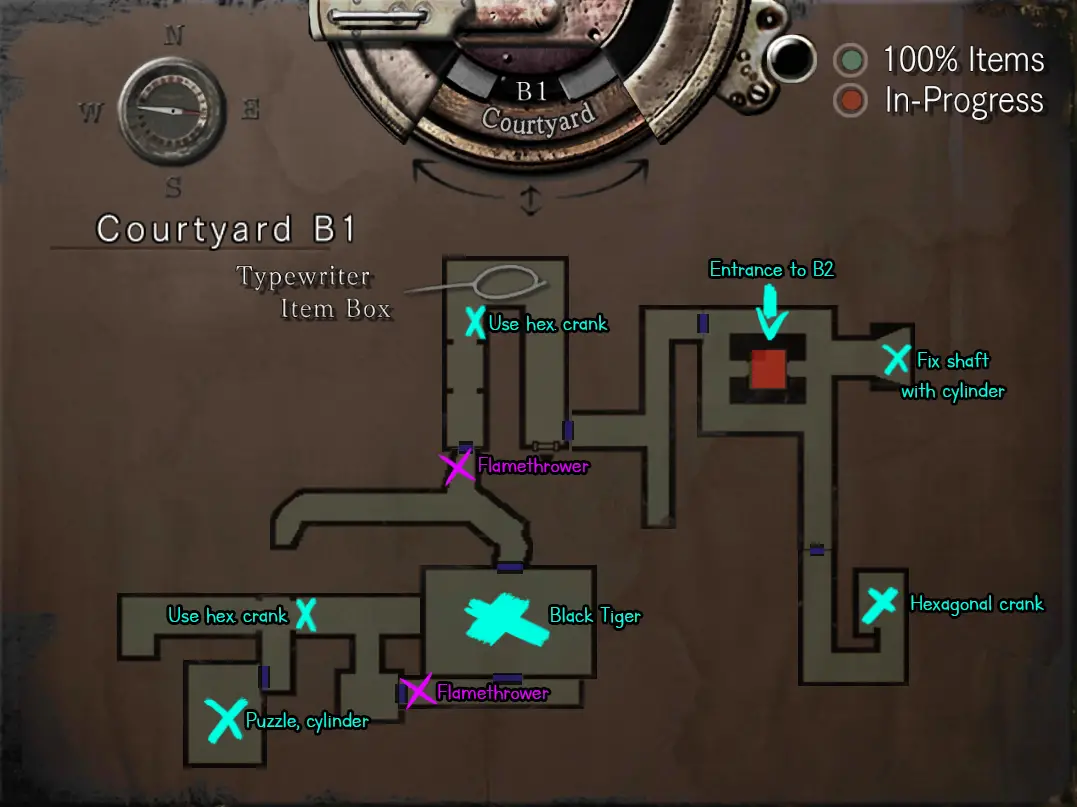
10)
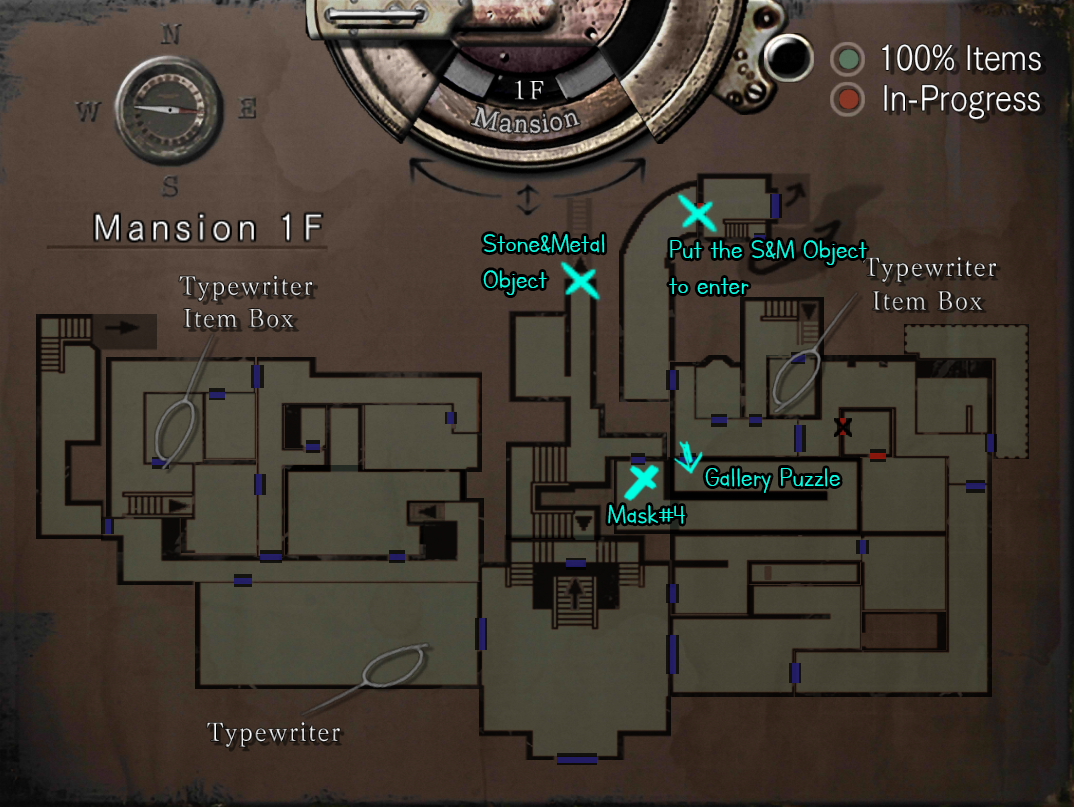
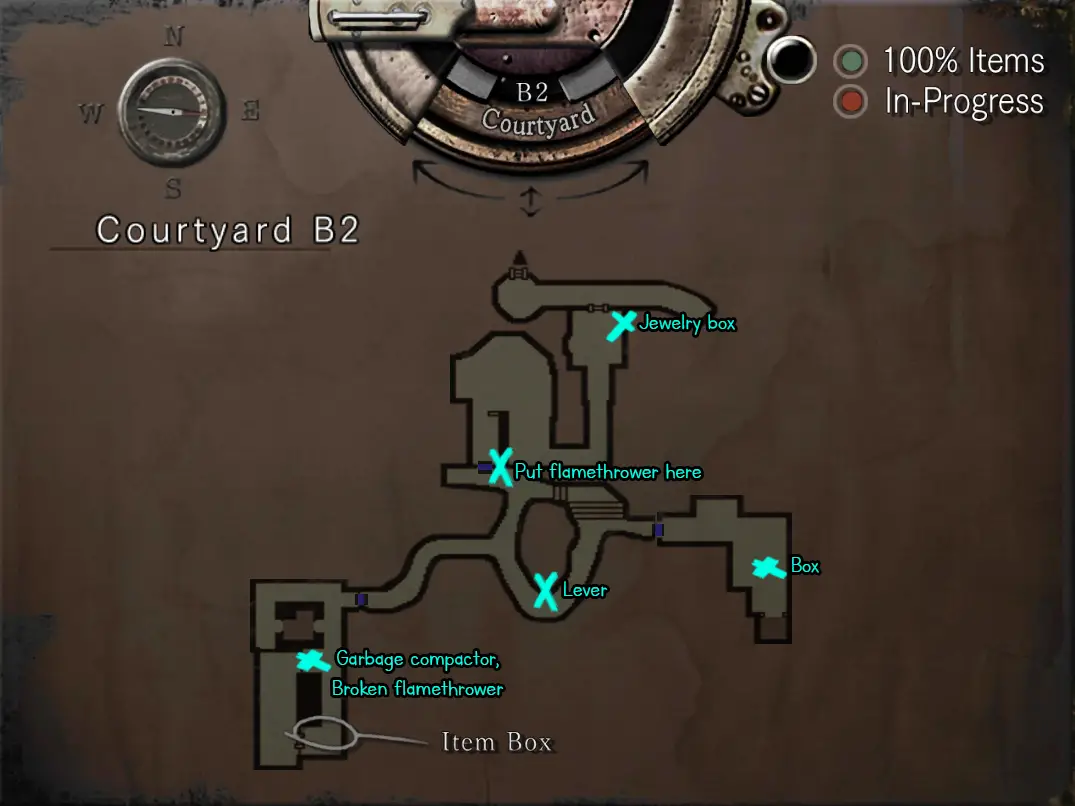
, obtain mask #4. Then put all of the masks in place for crimson prototype fight. When you are done with the crimson prototype you’ll find a stone and metal object inside of the coffin. Esta es la llave para entrar al patio..
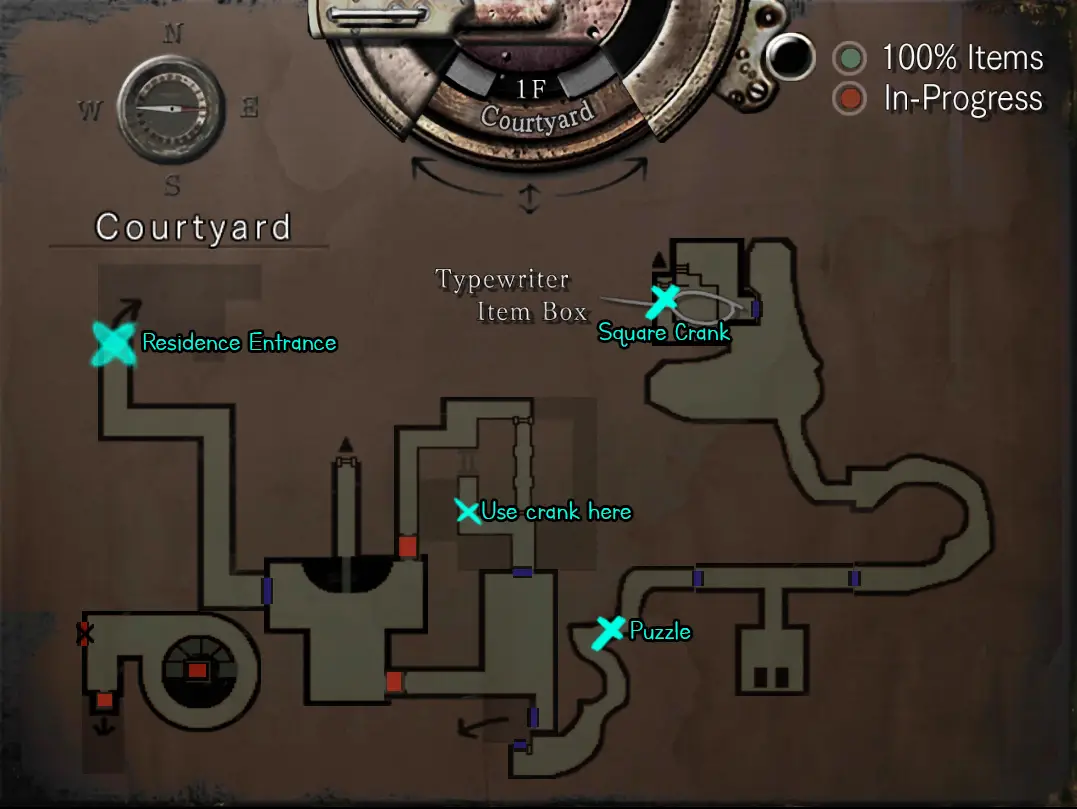
11) Después de un pequeño rompecabezas (Rojo -> W., Azul-> norte) para abrir las puertas, Dirígete a la cabina para conseguir la manivela.. Cuando intentes irte, tendrás el primer encuentro con Lisa.. Cuando estás fuera de la cabina, Retrocede al principio y ve a la piscina.. usa la manivela, Pasa por la piscina y toma el ascensor.. Sigue el camino para entrar a la residencia..
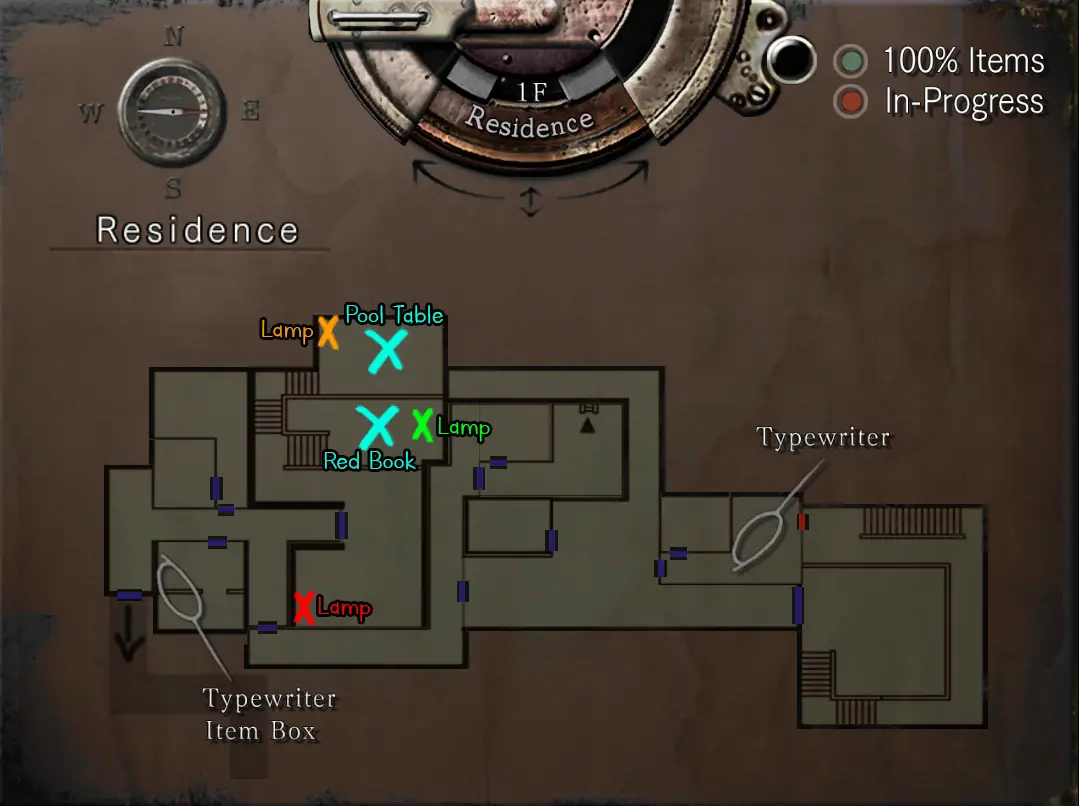
12) Ir a la sala de billar, Recoge el libro de abajo y enciende las lámparas.(velas? No estoy seguro.) Haz una nota mental o una captura de pantalla de aquellos que tienen las bolas de billar para usarlas en el futuro, así no tendrás que volver aquí..
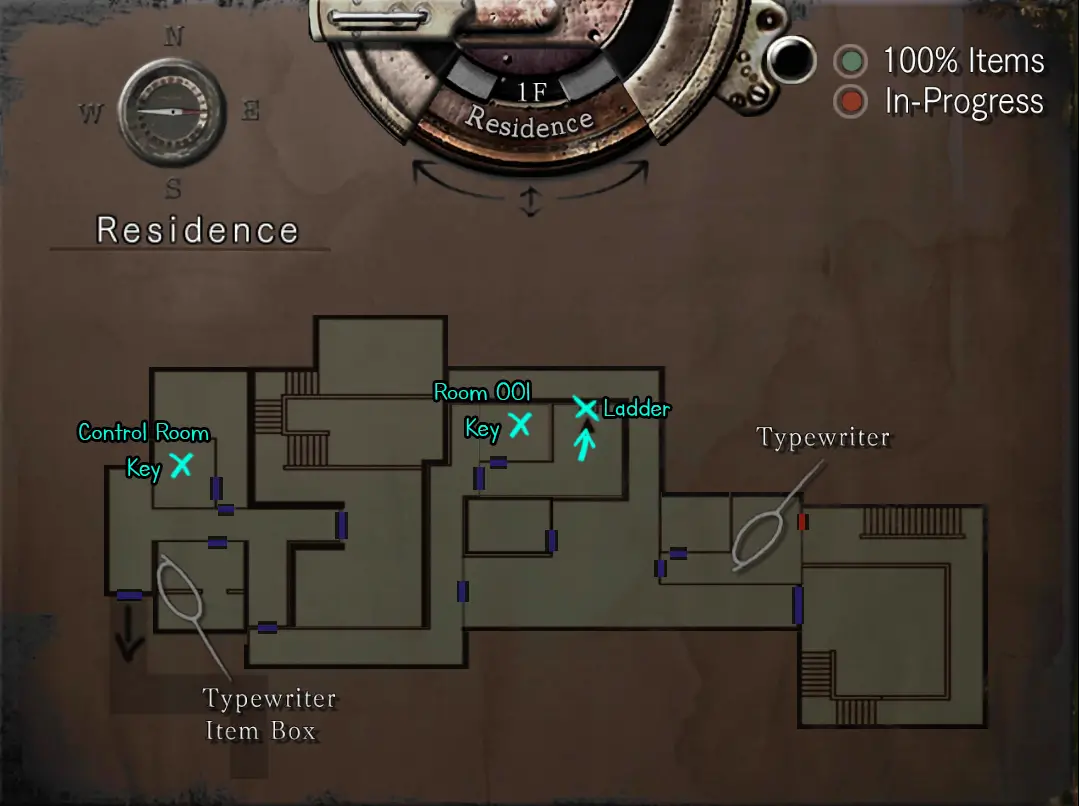
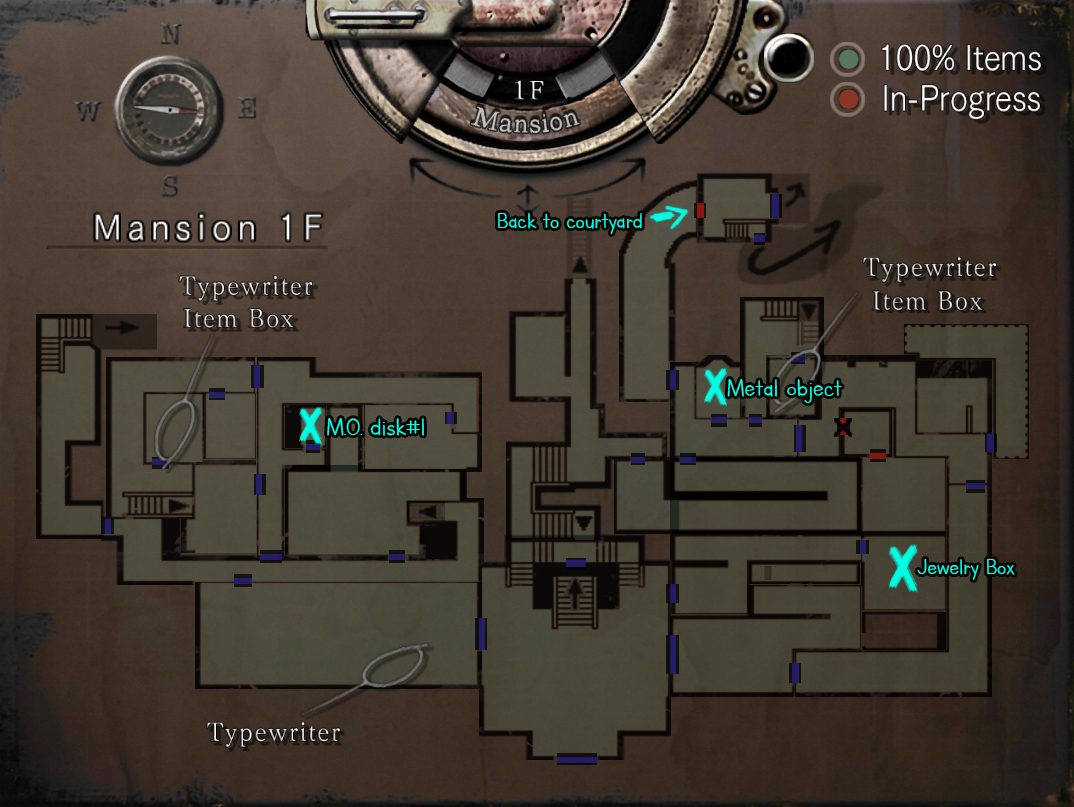
13) Obtener espacio 001 llave del estante del baño. ir a la habitación 001 y recoge la llave de la sala de control. volver a la habitacion 002 y empuja las estanterías para llegar a la escalera. Bajar.
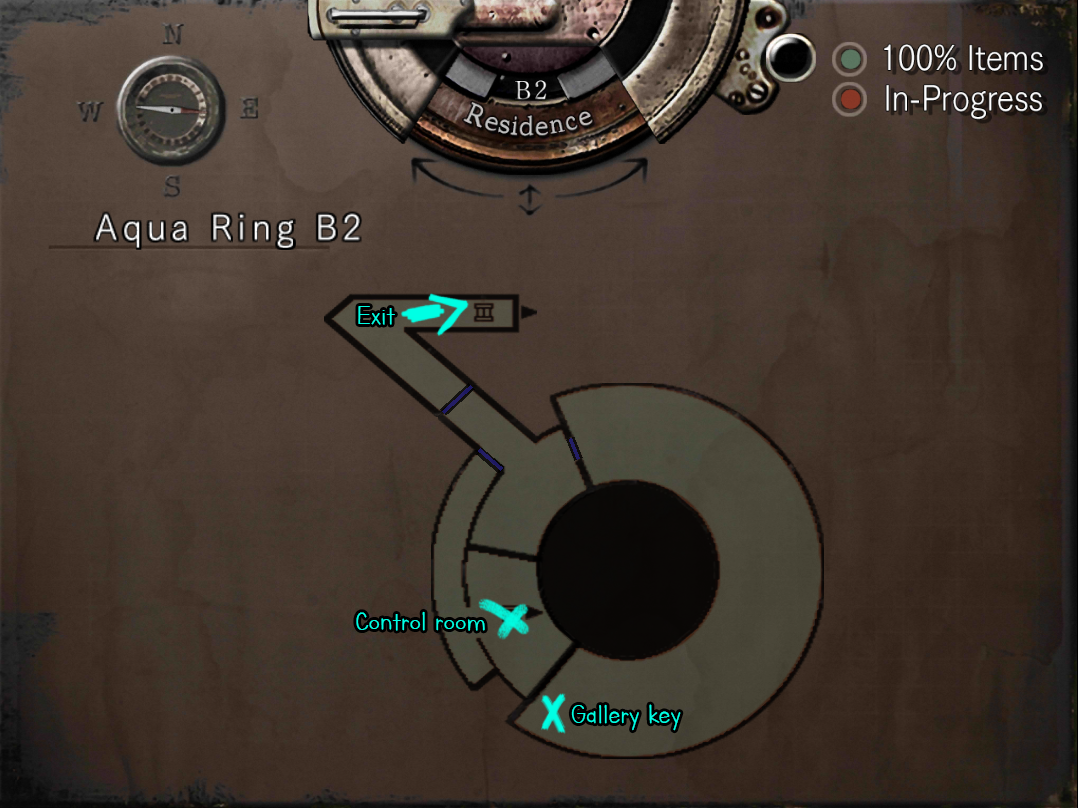
14) Corre alrededor de los tiburones, baja las escaleras y haz lo sala de control. Luego recoge la clave de la galería.. Luego vuelve arriba a la residencia..
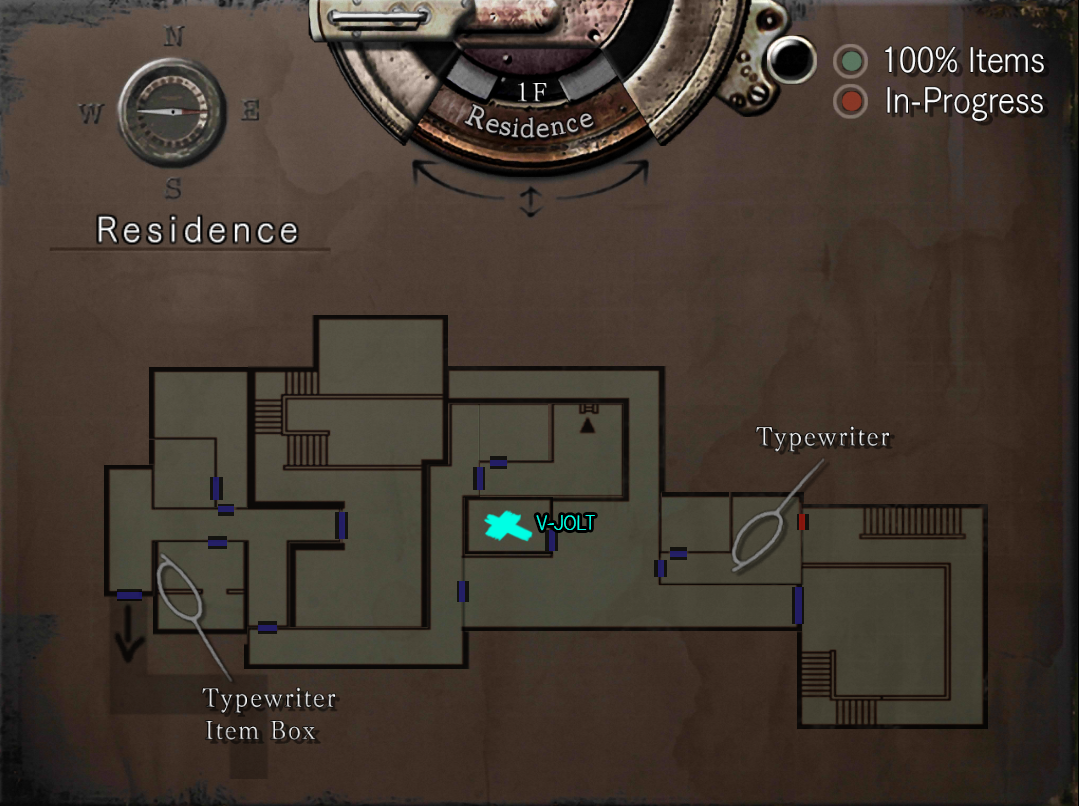
15) Entra a la galería, Recoge el pesticida en aerosol del cadáver y úsalo en el nido de abejas.. Luego usa el código de la sala de billar que verificamos anteriormente. (lámparas y bolas de billar) para abrir la sala médica y hacer V-JOLT. (V-JOLT es opcional, no tendrás que luchar contra la planta 42 si lo logras.) Omita el siguiente paso también si se está saltando V-JOLT.
Receta V-JOLT:
UMB No.3 + Agua = NP-004
notario público-004 + Amarillo-6 = UMB No.10
Amarillo-6 + Agua = UMB No.7
UMB No.10 + UMB No.7 = Vicepresidente-017
vicepresidente-017 + UMB No.3 = V-JOLT.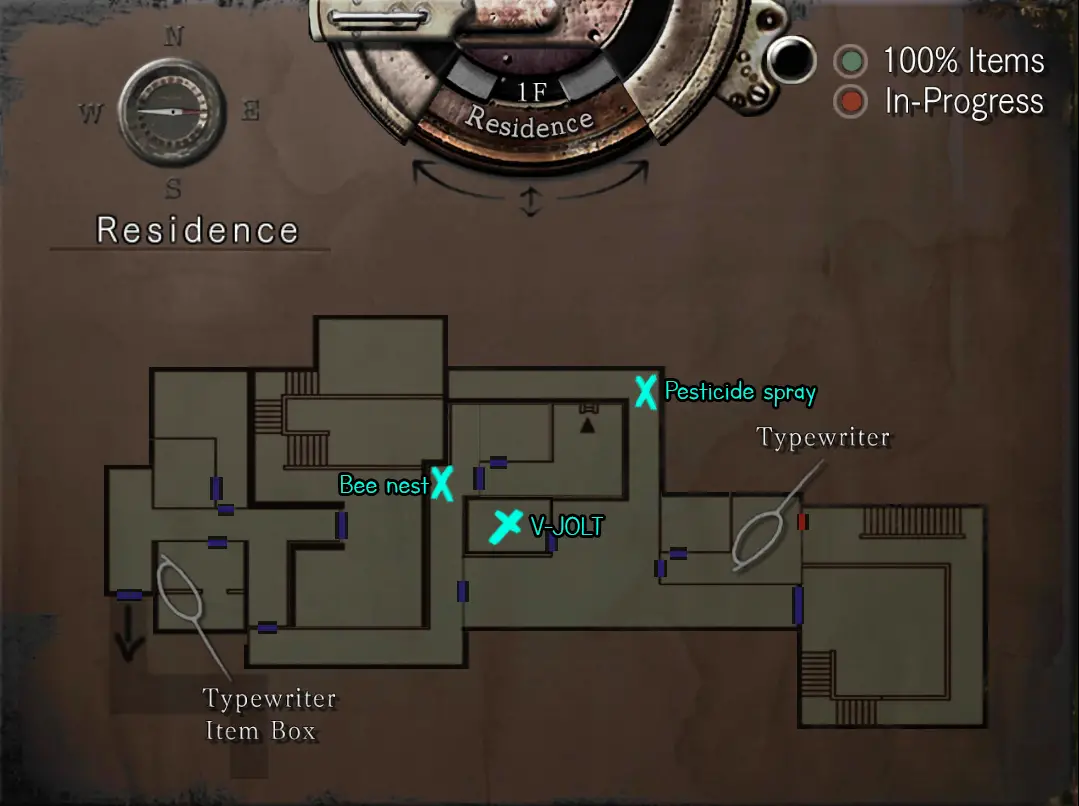
16) Dirígete al anillo acuático nuevamente y usa V-JOLT en la Planta. 42 raíces.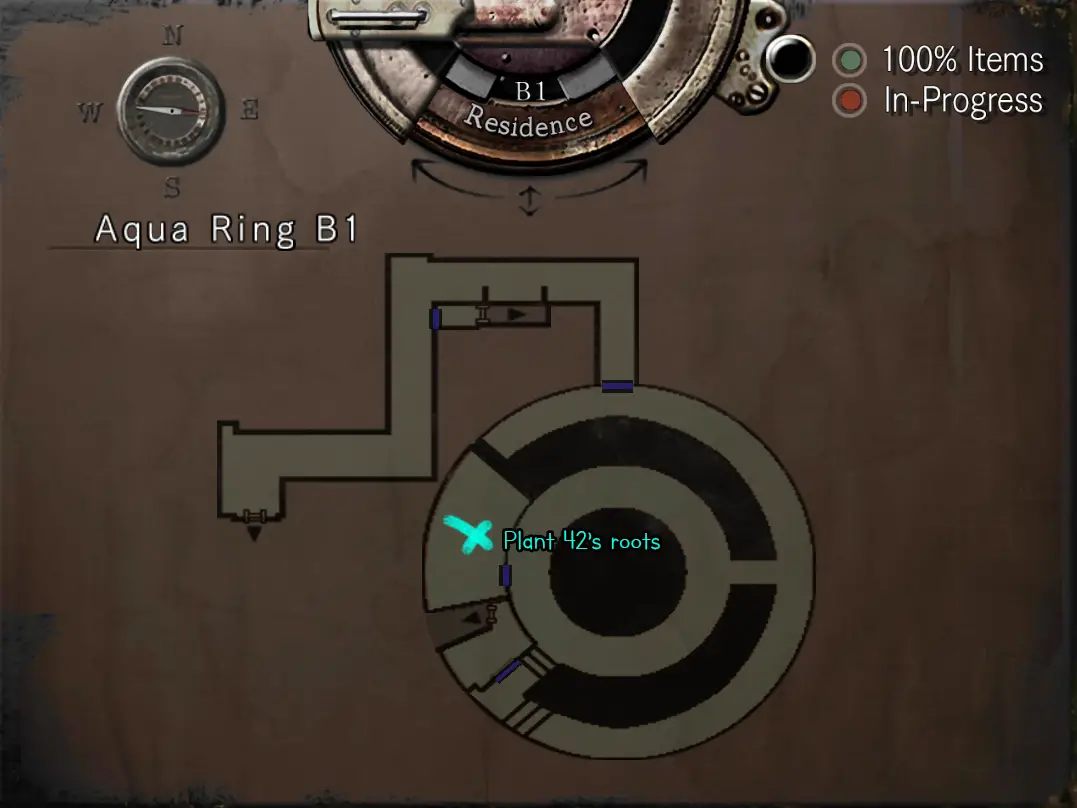
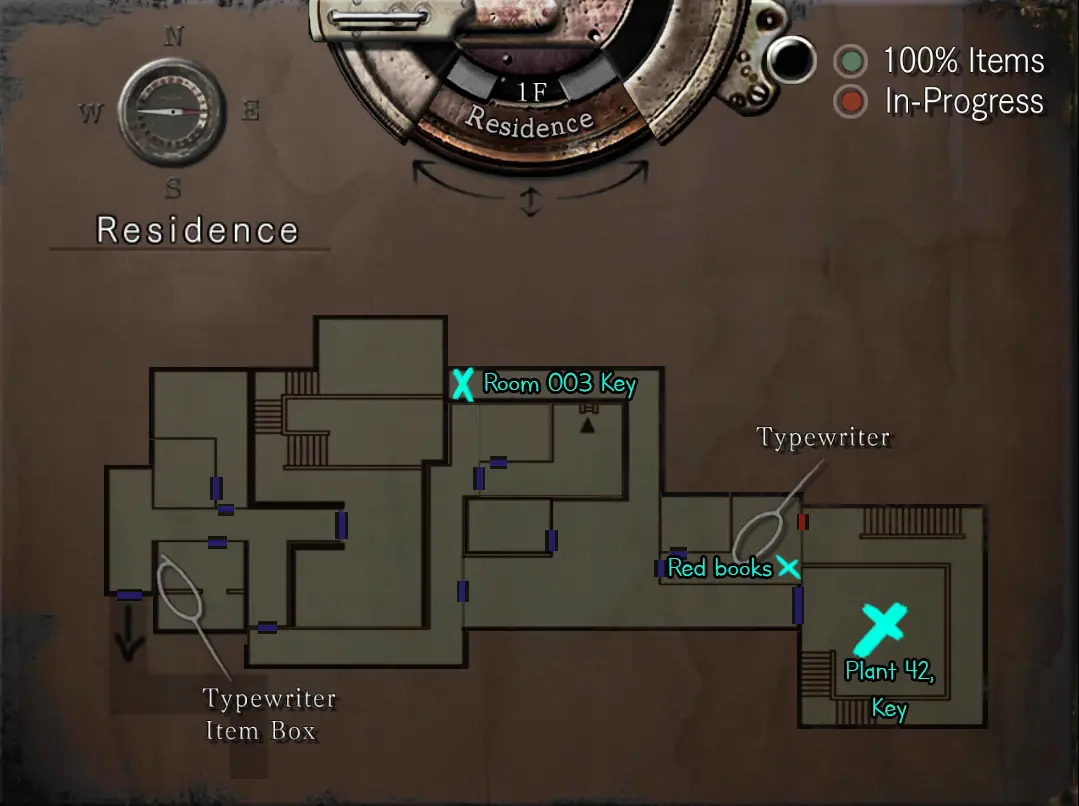
17) sala de recogida 003 clave ahora que las abejas se han ido. Entrar a la habitación 003, Clasifica los libros en el estante usando el libro rojo que recogimos antes. (es mi favorito. pintura de venus yay) y entrar a la Planta 42 room to progress. After defeating Plant 42 pick up the key from the fireplace.
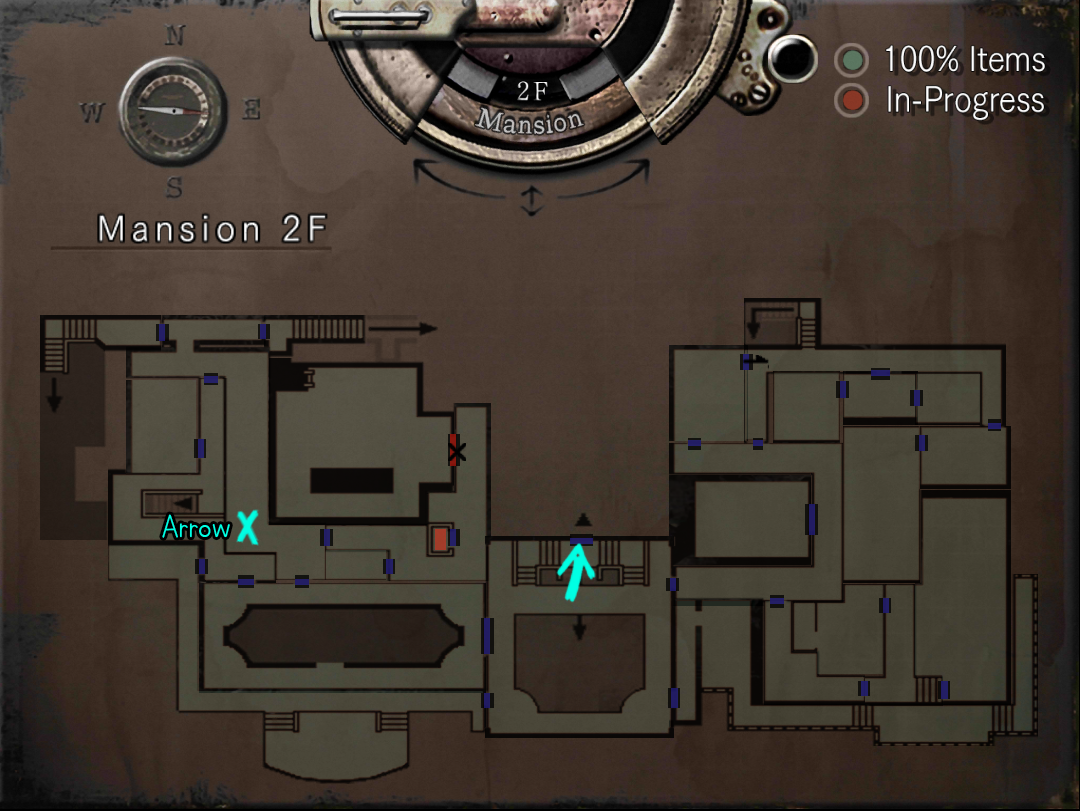
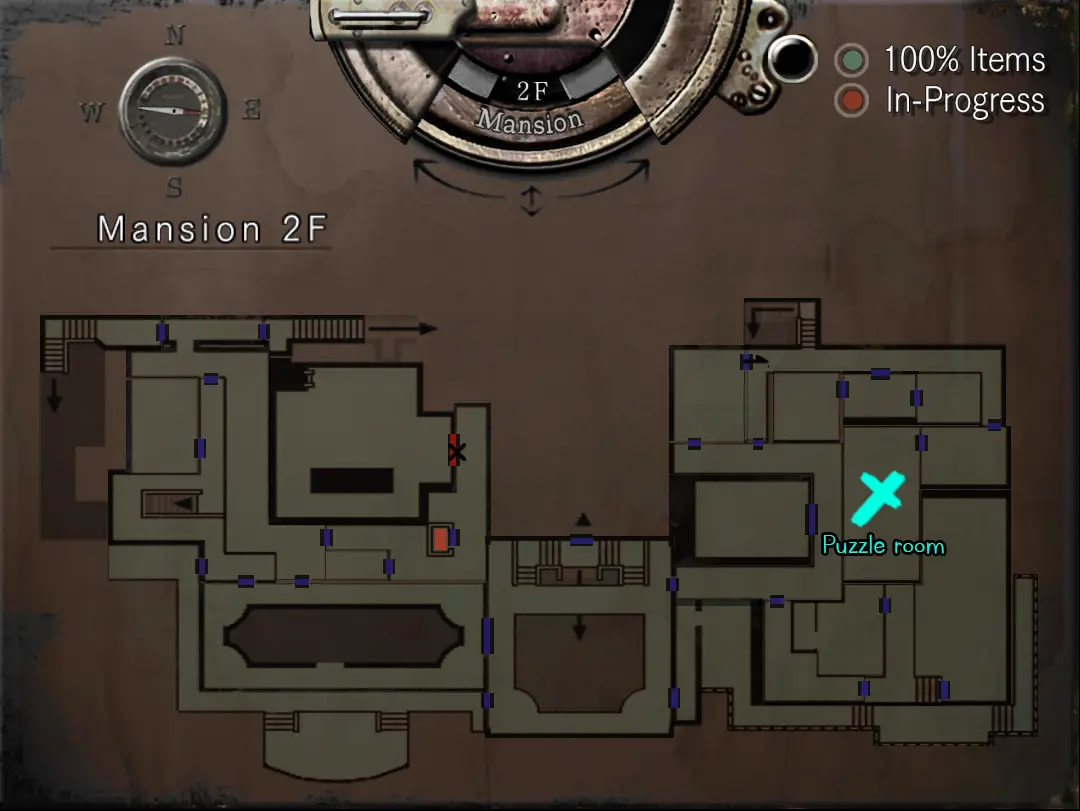
18) Backtrack aaaaall the way to the mansion again. Make your way to another statue room,
to reveal a hidden passage below. Before you descend further you’ll find a book with a medal inside.
19) Fix the power supply, get in the elevator.

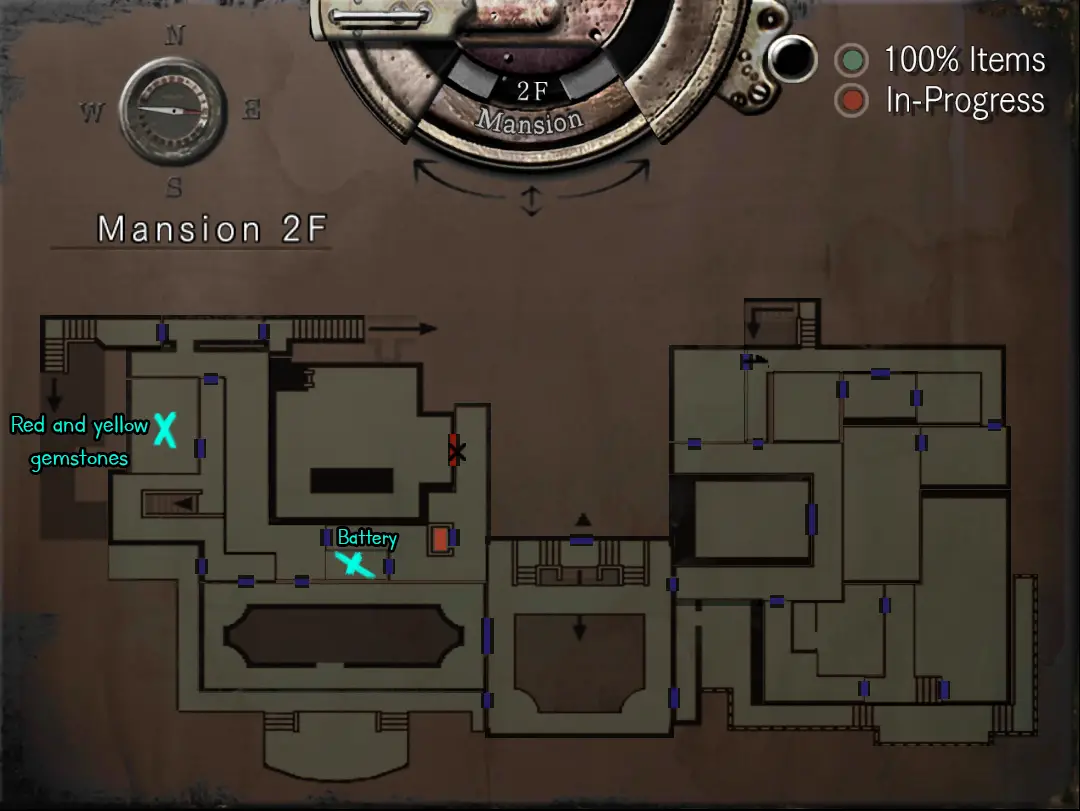
20) Pick up the battery. Pick up the red and yellow gemstones from the hawk room. Yellow is only needed for the first M.O disk. If you aren’t planning to save Chris later you can skip this and just pick up red gemstone.
21) We can now kill Yawn, after defeating him pick up the book and inside of it you’ll find another medal.
22) You can get the M.O disk now if you picked up yellow gemstone.
Pick up jewelry box and combine it with red gemstone to open it. Examine the broach, it’s going to transform into a key. Then you can enter the study room to pick up a metal object. After that go back to courtyard.
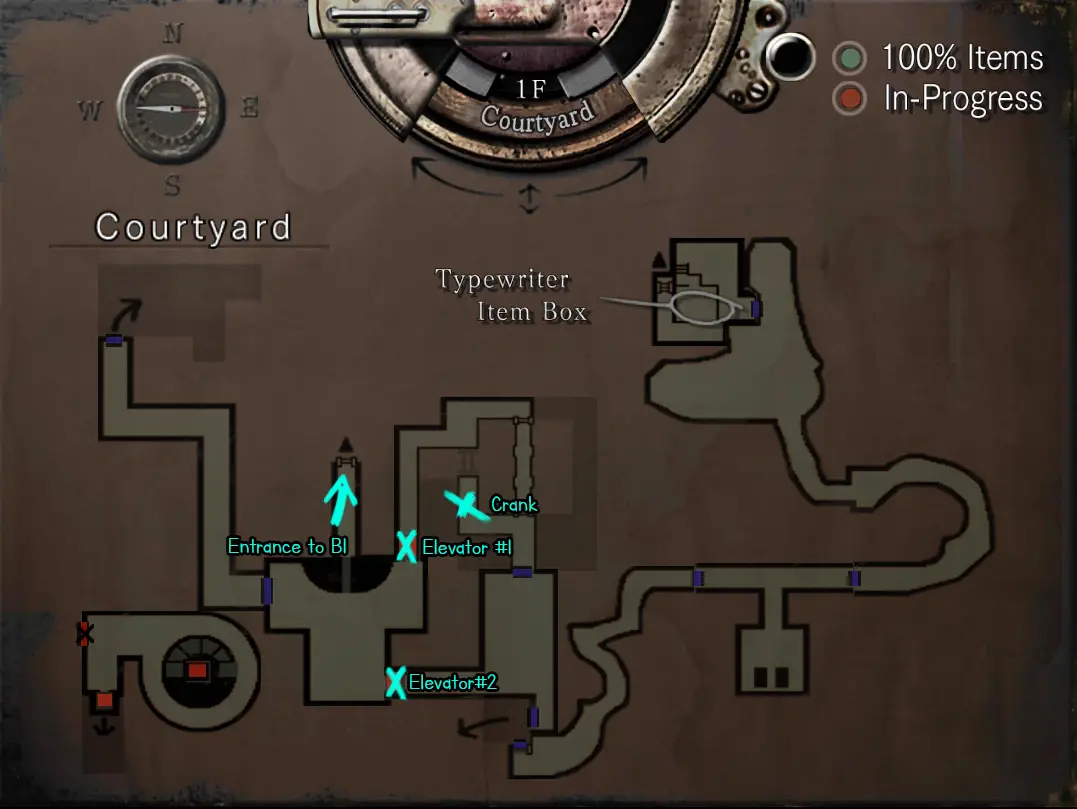
23) Take the elevator to the fountain area, use the battery pack on the broken elevator and go back to the pool. Use the crank on the pool. Then take the fixed elevator back to the waterfall and go down from the ladder.
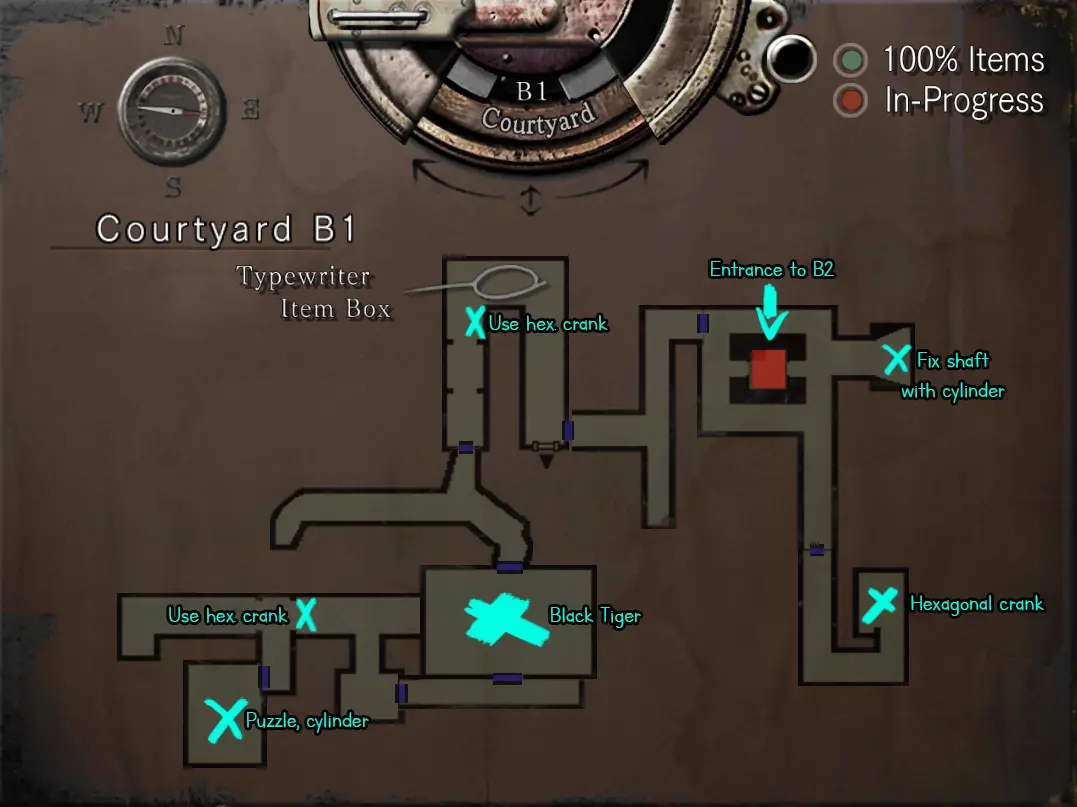
24) Pick up the hexagonal crank from Enrico’s body. Either defeat Black Tiger or pass through the room. You need to use the survival knife to clear up the door and go through. Solve the puzzle to get cylinder and go all the way back to the elevator. Pick up the shaft, combine with the cylinder and put it back (order of buttons are on the shaft) then take the elevator.
25) Push the box in the room to the device and move it downstairs. Then go back to the elevator room, take the ladder downstairs and use the garbage compactor to break the box. Pick up the broken flamethrower. Pull the lever in the hallway that Lisa is wandering around, use the broken flamethrower on the device next to the locked door to unlock it and enter. Pick up the jewelry box and use the ladders to climp up. Inside of the jewelry box you’ll find a stone ring. You can now combine stone ring and metal object.
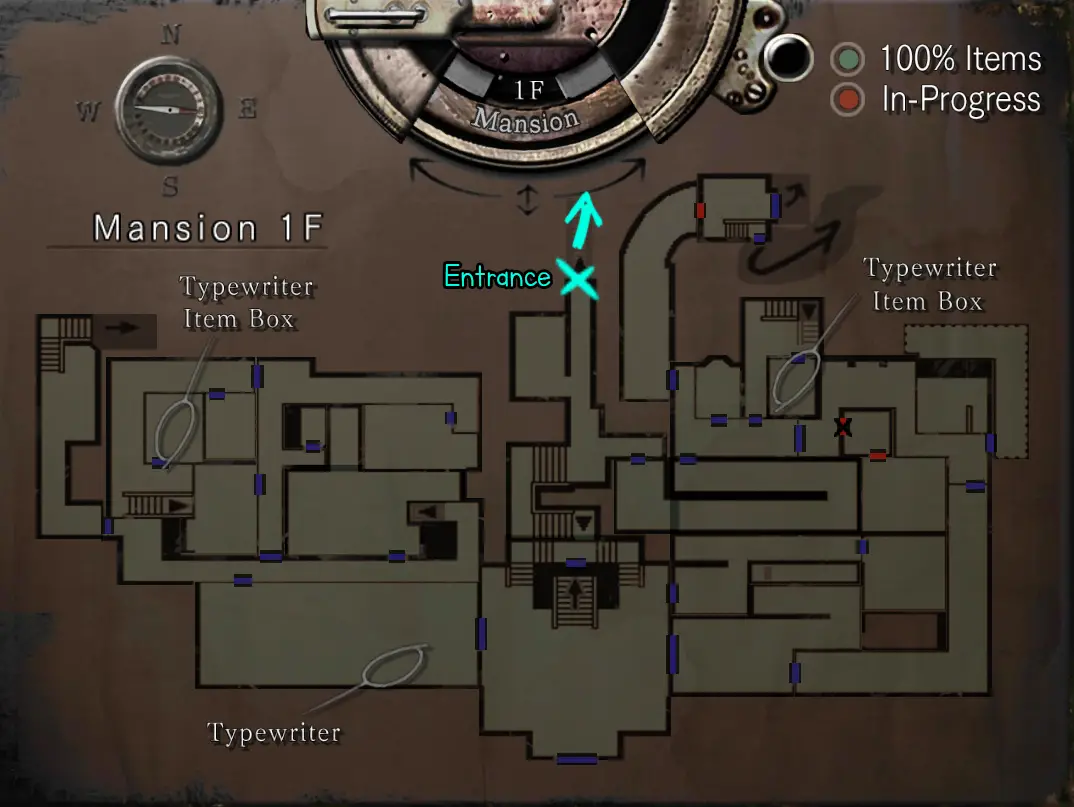
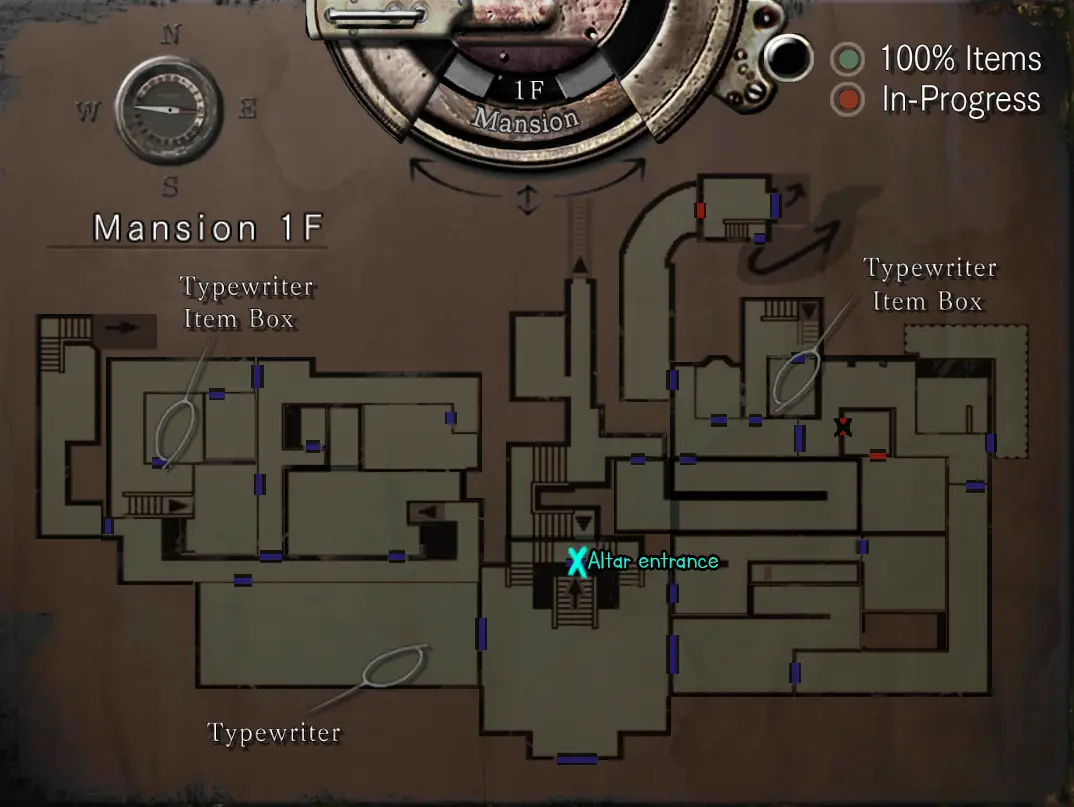
26) Go back to the mansion. You can enter the altar now.
Jill – Laboratorio
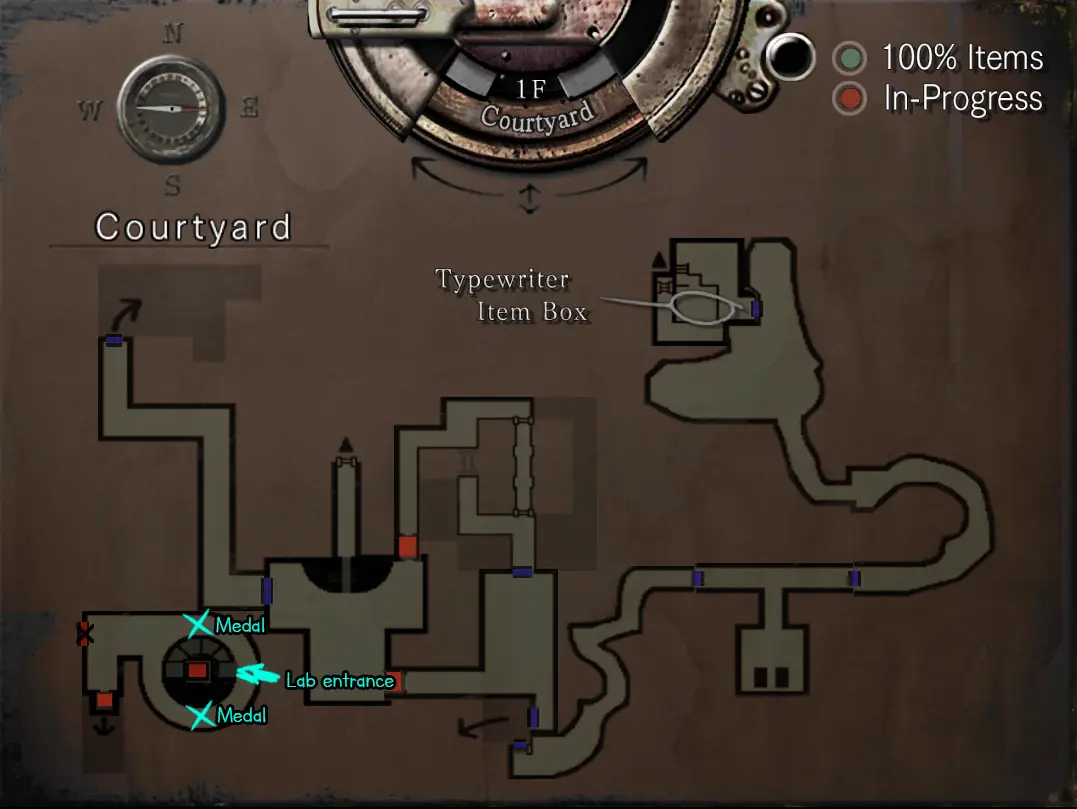
27) After you enter the altar, it’s pretty straightforward. Just follow the path and good luck with Lisa. After that proceed through the elevator and put both medals in their spots. Fountain/Pool thingy is going to be drained and we can enter the last part, underground laboratory.
28) Keep descending to Laboratory B3, enter the operating room and use the PC.
IDENTIFICACIÓN:JOHN
Contraseña: ADA
Next password: CELL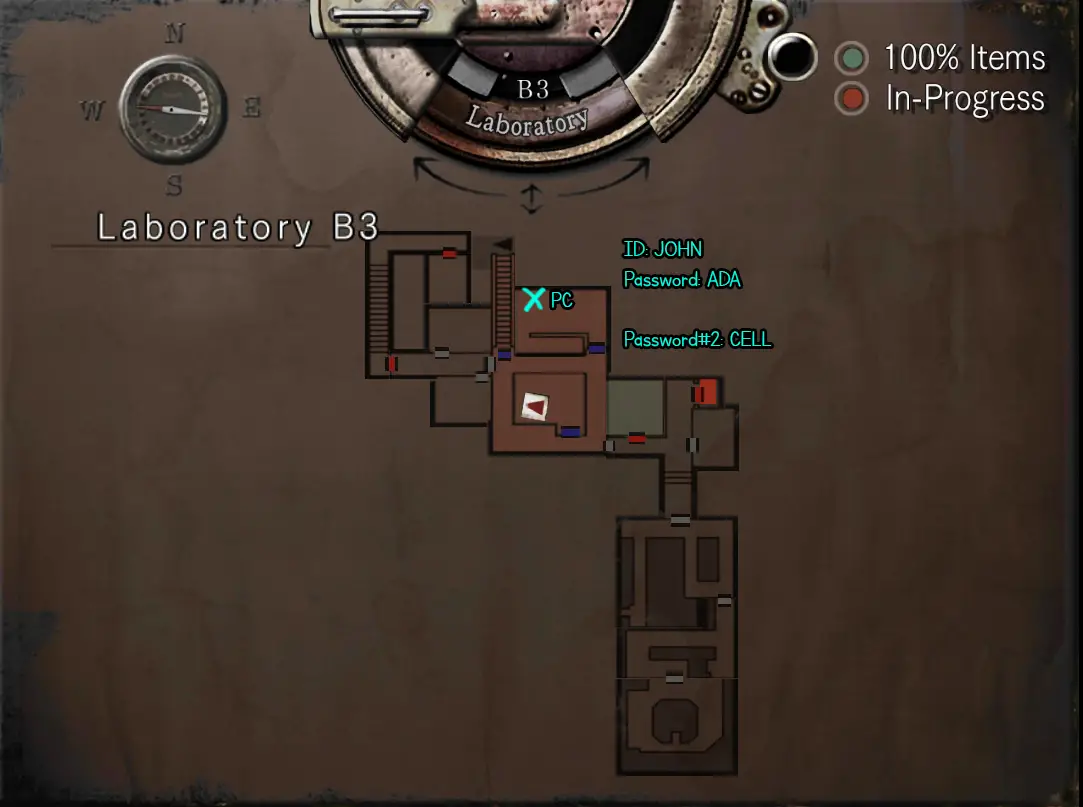
29) Vuelve arriba, you now have access to the previous locked room. Before you enter pick up the 2nd MO disk from the desk. Enter the room and pick up the last MO disk from the corner on your left. (De nuevo, if you are not planning to save Chris just skip the disks.) In front of it on the wall there’s a passcode entry terminal,
el código es 8462.Pick up the Lab Key from the desk inside of that area.
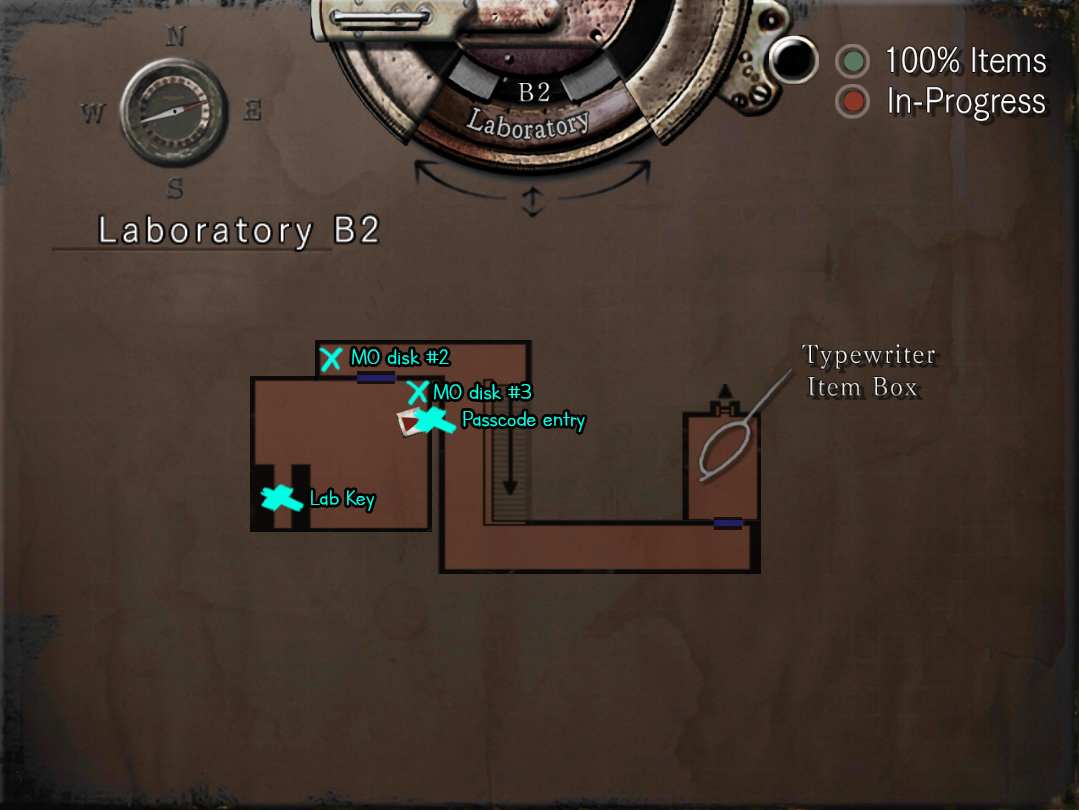
If you’d like to transmit MO disks to save Chris, here are the locations: 
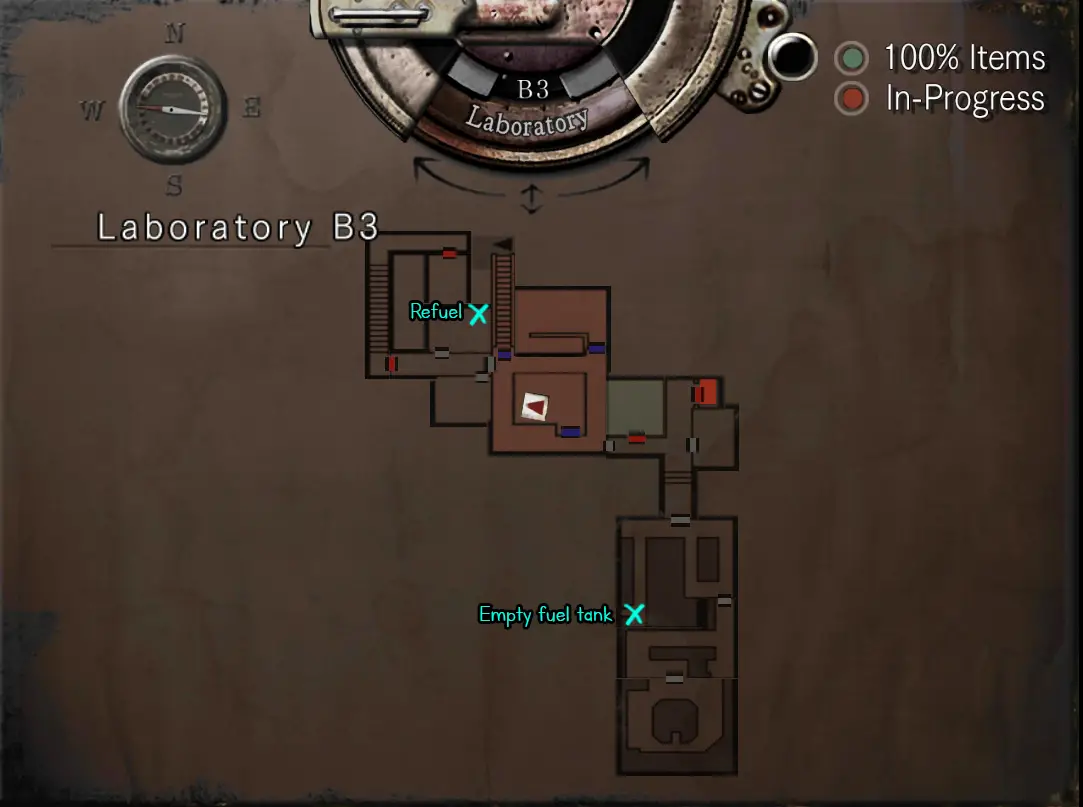
30) Proceed through the little corridors and pick up the empty fuel shell, refuel and place it back into its place. DO NOT RUN while carrying the full shell.
31) Reach the power switch thingy at the end of the little maze, power it up and then take the elevator.

32) Enjoy the cutscenes and Tyrant fight. If you didn’t save Barry don’t forget to pick up the key from the floor, if you saved Barry emergency alarm will start and locks will be released. Unlock the main lab by using the pc in the corner of the room and exit. If you transmitted the M.O disks you need to go to the cell Chris is being kept and take him out of there.
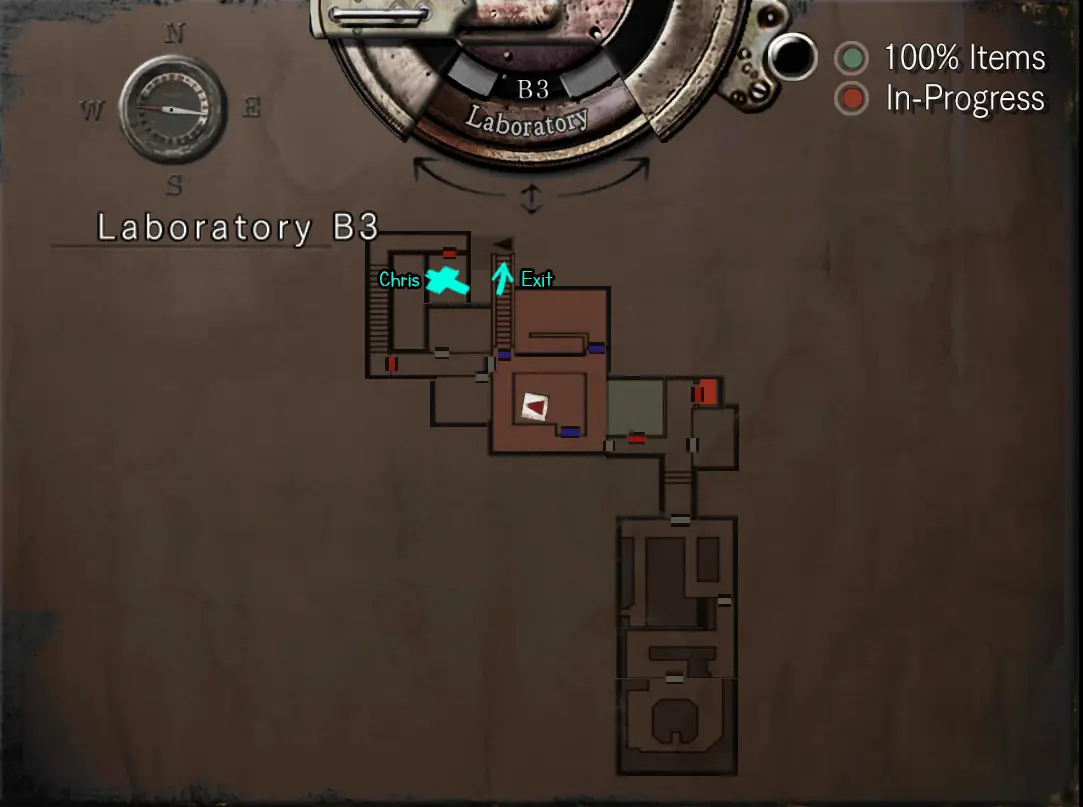
33) Run all the way to Laboratory B1 and fix the elevator’s fuse (missing piece is right in front of it). Signal Brad when you are ready.
cris – Beginning to Lab
1) Check Kenneth and go back to main hall.
2) Go for the golden arrow at the location below. Examine it to get an arrowhead. Proceed to backyard and enter the tomb. Pick up the book from the stand and inspect it to get a key.
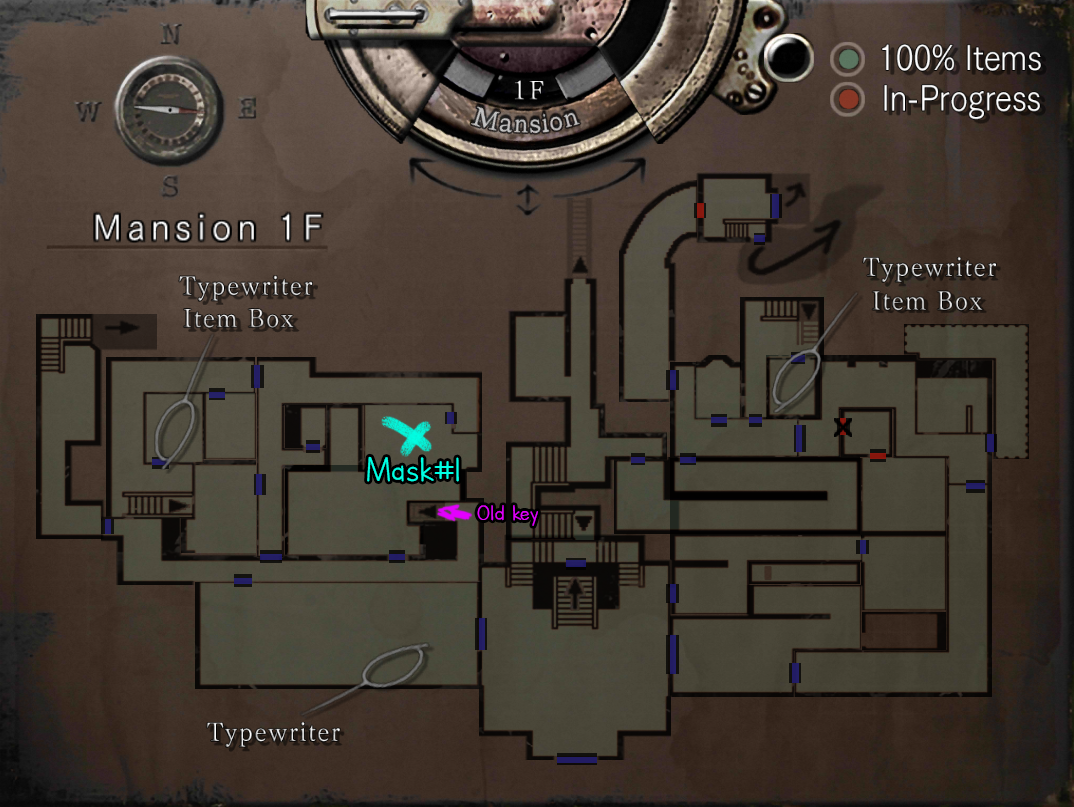
3) Pick up the old key from the bahtub, then use it to open the outside boiler door and pick up herbicide/plant chemical. On your way to the next location, pick up the old key from next to the typewriter.
4) Pick up dog whistle. Use the dog whistle on the balcony to get a collar. Inspect the collar to get an imitation key.

5) Pick up the real armor key and put the imitation key in its place.
6) Use herbicide and obtain the first mask.
(Rojo) Pick up the old key from basement (on the shelf in the corner.)
7) Statue room puzzle and mask #2. Then trigger Richard’s time and bring him the serum (o no? tu elección. You can’t make V-JOLT later if you save him.) After dealing with Richard take the first musical score.
Statue room puzzle:
Arriba a la derecha
Abajo a la izquierda
Abajo a la derecha.
Press the two sun pieces on the box.
8) Pick up the fake emblem from the dining hall (above the fireplace), go to the bar/piano room to obtain the other half of the musical score and combine both scores. Try to play the piano and Rebecca will come to help. Go to main hall and come back to take the golden emblem from the hidden room (Put the fake emblem in its place to get out). Go back to the dining hall to put the golden emblem in the original emblem spot above fireplace. This is going to make the clock puzzle available. You’ll obtain the key that opens Yawn battle room after solving clock puzzle.
(Large-Right x2)
9) First yawn battle, pick up the mask#3 from the corner of the room
10) Gallery Puzzle, obtain mask #4. Then put all of the masks in place for crimson prototype fight. When you are done with the crimson prototype you’ll find a stone and metal object inside of the coffin. Esta es la llave para entrar al patio..
11) Después de un pequeño rompecabezas (Rojo -> W., Azul-> norte) para abrir las puertas, Dirígete a la cabina para conseguir la manivela.. Cuando intentes irte, tendrás el primer encuentro con Lisa.. Cuando estás fuera de la cabina, Retrocede al principio y ve a la piscina.. usa la manivela, Pasa por la piscina y toma el ascensor.. Sigue el camino para entrar a la residencia..
12) Ir a la sala de billar, Recoge el libro de abajo y enciende las lámparas.(velas? No estoy seguro.) Haz una nota mental o una captura de pantalla de aquellos que tienen las bolas de billar para usarlas en el futuro, así no tendrás que volver aquí..
13) Obtener espacio 001 llave del estante del baño. ir a la habitación 001 y recoge la llave de la sala de control. volver a la habitacion 002 y empuja las estanterías para llegar a la escalera. Bajar.
14) Corre alrededor de los tiburones, baja las escaleras y haz lo control room puzzle. Luego recoge la clave de la galería.. Luego vuelve arriba a la residencia..
15) Entra a la galería, pick up the pesticide spray from the corpse. Use the spray on the bee nest. Go back to where the nest was and pick up room 003 llave. Get in the room and reorder the red books. It will open a door to Plant 42 luchar. If you didn’t save Richard, when you enter the door you’ll switch to Rebecca to make V-JOLT. Si salvaste a Richard, salta el siguiente. 2 pasos y no olvides recoger la llave de la chimenea después de Plantar 42 luchar.

16) Utilice el código de la sala de billar que comprobamos anteriormente. (lámparas y bolas de billar) para abrir la sala médica y hacer V-JOLT.
Receta V-JOLT:
UMB No.3 + Agua = NP-004
notario público-004 + Amarillo-6 = UMB No.10
Amarillo-6 + Agua = UMB No.7
UMB No.10 + UMB No.7 = Vicepresidente-017
vicepresidente-017 + UMB No.3 = V-JOLT.
17) Dirígete al anillo acuático nuevamente y usa V-JOLT en la Planta. 42 raíces.
18) Backtrack aaaaall the way to the mansion again. Make your way to another statue room, resuelve el rompecabezas para revelar un pasaje oculto debajo. Before you descend further you’ll find a book with a medal inside.
19) Fix the power supply, get in the elevator.
20) Pick up the battery. Pick up the red and yellow gemstones from the hawk room. Yellow is only needed for the first M.O disk. Si no planeas salvar a Jill más tarde, puedes omitir esto y simplemente recoger la piedra preciosa roja..
21) We can now kill Yawn, after defeating him pick up the book and inside of it you’ll find another medal.
22) Puedes obtener el disco M.O ahora si deseas salvar a Jill más tarde..
Recoge el joyero y usa la piedra preciosa roja para abrirlo.. Examine the broach, it’s going to transform into a key. Then you can enter the study room to pick up a metal object.
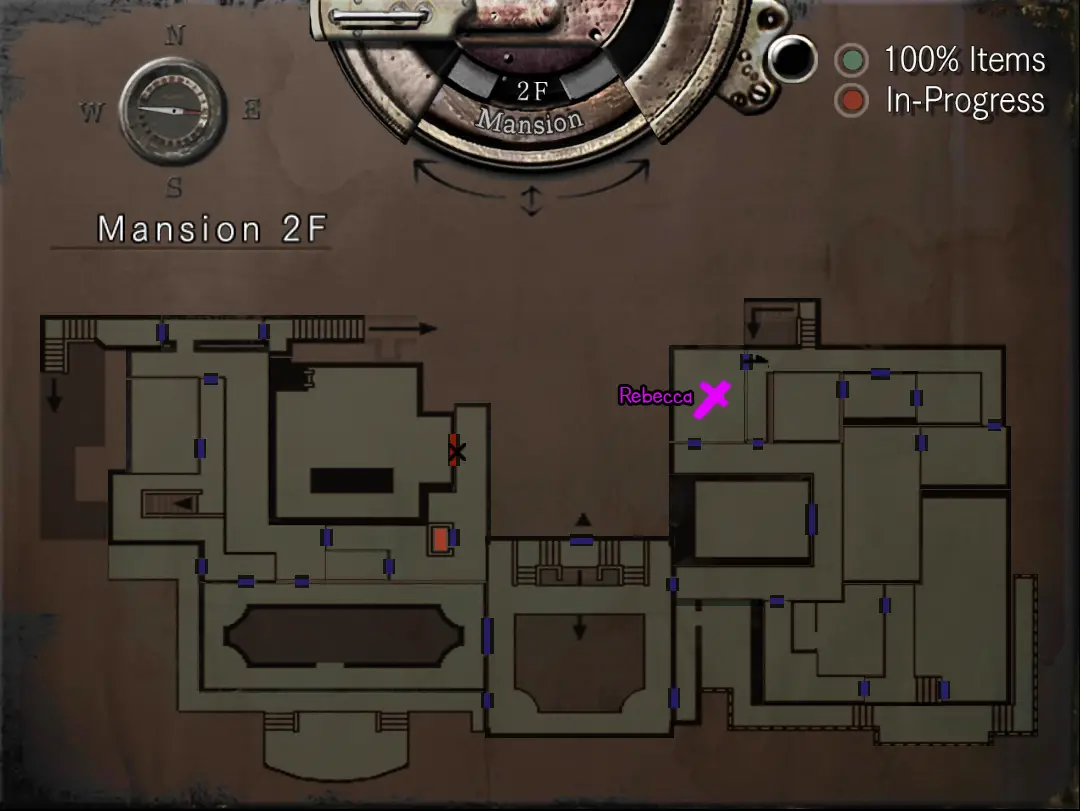
Cuando entres a la habitación escucharás a Rebecca gritar.. Si quieres salvarla, ella está arriba.. After that go back to courtyard.
23) Take the elevator to the fountain area, use the battery pack on the broken elevator and go back to the pool. Use the crank on the pool. Luego toma el ascensor fijo de regreso al área de la fuente/cascada y baja por la escalera..
24) Pick up the hexagonal crank from Enrico’s body. Either defeat Black Tiger or pass through the room. You need to use the survival knife to clear up the door and go through. Recoge y mueve el lanzallamas en la repisa para desbloquear la puerta.. Solve the puzzle to get cylinder and go all the way back to the elevator. Pick up the shaft, combine with the cylinder and put it back (order of buttons are on the shaft) then take the elevator.
25) Push the box in the room to the device and move it downstairs. Then go back to the elevator room, take the ladder downstairs and use the garbage compactor to break the box. Pick up the broken flamethrower. Pull the lever in the hallway that Lisa is wandering around, use the broken flamethrower on the device next to the locked door to unlock it and enter. Pick up the jewelry box and use the ladders to climp up. Inside of the jewelry box you’ll find a stone ring. You can now combine stone ring and metal object.
26) Go back to the mansion. You can enter the altar now.
cris – Laboratorio
27) After you enter the altar, it’s pretty straightforward. Just follow the path and good luck with Lisa. After that proceed through the elevator and put both medals in their spots. Fountain/Pool thingy is going to be drained and we can enter the last part, underground laboratory.
28) Keep descending to Laboratory B3, enter the operating room and use the PC.
IDENTIFICACIÓN:JOHN
Contraseña: ADA
Next password: CELL
29) Vuelve arriba, you now have access to the previous locked room. Before you enter pick up the 2nd MO disk from the desk. Enter the room and pick up the last MO disk from the corner on your left. (De nuevo, Si no planeas salvar a Jill, simplemente omite los discos.) In front of it on the wall there’s a passcode entry terminal,
el código es 8462.Pick up the Lab Key from the desk inside of that area.
Si desea transmitir discos MO para salvar a Jill, here are the locations:
30) Proceed through the little corridors and pick up the empty fuel shell, refuel and place it back into its place. DO NOT RUN while carrying the full shell.
31) Reach the power switch thingy at the end of the little maze, power it up and then take the elevator.
32) Enjoy the cutscenes and Tyrant fight. Si no salvaste a Rebecca, no olvides recoger la llave del suelo., Si guardaste a Rebecca, la alarma de emergencia se activará y se desbloquearán las cerraduras.. Desbloquea el laboratorio principal usando la PC en la esquina de la habitación y sal.. Si transmitiste los discos MO, debes ir a la celda en la que se encuentra Jill y sacarlo de allí..
33) Run all the way to Laboratory B1 and fix the elevator’s fuse (missing piece is right in front of it). Signal Brad when you are ready.
Eso es todo lo que estamos compartiendo hoy para este Resident Evil guía. Esta guía fue originalmente creada y escrita por Aurora. En caso de que no actualicemos esta guía, puede encontrar la última actualización siguiendo este enlace.