
- Title: Dead Island: Riptide Definitive Edition
- Release Date:
- Developer:
- Publisher:
Information about Dead Island: Riptide Definitive Edition is still incomplete. Please help us fill the details of the game using this contact form.
Can’t find a comprehensive collectibles guide without having to completely tab out of your game? Well, look no further because this will be the guide for you!
Whether you’re just a perfectionist, a collectible hunter or just looking to get the achievements for Mystery Solved, News Junkie, Professional Tourist, and finally Hoarder this will hopefully help you on your endeavor.
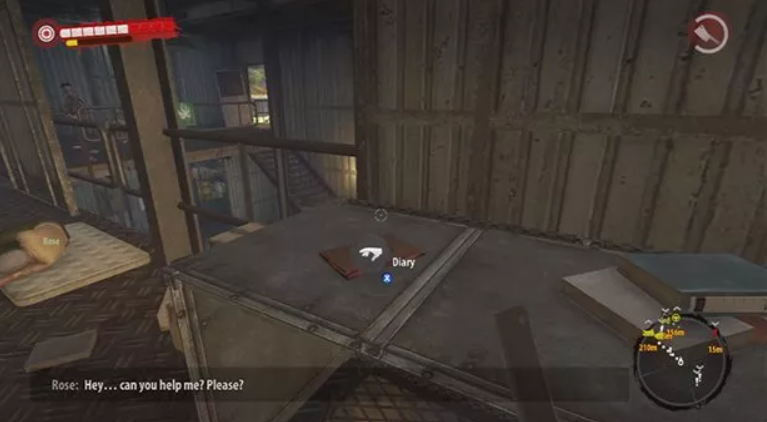
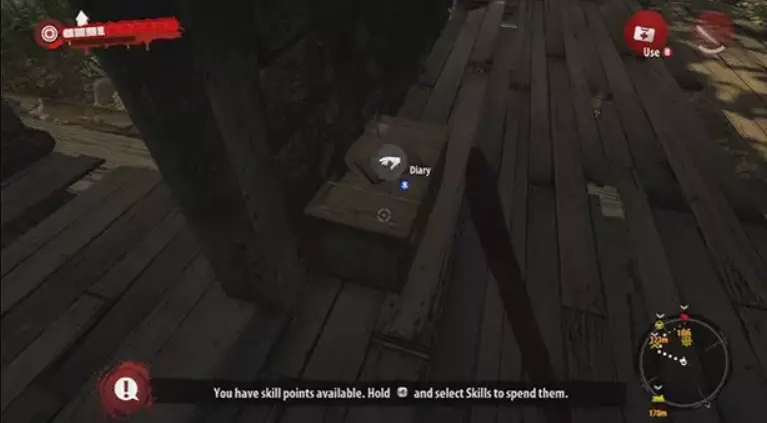
John Morgan’s Diary Entries
John Morgan has a total of 10 diary entries scattered all over the island of Palanai. You can find them in the flooded jungle, Dr. Kessler’s Lab, the Japanese Tunnels, and lastly Henderson.
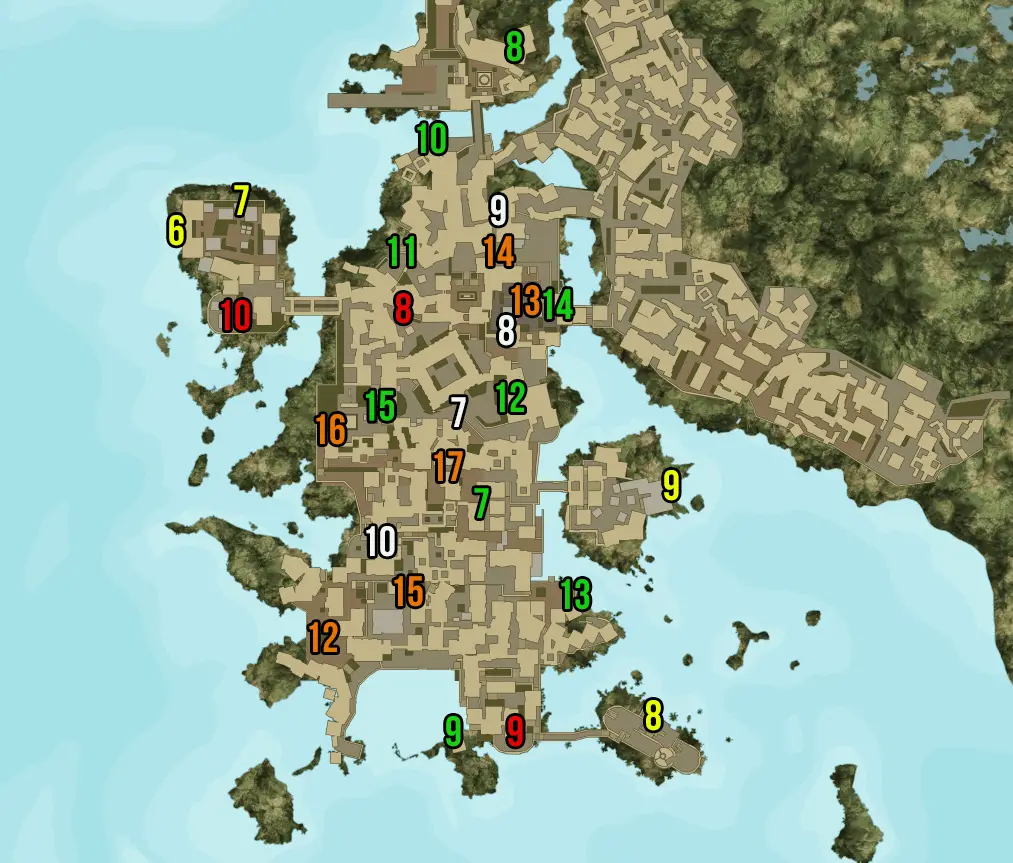
On this map of the flooded jungle, all of the diary entries by John Morgan are numbered in WHITE if you want to place a map marker for the exact location.

Flooded Jungle
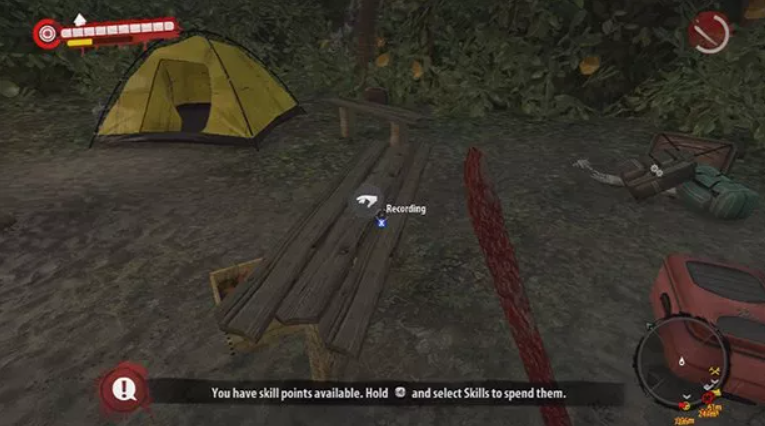
Diary 1
Once you reach chapter 2, you can access this diary recording in Paradise camp. It’s on the second floor near the west entrance of the camp.

Diary 2
You’ll find this entry in the survivors camp in Halai village once you gain access to this site. You’ll find it on the second floor where the merchants are.
Diary 3
You’ll find this entry in Jimmy’s workshop inside Marik’s Marina. This is also the same location where you find the mud pump later on in the main storyline. However, you don’t need to be this far along in the main quest be to able to gain access to this building.

Diary 4
This entry is in the Santa Maria mission, so still nothing too complicated yet. You’ll find this on the second floor of the building.
Dr. Kessler’s Lab
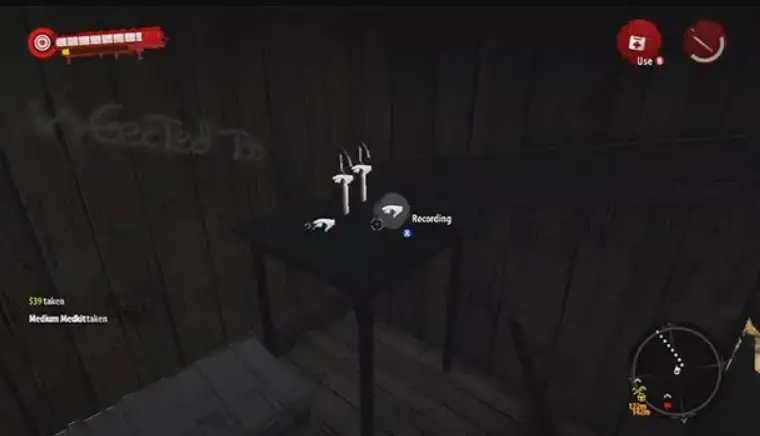
Diary 5
Once you’ve progressed far enough along the main storyline you’ll gain access to Dr. Kessler’s lab. In here is where you’ll find John’s 5th diary entry. This can be found on the table near the window.

The Tunnels
Diary 6
The first time I went collectable hunting this one took me a little while to find since you don’t have access to the world map down in the bowels of the Japanese tunnels. If you have the side quest History Lesson active, you can find this diary entry in the room next door to the notes. All you have to do is climb the center radar tower to the top and check the collapsed offices for this diary on a shelf.

Henderson
Welcome to the big city! There’s lots of scary things to fight here but there are also a lot of collectables to grab!
Once again, the diary entries are the WHITE numbers on this map.
Diary 7
Once you’ve done a little bit of exploring through Henderson, you’ll most likely come across the makeshift hospital. If this is the case, head on inside and grab diary entry #7 which is sitting right on the front desk!

Diary 8
A little bit south of the Old Town Cinema is a Dead Zone entrance called “Infested Warehouse”, and you can find John’s 8th diary installment on the jumble of tables just outside of this map portal.

Diary 9
Nearly there! Second last entry to collect! Diary #9 is on a fruit crate in an alley just west of Frankie O’Hara’s Dead Zone entrance (you may have already collected this entry on your way to the theatre for the first time in the quest City Newcomer). Check the crate for this diary page before leaving for your next adventure.

Diary 10
The last entry to collect! Way to go superstar! You’ll have to go all the way to Southwest Henderson to find this one, just north of Jorge (the Perfect Plan and A Collector guy in the barricaded room over the Sea Market), there is a workbench. To its east, there is a small temporary camp/safe zone with this diary.

Island Guidebook Pages
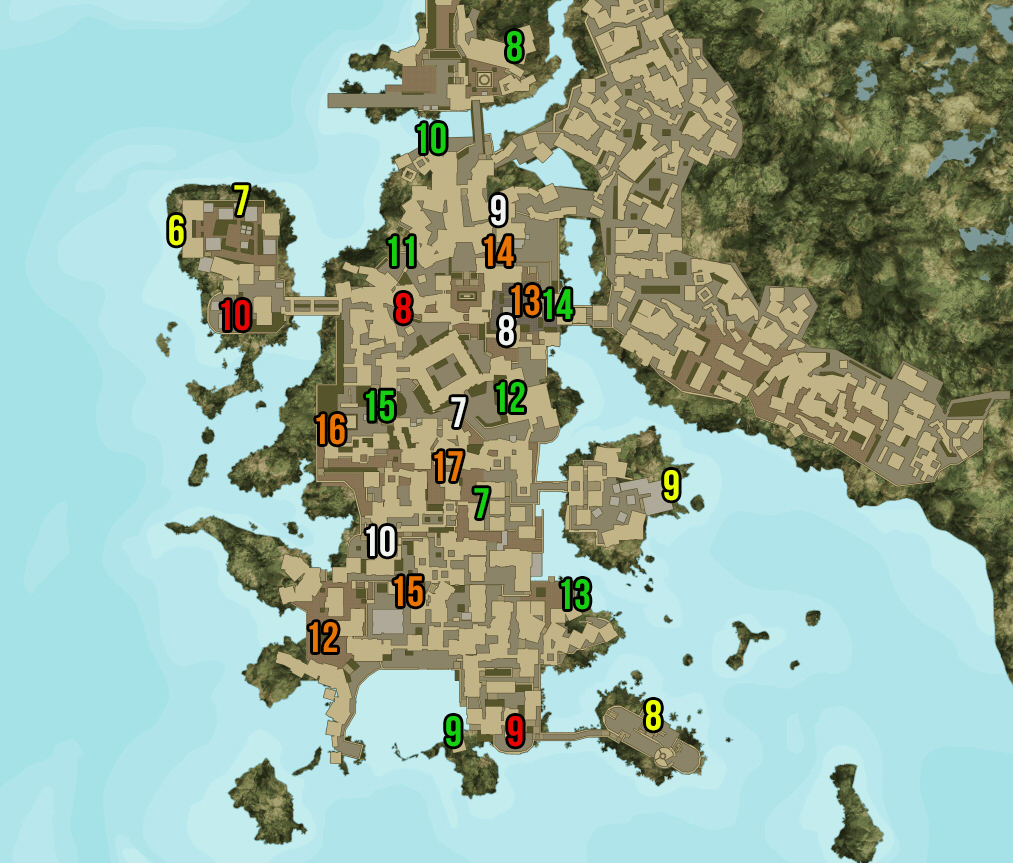
There are 17 pages in the Island Guidebook to find in the game.
- Flooded Jungle – 9 Pages
- Tunnel – 1 Page
- Ferry Station – 1 Page
- Henderson – 6 Pages
So, let’s not waste any time and get started on filling up your collectibles inventory.

On this map, all of the guidebook entries in the Jungle are marked in Orange if you want to put down a map marker, and within the guide, there are screenshots of the in-game locations.
Flooded Jungle
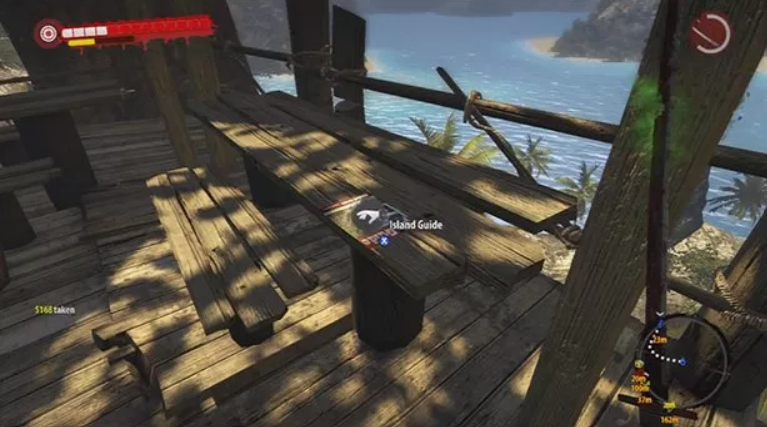
Guidebook Page 1
You’ll find this page down the east entrance to paradise survivor camp. It’s on the bench right next to the static car that spawns there. You should be able to find this easily. The walker that is taking a nap on this bench may be alive so be careful not to get jumped!
Guidebook Page 2
This page is on a table across the road from the Kiwi Camp, it’s right along the main road and shouldn’t take very long to get to if you use to car that you find next to page 1.
Guidebook Page 3
North of Hoyahoya Bar on the main road, there is a pedestrian path to Mataka Village going through a yellow blob (as seen on the in-game map). Guidebook Page 3 is on one of the two fruit stand tables to the south of where this pedestrian hiking trail starts.

Guidebook Page 4
Zimanaki Rest southeast of Mataka Village.
Guidebook Page 5
Southwest of the Helicopter Wreck is an optional “Rescue Alfred” mission. The guidebook page is in the trailer Alfred is standing next to the Weighted Mod blueprint.

Guidebook Page 6
You can find this page in Marik’s Marina, south of the Lonely Cave on a table behind the first house just south of the cave.

Guidebook Page 7
Going a little bit south of the Biosphere labs, there are two shed things, one of which has a workbench – the guidebook page is in the shed that’s just northwest of this workbench.

Guidebook Page 8
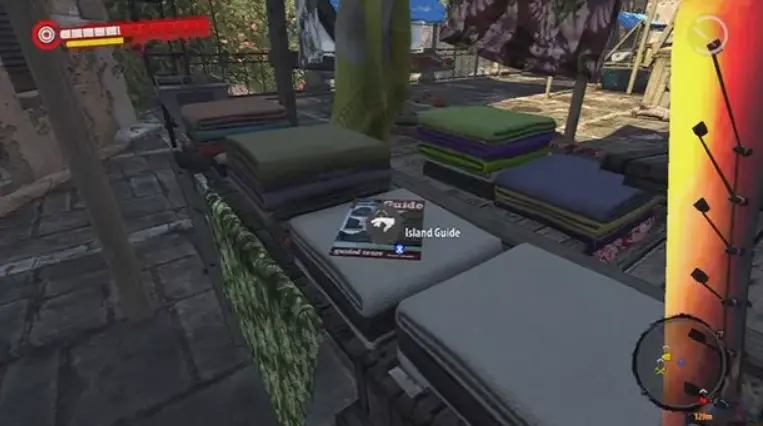
In the first area’s flooded jungle, there are three tree-platforms in a O-O-O formation on the map just south of the Helicoptor Wreck — northeast of the O-O-O structure (and the mission Rescue Megan) is a campsite with this brochure on the ground.

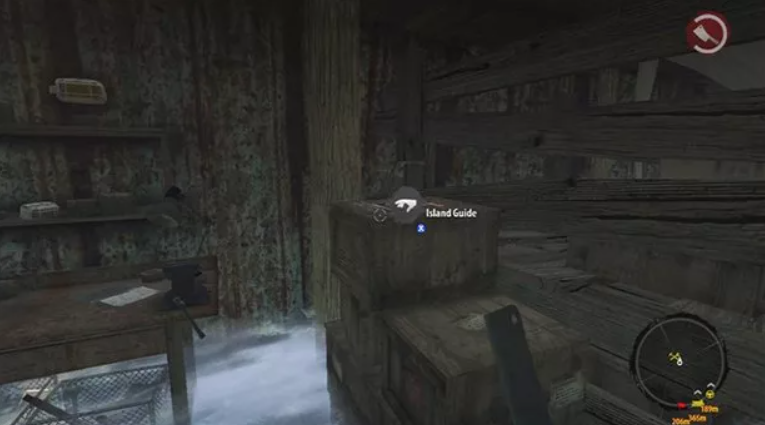
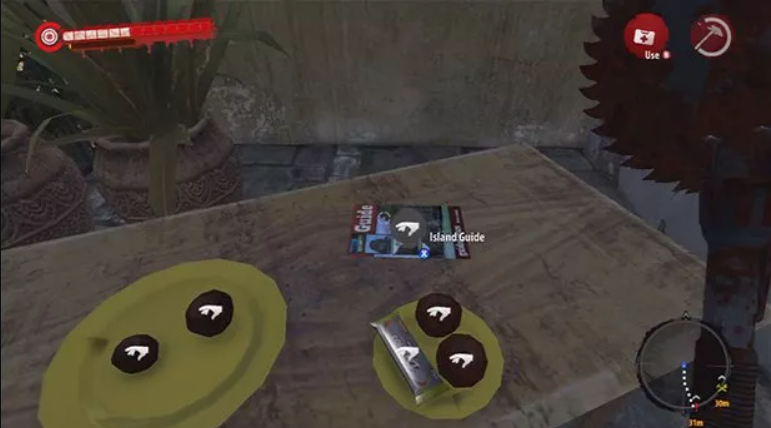
Guidebook Page 9
Last one for the flooded jungle! After you pick this one up make sure to give your feet a little rest from all that running. So, you can find page #9 in Halai Village, in the shack where Father Marcus’ toolbox is in the main story, Where The Dead Live. It is right next to the workbench.
The Tunnels
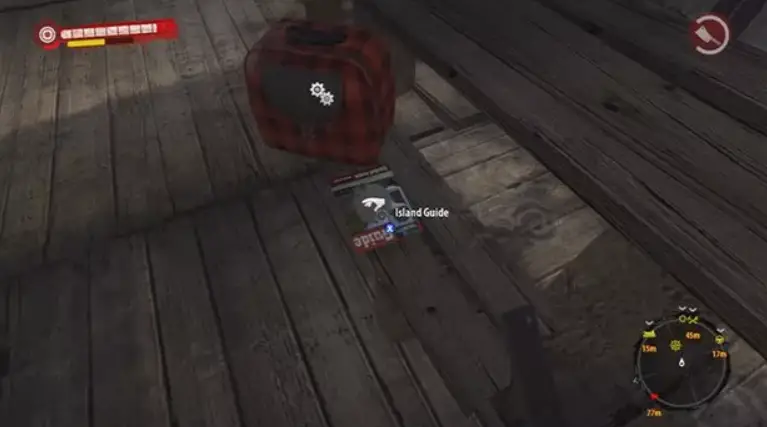
Guidebook Page 10
This is the only page in this area of the map. At the end of the Tunnels section, you will be at the Smugglers’ Den (the place with a lot of stolen luggage in the den). Mark the main quest and face the locked exit door; look to the right of the door for a mattress with this guide page on it.
Panai Ferry Station
Once again, the guidebook entry in the Ferry Station is marked in Orange if you want to put down a map marker, and within the guide, there are screenshots of the in-game location.

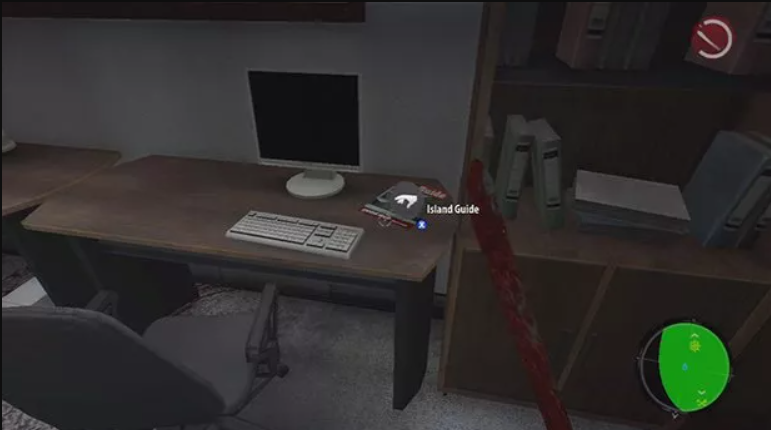
Guidebook Page 11
In the Ferry building on the second floor, in a small office near the stairs and a minigun crate.
Henderson
Same deal as before, the guidebook entries in Henderson are marked in Orange if you want to put down a map marker, and further down the guide, there are screenshots of the in-game locations.
Guidebook page 12
Near Aubrey, the trader southwest of Sea Market. At the bottom of the ladder leading to Aubrey’s balcony, there is a stall with this guidebook page.
Guidebook Page 13
This page is in the Cinema’s screening room (where the audience sits) behind the first row of chairs (just run behind that row and you should see the page).

Guidebook Page 14
Just down from the cinema’s emergency ladder on the roof is a partly blockaded area with a table and chairs set up. The page is on the table.
Guidebook Page 15
In the Sea Market, on a stall north of the big building housing the superfish (for Superhero). The big building has a rescue mission as well, Rescue Lydia.

Guidebook Page 16
This page is west of Scar (Dr. JJ Evans’) Dead Zone. There’s a brick boardwalk that’s beside the Dead Zone portal. A park bench has this page on it.

Guidebook Page 17
The last page! Great job so far! Now, make your way to the plaza south of the Dead Zone called “Infested Storage” in the central west section of Henderson. The gang of Infected in the plaza can be spoofed by going on the ladders, but watch out if you have to face them and the Ram which patrols this area.

Secret Files
There are 15 Secret Files to collect through the game, they are distributed as follows;
- Flooded Jungle – 3 Files
- Biosphere Laboratory – 1 File
- Tunnel – 1 File
- Henderson – 4 Files
On this map, the exact location of the secret files is marked as Yellow numbers.

Flooded Jungle
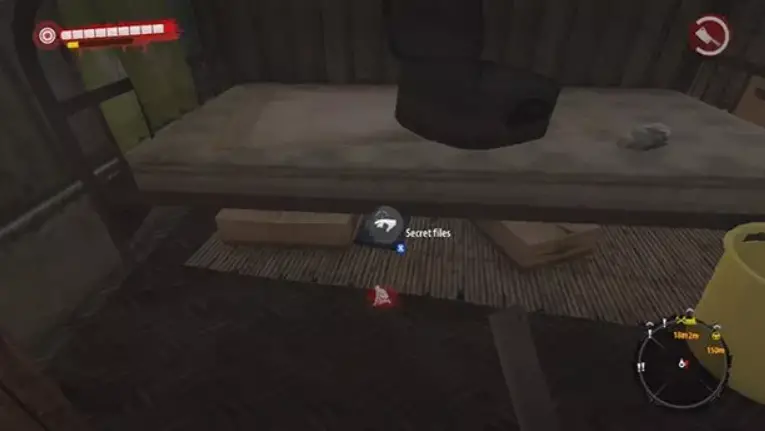
Secret Files 1
In the Halai Village safe zone, there is a small bedroom on the ground floor of the trader’s building that has a hoo-doo shrine with Oleander scattered around. The file is under the bed in that room. (This is also supposed to be Marcus Villa’s room)
Secret Files 2
In Halai Village, the shack where Father Marcus tells you to go in Where The Dead Live. It is easily found during this quest. It is next to the Liquid Fire mod.

Secret Files 3
This file can only be reached after getting (or completing) White Line, a side quest from Bruce in Halai Village. In the drug lab in the middle of the flooded jungle for White Line (east of Hanging Joe’s and south of Peter Spicer’s Shack). It will be to the west of the Treehouse Maggie asks you to check first in Safe Haven.

Dr. Kessler’s Lab
Secret Files 4
In Dr. Kessler’s Biosphere, check the hallway between the office and the shower/decontamination room for this file.

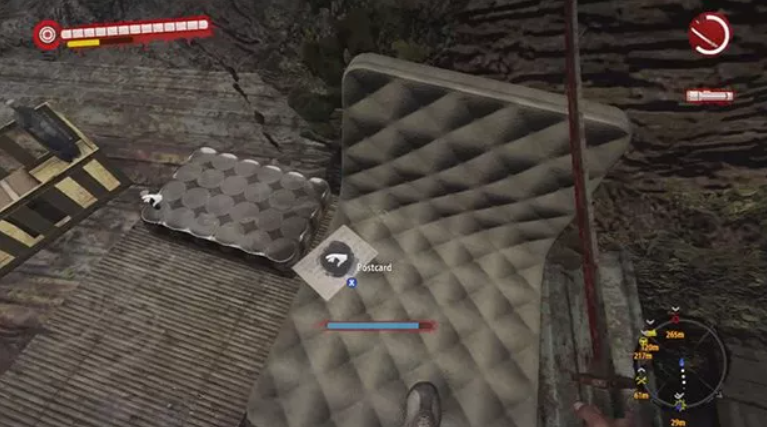
The Tunnels
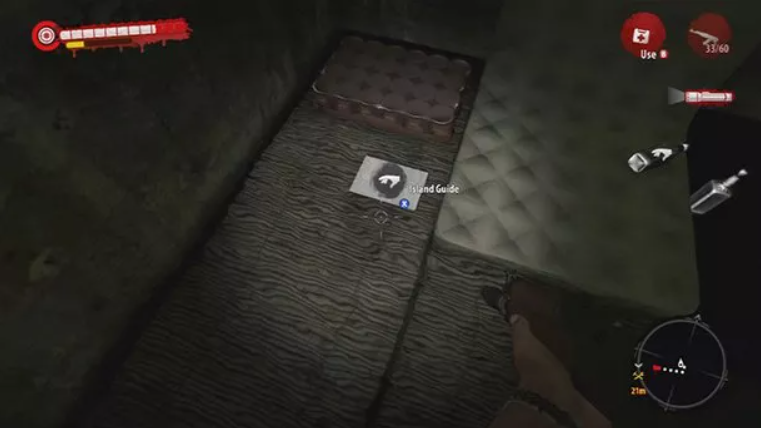
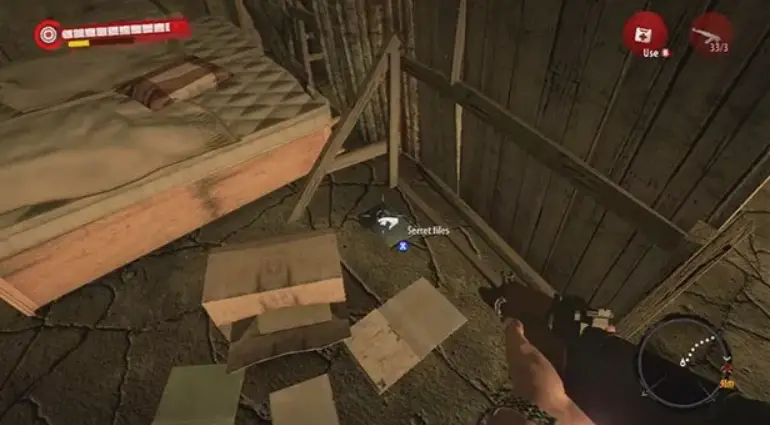
Secret Files 5
The Tunnels’ Smuggler Den. Check the Chief’s quarters for this file, it’s next to one of the bunking mattresses.
Henderson

As per usual, I’ve included this map of Henderson with all the collectible numbers on it. We are still looking at the YELLOW numbers here.
Secret Files 6
The military base west of the cinema. The files are in the outpost’s comm building — in the room where you battle the second Grenadier in a series of small office rooms. There is a large comm panel in that room as well as the Rifle Ammo blueprint.

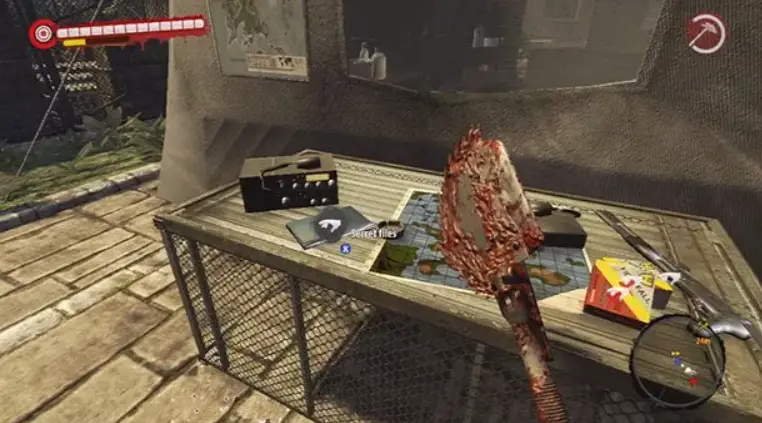
Secret Files 7
The military base west of the cinema. The files are next to the fast-travel map, on the table with the shotgun spawn.
Secret Files 8
On the port side of the crashed chopper (in Chapter 11) at the Old Fort of Henderson. Check the seats next to the mini-gun pylon.

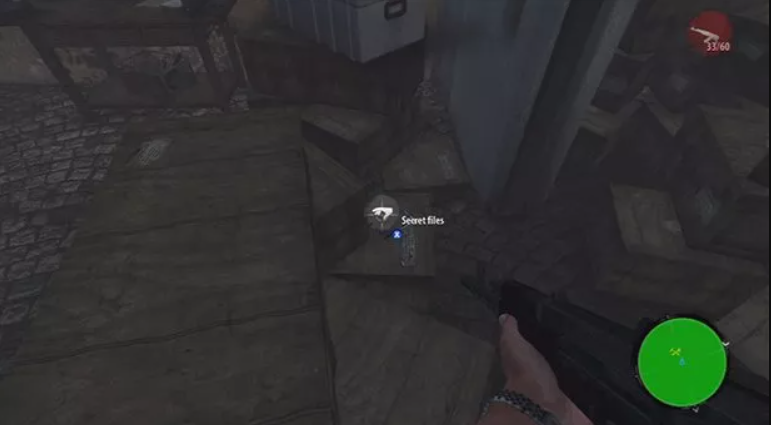
Secret Files 9
The workbench at the last part of Henderson’s QZ, atop the stairs from the Docks portal, there’s a secret file in the boxes near the workbench.
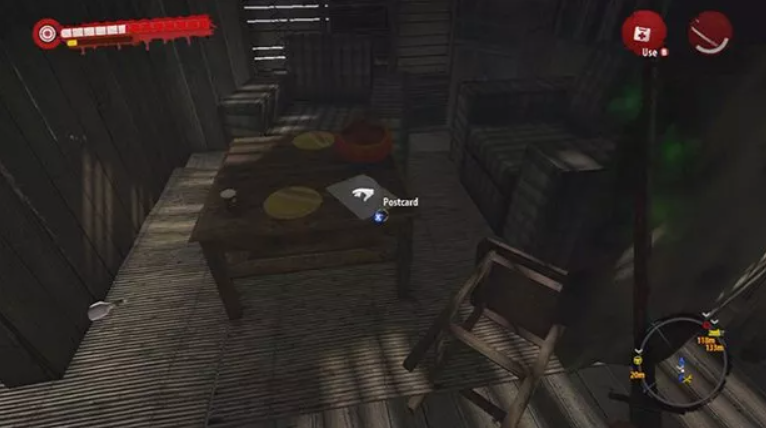
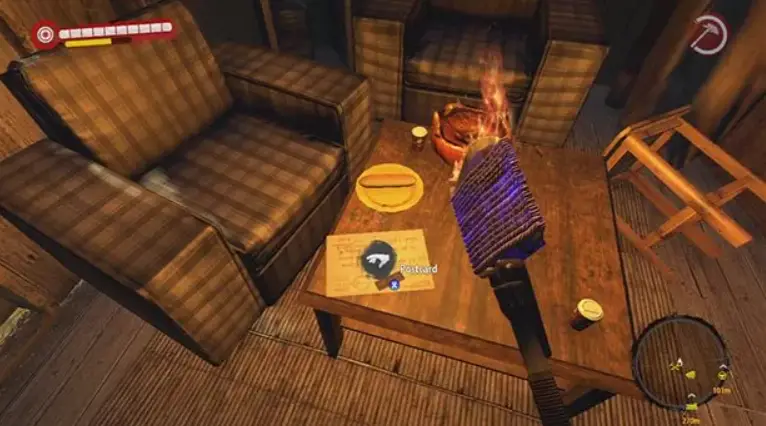
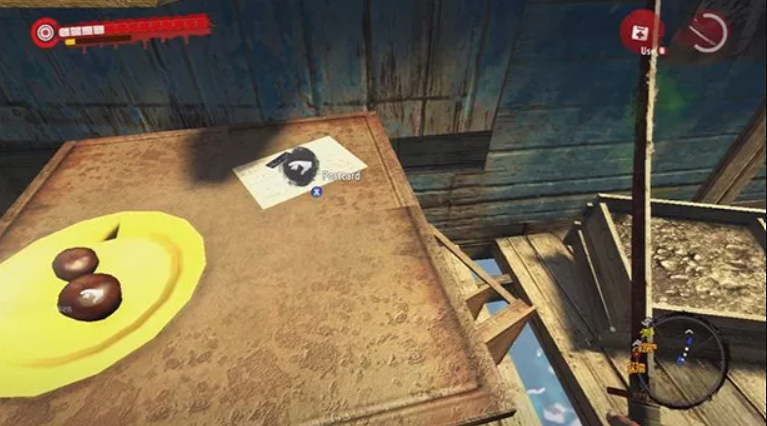
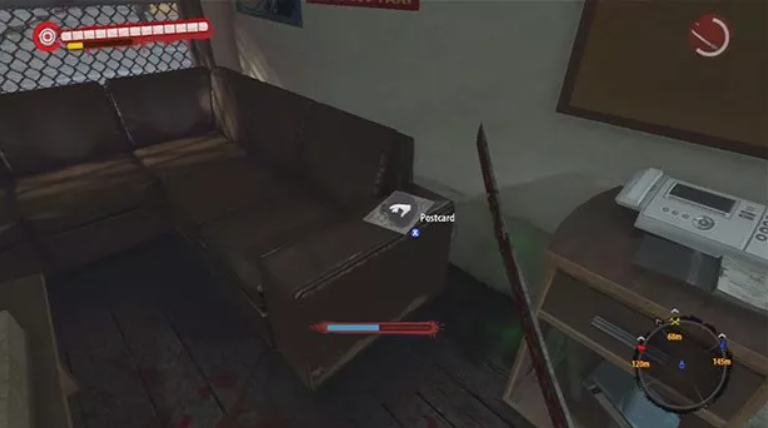
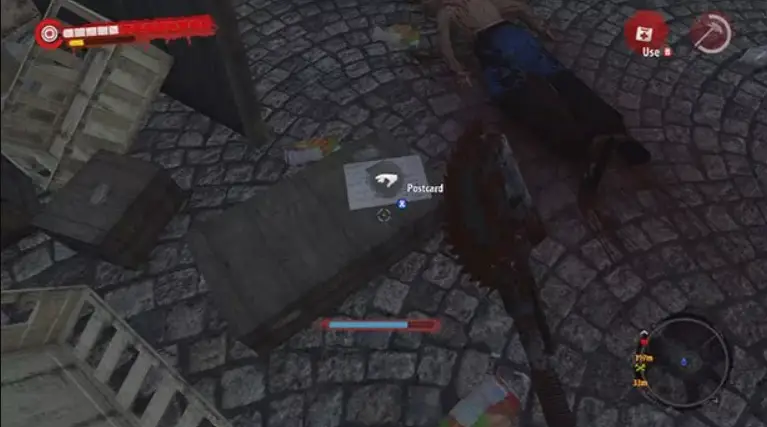
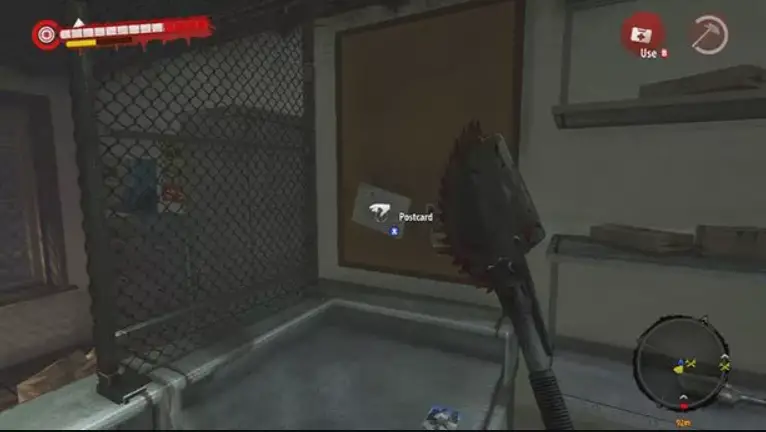
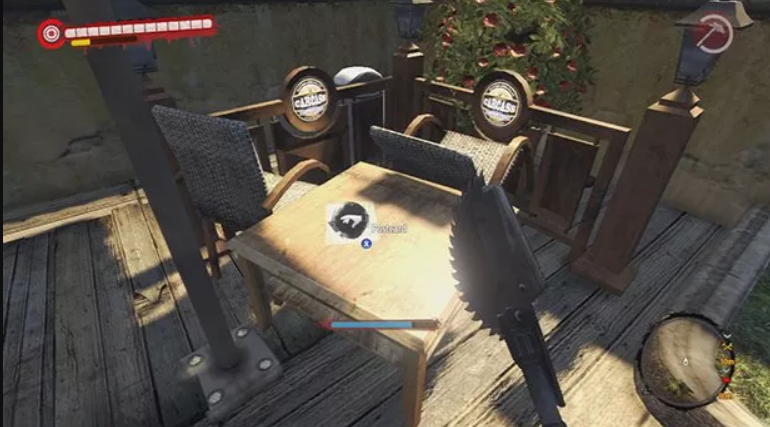
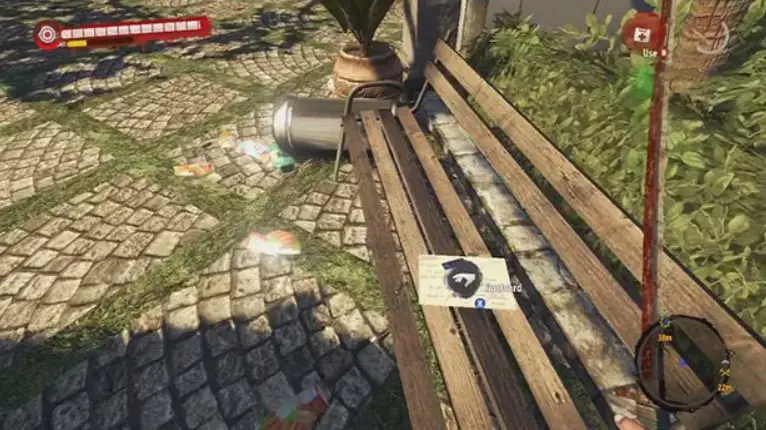
Postcards from Palanai
I’d hate to be the guy trying to send a postcard during the apocalypse, but these people didn’t really get it. Let’s be nosy and take a look at what they were saying.
This is how they are spread out;
- Flooded Jungle – 6 Postcards
- Henderson – 8 Postcards
- Nick’s House (Quarantine Zone – Henderson) – 1 Postcard

Here’s our map, old faithful, and for this section we are looking at GREEN numbers. So, let’s take a look.
Flooded Jungle
Postcard 1
Building in the Paradise (may require you to enter Chapter 2 to unlock the building door to fast travel).

Postcard 2
Kiwi Camp — the campground/mobile home park on the main road between Paradise Camp and Halai Village. At Kiwi Camp, locate the bar/restaurant on the eastern side. The postcard is inside.
Postcard 3
Halai village, in the same room as the trader.
Postcard 4
Southwest of Breri Outpost. There’s a small encampment on a wood shack; the postcard is on some bedding at the campsite.
Postcard 5
In Mataka Village, complete Natural Resources to gain entry to Marcus’ house. There is a postcard on a table in the backroom.
Postcard 6
In Halai Village, in a square hut jutting out into the water. The postcard is on a table in that bungalow’s south-facing.
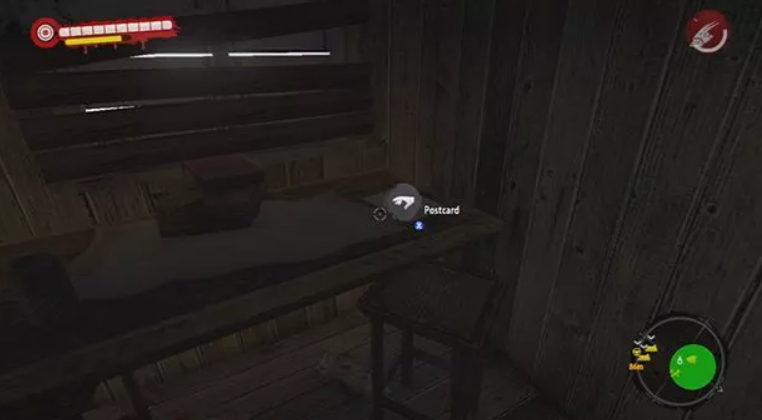
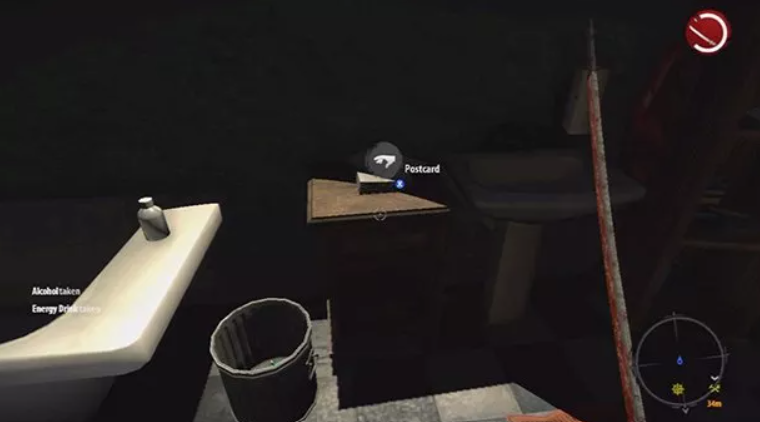
Henderson
Luckily enough, we don’t need to worry about finding any of these guys in the tunnels or from Dr Kessler’s lab (Her doesn’t really strike me as the type to send postcards anyway)

As always, we are looking at our map and we’re hunting for the locations marked in GREEN.
Postcard 7
This postcard requires you to take a short detour in the Quarantine Zone to a Dead Zone called “Nick’s House” (it’s on your map). The postcard is on the 2F (past the Screamer) in a small upstairs restroom.
Postcard 8
In north Henderson, there’s a postcard on the ground next to the bank’s main entrance.
Postcard 9
Inside a shop with a barricaded (break down) door in south Henderson. West of the causeway to the Old Fort of Henderson is an area of the flooded town; the store you want is the brown square out alone in the water. The Phoenix Mod plans are also there.
Postcard 10
After crossing the bridge from the north shore of Henderson into the center of the city, go under the bridge and stroll on the south shore of the riverbank. The postcard is at the end of the promenade, before you find the Exploding Meat blueprint.
Postcard 11
Northeast of Damien (the quest giver for Memories) and his workbench loft, there is a table on the street with a postcard on it.

Postcard 12
This postcard on the bench near the Church’s front entrance. Be aware of the group of Infected and the Screamer zombie near this pick-up.

Postcard 13
In Rodrigo’s shop. He is the trader north of Stan’s House (the doctor’s house for ER) in southeast Henderson.
Postcard 14
On a connecting rooftop south and east of the Old Town Cinema in Henderson.
Postcard 15
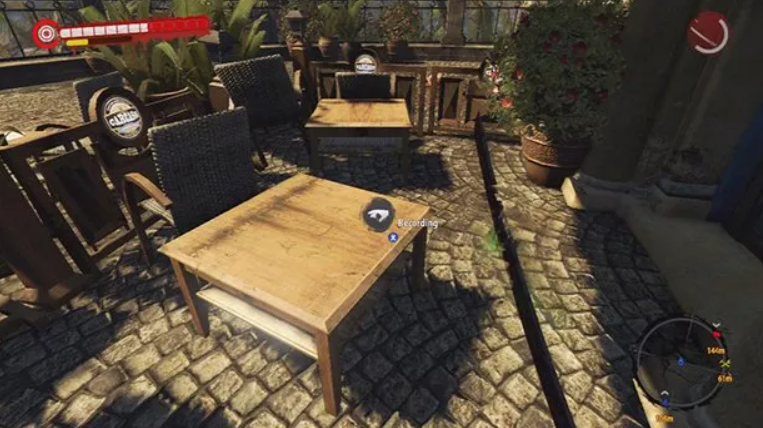
This one is east of the marker Villa Henderson, and on a bench north of where you Rescue Eva and the bistro where you complete The Dead Can’t Dance.
Voice Recordings of Angela Guerra
There are 10 of these recordings that you can find on Palanai. These are my personal favourite to collect – I’m not sure why but I just really like the lore that these provide for the initial outbreak for the island.
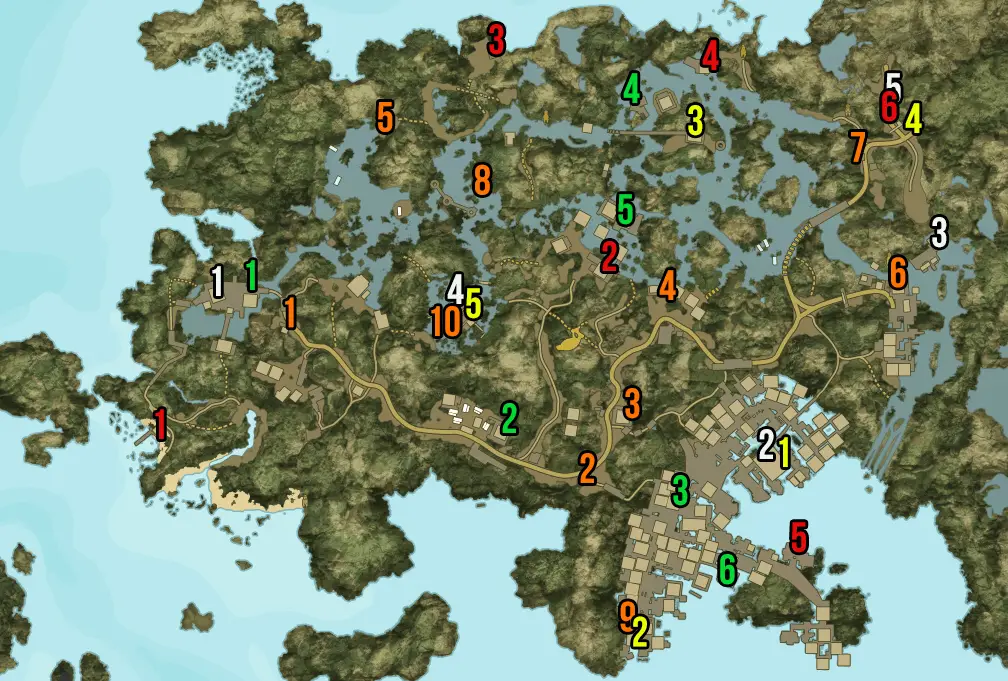
Our map tells us that these recordings are the RED numbers.
We find them in this order
- Flooded Jungle – 5 Recordings
- Biosphere Laboratory – 1 Recording
- Ferry Station – 1 Recording
- Henderson – 3 Recordings
Flooded Jungle
Recording 1
This is likely the first collectible you’ll find when you first start the game, it’s simply in a little bungalow northwest of Pearl Sands.
Recording 2
recording #2 is also quite easy to find. You’ll easily come across it in the Bungalow with the power cables (for the early-on quest Electrifying) in Mataka Village.

Recording 3
Northeast of the Helicopter Wreck in the flooded jungle, there is a workbench and Miya (the giver of the quest Proximity). The recording is on a table near that workbench.
Recording 4
This bad boy is at Kingston Shack, between the Yagavai Waterfall and Oliver Wenge’s Dead Zone. The recorder is on the wood beam next to the metal weapon chest. I missed it the first couple of times because it blends in quite well, so be weary of that.
Recording 5
Just west of Rescue Kitty, the NPC stuck in a wooden watertower surrounded by zombies north of Ocean View Bungalows in Halai. To reach this recording, use the nearby ladder from the water to the shack roof. A Pick of Destiny will always be next to this tape’s spawn point.

Recording 6
If you’re doing the quest Surplus for Miya, you can find this tape here in the bunker of BioSphere labs with the revolver for Miya’s sidequest.
Ferry Station
Our only other collectable in the Ferry Station, which is the red number.

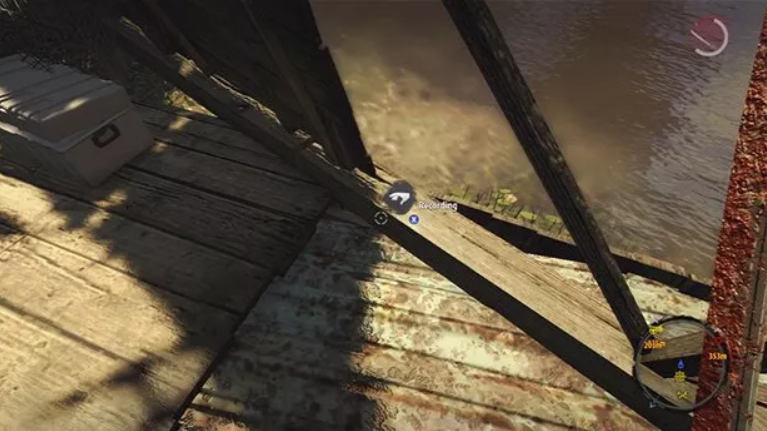
Recording 7
This recording is found after (or during, if that’s how you roll) Terminal Siege. You can enter the warehouse across from the Pinai Ferry station to find a workbench after the zombies come out of the building. The tape is on a shelf in the corner of the building. The Shockwave Mod (Area of Effect) plans are also in this building.
Henderson
Still looking at the RED numbers, we can see where we need to go for our final stretch in our collectible hunt.

Recording 8
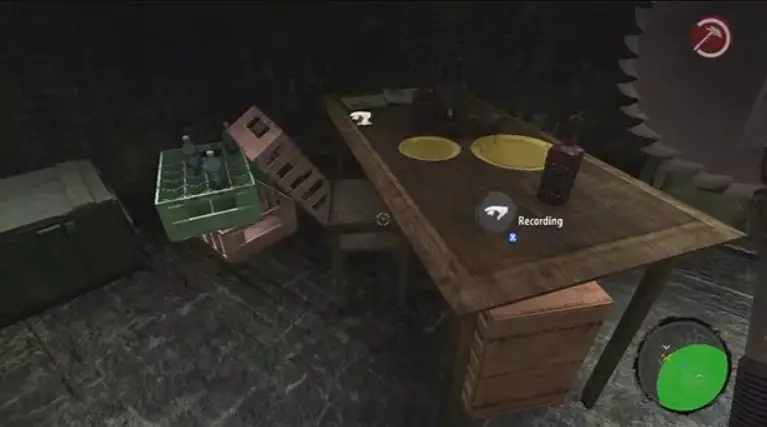
Northwest of the Town Hall in Henderson, there are four workbenches “close together” which sorta surround a small tan square (a square monument with drinking fountains on each side). Just south of this small monument is a table with this audio tape.

Recording 9
South of Ogio Moke’s Laundry, there is a hemispherical boardwalk (if you see if on the map); the recording is on the table.
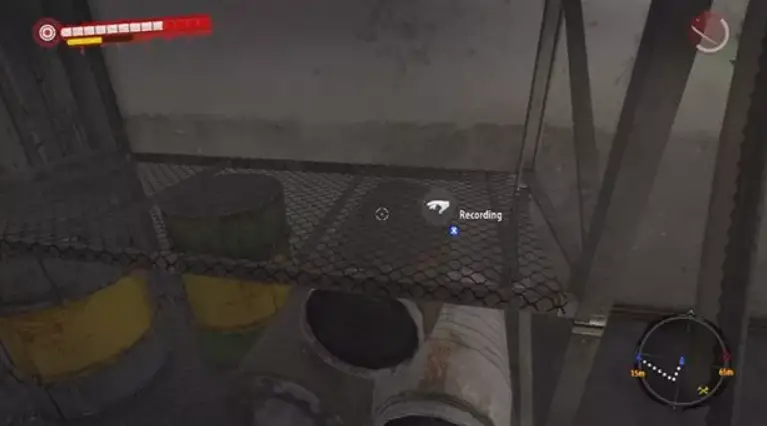
Recording 10
In the military outpost’s southern half; check the southwestern tent. You’ll see the tape on a shelf.

That's everything we are sharing today for this Dead Island: Riptide Definitive Edition guide. This guide was originally created and written by Kova. In case we fail to update this guide, you can find the latest update by following this link.