- Title: ΔV: Rings of Saturn
- Release Date:
- Developer:
- Publisher:
Information about ΔV: Rings of Saturn is still incomplete. Please help us fill the details of the game using this contact form.
This guide is aimed at guiding new players through the basics of flight, starting with the HUD and manual control, then moving on to autopilot functions, and finally advanced issues such as defensive piloting, basic principles of reaction engines, and delta-v.
Introduction
This guide aims to provide a general overview of how movement in space is possible, how to understand the freedoms and limitations it imposes, and how to navigate the hazards of the rings of Saturn.
I’ve chosen to provide a mix of conceptual and in-game information. While not all of it is needed to play the game, I feel that it can be much better appreciated with some knowledge, and the game itself is a great way to start wrapping your head around spaceflight. I won’t cover the really advanced stuff- orbital mechanics, transfers, mass and propellant fractions, spaceship design, and so on. There’s Kerbal Space Program for that.
Most importantly- have fun! ∆V is not so much a game, almost more like an experience, and so take from it what you enjoy.
Basic: Vacuum
Delta-V is a game about realistic movement in space. Let that sink in. We’re familiar with movement on the ground. Some of us are even familiar with movement on water, underwater, and in the air.
Movement in space is completely different from all of those, for a couple of main reasons:
- There is nothing to slow you down, and
- There is nothing to push off.
All forms of movement that we’re familiar with relying on both of those. We walk by pushing off the ground with our feet, and we keep our feet in place using friction against the ground. Planes fly by pushing air backward, generating thrust, and using aerodynamics to convert some of that thrust into the lift. Ships and submarines move through and are slowed by water.
In space, you have very little- effectively none- of that available. Yet movement is possible. How?
The fundamental idea of a rocket is that you bring your own stuff to push off.
If you push off a wall, you move backward, and the wall appears to stay in place- but it does not. You have exerted a similar force on it. It only appears to stay still because it is so much more massive than you are. Similarly, when you throw a ball, you don’t feel like it’s pushed you back. But it has, ever so slightly, and you’ve absorbed the force by how you stand and move.
In space, that is the only way to move. By pushing off against something- which we have to bring with us- we can change our velocity. And because there is nothing to slow us down, we use the same principle to slow down and stop.
Basic: Vectors
When you are moving, your movement has both a direction and a speed. These combined give you your velocity.
Velocity is a vector quantity, meaning that it is described using both a magnitude (in this case, speed) and a direction. In the game, this is represented with straight lines.
Let’s look at the first green line for now- the one leading into the diamond. This is your current velocity. No matter which way you’re facing, this is the direction that your ship is moving in.
Crucially, unlike on Earth, turning does not slow you down or even change the direction you’re moving in. If you want to change your direction or slow down, you have to fire your rockets in the appropriate direction.
Whenever you fire your rockets, you generate a force on your ship. This results in acceleration- a change in velocity over time in a specific direction. Suppose you are moving at 15 meters per second (m/s) northwards. To come to a complete stop, you need to change your velocity by 15 m/s southwards.
You can do this by decelerating at a rate of 5 meters per second per second, or 5m/s^2, for three seconds. Every second, your velocity changes by 5 m/s, which is why acceleration is given as distance per second, per second. After one second, your velocity would be 10m/s; after two seconds, 5m/s; and after 3 seconds, you would be at a complete stop.
Similarly, you can do this by decelerating at a rate of 15m/s^2 for just one second. Note that acceleration also has a direction. If you aren’t accelerating in the direction of your current movement, the effect of acceleration on your velocity is not as straightforward as adding the numbers together.
The safest way to change direction is in fact to slow down to a stop first, then start moving in your new direction. It’s slow, and it consumes more fuel than the alternative, but it’s an intuitive maneuver to perform and can be done with just basic eyeballing.
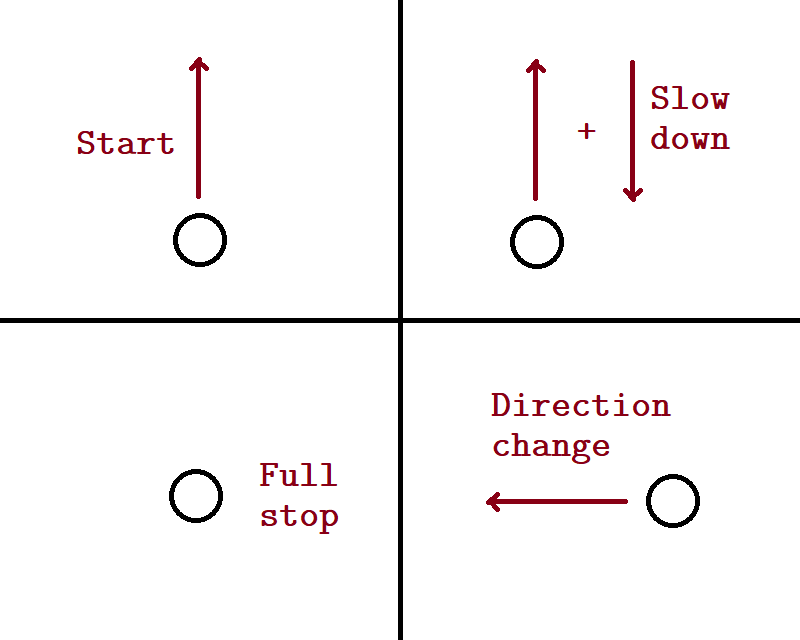
Notice one thing: each time we fire our rockets in a certain direction, we are basically creating a vector in that direction. And to determine where and how fast we are moving at the end of it all, we are simply adding both vectors together.
This should suggest a faster way to change direction- fire the rockets such that we end up with our desired vector, instead of coming to a complete standstill first.
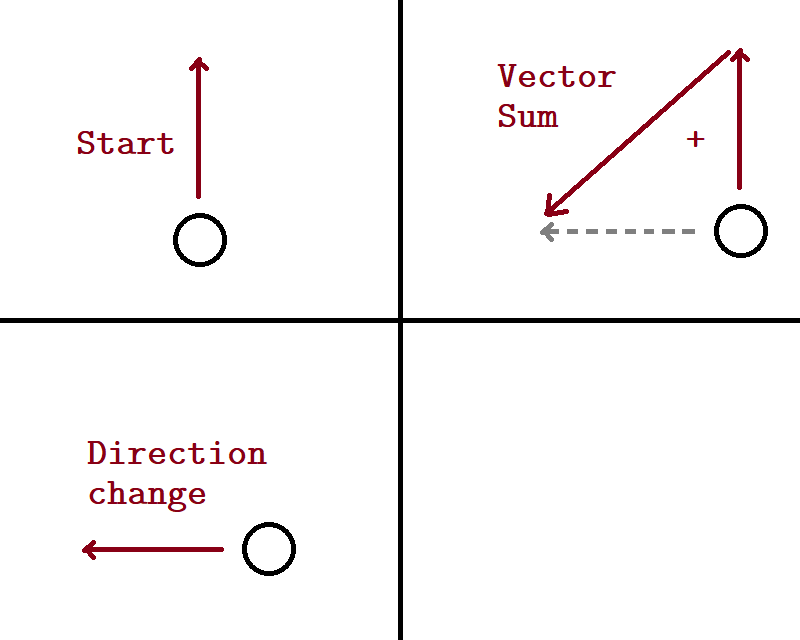
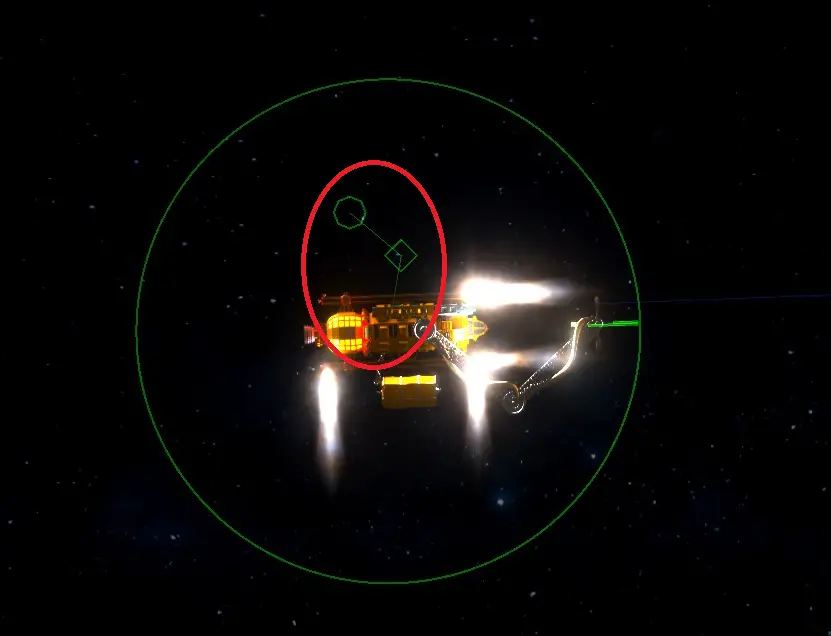
And this is what we see in the first image in this section. The diamond and line A represent our current vector, and the octagon and line C represent our desired vector. To achieve it, we must fire our rockets in the direction of line B, from the diamond towards the octagon.
Basic: Visuals
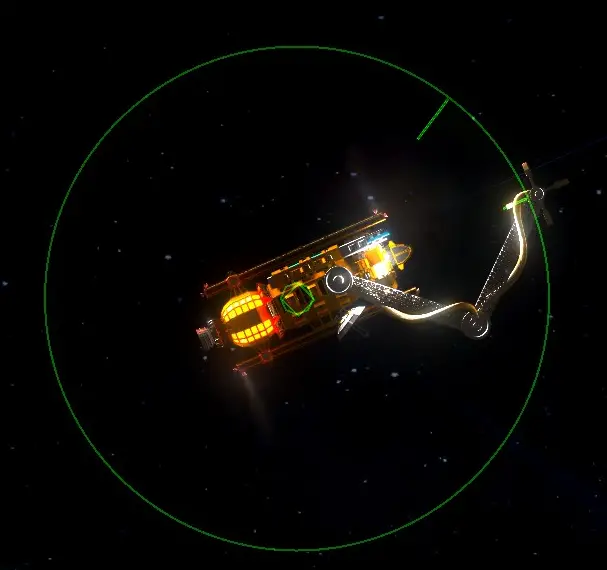
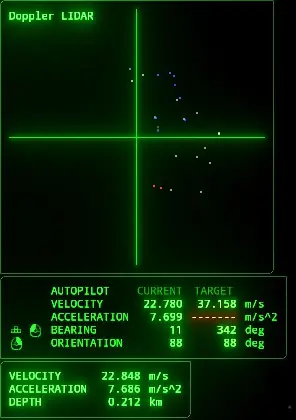
Let’s get acquainted with some of the display elements.
As we covered in the previous section, the diamond shows the direction you’re currently moving in, while the octagon shows the direction you’ve set the autopilot to move towards.
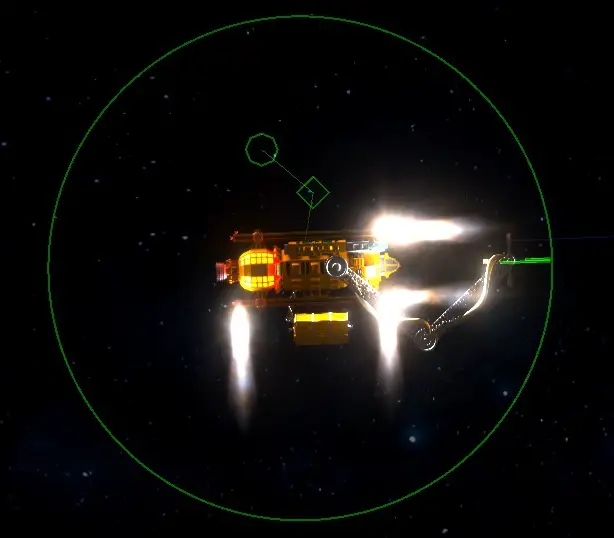
On the edge of the green ring are two lines. The shorter green line shows where your ship is currently facing. The longer green line shows where you’ve instructed the autopilot to face towards.
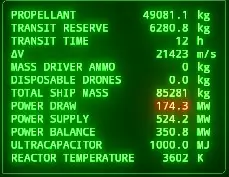
Next, the information panel on the right of the screen has some details that might help you. Pay attention to your total ship mass.
Finally, you have your instrument panel. Let’s cover the lower panel first.
The panel displays your current velocity and acceleration at that instant. Note that acceleration here sums up all forces that are currently acting on your ship, not the acceleration along your current vector, and so is never negative. That is to say, even if you are braking, your acceleration will show up as a positive value because it is not tracking acceleration in the direction you are moving- it is tracking overall acceleration.
Depth is simply how deep into the rings you are. Now, for the middle panel. This panel covers the information related to your autopilot, but it also includes some instantaneous information. The “Current” column shows the status of your current ship. In addition to velocity and acceleration, which we’ve covered, it also includes bearing and orientation.
Bearing is the direction of your velocity. 0 degrees is directed towards the top of the screen, 90 degrees is to the right, 180 degrees is directly down, and 270 degrees is directly left. In the image below, the ship is moving up and very slightly to the right.
Orientation is the direction in which you are facing in, and the facings are the same as with bearing. In the image below, the ship is facing almost directly to the right.
The “Target” column shows the values that you have programmed the autopilot to attempt to reach. In the image below, the autopilot has been instructed to move the ship faster towards the top of the screen and a little to the left, while maintaining the direction it is facing in.
Basic: CBDR
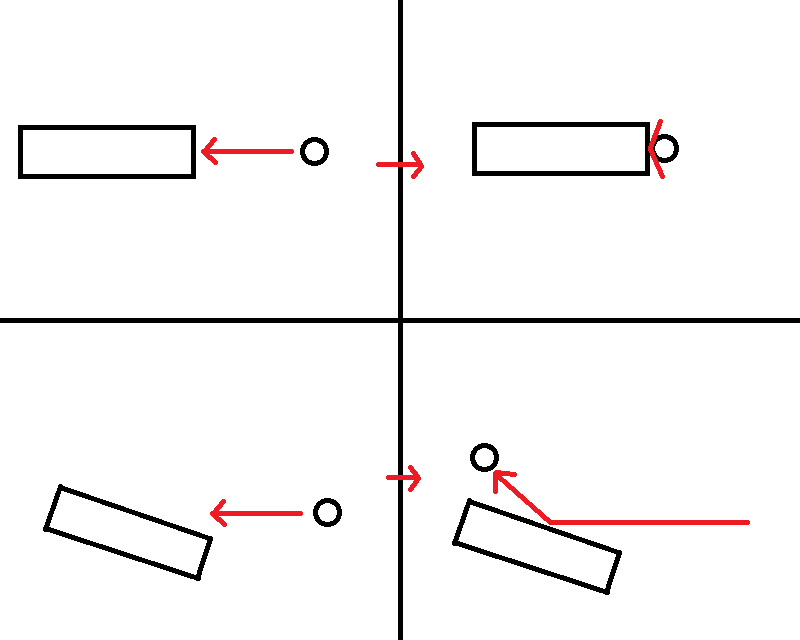
The principle of constant bearing, decreasing range is extremely important for detecting collisions in situations where there is no background to refer to.
The idea is simple. If an object stays in a specific direction relative to you (constant bearing) but is getting closer over time (decreasing range), then you are on a collision course with it.
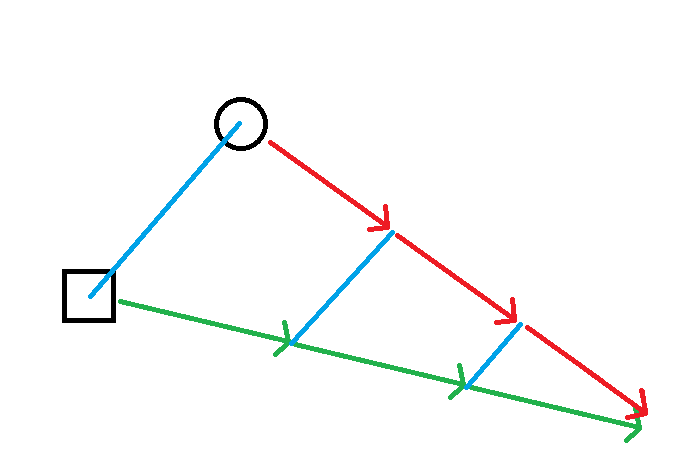
From the perspective of either the circle or the square, at each point in time, the other shape is at the same bearing, but it is also getting closer. This means that at some future time, they will collide, as the arrows show.
This principle is most useful when having to manually reckon collision courses with moving objects that are not changing their direction of movement. You’ll rarely need it, but when you do, it’ll save your ship.
Basic: Manual Flight
Manual flight is the easiest to understand. When you press a key, the reaction from the ship is straightforward. It will do the same thing every time.
- W – Fire your rear thrusters, accelerating you towards where you are facing.
- S – Fire your front thrusters, accelerating you backward from where you are facing.
- A – Fire your right thrusters, accelerating you to the left, as though you were sidestepping.
- D – Fire your left thrusters, accelerating you to the right, as though you were sidestepping.
- Q – Fire your front right and rear left thrusters, turning you towards your left.
- E – Fire your front left and rear right thrusters, turning you towards your right.
- Shift – Fire your main engine, greatly accelerating you towards where you are facing.
Note that with manual control, it is very difficult to achieve precise maneuvers. Even coming to a full stop is not trivial- you do not have fine control over the thrust level of each thruster.
The problem is compounded if your craft has an imbalanced center of gravity. If you have heavier equipment on one side- the TH1 cargo container on your right, for example- accelerating forward will also slightly turn you towards the right.
This is where the autopilot comes in. Even with the most basic autopilot, it automates some basic actions, allowing you to fly without having to make every single vector calculation yourself, or worse, come to a full stop every time you want to change direction.
Intermediate: Autopilot Fundamentals
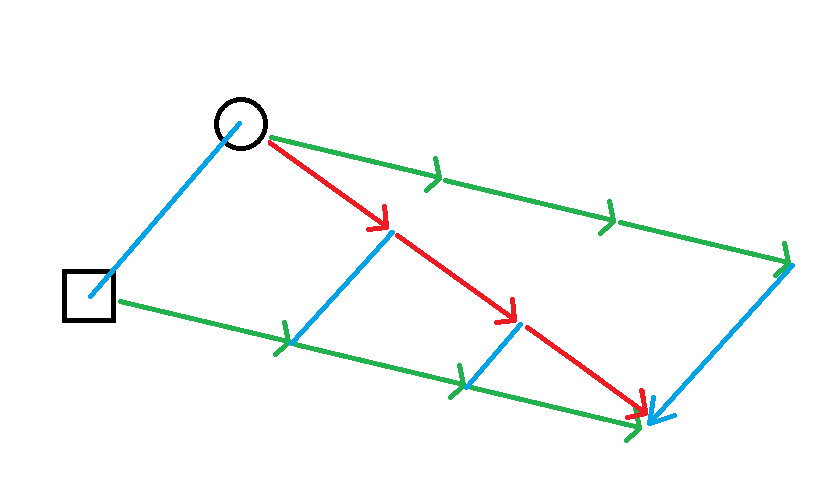
Remember from the manual piloting section that we can fire our thrusters to generate thrust in the forward, reverse, left, and right directions to move us (as opposed to turning us). This is called translational motion- when we move to a different point in space.
Since ∆V is a 2D top-down game, we are only concerned with being able to move up, down, left, and right- we can achieve any vector we desire by adding together combinations of up, down, left, and right.
In the following image, the red arrows represent our starting vectors, the green arrows represent our desired vectors, and the blue arrows represent how we go from start to end using just acceleration in the up, down, left, and right directions.
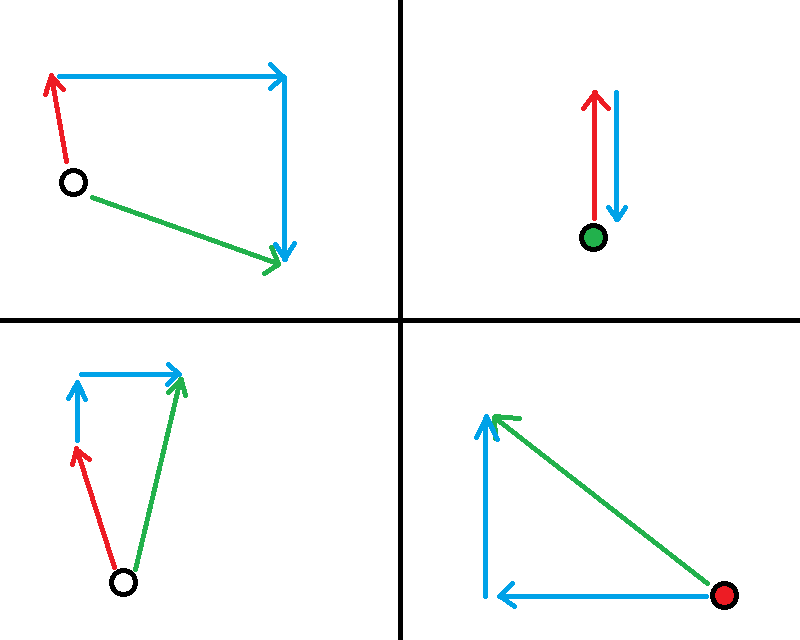
But what if we aren’t lined up with the top and bottom of the screen? Does this still work?
Unsurprisingly enough- yes, it does. No matter how we rotate our ship, as long as we can fire our thrusters in opposite directions and at right angles to each other, we will always be able to achieve our desired vector without having to turn about.
Below is the previous example, but with our axes rotated by 45 degrees.
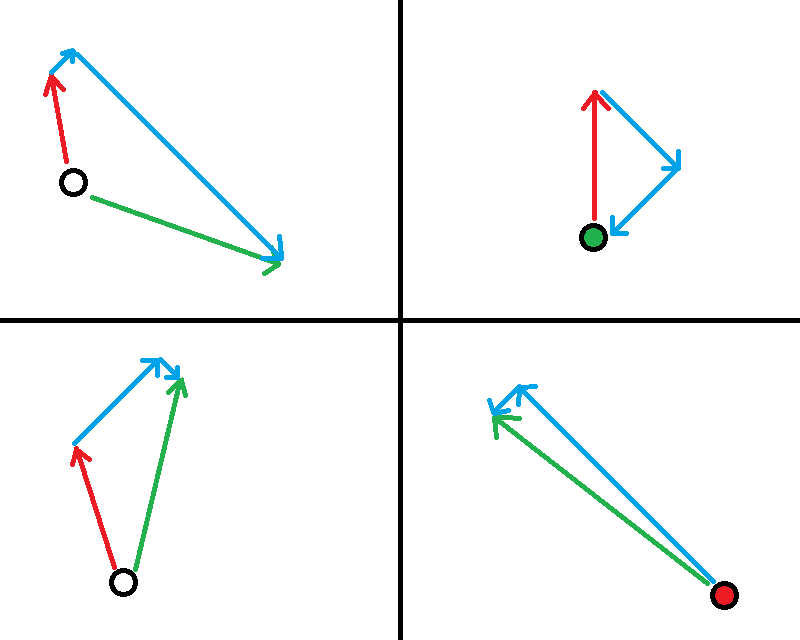
This is the basis of how the autopilot operates. When you press the button without doing anything else, it tries to bring the ship to a full stop by firing the thrusters in such a way that brings your vector to zero, without turning your ship.
Another basic autopilot control is clicking and dragging with the left mouse button. As seen in the “Vectors” section, this changes your target vector, which the autopilot will attempt to achieve by, once again, firing the thrusters without turning you around.
The final basic autopilot control is right-clicking. The autopilot will attempt to rotate your ship to face the direction you just right-clicked in. Notably, this is not a translational movement; this will not change your current vector.
Remember: translation and rotation are handled independently by autopilot. When in doubt (or in a panic), hit the autopilot key to come to a full stop. When you need to make fine turns or hold a specific orientation, right-click and hold down the button. When you need to make fine movements, left-click and drag.
Intermediate: Mass
It’s harder to move something that’s “heavier”. That’s an intuitive principle, but it applies to movement in space as well.
Rather than thinking about weight, we think about mass: the amount of matter that we’re trying to move. Weight on Earth is a result of the Earth’s mass pulling us downward at a constant rate; the Moon has much less mass, though it is smaller, and so on its surface we weigh about 1/6th the amount we do on the surface of the Earth even though we have the same mass.
- The key equation is a simple one: Force = Mass × Acceleration.
- This also gives us a simple identity: Acceleration = Force ÷ Mass.
Our engines and thrusters produce a certain amount of thrust. This provides the force in the equations. The mass is simply the amount of mass that our ship comprises.
If the ship’s mass doubles, then assuming that force does not change, acceleration must be halved in order to preserve equality.
Note that these two affect acceleration, not velocity. Having twice as much mass does not change our maximum speed; it, however, means that we accelerate half as quickly, and thus it will take twice the time (and distance) to reach that speed.
Since this also applies to slowing down, it is important to keep an eye on the total mass of your ship so that you have an idea of how maneuverable it is. As your mass increases, it becomes more and more dangerous to mine in dense belts or to chase down ore chunks at high speed.
A larger propellant tank will weigh you down, as will a cargo container and picking up ore. This can be compensated for by increasing the force- upgrading your engine and thrusters- but those upgrades come with their own requirements. As you burn propellant, your mass drops as well. What you go with ultimately depends on the level of maneuverability you are comfortable with.
Intermediate: Hardware
Your ship is equipped with a set of thrusters and the main engine. These provide the thrust necessary to maneuver about the rings.
The Nuclear Thermal Rocket, or torch, is the main engine on your ship. It provides a great amount of thrust in the forward direction.
Throughout human history, almost every single rocket ever fired, and everyone that has flown has been a chemical rocket. That is, the energy needed to heat up the propellant and accelerate it to a high speed comes entirely from the chemical reaction of the fuel with its oxidizer.
This limits the efficiency of the system, as chemical reactions can only provide so much energy. In the 1940s, however, the nuclear thermal rocket was conceptualized: using the heat from a nuclear reactor to provide energy to the propellant, greatly increasing the amount of thrust you get per kilogram of propellant you spend.
The main tradeoff between engine designs is between thrust and exhaust velocity. An engine with a high amount of thrust gives you better acceleration, thus making your ship more nimble. An engine with a high exhaust velocity gains more acceleration out of the same amount of propellant, making it more efficient.
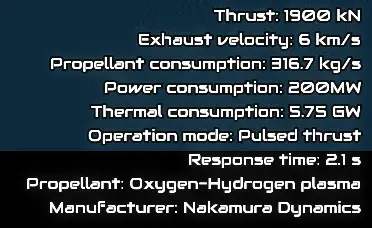
We can see this by comparing two engines- the ND-PNTR, and the RA-TNTRL-K37. Assuming a propellant tank with 1000kg for both, let’s fire each engine until the tank is empty, and compare the total impulse of each engine- the thrust multiplied by how long the engine burned for which, since we’re using the same amount of propellant, is a quick and dirty way of comparing their efficiency.
ND-PNTR:
- Thrust: 1900kN
- Exhaust Velocity: 6km/s
- Propellant Consumption: 316.7kg/s
- Burn time: 1000/316.7 = ~3.16s
- Total impulse: 3.16 × 1900 = ~6000kNs
RA-TNTRL-K37:
- Thrust: 750kN
- Exhaust Velocity: 15km/s
- Propellant Consumption: 50kg/s
- Burn time: 1000/50 = 20s
- Total impulse: 20 × 750 = 15000kNs
Over the course of a full propellant tank, you would get roughly 2.5 times as much use out of the RA-TNTRL-K37 as the ND-PNTR. It would not be able to accelerate as quickly, but that’s the tradeoff.
Another thing to note is that some engines have a response time- they take time to start up. This can be a huge problem when using your torch for emergency braking, so take that into account.
One side-effect of having an engine that accelerates its propellant to unearthly levels of energy is that it makes for an excellent weapon, thus the Kzinti lesson, as related by Larry Niven: “a reaction drive’s efficiency as a weapon is in direct proportion to its efficiency as a drive”.
More advanced engines include magnetohydrodynamic and hybrid designs, which use magnetic and electric fields to accelerate the propellant.
One last thing to note is that all engines require a certain amount of power and heat from your reactor core to function. When upgrading your engine, make sure your reactor is capable of supplying it with the required energy.
Your Reaction Control System (RCS, ACS) is the set of thrusters that give you your freedom of movement in all directions. This is the system that you will be using most of the time. While it provides less thrust than your main engine and is usually less efficient, the maneuverability and ability for fine adjustments it provides are essential.
RCS systems have the same tradeoffs as torches, and I won’t go into them here.
Gimballed systems have swiveling nozzles, which allow the thrusters to direct their thrust away in other directions. This is a form of thrust vectoring and has a non-trivial effect on their effectiveness.
Whether you use them is up to personal preference, as they also come with the usual tradeoffs, though the thrust vectoring makes the calculations less straightforward.
Intermediate: Weapon Mounts, Convergence / Regulation
A short section, but important. Keep track of where your weapons are mounted on your ship. The stock K37-TNTRL has three mounts- a central one, and one on either side.
When you lock onto a target, it lines up your center with the center of the target. Usually, this means that your central weapon mount is in line with the target, but for smaller targets (such as tiny ring roads), the weapons on your side mounts will miss.
At no point do your weapon mounts ever to track a target in front of you, no matter the distance. They always fire parallel to each other, and so they do not converge. This is important when trying to hit tiny targets, and if you find yourself missing even with the aiming guide, this may be the cause.
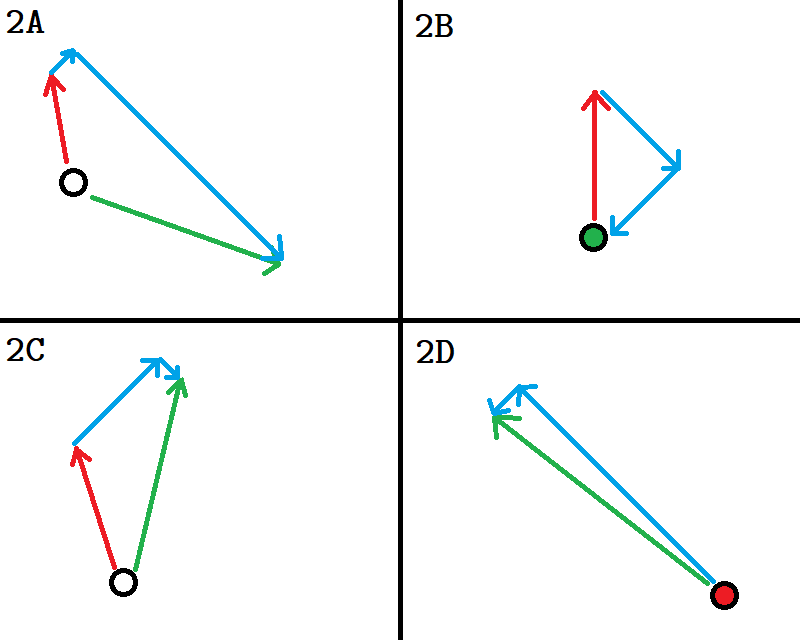
Advanced: Autopilot Functions
The autopilot is very useful when moving around freely, but its main feature is its ability to determine movement relative to a target.
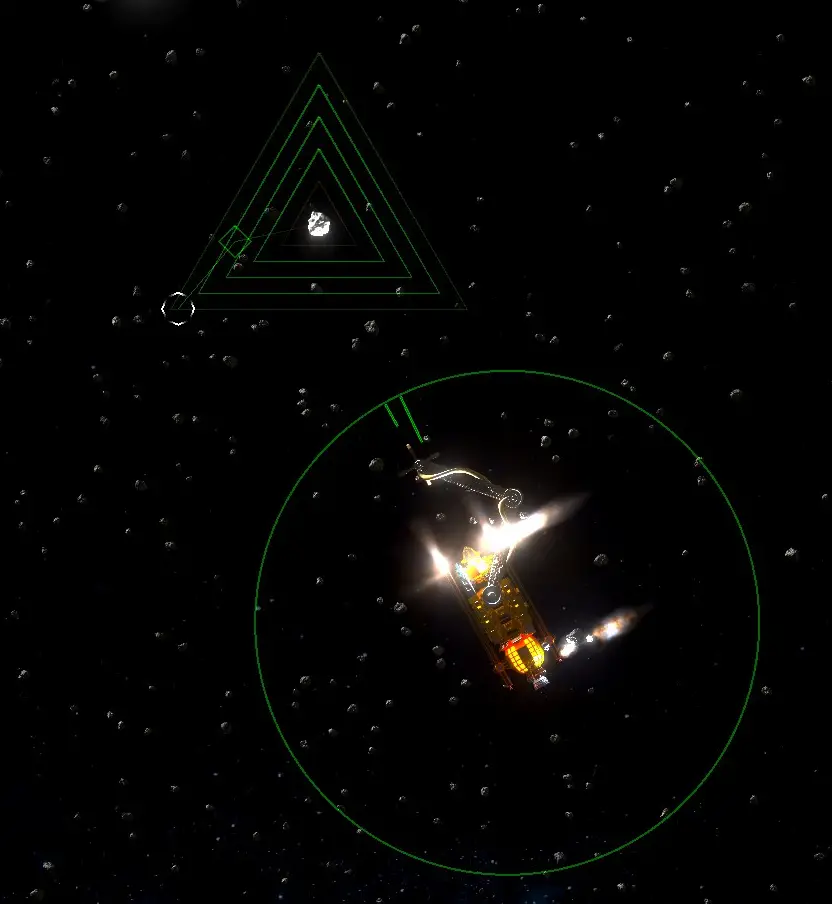
In the above image, the ship has locked onto a ring road. The diamond and octagon represent the ship’s current and desired velocity relative to the target, while the lines at the edge of the green ring represent the ship’s current and desired orientation.
Tapping the autopilot key while locked onto a target will instruct the autopilot to attempt to match speed with the target. This does not mean that you will stop; if your target is moving left at a speed of 10m/s, for example, the autopilot will attempt to move you towards the left at a speed of 10m/s, but the diamond will appear in the center of the target.
Careless use of autopilot velocity matching can lead to horrible collisions, especially when chasing fast beryllium chunks. Be very careful and always keep an eye out for your surroundings.
Another excellent feature of the autopilot is the automatic approach trajectory. Recall the earlier image from the CBDR section, but this time, both you and your target are starting with identical velocities (green arrows).
If you and your target are matched in velocity, i.e. the diamond is right above the target, you will not get closer to or farther away from each other. That also means that if you wish to collide with it, all you need to do is accelerate directly towards the target, irrespective of your current individual velocities, i.e. in the direction of the blue arrow.
When locked onto a target, your autopilot will automatically attempt to make your desired vector lie on a line between you and the target. You can drag your desired vector towards or away from you to make the approach slower or faster. Note that if your desired vector is short of the target (i.e. between you and the target, rather than past the target) you will actually drift away from each other.
This means that accelerating straight towards the target will put you on a collision course. This is meant to make picking up ore chunks easier, but as with all autopilot functions, use it carefully.
Advanced: Defensive Piloting
Defensive piloting involves using the full capabilities of your ship to avoid collisions and damage.
The most fundamental idea is to simply apply full brakes- deselect all targets, hit the autopilot key, and hope that your rockets have enough thrust to bring you to a full stop.
By angling your ship such that an incoming impact hits at an angle rather than head-on to any component, you may reduce the damage you take, especially from collisions with small objects, which are likely to just bounce off.
Recall the earlier images from the Vectors section.
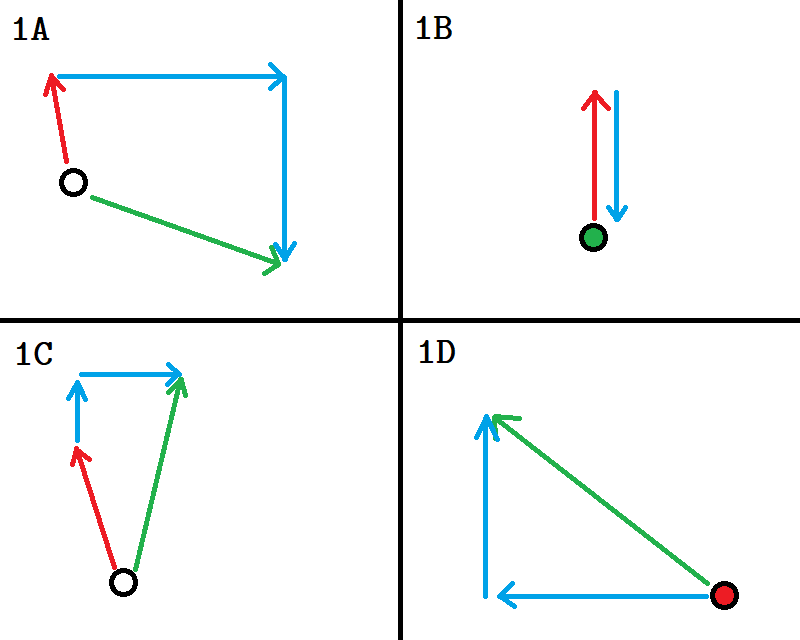
Let’s first compare situations 1B and 2B. In 1B, to decelerate to a full stop, you are only firing your front thrusters. In 2B, you are thrusting along two vectors, and notice that each vector is individually shorter than the single vector in 1B, even though combined they are longer.
Note that on your ship, you can fire two sets of thrusters at the same time, and indeed the autopilot will do that for you. What this means is that in 2B, your ship will come to a full stop quicker, at the cost of consuming more propellant for the same amount of deceleration. In 1B, you are using your thrust the most efficiently, but it is slightly slower than in 2B.
In an emergency situation, where every single millisecond counts, it may help to rotate your ship slightly to make use of additional thrust for slowing down.
Most of the time, however, the quickest way to come to a full stop is to turn completely around and fire your main torch. The thrust it provides is so great that it more than makes up for the time it takes to rotate your ship.
Additionally, the exhaust from your torch causes a huge amount of damage. If you are in danger of imminent collision with a ringroid, the damage from your torch may be enough to break it up into smaller pieces and completely negate any damage altogether.
This is another reason you may want to decelerate directly facing the collision as in 1B. Even though you are decelerating slower, your forward thrusters are exhausting directly into the collision object, and you have the additional benefit of being able to use any forward-facing weapons to further break up any targets.
The exact way you decide to pilot will depend on the situation, and what you are comfortable and have trained with.
Advanced: Reaction Mass, Exhaust Velocity
As described earlier, rockets can function in space because they bring their own mass to push off. This is called reaction mass.
Our intuition regarding reaction mass applies- if we push off harder, we will feel a harder reaction force, and thus move away faster. This gives rise to the concept of exhaust velocity: how fast our reaction mass is leaving the exhaust nozzle.
In fact, exhaust velocity contributes so greatly to the efficiency of a rocket that the amount of delta-v available on a mission- how much a vehicle can change its speed in free space throughout its entire lifespan- is linearly related to exhaust velocity.
However, in the game, we aren’t limited to the relatively lethargic speeds of chemical rockets. Our rockets start at a mind-blowing 6000m/s exhaust velocity for the least efficient- in comparison, the most efficient modern-day H2/LOX rockets have around 4000-4500m/s exhaust velocity.
This means that the engines in-game are spectacularly efficient compared to modern-day rockets- otherwise, there would be no game if you ran out of fuel after a few minutes, or if 90% of your ship’s weight was dedicated to fuel.
Another advantage of nuclear engines is their ability to easily restart. Chemical rockets need a reliable method of starting the chemical reaction, and much of the history of chemical propellants has been finding a fuel and oxidizer mix that is hypergolic: they ignite spontaneously when contacting each other. Getting a reliable and safe start is not a trivial task. With a nuclear thermal rocket, there is no such issue- propellant is simply pumped over the core as needed.
Advanced: Delta-V
We’re now able to understand ∆v: the total ability of a rocket to change its velocity in free space.
Let us first consider the effect of firing a rocket. A certain mass of propellant is ejected through the nozzle at the exhaust velocity, resulting in a certain amount of momentum. Due to the law of conservation of momentum, the rocket’s momentum must change by that same amount, in the opposite direction.
The formula for momentum is: p = mv
Where p = momentum, m = the mass of the object, and v = its velocity.
Suppose a 1000kg rocket burns 100kg of propellant with an exhaust velocity of 100m/s. The momentum of the exhaust is 100kg × 100m/s = 10000 kg·m/s. The rocket gains an equal amount of momentum, which results in a change in velocity of the rocket of p ÷ m = 10000/950 = ~10.5m/s.
This result is not exact, because rockets do not fire instantaneously- they take time to burn up their propellant and expel it, and throughout the process, the rocket’s mass changes, and so our result is lower than what we would expect. Notice that we take the weight of the rocket as 950kg as an approximation of its weight in the middle of the burn.
Now suppose our now-900kg rocket burns another 100kg of propellant:
10000/850 = ~11.8m/s
Our rocket’s velocity is now 10.5 + 11.8 = ~22.3m/s.
Suppose we burn up the last 100kg of propellant that we have onboard:
10000/750 = ~13.3m/s
Our rocket is now traveling at ~35.6m/s and now weighs 700kg.
Tsiolkovsky’s rocket equation, also known as the ideal rocket equation, is an integration of this process over time, to determine the total amount of velocity change a rocket can produce on itself by expending all its propellant.
Taking the rocket equation from Wikipedia:

∆v = v_e ln(m_0 / m_f)
= 100 ln(1000 / 700)
= ~35.6m/s
Now consider an in-game example: a ship with an 80,189kg propellant tank, an exhaust velocity of 25,000m/s (using an efficient RCS), and a total ship mass of 124,064kg.
∆v = v_e ln(m_0 / m_f)
= 25000ln(124064/(124064-80189))
= 25986m/s
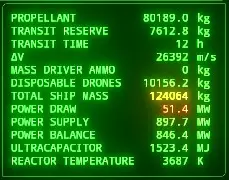
Close enough. Our ship thus has 25,986m/s of ∆v. It can accelerate to 100m/s and come to a full stop almost 130 times, each burn using up 100m/s of its ∆v.
That's everything we are sharing today for this ΔV: Rings of Saturn guide. This guide was originally created and written by whythecynic. In case we fail to update this guide, you can find the latest update by following this link.