

- Título: Age of Darkness: Final Stand
- Data de lançamento:
- Desenvolvedor:
- Editor:
Information about Age of Darkness: Final Stand is still incomplete. Por favor, ajude-nos a preencher os detalhes do jogo usando este formulário de contato.
Really basic concepts for priorities, base building, and progression.
Começando
Opportunity Cost
Don’t get distracted and let your resources reach the cap, especially at first. Build a logging camp well before you run out of wood. This means only 1 ou 2 houses or food production buildings. Rush exploring to find a good spot for a logging camp. Pay attention to the rating. If you can get it in the 19-24 faixa, you’ll be set for a while with just one. You probably don’t need more than two of these.
Your next priority is gathering stones. You may find a vein of 3-5 right near the base. Only build on this if you can’t find a better one nearby. Each building has upkeep and you are committing pop to it. Maximize your yield vs cost vs pop by building on the best vein you can secure. Try to scout for this quickly.
Map Generation
If you can’t find more than a 4 tile stone vein within a reasonable distance from your base, consider rerolling your map. I really struggled one round due to being staved for stone. I got curious and would generate a new map, save immediately, and then rush exploration. After a few rounds, I had a few really decent starts. There’s a huge amount of variability and some maps simply seem unfair. Totally reasonable if you think this is cheating, but it is an early access game. There may be balance issues and your enjoyment of the game may depend on the start being favorable. If you get good, you should be able to thrive under the worst conditions. Focus on enjoying the game and learning first.
Base Building and Expansion
Base Layout
This game changed the way I build bases. I like orders. I like grids. I like using space efficiently. Doing all of those things is a really efficient way to get absolutely destroyed in this game. Spread your buildings out as much as possible to make use of their line of sight (LoS). #1 You cannot build where you do not have active LoS, #2 bad things will actually spawn within your borders if you have even a single tile of the fog of war during death nights, e #3 nothing sucks more than sending reinforcements to your front lines and getting debuffed by death night fog of war because you left giant swaths of emptiness between your barracks and your front lines. Line of sight = control.
Walls are going to fall. Buildings are going to fall. Faça o que fizer, don’t let your stockpiles fall. Put those in a dead-end off the beaten path. You may as well lose the game before you lose those. If your resources end up at max during a prolonged fight and they fall, everything above the cap gets gobbled up by the baddies. I’m still disappointed about that loss…
Chokepoints
The fewer walls you build the better. When faced with a long narrow corridor, don’t do what I did and build on the bad guy side unless you intend to build multiple layers of walls. Build on your side. The goal is to slow them down by forcing them através the chokepoint antes they get to your walls. It’s a lot easier to kill an infinitely long horde of bad guys if they walk single file into your towers of doom.
Let’s think about this like a math problem with two scenarios with constant DPS.
I can afford enough firepower to kill 50 baddies per second at a given location. There are an infinite amount of baddies, but they take up physical space and therefore have to queue like they’re trying to get on a ride at Disney after they got rid of Fastpass.
If I funnel them to my front door first, then only 40 baddies per second can hit my walls. 40 is less than 50. Isso é bom, my walls might stay up. If my wall is twice as wide but my DPS remains the same, então 80 baddies per second can hit my walls. Desde 80 is more than 50, isso é ruim. My walls are going to take a lot of damage and I’m probably going to be kiting the baddies all the way back to my base’s interior.
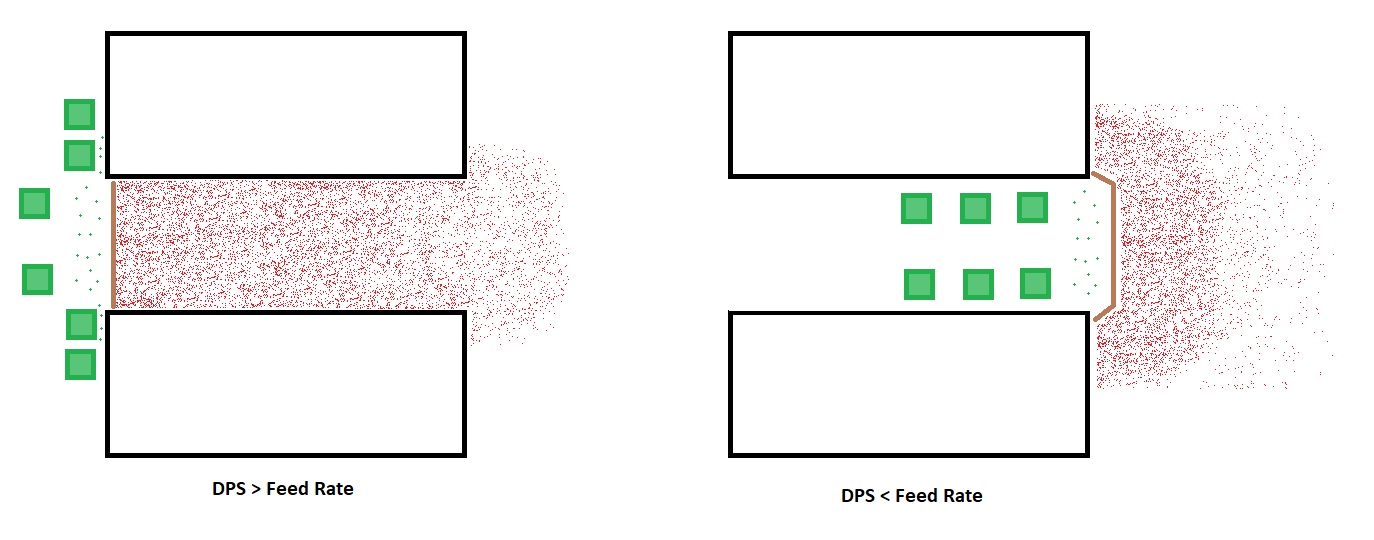
More firepower across less surface area = success
Research and Upgrades
Food Production
Upgraded food production is bigger than the little huts you start with. Reserve some space for the big boys. Once you unlock tier 2 houses and tier 2 food production, expand your food fast so that you can upgrade your existing houses one after the other.
Nível 1 (Food Hut) is the best Food/Gold you’re going to get, but it’s a lot of space.
Nível 2 (Fazenda) and Tier 3 (Refined Farm) are more space-efficient than Tier 1. The Food/Gold is the same between them, so upgrading to Tier 3 is fine if you run out of space and have the mats. Nível 3 lets you jam more pops into one space. Obviamente, shoot for the absolute best yield for farms and use huts to fill in garbage areas.
Max food Stats
- Nível 1: 11 Comida (5.5 Food/Gold, 1 Pop)
- Nível 2: 31 Comida (1.55 Food/Gold, 2 Pop)
- Nível 3: 62 Comida (1.55 Food/Gold, 4 Pop)
Habitação
Wood is a nonissue and if you rerolled for good stone, then you will be ham-stringed by gold. Upgrading to Tier 2 (Lodge) is a huge gold increase and something that really changed the trajectory of my games. Houses = gold. Upgrade what you’ve got ASAP to tier 2.
After writing this I decided to run some numbers, nível 3 habitação (casa) isn’t worth it if you’ve got space. Fill in any available space with tier 2 housing first. It’s about 17% less Gold/Food to upgrade everything to Tier 3, e isso é 10 stone per house. You need walls more than you need houses. Build more Tier 2.
Pesquisar
Once you unlock everything in Tier 1 pesquisar, just sell the thing. It takes up a lot of pop and you get a small refund. Replace it with a stockpile if you can.
Isso é tudo o que estamos compartilhando hoje para isso Age of Darkness: Final Stand guia. Este guia foi originalmente criado e escrito por Mogsetsu. Caso não atualizemos este guia, você pode encontrar a atualização mais recente seguindo este link.