This guide explains how to get each ending and corrects some misunderstandings about certain numbers.
Math Logic
There are four endings in Signalis. One of them, de “Artefact” einde, remains a secret until certain objectives are completed in the game. The other three endings, known as the “Geheugen,” “Promise,” en “Vertrekken” einde, depend on specific values tracked within the game.
Each of these endings corresponds to an internal value, namely Circle (Geheugen), Dood (Promise), and Leave, which are tallied when you enter the Cryogenics room towards the end of the game. These values can change based on various conditions as explained below.
Circle=2 at the start of the game. Death and Leave start at 0.
TotalPurePlaytime < 6H: +2 for Circle
TotalPurePlaytime > 12H: +1 for Death
Kills > 90: Death+1
Kills > 120: Death+1 (opnieuw)
DamageTaken > 1900: Death+1
Sterfgevallen > 5: Death+1
regenTime > 5M (300sec): Death+1
regenTime > 5M (300sec): Death+1 (repeats twice)
NearDeathSurvives > 8: Death+1
NPC talks > 25: Leave+1
NPC talks > 35: Leave+1 again
HealingTimeFraction calculated as healedTime / healedTimeSegment
HealingTimeFraction > 0.6: Vertrekken +1
HealingTimeFraction > 0.8: Vertrekken +1
MemoryTime > 5min: Leave+1
doorChecks > 40: Leave+1
Final logic flow-chart:
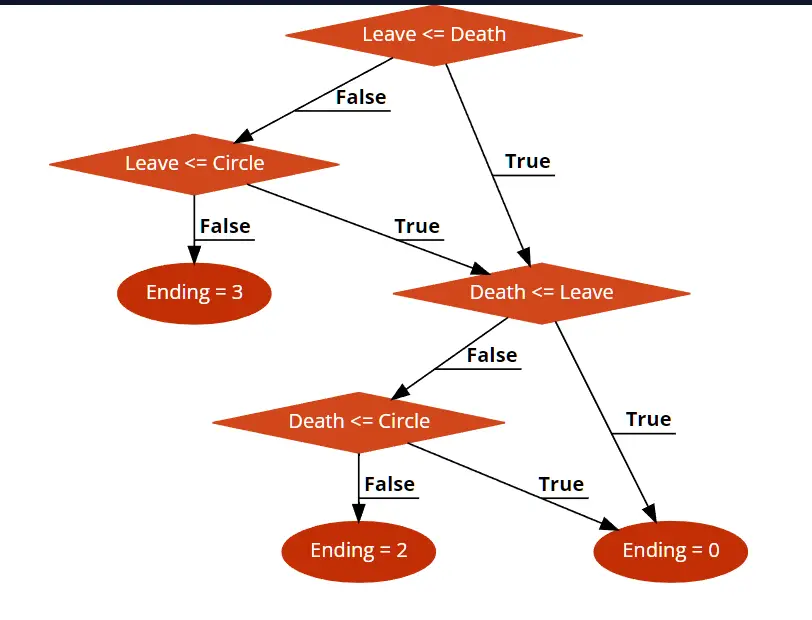
To simplify things, here’s the basic logic for the different endings:
- If Death is less than Leave and Leave is greater than Circle, you get the “Vertrekken” einde.
- If Death is equal to Leave, you get the “Geheugen” einde.
- If Leave is less than Death and Leave is also less than Circle, you get the “Promise” einde.
- If Leave is less than Death and Death is less than Circle, you also get the “Geheugen” einde.
- If Death is less than Leave and Death is less than Circle, you again get the “Geheugen” einde.
Let us now define what each variable means:
[TotalPurePlaytime]
Only includes the time spent actively playing the game, excluding time spent in inventory, dialogue text boxes, notities, menus, and loading screens.
[Kills]
Reflects the number of enemies you’ve eliminated, even counting reanimated enemies as new kills.
[DamageTaken]
This measures the base damage you’ve received, not accounting for any difficulty or resistance modifiers. Bijvoorbeeld, if you bump into an enemy, it adds 20 to this value.
[Sterfgevallen]
It keeps track of how many times you’ve died in the game, and this count stays with your save.
[regenTime]
This special number called regenTime might seem misleading at first. Some may think that using Repair Patches and Repair Sprays can increase it, but that’s not true. Eigenlijk, regenTime only increases when Elster is repairing damage below specific limits. In case you didn’t know, Elster will automatically heal herself if her HP drops below 12 on survival difficulty or 26 on normal and casual difficulty. This is the only way that regenTime can rise.
[NearDeathSurvives]
When Elster takes a really big hit that would normally end her, you’ll see a red, 3×3 square on the screen, and that means she’s in “Near Death Mode.” While she’s in this mode, if she gets hit again and her HP drops to zero, she won’t make it. The interesting thing is, this value increases by 1 as soon as she enters Near Death Mode. Voor zover ik weet, the only way to reset the cooldown from Near Death is to save the game. Saving the game also brings Elster’s HP back to a specific level if it’s below that threshold.
[NPC talks]
This number shows how many different conversations you’ve had with the characters in the game. Maar hier is het addertje onder het gras: once you’ve heard everything a character has to say, this number stops increasing.
[HealingTimeFraction (healedTime/healedTimeSegment)]
I’m not entirely sure about the exact meaning of this value, but based on multiple tests, it seems like [healedTime] represents the time spent in Nominal health, which means having over 80HP. [healedTimeSegment] could be the time spent in each specific section. alternatief, it might be related to the time you spend in Nominal Health during the Mynah and Falke bossfights because if you skip these fights and go straight to the ending, you won’t earn points for the Leave ending. Echter, I tried loading a save where I maintained low HP, fought Mynah with 100HP throughout, and then entered the ending area using debug, but I didn’t receive any points. Dus, to aim for this ending, it’s a good idea to keep your HP above 80 te allen tijde, and that should help you earn those two points.
[MemoryTime]
This is the time you spend in the Penrose memory after the fake ending. It has the same exclusions as TotalPurePlaytime. It starts after Elster wakes up and ends when she jumps down the flesh hole into the 1st person beach segment. Interessant genoeg, the time you spend in the 1st person segments does not contribute to this value, even though some might think it does.
[doorChecks]
This number increases by 1 each time you inspect a different broken door with red X’s over them. You can’t just repeatedly check the same door 41 times to make it go up; you have to actually check the door and bring up the dialogue box for the variable to increase. Doors that you can open with keys or that can be accessed from the other side don’t count toward this value.
Artifact ending
Om dit einde te krijgen, you need to find three hidden keys as you play through the game, and then use them to unlock the safe in Ariane’s room at the end of Rotfront. Interessant genoeg, this ending was initially uncovered by converting SSTV signals in the game into images, which revealed the locations of the keys.
Key of Love
You can find the Key of Love in Leng – B2, inside the Isolation room. Tune your radio frequency to 96.000 kHz and then check the box located in the bottom right corner of the room.
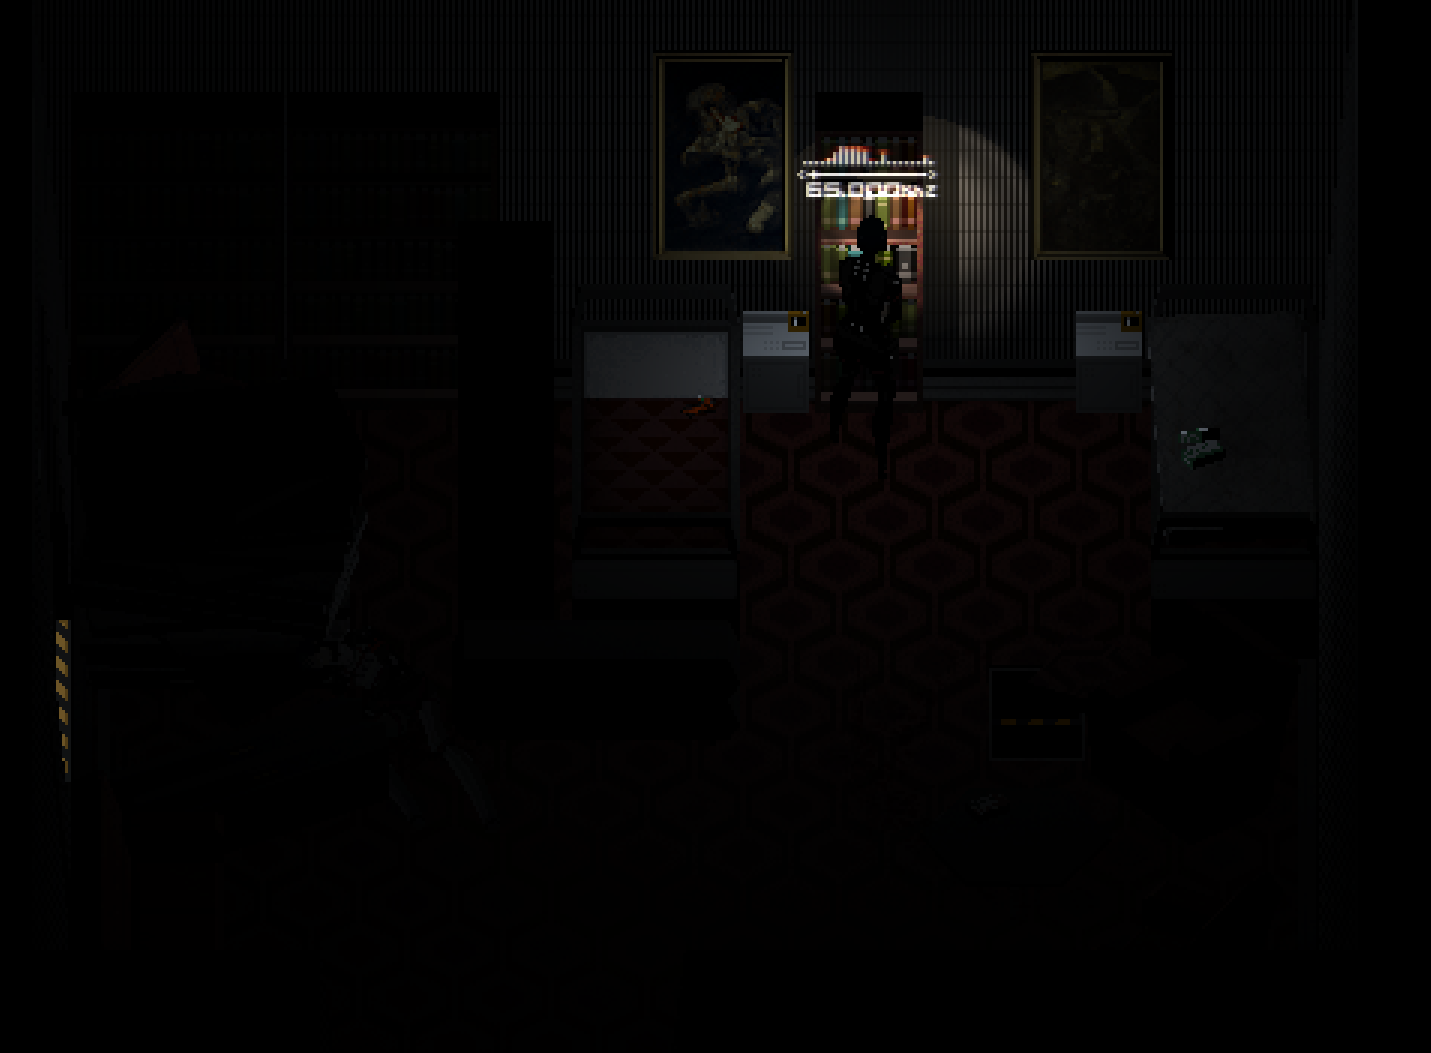
Key of Eternity
The Key of Eternity can be found in Leng – B8, within the STCR Dorm. Adjust your radio frequency to 65.000 kHz and inspect the bookcase to the right of the painting of “Saturn Devouring His Son.”
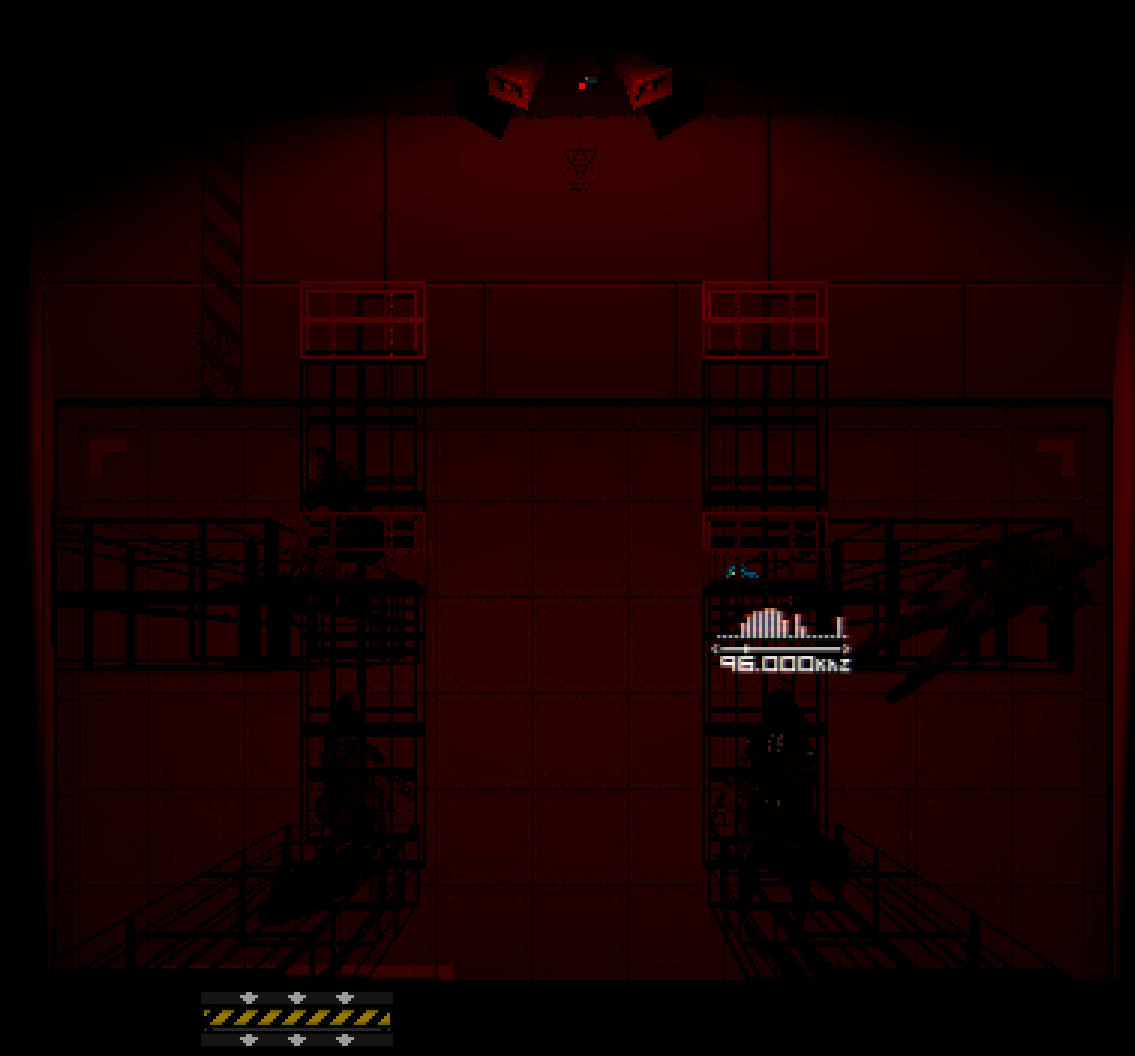
Key of Sacrifice
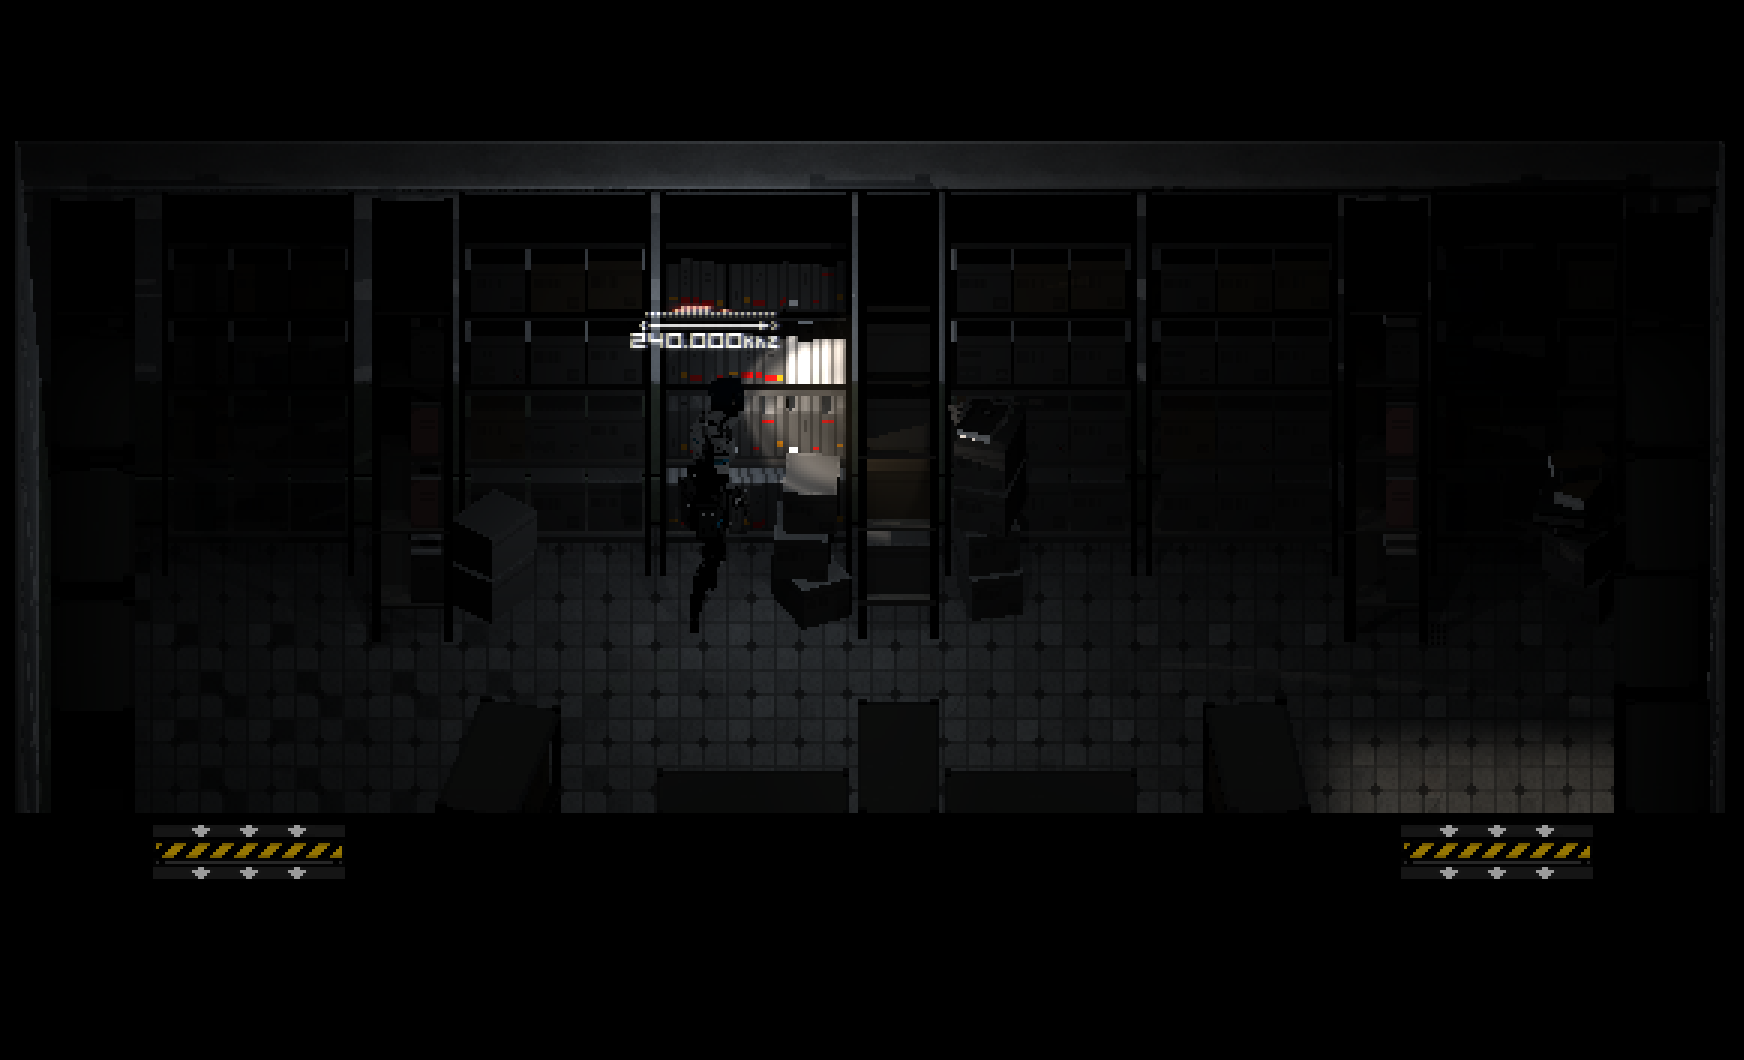
To locate the Key of Sacrifice, head to Rotfront (Begane grond) in the Backroom. Set your radio frequency to 240.000 kHz and check the area between the bookcase and the boxes, as shown in the picture below.
De kluis
Make sure you have all three keys in your inventory before completing the eclipse puzzle in Rotfront. After finishing the puzzle, you won’t be able to back out of it. Enter the hole into Ariane’s room, Sluit rechtsaf, and locate the safe.
Once you have all the keys, you’ll need to enter the following code:
39486 60170 24326 01064
This code matches the numbers displayed in Ariane’s room at the beginning of the game. After entering the code, open the safe to claim the treasure inside.
Ending Tips
Geheugen
This is the easiest ending to get in the game. The game tends to favor it and defaults to it if there’s any tie between all three endings. If you finish the game in under 6 hours and avoid taking hits, sterven, entering Near Death mode, checking broken doors, talking to NPCs, and speedrun the Penrose memory, you’ll likely achieve this ending. Even if you don’t follow all these tips, you’ll probably still get this ending.
Promise
This ending can be surprisingly challenging to achieve in under 6 uur, especially on Survival difficulty. Echter, if you know how to work the game’s mechanics, you can easily earn 5 points toward the death value. The simplest way to get this ending is to farm [DamageTaken], [NearDeathSurvives], [Sterfgevallen], en [regenTime] on enemies just outside a save room. Position yourself near a save room with an easily accessible enemy. Save the game, leave the room, take damage from enemies until you trigger Near Death, return to the save room, wait a few seconds to regenerate, redden , and repeat. Each encounter with an enemy deals 20 schade. To make it even easier, you can lower the difficulty to Casual, as saving on Casual difficulty heals you to 80HP, allowing you to endure more hits before reaching Near Death. It takes about 96 hits to accumulate 1900 schade. On Casual and Normal difficulties, it takes approximately 42 seconds to auto-regenerate to 26 HP (when the controller stops vibrating). You can easily max out [regenTime] in 7-9 cycles and then die six times to achieve this ending.
Vertrekken
Arguably the most challenging ending to obtain in under 6 uur. To achieve this ending, check every broken door, exhaust the patience of every NPC, and take your time in the Penrose memory. Always try to keep your HP in Nominal status when possible and heal back to Nominal status as soon as you can. This last part is crucial because those additional 2 points can push you above the 4 Circle points if you complete the game within 6 uur.
Cheat Engine
Do you want to experiment with the values and double-check this information? I’ve developed a Cheat Table for Cheat Engine that monitors most of these values, except for [healingTimeFraction] because I couldn’t find those values. It’s worth noting that the game keeps track of how long you stay in Nominal status and seems to reset after the end of each segment that corresponds with the “INTRUDER” debug menu. Echter, boss fights seem to play a role, as forcing the game to end without battling at least Mynah or Falke results in no points toward the Leave ending.
Here’s the Cheat Engine table:
<?XML -versie ="1.0" Encodering ="UTF-8"?>
<CheatTable CheatEngineTableVersion="45">
  <CheatEntries>
    <CheatEntry>
      <Id>17</Id>
      <Beschrijving>"HP"</Beschrijving>
      <VariableType>4 Bytes</VariableType>
      <Address>"GameAssembly.dll"+02086B30</Address>
      <Offsets>
        <Offset>8</Offset>
        <Offset>B8</Offset>
        <Offset>50</Offset>
        <Offset>130</Offset>
        <Offset>80</Offset>
        <Offset>48</Offset>
        <Offset>A0</Offset>
      </Offsets>
    </CheatEntry>
    <CheatEntry>
      <Id>11</Id>
      <Beschrijving>"NPC talks"</Beschrijving>
      <ShowAsSigned>0</ShowAsSigned>
      <VariableType>4 Bytes</VariableType>
      <Address>"GameAssembly.dll"+0205E718</Address>
      <Offsets>
        <Offset>14</Offset>
        <Offset>B8</Offset>
        <Offset>58</Offset>
        <Offset>98</Offset>
        <Offset>78</Offset>
        <Offset>10</Offset>
        <Offset>80</Offset>
      </Offsets>
    </CheatEntry>
    <CheatEntry>
      <Id>12</Id>
      <Beschrijving>"???"</Beschrijving>
      <ShowAsSigned>0</ShowAsSigned>
      <VariableType>Float</VariableType>
      <Address>"GameAssembly.dll"+0205E718</Address>
      <Offsets>
        <Offset>18</Offset>
        <Offset>B8</Offset>
        <Offset>58</Offset>
        <Offset>98</Offset>
        <Offset>78</Offset>
        <Offset>10</Offset>
        <Offset>80</Offset>
      </Offsets>
    </CheatEntry>
    <CheatEntry>
      <Id>10</Id>
      <Beschrijving>"MemoryTime"</Beschrijving>
      <ShowAsSigned>0</ShowAsSigned>
      <VariableType>Float</VariableType>
      <Address>"GameAssembly.dll"+0205E718</Address>
      <Offsets>
        <Offset>20</Offset>
        <Offset>B8</Offset>
        <Offset>58</Offset>
        <Offset>98</Offset>
        <Offset>78</Offset>
        <Offset>10</Offset>
        <Offset>80</Offset>
      </Offsets>
    </CheatEntry>
    <CheatEntry>
      <Id>5</Id>
      <Beschrijving>"doorChecks"</Beschrijving>
      <VariableType>4 Bytes</VariableType>
      <Address>"GameAssembly.dll"+0205E718</Address>
      <Offsets>
        <Offset>24</Offset>
        <Offset>B8</Offset>
        <Offset>58</Offset>
        <Offset>98</Offset>
        <Offset>78</Offset>
        <Offset>10</Offset>
        <Offset>80</Offset>
      </Offsets>
    </CheatEntry>
    <CheatEntry>
      <Id>19</Id>
      <Beschrijving>"DamageTaken"</Beschrijving>
      <VariableType>4 Bytes</VariableType>
      <Address>"GameAssembly.dll"+0206DEA8</Address>
      <Offsets>
        <Offset>10</Offset>
        <Offset>B8</Offset>
        <Offset>18</Offset>
        <Offset>60</Offset>
        <Offset>C8</Offset>
        <Offset>50</Offset>
        <Offset>40</Offset>
      </Offsets>
    </CheatEntry>
    <CheatEntry>
      <Id>24</Id>
      <Beschrijving>"Shots Fired"</Beschrijving>
      <ShowAsSigned>0</ShowAsSigned>
      <VariableType>4 Bytes</VariableType>
      <Address>"GameAssembly.dll"+0206DEA8</Address>
      <Offsets>
        <Offset>C</Offset>
        <Offset>B8</Offset>
        <Offset>18</Offset>
        <Offset>60</Offset>
        <Offset>C8</Offset>
        <Offset>50</Offset>
        <Offset>40</Offset>
      </Offsets>
    </CheatEntry>
    <CheatEntry>
      <Id>22</Id>
      <Beschrijving>"Kills"</Beschrijving>
      <ShowAsSigned>0</ShowAsSigned>
      <VariableType>4 Bytes</VariableType>
      <Address>"GameAssembly.dll"+0206DEA8</Address>
      <Offsets>
        <Offset>14</Offset>
        <Offset>B8</Offset>
        <Offset>18</Offset>
        <Offset>60</Offset>
        <Offset>C8</Offset>
        <Offset>50</Offset>
        <Offset>40</Offset>
      </Offsets>
    </CheatEntry>
    <CheatEntry>
      <Id>21</Id>
      <Beschrijving>"Sterfgevallen"</Beschrijving>
      <ShowAsSigned>0</ShowAsSigned>
      <VariableType>4 Bytes</VariableType>
      <Address>"GameAssembly.dll"+0206DEA8</Address>
      <Offsets>
        <Offset>18</Offset>
        <Offset>B8</Offset>
        <Offset>18</Offset>
        <Offset>60</Offset>
        <Offset>C8</Offset>
        <Offset>50</Offset>
        <Offset>40</Offset>
      </Offsets>
    </CheatEntry>
    <CheatEntry>
      <Id>20</Id>
      <Beschrijving>"NearDeathsSurvives"</Beschrijving>
      <ShowAsSigned>0</ShowAsSigned>
      <VariableType>4 Bytes</VariableType>
      <Address>"GameAssembly.dll"+0206DEA8</Address>
      <Offsets>
        <Offset>20</Offset>
        <Offset>B8</Offset>
        <Offset>18</Offset>
        <Offset>60</Offset>
        <Offset>C8</Offset>
        <Offset>50</Offset>
        <Offset>40</Offset>
      </Offsets>
    </CheatEntry>
    <CheatEntry>
      <Id>23</Id>
      <Beschrijving>"regenTime"</Beschrijving>
      <ShowAsSigned>0</ShowAsSigned>
      <VariableType>Float</VariableType>
      <Address>"GameAssembly.dll"+0206DEA8</Address>
      <Offsets>
        <Offset>24</Offset>
        <Offset>B8</Offset>
        <Offset>18</Offset>
        <Offset>60</Offset>
        <Offset>C8</Offset>
        <Offset>50</Offset>
        <Offset>40</Offset>
      </Offsets>
    </CheatEntry>
    <CheatEntry>
      <Id>9</Id>
      <Beschrijving>"Ending Tally **Calculated after entering Cryogenics room at end of game**"</Beschrijving>
      <Options moManualExpandCollapse="1"/>
      <GroupHeader>1</GroupHeader>
      <CheatEntries>
        <CheatEntry>
          <Id>7</Id>
          <Beschrijving>"Cirkel (Geheugen)"</Beschrijving>
          <ShowAsSigned>0</ShowAsSigned>
          <VariableType>4 Bytes</VariableType>
          <Address>"GameAssembly.dll"+0205E718</Address>
          <Offsets>
            <Offset>0</Offset>
            <Offset>B8</Offset>
            <Offset>58</Offset>
            <Offset>98</Offset>
            <Offset>78</Offset>
            <Offset>10</Offset>
            <Offset>80</Offset>
          </Offsets>
        </CheatEntry>
        <CheatEntry>
          <Id>6</Id>
          <Beschrijving>"Dood (Promise)"</Beschrijving>
          <ShowAsSigned>0</ShowAsSigned>
          <VariableType>4 Bytes</VariableType>
          <Address>"GameAssembly.dll"+0205E718</Address>
          <Offsets>
            <Offset>4</Offset>
            <Offset>B8</Offset>
            <Offset>58</Offset>
            <Offset>98</Offset>
            <Offset>78</Offset>
            <Offset>10</Offset>
            <Offset>80</Offset>
          </Offsets>
        </CheatEntry>
        <CheatEntry>
          <Id>8</Id>
          <Beschrijving>"Vertrekken"</Beschrijving>
          <ShowAsSigned>0</ShowAsSigned>
          <VariableType>4 Bytes</VariableType>
          <Address>"GameAssembly.dll"+0205E718</Address>
          <Offsets>
            <Offset>C</Offset>
            <Offset>B8</Offset>
            <Offset>58</Offset>
            <Offset>98</Offset>
            <Offset>78</Offset>
            <Offset>10</Offset>
            <Offset>80</Offset>
          </Offsets>
        </CheatEntry>
      </CheatEntries>
    </CheatEntry>
  </CheatEntries>
  <UserdefinedSymbols/>
  <Comments>Info about this table:
</Comments>
</CheatTable>
Dat is alles wat we vandaag hiervoor delen SIGNALIS gids. Deze handleiding is oorspronkelijk gemaakt en geschreven door Signal Heat. Voor het geval we er niet in slagen deze handleiding bij te werken, U kunt de laatste update vinden door dit te volgen link.