
- Title: Neon White
- Release Date:
- Developer:
- Publisher:
Information about Neon White is still incomplete. Please help us fill the details of the game using this contact form.
A present-finding guide for the distinguished Neon White runner on a tiny data plan. No videos, just images.
General advice
Are you trying to track down one last present? Maybe you can’t figure out how to cross an impossibly wide gap? Are you on a terrible internet connection that can’t handle videos? Read on!
First, some general advice: Presents are often located very high up or very far away, requiring many cards to successfully reach. Track down the present by looking for strangely placed architecture, foliage growing up walls and ledges, or conspicuous objects. There’s no time pressure on present collection, so once you’ve found the present, carefully pick your way through the level while collecting and saving up cards. Avoid unnecessary fights and wasteful shortcuts, use regular jumps where possible, and rotate weapon use to avoid entirely using up cards.
If you find it tough to time jumps, you can hold down the jump button even while in midair and your character will jump again the moment he touches the ground. This is useful for maximising height during explosive-assisted jumps.
Turn up the aim assist if accuracy isn’t your forte. The demons can go cry about it after you’re gone.
I apologise in advance for not knowing the proper names of the demons, I didn’t want to erase my data a third time to find out.
Your character portrait vibrates with excitement while you’re standing in water. That’s not a tip, but it’s pretty funny to look at.
That’s all, I hope you find this guide to be helpful. I’m not a skilled player, so I’ve tried to stick to simple and unsexy routes as much as possible. The presents ahead are indexed by level name and level number for easy searching.
Chapter 1 – Rebirth
1-1 Movement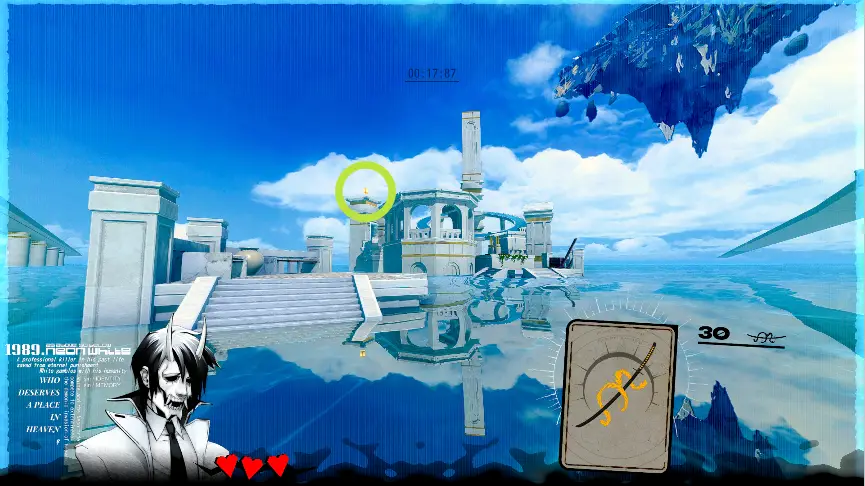
Straightforward, as the first present should be. Presents don’t show up until you’ve successfully passed the level at least once.
From the exit, jump across the roofs to get the present.
1-2 Pummel 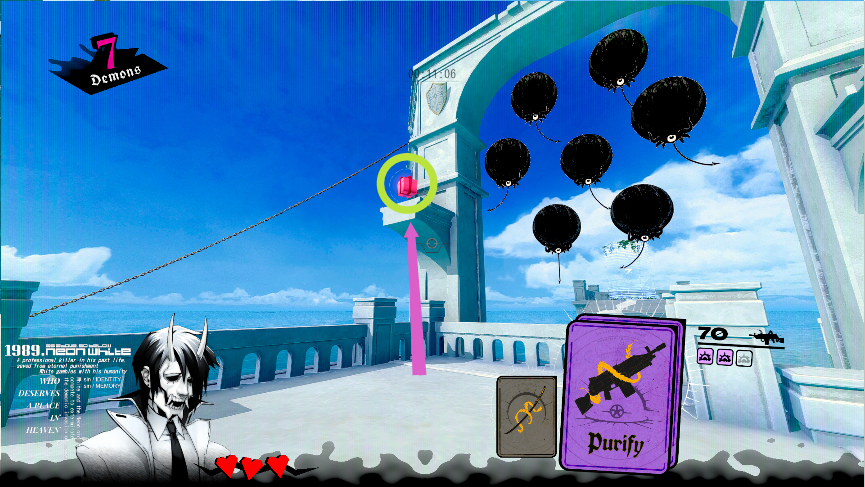
Use Purifys to grenade-jump up to the present. To grenade jump, right-click and shoot the ball at your feet. You can get more height by jumping just before the grenade explodes.
1-3 Gunner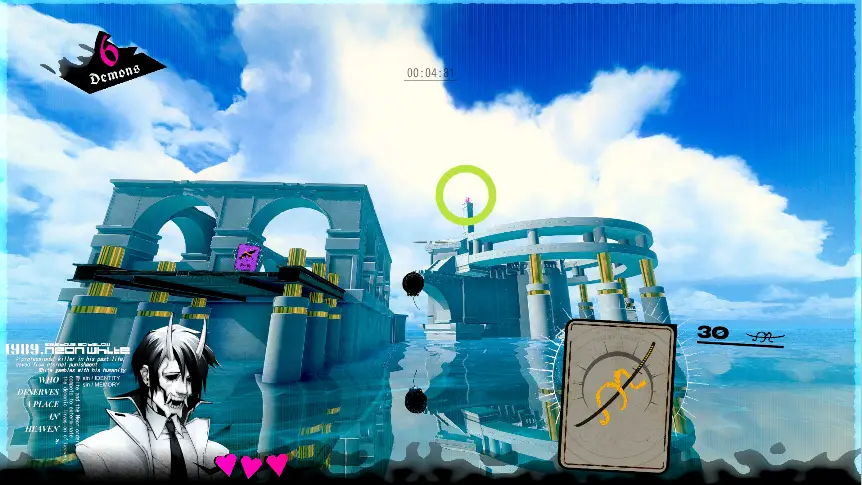
The present is up at the highest point of the level. This is a very common trend, so if you’re struggling to find a gift, look up.

You can chain grenade jumps to climb tall walls. Two or three will do it.
1-4 Cascade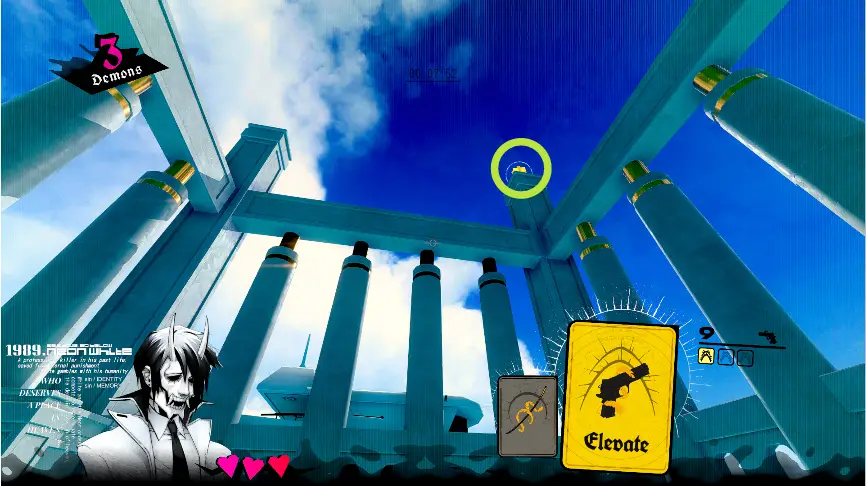
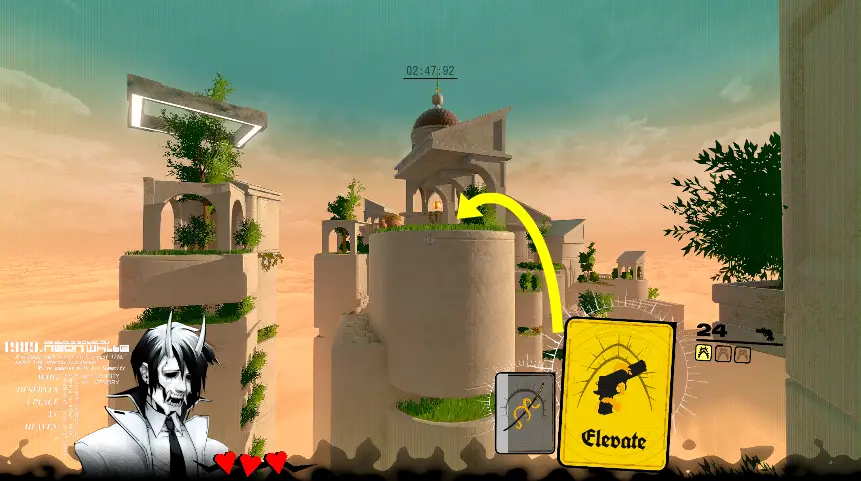
Visible behind and above you at the start.
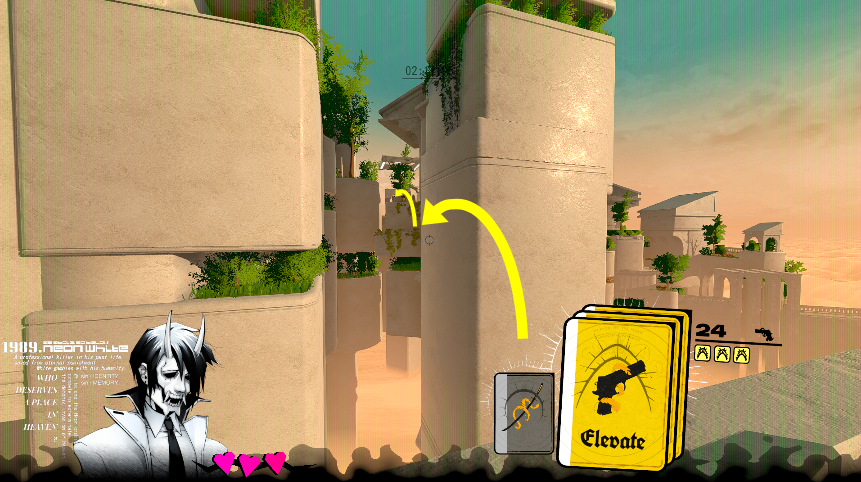
Grab the extra Elevate from the vending machine. Double jump up to the second Elevate as normal. Double jump up to the beams above, then run back towards the present and double jump up to the top.
1-5 ElevateElevate: a classic double jump card, and that’s all that I have to say about it.
The present is visible from the start.
Fill up on Elevates and chain double jumps up to the top.
1-6 Bounce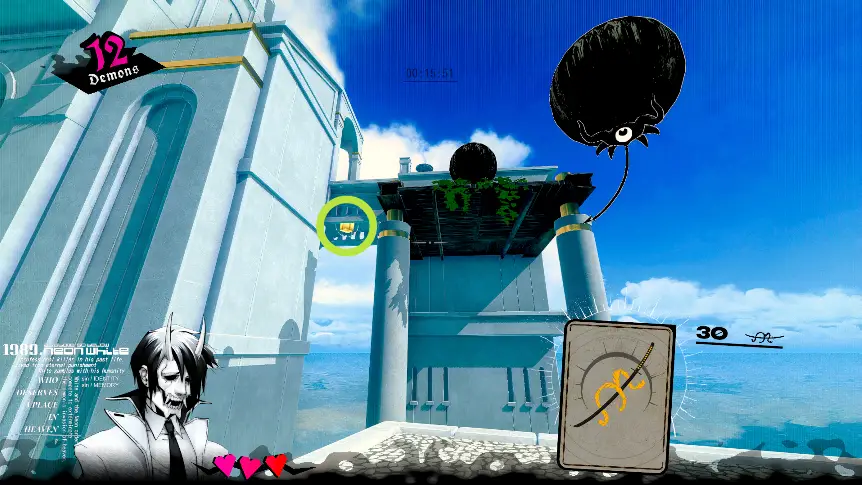
This present is hiding under the bridge.
Grab an Elevate, drop off the side, double jump to the present.
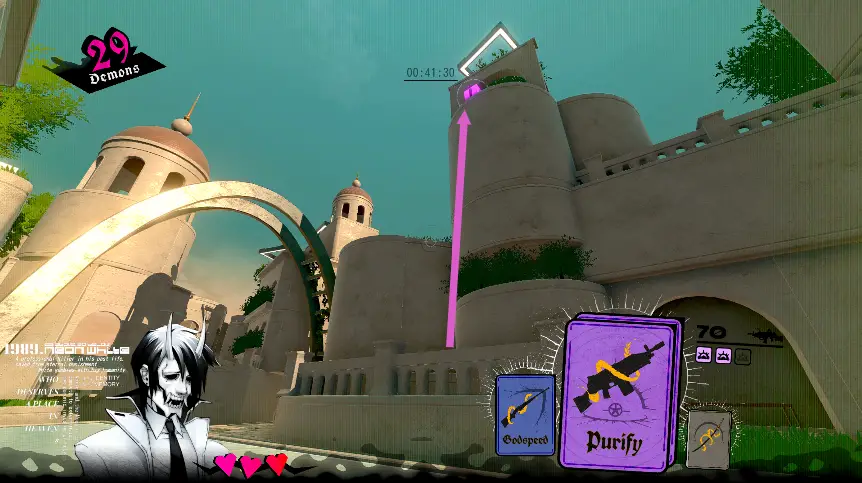
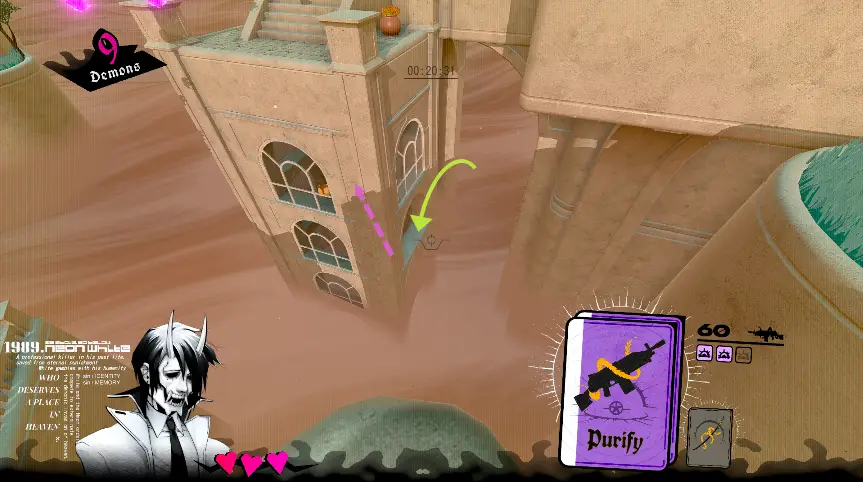
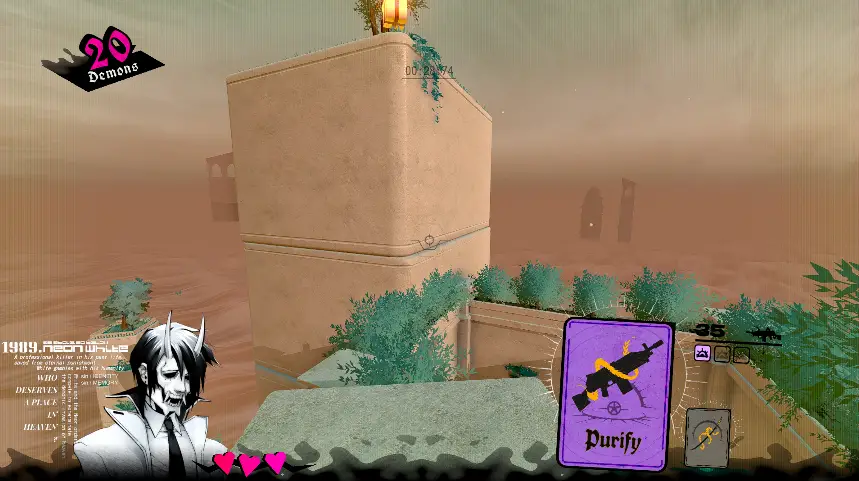
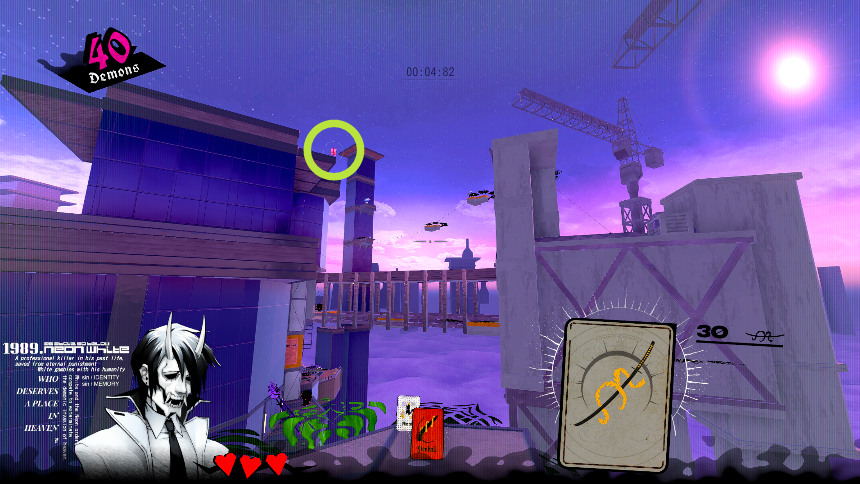
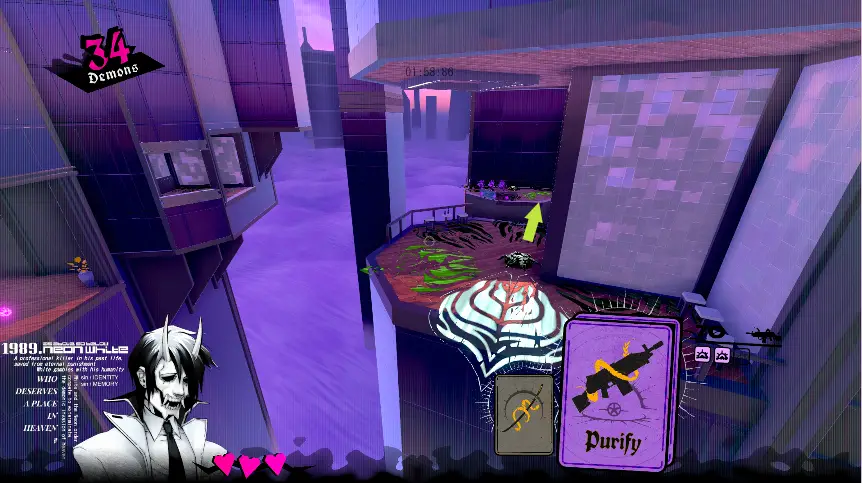
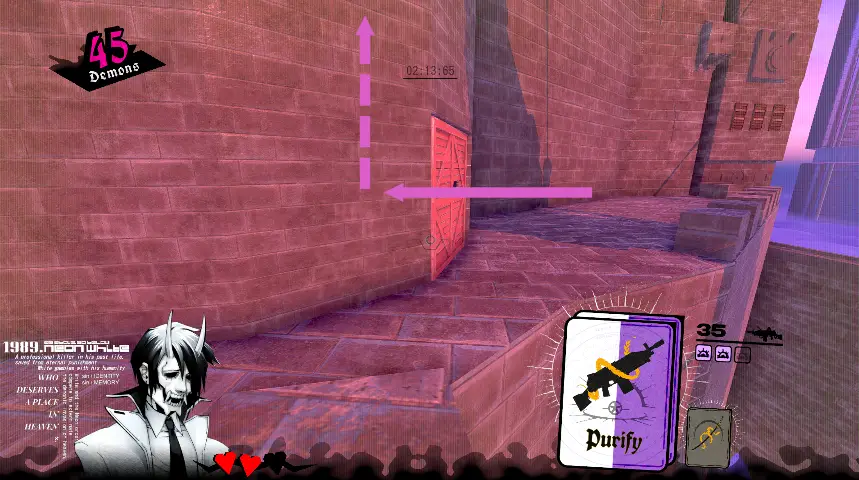
1-7 PurifyPurify: Excellent at killing enemies. High ammo capacity makes it easy to save up cards. The grenades will provide a strong upward boost as long as you’re anywhere close to the blast. The audio cue from the grenades can be used to time grenade jumps.

The present is above the exit. Grab both Purifys, get to the exit, and grenade jump up.
1-8 Climb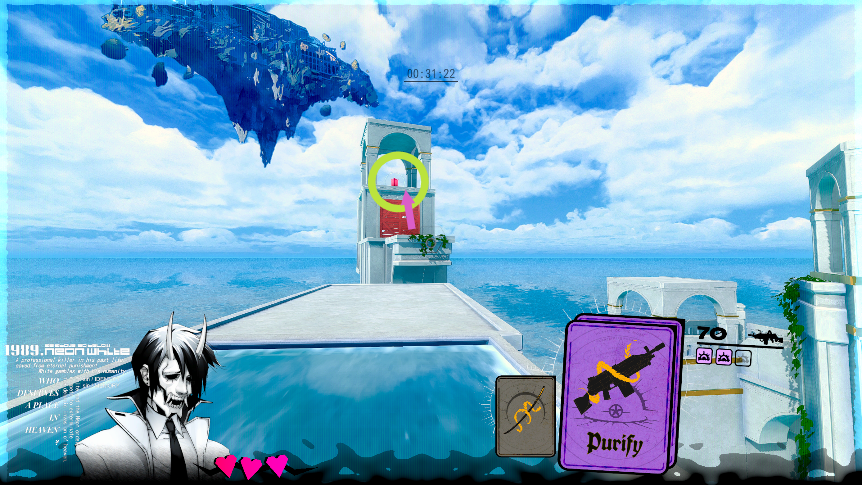
Right above the exit. Grenade jump up.
1-9 Fasttrack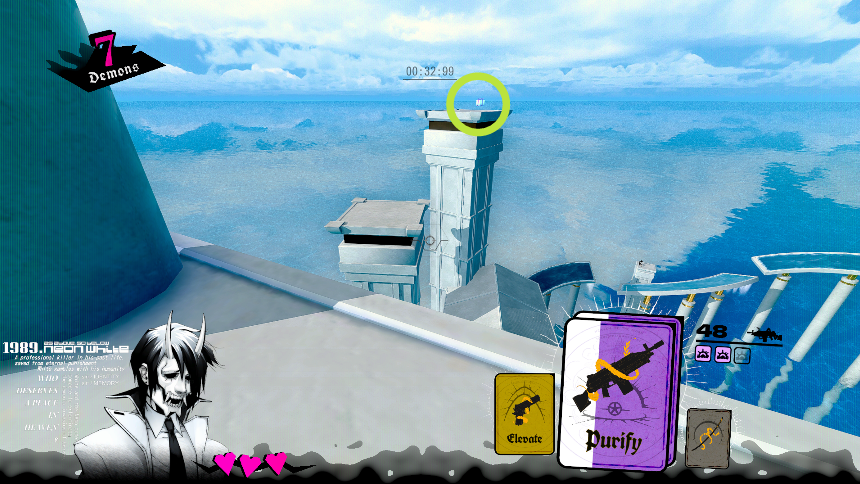
Visible to the right of the exit.
Save up the two Purifys and an Elevate. From the exit, grenade jump to the middle platform, then the end platform, and finish with a double jump.
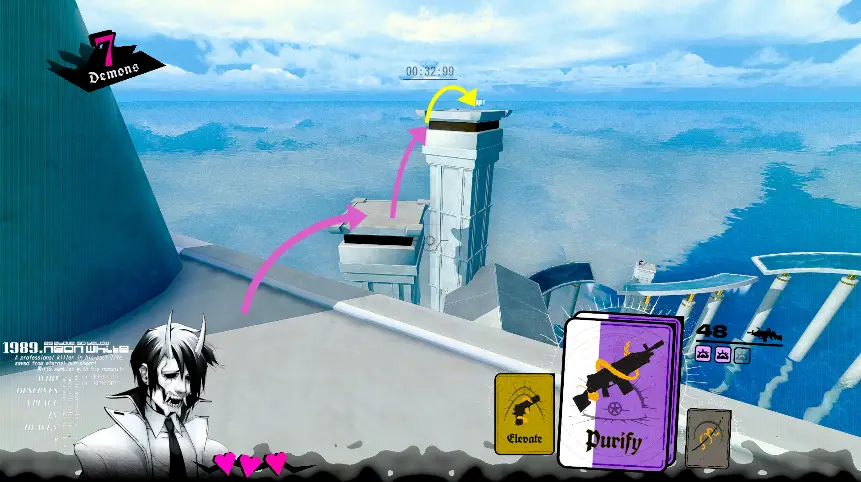
1-10 Glass Port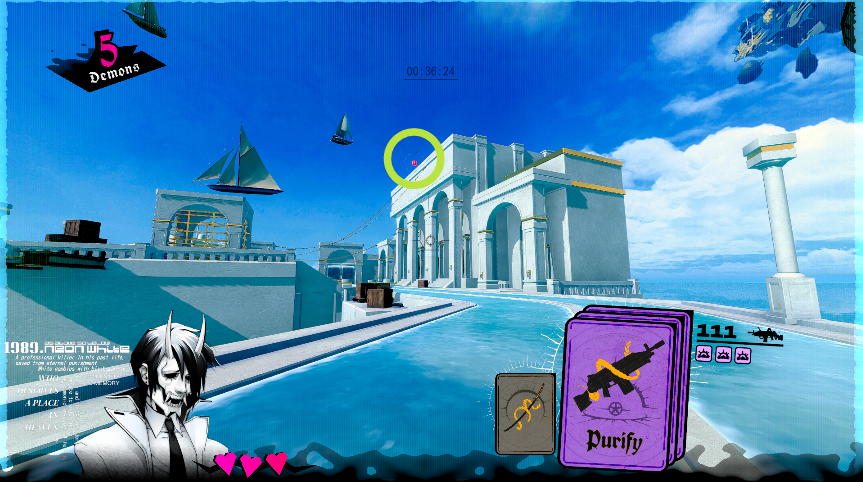
The present is on the roof of the large building facing the docks.
Grab 3 Purifys and head to the end of the track. Grab the Elevate from the demon, grenade+double jump up the arch at the end of the track, then grenade jump across the roofs. If you’re having trouble, you can save another two Elevates from the demons at the start of the level.
Chapter 2 – Killer Inside
2-1 Take Flight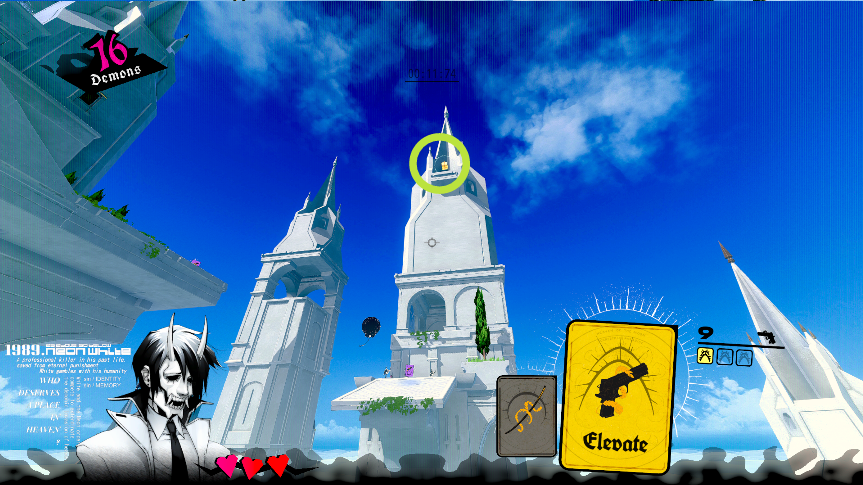
From the start, look up to find the present.
Get two Elevates from the demons while saving a Purify. After the stairs, turn around. Double jump back to the roof above the start, then grenade + double jump to the present.
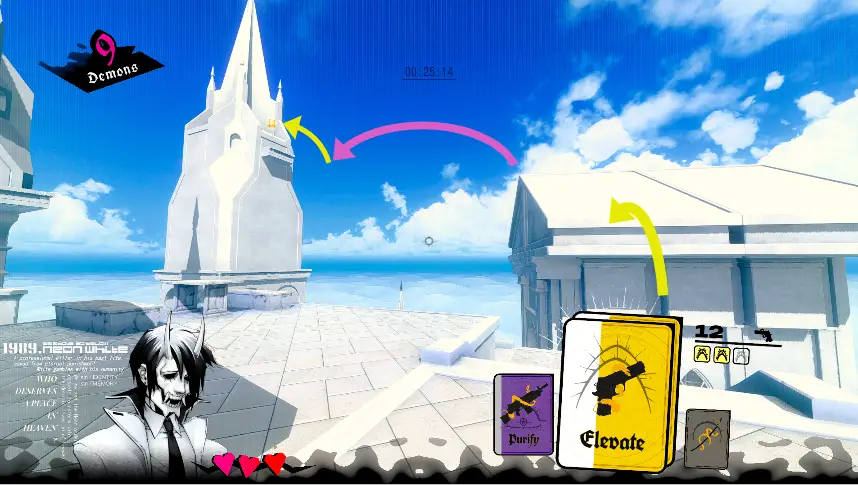
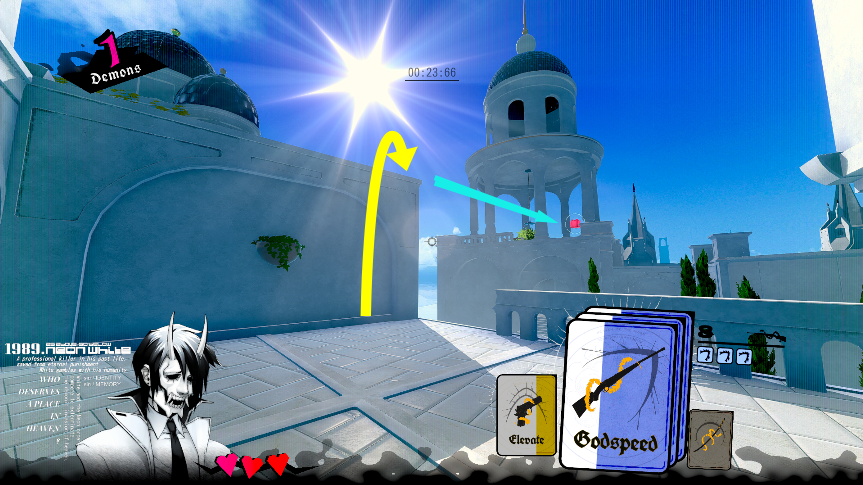
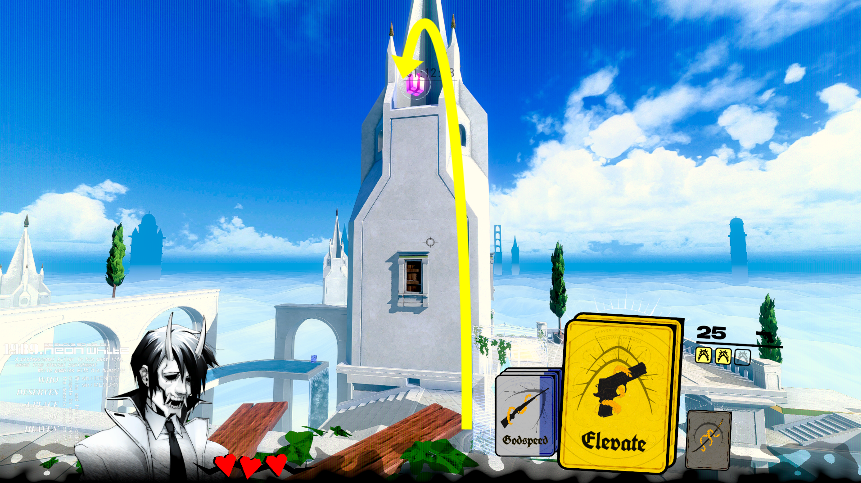
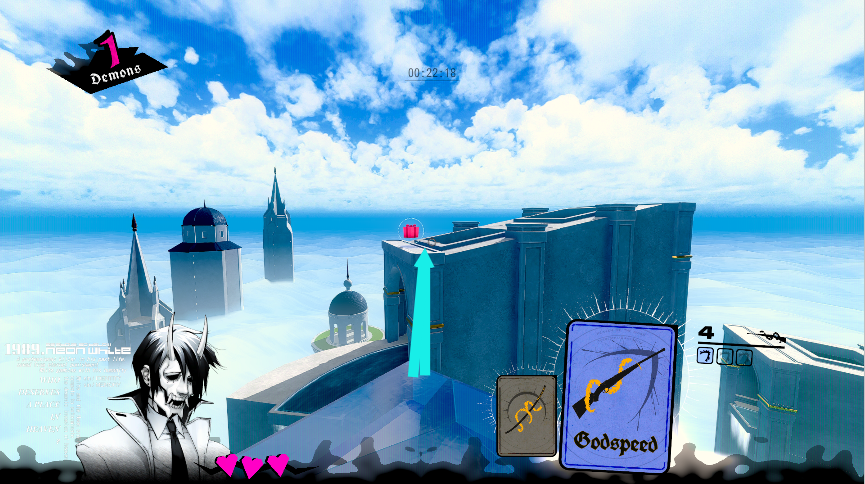
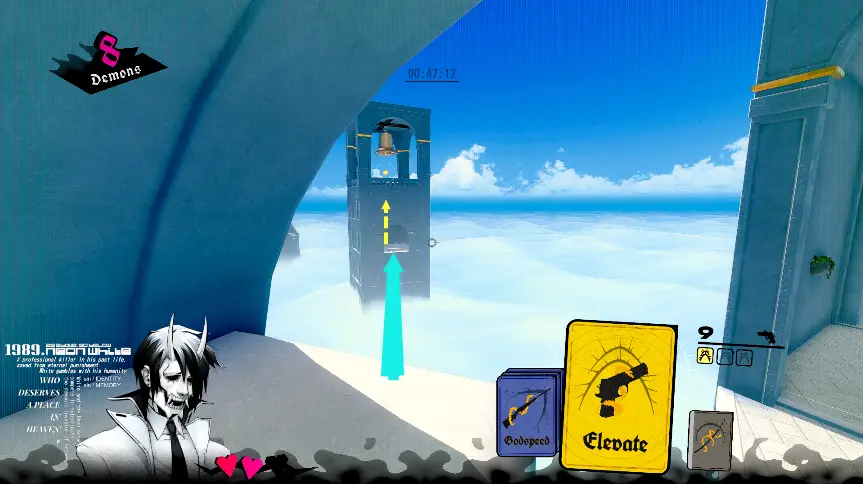
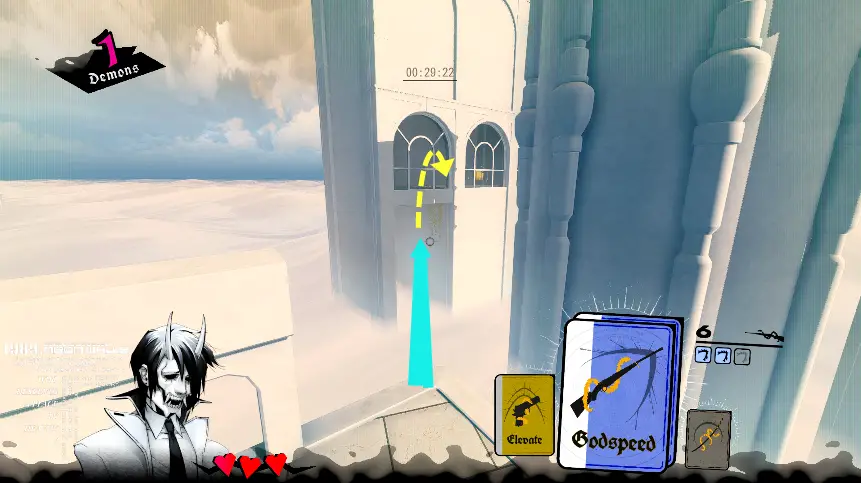
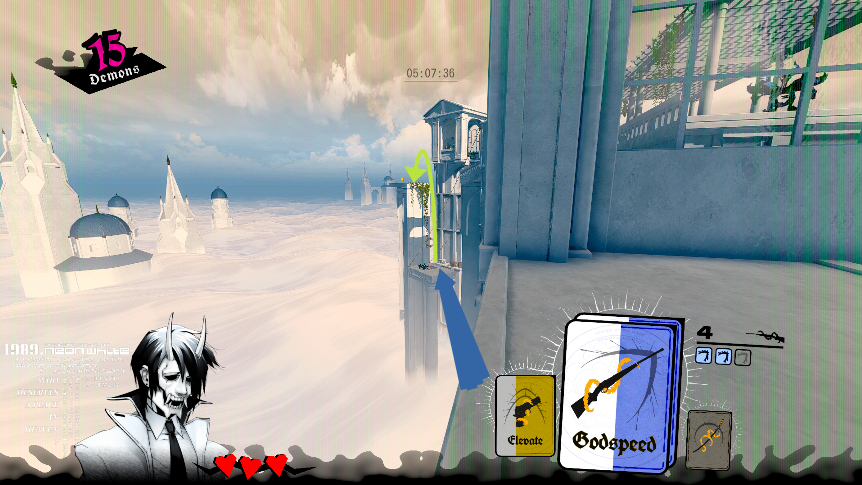
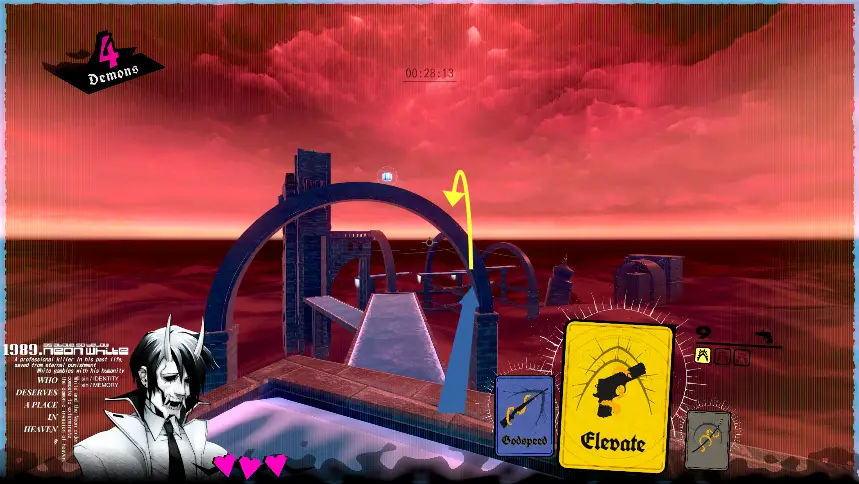
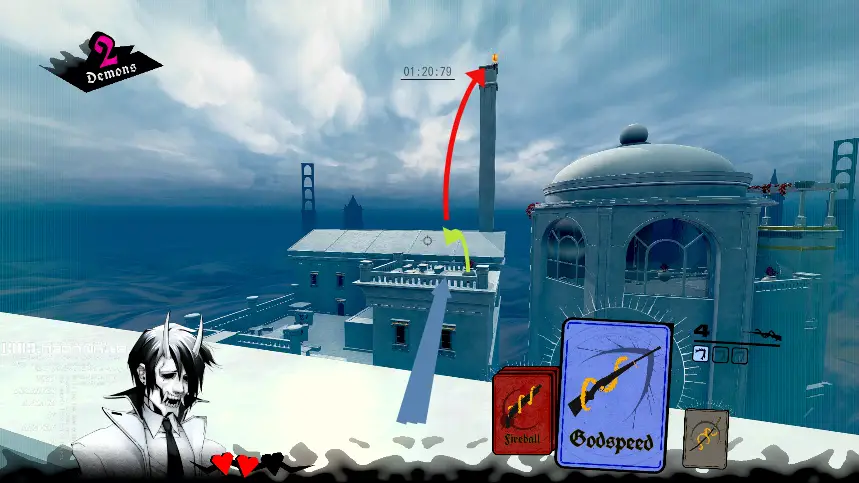
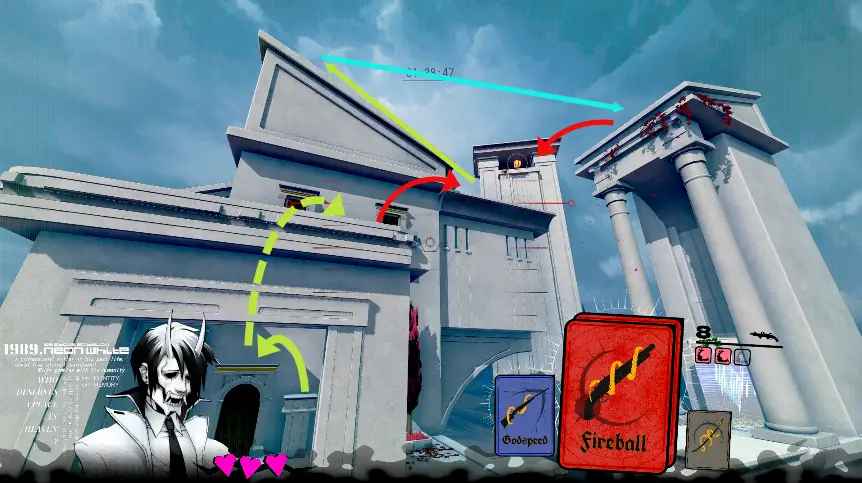
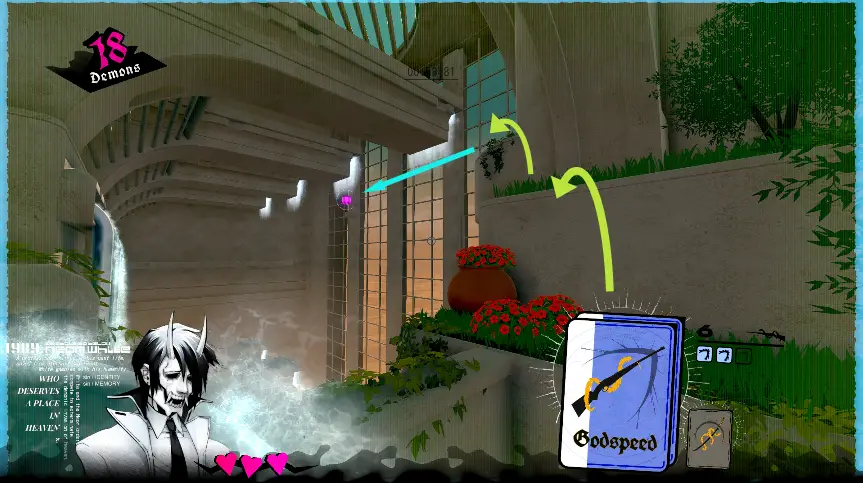
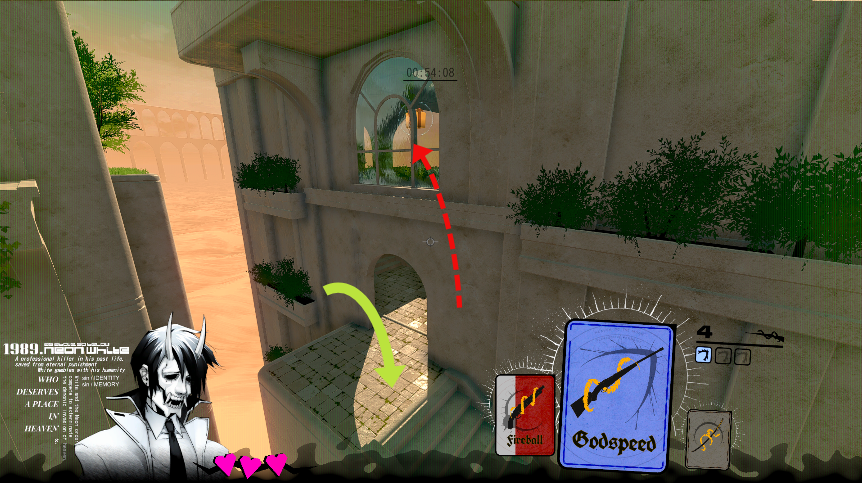
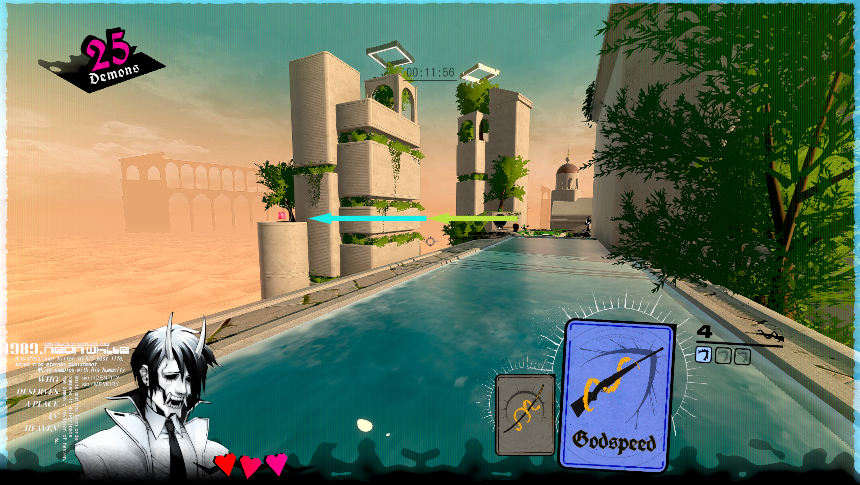
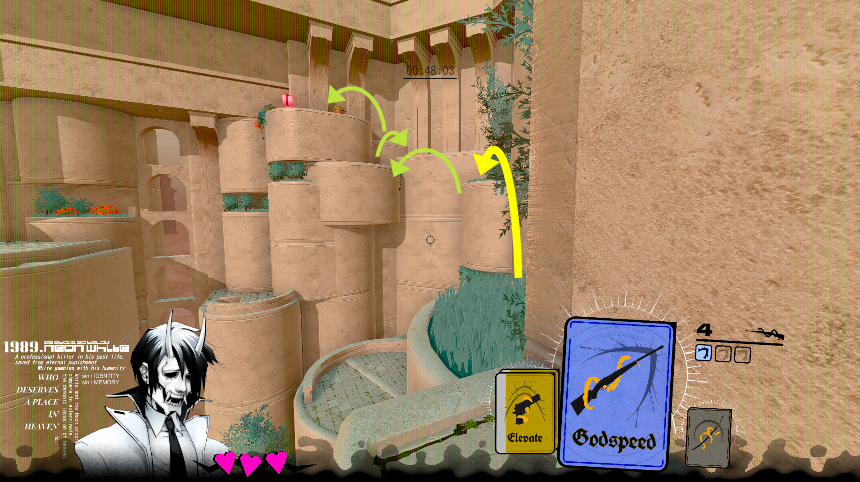
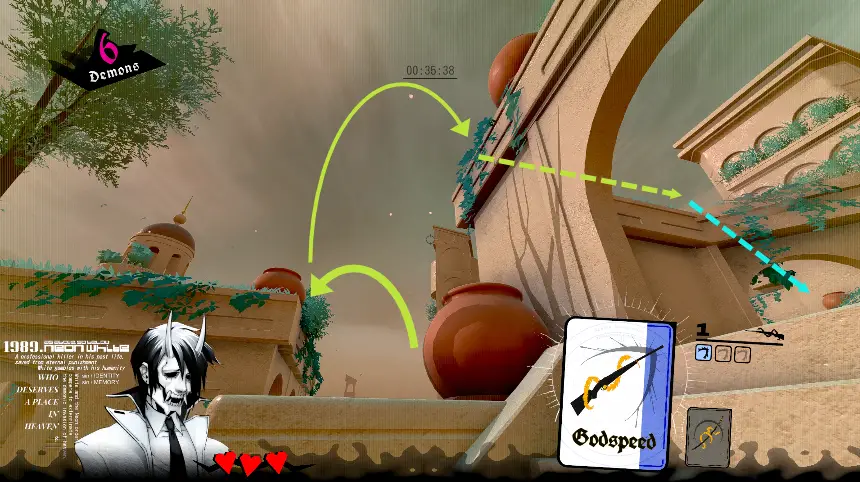
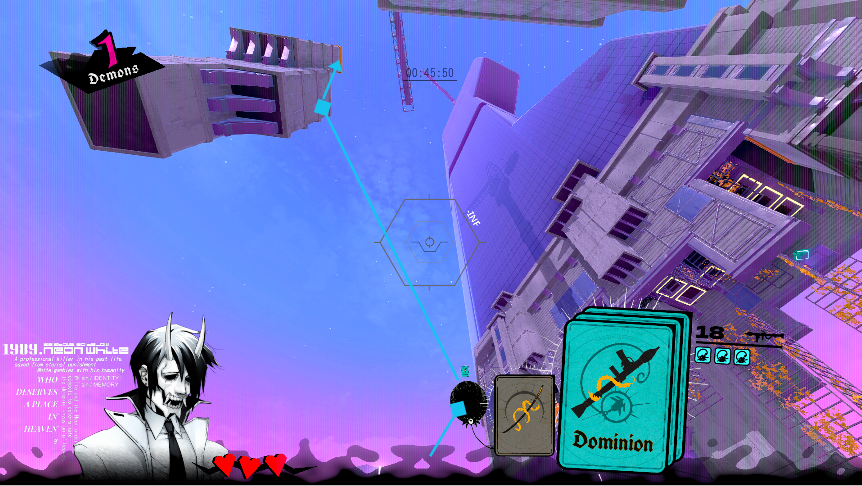
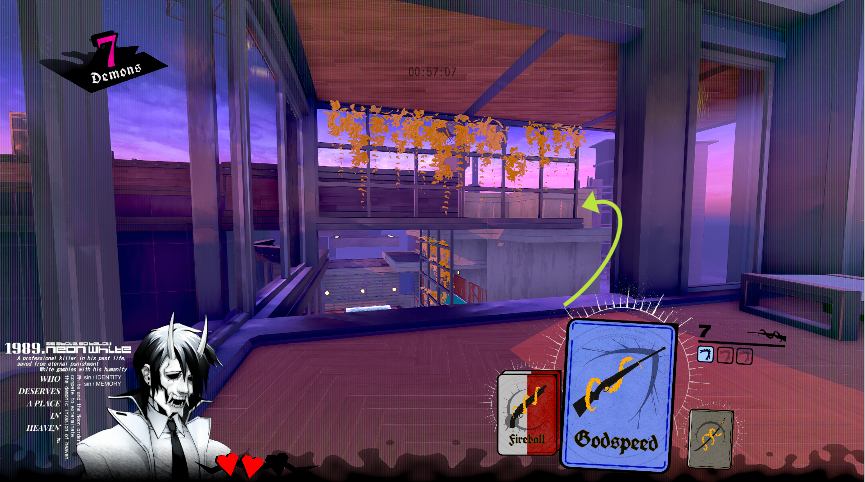
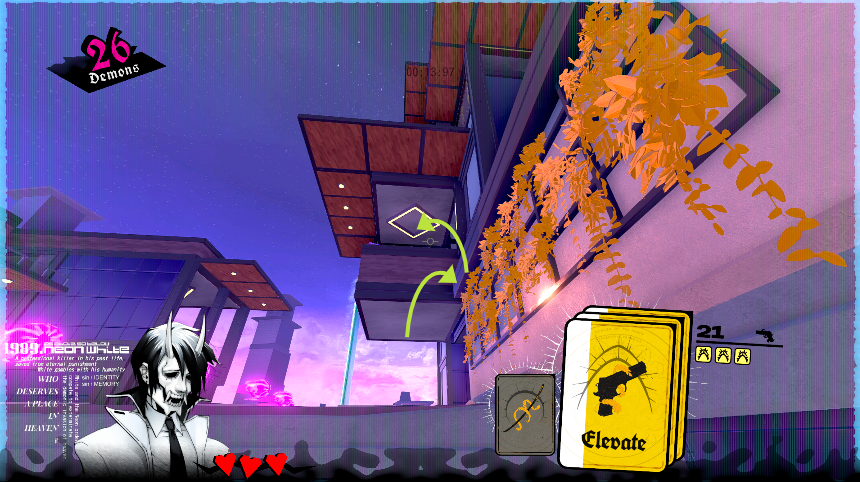
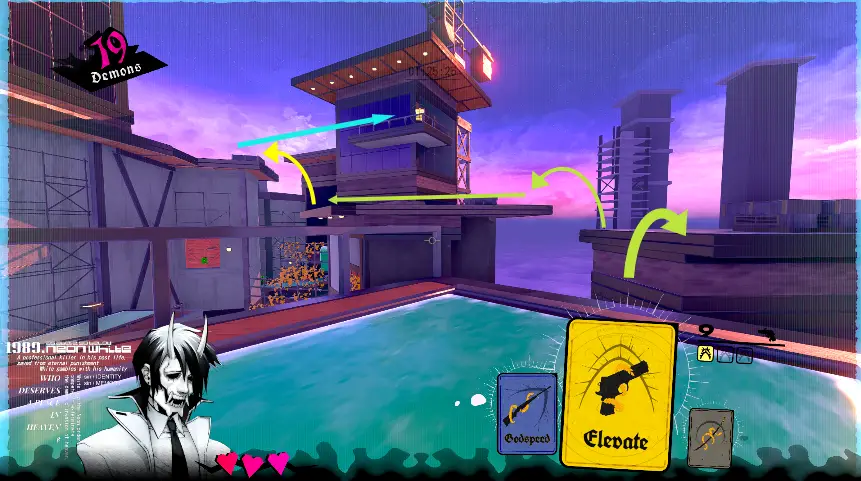
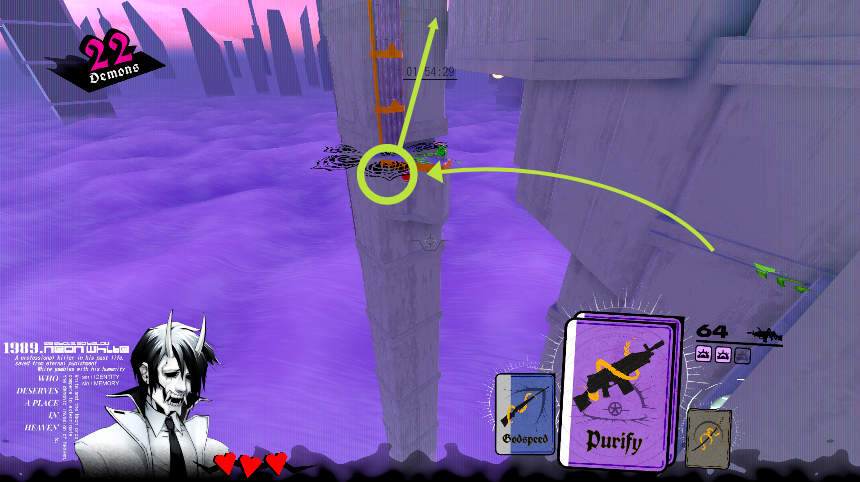
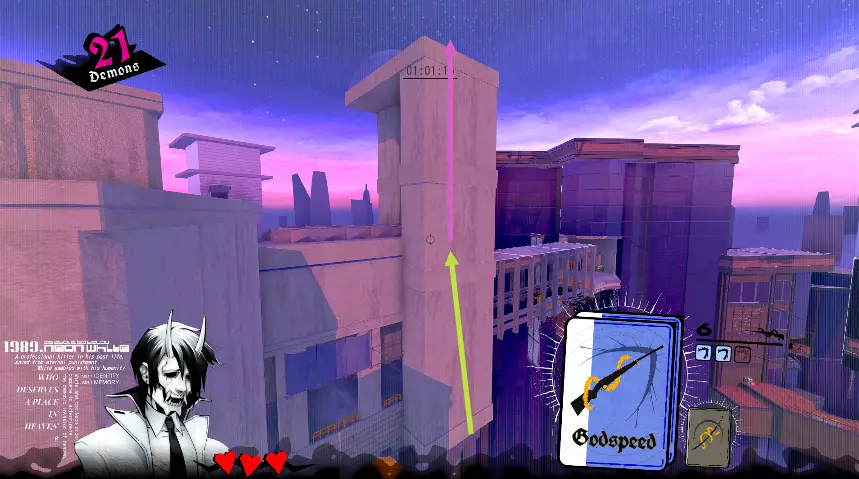
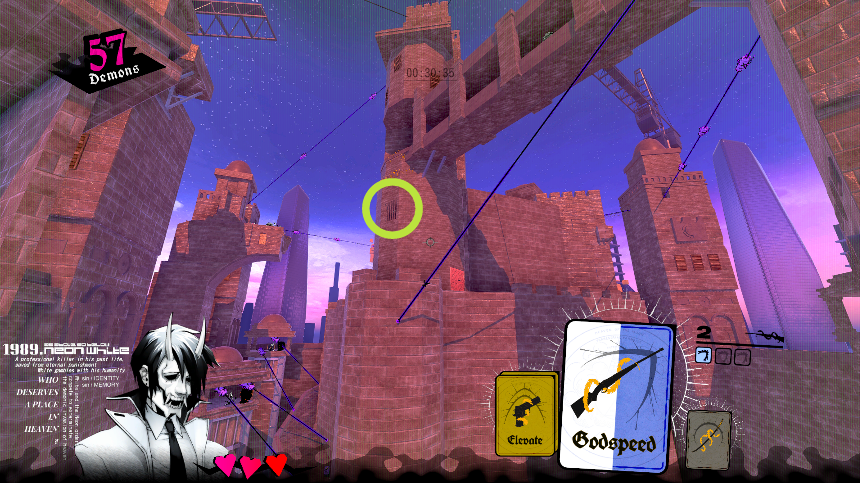
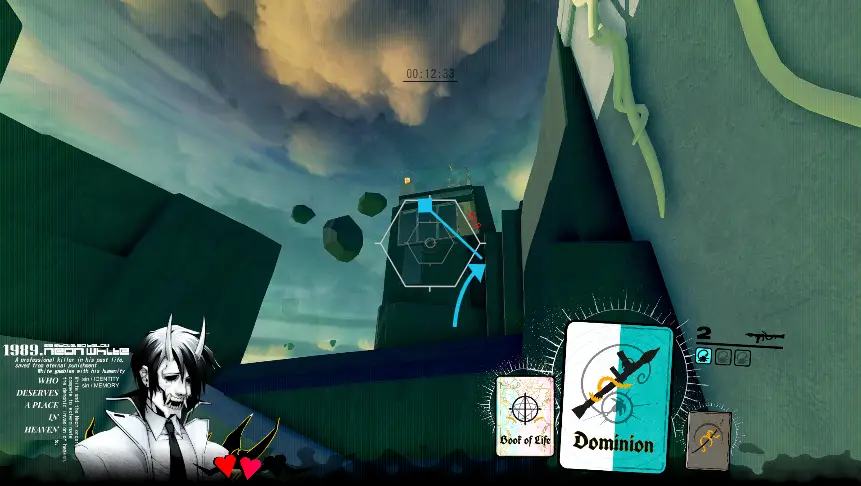
2-2 GodspeedNow we’re talking! Godspeed is great for hitting targets at long range and getting through levels fast. Start off with a running jump before using the airdash to gain a bit of extra height and distance.
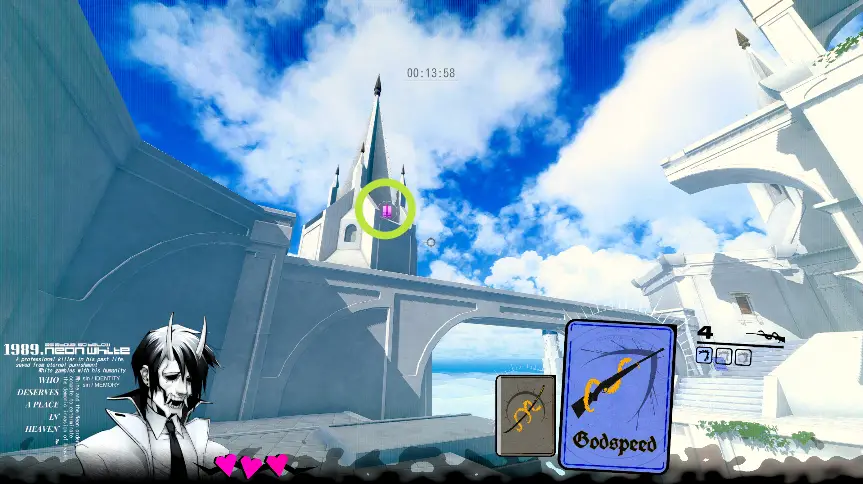
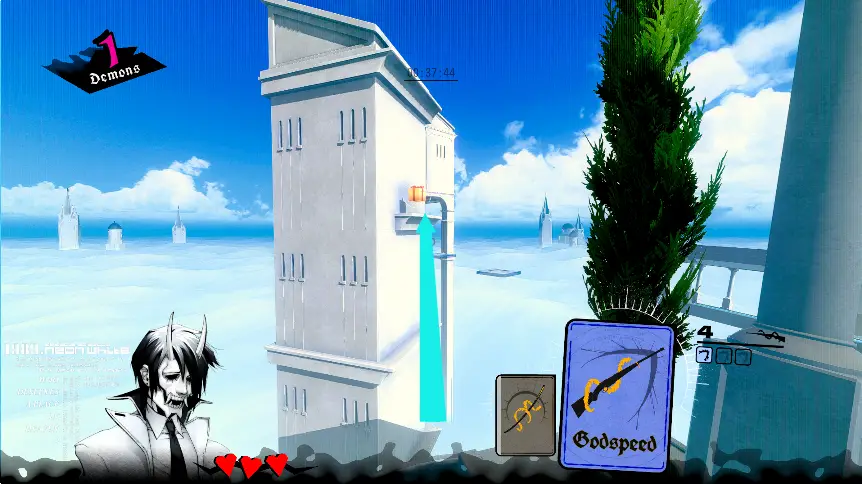
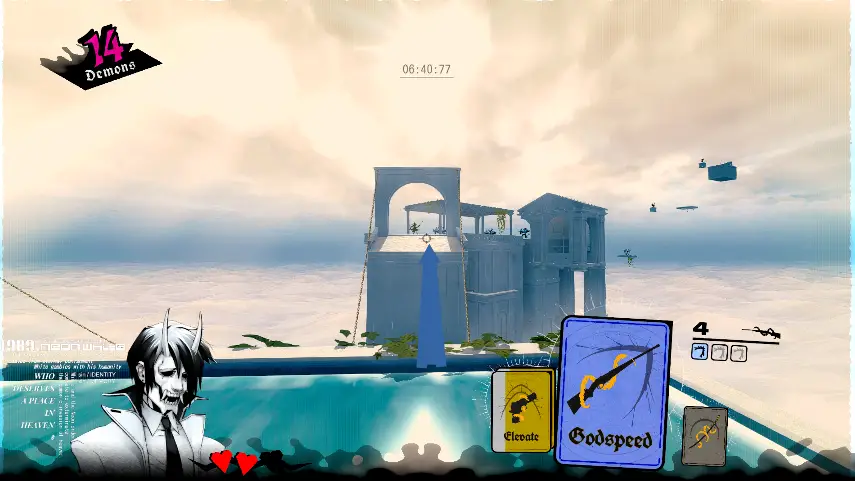
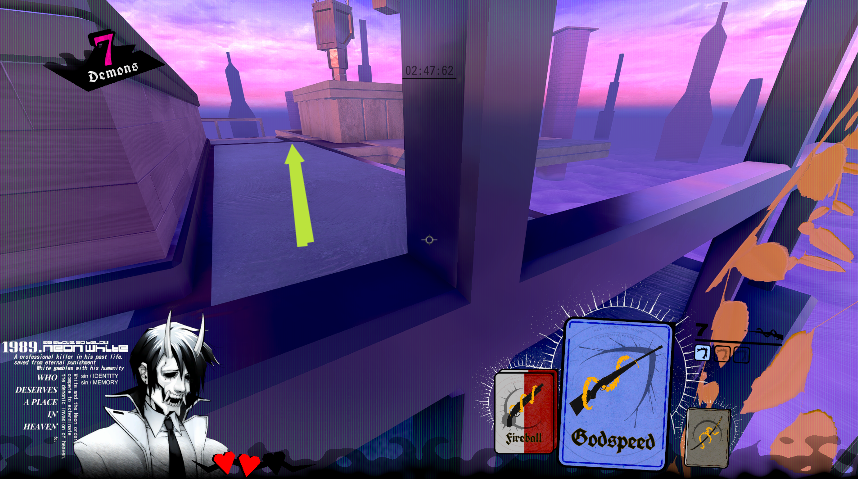
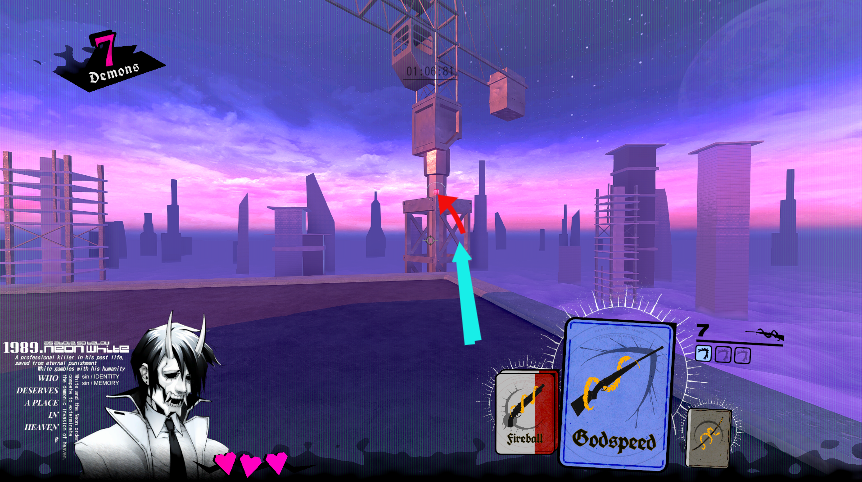
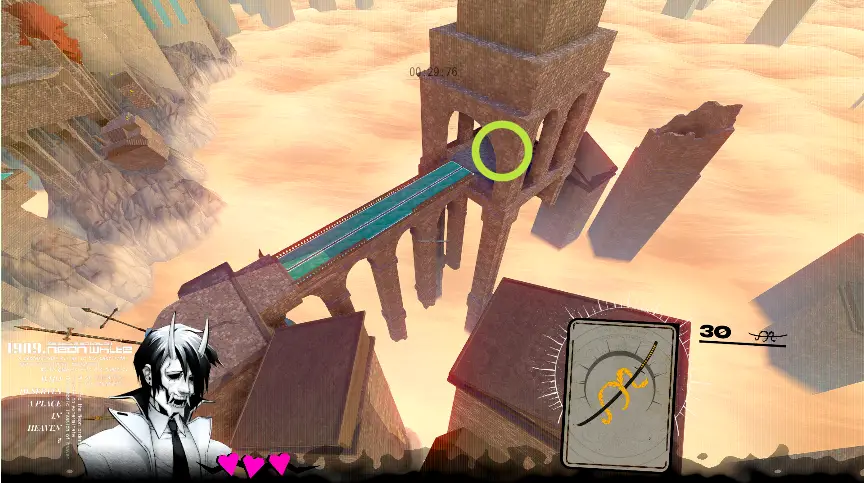
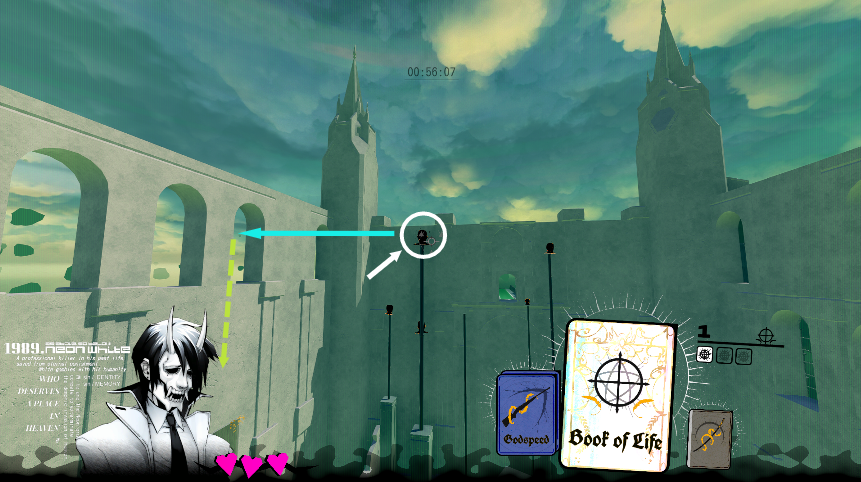
This present is located in a tower apart from the main level.
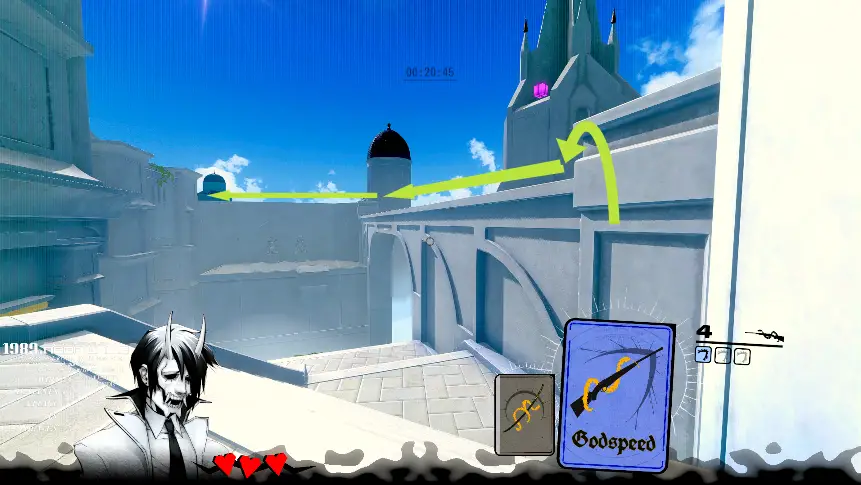
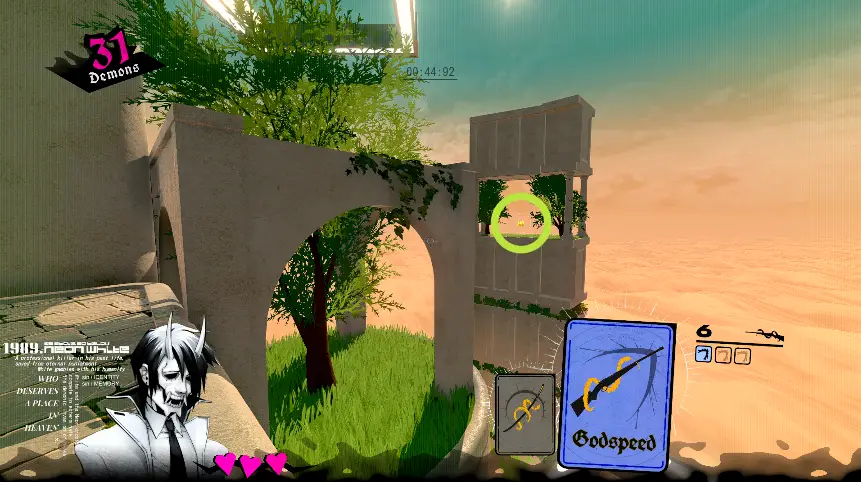
From the fourth Godspeed, turn back and jump onto the low wall in front of the present. Circle back around to the roof of the building you came from.
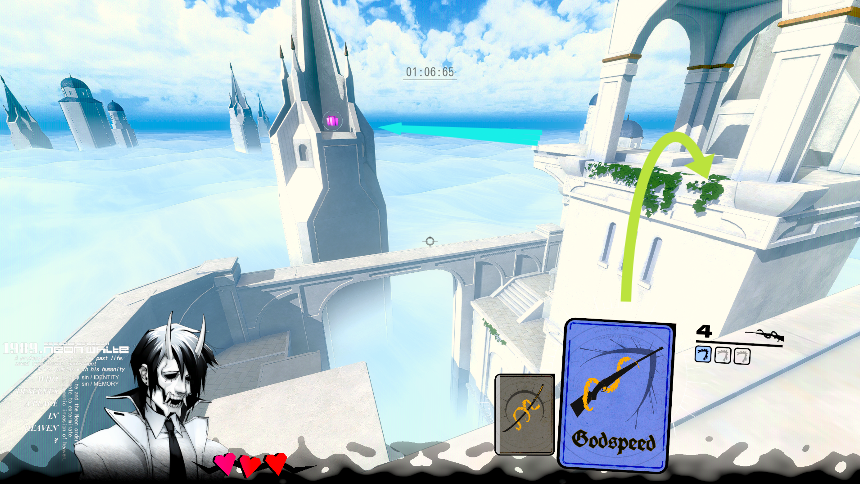
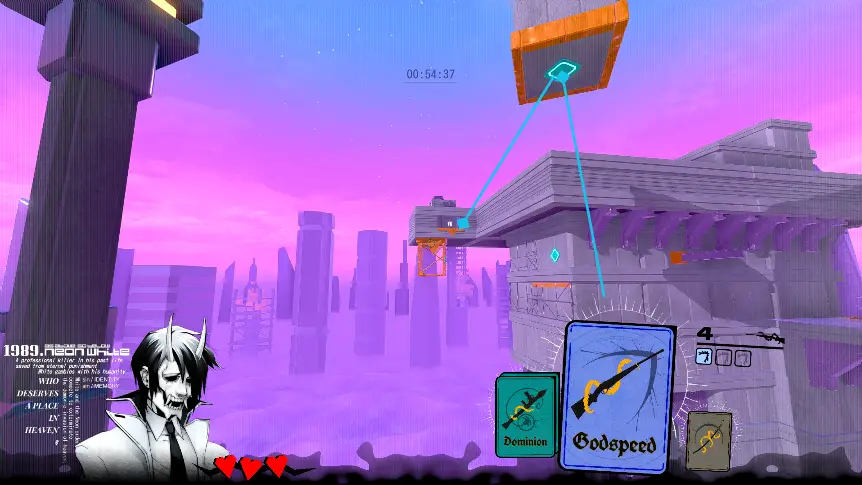
From the roof, jump over to the platform facing the tower. That will put you in range to airdash to the present. See how the proper route is highlighted with foliage on the ledges? This kind of signposting is used often throughout Neon White.
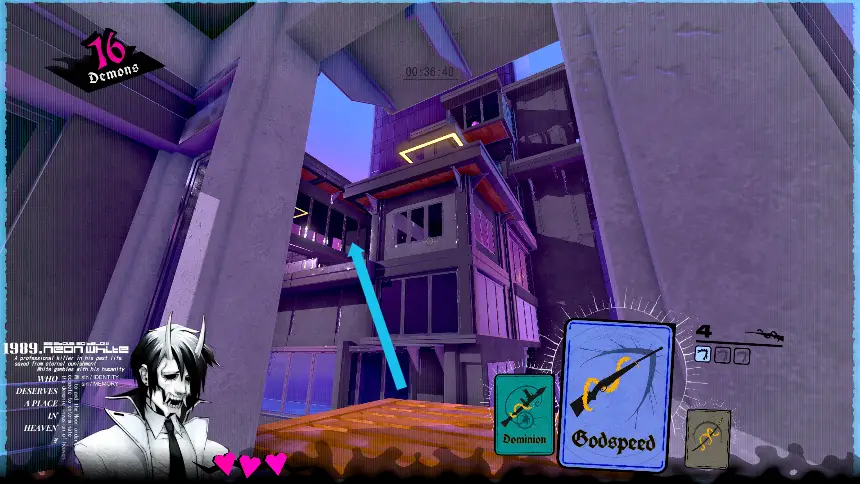
2-3 Dasher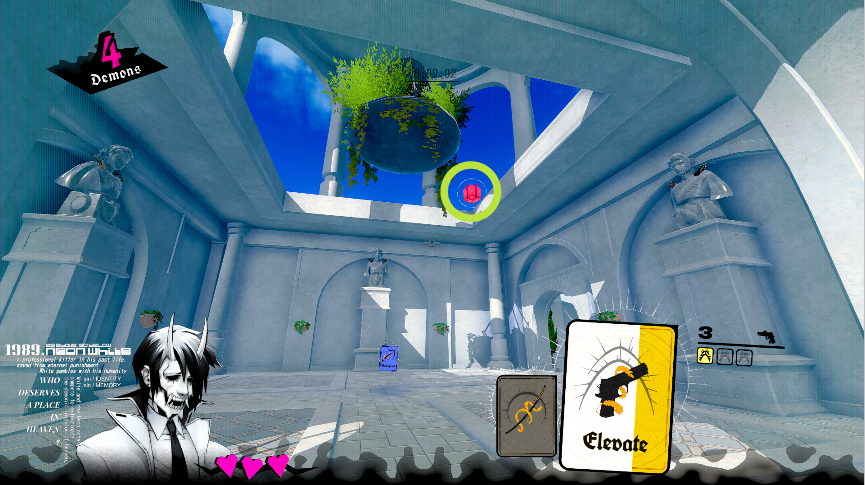
Right above the first blue demon.
Save the Elevate and Godspeed. You’ll need to shoot with some accuracy so as to not use up your cards early. From the second blue demon, double jump on to the nearby wall and airdash twice to reach the present.
2-4 Thrasher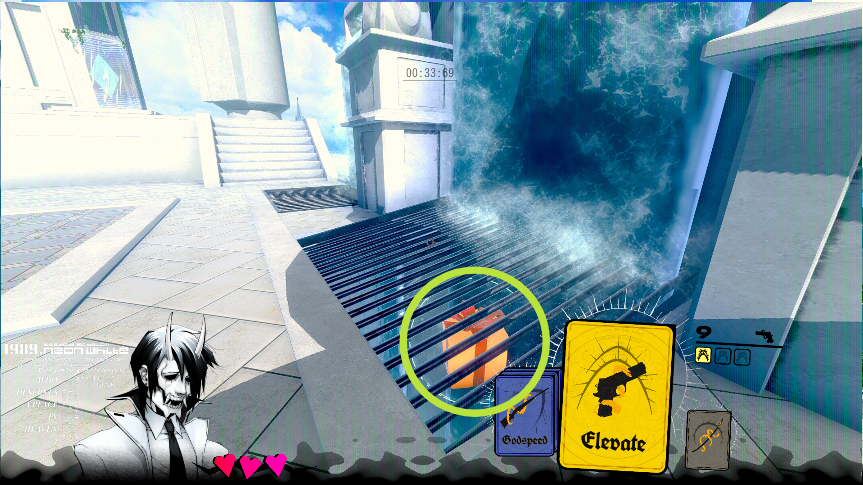
Check the grates to the right side of the exit, the present is under the damaged one. Presents emit a slight ringing sound, so keep an ear out if you’re trying to find one.
One Godspeed and one Elevate will be sufficient. Drop off the left side of the ledge, double jump towards the present, then airdash over once your height is matched.
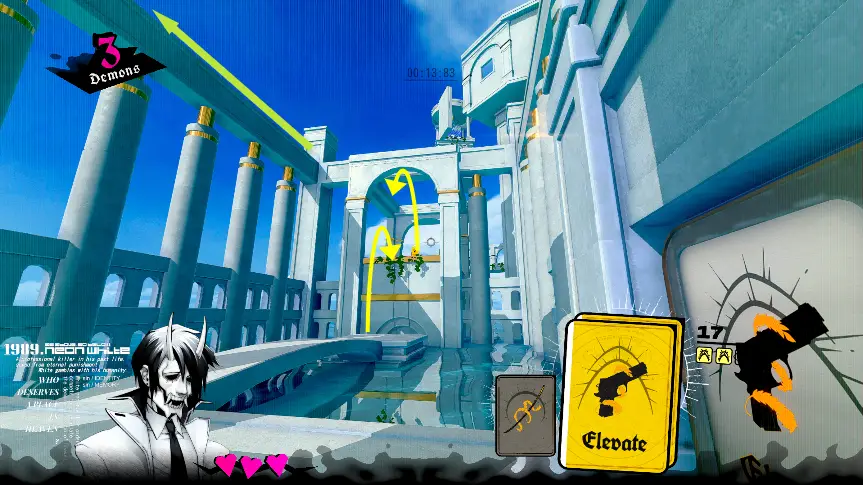
2-5 Outstretched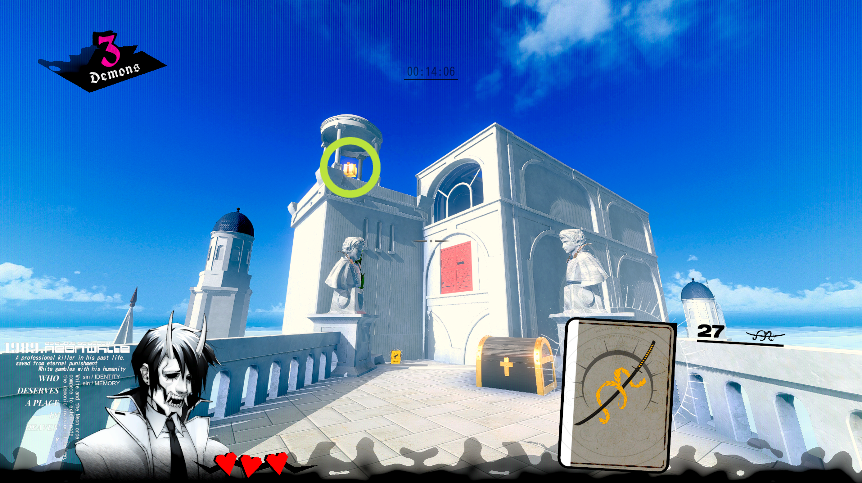
Visible from the start, under a gazebo on the roof.
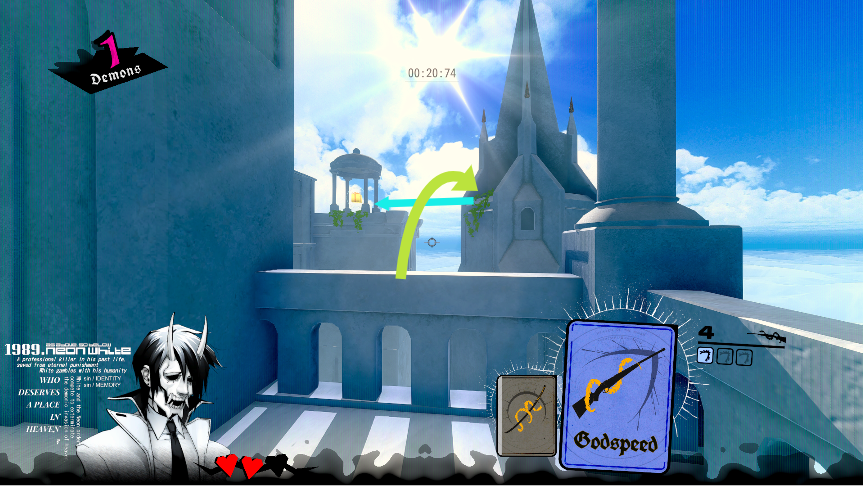
After the indoors section, pause on the balcony and turn left. Jump from the railing to the steeple, then airdash to the present.
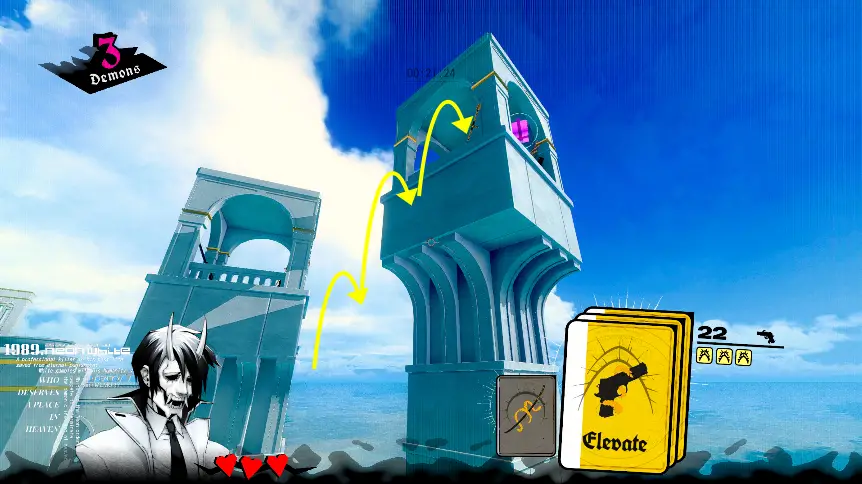
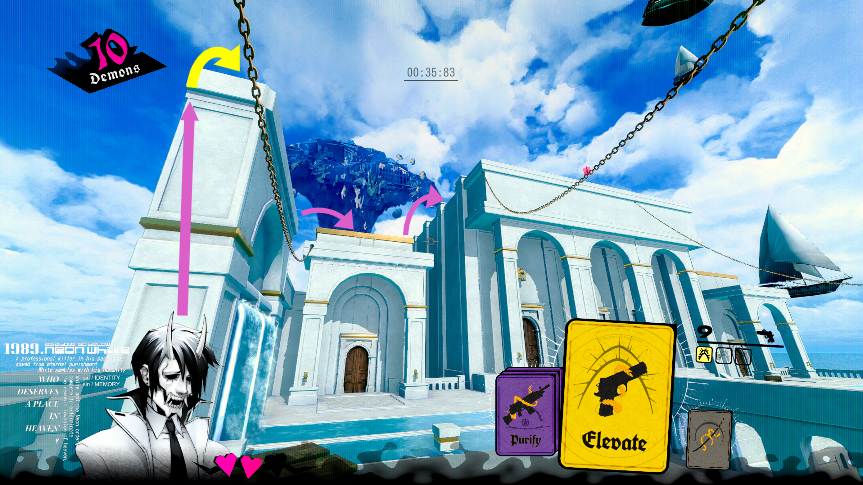
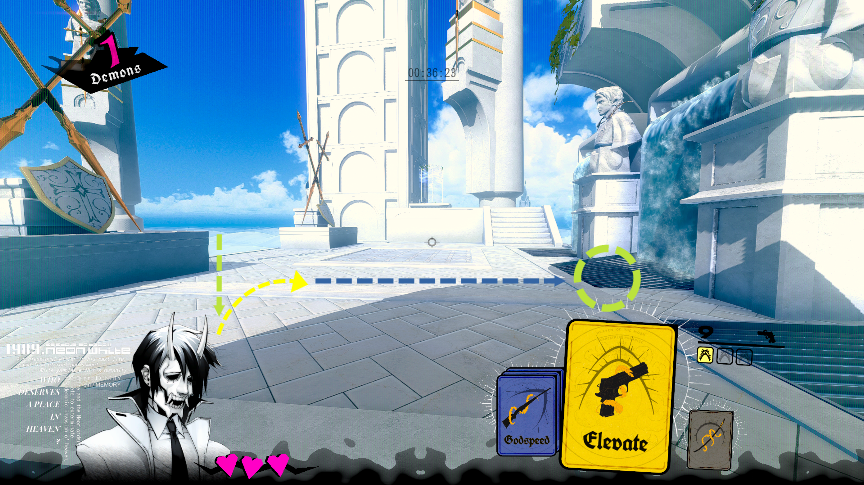
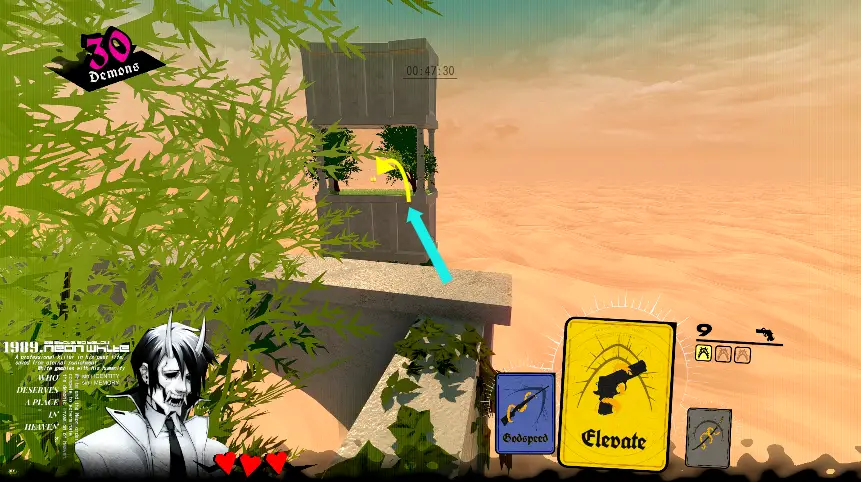
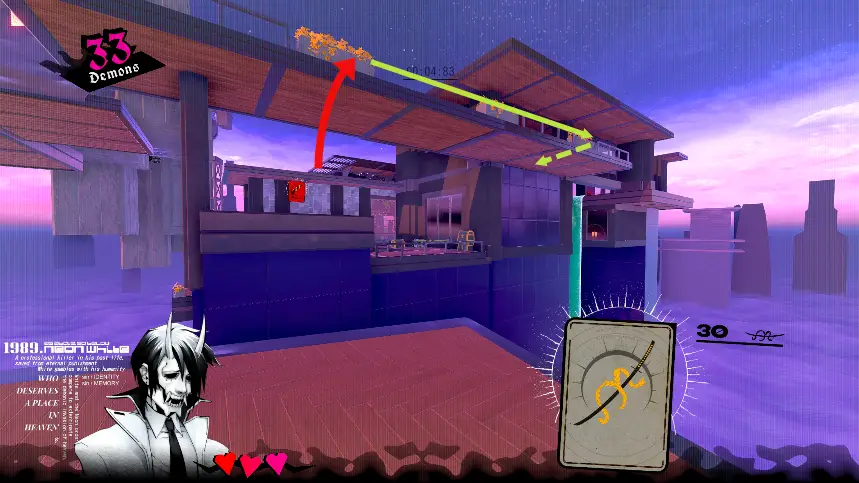
2-6 Smackdown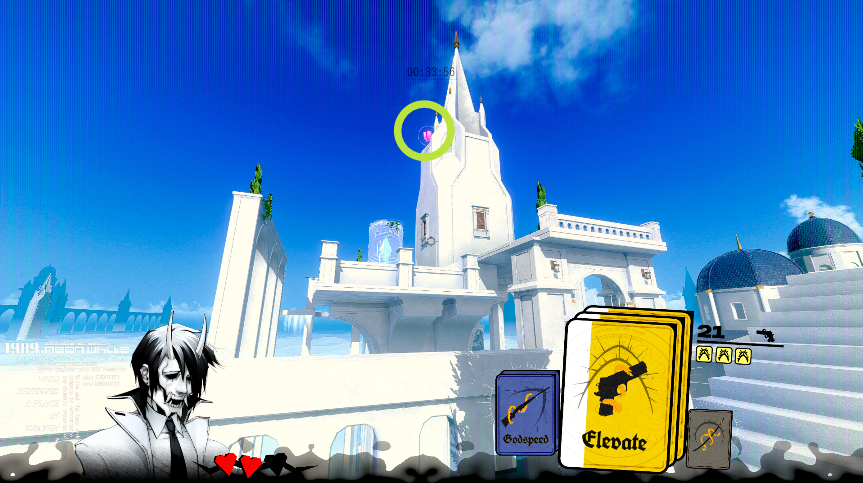
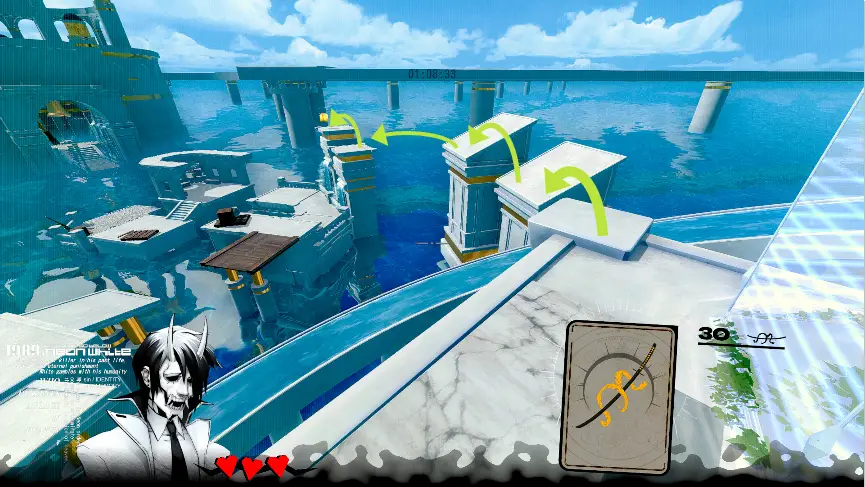
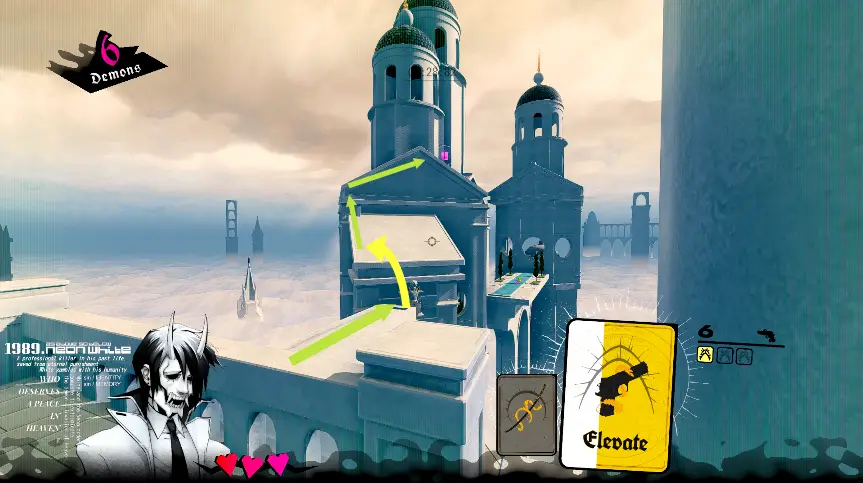
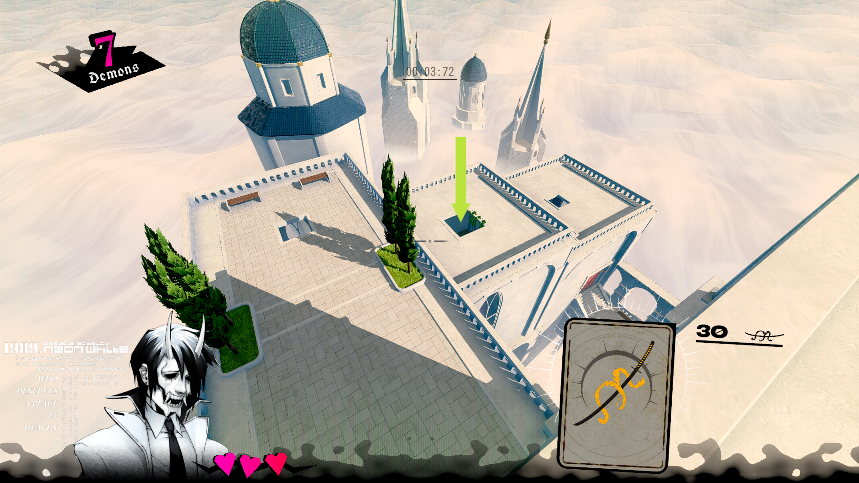
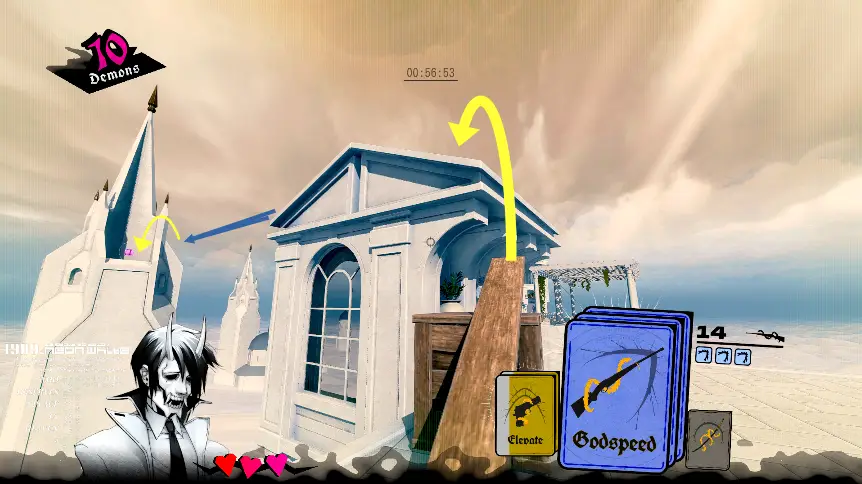
This present is atop the central steeple.
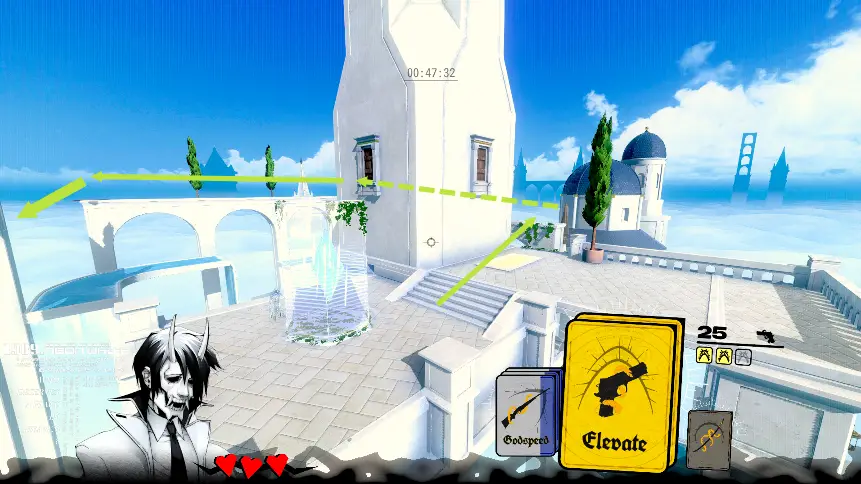
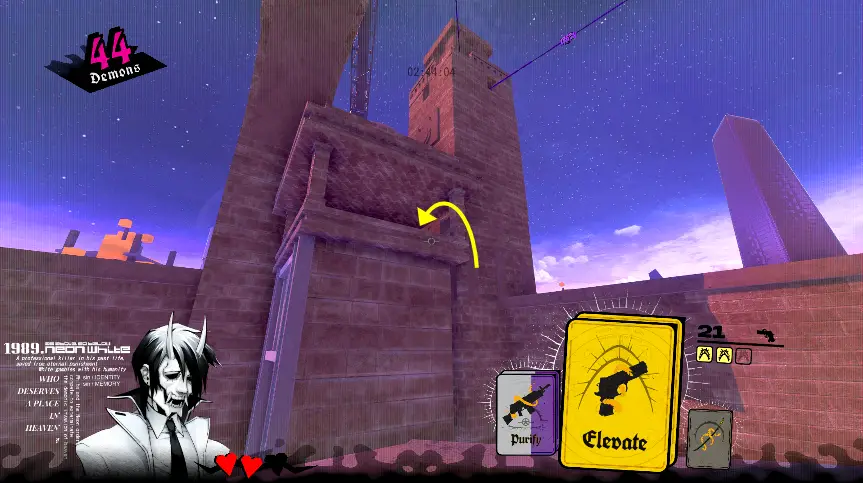
Prepare by getting three Elevates from the vending machine and the yellow demons. Get to the exit, go to the nearby yellow mat, then run a lap across the top of the arches. Similarly to 2-2, planks on the arches will signpost the intended route.
At the end of the path, use the remaining Elevates to double jump to the present.
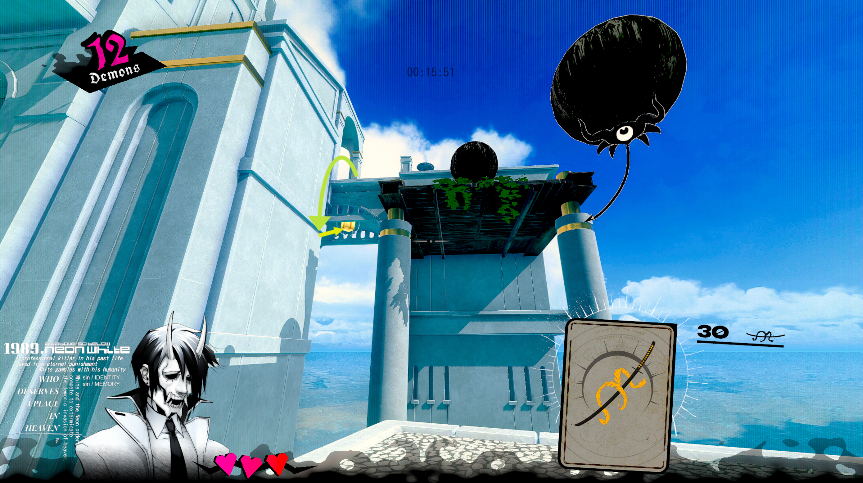
2-7 Catwalk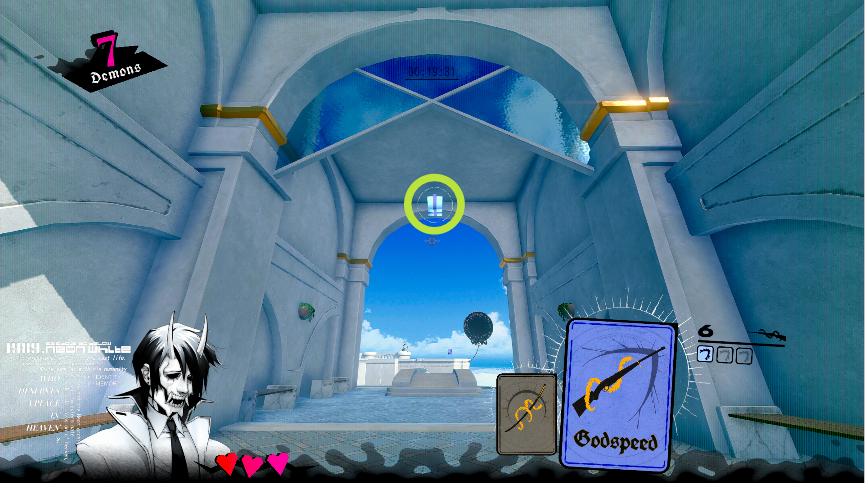
This present is floating up behind the breakable wall. The glass on the arch will block you from a straightforward approach.
Approach from the rear. Jump on to the balloon demon. That will give you enough height to airdash to the present.
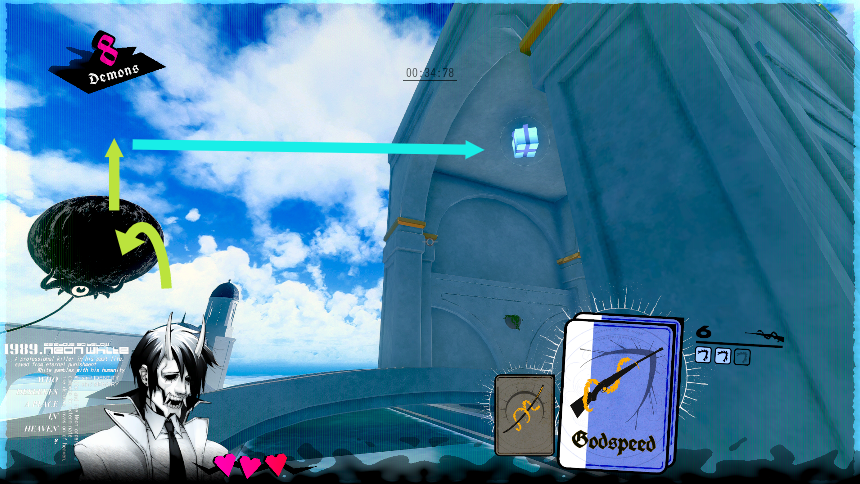
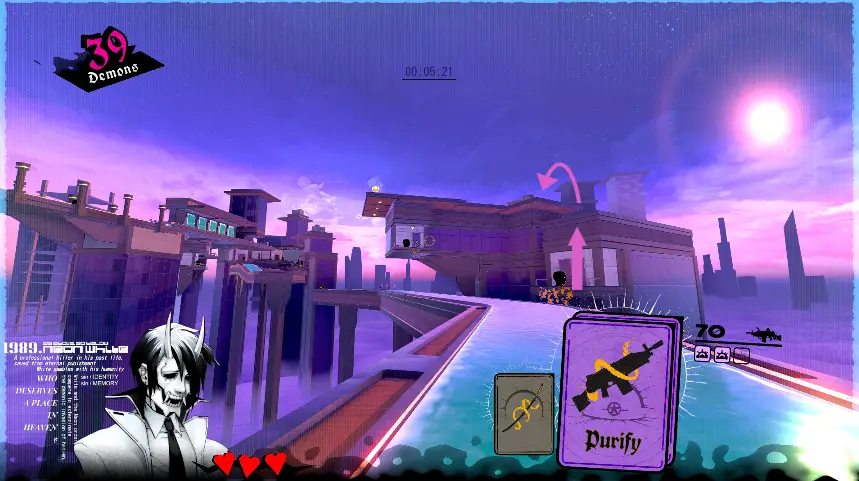
2-8 Fastlane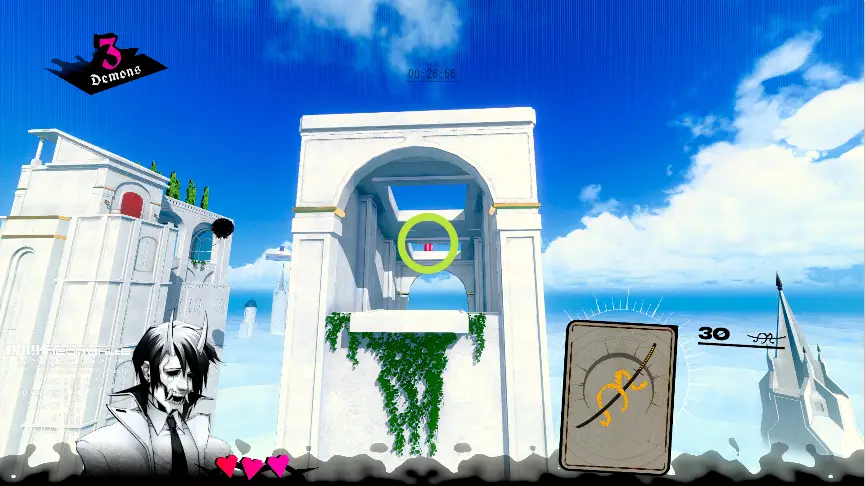
Up above the water track.
Get the Godspeed, turn around, airdash over.
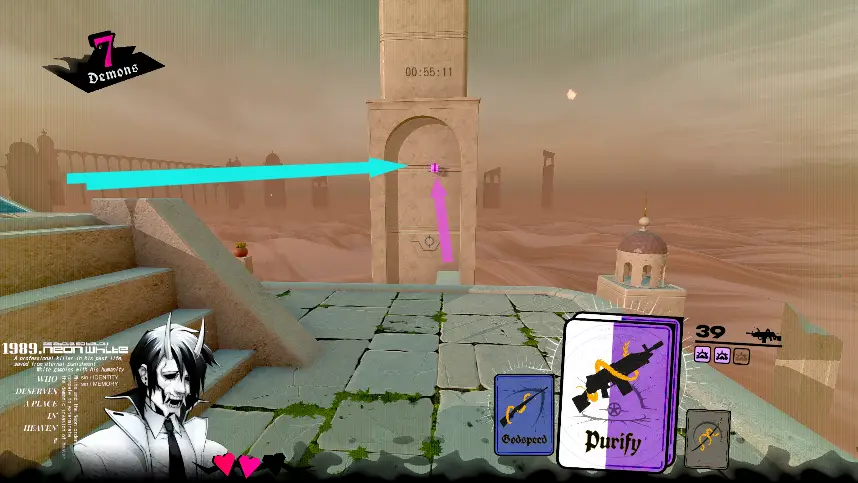
2-9 Distinguish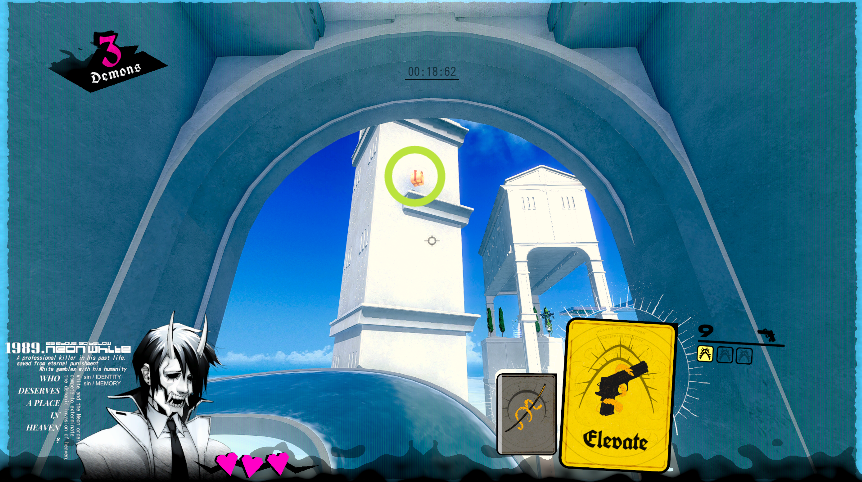
Look up from the tunnel after the starting glass section.
Get the Godspeed after the balloon demons, backtrack to the highest point of the platform, then airdash over.
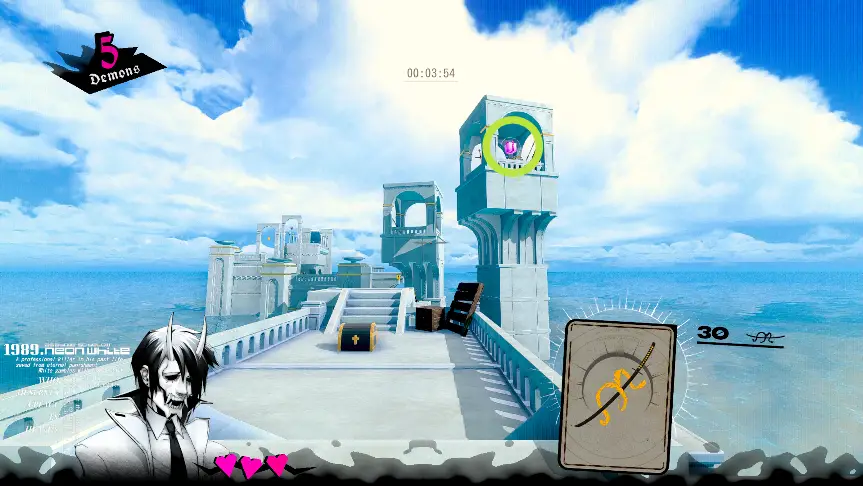
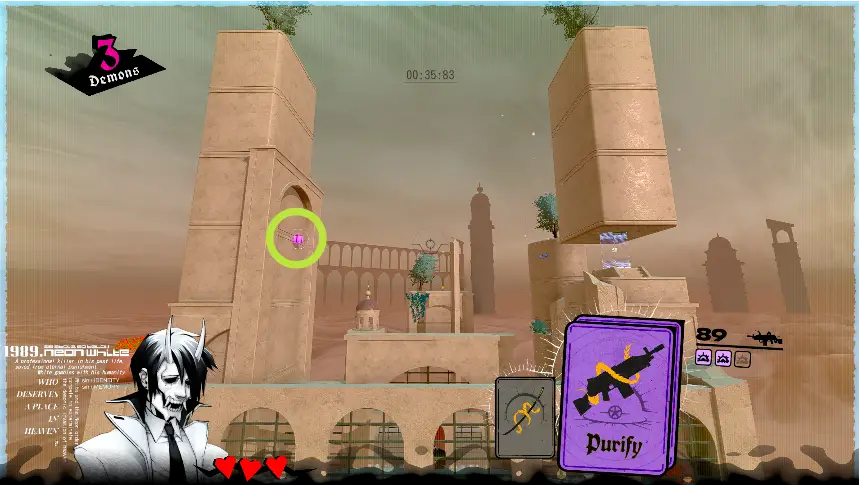
2-10 Dancer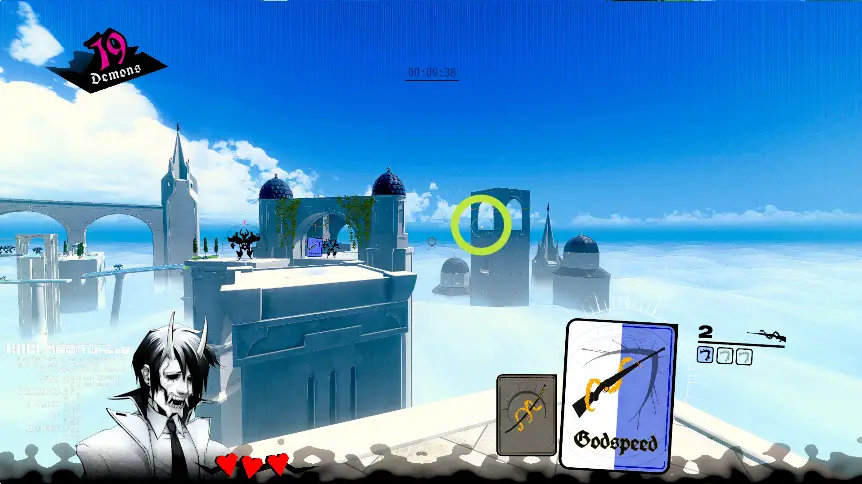
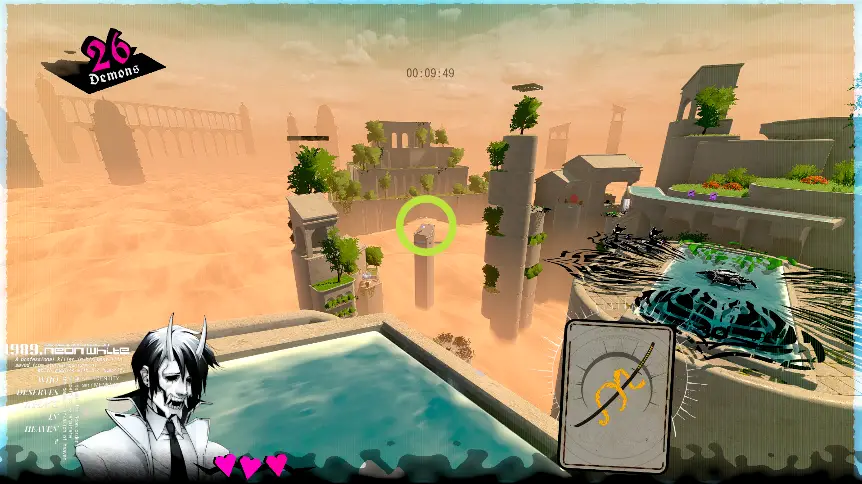
The present is on the belltower to the right. This is a good level to observe another quirk of the presents: at long distances, the thin glowing ring around the present is easier to see than the present itself.
Hoard three Godspeeds and get the Elevate from the yellow demon. Backtrack to the drain almost across from the present and hop on top. From this position, triple air dash to the lower opening, then double jump up to the stairs leading to the present.
Chapter 3 – Only Shallow
3-1 Guardian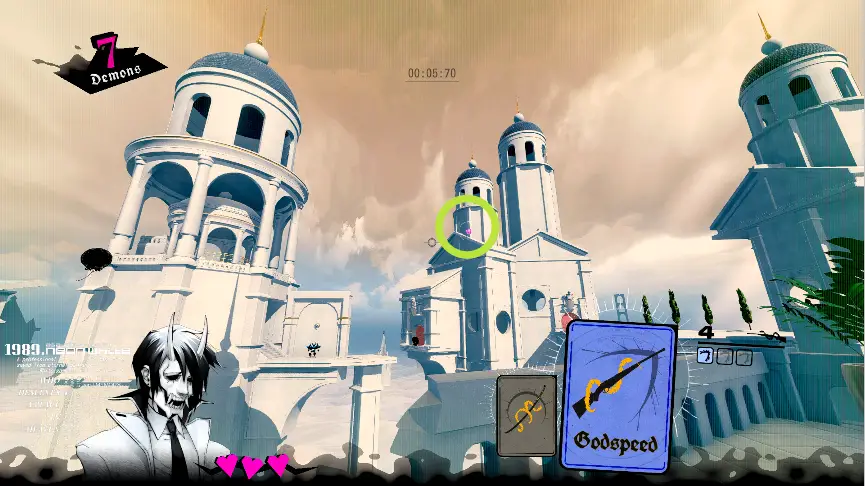
Like most other presents, this one is on top of a building.
At the first head, go right and hop the railing. Double jump to the roof across, then jump up the roof via the left corner.
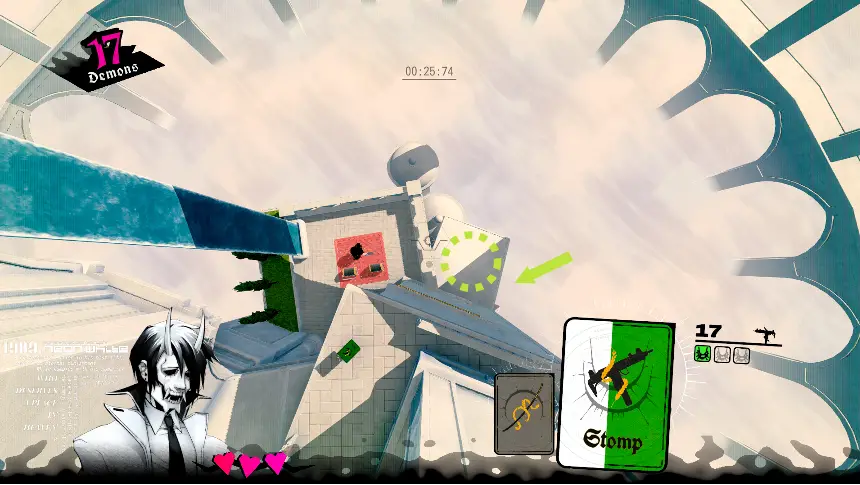
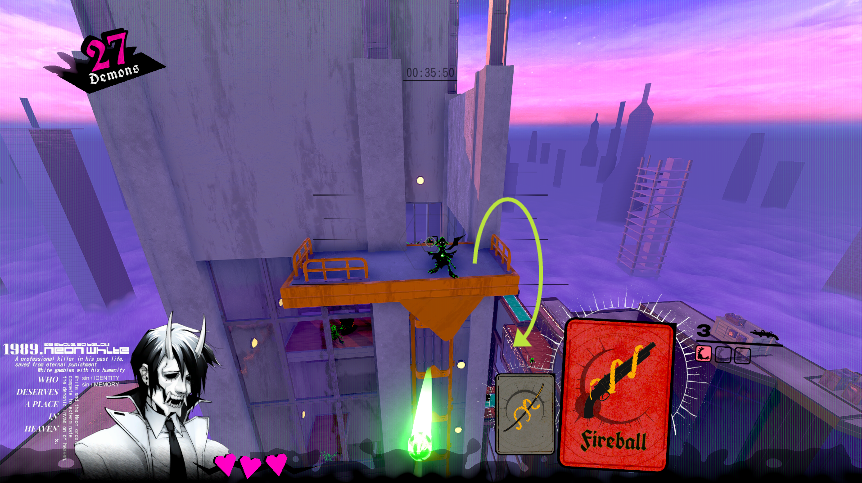
3-2 Stomp You can activate the traversal ability without jumping, as a strong close-range attack. Otherwise, Stomp sux unless you need to hit the ground fast.
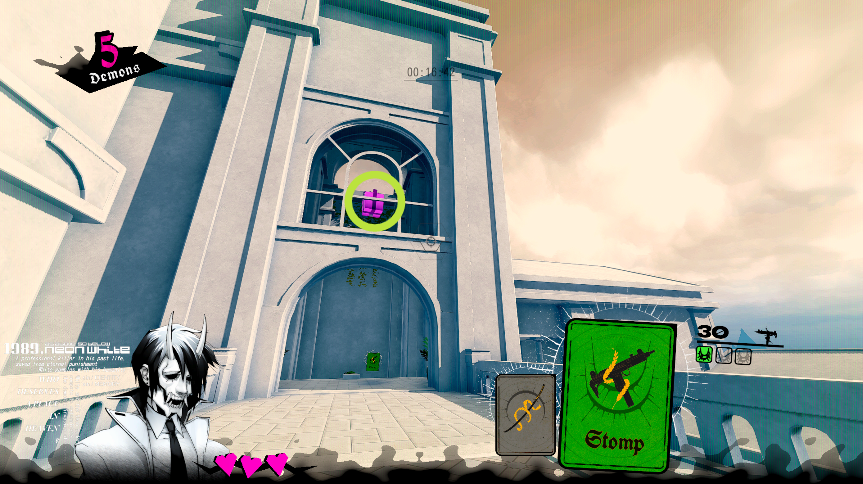
This present can be seen after the first head.
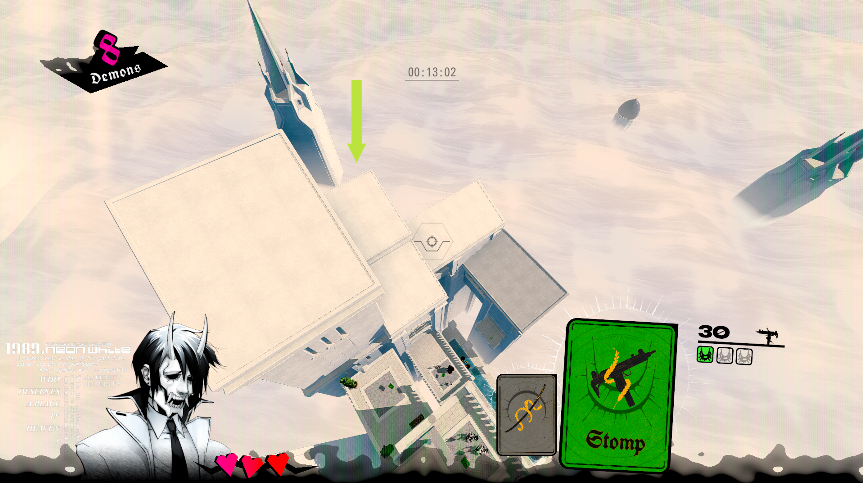
Rewind back to the start. Fall around to the far side of the building, there’s an opening that will let you jump to the present.
3-3 Jumper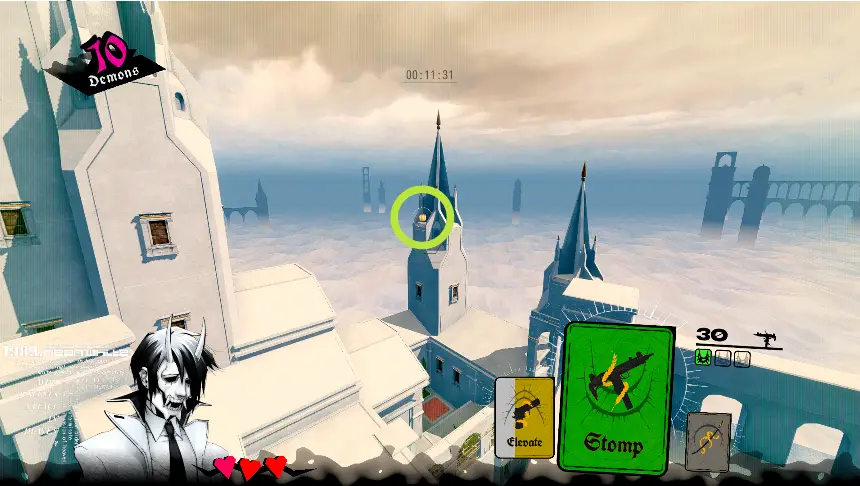
Visible from the first breakable floor.
Jump to the roof on the left, then double jump to the present.
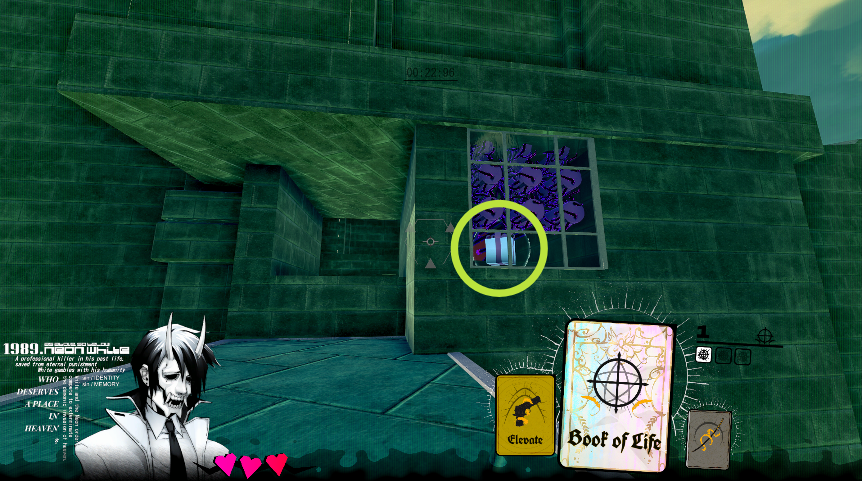
3-4 Dash Tower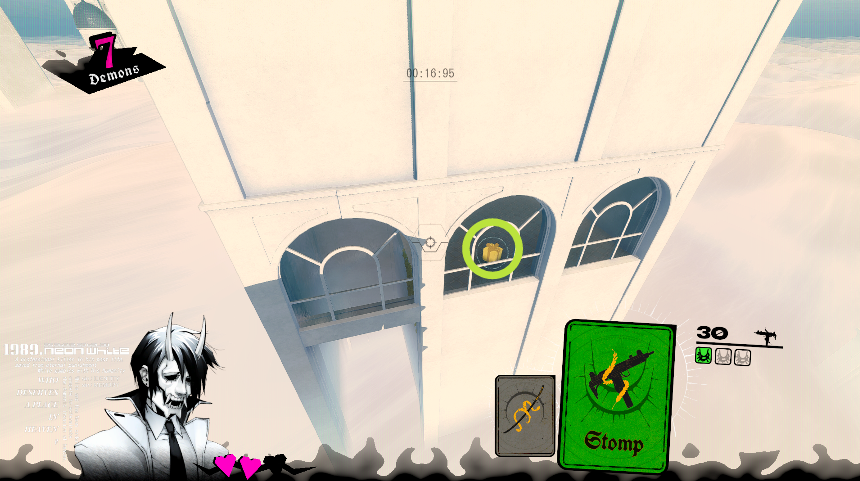
The present is in a hidden basement under the first building.
You just need one Godspeed and one Elevate. Proceed down to the lower platform and turn around. Airdash under the window and double jump up.
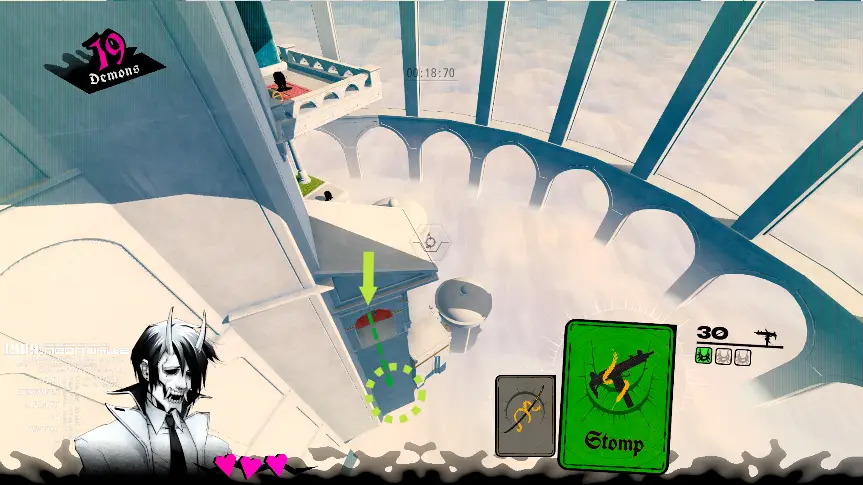
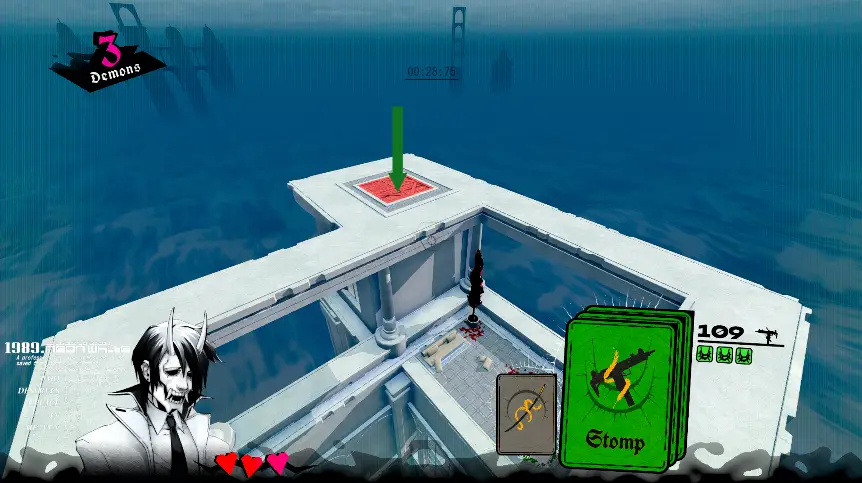
3-5 Descent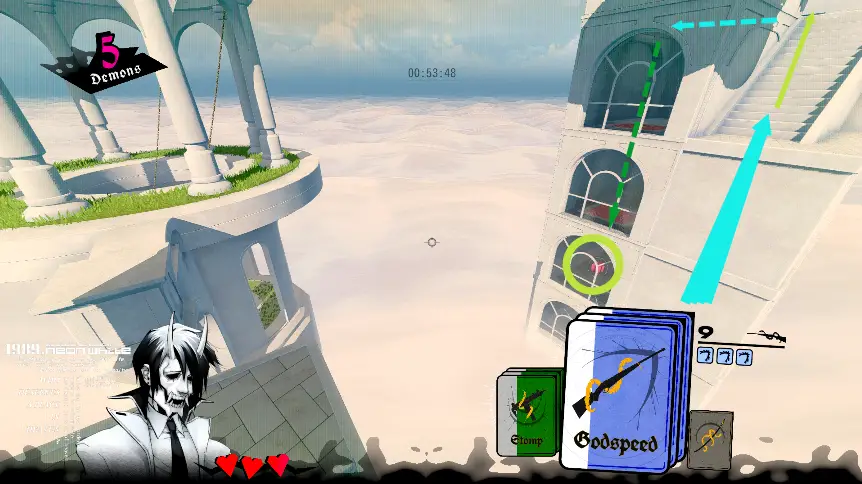
Located at the bottom of the starting building. Save up 3 Stomps and 2 Godspeeds. From the bench beside the blue demons, you can airdash to the stairs. You’ll need one more airdash to break through a door behind the building, then 3 stomps to get through the floors.
3-6 Driller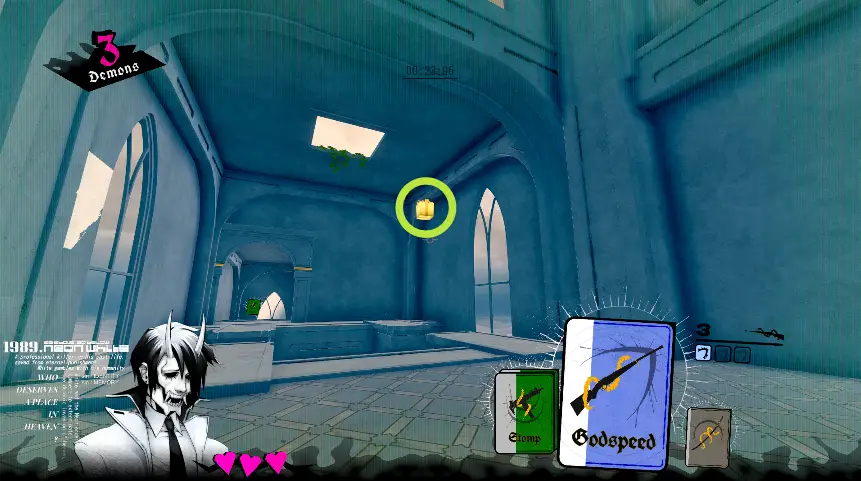
Like 3-2, you want to drop in from above.
From the start, turn around and drop through the middle skylight.
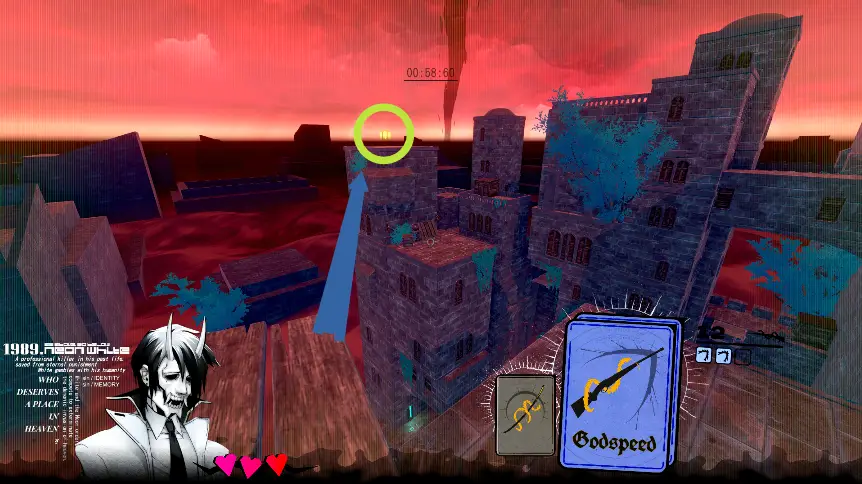
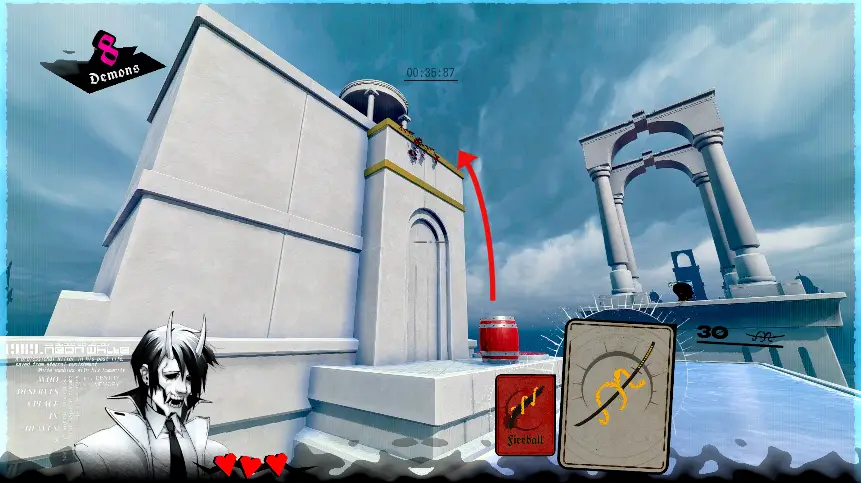
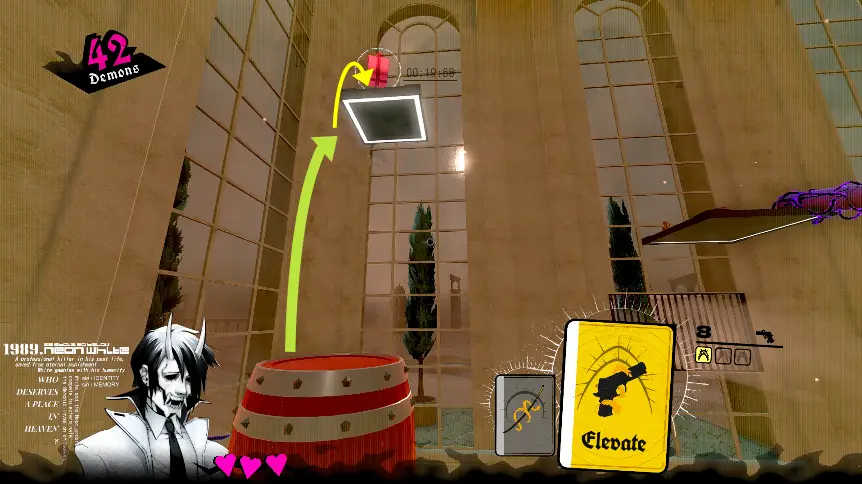
3-7 CanalsI feel like sniping everything from a distance is the wrong way to “properly” ace this level…but it worked so it’s OK.
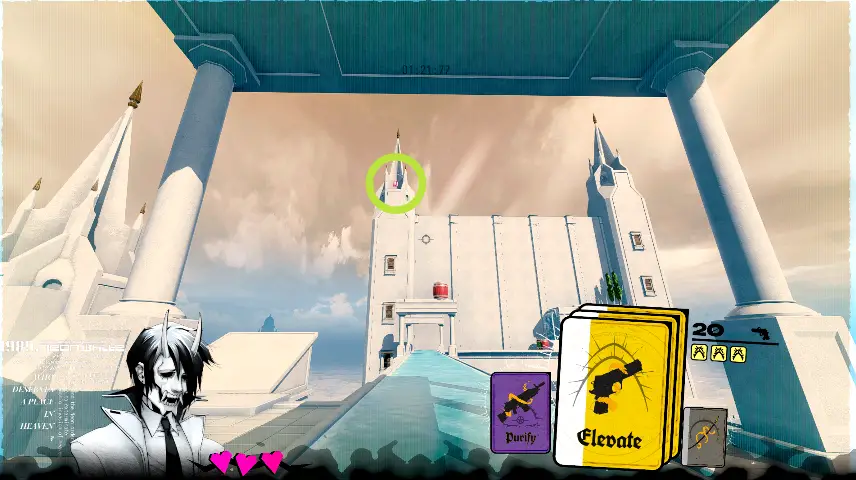
Up on the steeple across form the Purify.
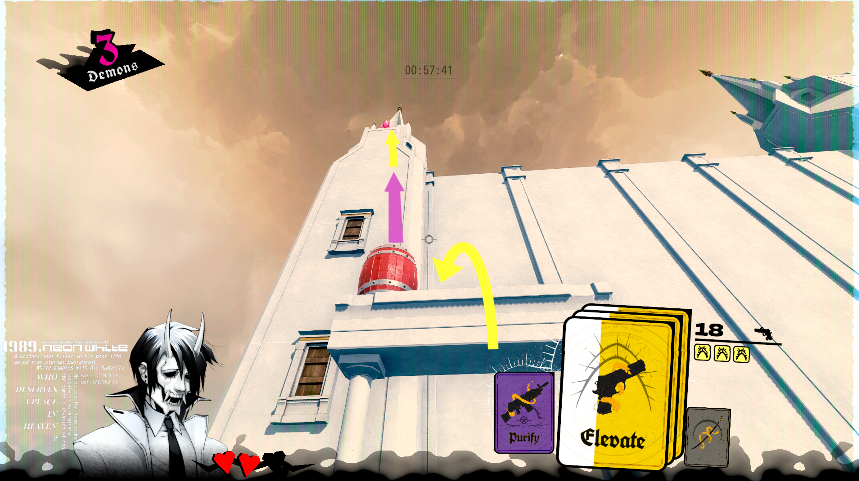
You’ll need 3 Elevates, the Purify, and the barrel below the present. There’s an Elevate vending machine at each platform on the way to the Purify. Double jump onto the beam below the present. Jump onto the barrel. Grenade jump off of the barrel, then use your remaining double jumps to reach the present.
3-8 Sprint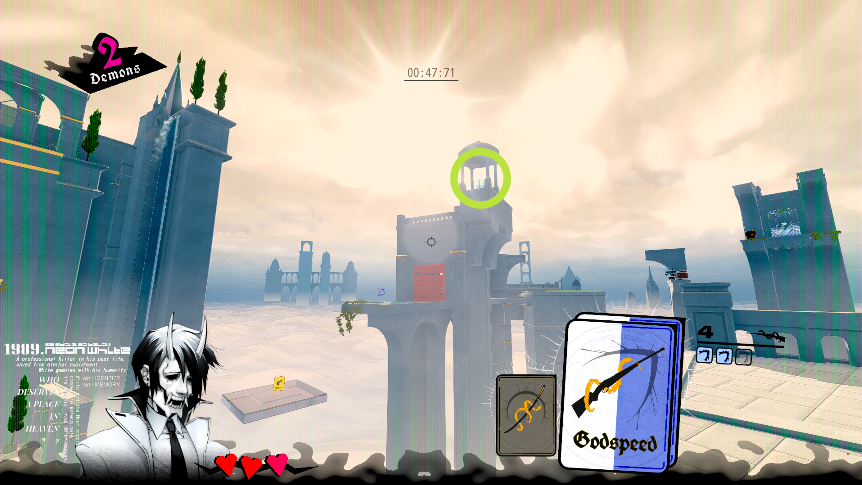
Located on the gazebo just after the glass platform.
Two Godspeeds will do it, and one of those can be collected from the last blue demon. Get to the exit, and kill the last blue demon and the head without damaging the barrel. Get on the barrel, barrel jump, then airdash to the right roof with the two pillars. Then, airdash to the left roof containing the present.
(Alternatively, with three Godspeeds you can simply barrel jump and airdash directly to the present.)
3-9 Mountain
Visible just before the last small breakable floor. You want to approach this present from higher up, though.
Three Stomps needed, or a mix of Stomp and Purify to break through three floors. After the indoors section, there’s a building with a sloped roof to the right of the Purify chests. Drift to the right side of that building, enter the opening, and break through the floors.
i died to get you this screenshot
3-10 SuperkineticThis present is torturous…unless you know the trick.
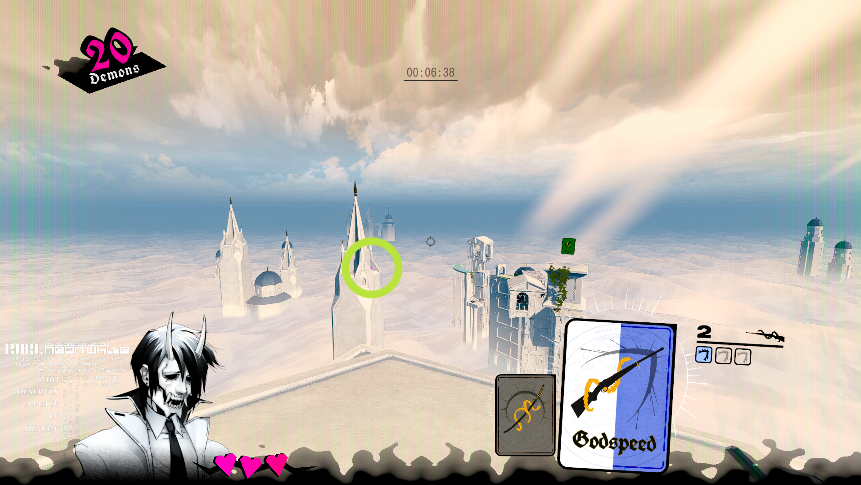
Visible on the distant steeple right from the start. Ultimately, you’ll need 3 Godspeeds and an Elevate to comfortably cross the distance to the present.
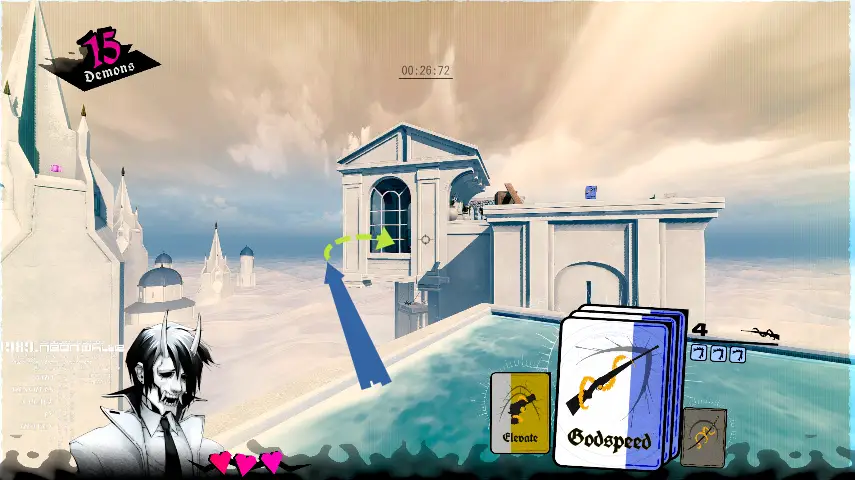
Yes, you can BARELY jump the gap without using an Elevate. Here’s a much easier way, though: The windowed room beside the gap is easily accessible if you go around the side. So, stock 3 Godspeeds and the Elevate on the way to the gap, then airdash around the left into the room.
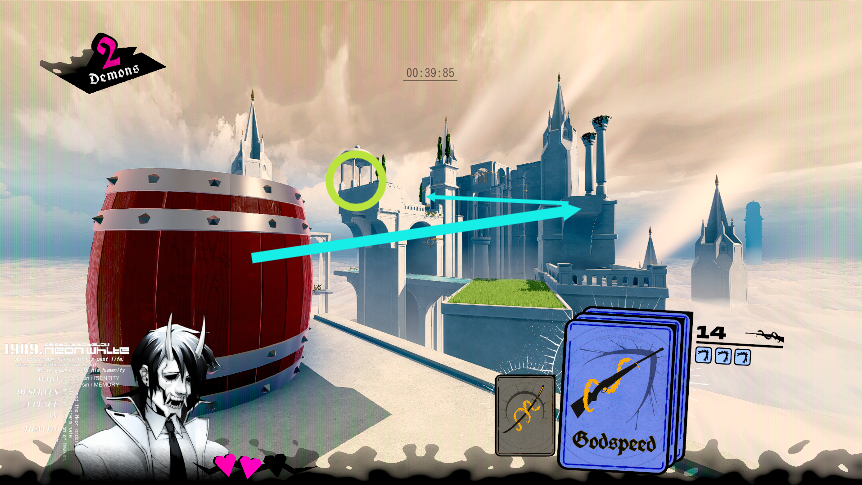
Now you can reach the second Elevate. Airdash over to the blue demon and barrels in the distance, barrel jump up, grab the Elevate.
Backtracking time. Turn around and airdash back using the Godspeed you got from the previous barrel jump. Kill the green demon and use the submachine gun to kill the blue demons. Restock your Godspeeds, but be VERY careful not to overwrite your Elevates. (New cards overwrite your offhand card, so either switch guns or deplete your Stomp.)
Now you’re set up with two Elevates and three Godspeeds. Go up the plank ramp, double jump on to the roof, then triple airdash + double jump to the present. Good riddance!
Chapter 4 – The Old City
4-1 Arrival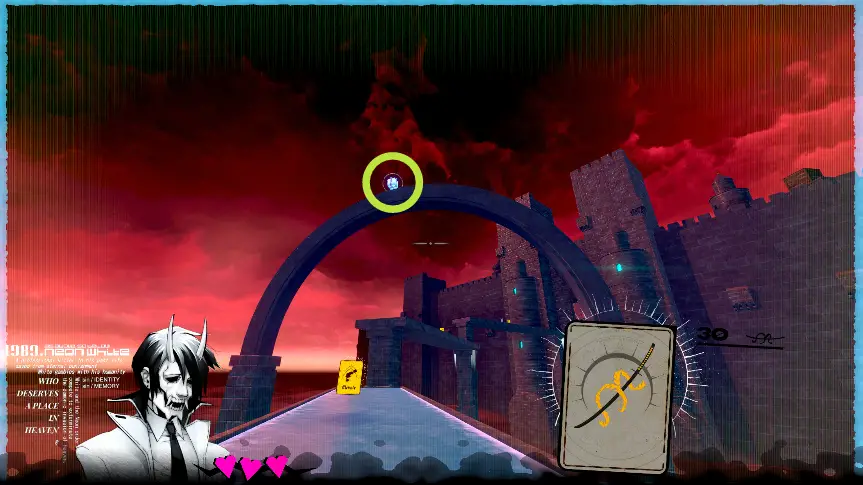
Located on top of the arch just before the exit.
Grab the Godspeed and Elevate at the very end, turn around, then airdash + double jump onto the arch.
4-2 Forgotten City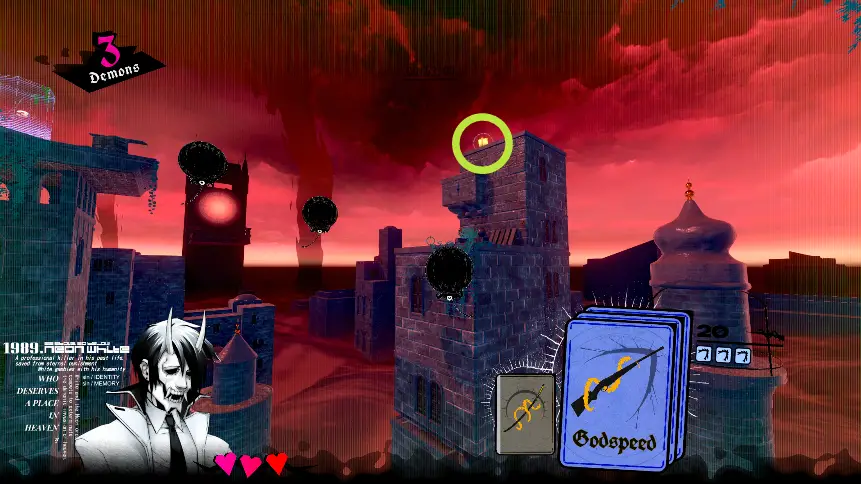
On the roof of the tower just before the exit.
Stock up two Godspeeds once you reach the exit, no special routing is needed. Get on top of the crates to the right of the exit, turn around, double air dash over.
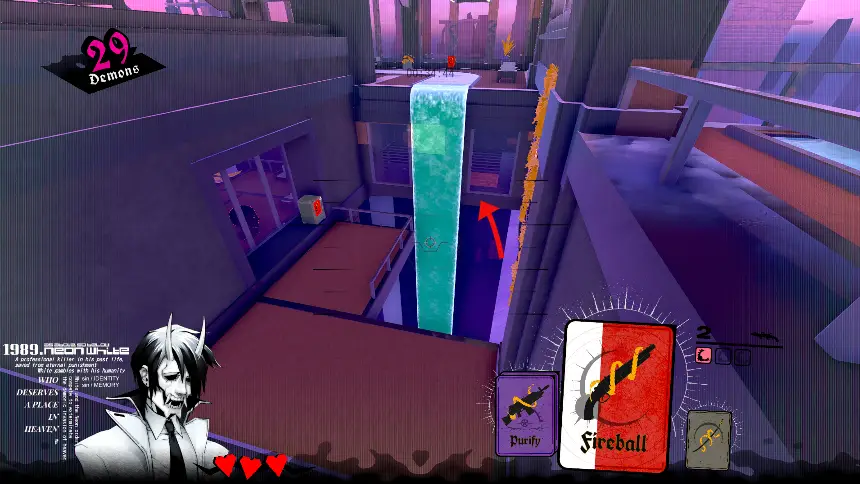
Chapter 5 – The Burn That Cures
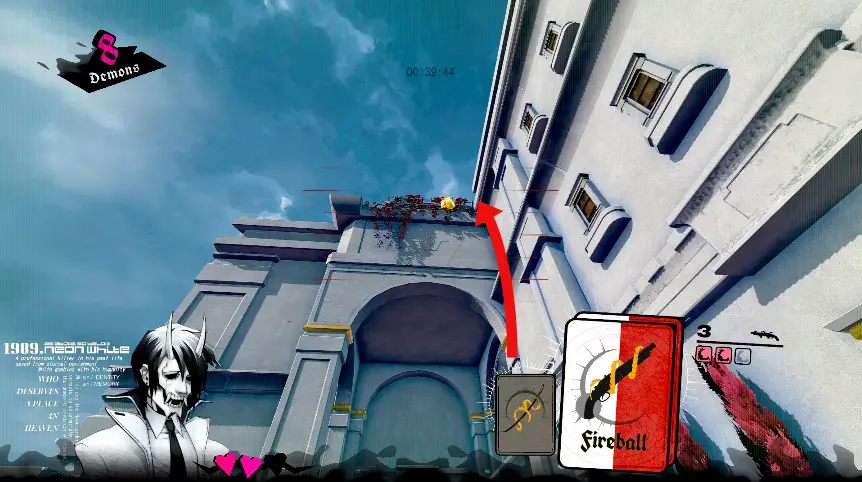
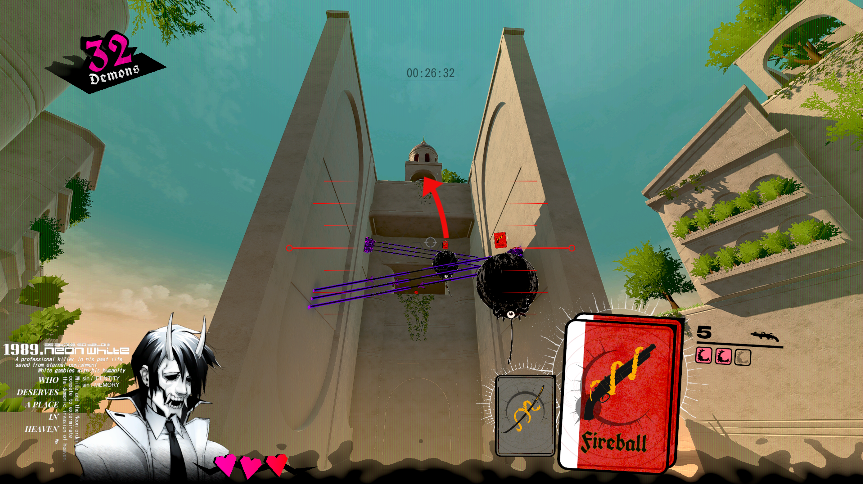
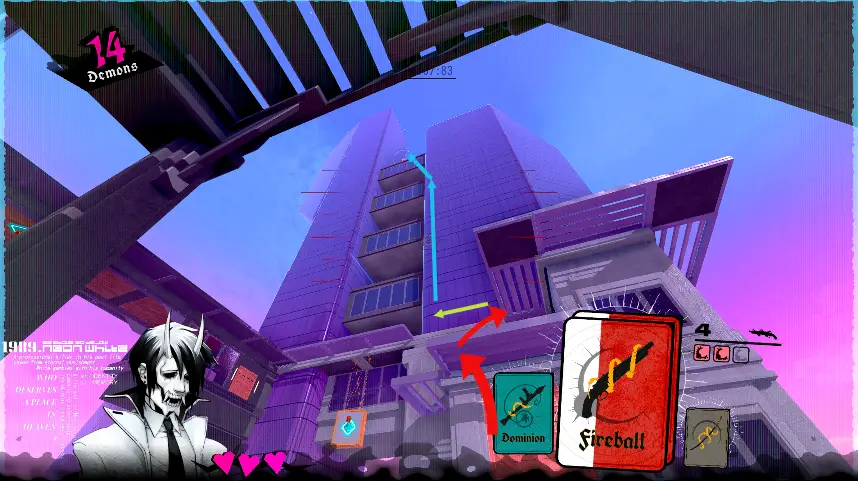
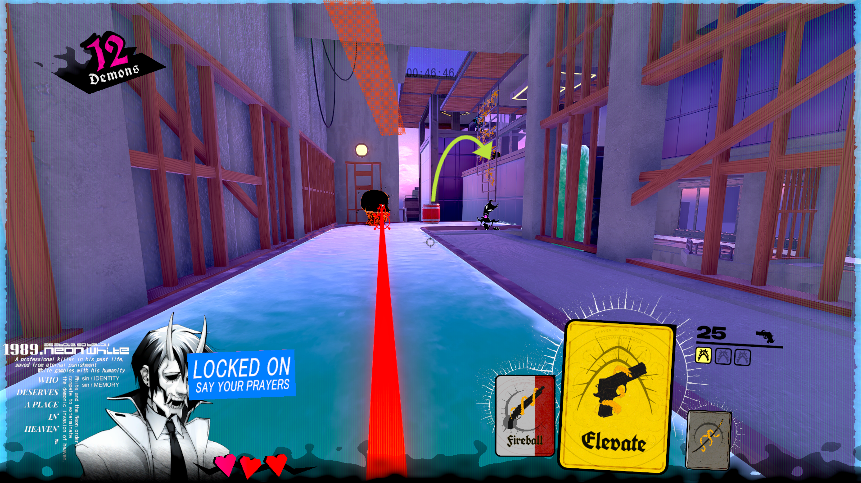
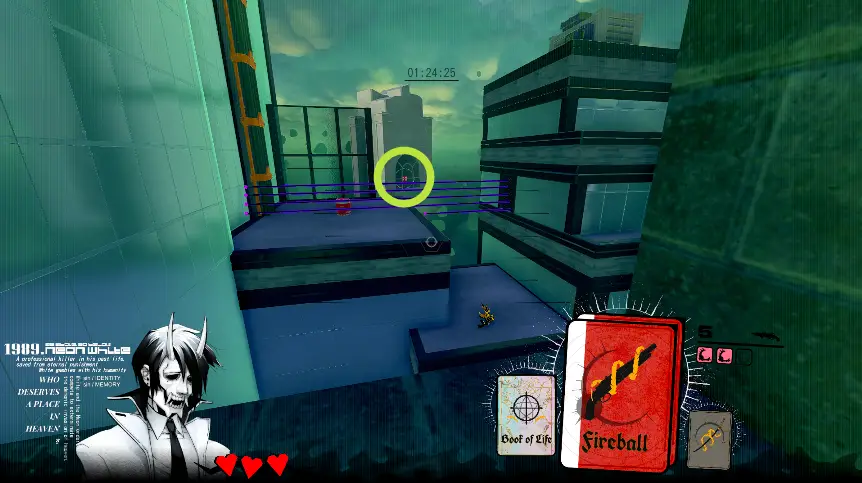
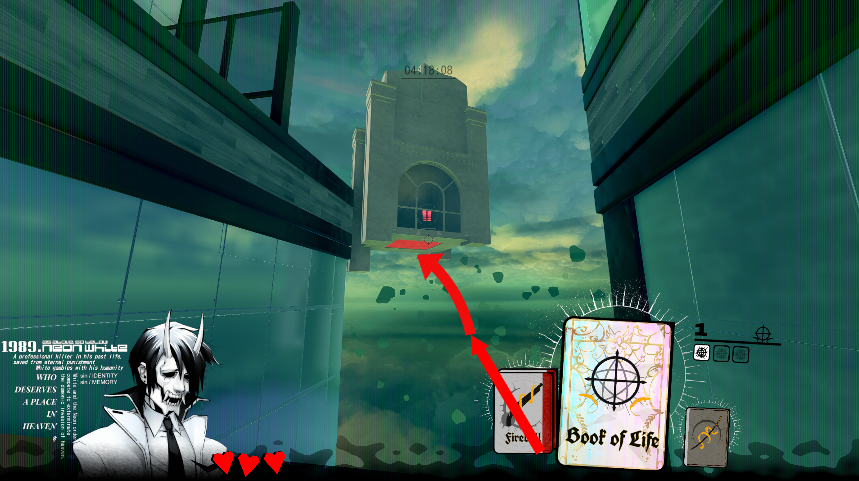
5-1 FireballWhat a card! A powerful shotgun with an even stronger traversal ability attached. The spread is fixed, so you can inefficiently plink enemies at a long distance using the inside markings on the reticle. Importantly, the shotgun itself also has excellent door breaking power, which is very useful for saving up cards.
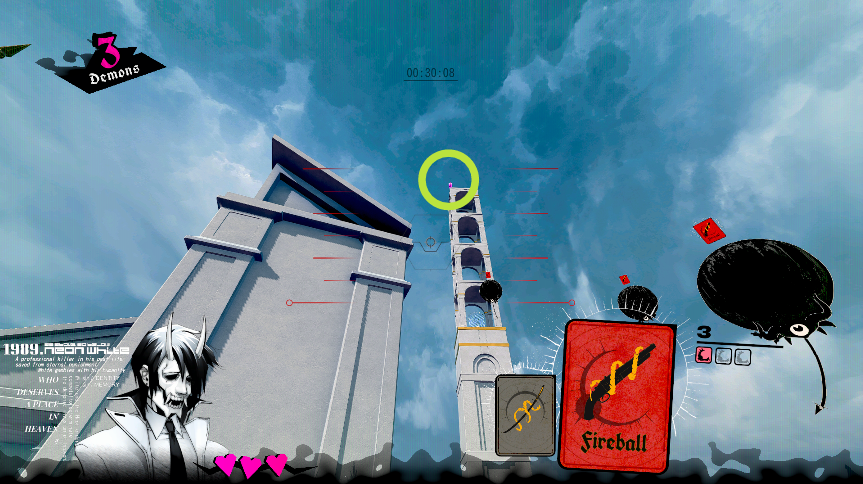
Oh, word? This present is wayyyyyy above the exit.
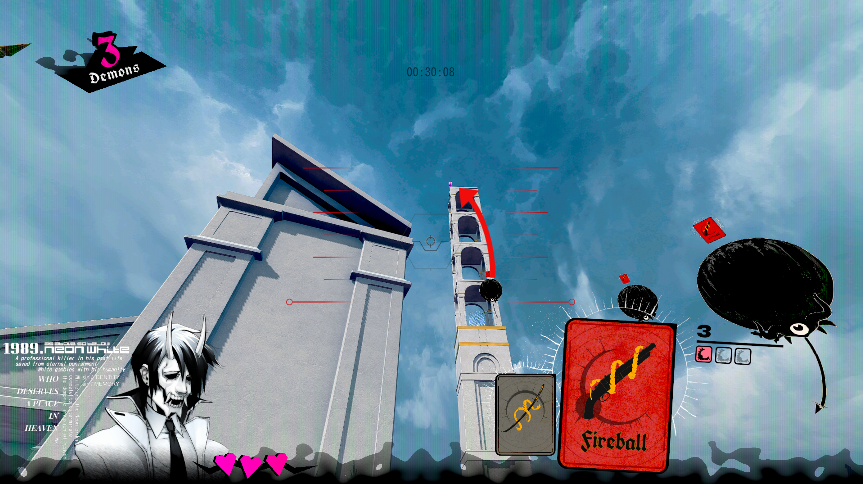
You’ll need three Fireballs stocked up by the time you reach the balloon demons. You can save Fireballs by:
– Normal jumping from the platform with the first head to the platform with the stairs,
– Walking up the stairs normally,
– Or shooting the final two heads instead of fireballing them.
After that, triple fireball up to the present. There’s a bit of an arc to the fireball, so aim slightly high.
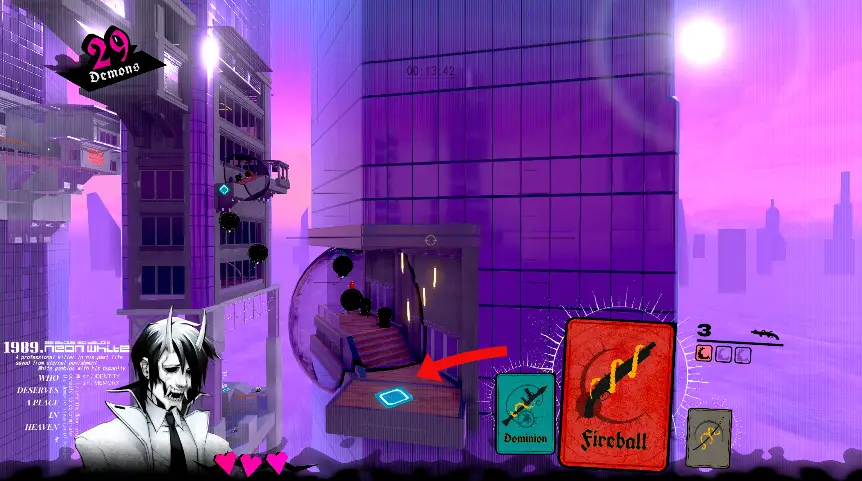
5-2 Ringer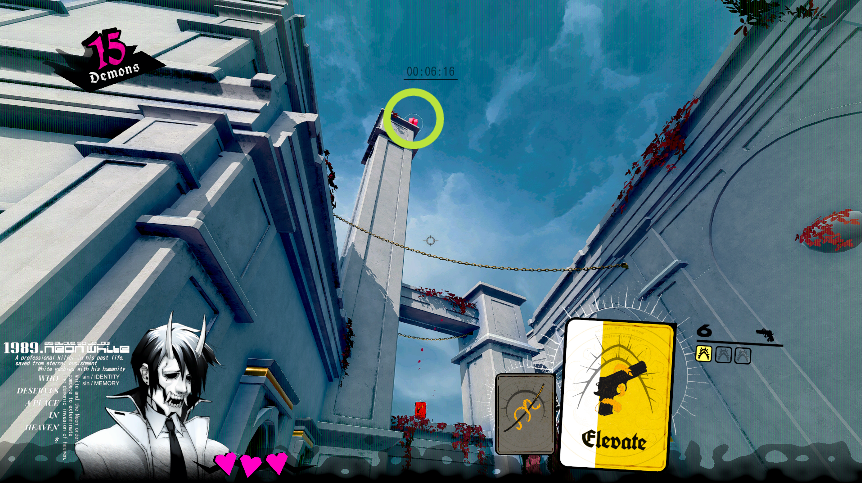
From the first Elevate, look up to locate the present.
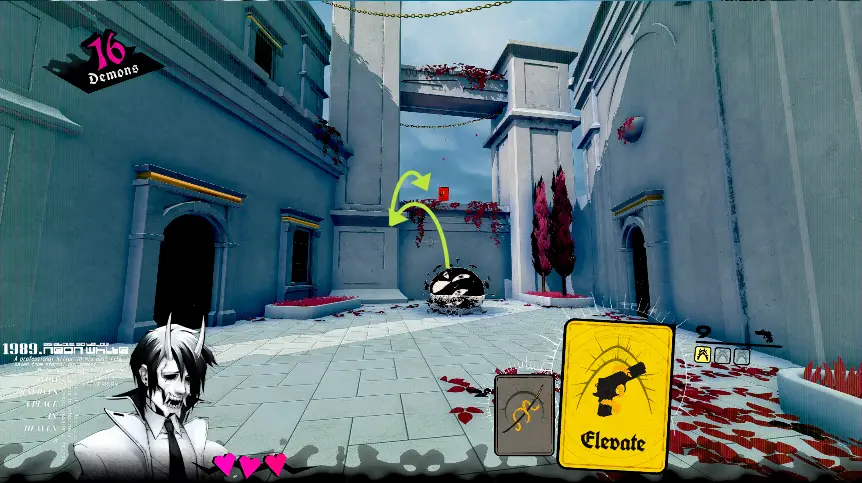
Save your Elevate. Jump on top of the blob, jump onto the lip of the left pillar, jump to the Fireball. If you like, you can jump directly from the blob to the Fireball with some momentum; hold the jump button while in mid-air to jump the moment you touch your feet to the blob.
After collecting the Fireball, turn back around. follow the foliage path counterclockwise. Then, fireball + double jump up to the present.
5-3 Cleaner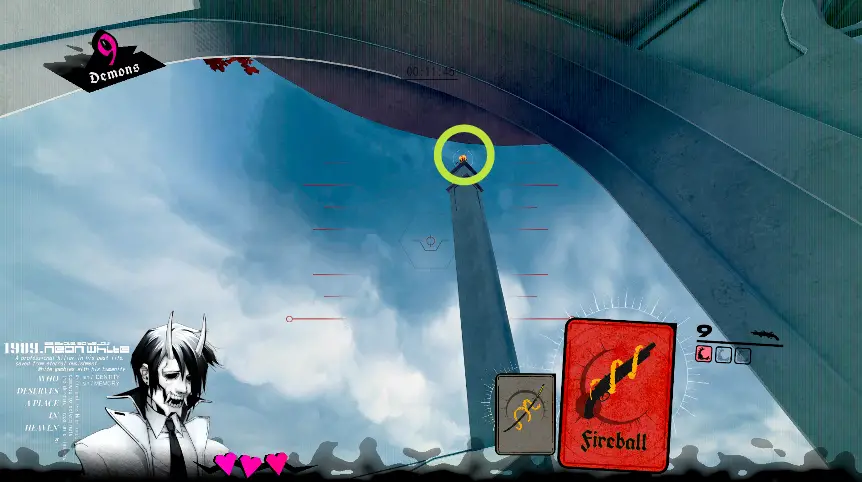
Look up when you see the first head. It’s on top of the chimney.
You need to do a lap around the level to get in position for the present. Save up 3 Fireballs and take the Godspeed from the final blue demon. Airdash back to the starting balcony, cross over to the roof, triple fireball up to the present.
Ways to save fireballs on this level:
– Jump left onto the balcony instead of breaking through the first door,
– Break doors with the shotgun primary fire instead of fireballing through,
– Collect from the two vending machines during the section where you fireball up through the ceiling.
5-4 Warehouse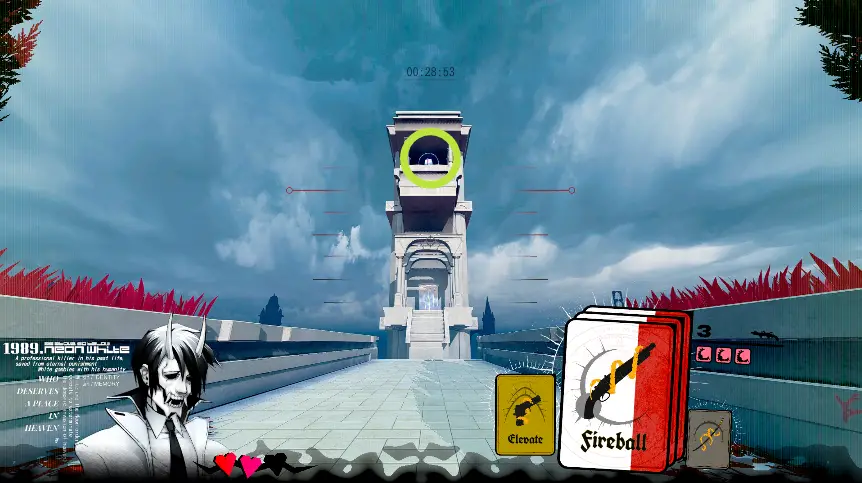
Just above the exit. An unremarkable present.
There are more than enough cards available to reach this present, two Fireballs will do it.
5-5 Boom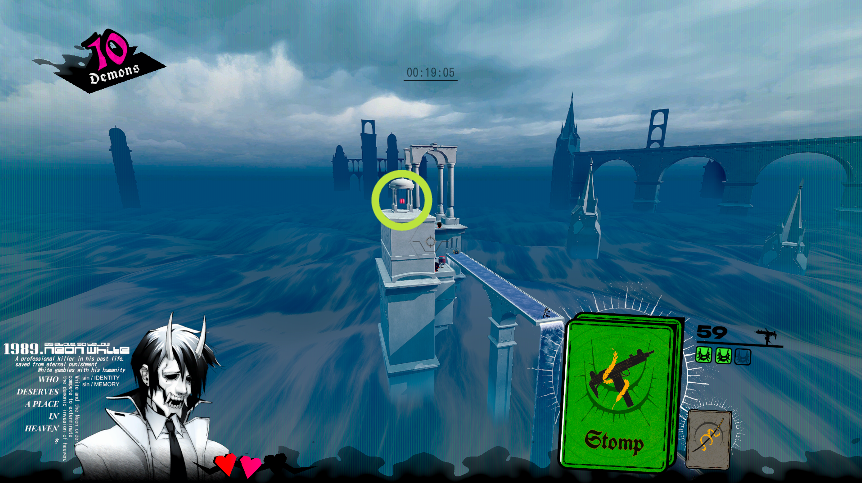
On top of the tall building to the left of the exit.
Fireball up to the gazebo, there’s one located in the nearby chest. You can use the barrel if you want.
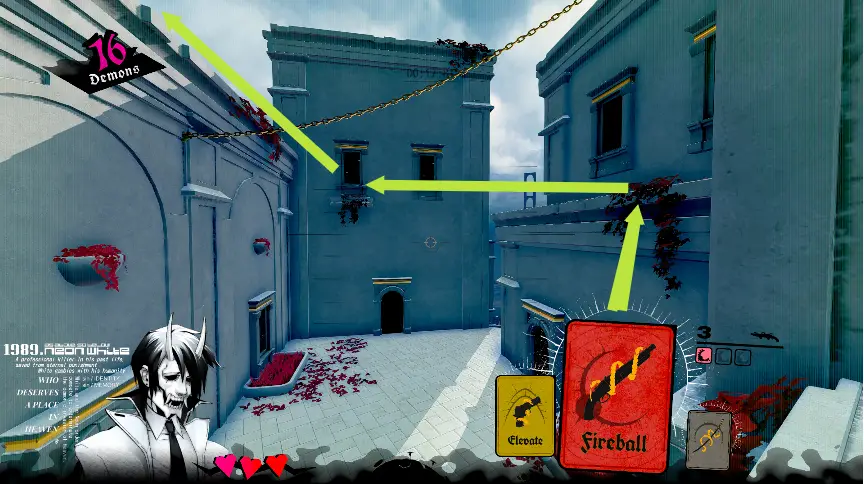
5-6 Streets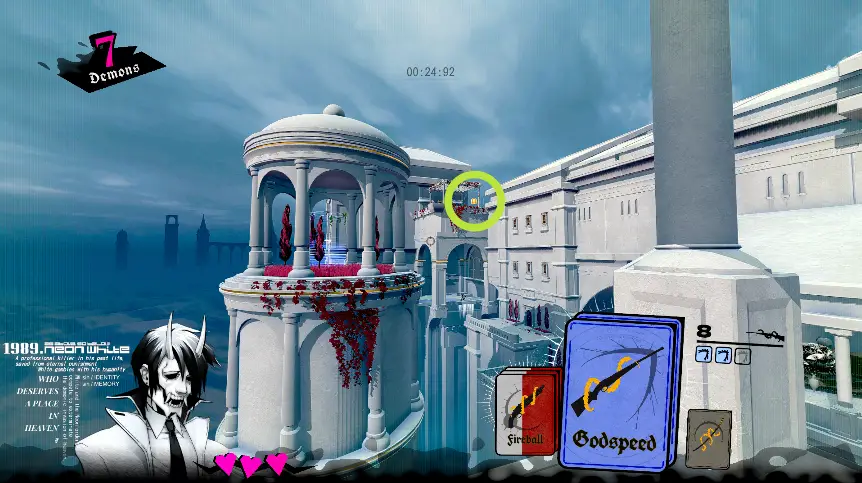
The present is above the starting point, but you wouldn’t normally see it until you’re near the exit.
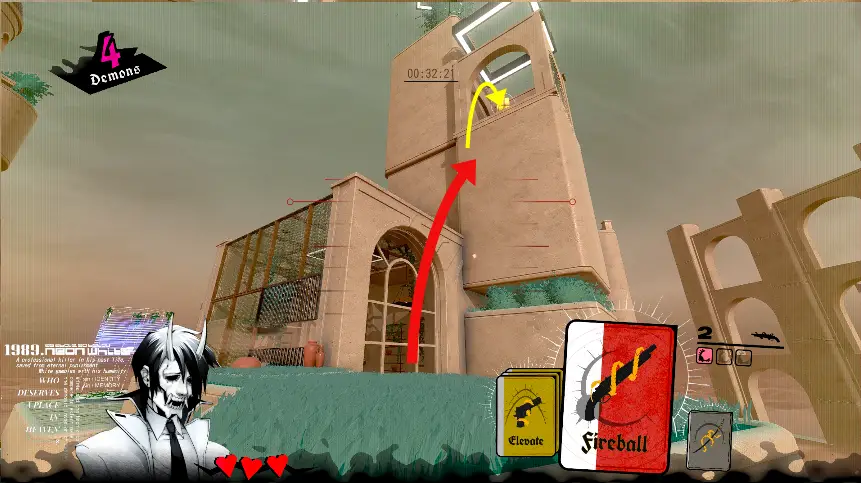
Like so many other presents in this mission, the solution is to fireball up there. After grabbing the first two fireballs, turn around, look up, then blast off.
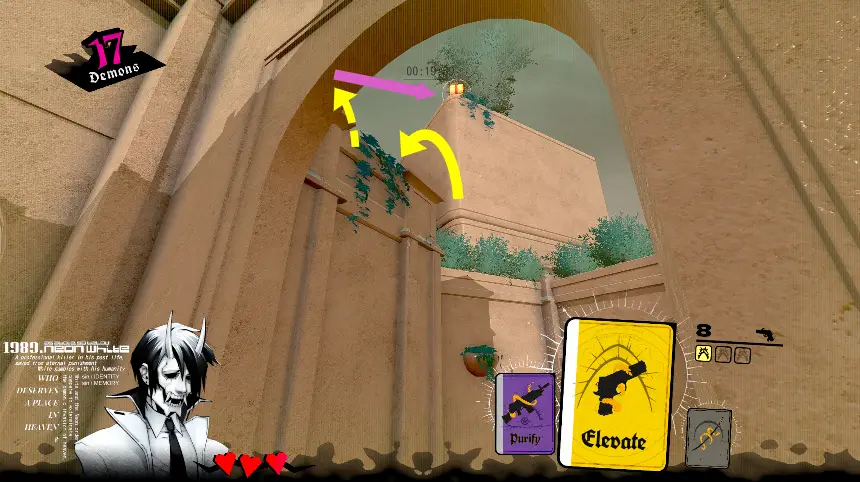
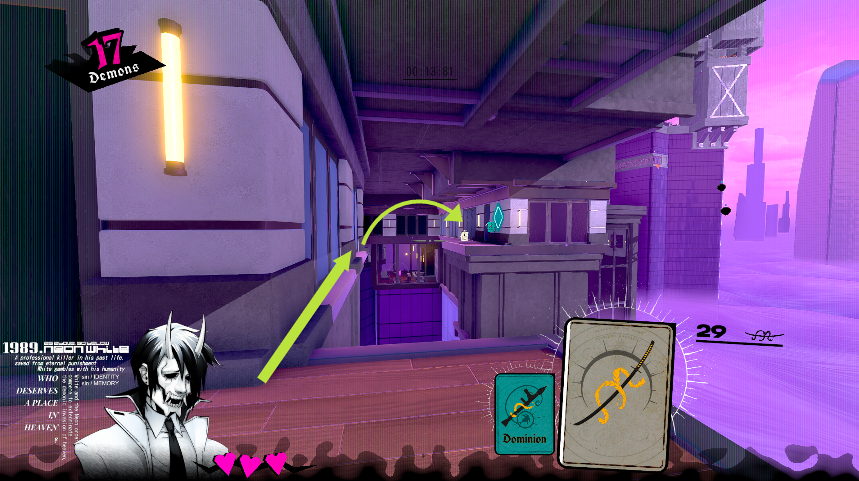
5-7 StepsDo you know how hard it is to draw arrows on these pictures?

This present is in its own building beside the exit. You’ll need to hoard both Fireballs and the Godspeed to comfortably reach this present. Save a Fireball at the midway point (where the blue demon is) by going left and
around the breakable wall.
You want to get onto those sloped roofs. Climb onto the entrance of the building using the doorframe. Fireball to the roof of the same building. Run up the sloped roof, then airdash to the roof of the building with the exit. Fireball to the present.
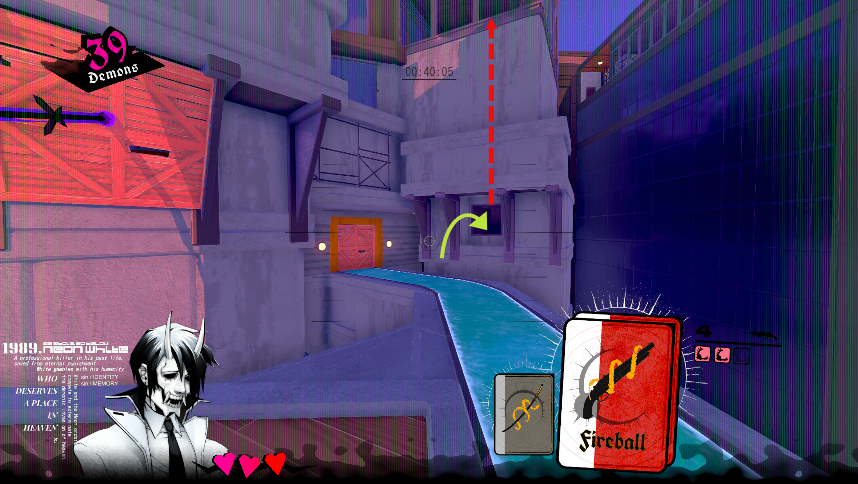
5-8 Demolition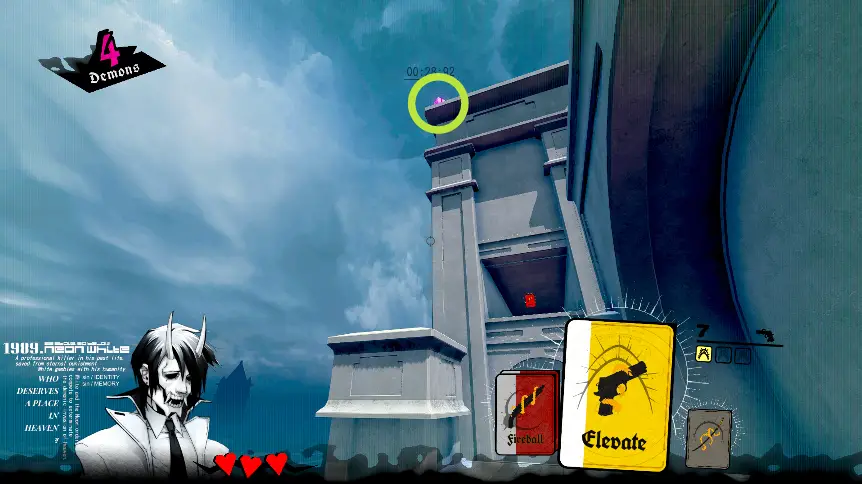
This present is above the tunnel.

Two Fireballs will do it if you launch yourself off of the left pillar. You can use the vending machine Elevate to grab an extra fireball from the tunnel.
5-9 Arcs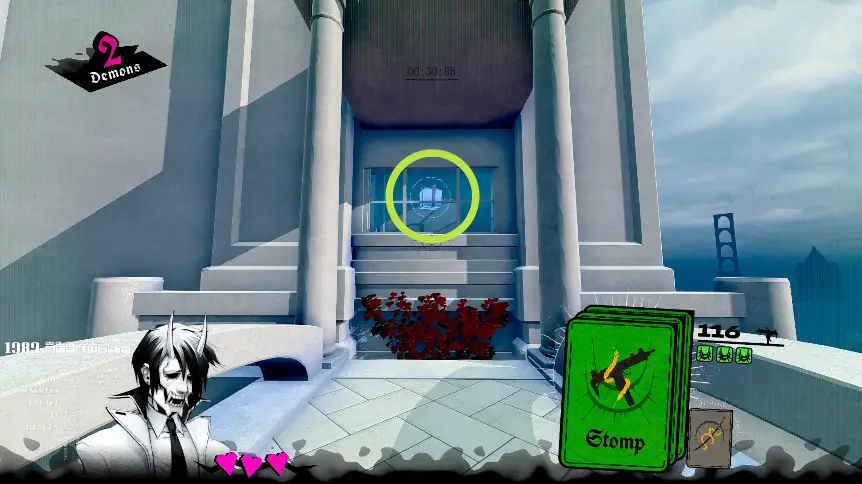
Seen here through a window during the normal route.
The present is accessible via a breakable hatch during the final barrel jump. Look down at the peak of the jump and you’ll see the hatch. You’ll need three Stomps to get through. You can save those up by shooting the barrels at close range instead of stomping them.
5-10 Apartment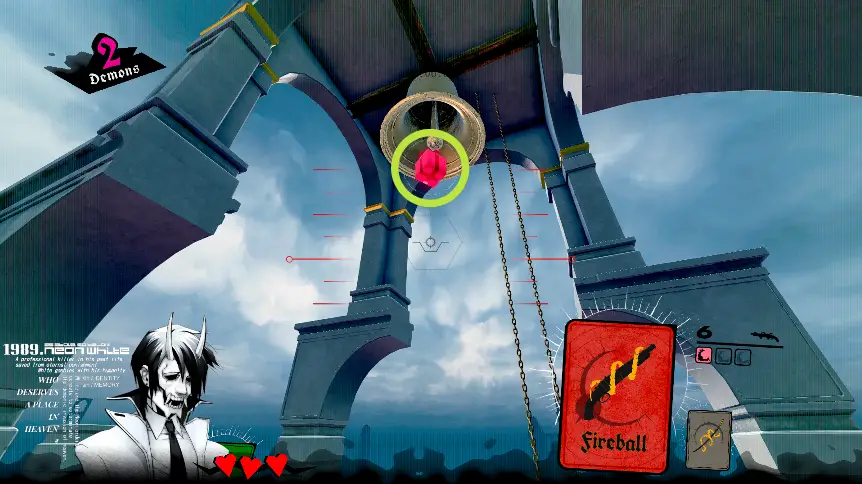
This present is at the very top of the stage. Um, just use a Fireball. Fun level, though!
Chapter 6 – Covenant
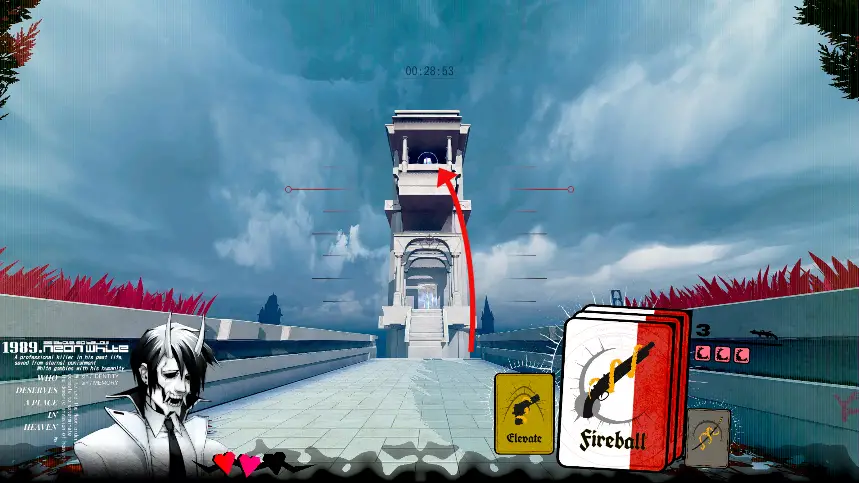
6-1 Hanging Gardens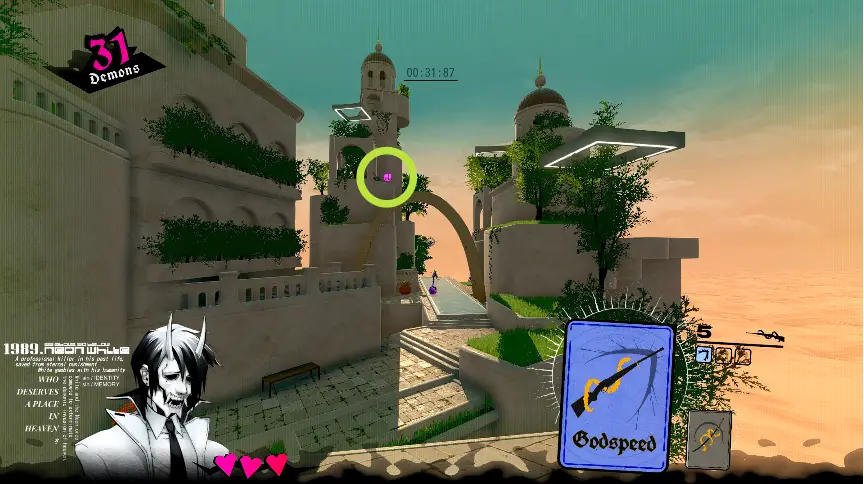
You’ll see the present on your way to the final section.
Grab the two Purifys, turn around, backtrack to the present, and double grenade-jump up.
6-2 Tangled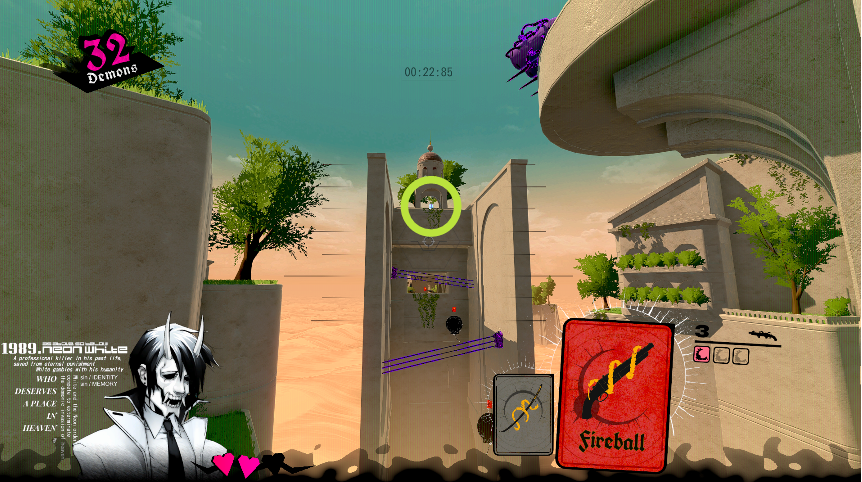
This present is far away, up above the balloon demons.
In a shocking twist, you’ll use two Fireballs to reach the present. Save up the first fireball by shotgunning the first blob, grabbing the ammo, then falling off the left side down to the chest. Grab the second fireball from the chest. Blast up to the present from the second balloon demon.
6-3 Waterworks
To find this present, move your mouse/thumbstick up and to the left when you load the level.
You need two Godspeeds and a bit of height to reach the present.
Get past the tripwires. From the Elevate, turn around, climb up above the doorway you just left, and backtrack. There’s a platform marked by some ledge vegetation. Double air dash from there.
6-4 Killswitch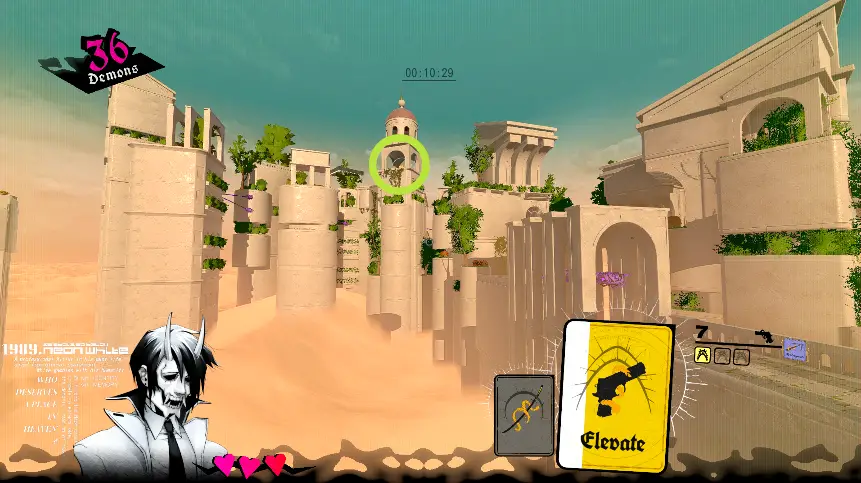
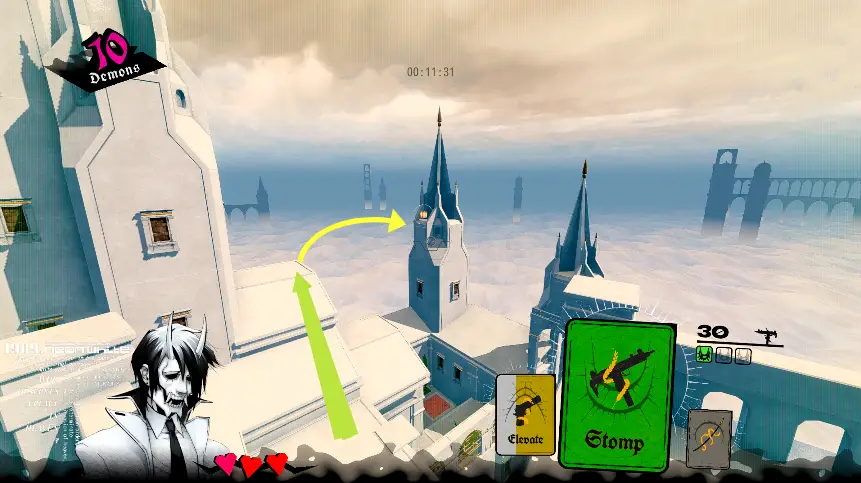
This tricky little bugger is in that domed tower in the middle.
You need three Elevates. Get to the last Elevate, grab two more from the vending machine, then turn around and backtrack. Follow the ledge vegetation.
Use one double jump per tower to reach the present.
6-5 Falling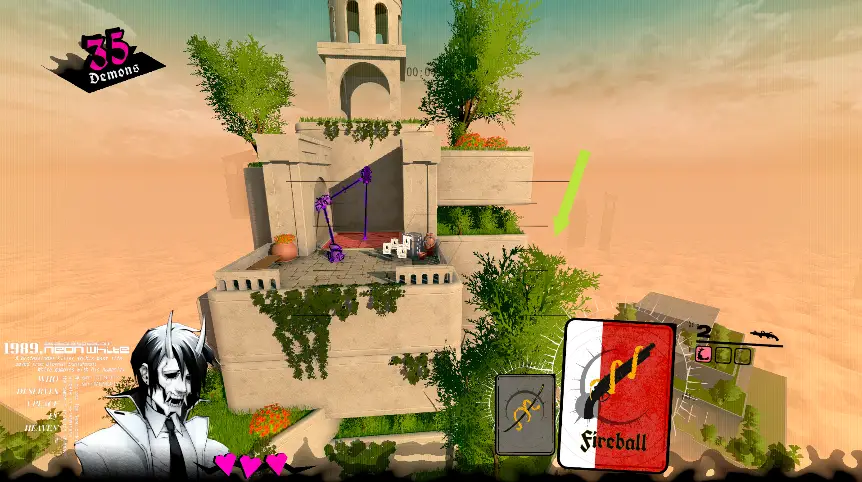
At the first vending machine, jump off the side and circle around to the back.
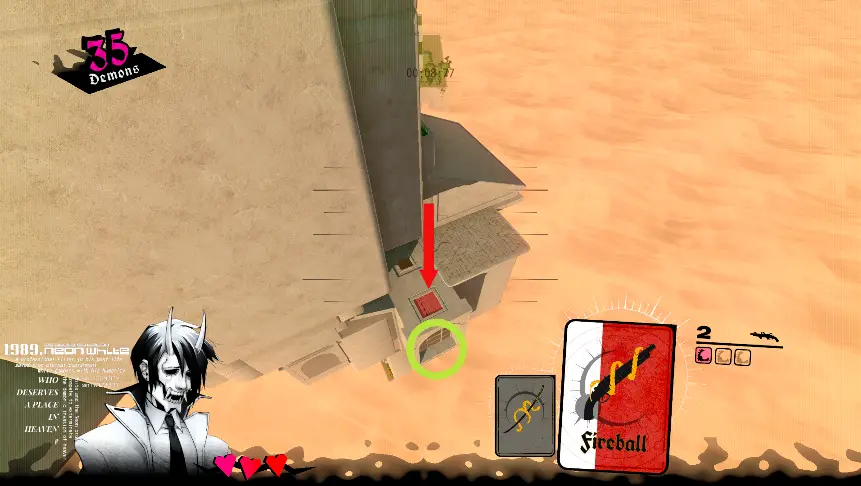
There’s a breakable hatch behind the building. Fireball through to reach the present.
6-6 Shocker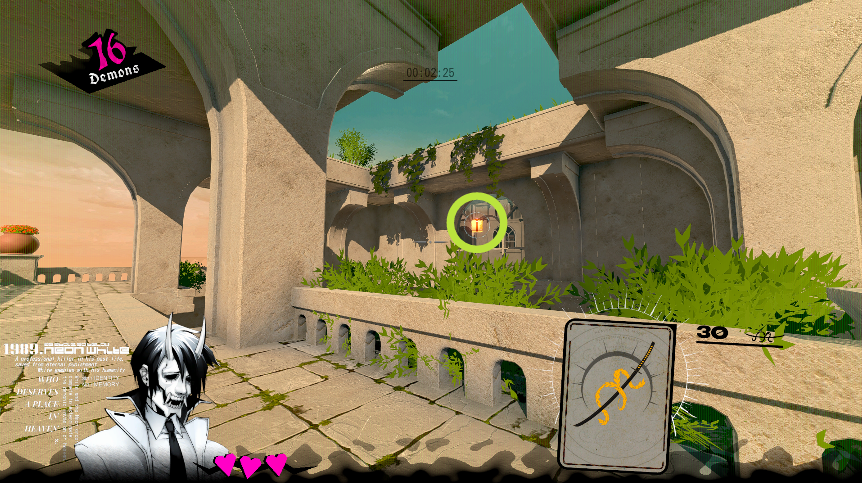
Yes, it’s right there. No, you can’t get it without touring the level first. The dang level designers put an invisible wall on the side planters.
You just need a single Fireball. Just before you reach the exit, jump back down to the start and fireball up to the present.
6-7 BouquetWhy yes, I do have a soft spot for levels that require precise aiming at high speeds.
Observe this present to the right of the exit, resting on its natural habitat: the sloped roof.
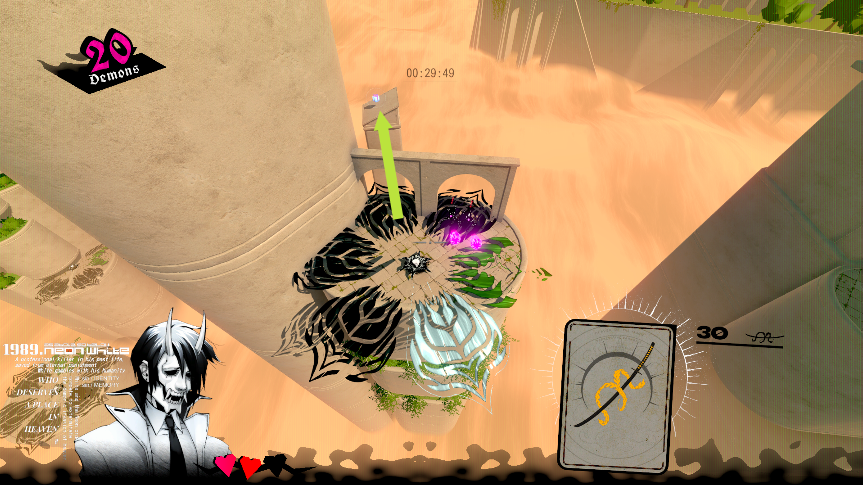
You don’t need a single card to reach the present. The fourth flower (a.k.a. the second flower after the Purifys) will deliver you straight to it. Launch yourself off of the petal facing the present.
6-8 Prepare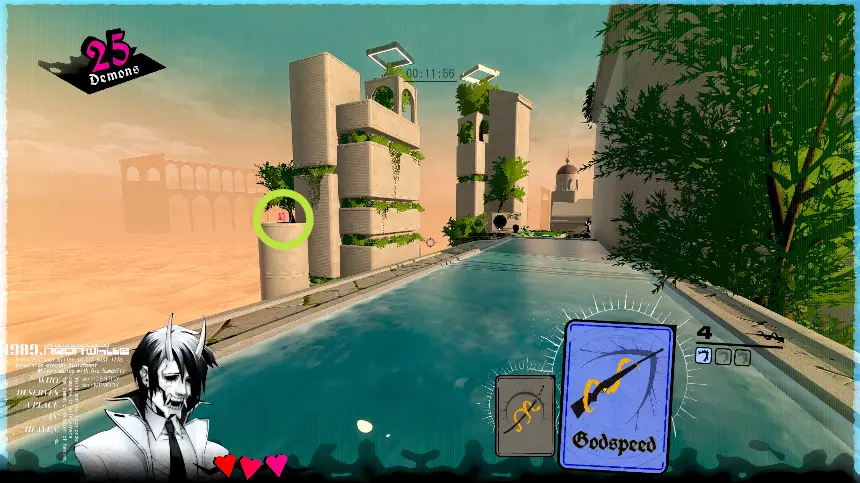
You can see this present just before the second flower.
Get the Godspeed, launch yourself off of the flower and finish with an airdash.
6-9 TriptrackNice level, BRUTAL present.
After doing the barrel jumps, look right. The present is sitting on an out-of-the-way tower.
You need a Godspeed and the Elevate located farther down the track. Get the Elevate and turn around. You must maximize your horizontal distance. Take a
fullrunning jump off of the arch, airdash, then double jump once you fall slightly below the present platform. If you try to double jump first, you won’t be able to cheat that last bit of distance out of the jump arc.
6-10 Race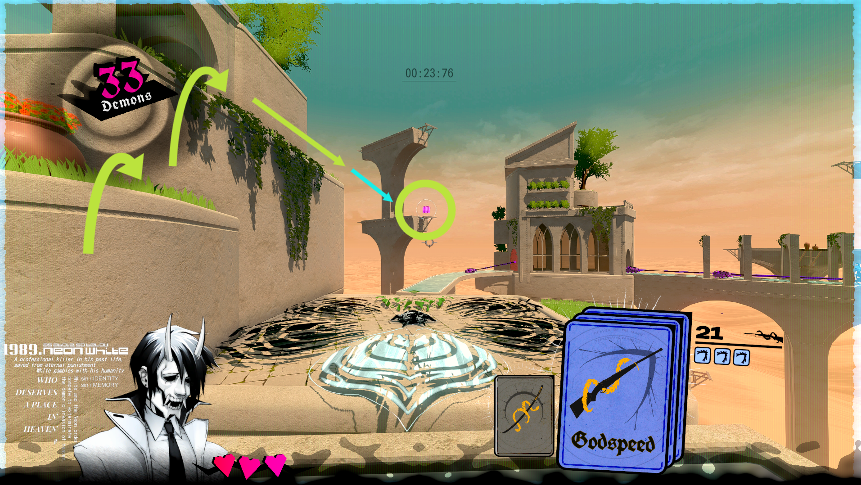
A straightforward present, located after the blue demon. Jump up to the left and airdash over.
Chapter 7 – Reckoning
7-1 Bubble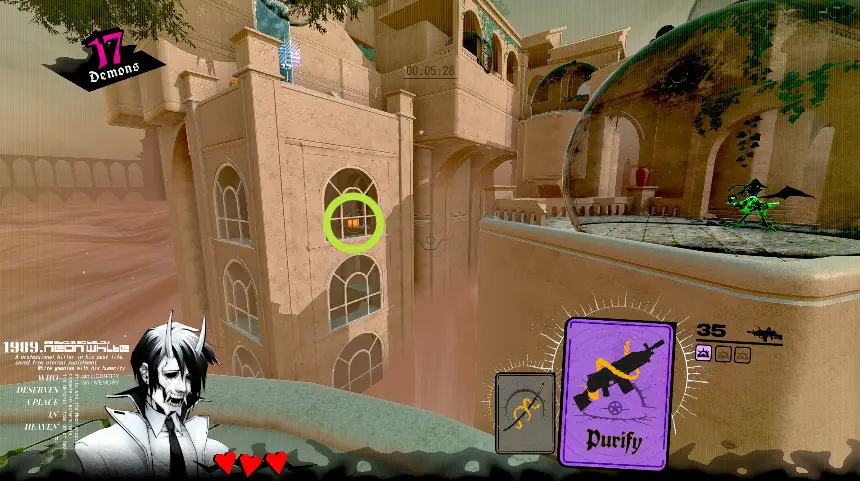
Time for some window shopping.
From the second Purify, jump down into the opening below the present, then grenade jump up.
7-2 Shield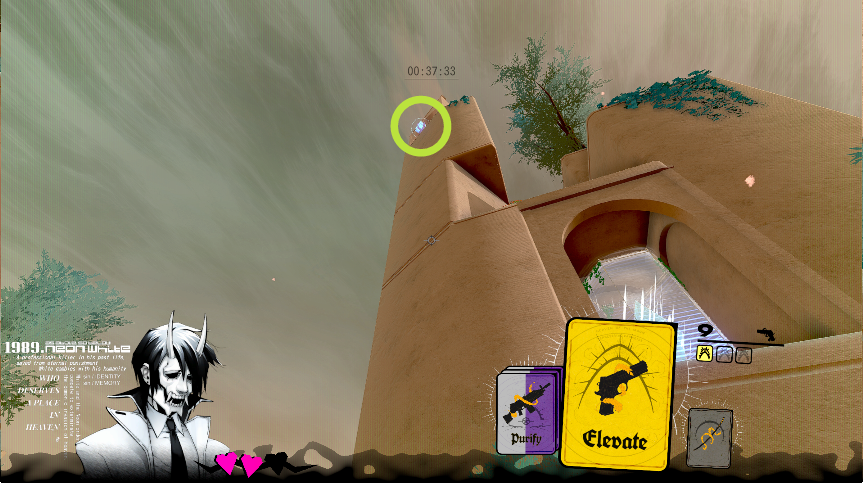
This present is right above the exit. Fortunately, there’s plenty of weaponry strewn about the level.

You’ll get three Purifys and an Elevate right at the end, just keep them stored up by gunning the heads down. Get right up under the present, triple grenade jump up, then a double jump to finish.
7-3 Overlook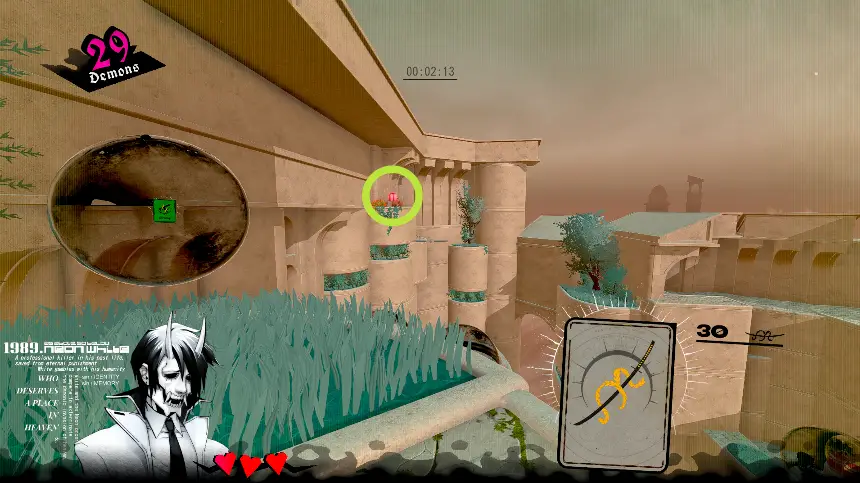
Another present that’s simple to locate, but a bit tougher to get.
You just need one Elevate. Turn left at the last jump to the exit, then follow the path around to the present. Double jump to the tree, then parkour over to the present.
7-4 PopGosh, this level is long.
The present is across from the exit.
You can use any combination of Purify and Godspeed to reach the present from the exit. Either cross the beam and grenade jump up twice, or stand on the exit platform and double airdash over, or grenade then airdash, whatever you want.
7-5 Minefield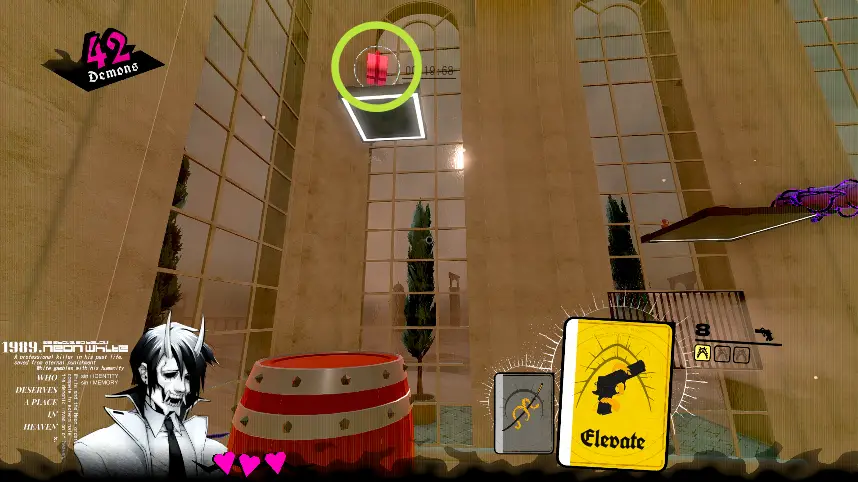
At the first solid platform, look up.
Save the Elevate by following the waterfall path instead of jumping directly to the glass. Then you can barrel jump into a double jump to reach the present.
7-6 Mimic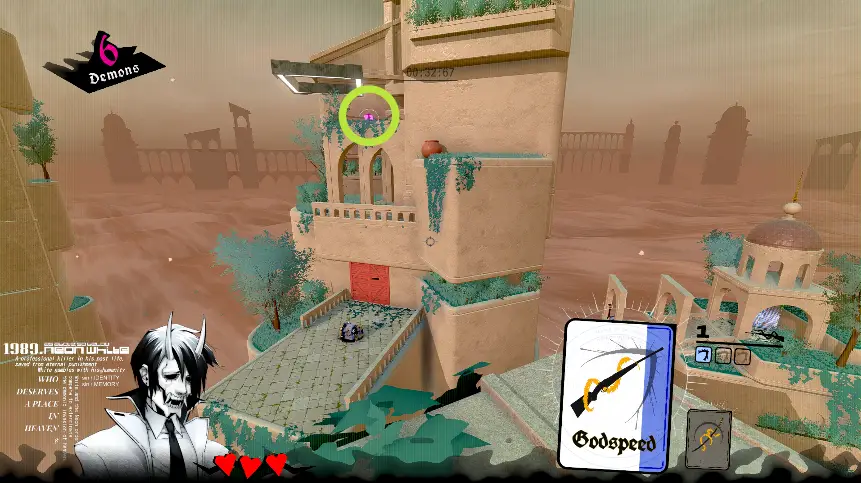
Above the breakable door. You just need one Godspeed.
After the first mimic, follow the pots to reach the middle roof, and then airdash to the last pot to reach the present.
7-7 Trigger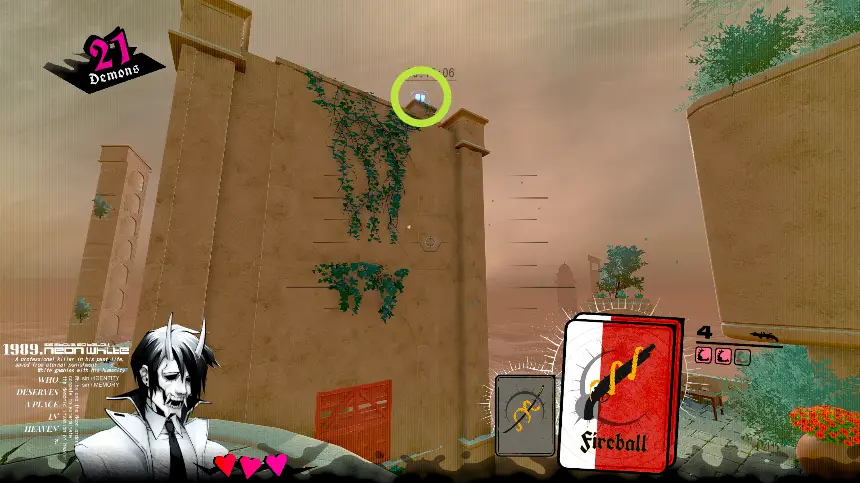
This present is above the breakable wall.

The two Fireballs you get by this point are enough to reach the present from the left platform.
7-8 Greenhouse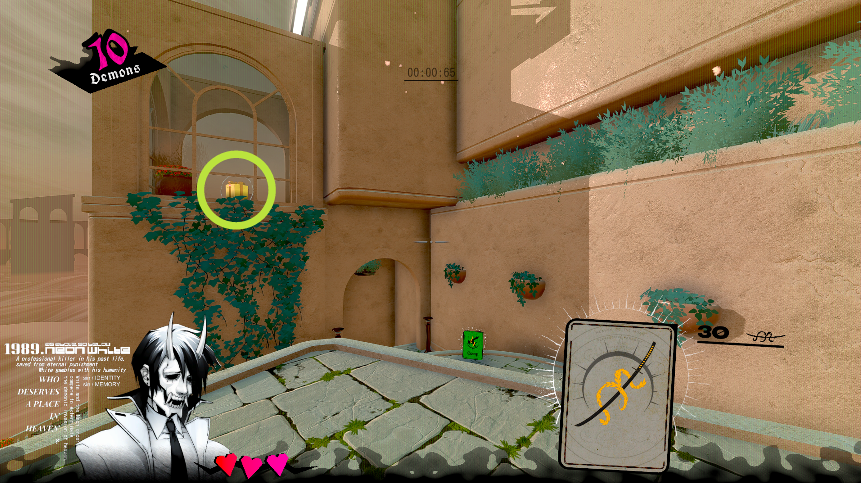
Visible from the start.
You can hoard Elevates on the final path to the exit by using the mimics as stepstools. Once you reach the top, you’ll only need one Elevate and one Fireball to reach the present.
7-9 Sweep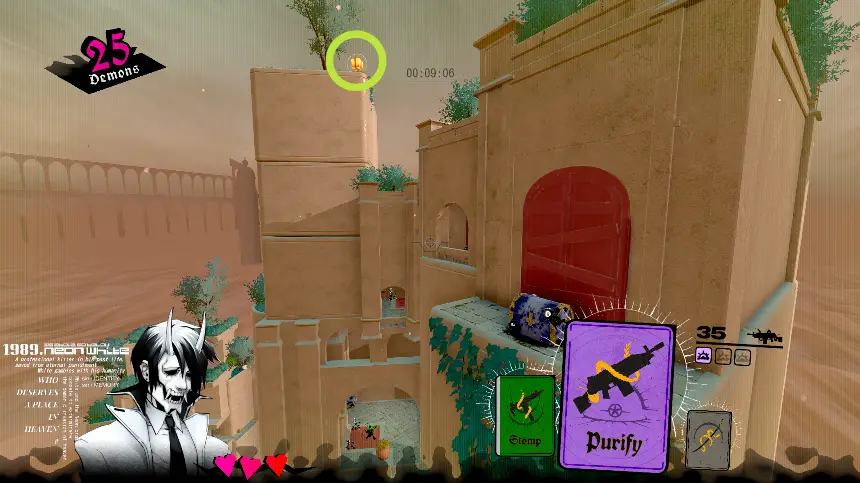
A tricky present to reach, located on top of the second building.
One Elevate and one Purify needed. Again, the ledge foliage shows the path. After the first room, double jump up to the left instead of dropping down. Turn around and jump up to the corner pillar to get a bit more height, then grenade jump to the present.
In position for the final jump.
7-10 Fuse
The “present” is out of the way, above the last blue demon. Keep an eye out for the bright green glow.

Double jump up to the hatch, but turn left instead of descending. Jump and then fireball over to the sloped roof across, which will put you in jumping range of the “present”. Then, follow the balloon demons up to the end.
Chapter 8 – Benediction
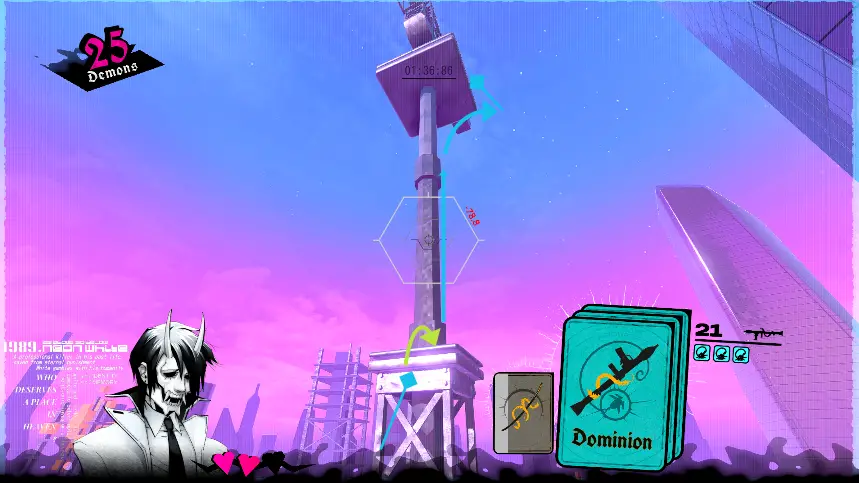
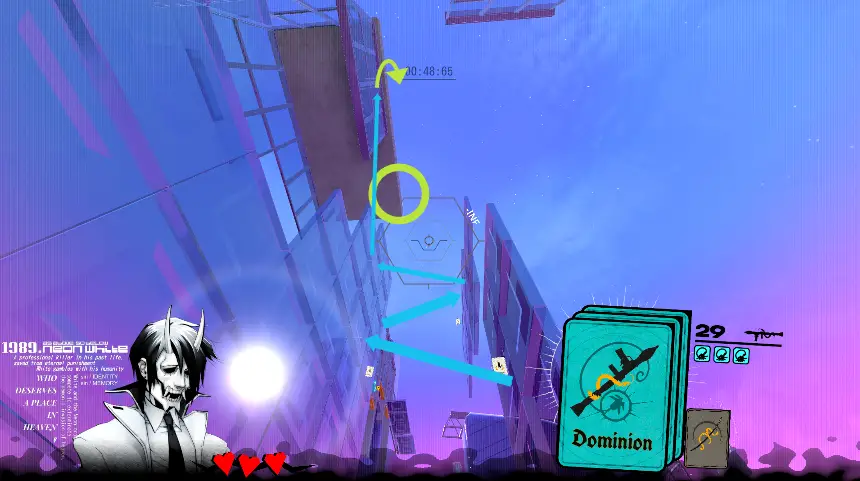
8-1 Heaven’s EdgeDominion is SO STRONG. The rocket is strong and pin-point accurate, the grapple traverses in any direction, and you can use rocket jumps to freely scale up and across walls. Surely present collecting from here on will be a cinch! lol, lololol.
From this point on, there’s considerable variability in the cards and ammo that you need to collect a given present. I’ve tried to describe vanilla, easy-to-perform routes where possible.
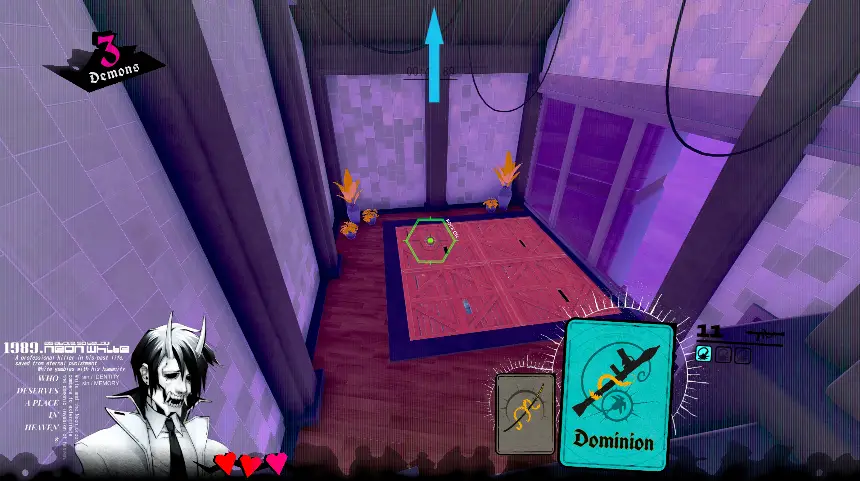
Seek the huge breakable floor to the exit. The present is located in the ceiling of this room.
With your Dominion card, grapple up by aiming at the wall across from the present.
8-2 Zipline 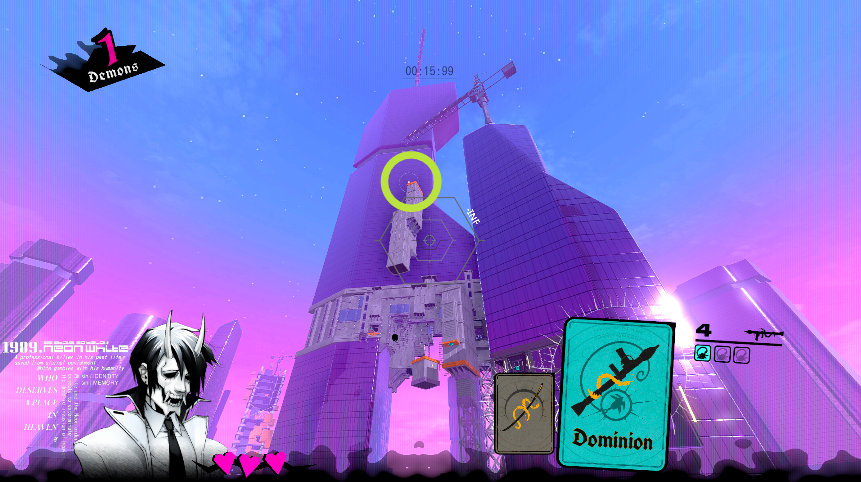
No, I insist on calling the traversal skill “grapple”.
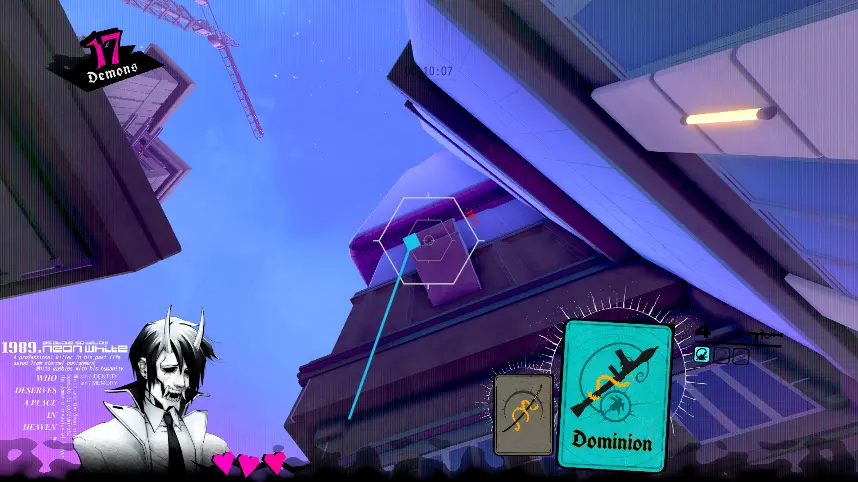
The present is (technically) visible from the start, right after you learn how to use the grapple. The present is on a floating tower in the middle of the level.
You want at least two Dominion cards and about four shots:
– At the start, rocket jump up the wall instead of grappling,
– or when entering the first skyscraper, rocket jump up the wall instead of grappling.
That will give you two or three Dominions by the time you reach the balloon demon below the present. Get on the demon, turn around, and grapple to the floating tower. Then, rocket jump up the tower to the present.
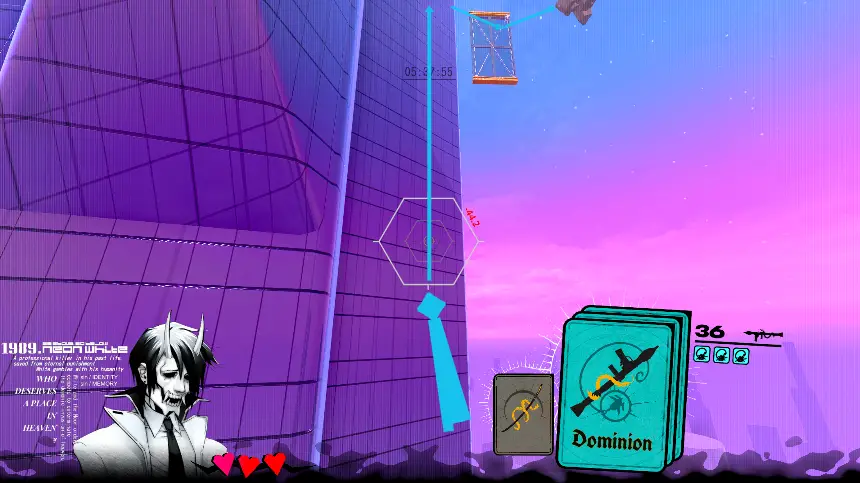
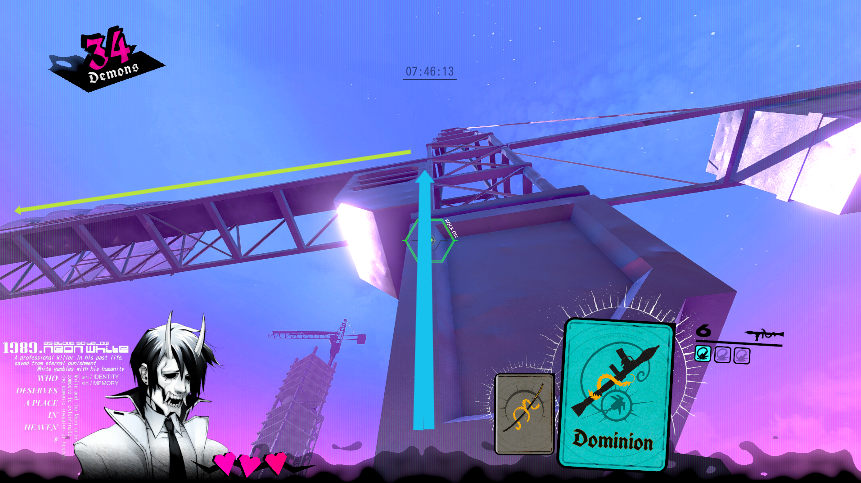
8-3 Swing
This gift is found by turning around after the final grapple point. You’ll need two Dominions, and you can save the extra Dominion by rocket jumping directly off of the breakable floors in the first half of the level.
Turn around at the exit. Grapple back using the roof grapple point that you just used, then grapple to the present. You can use the Godspeed to adjust your position for the second grapple.
8-4 Chute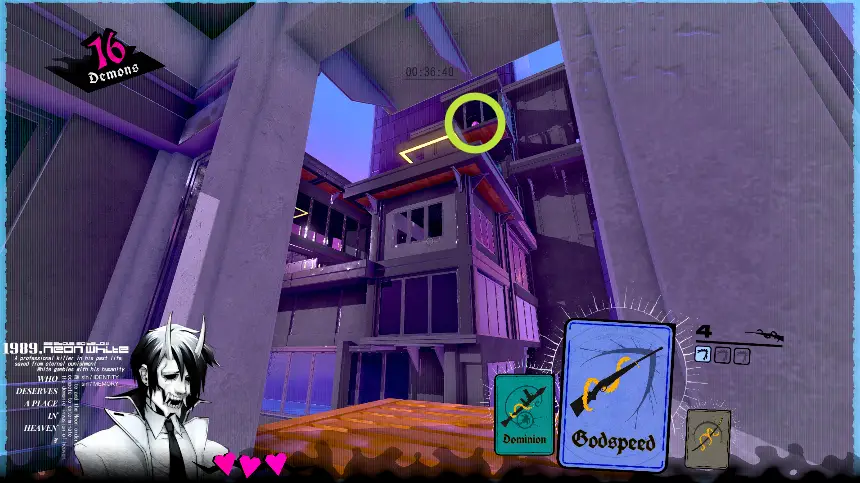
Only one Dominion is needed, although the Elevate or Godspeed can save a rocket. From the blue demon, turn around and look up; the present is visible in its own little penthouse.
Head back to the previous platform and rocket jump up to the patio on the left.

Enter, then rocket jump or grapple up to the present. The waterfall has a handy ledge to make the climb easier. As with Purify, you don’t have to look down to rocket jump off of a wall; you just have to be in the blast radius.
8-5 Crash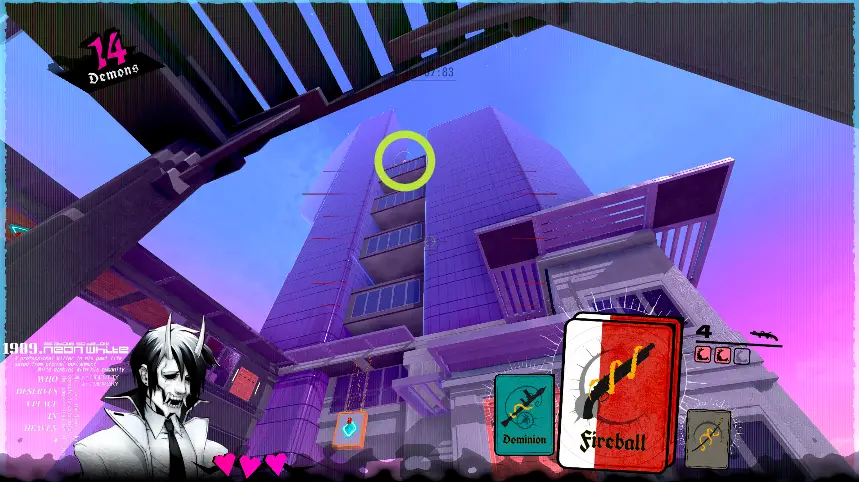
This present is located 10 floors up, above a stack of skybridges. The preparation is tricky for this level because you have to expend a lot of resources to simply reach the starting point. Here, I’ve stocked up 2 Fireballs and a Dominion with 10 rounds using the following route modifications:
After the first set of balloon demons, fireball to the ledge instead of grappling.
Grapple to the second ledge as normal, but kill the heads with your shotgun. Use the ammo card on your Dominion. Go around the corner and kill the next heads with your shotgun.
Now, fireball up twice to the roof, then rocket jump up the skyscraper as far as you can. On your last rocket, grapple the top skybridge to reach the present.
Chapter 8 – Benediction, cont.
8-6 Ascent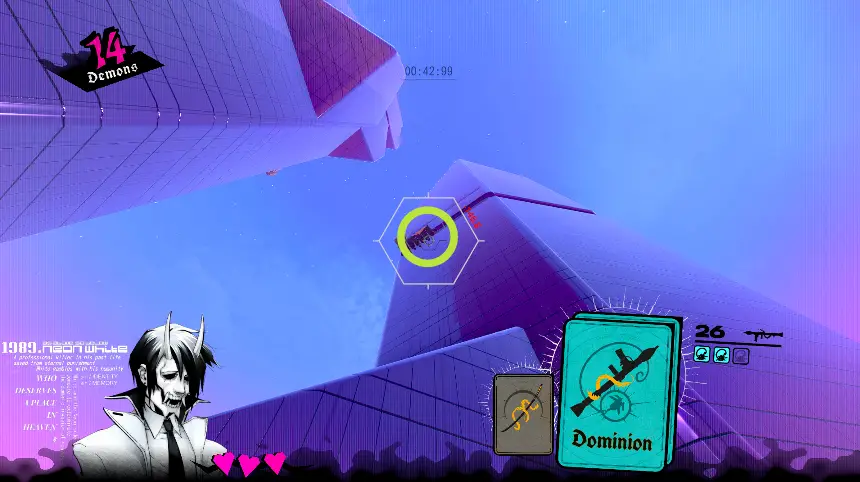
This “present” requires a lot of ammo, but you also get a lot of ammo, so no problem.

Play through normally, avoiding the shortcut to collect the extra ammo cards. At the very end, instead of going to the exit, you’ll have to go even higher up. Grapple up to the slope, then rocket jump up (takes about 7 rockets).
After the balloon demons, grapple to the wall and then rocket jump straight up to another ledge (about another 10 rockets). Then, grapple to the glass panel and grapple to the finish.
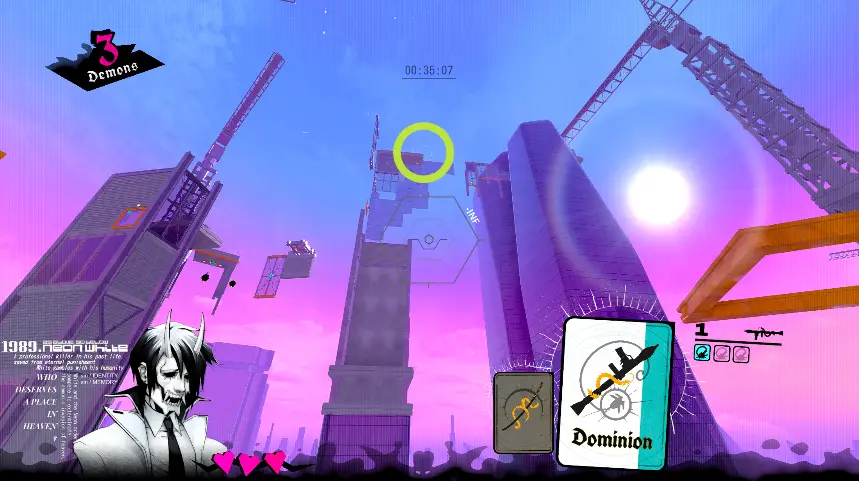
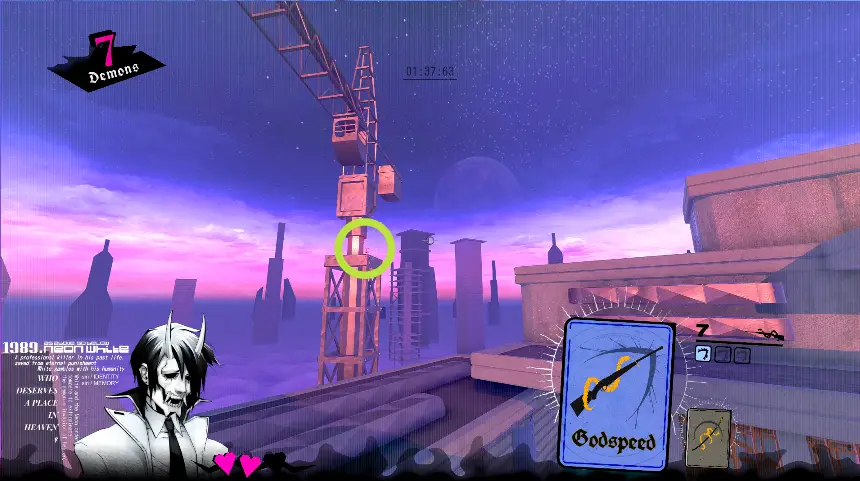
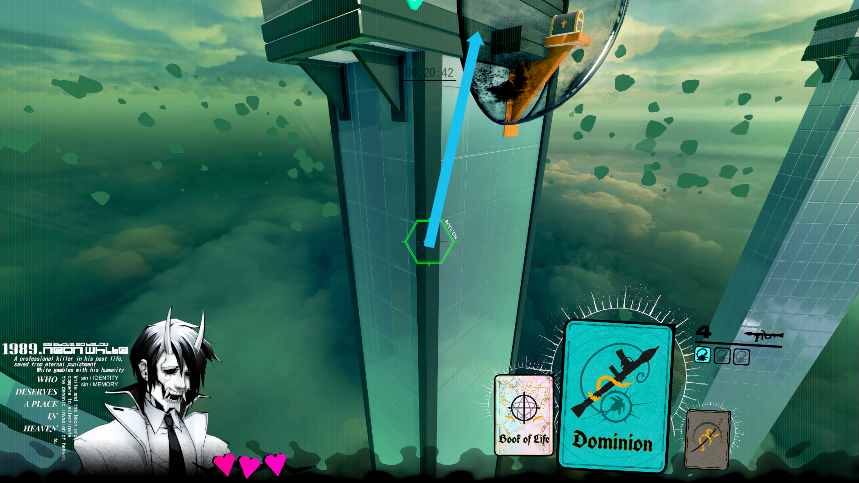
8-7 StraightawayWelcome, reader! You’re probably looking for the next screenshot.
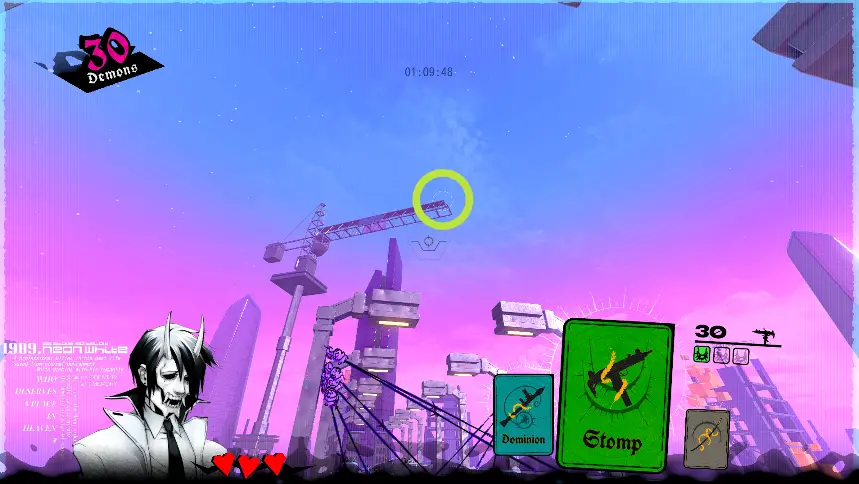
The present is located in actual Heaven, apparently. You need three Dominions and SO many rockets to reach it. The more ammo you have, the more attempts you can make at the present.

Hoard Dominion cards after breaking through the floor by rocket jumping across the walls instead of grappling. You don’t need to rocket jump for every single card on the way to the bridge, so feel free to grapple one of the cards if needed.
You have successfully landed on the second bridge with two Dominions in hand and the third Dominion ahead. Cross the bridge, grab the ammo, and avoid the enemies. You can parry enemy bullets back at them for a speed boost if you like.
Take a running jump and grapple across to the base of the crane. Rocket jump up until you’re in grapple range to the second platform, then jump outwards and grapple the edge of the platform to get on top. It takes about 9 rockets. There’s a collar in between that you can rest on if needed.
Then, rocket jump up on top of the crane. It takes about 5 rockets, and you can use your last grapple at this point. Breathe a sigh of relief, secure in the thought that you’ll never have to do this again…unless you decide to make a guide like me.
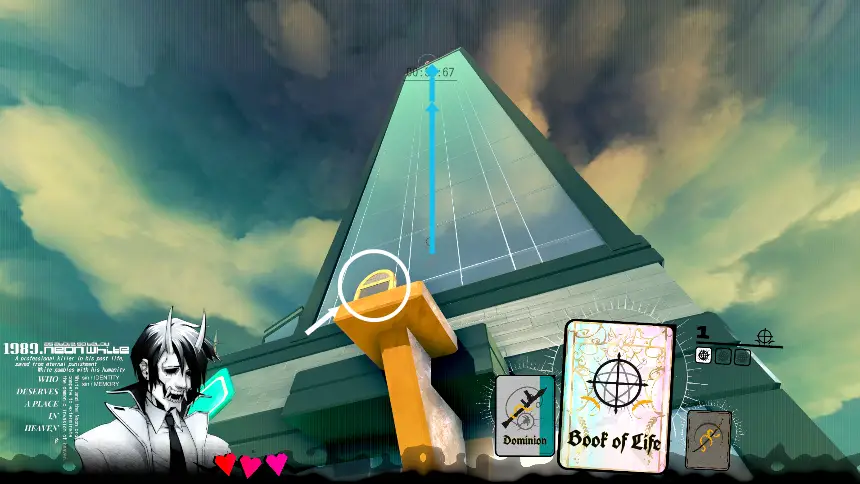
8-8 FirecrackerFinally, an easy one.
Located in a vertical shaft before reaching the exit, accessible from below.
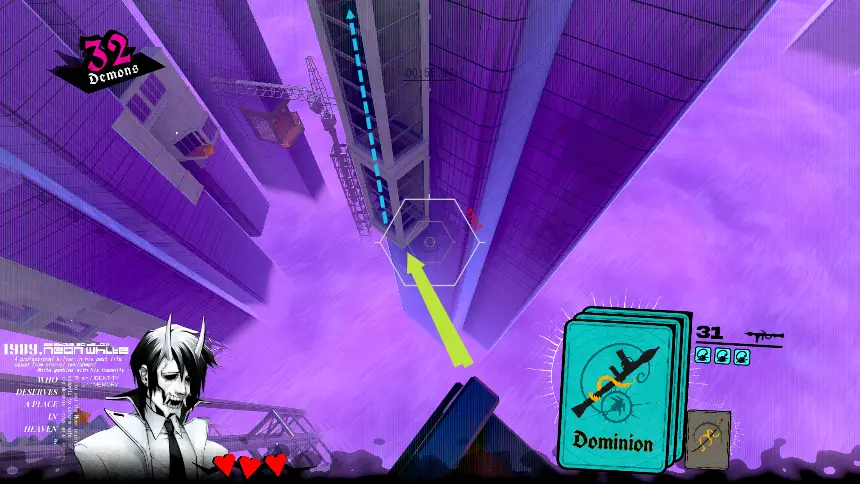
Drop down and rocket jump out. It takes like, 9 rockets, less if you finish with a grapple. The key is to build up rocket ammo as you go by not running out of Dominion cards. There are plenty of points where you can rocket jump to the next card instead of burning your last card on grappling; the easiest point is at the mimics, where you can simply float down to the balloon demon.
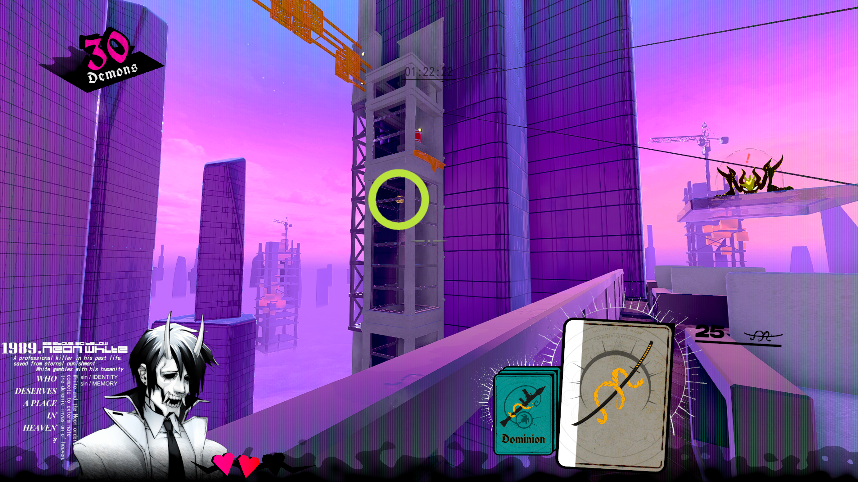
8-9 Streak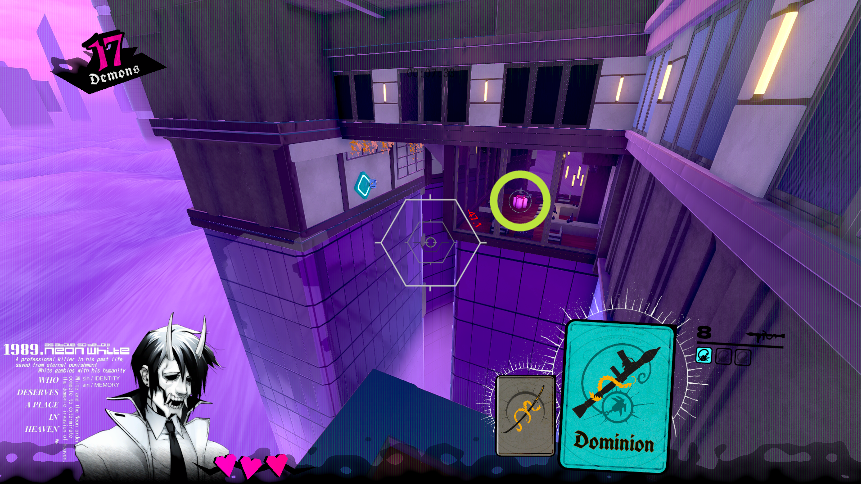
This present is in the restaurant near the start.
Once you hit the balloon demon, whip around, look up, and grapple the vent opening.
If you’d like an easier route, save the starting Dominion by walking along the left windowsill and jumping to the blob (not pictured here because its shots were getting in the way of my photography).

The extra Dominion will allow you to grapple to the rooftop across from the vent opening for an easy grapple to the vent.
8-10 MirrorThis present is tough to screenshot.
Located on a rooftop above the final glass panel corridor.
Here’s another angle, shot from the start of the glass corridor. Climb up to the top of the corridor with rocket jumps. There’s enough ammo to allow a successful climb without modifying the normal route, but you can save up many rockets in the first stretch by rocket jumping off of the heads instead of grappling them.
Chapter 9 – Apocrypha
9-1 EscalationThe “clean” route demands quite a bit of precision, but I have an easy route that takes advantage of some architectural exploits in the level.
First, the present is located on a crane in the corner of the level. One Godspeed and one Fireball can barely cross the gap with good timing, but my route will give you a Godspeed and two Fireballs.
You can save up the first Fireball with some semi-legal moves. Instead of fireballing through the door as you normally would, double jump from the couch to the doorway. There’s a little lip in front of the door that you can balance on. While pressed up against the door, shotgun it twice and then finish breaking the door with 16 handgun rounds.
There’s a lip on the left side of this gap that you can run across. Your extra Fireball is now secured. Proceed into the next building as usual. Make sure you switch back to your katana before attacking the tripwires!
Save an Elevate by not taking the shortcut, and barrel jump up to the second Fireball. Shotgun the head, double jump up the ledge, shotgun the blue demon.
At this point, you should have two Fireballs and a Godspeed. Turn around. In a celebration of Neon White’s air control, you can curve-jump around the trellis.
You can also balance on the lip of the trellis ledge if you’re struggling to jump around in one go. Cross the rooftop.
From the far corner, airdash and then fireball twice to the present. Pat yourself on the back.
ADVICE FOR HONORABLE PLAYERS WHO DON’T WANT TO BALANCE ON TINY LEDGES:
You can skip the entire first section by triple-jumping up to the right and then double jumping up to the blue demon. Not strictly necessary, but it’ll make your (many) restarts much faster. The “proper” route is otherwise identical. The jump is exacting without the grace of the second Fireball, but it is possible.
9-2 Bolt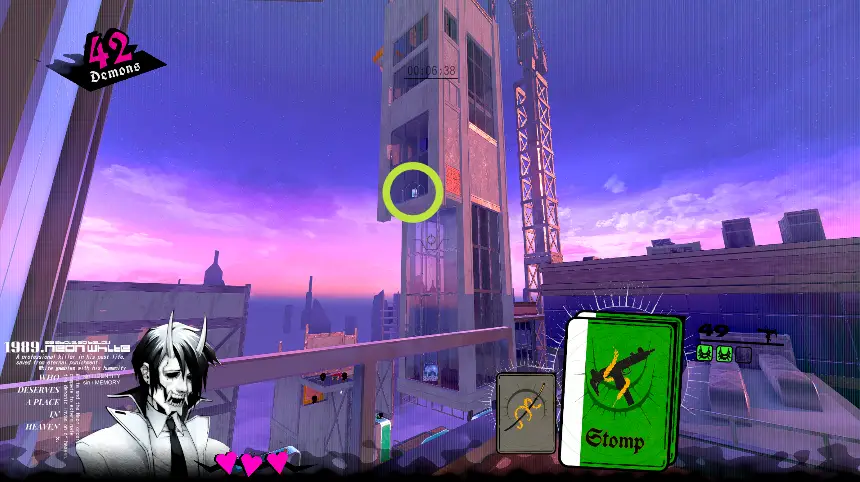
Located above the exit, and visible from the start.
One Fireball needed. After you do the big barrel jump leading to the final drop, land on the ledge and then jump around to the back side of the building. Fireball through the wall as you fall to reach the present.
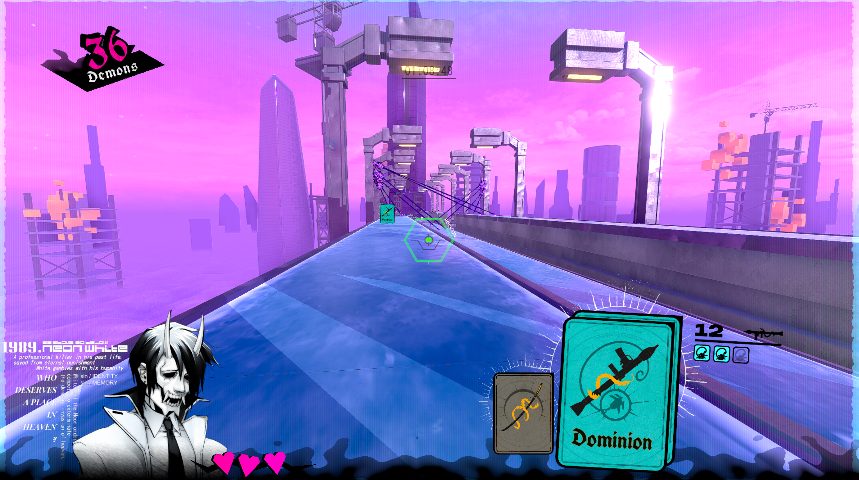
9-3 Godstreak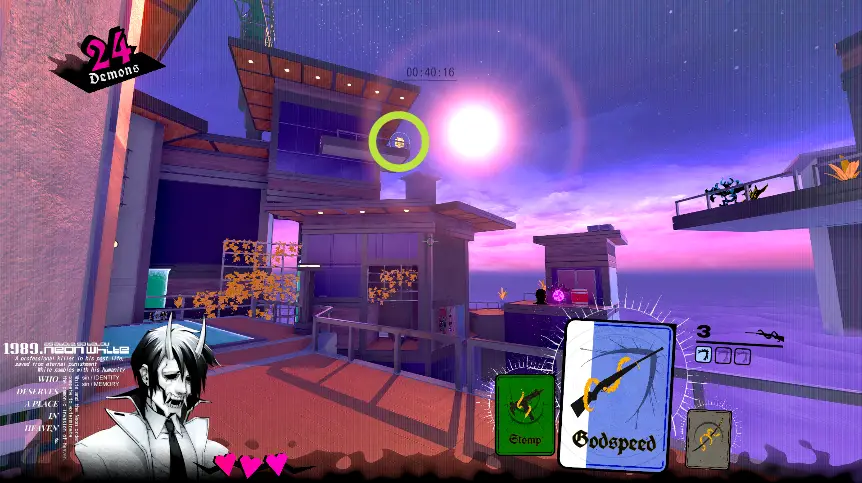
This level is a big loop, and the present is up high on the far side of the loop.
You need one Godspeed and one Elevate, which are both conveniently available after the first half of the loop. Turn around, jump to the right rooftop, jump to the middle rooftop, double-jump to the left roof top, airdash from the vent fans to the present.
9-4 Plunge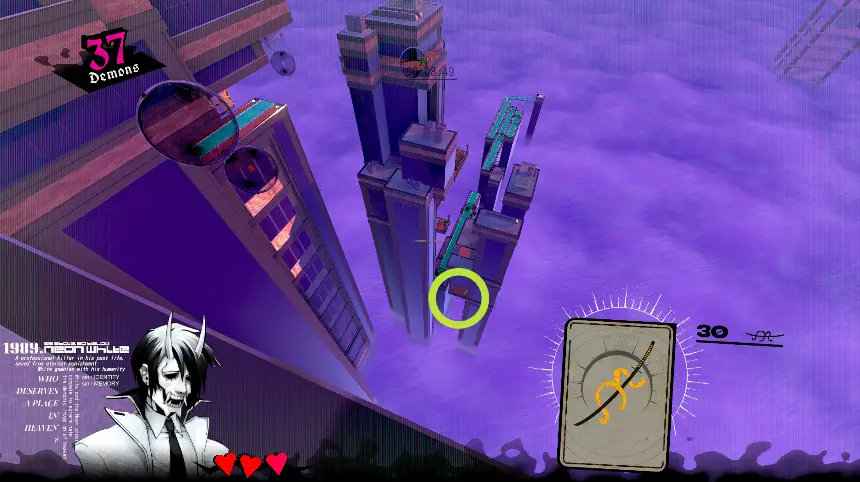
The present is below the building with the breakable hatch.

From the start, fall all the way down into the visible opening, then back up off the ledge and grab it. If you need a bit more assistance, you can grab the starting Fireball before falling towards the present.
9-5 Mayhem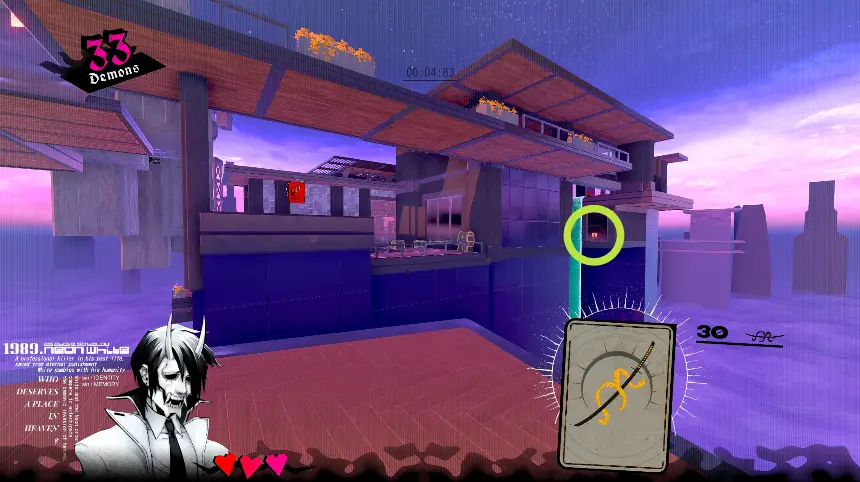
Located to the right of the starting point. It’s much easier to go backwards to reach the present.
Grab the Fireball, launch yourself to the floor above, and go right.
Jump under the hatch and fireball up.
9-6 Barrage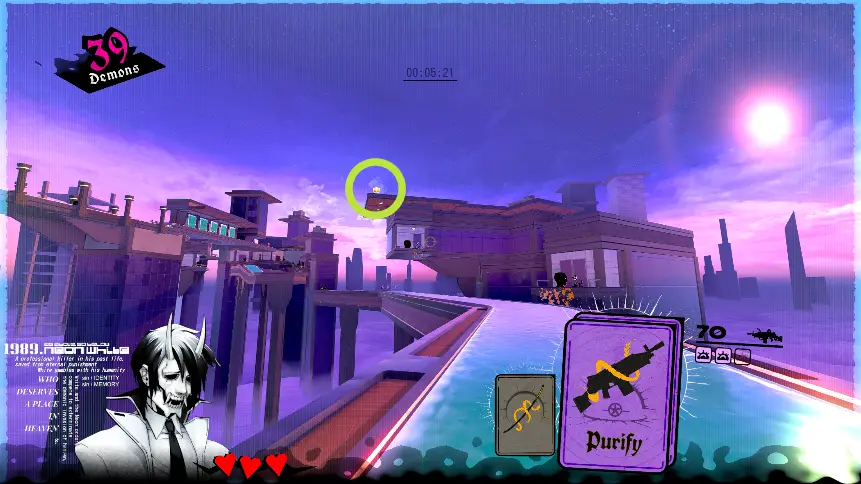
As always, the present lies tantalizingly out of reach.
You just need three Purifys, and there are plenty on your starting platform. Double-grenade jump up the first building from the nearest ledge, where the foliage is. Then grenade jump up to the roof.
9-7 Estate
This present is stuffed into a crawlspace just before the balloon demon section. Easily obtainable with the Fireball and Elevate you can get in this very room. Go up, get present.
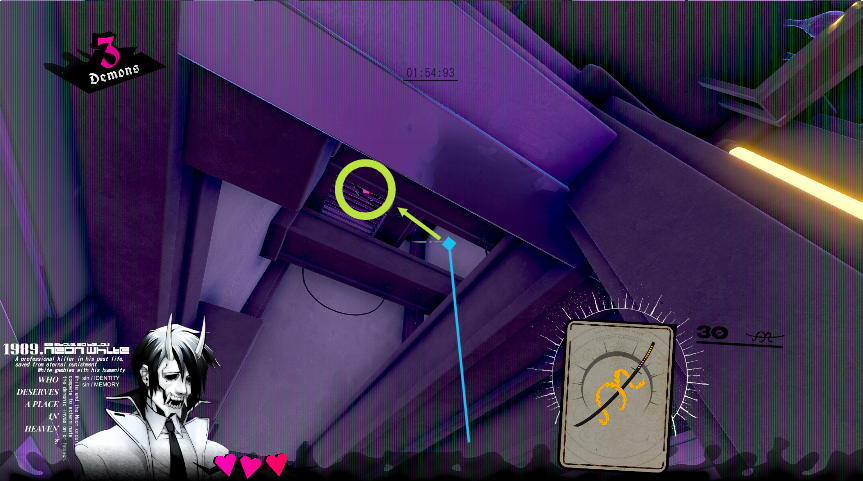
9-8 Trapwire
The present is in kissing distance! Note the massive vent behind it.
The vent opening is in the second breakable wall just before the exit. Two Fireballs needed: One from the first head, one from the chest before the walls. Jump in, launch up twice through the vent.
9-9 RicochetThis present is a struggle to collect. I advise getting familiar with the level shortcut so you don’t lose your mind.
You’ll have to jump from the roof of the concrete building to the present. It’s getting up to the concrete building that’s the tough part.
You need two Purifys and a Godspeed. Save the two Purifys by taking the flower directly to the right.
Grab the Godspeed from the vending machine. You can use the flower to blow up the head.
HOLD THE JUMP BUTTON DURING THE BARREL JUMP. Launch yourself towards this flower, but aim for the petal to the left of the green petal (your left). You’ll be launched backwards towards the target roof. Turn around quickly.
Double grenade jump up the wall. The grenade jumps need to be spaced out for maximum height. If you held jump during the barrel launch, you’ll have enough height to reach the roof. Don’t hug the wall too tightly, otherwise the small protrusions on the wall will block your ascent. Once on the roof, airdash to the present.
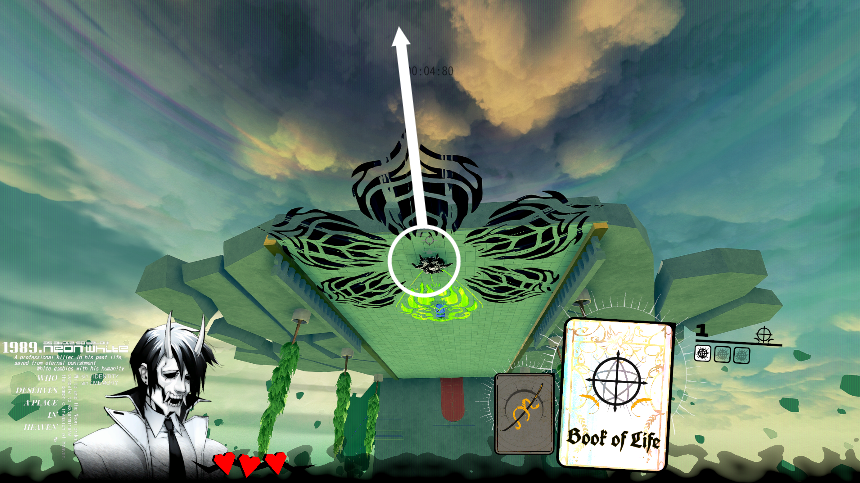
9-10 FortressThis castle is a triumph of level design. it flows so well
The princessThis present is imprisoned in the central tower. Entry is through the breakable wall ahead.
Proceed normally, get the two Purifys, and save them up by gunning down the enemies in the guard towers. You should have spare Elevates; double jump into the far guard tower. The chest in the tower contains a conveniently placed Dominion which should be used to replace your other Elevate.
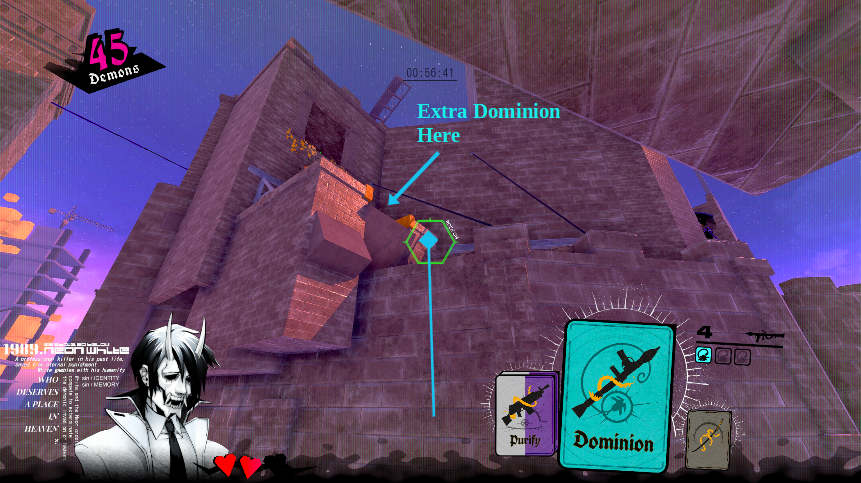
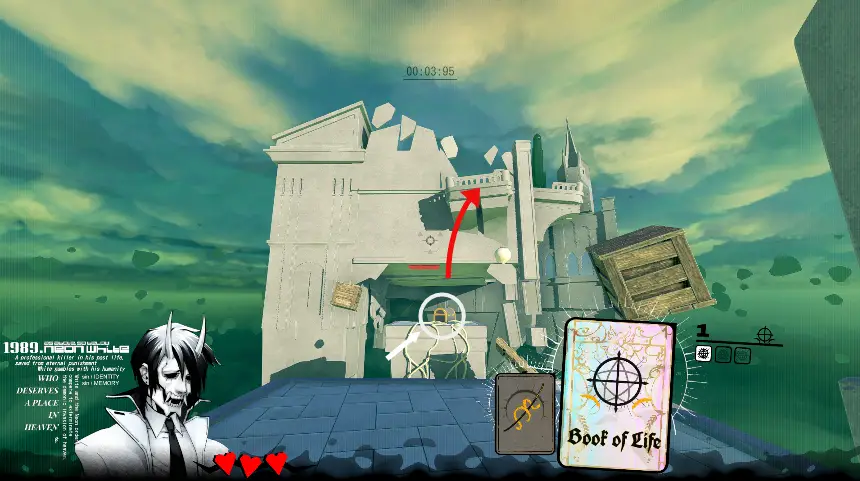
Turn back towards the central tower and grapple up. If you aren’t confident in your grenade jumping, you can grab a bonus Dominion by grappling towards the orange-rimmed well.
Walk around the right side of the tower. Bust through the door with a grenade, then grenade jump up to the present (or use your bonus Dominion).
Chapter 10 – The Third Temple
10-1 Holy Ground 
This “present” is located in a side tower far off to the right. From the second diamond, fall down and to the right towards the near tower. As you fall under the half-arch, rocket jump back up the cliff side until you’re high enough to grapple to the far tower.
After that, it’s a straight shot down to the present.
Chapter 11 – Thousand Pound Butterfly
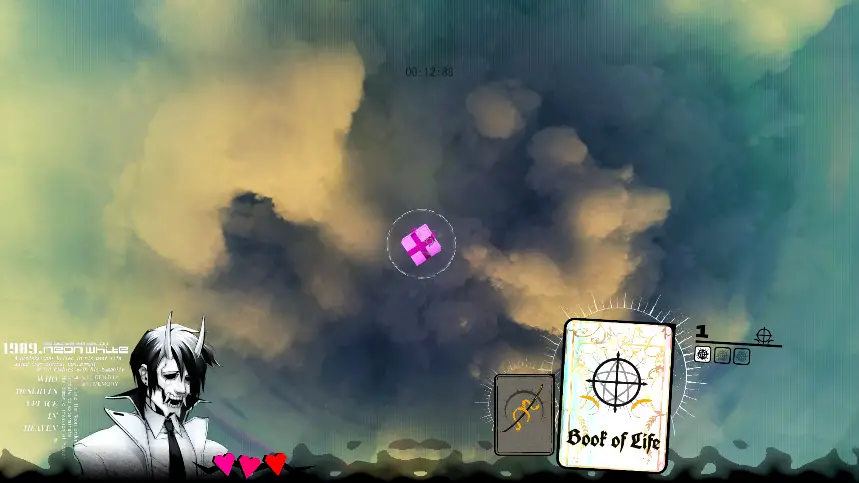
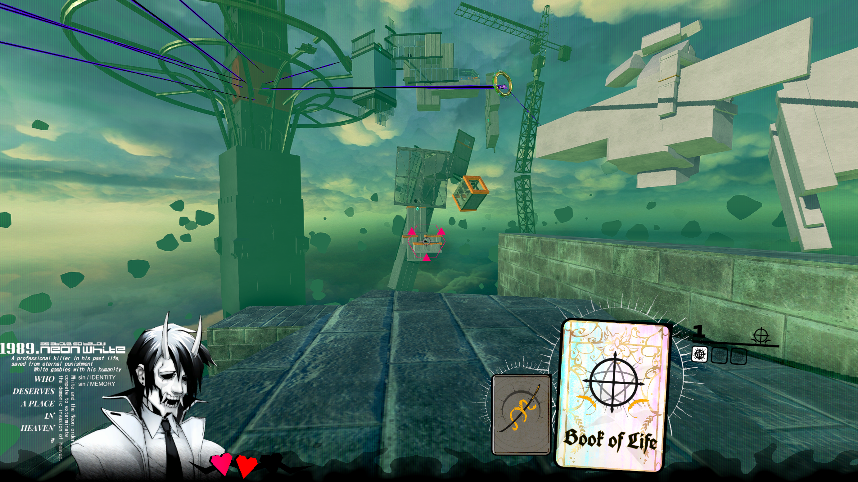
11-1 Spreeboof of life. It’s OK, 4/10.
The book’s warp range is practically infinite, enabling some truly degenerate shortcuts. Warping imparts some slingshot momentum, so adjust your starting position before you warp.
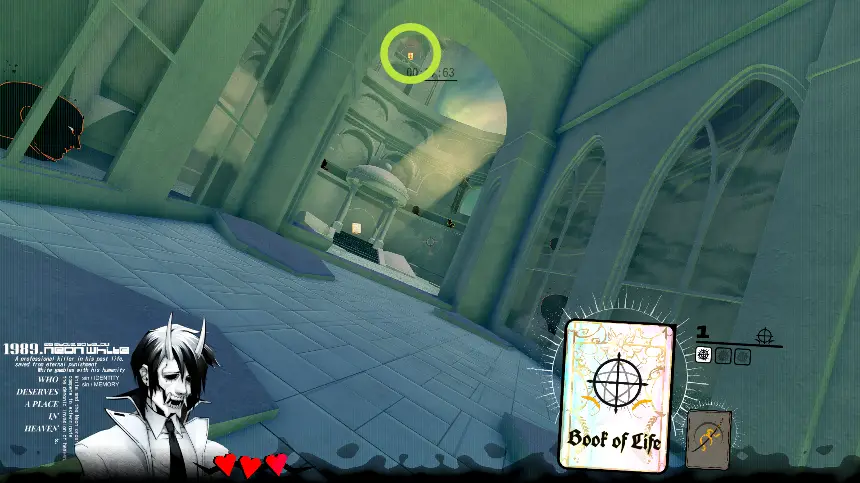
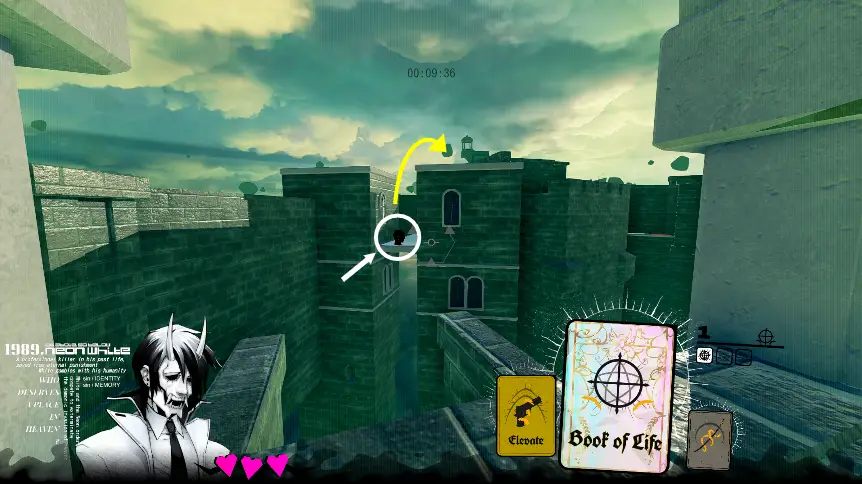
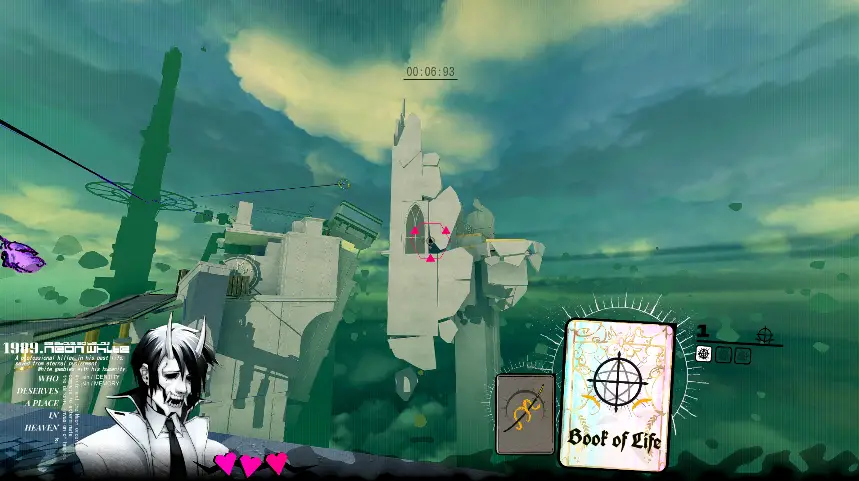
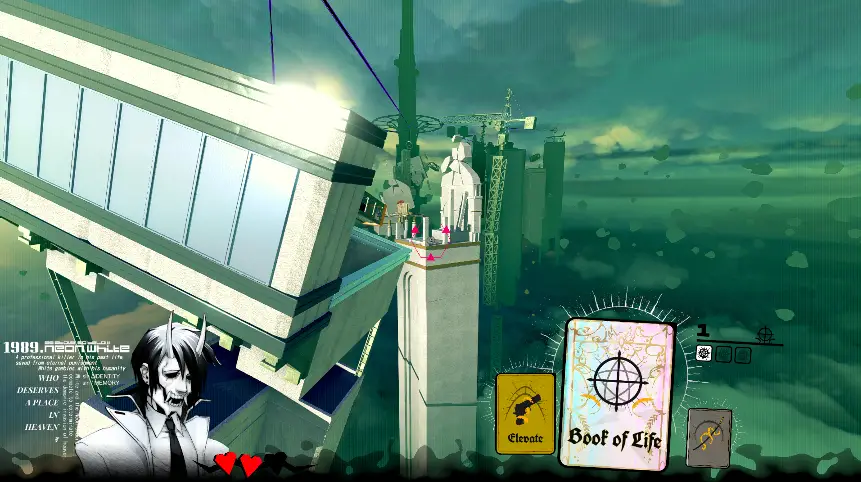
The present is up and behind the exit.
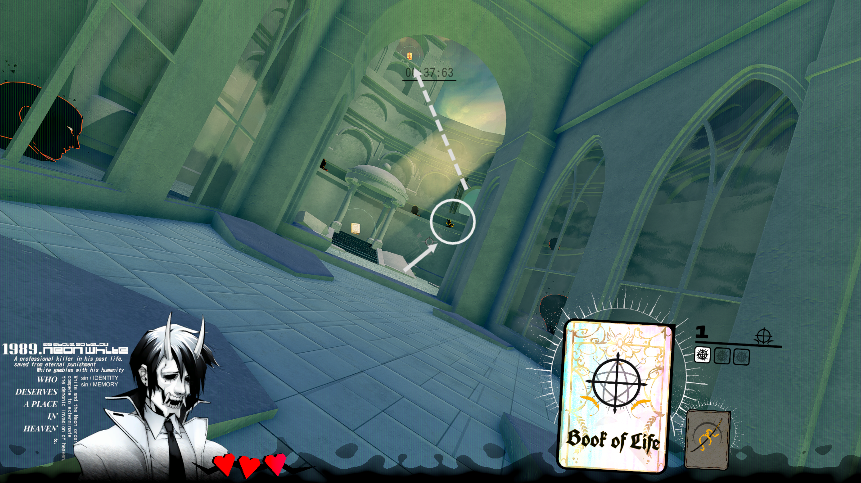
Get through the opening behind the sole yellow demon, then follow the balloon demons up and leftwards to the present.
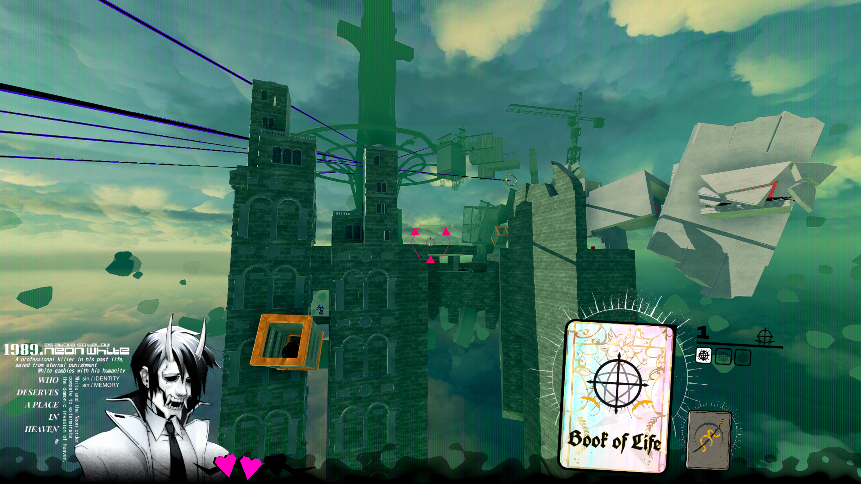
11-2 Breakthrough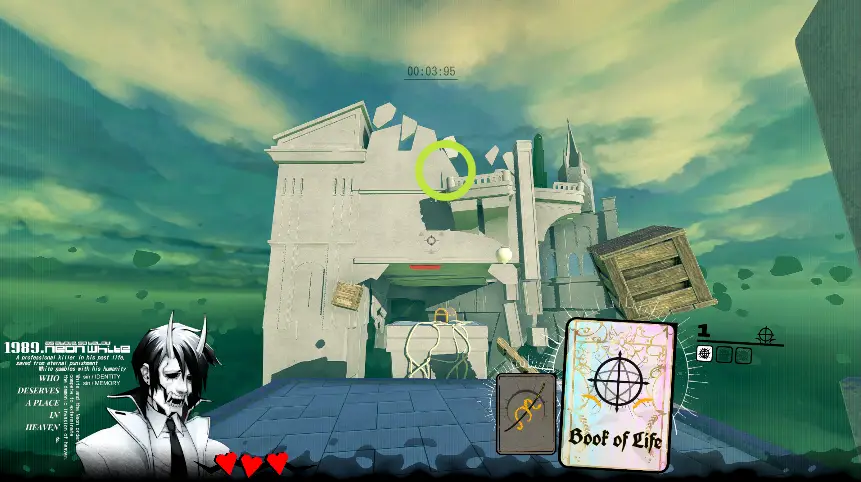
It’s on the top floor of the building across from the start.
Warp to the chest, then quickly fireball up to the balcony.
11-3 Glide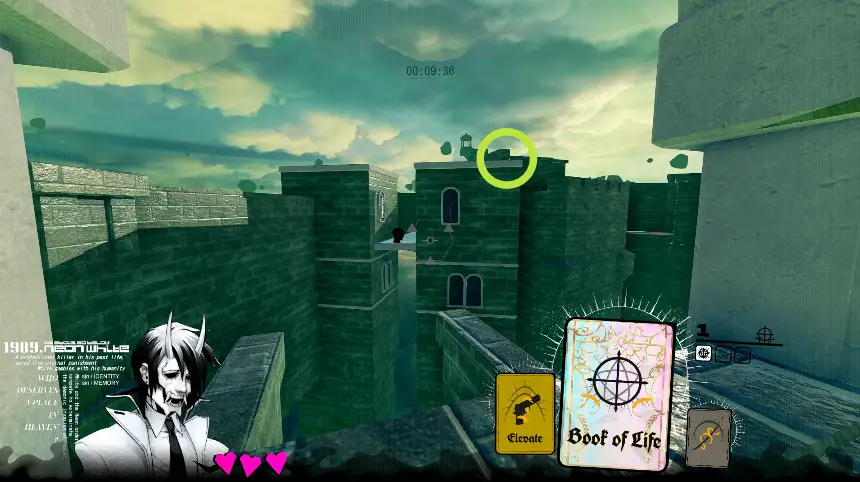
On the roof, up and to the right of the third head in the level.
Save your Elevate by warping to the first flower instead of jumping the gap. After warping to the third head, double-jump to the roof.
11-4 Closer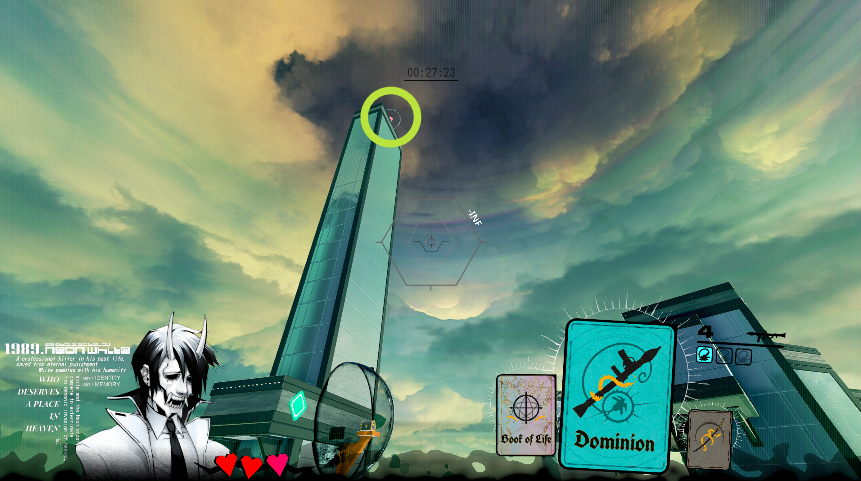
A tricky present overlooking the Dominion grappling section.
As with other Very High presents, save up Dominion cards by rocket jumping instead of grappling. From the first Dominion chest, launch yourself towards the nearest corner of the skyscraper and rocket jump up to the ledge. It should take 3 rockets.
Switch back to the book. Hop off of the ledge and turn back around. Warp back up to the chest and rocket jump up the wall. Once you’re down to your last rocket, finish your ascent by grappling to the top.
11-5 Hike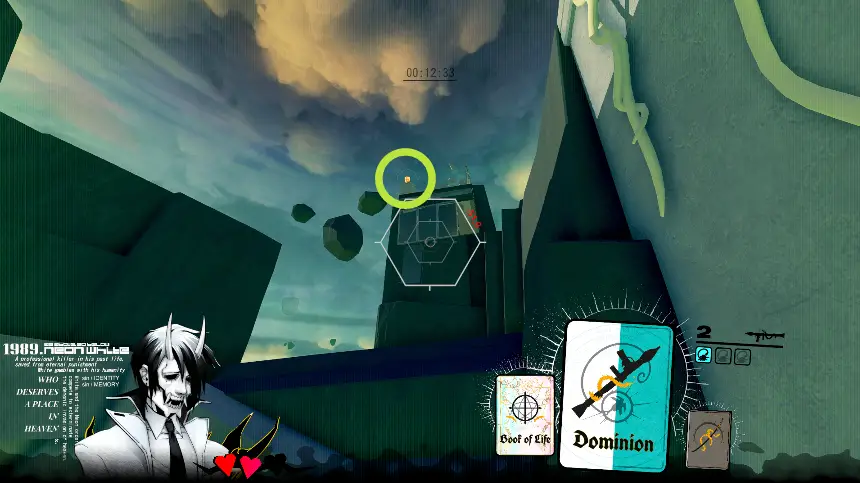
After popping out of the starting pit, look left to see the present.
Save the starting Dominion by rocket jumping up the wall to exit the pit, then rocket jump + grapple to the present.
11-6 SwitchI made this guide after trying to search for “Switch” on the Discord. :>
You just want to find the present? Turn off the music and jump! Then look up.
To collect: jump past the first flower, turn around, then warp it. It’ll launch you towards the present.
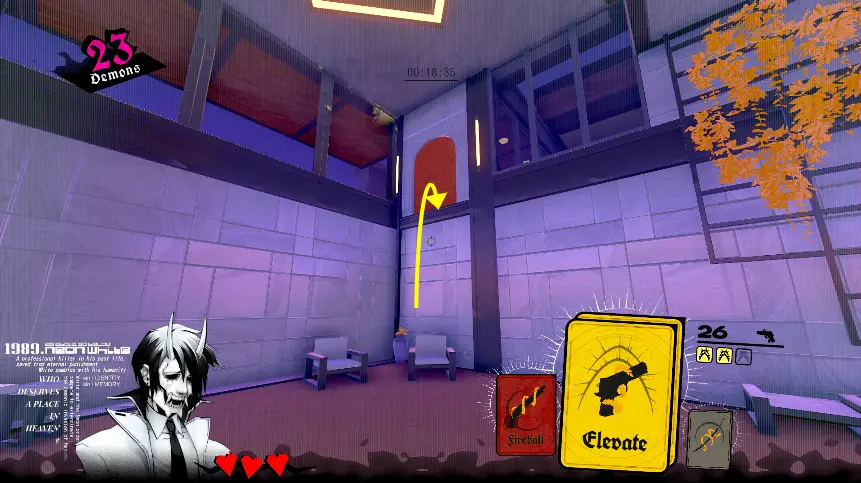
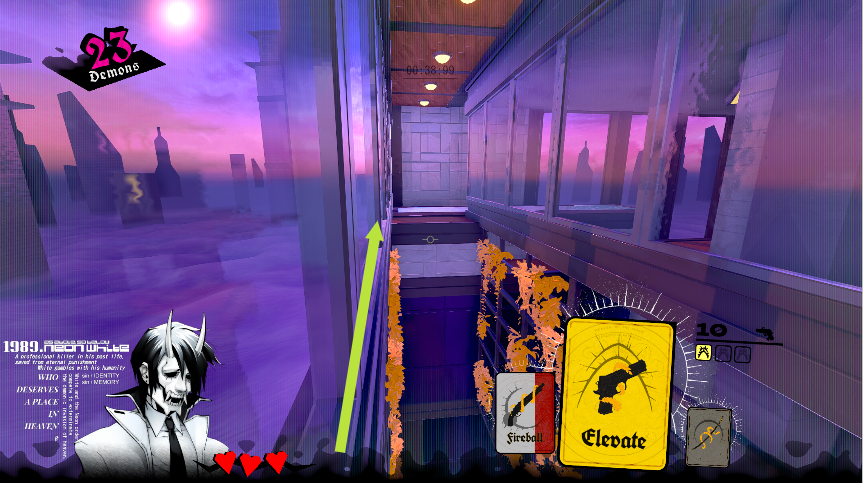
11-7 AccessYou could say this present is difficult to “access”, heeheehee
After breaking through the large triple-stacked wall, you’ll see the present in a little building across the way. Since there’s a floor hatch in the way, you’ll need two Fireballs to reach it.

Get through as normal until you get to the first Fireball. Warp-kill the head with your book, grab the Fireball, and shoot the vending machine to get your second Fireball. Instead of fireballing through the wall, shoot it out (3 shots needed, perfect!). Jump on the vending machine, warp out using the tripwire, and warp-kill the other tripwires. Warp through the hole via the balloon demon and land beside the yellow demon.
Don’t warp-kill the yellow demon or you’ll lose your Fireballs. Fireball to the present, then fireball up through the hatch.
11-8 Congregation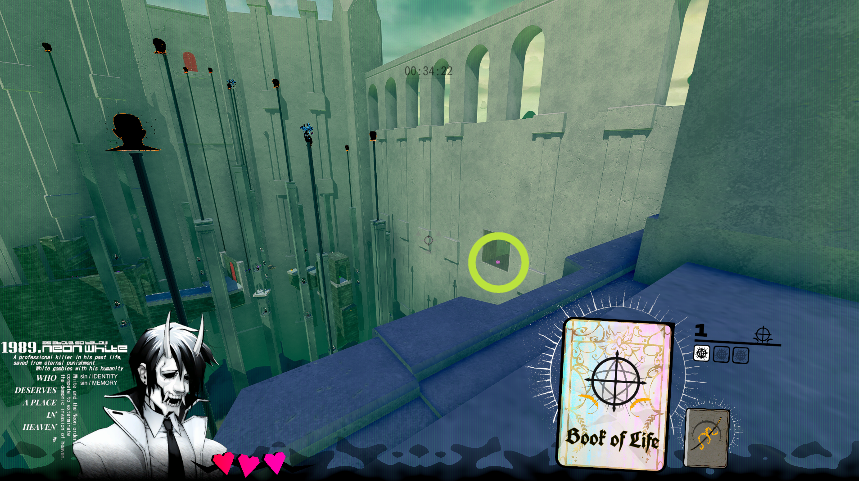
In the final arena, look down and to the right. The present is protected by a window, so you’ll have to drop down from behind.
Warp to the two blue demons, turn around, and warp to the indicated head. Airdash twice to the left through the arch and fall down to the ledge. Get the present.
11-9 SequenceAnother present that you can find with a careful ear.
You’ll see the present after the second set of doors by turning around.

At the second set of doors, cut down the middle mimic and edge down the side to reach the present.
11-10 Marathon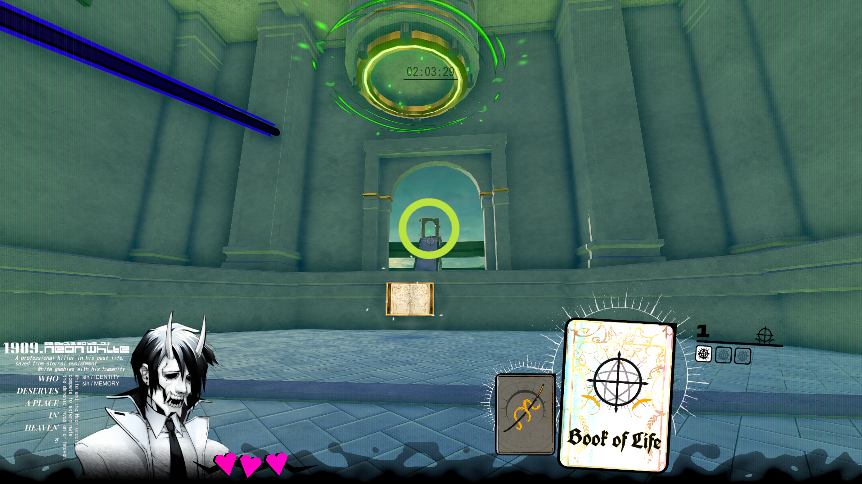
First, the present is located behind the exit. The difficulty lies in traversing every section in between in one go. To that end, here are some shortcuts to bypass the difficult and tedious sections.
Look right at the start. Warp through the crack.
After the ring, warp this demon. You can shoot the tripwire here to help break the exit walls.

Get the Purify after the head. Instead of dropping through the hatch, warp this demon. Grenade jump the floor hatch ahead, which will give you enough height to reach the roof of the building. (Hold the jump button before the jump.)

After the super grenade jump, warp this demon.
After the Fireball section, run up to the right corner of the ledge. Jump straight upwards and warp this demon. This demon can only be seen at the peak of the jump, so it might take a few attempts at the highest point of the ledge. Also, you can warp-kill the nearby tripwire to help break the exit walls.
Warp this demon to enter the final Dominion section. Proceed through as normal, but shoot two or three rockets towards the exit walls between each grapple. Take care to not get hit by the tripwires as you approach the present.
After getting the present, you must ascend the tower in a counter-clockwise spiral, collecting weapons and bopping enemies in a fashion similar to the sidequests. The final rocket climb needs like, 25+ rockets. Don’t use grapples, because you’ll need them all for the final gap. Good luck!
That's everything we are sharing today for this Neon White guide. This guide was originally created and written by Brilli. In case we fail to update this guide, you can find the latest update by following this link.