- 제목: Project Heartbeat
- 출시일:
- 개발자:
- 발행자:
Information about Project Heartbeat is still incomplete. 이것을 사용하여 게임의 세부 정보를 입력할 수 있도록 도와주세요. 문의 양식.
The ultimate guide for beginner and advanced players alike. This guide will teach you the basics, help you understand the mechanics taken from the “Project Diva” series Project Heartbeat was modeled after, all the way to advanced techniques used by top players around the world.
소개
Today we’ll be talking about the very basics to playing Project Heartbeat, as well as take a deep dive into methods used for top level play, the origins of system mechanics, 그리고 훨씬 더.
While you can use whatever controller you like in Project Heartbeat, traditionally this game was either played with an arcade controller, or a Playstation controller (DS4 preferred). While arcade controls are certainly going to be talked about, this guide will be written under the assumption you are using a Dualshock 3/4/5. Any controller with the same general button layout such as an Xbox or Nintendo Switch controller will still apply, but I HIGHLY recommend the Dualshock 4 가능하다면.
What you missed by not playing Project Diva
You can skip this section entirely if you’ve played Project Diva F 2nd & Project Diva Future Tone or are already familiar with the history of the franchise.
Just in case you bought this game off steam with no knowledge of its history, Project Heartbeat is a spinoff game modeled after the official Vocaloid rhythm game series produced by SEGA titled “Project Diva.”
There are two definitive releases of Project Diva that we’ll be referencing throughout the guide. Project Diva F 2nd (which we’ll refer to as F2nd), and Project Diva Future Tone (whichi we’ll refer to as FT).
F2nd was a PS3 game and for many years the definitive way to play the series. F2nd was a refined version of Project Diva F, as well as being the latest official release to contain a chart editor.
FT is the latest release in the series, that is an arcade game with a very good PS4 port. Featuring over 200 songs and unique system mechanics, combined with a difficulty level that F2nd never even came close to, Project Diva Future Tone is THE definitive Project Diva game.
The Essentials
Let’s not waste any more time. Here we’ll go over all the base mechanics and everything you need to know to be able to start playing any map you want!
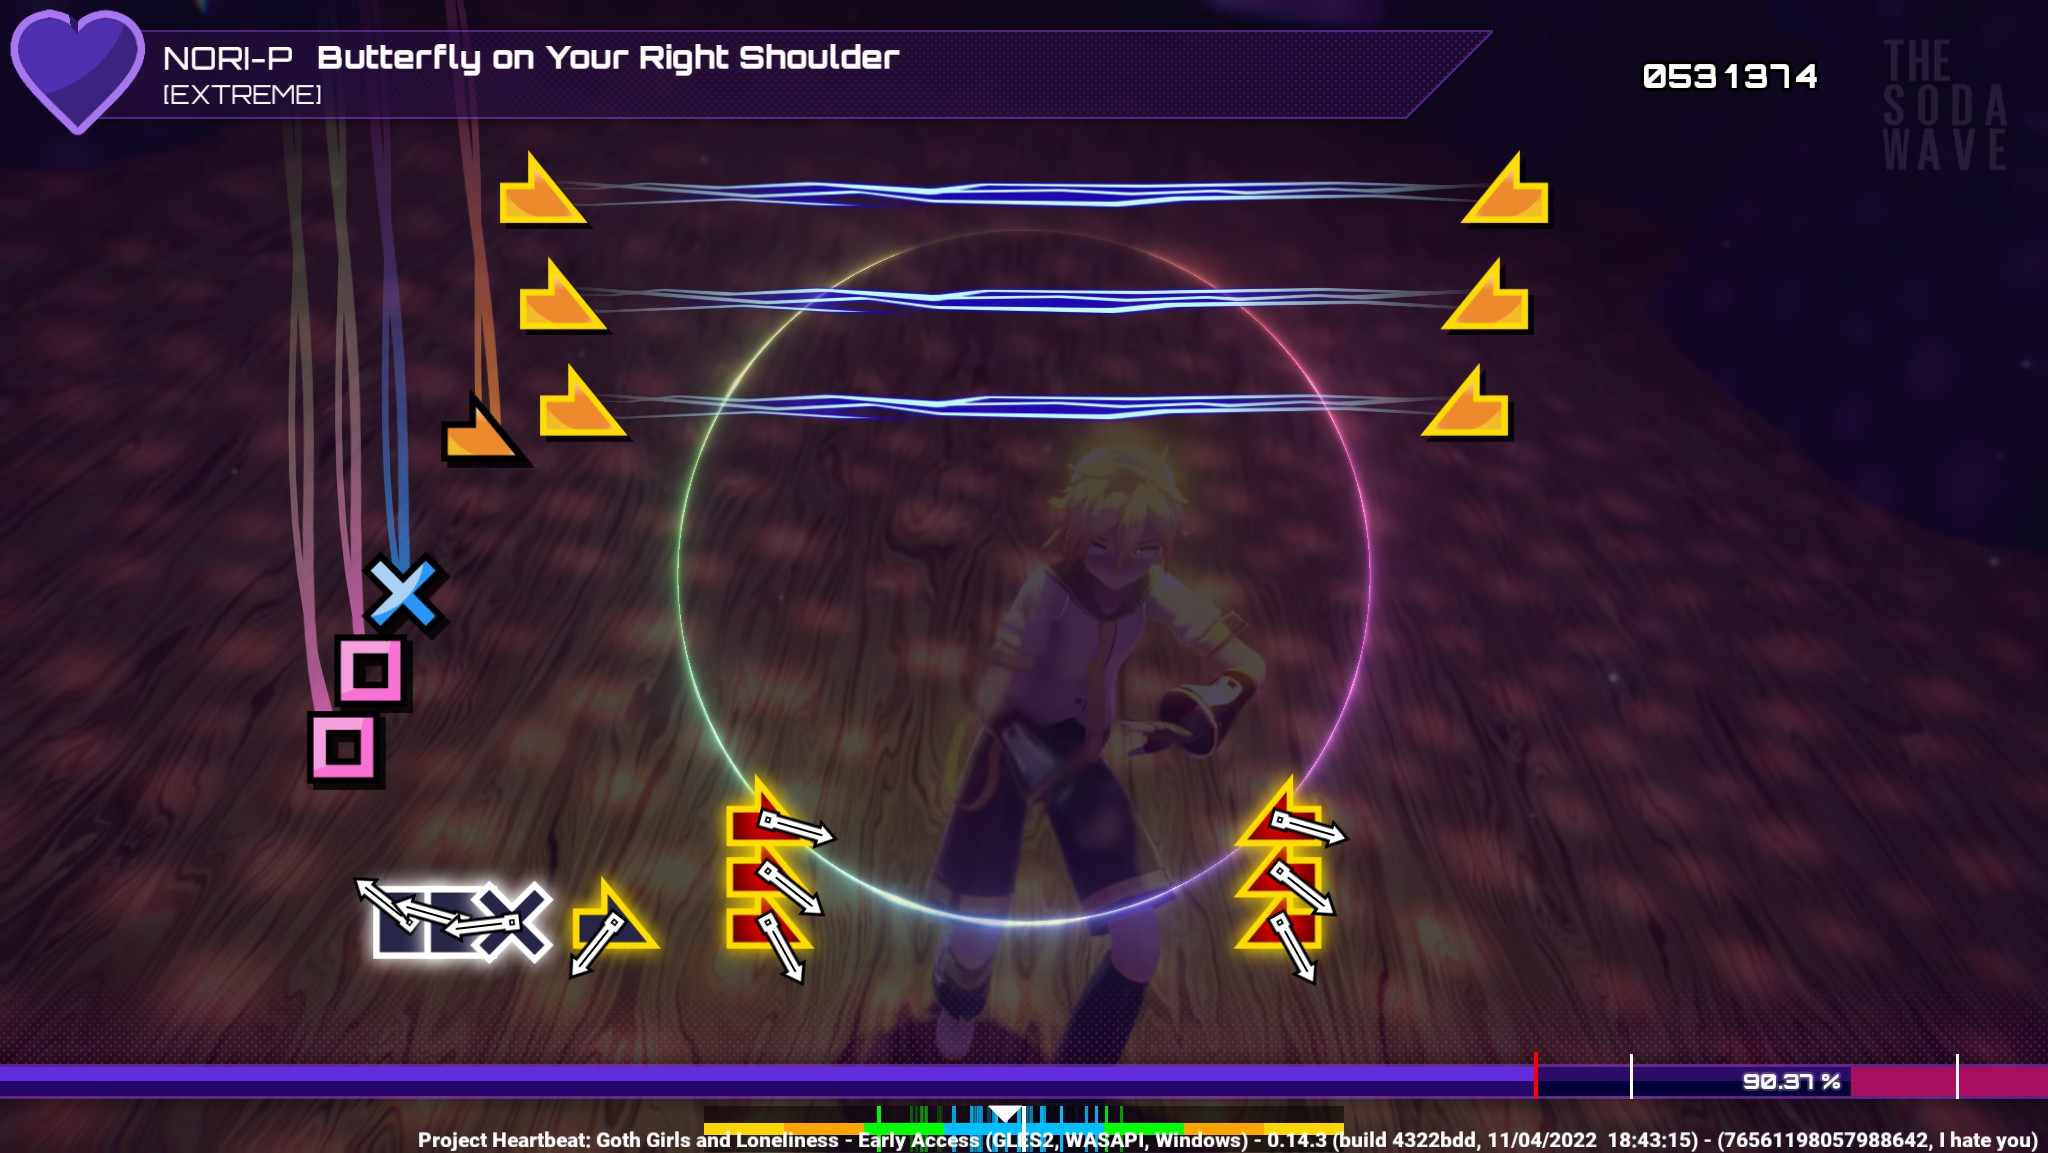
The basic flow of the game goes like this: Outlines of the upcoming notes appear on the screen, then the full image of said notes will fly from across the screen and it is your job to hit the correct note as it collides with the outline.
If you need help understanding the timing, there’s a little clock hand rotating in the center of the outline which helps indicate when the note will arrive. Rotating clockwise, you should hit the button right as the hand reaches 12, 일명, straight up.
In this game you only have five inputs, with at least two buttons to activate each.
- 삼각형
- Square
- 엑스
- 영형
- 마음 (or Slider)
All of the face buttons can be activated with the dpad in their respective directions. What I mean by that, is to imagine that instead of a dpad, you have another set of face buttons under your left thumb.
- Triangle = Up
- Square = Left
- X = Down
- O = Right
이것을 명심하십시오. You will NEED TO ALTERNATE BETWEEN RIGHT AND LEFT HAND in order to hit the buttons at the speed required for gameplay.
F2nd Mechanics
“So far you’ve been making sense, but what is all this? And why haven’t you explained Heart/Slider yet?”
Project Heartbeat allows for the usage of system mechanics from either F2nd or FT, but rather uniquely allows charters to use system mechanics from both games simultaneously. 그것은 말한다, I’m going to separate F2nd mechanics from FT mechanics, even though they’re all the same game in Project Heartbeat.
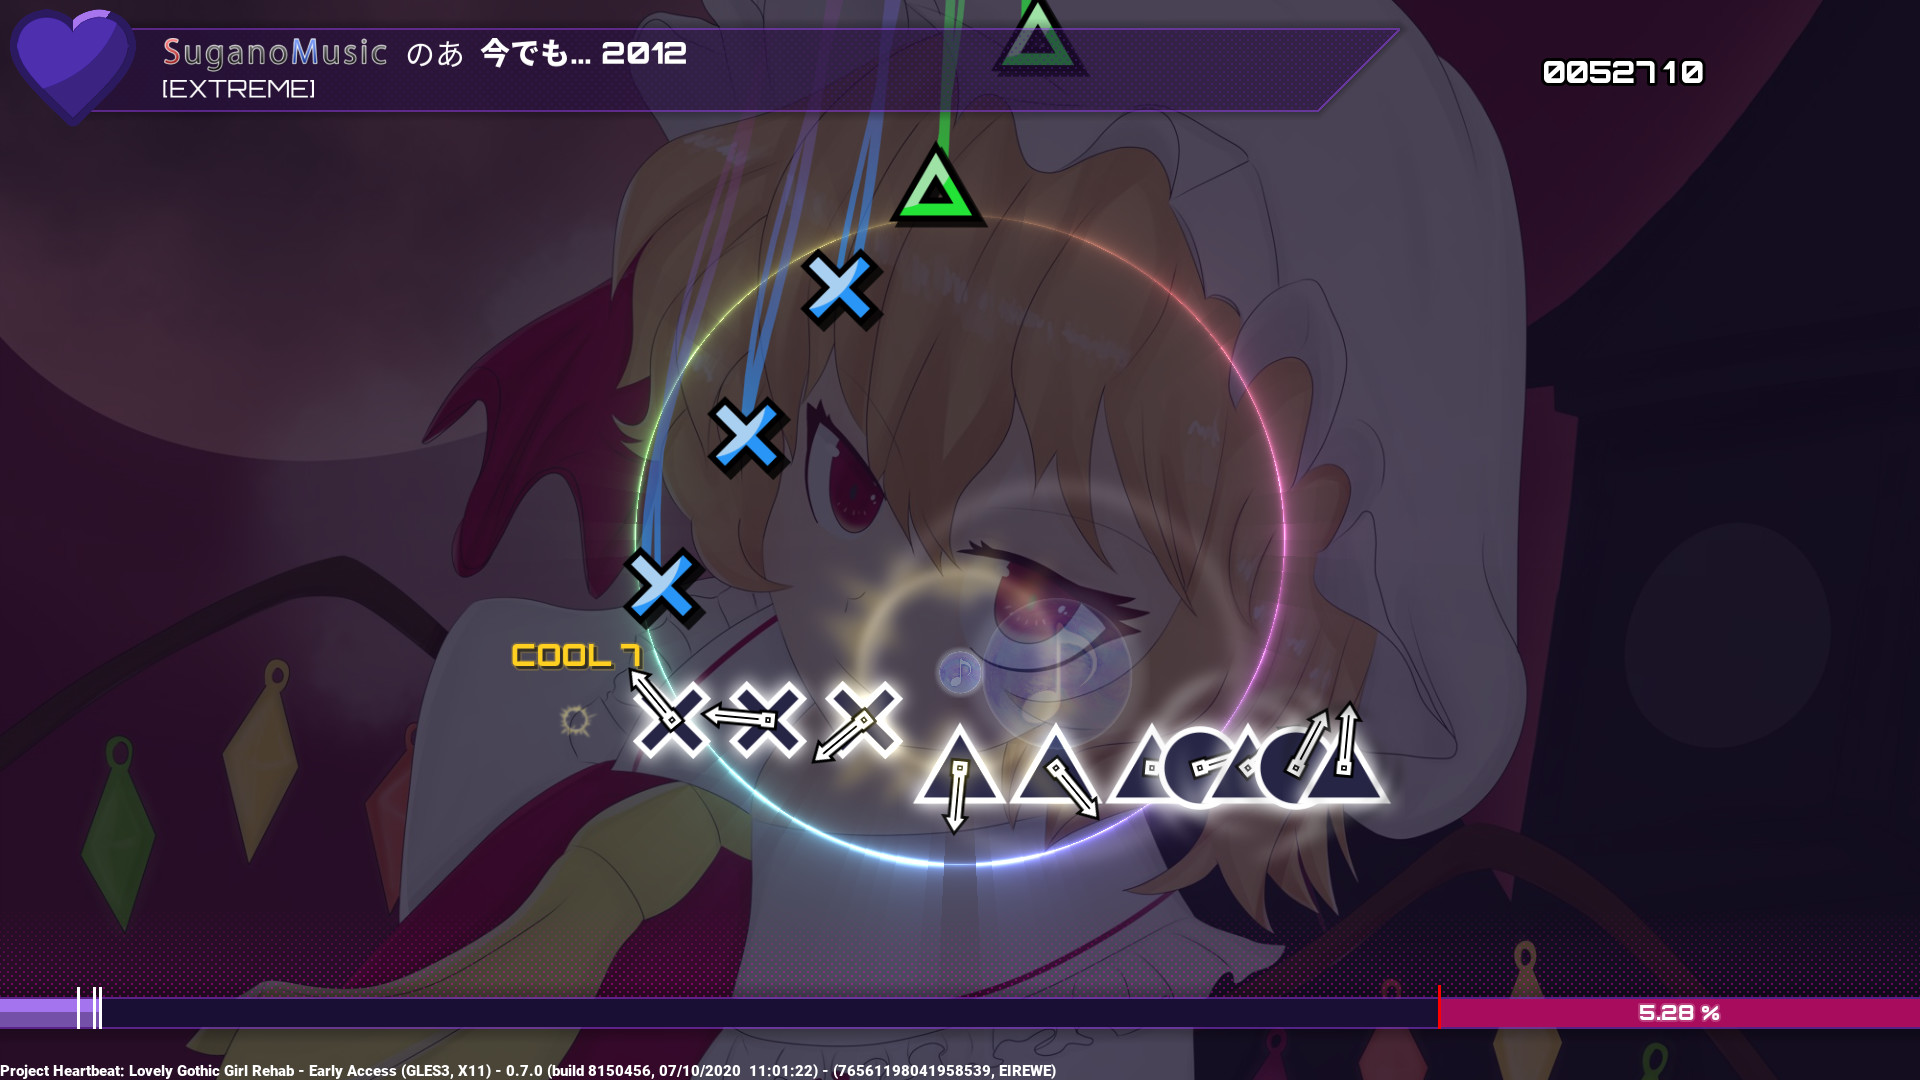
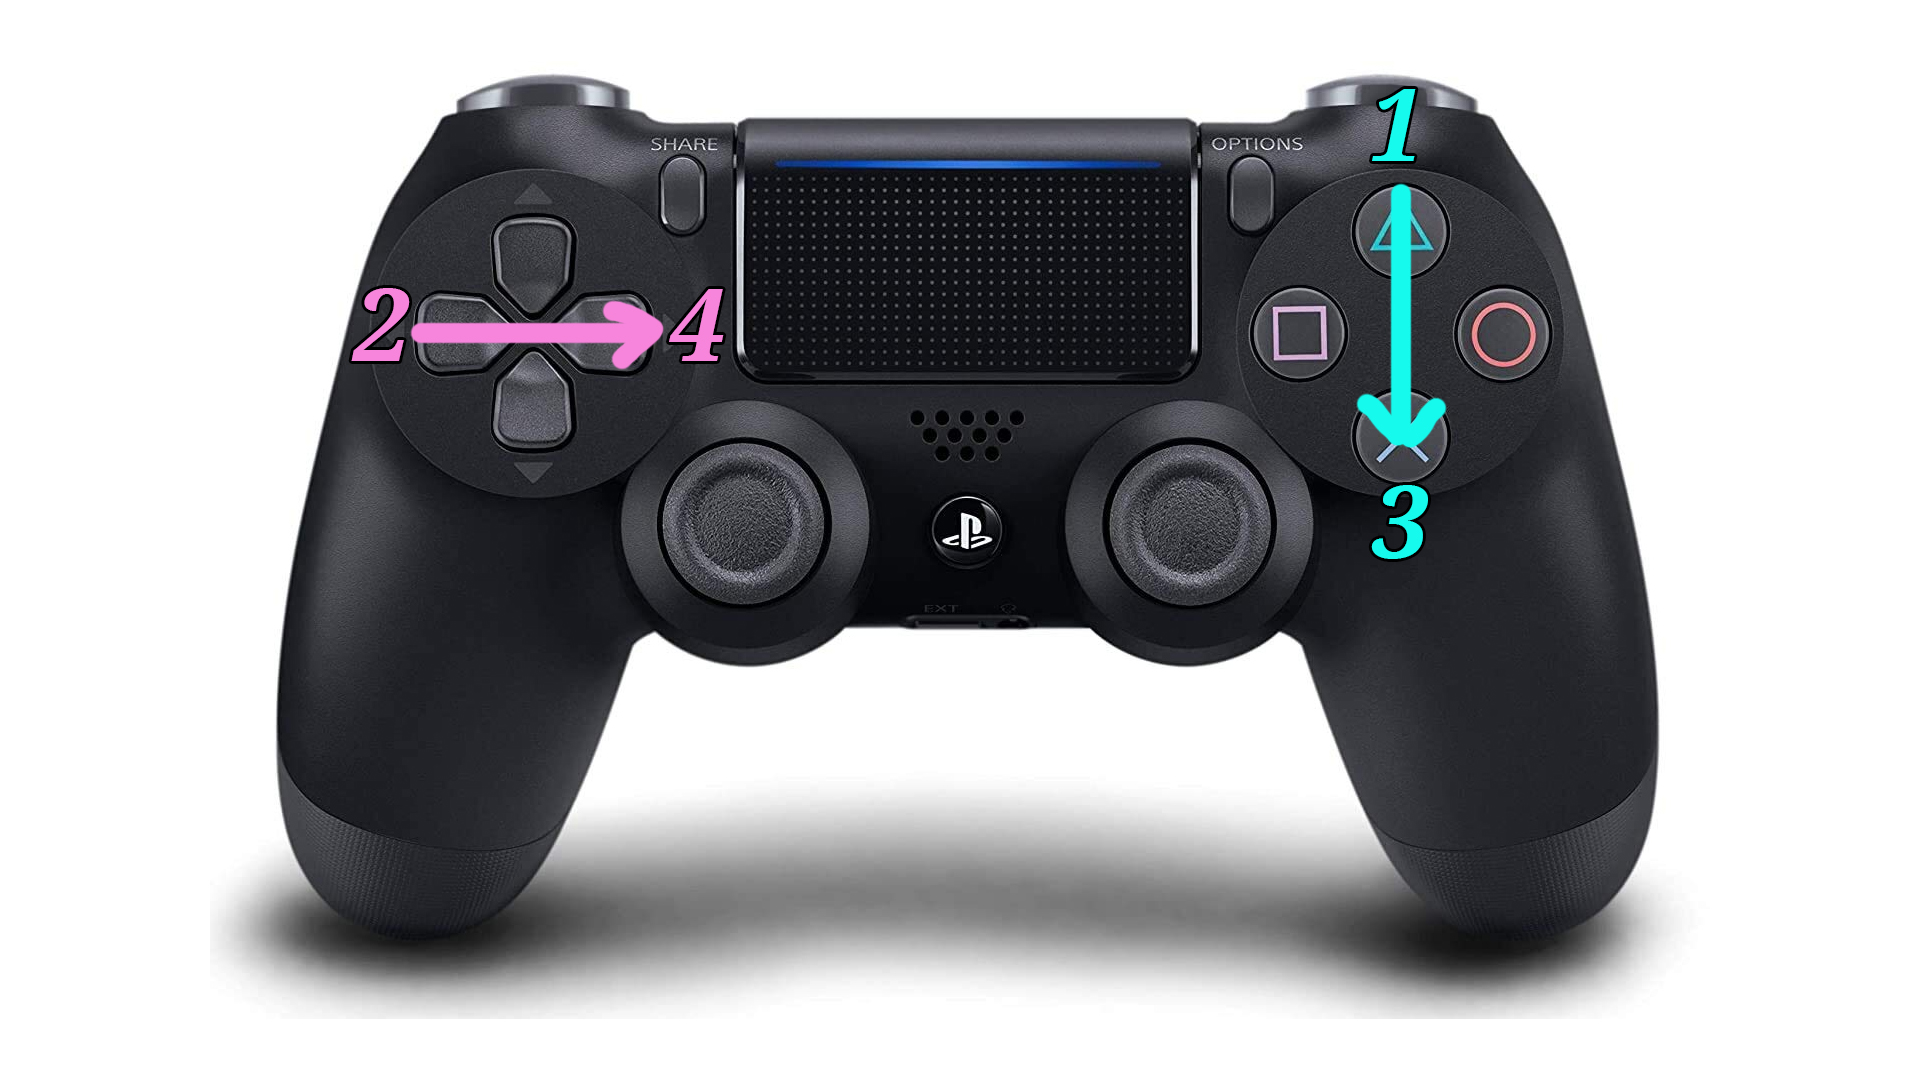
In the image above, we have the three definitive F2nd mechanics.
- 마음 is activated by flicking the control stick. There are Double Hearts which have a similar graphic to the Arrow.
- 화살 is activated by pressing the indicated direction on both the dpad and the face buttons (예를 들어. a left arrow means hit “왼쪽 + 정사각형,” down arrow means hit “아래에 + 엑스”)
- The funny-looking X is a F2nd Hold, which requires you hold the button at the start of the line and release at the end of the line. Messing up the hold or the release will end your combo.
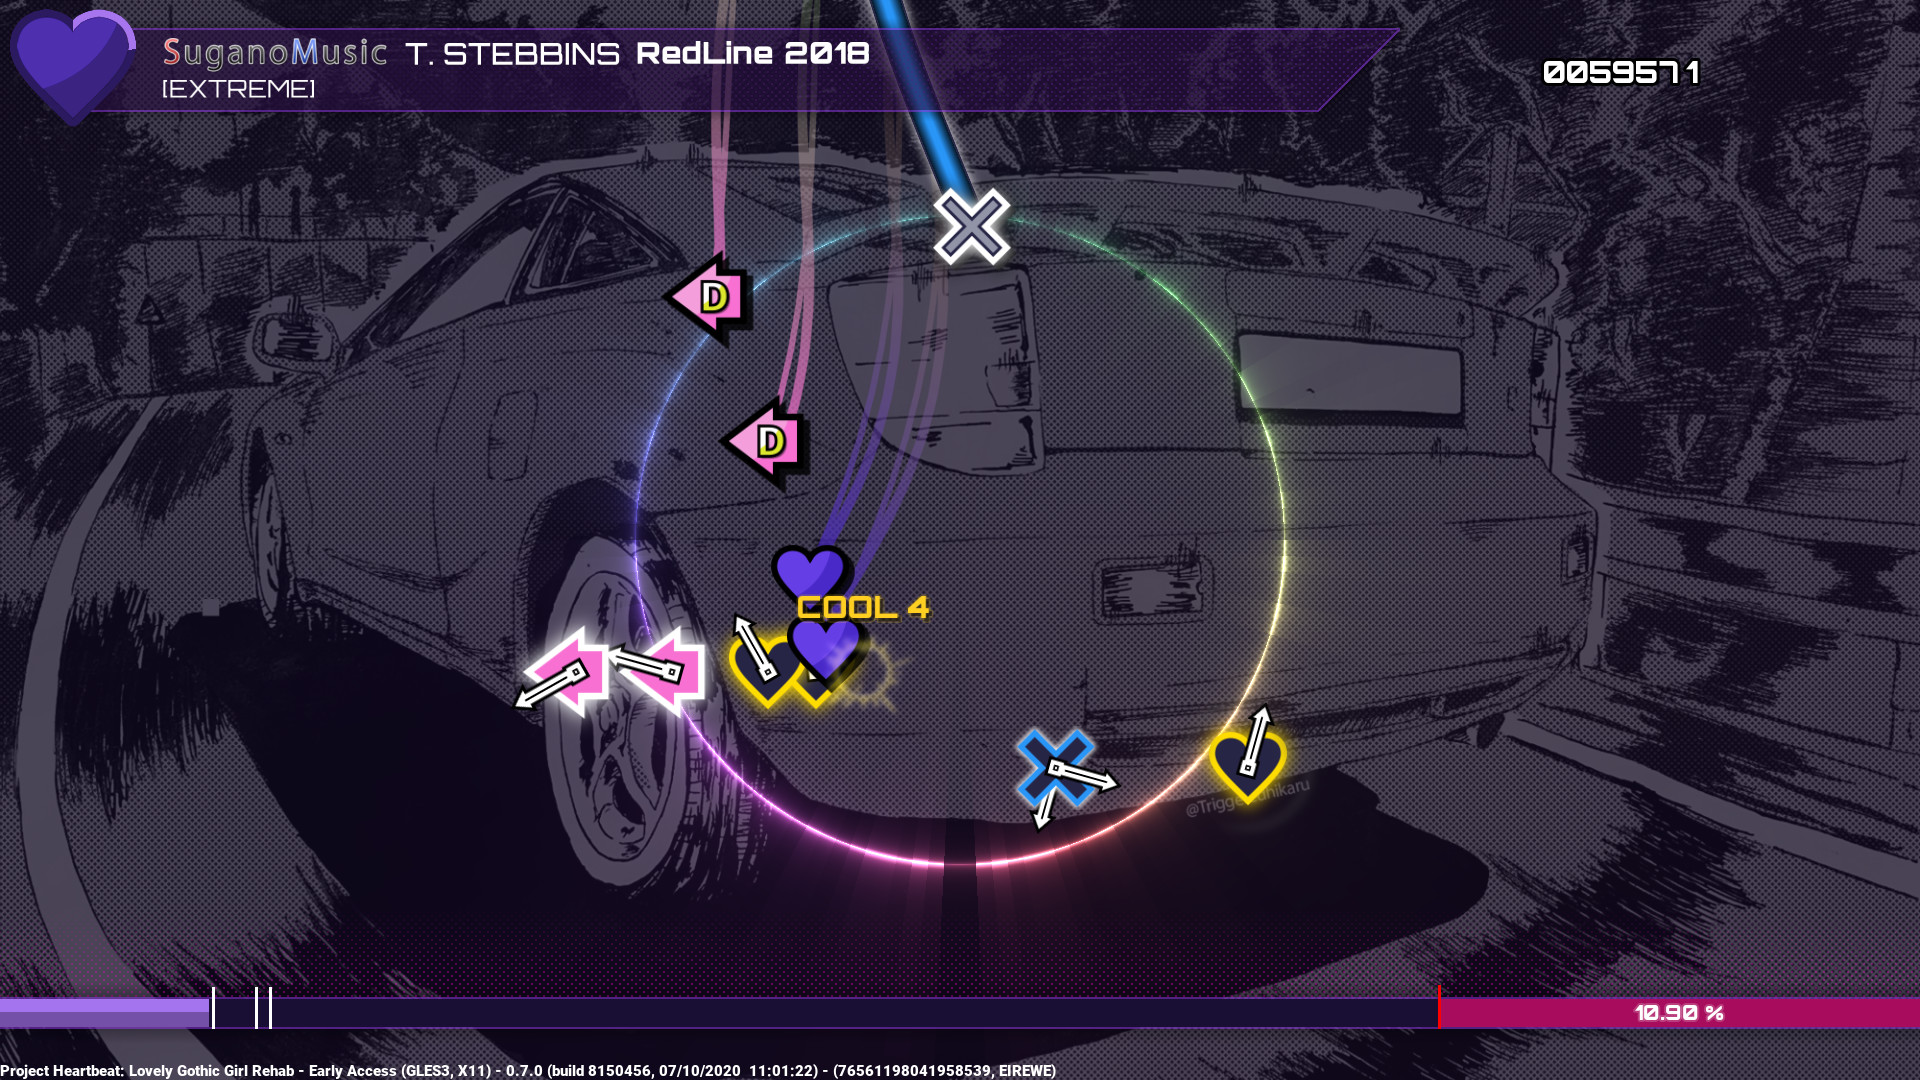
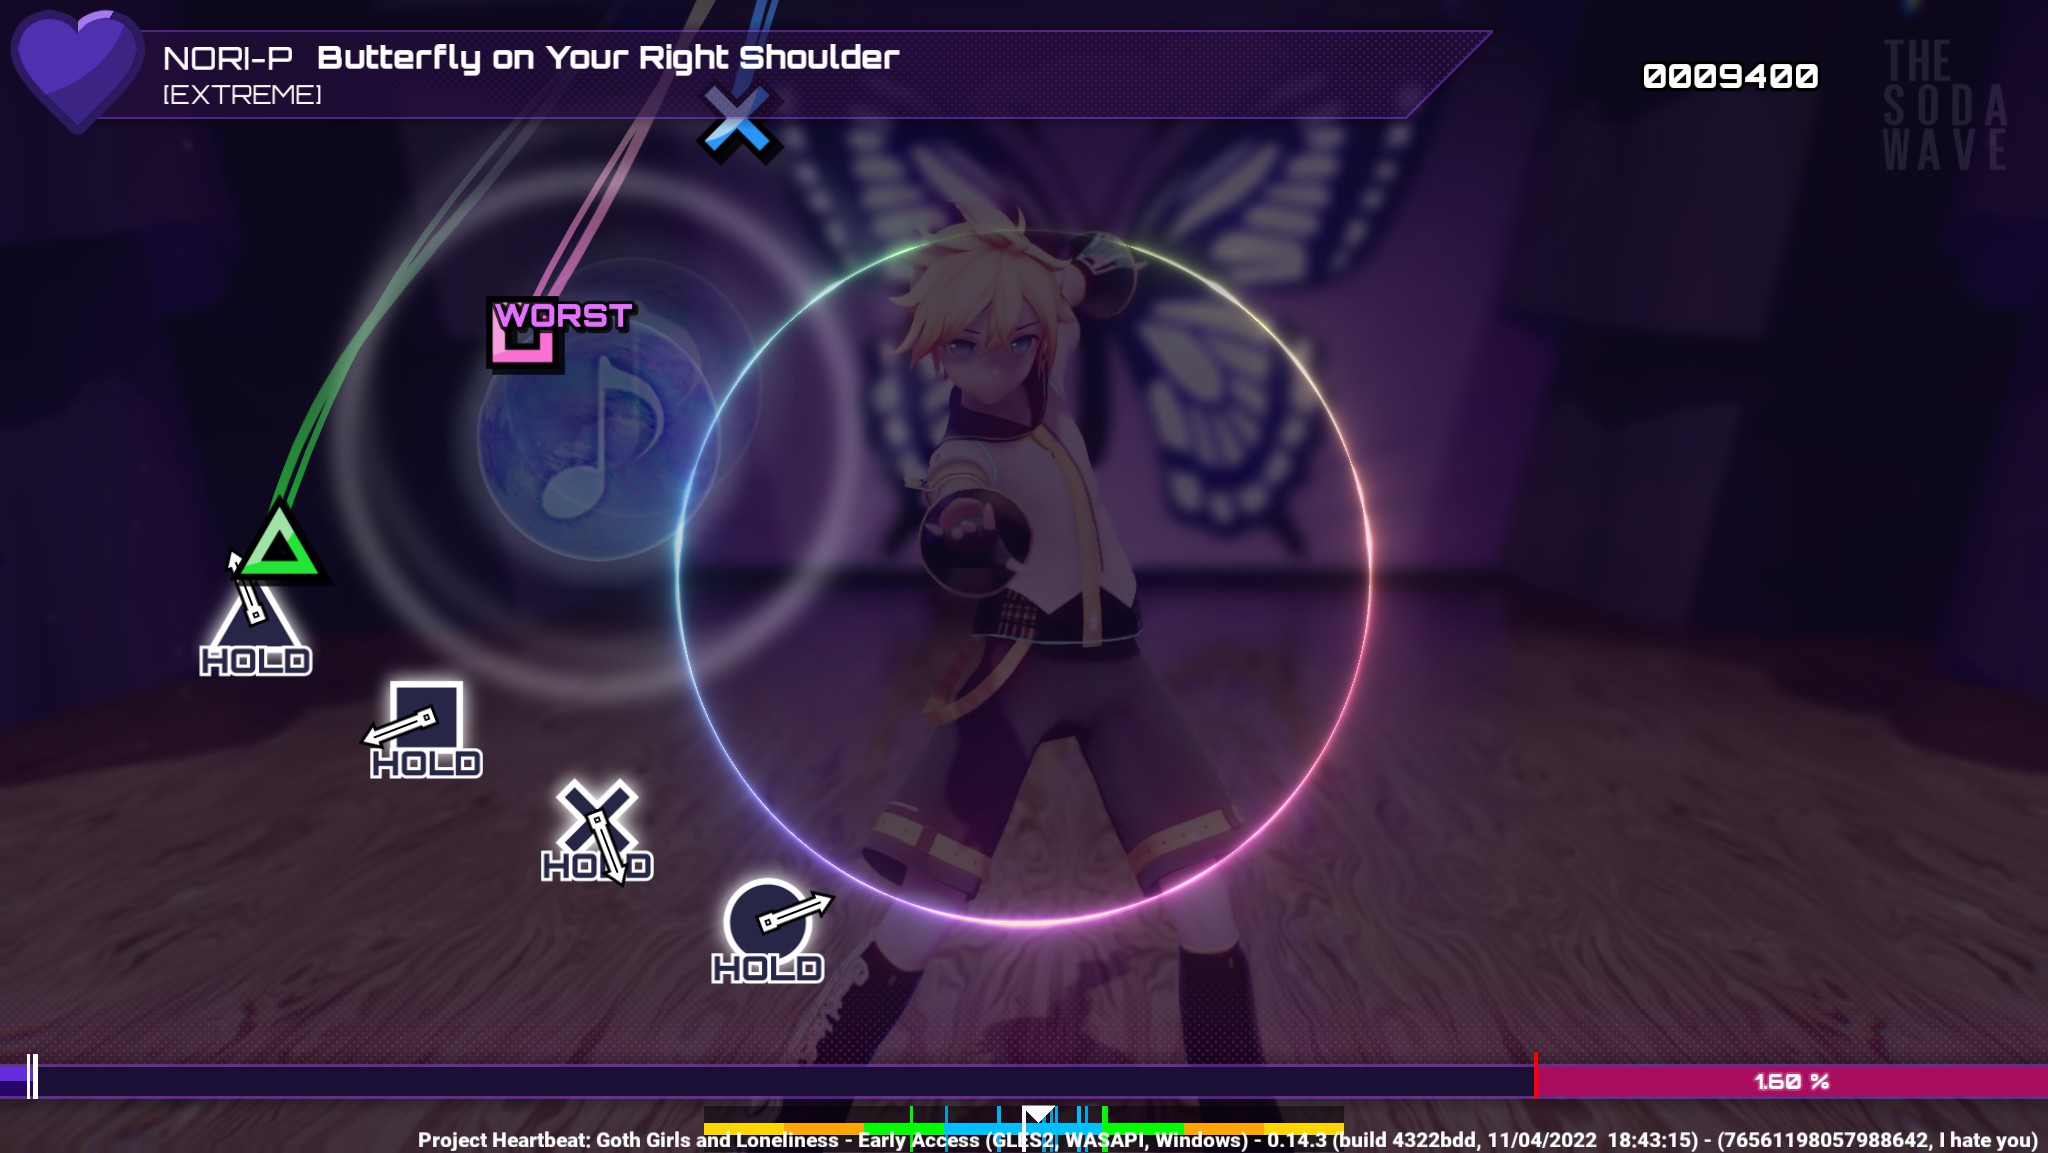
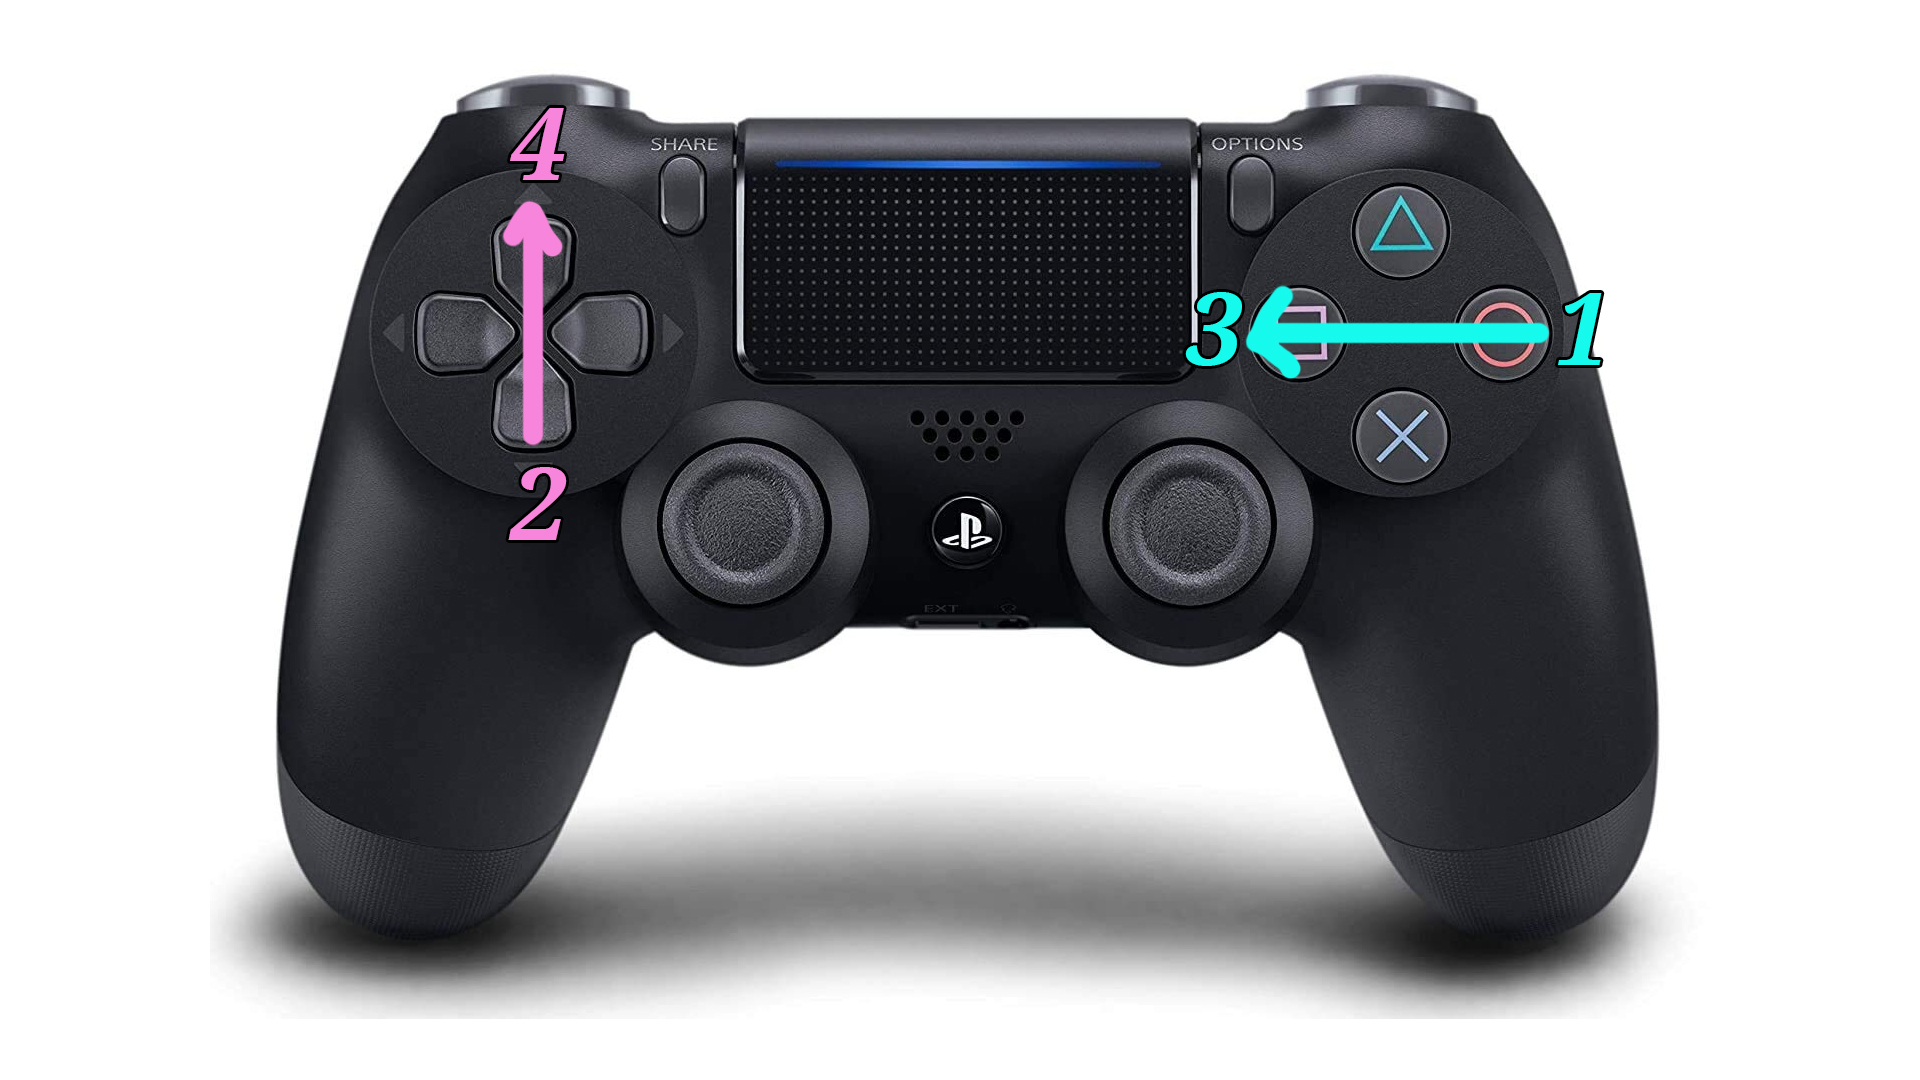
Future Tone mechanics (Sliders and Multi-notes)
Multi-notes require you to hit multiple directions at the same direction. You can use any combination of face buttons vs dpad that you like. 예를 들어, to activate the Square + X combination in the picture, you could hit:
- Square + 엑스
- Square + 아래에
- 엑스 + 왼쪽
- 아래에 + 왼쪽
Multi-notes come in any amount from 2 에게 4 메모. More later on how best to deal with these notes.
Sliders are similar to Hearts, however they are directional. You may have to flick left or right, or do something different on both sticks at once (예, sliders have multi-notes as well!)
Sliders also have hold variations (but they are very easy compared to F2nd Holds).
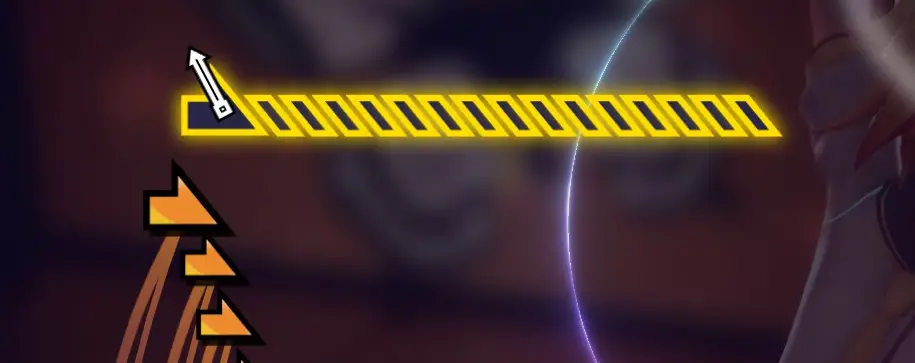
마지막으로, we have the Future Tone Hold (FTHold). Unlike holds in F2nd, you will be asked to hold the button down even while you perform other actions. 하지만, THIS IS COMPLETELY UNNECESSARY FOR YOUR COMBO. These holds are for points, and only points. Do not drop your combo trying to do a FTHold (even though I know you will, because you’re greedy).
거기, that wasn’t so bad, 그랬어?? Now you know enough to start playing the game!
Macros and Arcade Logic
The PS4 release of Future Tone introduced button mapping and macros. “Macros,” meaning you could assign your bumpers or triggers to any combination of button that you wanted (such as X+O on right bumper, Square+X+O on trigger, 등. 등.). Project Heartbeat actually does allow for fully-functional “macros,” but not in the way people might expect from FT’s menus.
You can assign as many buttons as you want to any command. 예를 들어, you can have Dpad Right and O activate the “Note Right” 명령, then add Right Bumper. 그런 다음으로 이동하십시오 “Note Down” command and once again add Right Bumper. 지금, when pressed, right bumper will activate X (“Note Down”) and O (“Note Right”) 동시에! Pretty awesome, 오른쪽?
Recommended Macros
- Left Trigger: 삼각형 + Square + 엑스 + 영형
- Right Trigger: 삼각형 + Square + 엑스 + 영형
- Left Bumper: 삼각형 + Square
- Right Bumper: 엑스 + 영형
I highly, highly, HIGHLY recommend you go with these controls. They are widely regarded as the best possible control configuration.
I’ll be spending the next part of this section explaining exactly why and what is so good about these macros. This may get a little overwhelming, so bear with me.
Arcade Logic
We’ve come this far without talking about the original Future Tone arcade cabinet, but the time has come where you must understand where this game originated from.
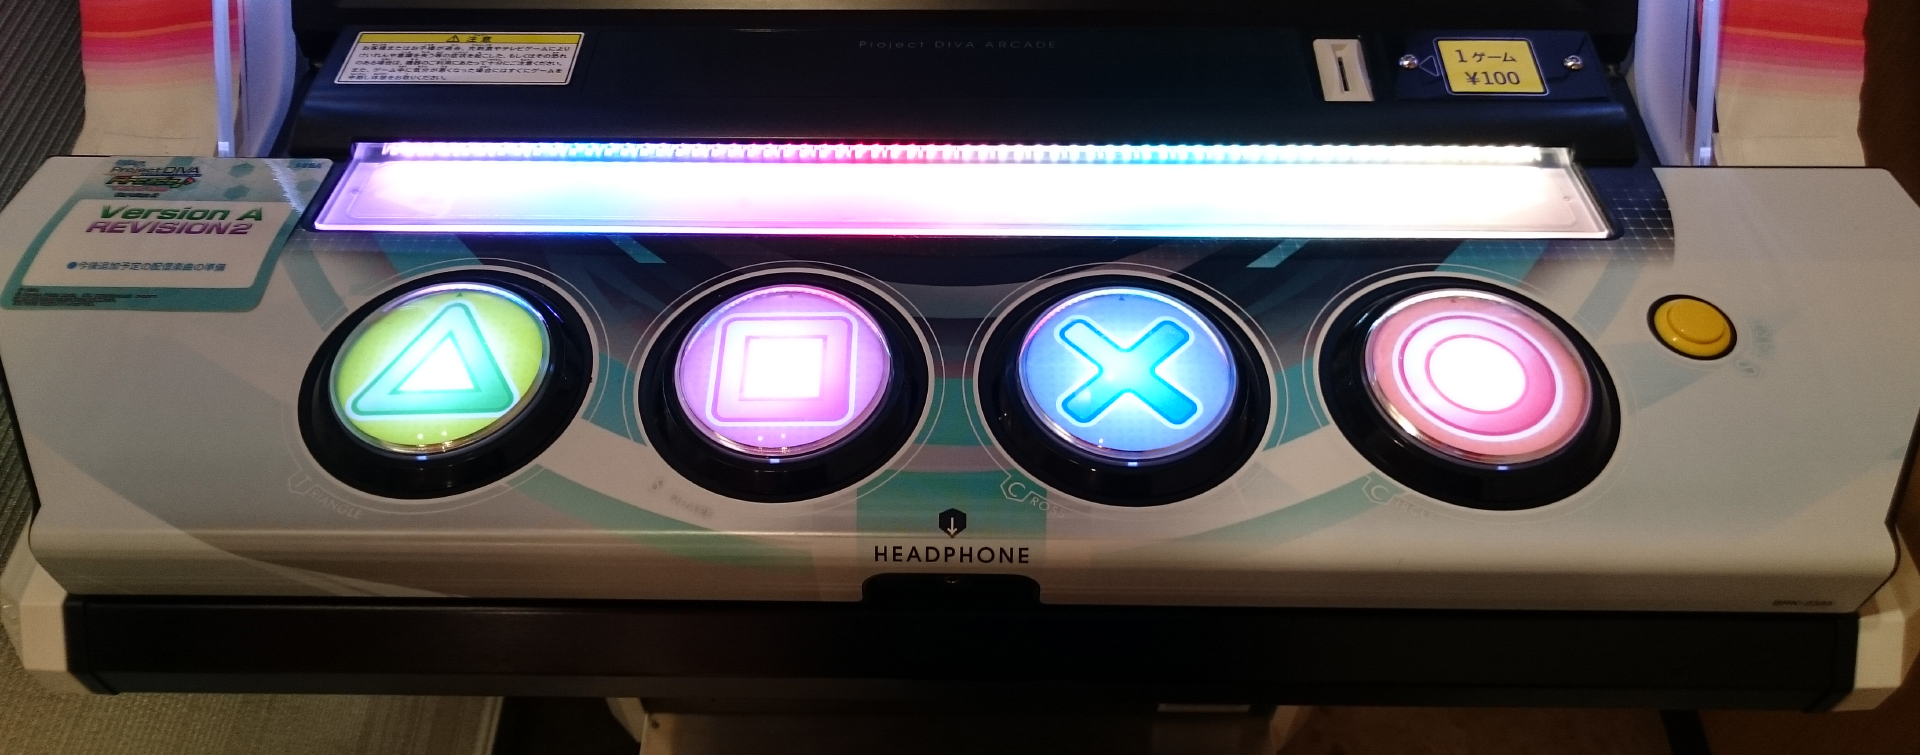
보시다시피, the original button layout for Future Tone has Triangle, Square, 엑스, and O spread out in a line, rather than diamond shape like on Dualshock. Burn this layout into your brain, because everything is mapped using arcade logic.
You notice how multi-notes keep Square + X close together whereas Triangle + O are always spread farther apart? Or how Triangle + X are separated, and so is Square + 영형. The notes are spaced apart according to what makes sense to this arcade layout. When playing a chart, you may notice a pattern of:
삼각형 + Square then Square + X then X + 영형
You see how arcade logic could explain the simplicity of this pattern? All you’re doing is walking down the controller from left to right, except hitting two buttons at a time.
When you first think about adding macros, most players immediately gravitate toward the idea of Triangle+X and Square+O (we’ll refer to these as the “cross-ways macros”). This makes sense — those are the only combinations that the dpad can’t perform without assistance from the face buttons (and for the face buttons, this is not possible without using multiple fingers). This makes sense at first, and on rare occasion some maps are actually worth changing to these macros for, 하지만 99% of maps the recommended layout is ideal.
The are two major reasons for why we use Triangle + Square / 엑스 + O macros (we’ll refer to these as “모서리” macros).
- 첫 번째, consider the arcade logic we discussed earlier. Arcade considers “모서리” combinations one-handed maneuvers, 반면 “cross-ways” inputs are considered two-handed maneuvers. With this in mind, Dualshock and Arcade controllers actually have that in common, meaning maps will be naturally designed to accommodate the concept. Another way to frame this is to think of “모서리” inputs being treated as a standalone button, 반면 “cross-ways” are treated as two buttons.
- 두번째, 잘, your thumb is built this way. Square + X and Triangle + O are ergonomically very easy for you to hit together, so there’s no need for a macro. 그만큼 “corners” are harder to press so, especially in more complicated patterns, having such an awkward press treated as being as simple as any normal button press… 잘, it feels bad.
With all of this said, a lot of this you may pick up intuitively without a need to think about the arcade cabinet, but it’s always important to remember what we’ve learned here in case you ever find yourself stuck or confused.
Advanced Control Tips
This section is going to go over some hyper specific tips and tricks you can use to help read and execute complicated charting patterns (aimed for more advanced players).
Glossary
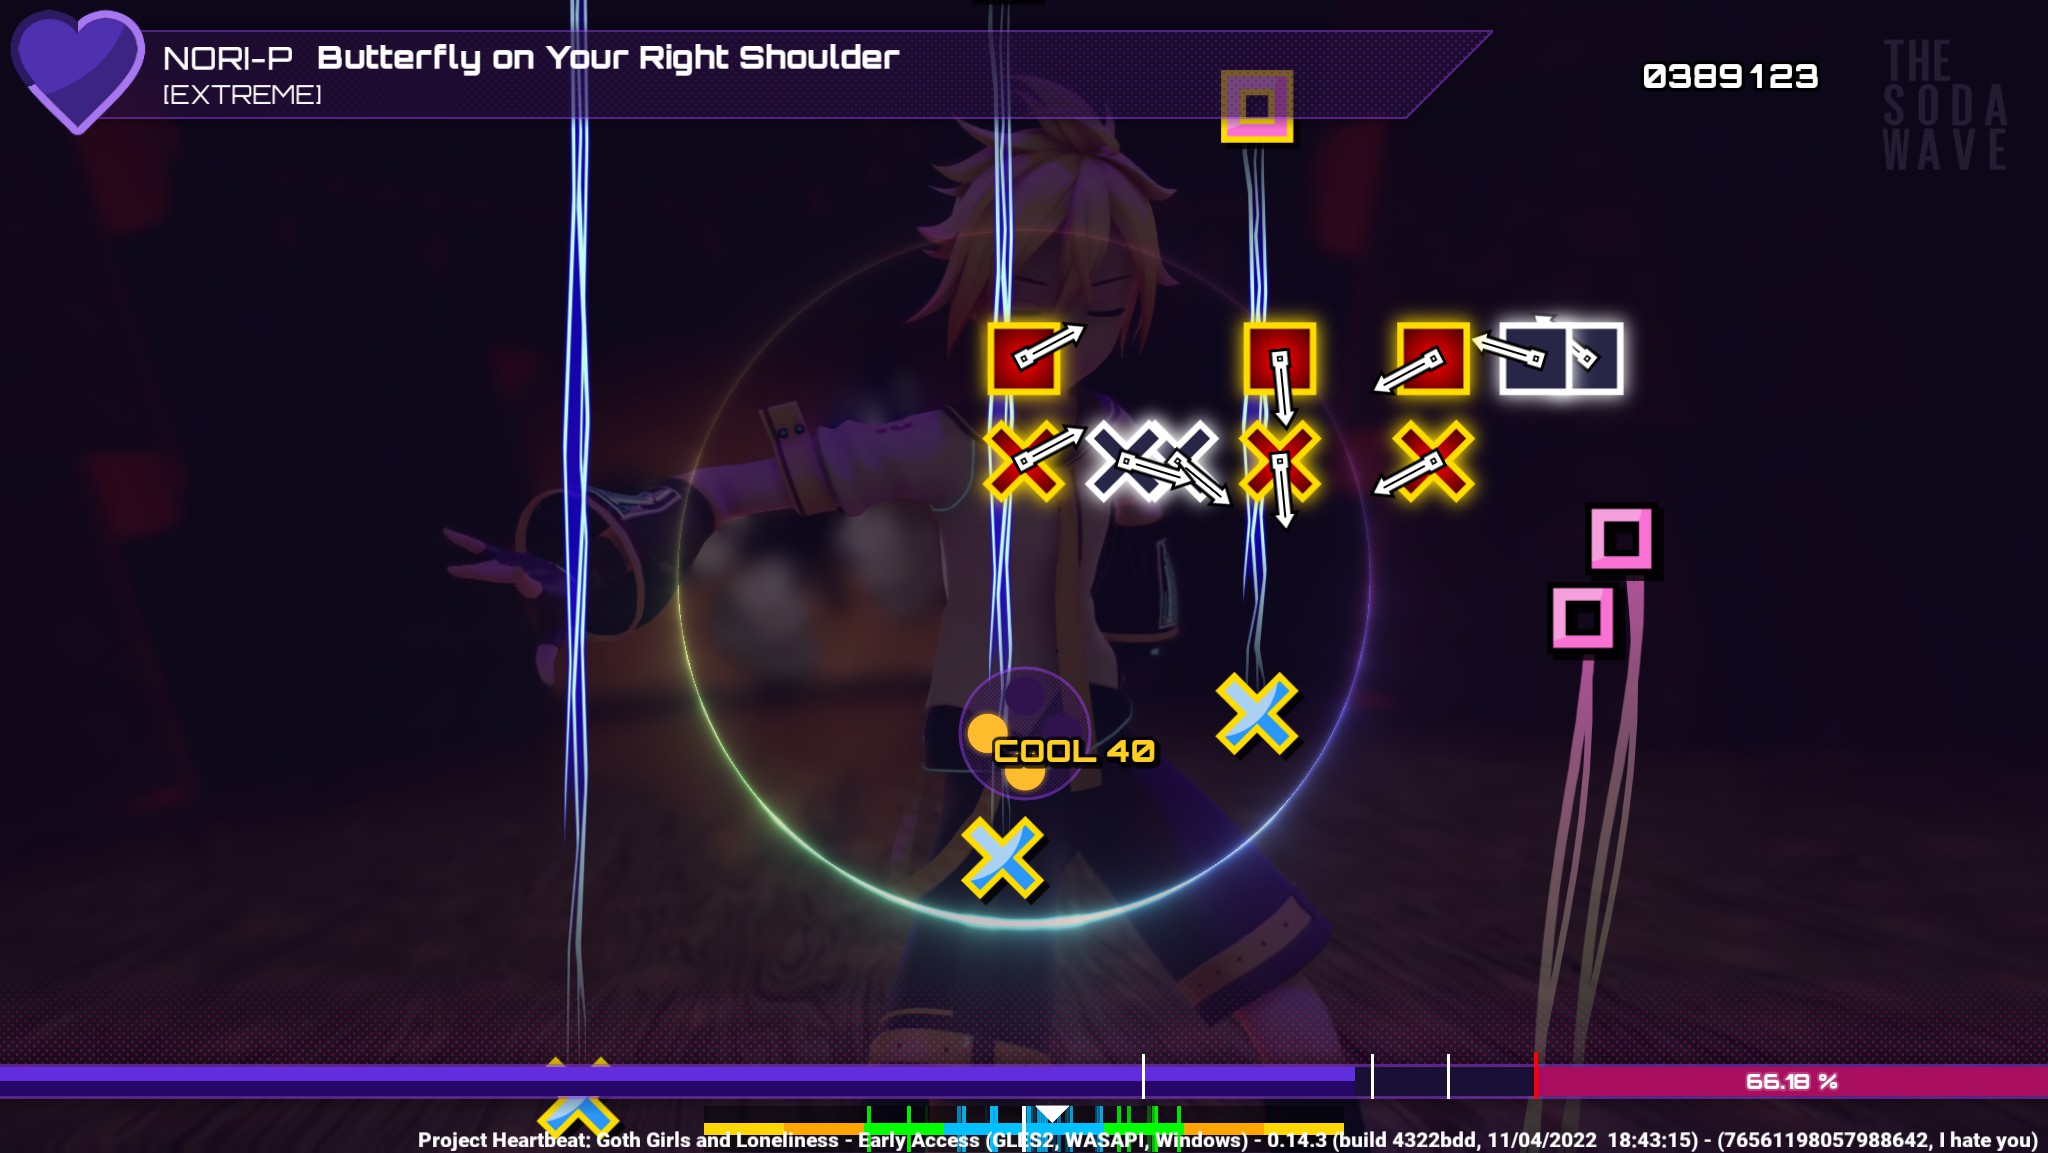
- Overlapping Notes: Notes that quite literally “overlap” each other visually typically indicate a need to use two hands in order to keep up with the pace.
- Alternating Overlapping: Overlapping notes that are alternating more than one button (예를 들어. XOXOXO instead of just XXXXXX).
- 360에스: Overlapping notes that go through all four buttons.
- Triples: Multi-notes that contain three different buttons.
- Quads: Multi-notes that contain all face buttons at once.
- Odd Switch: Overlapping notes that change pattern on an odd set of numbers (예를 들어. XXXOO, meaning you start the pattern on your right hand but are forced to initiate the pattern on your left hand)
- Hold Switch: The act shifting your hold form one Quad macro to the other (this will be explained momentarily).
Hold Switching (FTHold Only)
Find doing holds unreasonably hard? That’s okay. Doing holds is unreasonably hard on pad, so we have a workaround. I bet you’ve probably been wondering this whole time why we have two triggers bound to Quads? 잘, you’re about to find out.
Let’s say you run into an X(잡고 있다). 그래서, you start hold on X with the X button. The game no longer cares what button you used to start holding X, it only cares that an X button is being held. 이는 다음을 의미합니다., if you were to start holding Down on the dpad, have at least a frame where both Down and X were being held, then let go of X, you will have successfully “transferred” the hold status onto Down, because at no point did we ever cut the signal saying that X was being held. You see where we’re going with this?
당신은 할 수 있습니다 “옮기다,” 또는, “Hold Switch” this to any button, and if your trigger is bound to Quad, it can be any button you want it to be. What if you’re holding two buttons? Or three? Or even four? You can still “옮기다” to the trigger as long as there is some overlap in the time you push the trigger before releasing the previous holder. The only thing the game cares about is that the signal that is “holding” the button started after the hold button started (다시 말해서, you can’t just hold trigger the entire game).
지금, why do we have two triggers set to this?
Let’s say you hold X, do a really fast section, then at the end of that start holding O. You can hold X, transfer to right trigger, play until the next hold, hold O, then transfer both holds onto left trigger! This is the key to optimizing your hold points.
How to hold the controller – 그만큼 “Shake Method.”
응, I’m seriously about to talk to you about ergonomics. This tip is going to greatly help your performance and your health, so keep reading.
When you reach an excessively quick portion of the chart, full of overlapping notes going at a potential speed that you can’t keep up with, 단지 “hitting the buttons” won’t do. Your wrists will eventually start hurting and most likely you’ll still be going too slow.
How you hold the controller/choose to play is largely up to you. Everybody’s different. But when you know you’re about to do a really fast part, consider adjusting your grip to the “Shake Method” 위치.
괜찮은, enough pretense, I’ll explain it now.
The fundamental aspect of this grip is that you’ll remove all the weight from your fingers and hold the controller entirely by the pressure between your palms. 몸소, I see it more as your right hand pushing the controller against the left palm. 여기에서, if you stiffen both your thumbs on top of the required button, and shake your right arm, you should essentially be “shaking the controller into your thumbs” rather than using your thumbs for each individual press. This will give you infinitely more speed and precision and puts the stress on your whole arm, rather than specifically your wrists/fingers which is SIGNIFICANTLY better for your health.
This method takes a bit of time to get used to and can be easier/harder depending on which notes you alternate during the overlap (내 생각에는, Triangle+Right is the easiest combination to mash, where Anything+Left is the hardest
360에스
For a lot of people these are very difficult when you start, but over time these will be second nature. If we go back to arcade logic, 그만큼 “360” motion you do around the controller is actually just moving from left to right on the cabinet. 또는, 어떤 경우에는, right to left (reverse 360).
99% of 360s are either: 삼각형 > Square > 엑스 > 영형, either starting on Triangle, or starting on O.
이를 수행하려면, you simply have one hand on the Y axis and one on the X axis.
Right hand Triangle, left hand Left, right hand X, left hand Right
Right hand O, left hand Down, right hand Square, left hand Up
Triples
The vast majority of multi-note triples consist of Square + 엑스 + (Triangle or O). 이것은, 다시, going back to arcade logic, because Square + X is the center of the controller, and any combination of three where both Square or X aren’t present is considered harder, and far more uncommon.
함께 “모서리” macros we set earlier, we now have an easy way to do these with one hand!
With the left hand, hit the Left Bumper + 아래에, and that will cover Triangle+Square+X triples.
With the right hand, hit Right Bumper + Square, and that will cover Square+X+O triples.
기타.
- Odd Switches: These are hard, no work around. If the bpm is slow enough and your hands are fast enough, sometimes you can double up on your right hand (예: 엑스(오른쪽)엑스(왼쪽)XO(both right)영형(왼쪽), that way you never have to start on your left.
- Several Multi-Notes in a row: Look to see if there’s a common note. If the pattern is Triangle+Square > Triangle+X > Triangle+O, then you can keep on hand hitting Triangle and simply have the other hand circle around the other buttons.
이것이 오늘 우리가 공유하는 모든 것입니다. Project Heartbeat 가이드. 이 가이드는 원래 작성자가 작성하고 작성했습니다. I hate you. 이 가이드를 업데이트하지 못한 경우, 다음을 수행하여 최신 업데이트를 찾을 수 있습니다. 링크.