- Title: Darksiders II
- Release Date:
- Developer:
- Publisher:
Information about Darksiders II is still incomplete. Please help us fill the details of the game using this contact form.
For the very specific circumstance where you started the Shaman’s Craft quest just a little late, after finishing the dungeons it ‘normally’ hits.
Blue Text Means Quest
You may have been an idiot, like me, and assumed that colored dialogue options represented ‘repeat past conversation’ or something. Bad news: actually that meant this was a quest. If you made this mistake for Shaman’s Craft, I will explain how to finish this quest relatively promptly.
If you instead waited for the late-game to start this, I hear you can do it in the Crucible pretty quickly, which will also provide you with phat lootz. But I’m going to assume you didn’t, and are still in the Forge Lands with the Makers.
So, here’s the list of quest goals:
- Track down Karn and speak with him
- Harvest some Stalker’s Bone from a Stalker
- Return to Karn and ask about Mordant Dew
- Harvest some Mordant Dew from a Stinger
- Return to Karn and ask him about Carven Stone
- Harvest Carven Stone from a Construct Sentinel
- Return to Muria with the materials
- Return to Tri-Stone and speak with Muria.
Where’s Karn?
Karn moves around as you complete the first three dungeons, and you need to talk to him several times.
You will first see him at the gate to the Cauldron; after you complete it, he moves to Stonefather’s Vale, and opens the way to the Shadow Gorge. When you finish the Drenchfort at the other end of the gorge, he moves to the gate to the Lost Temple. After you finish that, he joins the smiths in the Maker’s Forge, and stays there.
Fortunately, you can fast travel to talk to him, relatively quickly regardless of where he is at the moment, unless you haven’t been to his current location yet. But if that’s true, good news! You’re back on the expected track of the side quest and it will be straightforward to complete it in line with the main quest.
I’ll assume that you started this quest after the Lost Temple, because that’s what I did and it’s the most inconvenient time to do it. You’ll be bouncing back and forth to the Forge for this.
Stalkers, Stingers, and Sentinels
Stalkers: There’s a Stalker in the Cauldron, which is the intended target. If you already cleared it, though, it won’t get restocked on later visits. If you still need a bone, visit the Fjord; trios of monsters, each with a Stalker and two Prowlers, respawn every time you visit. Alternately, there’s a Savage Stalker in the Shattered Forge, which is an optional dungeon cleared for another sidequest, The Hammer’s Forge, which you might also be completing. I can’t conclusively verify that this counts for Shaman’s Craft, though, I did it in the Fjord, which is right next door to the Shattered Forge anyway.
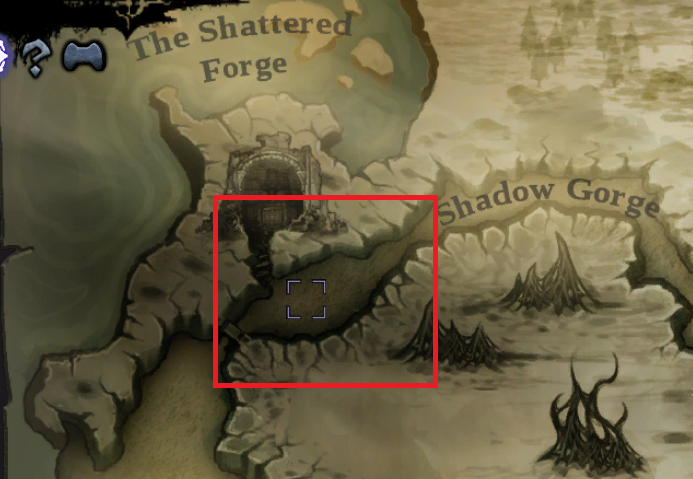
Stingers: There are tons of nests of these pests in the Drenchfort. There’s a variant common in the Foundry, too, which probably counts. But if you’ve already cleared Drenchfort, probably the best path to wrap this quest up promptly is in the overworld; look between the Fjord and the Shadow Gorge, where there is a respawning Stinger Hive. Unsurprisingly, this creates Stingers. If you need clarification, see here:
Construct Sentinels: These evil floating masks are faced repeatedly in the Lost Temple, where they heal and resurrect your other Construct enemies. Like the Stalkers, they have a presence in the Shattered Forge, this one not even a variant; the last fight of the dungeon has a Sentinel (just one), which works out even if you needed the Savage Stalkers for step 1. There aren’t any Stingers present in here, so you’ll need to find some of those when you pop out to talk to Karn, before you talk to Karn again and come back to finish off the dungeon and the Sentinel. If you’ve already finished the Forge, I’m not actually sure where you can find them again. Will update when I run into them, or a variant, later.
The Easy Part
Now head back to Shaman Muria. She never moves much, so she’s right where she was. Probably for the best; with that blindfold of hers, she’d fall down the stairs. Makers are pretty tough, but that would be embarrassing. In any case, hand over the goods and you’ll get a fancy talisman that lets your secondary weapons generate Chaos Reaper Energy. You’re done.
That's everything we are sharing today for this Darksiders II guide. This guide was originally created and written by PDV. In case we fail to update this guide, you can find the latest update by following this link.