A guide in order to help you complete “Resource Manager” with ease!
The Achievement Itself
In order to complete the achievement (If you somehow didn’t know) is you cannot open the Item Box more than 3 times. But at the minimum within the story you already open the Item Box 3 times, meaning you can’t open it at any other point.
These points being:
Before Lucas’ Birthday Puzzle, Because he won’t let you enter with any items.
After Lucas’ Birthday Puzzle when you need to collect your items.
And after Mia saves you from the ship and you make it to the boat house.
You CAN kind of open the item box. Upon dying from specific points in the game, you can “Manage your Inventory” and move items from the Item Box into your inventory and vice versa, this doesn’t count against the achievement.
To note: You sadly cannot get any of your unlocked items until after Lucas’ Trap, such as the ALBERT-01R, Dirty Antique Coin, or Walking Shoes
Story Items
Story items within the game are important! As the name implies, but for this run, they can be a detriment. Story Items cannot be dropped, dropping items are important for this run as you need to make space for other items. But once you pick up a Story Item, you can’t drop it and the only way to get rid of it is through the Item Box.
So an important tip for the run is to not grab these if necessary.
Items you won’t need:
VHS Tapes (2 Exceptions)
Model Shotgun – You can grab it but it is not needed.
Toy Hatchet – You can grab it for the extra stabilizer but it is not needed.
Scorpion Key – It is not needed UNLESS: You want to get the Broken Shotgun and an easier access to the Main Hall
Items you WILL need:
Hatch Key – It disappears when used on the hatch so it doesn’t matter.
Dog Head Reliefs – It’s best to grab them then immediately put them in the door.
Clock Pendulum – Needed for White Dog Head Relief
Statuettes – Needed for puzzles, suggested to only grab them when you are going to do them.
Dissection Room Key – It disappears when used so it doesn’t matter
Crank – You’ll have to carry this until Jack’s final fight
Crow Key – You have to carry this to progress, doesn’t need to be grabbed after Lucas’ Puzzle
Lantern – Needed for The Lantern Holder, disappears when used so it doesn’t matter
D-Series Arm – You’ll have to carry this until Jack’s final fight
Keycards – Suggest to put one immediately into it’s slot before continuing on
Battery – But it’ll be used almost immediately so it doesn’t matter
Eveline’s Tissue Sample/E Series Neucrotoxin: This can’t be removed from your inventory
Note for Cassette Tapes:
If you are doing this on Madhouse, Cassette Tapes also count as Story Items and you can’t get rid of them, I suggest only grabbing one for your inventory when you are going to save.
Note for Weapons:
You basically can’t drop any of them
Knife – You need
G17 Handgun – You need
All Shotguns – You don’t need
Chainsaw – You need to exit the processing area
M19 Handgun – You don’t need
Burner – You may need
Grenade Launcher – You don’t need
P19 Machine Gun – You don’t need, but is suggested to grab as Mia
Remote Bombs – You don’t need but you can get rid of them
Tips
The game should be played on Easy, as it’s an easy challenge (But if you want to do higher difficulties, fine by me) and could be played with “Just get me outta here” and “Walk it off”
You do not need to grab everything, you need to manage your inventory.
Treasure photos can be discarded, you have to look at them first but otherwise you do not need them in your inventory to find the treasure.
DO NOT THROW AWAY YOUR HERBS, You can use them to gain a little bit of health, think about using your herbs instead of your first aid med first.
Gunpowder can turn 10 normal pistol ammo into 5 enhanced pistol ammo by combining it in the normal inventory, you can use this to use excess gunpowder and to temporarily gain more power.
Use antique coins if you can as you get them, don’t hold onto excess (Some exceptions apply).
If you worry about missing some weapons, don’t worry they can appear later, such as the grenade launcher appearing in the swamp house when you get there.
You don’t need the Magnum, just don’t grab it, it’s only going to waste your space.
If you die during Jack’s Final Boss fight you can re-arrange your inventory without using up your item box.
IF YOU DO NOT HAVE THE WEAPON THEN DON’T PICK UP IT’S AMMO UNTIL YOU DO.
It’ll only waste space until you do get it, such as getting the shotgun pellets before you get any shotgun.
CASSETTE TAPES, DO NOT PICK THEM UP UNLESS YOU ARE GOING TO SAVE. You can carry cassette tapes out of areas you find them in though, such as one within the basement to take it up and save. As they count as story items and you can’t drop them.
Guest House – The Simplest Area
You can play the game here, COMPLETELY normally. You can grab every item without worry of space.
INCLUDING THE VHS! Whatever you grab here will appear within the Item Box when you are taken to the Baker’s House. So anything here will not matter. (This means you can grab the antique coin from the VHS section without worry.)
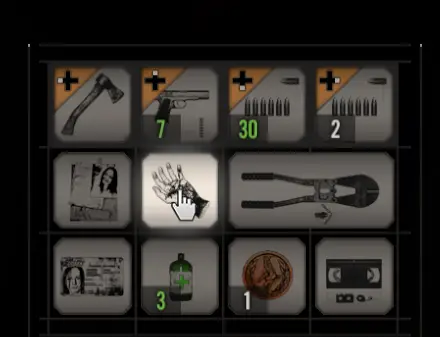
I grabbed every item and it fits perfectly, including the VHS, Antique Coin, My Hand, All Ammo and Everything else needed
Otherwise we can move on!
Baker’s House
First Area (Dining Table/Kitchen):
You’ll want to escape and first head to the hatch key while avoiding jack. If you are playing on normal or easy you can run straight past him, grab the hatch key, and able to get into the hatch before he catches you.
If you’re playing on madhouse you’ll want to wait for him to walk over, if possible try to get him to break down the wall between the hatch and where the hatch key is, since the hatch area has a great hiding spot you can hide there when you lead jack around so he doesn’t see you.
Garage Fight:
You should aim for getting Ethan’s Car Key and immediately use it instead of trying to grab the gun. You can then run jack over and you’ll be fine.
In madhouse you’ll probably want to grab the lockpick and use the Car Key, as the whole point of the achievement is to NOT have inventory space, and most lockpick boxes will give you lots of stuff in your inventory.
YOU MUST GRAB THE HANDGUN, The game wont let you progress otherwise, don’t worry it’ll appear by the ladder so you can’t miss it.
Don’t grab any antique coins, just the ox statuette and you’ll be able to head on through.
Next you should grab the clock pendulum for the White Dog Head Relief and look in the book upstairs for the Blue Dog Head Relief and put them on the door.
IF YOU ARE ON MADHOUSE, YOU CAN USE 3 ANTIQUE COINS TO SKIP PAST THE WOODEN STATUETTE SECTION. (Jack is also hunting you before you head to that area, so it’s probably best. Do note that if you grab it that you’ll miss out on one other cage item, but considering you should skip the magnum it’ll be fine)
Next you have to head to the bathroom and grab the wooden statuette and make it to the shadow puzzle.
The Baker’s Basement
When entering the basement it’s better to just go through in about one trip.
Head into the dissection room and open Tamara’s Box (Far Right) and The box with the hand print, then open Travis’ and grab the dissection key, you can then head over to where the shutter gate is and pull it open.
YOU DO NOT HAVE TO GRAB THE SCORPION KEY.
You can grab the treasure photo and look at it to get steroids within Jack’s Den.
There is also useful stuff there to grab.
Next move towards the back of the basement area to open up the dissection area. It should be an easy fight against Jack, remember that the Chainsaw is extremely helpful and will only temporarily take inventory slots.
After this you have you Red Dog Head Relief and you can finally make it out to Zoe’s Trailer.
You can now grab antique coins and spend them on the cages.
If you’re on madhouse you have access to the grenade launcher, although you don’t need it.
You must head onto the Old House now and face off against Marguerite.
Old House
Make it through the front area and towards the back, the area near the Metal Statuette should lead to a small shack with a backpack. YOU SHOULD PICK IT UP, along with one of the pieces to the Flamethrower.
You must then make it to the other side and grab the other piece to complete the flamethrower, and head to where the fireplace is and burn it. You must then grab the statuette and try making it back towards the puzzle.
You must then head through the crawlspace and grab the Crank, this will take up one of your inventory spaces. You must head back to the right back side of the house and use the crank to gain access to the Crow Key. Marguerite will then attack you when you try to make it to the door, and you must defeat her (temporarily). Open the door and look at the briefcase and then answer Zoe’s Call, and head to the back to see that you need the lantern and go back after Marguerite who has changed into her, true form.
Chase after her and go to the greenhouse, and prepare to kill her. After you kill her she will grab your lantern and you’ll be able to make it through the Lantern door to grab the D-Series Arm. Zoe will have you come to her trailer but when you get there you will find out she was kidnapped.
Back into the House
Lucas is keeping Zoe within the Barnyard and you must get 2 keycards to get in there, but you need the snake key to proceed. Look into the fridge to find the cop’s decapitated head then head to the dissection room to grab the key from his body.
The Red Keycard is located within the basement, but to get there you must go through the master bedroom. Enter there and you’ll find a storage room with a backpack, collect it. Next you must correct the clock to be the same time as the rest of the clock. The time is 10:15. You’ll be able to enter the door under the bed and make it into the Workshop of the Basement, you’ll be able to then put the Red Keycard into the door, which is suggested you do first to keep extra inventory space.
The Blue Keycard is located within the Attic, to get there you must enter the Kid’s Bedroom and press a button on the Trophy Lamp. You can then enter upstairs and complete another shadow puzzle to get the Blue Keycard. You can grab the toy axe to do the shadow puzzle within the yard to get an extra stabilizer.
You must head back to the yard and open the door to the barn and enter.
Do note is that you have the Crow Key and can enter the Crow Door in Jack’s Den.
The Barn/Swamp house
You’ll have to listen to Lucas’ dumb speech that I’ve listened to 50 times already and head through a few hallways and rooms, watch out as there is wires attached to explosives. If you manage to find the treasure photo within the Master Bedroom you can move the mannequin head to grab a repair kit. You’ll make it to an entrance to a puzzle room and Lucas will have you put a random code in, you won’t be able to get it, watch out for the spikes as they’ll crush you if you don’t move out of the way in time.
You must navigate through the barn and you’ll eventually come up to the Barn Fight, you’ll have to kill a Boomer and then head up the elevator to a room with a burnt corpse (RIP Clancy), it’ll give you the code 1408.
BUT, This is the first time you use the item box. You must put all your items in before you enter the puzzle room, as Lucas will stop you so you can’t “cheat”.
You must go through his “Puzzle” but you’ll need to have info beforehand or to do it and die just to go through it with an extra piece of info.
You must head to the birthday cake and try putting the candle on the cake, but it’ll be put out by water, and Lucas will explain you have to put the candle on the cake. You must turn on the stove to light your candle to burn open the door tied with rope, inside is a hallway full of balloons that lead to another door, the code to the lock is LOSER.
You’ll be able to grab the valve and close the water, you can then light the candle and put it on the cake, before it blows it, but failing to kill you. Lucas will then drop a bomb into the room in attempt to blow you up, you must pull off the wooden cover off of the wall and drop the bomb in and stay a safe distance.
It’ll blow up leaving you a door to go through which will give you access to the D-Series head. You can now grab your items back, and if you have Infinite Ammo from beating madhouse you should grab it, along with anything else you think would be useful. (If you pick up infinite ammo, just never pick up ammo ever again.)
You’ll need the D-Series Arm, D-Series Head, and Crank before you continue on, save just in case before you grab anything.
Then you’ll walk over platforms, using cranks on two platforms before getting to the boat house where you can give Zoe the D-Series Arm and Head to make the antidote.
You’ll then have to fight jack, this fight should be simple if you have enough items, aim for the eyes and don’t forget Jack is slow, you can evade him or block him easily.
Molded Tape/Abandoned Ship
This area should be easy to head through, as Mia doesn’t grab that much items and starts with a naturally bigger inventory. You’ll need to grab the fuse from the Laundry Room and head up the stairs to F3 where Eveline will give you a tape to play.
Play this tape area through normally, it doesn’t matter too much as you’ll be able to collect every item without that much worry for space.
After this you’ll play as Mia again, this area of the game should be simple to run through. If you need extra space you can use a corrosive on F1 near where the stairs/Laundry room is to get a backpack.
Survival Knife is on F2 attached to a bench, the pistol is in a office near the Elevator of F1, and the Submachine Gun is on F4 in the Captain’s Office. The key to it is in the cafeteria and requires a corrosive.
Corrosive can be found in the painting puzzle room, you’ll get 3 of them.
Saltmines/Caves – The Final Stretch
Once you beat the ship you’ll regain control of Ethan Winters. And make it to the swamp house, this’ll be the final time you open the Item Box. Grab what you need, Eveline’s Tissue Samples will be with you forever.
You’ll be able to complete the rest of the game pretty normally, other than the fact you can’t get any extra materials from the Item Box, so grab them while you can with the box.
This is the end of the guide, if you wanted a normal game play walk through you can just look that up.
Thank you for reading my guide! I hope this helped you with Resource Manager!
That's everything we are sharing today for this Resident Evil 7 Biohazard guide. This guide was originally created and written by The World Machine. In case we fail to update this guide, you can find the latest update by following this link.


