
This manual teaches you everything about invasion markers. It covers setting them up, understanding how they work, and provides tips, truques, and hints. All the information you require to successfully create working invasions for your missions is included in this guide.
Introdução
In the Space Colony universe, an invasion occurs when a sudden group of aliens appears out of nowhere and starts attacking your base. You can anticipate invasions by using the military radar.
This guide focuses on setting up invasions using the Space Colony editor. I’ll walk you through the details of invasion markers and share tips and tricks for your missions. No entanto, dealing with invasions during gameplay won’t be extensively covered.
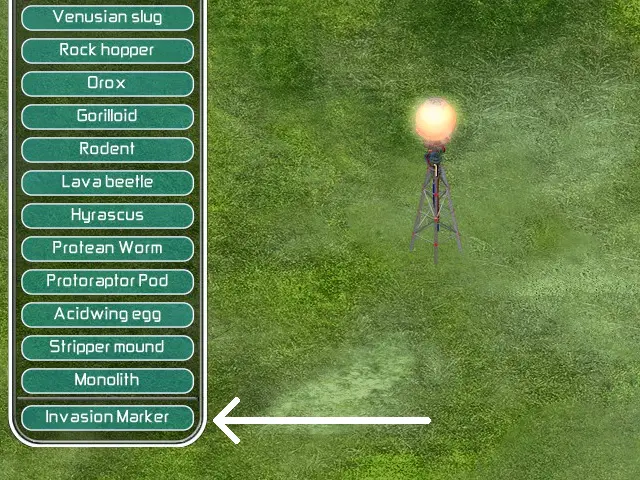
The main emphasis will be on information related to the campaign editor, as there’s not much to discuss about the planet editor. Before diving into the complex details, it’s important to ensure that your planet has at least one invasion marker. Without a marker during a mission, invasions won’t function. You can locate invasion markers at the bottom of the ‘aliens’ lista.
Once you position an invasion marker, you’ll observe that it’s automatically given a number. These numbers are assigned sequentially. It’s important to keep track of where you place each marker if you want specific aliens to come from specific markers.
In the editor, there seems to be no set limit to the number of markers you can place. No entanto, in the campaign editor, the ‘invasion’ condition only allows specific invasions from markers up to 50. I’ll provide more details on this later.
If you decide to delete an invasion marker, you won’t be able to use that number again until you’ve also deleted any invasion markers with a higher number. Para esclarecer, if you have invasion markers numbered 1 através 5 and delete marker #3, the next marker you place will have the number 6. Reusing marker number 3 requires deleting any invasion markers with a higher number.
Now that we’ve covered this, let’s delve into a more detailed explanation of how invasions function in the campaign editor.
Invasions in the Campaign Editor
When setting up your mission’s campaign, you can trigger an invasion at the condition/actions screen. The ‘invasion’ Ação, found near the top of the actions list, is categorized as an ‘action,’ meaning it can be activated when a specific condition is met.
Por exemplo, you can make an invasion occur after acquiring 10 units of iron. No entanto, most invasions are automatically triggered at a set time. To schedule an invasion at a specific time, choose ‘Auto’ at the top of the conditions list, along with a day number and an hour number.
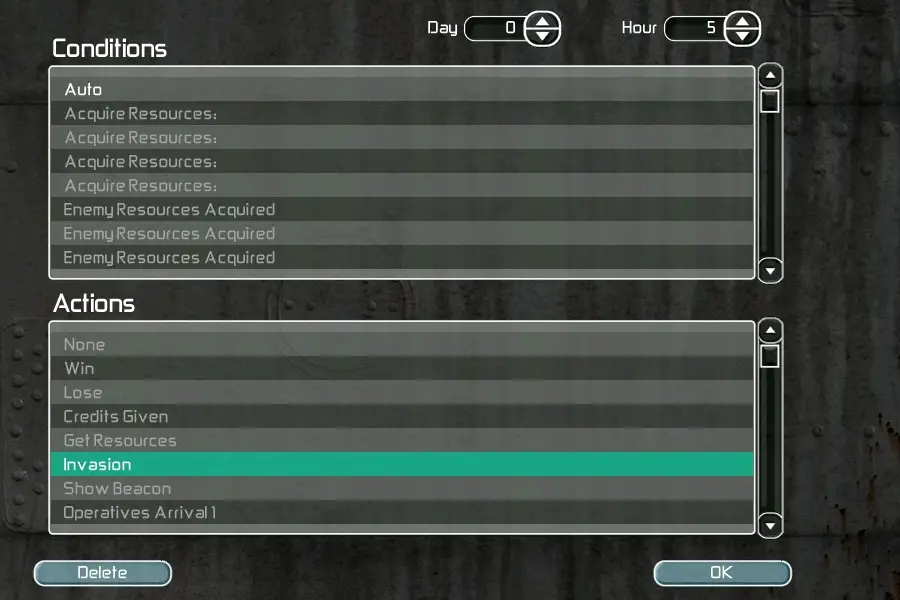
In the given illustration, the invasion will initiate for the first time on the very first day of the mission at hour 5, o que é 5 in-game hours after the mission starts.
After selecting the ‘invasion’ Ação, you’ll enter the invasion editor. Aqui, you’ll find a comprehensive list of aliens and several number bars at the bottom of the screen.

Let’s focus on those bottom bars for now: ‘Repeat Time,’ ‘Repeat Count,’ and ‘Invasion Marker.’
- Repeat Time determines the number of days that must pass before the invasion happens again. Por exemplo, if set to ‘1,’ the invasion will repeat daily at the same hour. If you don’t want it to repeat, leave this at 0.
- Repeat Count decides how many times the invasion will occur. Using the earlier example, if set to ‘3,’ the invasion will trigger once at hour 5, then repeat daily for 3 dias, totalizando 4 invasions. If you want it to repeat indefinitely, leave this at 0.
- Invasion Marker indicates the specific numbered invasion marker from which the aliens will spawn. This underscores the importance of remembering where you placed each marker on the map.
Setting this number to 0 means a random invasion marker will be chosen. This feature can be utilized to create unique and chaotic challenges, especially if you’ve positioned numerous invasion markers on your map!
Difficulty Differences
Agora, let’s shift our focus back to the extensive list of aliens. I’ll provide a brief overview of what each alien does in relation to the invasion marker.
Before we delve into that, it’s crucial to consider an essential aspect of invasions related to mission difficulty:
The number of aliens spawned by an invasion marker varies based on the difficulty.
- On easy mode, invasion markers will spawn 50% fewer aliens, arredondado.
- No modo difícil, invasion markers will spawn 50% more aliens, arredondado para baixo.
Por exemplo, if you set the marker to spawn 7 protoraptors, it will produce 7 protoraptors in normal difficulty. On easy mode, it will spawn only 4 protoraptors, while on hard mode, it will spawn 10. This factor is vital to keep in mind when designing your invasions.
When testing your level, it’s advisable to play it on hard mode to ensure your invasions aren’t too overwhelming on higher difficulty settings.
As a quick side note, while on this topic, the only other disparities between difficulty levels involve the rate at which mutant bees and burnflies spread their respective plants. Adicionalmente, Fribulan Ogres cannot spawn on easy mode.
To the best of my knowledge, these are the primary differences between difficulty levels. Elements such as a colonist’s mood appear to be unaffected by difficulty. If you’re aware of any other changes related to difficulty, Por favor me informe, as I haven’t come across any additional differences!
Alien’s Invasion Behaviour
Here are all the aliens summoned from invasions, along with their unique quirks:
- Protoraptor:
- Congregates around the invasion marker and attacks the nearest building.
- Does not lay eggs.
- If ‘Protoraptors Attack Chickens Only’ está habilitado, they will target your base only if there are space chickens present.
- Rodent YC5:
- Moves toward the bridge, then wanders randomly.
- Spreads disease if enabled.
- Can only be harmed by military systems if ‘Target Rodents’ está habilitado.
- Don’t summon too many if they cannot be targeted, as they might congest your base with rodents.
- Mutant Bee:
- Spawns a single mutant bee that flies toward the bridge, spreading ‘podulus toxicaria’ (their host plant) near the base.
- Spreads more plants at higher difficulties.
- Burnflies:
- Spawns a swarm of burnflies that fly around randomly, spreading ‘metaflaxus’ (their host plant).
- More likely to spread their plant at higher difficulties.
- Venusian Slug:
- Moves toward the bridge.
- Behaves typically by wandering around and producing offspring upon arrival or if interrupted.
- Hyracsus:
- Seeks and attacks the nearest building.
- Occasionally retreats to give birth to a single offspring.
- Acidwing:
- Slowly flies toward the nearest building non-hostilely.
- When near a building, lays eggs, becomes aggressive, and becomes immune to forcefields.
- Death Angel:
- Seeks and attacks the nearest building.
- Automatically dies after a short while.
- Orox:
- Seeks and attacks the nearest building.
- Orox (Base):
- Moves toward an Orox base, patrolling it.
- If no Orox base is present or if the ‘Orox attack’ action is triggered, behaves like the regular Orox.
- Gorilloid:
- Seeks and attacks the nearest building.
- Appears at the marker much quicker than any other alien.
- Space Gremlin:
- Locks on to an internal base facility and runs toward it.
- Explodes upon arrival, requiring facility repair.
- Can be distracted by plants and stays confused at the marker if unable to lock on.
- Stripper Insect:
- Spawns a single stripper insect.
- If vegetation is available near the base and the marker, the marker summons a stripper mound each time.
- Insects move toward the mound and disappear if summoned; de outra forma, they move around randomly.
- Higher difficulty levels don’t seem to affect mound summoning.
- Rock Hopper:
- Spawns a swarm of rockhoppers, running toward a nearby building.
- More swarms summoned improve targeting and cover more distance with subsequent swarms.
- Mechanoid:
- Does not summon the mechanoid at the marker.
- Mechanoids emerge from the base (on corridor tiles only) and destroy internal base facilities.
- If only mechanoids are summoned, the military radar gives no warning.
- Ooma:
- Moves toward the bridge, then wanders randomly.
- The only alien without different summon amounts on different difficulty levels.
- Fribulan Tourist:
- Moves toward the base and uses internal facilities.
- Appears next to a ‘Fribulan Mother’ if present on the map.
- When first summoned, the computer announces their presence.
- ‘Fribulan Tourists go Home’ action causes them to return to the invasion marker/mother and despawn.
Invasion Priority
You might have noticed that the list of aliens in the invasion editor follows a specific order, starting with protoraptors, followed by rodents, then bees, e assim por diante. This order isn’t random—it’s arranged from highest to lowest priority.
Em termos simples, if your invasion summons multiple types of aliens, the military radar will only warn you about the alien with the highest priority.
This feature can be both advantageous and frustrating. Do lado positivo, you can ‘hide’ the radar’s warning about specific aliens using an alien with higher priority. Por exemplo, if your invasion includes 5 rodents and 50 space gremlins, the radar will only give a warning about the incoming rodents, as they have higher priority.
No entanto, on the downside, this can be frustrating when the invading aliens are highly dangerous. Para resolver isso, when creating a map, I usually summon only one type of alien from an invasion marker at a time. Adicionalmente, I schedule different types of invasions to happen at separate hours to ensure distinct warnings. Por exemplo, I might have protoraptors appear only in hour 6 invasions, gorilloids in hour 12 invasions, Orox in hour 18 invasions, e assim por diante.
It’s worth noting that when the military radar issues a warning, it first provides a number of ‘klicks’ before identifying the alien. The number of klicks corresponds to the type of alien mentioned in the warning and nothing else. Here’s a breakdown of aliens and their corresponding numbers:
- 10: Fribulan Tourists
- 20: Rodents, Mutant Bees, Burnflies, Acidwing
- 30: Hyracsus, Death Angel, Orox
- 40: Protoraptor, Venusian Slug, Space Gremlin, Stripper Insect, Rock Hopper, Ooma
- 50: Gorilloid
This information can be somewhat useful for anticipating aliens in advance—if the announcement mentions 30 ou 50 klicks, you know you’re in for a significant challenge.
Exemplo:
Let’s examine an invasion example:
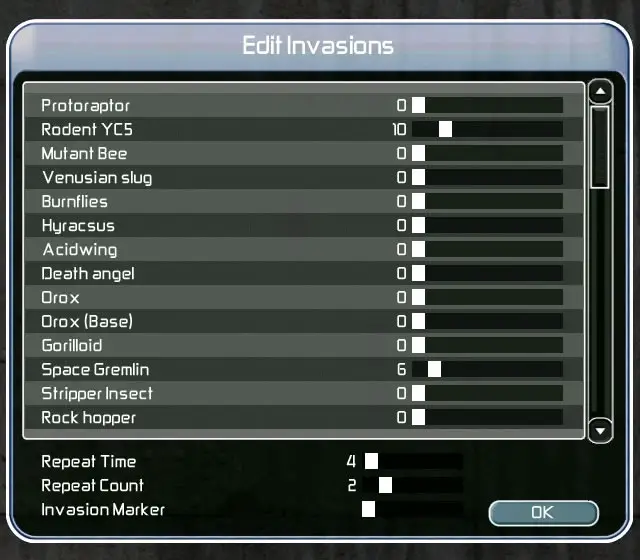
Neste cenário, this invasion marker will summon 10 rodents and 6 space gremlins. No modo difícil, it increases to 15 rodents and 9 gremlins, while on easy mode, it decreases to 5 rodents and 3 gremlins.
The ‘repeat time’ is set to 4, and the ‘repeat count’ é 2. This indicates that the invasion will occur again in another 4 days and then repeat once more 4 days after that, and it will not happen again.
Since no specific invasion marker is specified, each time this invasion is triggered, the aliens will emerge from a random invasion marker.
Pontas, Truques, and Hints
Congratulations on finishing the guide! You now understand the basics of invasion markers. Aqui estão algumas dicas, truques, and hints to help you use invasions in a creative way.
- Aliens appearing out of nowhere can look odd, so put invasion markers at the border of your level. This makes it seem like aliens are emerging from off-screen.
- Be cautious with monoliths on the map, as aliens may endlessly attack them due to their infinite health. Para evitar isso, avoid placing invasion markers with attacking aliens on the same map as monoliths. If you want both, position the invasion markers closer to your base so that aliens target your base, not the monoliths.
- Invasions can be triggered by specific conditions, not just at set times. Por exemplo, if you set an invasion to trigger after acquiring 20 base nutrients, it will stay inactive until that condition is met.
- Keep in mind that if you set a repeat time for the invasion, all repeats will trigger simultaneously once the condition is fulfilled. To avoid overwhelming situations, set a low repeat count.
- Create ‘booby traps’ by triggering invasions after collecting a certain amount of a specific resource. Place an invasion marker in the middle of a large vein of titanium ore, and have it activate after gathering a substantial amount of processed titanium.
- For a strategic challenge, scatter invasion markers across your map and have invasions spawn randomly from them. This makes it harder for other players to predict alien spawn locations, preventing easy spawn-camping and encouraging defense of their base.
- If you want aliens to spawn more frequently in a specific area with randomized markers, place more invasion markers there. The increased number of markers raises the likelihood of invasions occurring in that area.
- You can make invasion markers trigger in the editor by playing a level with an invasion, placing a radar, and quitting to the main menu before aliens appear. In the planet editor, click ‘Test Visibility,’ and the aliens will appear, behaving like they do in-game. This trick is handy for creating space gremlins to wreck base facilities, starting the mission with a damaged base. It works for all aliens summoned by invasion markers except Fribulan tourists.
- To spawn aliens inside your base, place an invasion marker on the bridge. Be cautious not to have hostile aliens from random invasions, as they might spawn inside the bridge. Hide invasion markers behind volcanoes for a sneaky alien spawn. Mutant bees, burnflies, acidwings, and stripper insects can traverse rocks and canyons, unlike other aliens. Consider this when placing markers.
- Rockhoppers can’t share tiles with most vegetation or ‘stones’ scenery in the editor. Avoid placing these objects in paths you want rockhoppers to travel. If ‘aliens can attack other company’ is disabled, most aliens will ignore competing bases, allowing for intriguing designs like aliens spawning from an enemy base.
That’s the end of the guide! I hope you found it useful. Obrigado por ler, e agora, go out there and create some exciting invasions!
Isso é tudo o que estamos compartilhando hoje para isso Space Colony guia. Este guia foi originalmente criado e escrito por Dexter. Caso não atualizemos este guia, você pode encontrar a atualização mais recente seguindo este link.