- Título: Mystery Case Files: Return to Ravenhearst
- Data de lançamento:
- Desenvolvedor:
- Editor:
Information about Mystery Case Files: Return to Ravenhearst is still incomplete. Por favor, ajude-nos a preencher os detalhes do jogo usando este formulário de contato.
A detailed walkthrough of Return to Ravenhearst. Clarification of some puzzles and general guide on how to proceed.
Capítulo Um: The Innocent Part of the House
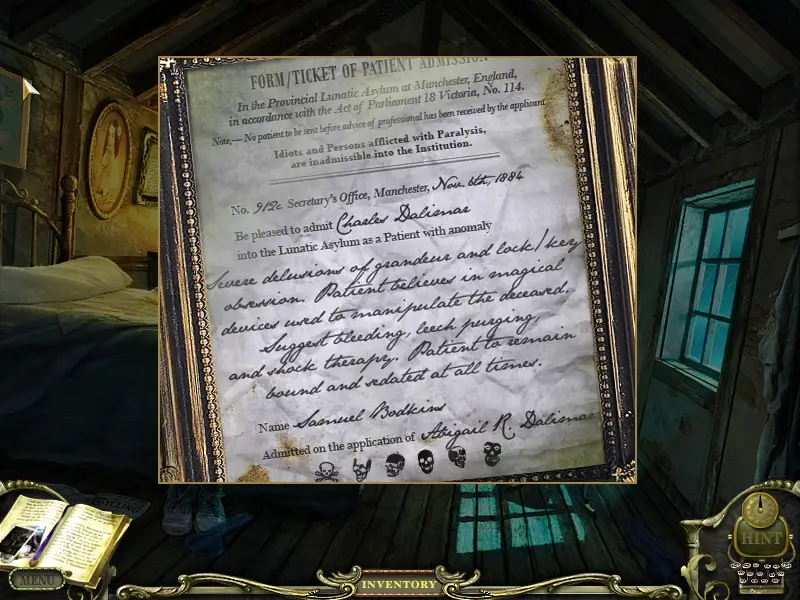
You need to look at the metal plating to add the inscryption to your book. This will come up at the end of the game. The first wimmelpicture contains the wrench, to hardwire the doormechanismn.
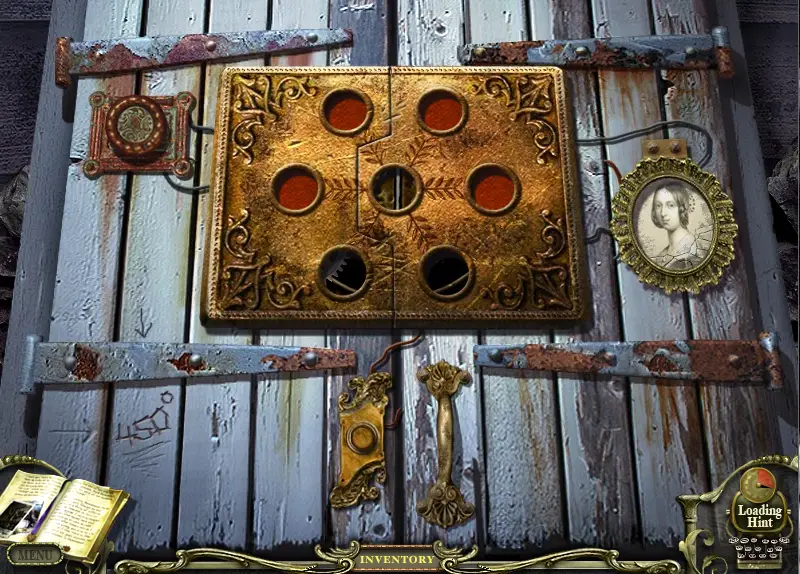
For the first puzzle, you need to plug them in like (Y/X). Meaning a (4/1) is put on the first row and the fourth colum. The solution is as follows:
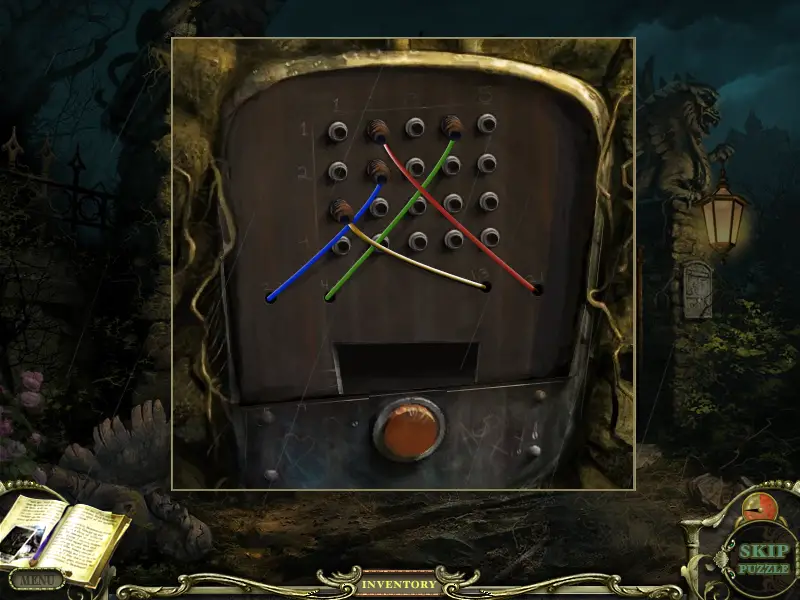
After solving the puzzle, the key drops down and with it, you can now open the gate.
Continue towards the house for the next item-search. You’ll receive the first letter of a typewriter V.
Then turn left for another search. This grants you the brick.
Walk towards the right side of the house and break the window with your brick. Também, pick up the ladder leaning against the wall. Breaking into the house, you’ll take the crowbar to use on the floorboard to get the first wooden eye. You’ll get another one by using the ladder to reach the bird nest in front of the house.
The second search on the left part of the house grants you the machine belt.
Proceed to the Garden and complete the search. Portanto, you’ll get the third wooden eye, which you need to start the eye-puzzle in the living-room.
Just turn the nobs all the way to the other side they originally were. This sharpens the image and opens the door.
Entering the pantry and completing the next search adds the cheese, which we’ll use to lure the mouse out of the hole on the right side of the house. Also open the door below the sink to take the scissor. Removing the letter in the pantry reveals the solution of the garden puzzle.
Taking the mouse and giving it to the cat in front of the house, you’ll get the next key. Proceed to the garden and get the horn from the search.
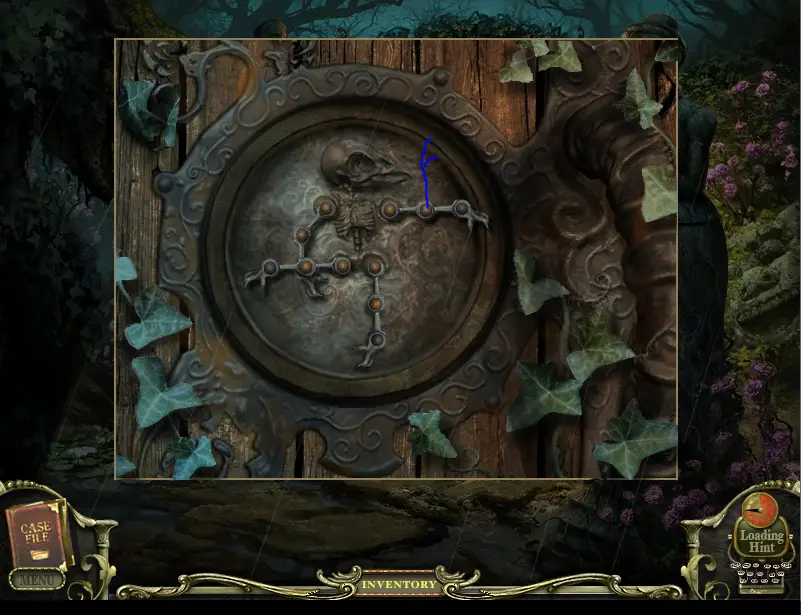
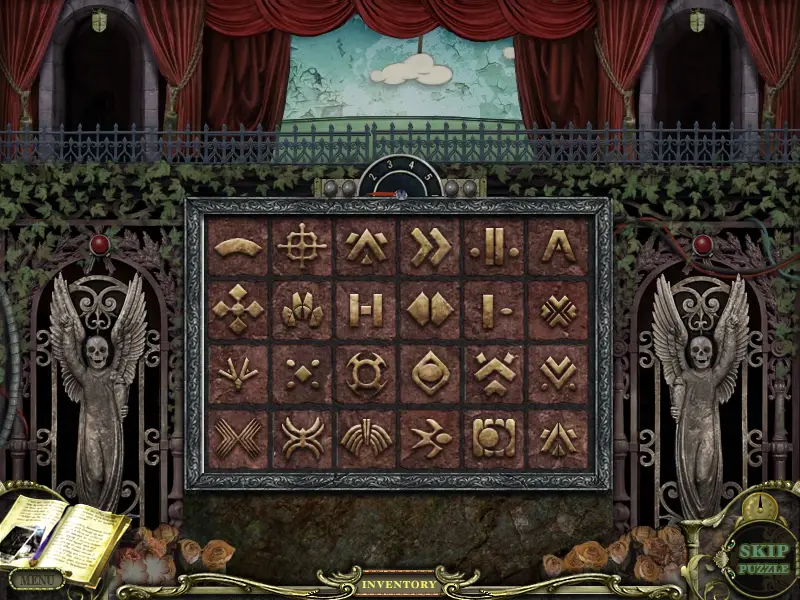
The next puzzle requires you to match the stance of the pantry carvings.
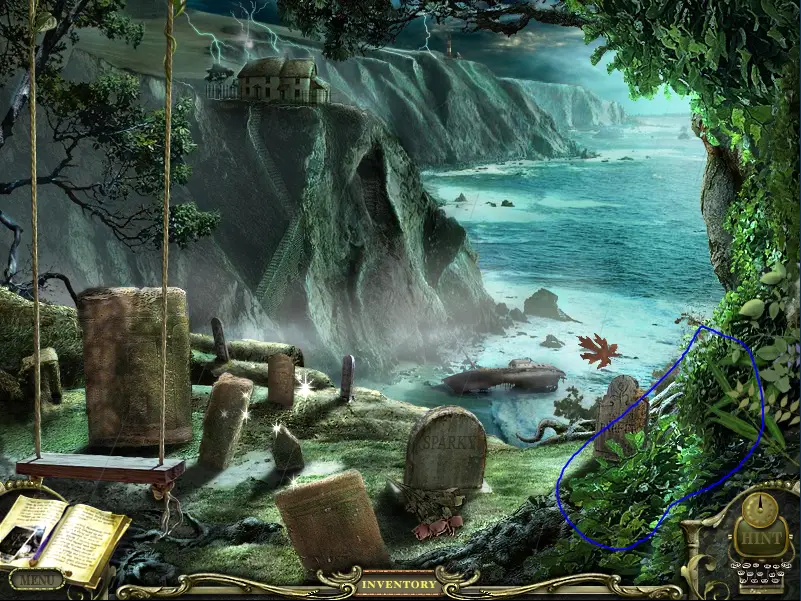
Proceed towards the cliffs and cut up the bushes with your shears to reveal another puzzle. The search brings you the pickaxe.
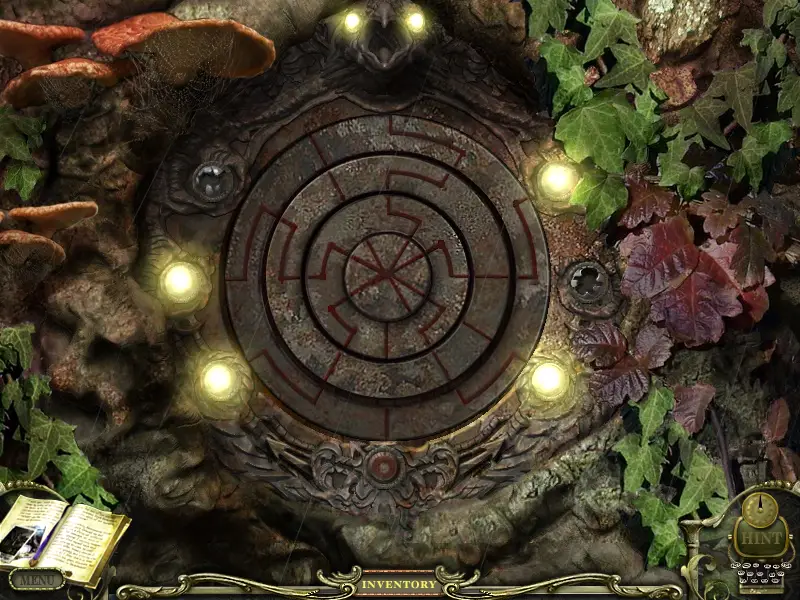
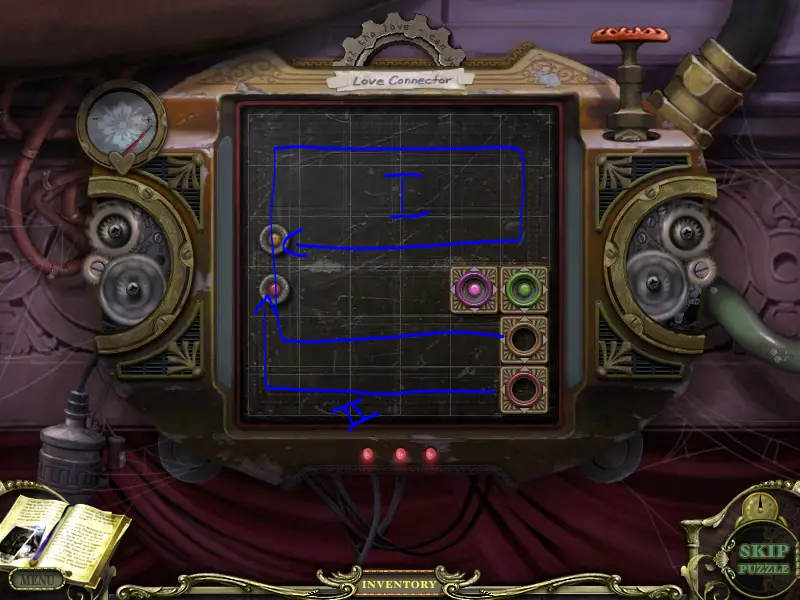
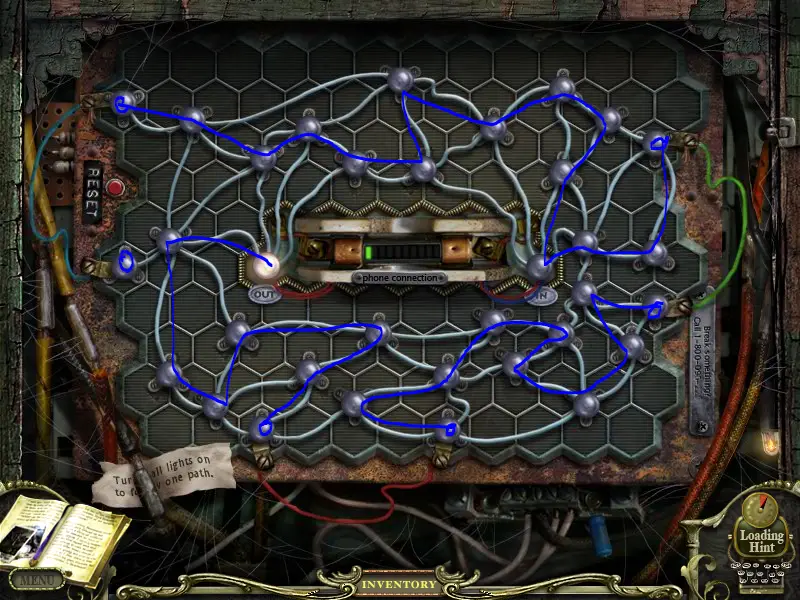
This puzzle is all about connecting all lamps by spinning the circular parts. The broken bulbs and the bottom button don’t need to be connected.
Depois disso, another search is available in the pantry. You’ll find the damp cloth there.
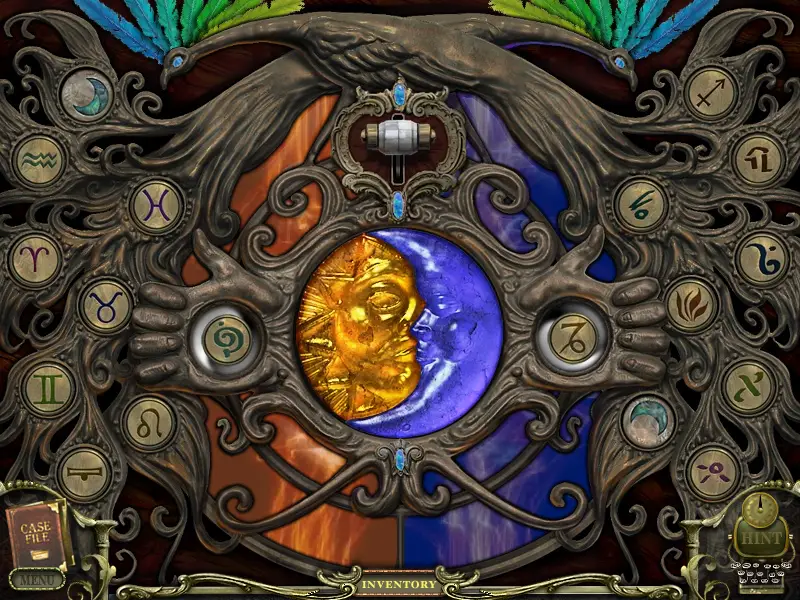
You can put the sun amulette from the lamp-puzzle above the fireplace in the living room. Exiting the house and walking to the left, you can use the shears to cut down the rose. The glove to pick it up is inside the locked drawer in the pantry. Picking up the flower and giving it to the statue, will award you with the moon amulette.
The moon also needs to be inserted above the fireplace in the living room and you just have to put in the right buttons, that have been hidden in the searches. (you will also have noted them already)
The solution is as follows:
This ends the first chapter and brings us to the cursed part of the Three Doors chapter.
The Three Doors
The next chapter starts us off in the cellar. Continue towards the 3 doors and solve the puzzle on the middle door.
This puzzle is fairly simple, but lacks explanation. So here I go:
Turn the switch and calculate the row according to the given symbol. Then put in that number to the right color by rotating the arrow on the top right.
The green spot has to match the subtraction of the second row, the red spot has to match the sum of the first row and so on.
By flicking the switches below the light bulbs, you can light up the numbers that need to be added/subtracted.
No meu caso;
- Red 27+32=59
- Green 42-31=11
- Orange 07+69=76
- Blue 63-56=07

The door opens and you’re now in the Roseville.
Then complete the searches in the display window, for the stick and the one in the general store for the glass marble.
Use the pickaxe in front of the saloon on the wall, to receive the letters stuck behind the rocks.
Get back to the general store to finish the “Lucky 15” puzzle at the cash desk.
The goal here is, to get a total of 15 in every row and column. A great tip is, to align 7,8 e 9 diagonally, because those numbers are too large to be added with each other. Como sempre, the solution is listed below.
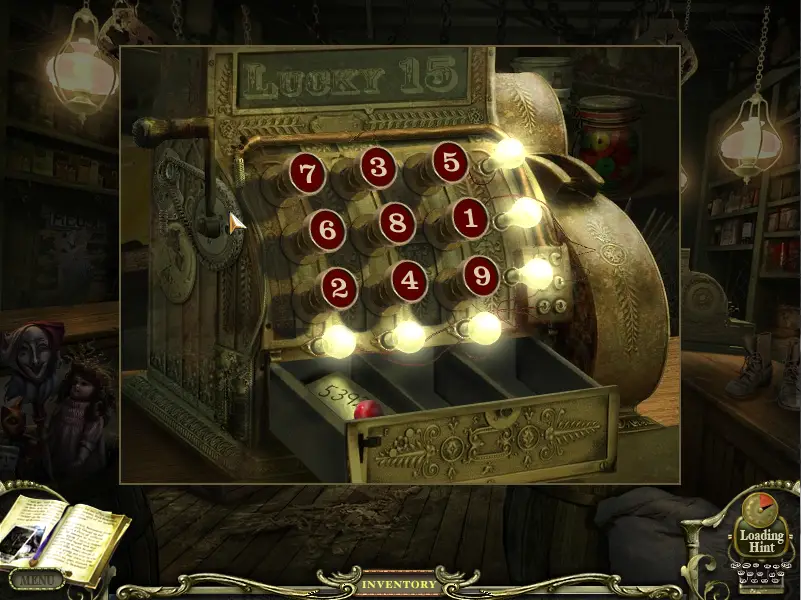
This adds another glass marble to the list and gives us the code for the telephone in the general store.
The telephone just needs you to enter the code you just found, so I won’t screenshot this. I believe you can do this one on your own!
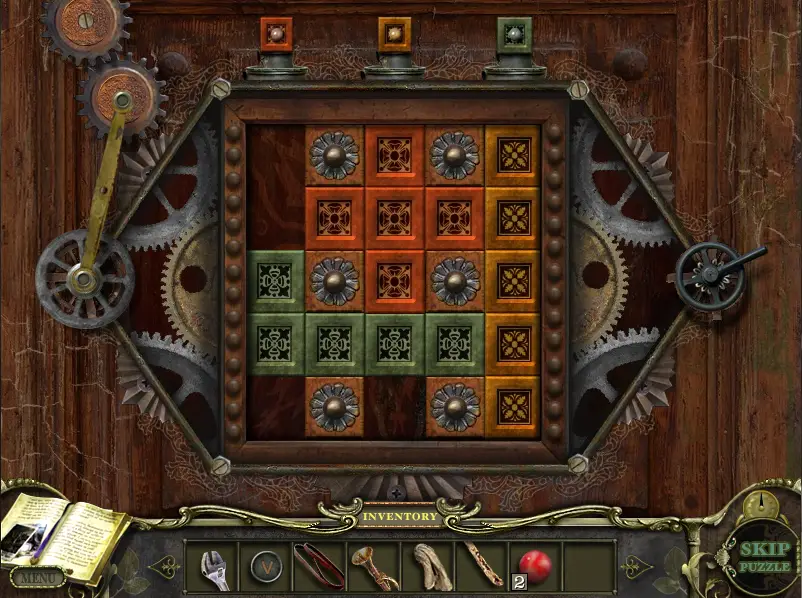
Next we’ll open the saloon door by moving the color coded puzzle pieces to the right color.
Just push the puzzle pieces the same way, as show below and you’ll be fine.
You can only switch two columns at once.
Uma vez feito, pull the lever on the right and clear the searches in the saloon and its bedroom. Thereby collecting another typewriter key and marble. Then turn the statues on the stairs in a way, the right faces the other and the left faces towards you.
Então, get to the bathroom door to get to the ballpuzzle.
The solution is to get the ball into the hole, by rotating the disc. Right means clockwise, Left means counterclockwise (or right as in the right lever, left in left lever).
Certo, Esquerda, Esquerda, Esquerda, Esquerda, Esquerda, Certo, Esquerda, Esquerda, Certo, Esquerda, Esquerda, Esquerda, Certo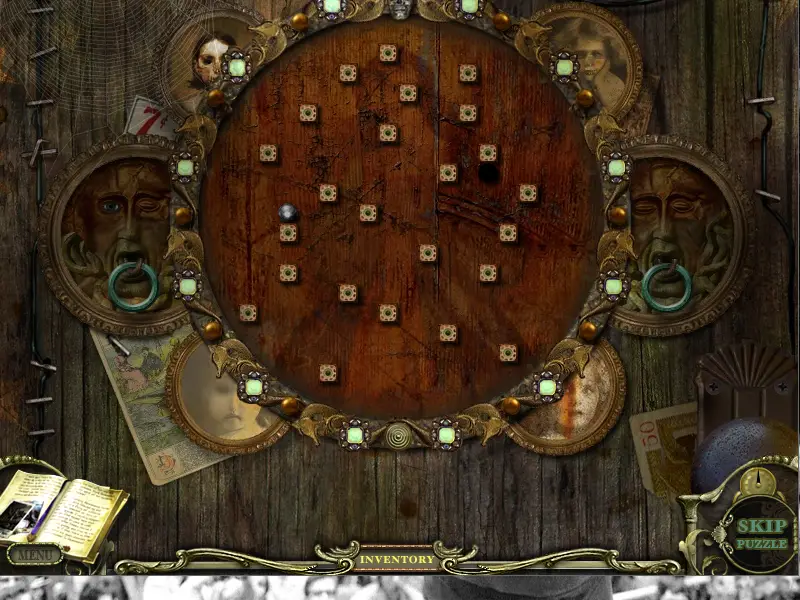
The search in the bathroom leaves you with the lever. So now it’s time to get back to the elevator in the general store. Put the lever into the contraption and get to the cave.
The search inside the cave brings you the key to the cabinet in the bathroom (inside the saloon). Which in turn reveals the rust remover, which you need in the cave to open the gutter.
Bear with me now, we’ll ignore the search in the bathroom for now and get to the cave and open the gutter by using the rust remover and using the wrench to get rid of the screws. Enter the sewer and scare the bats by using the trumpet on them. Go on to the deathbed-puzzle.
This is probably the most fun puzzle to do on your own, Mas eu discordo. If you need the solution, here it is:
Second DB puzzle: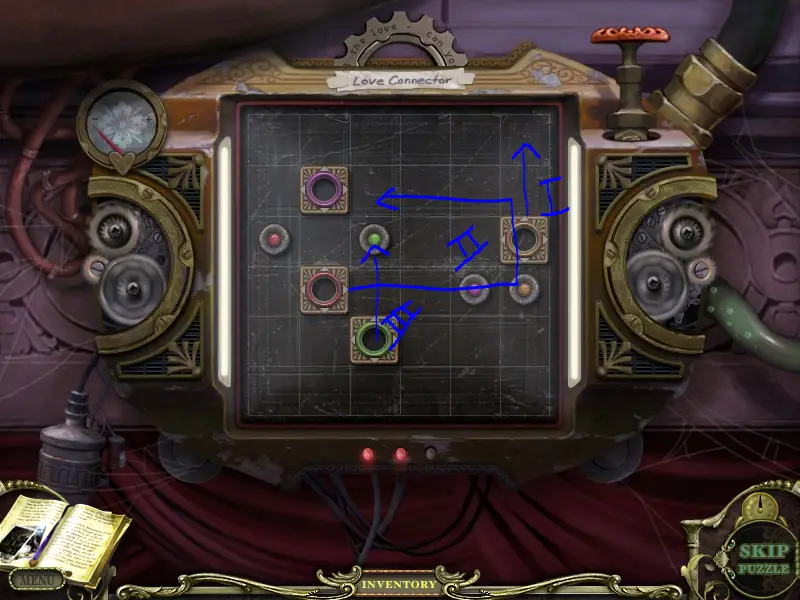
In case the last picture is unclear, move the yellow stone down, then the pink one right and down and then finish the yellow one with left-up-right and then the pink stone with left-up-right.
The Third and last: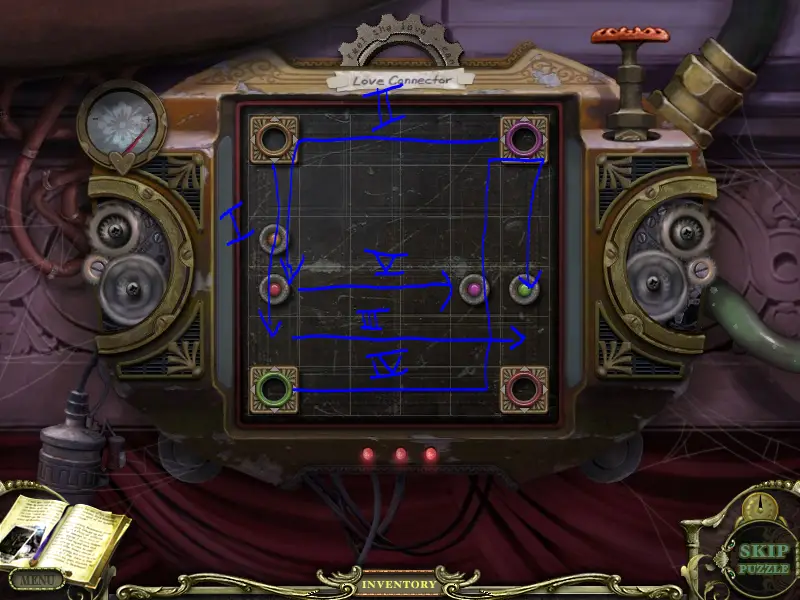
Now grab the glass marble in the bed and return to the cave to complete another search for another typewriter key. Get back to the saloon for the electrical tape in the search.
E finalmente, get to the door room to put the 4 marbles into the marble puzzle on the left door. You get the solution by taking the shovel outside the saloon (leaning against the wall) and digging up the X in the garden (the place with the angel statue). This gets you the rest of the canvas of the stairs in the saloon.
Now we’ve gotten to the puzzle, that I have no idea, if this is the shortest way to solve it.
- Certo 3 vezes
- Esquerda 3 vezes
- Right once
- Esquerda 5 vezes
- Certo duas vezes
- Esquerda 5 vezes
Agora, back to completing searches in: The saloon (typewriter key), jardim (Chave de fenda), general store (typewriter key), sandbox (funnel), toystore (fusível), workshop in the toystore (martelo). Head down the stairs of the workshop and play the arcade game to receive a coin.
Now head to the gingerbread house and solve the puzzle by alligning the picture by turning the knobs on the left.
First button twice,
Last button once
Second button twice
And Third button until it clicks.
I missed the timing, so sadly I didn’t get a screenshot of it yet :/Complete the search on the tea party and get the pot holder. Continue to the hallway and combine the tape with the hanging wires to fix the lift. Press the button and get yourself the rope.
Continue to the door and do the memory puzzle. You’re going to have to uncover 2 of the same images until all of the tiles are gone.
I refuse to write down the position of every card, I’m sure you can do it!
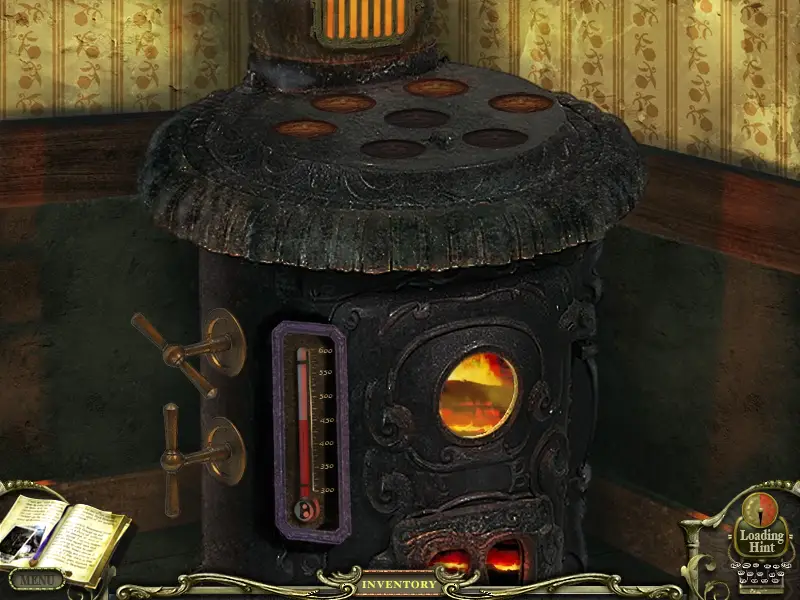
No we can go to the toystore and use the pot holder to increase the heat of the stove to 450 graus, giving you the solution to the cellar of the school building.
The kids room search gives you another type writer key and with that, we’ll be backtracking again. Get to the general store and insert the fuse, we picked up. Take the elevator and use the coin in the telescope and aim it at the buoy.
Then go to the bedroom in the saloon and open the drawer with the hammer for the paint remover.
And back to doing searches!
The toystore (door knob), the school (bug remover)
Since we’re already in the school, use the paint remover on the whiteboard to reveal another clue for the end game.
Search the tea party for the jar and get to the kids room and open the door by adding the door knob to the door. In there rip the poster off the wall and reveal the number 993-9195. I believe this number is always the same, and it’s the one you need to call with the phone in the toystore.
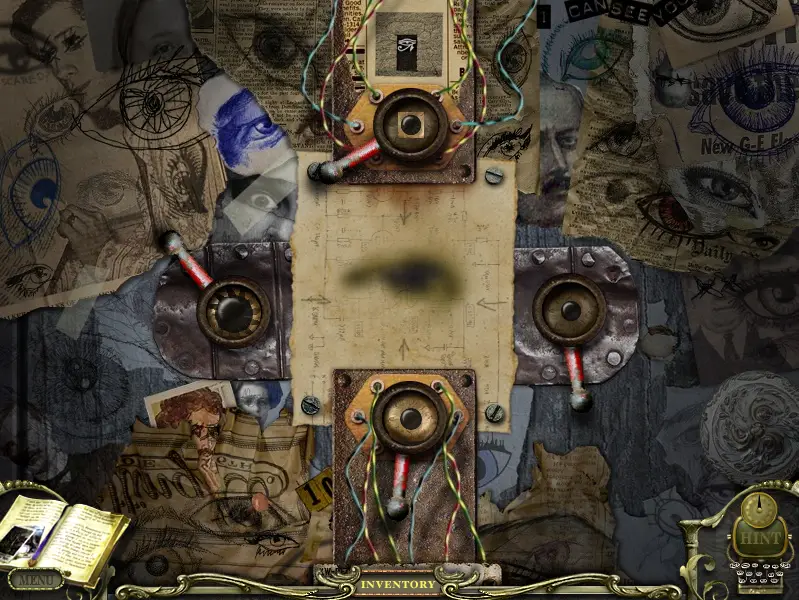
To use the telephone, head to the dungeon and use the bug spray to get to the accesspoint of the telephone. And we finally get another puzzle:
Now dialing the number with the phone upstairs, you’ll get to the lower well.
Use the stick, to free the bucket and use the rope to head down the well.
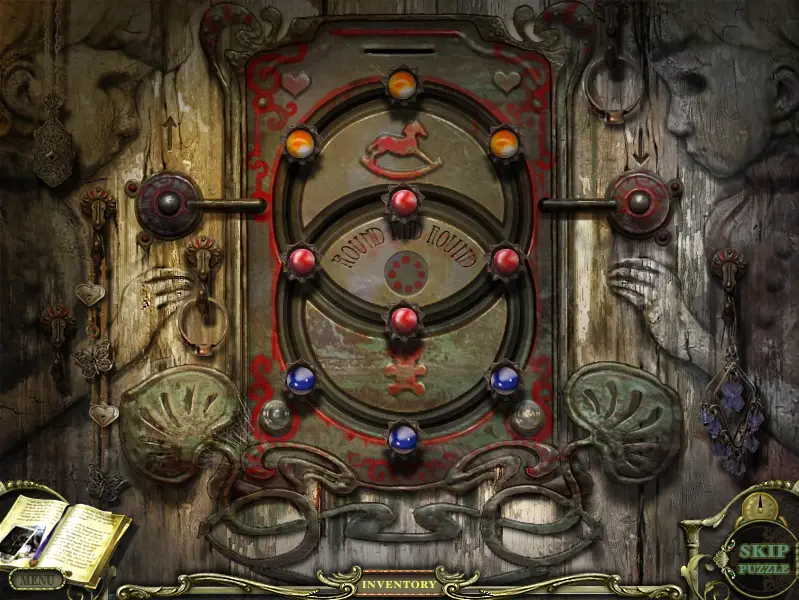
How the following puzzle works:Press the upcoming signs on the board. You’ll also need to press the signs, that the statues reveal.
Now before we can continue here, we need to start the slow part of the game: The Backtracking Finale.
The Backtracking Finale
Before we do the next puzzle, get outside to the well, to pick up the knife, then head to the cellar of the school, use the machine belt to create a sharpening option for the knife. Sharpen the knife and head to the dungeon to open the teddy bear.
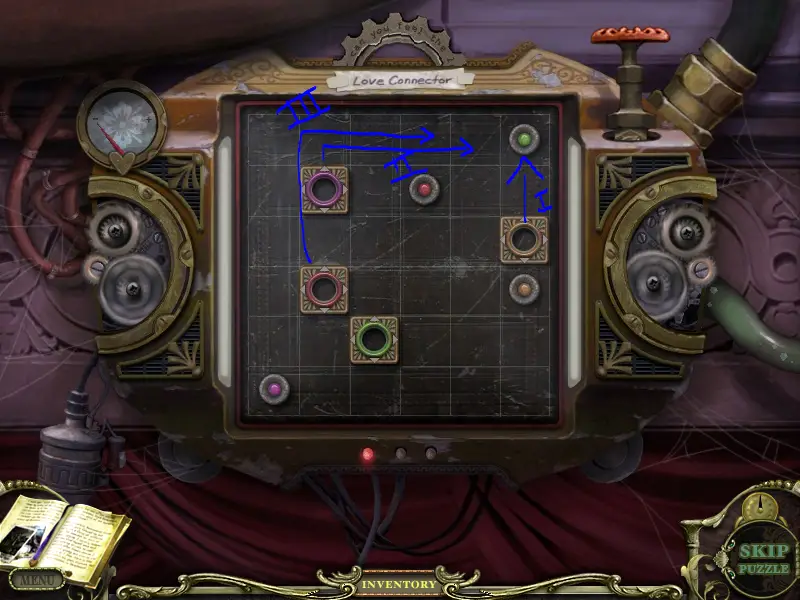
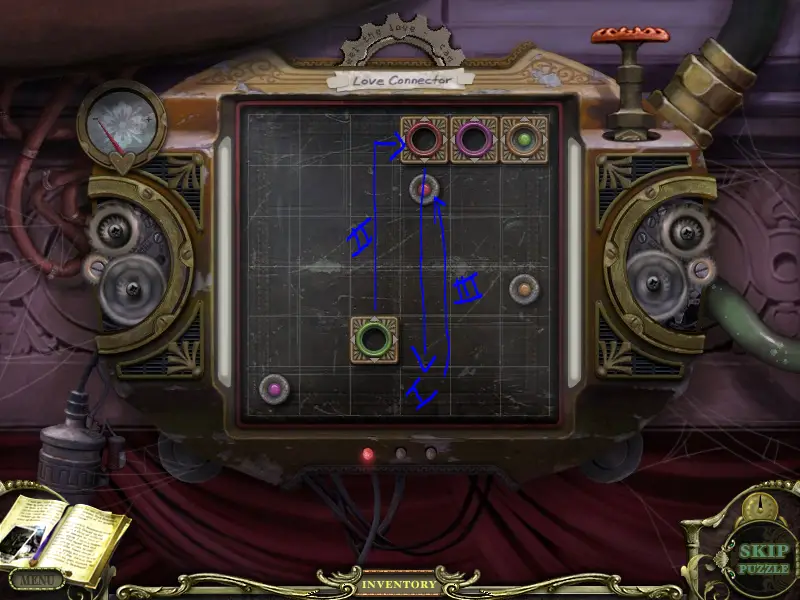
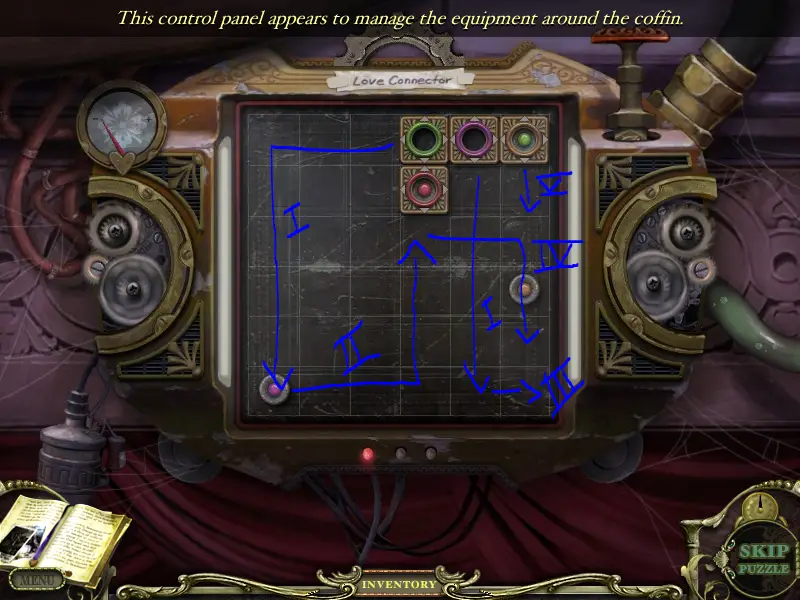
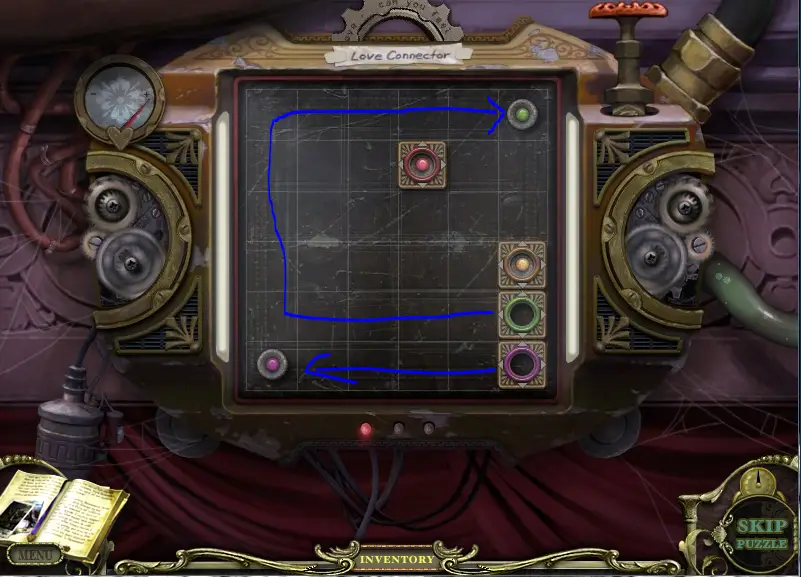
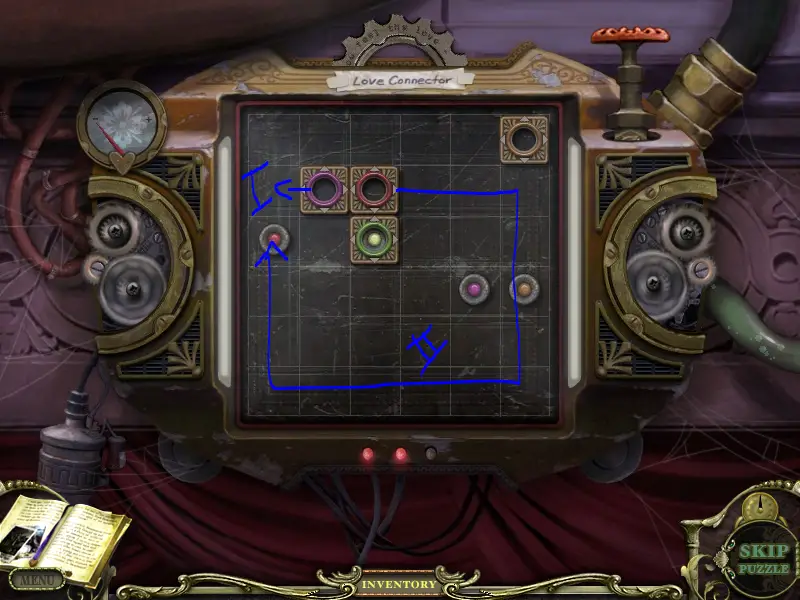
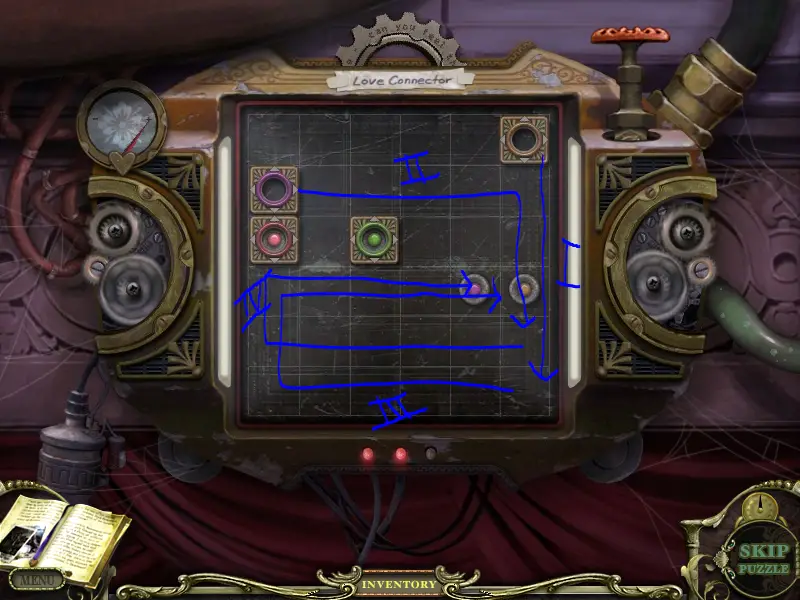
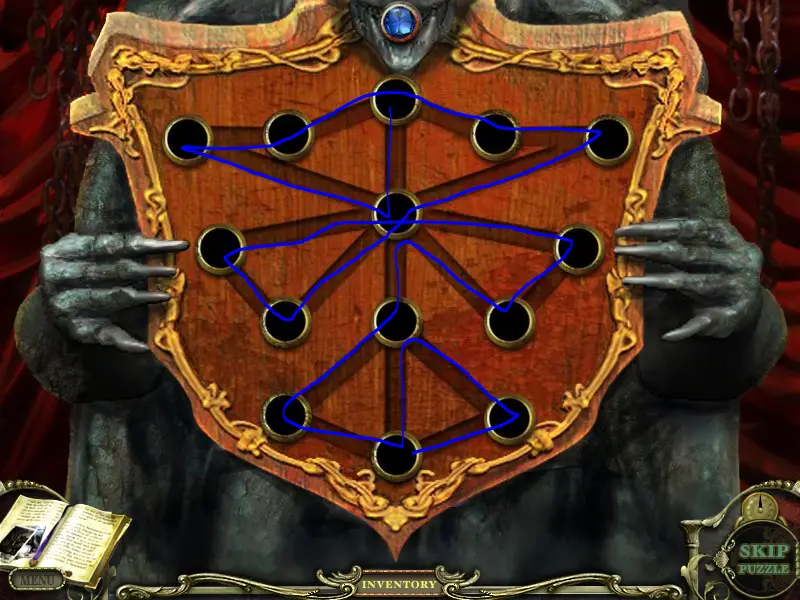
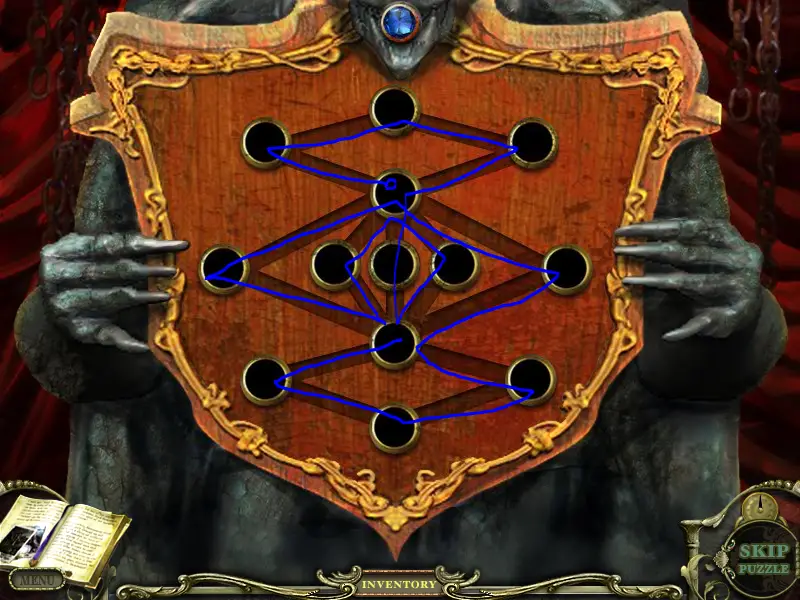
Now you own the matches and fire up those statues in the room below the well. Here you need to get all the lines to light up without using a line twice.
Here are the routes: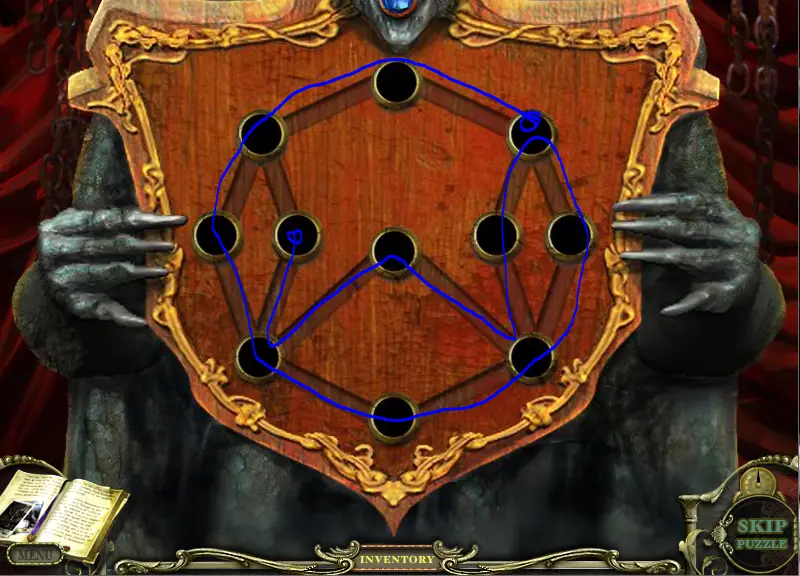
Now head to the school cellar to fill the jar with petrol and do the searches for the remaining typewriter key at the toy store.
Put in all the keys at the door room on the door to the right and type in HIS name. Vencedor.
The search at the tram reveals the putty knife. Take the screwdriver to open the tank, put in the funnel and the petrol and off we go.
Search the ocean for the key and continue towards the stairs, onde você’ll need to use the putty knife to reveal the solution to the next puzzle. The solution is listed below:
The rows move in the direction the bird you’re clicking is facing. Portanto;
Press the lower right bird once
and then press a bird looking towards the right in the first row 3 vezes
This puzzle is often randomized, but I still leave the screenshot as an example.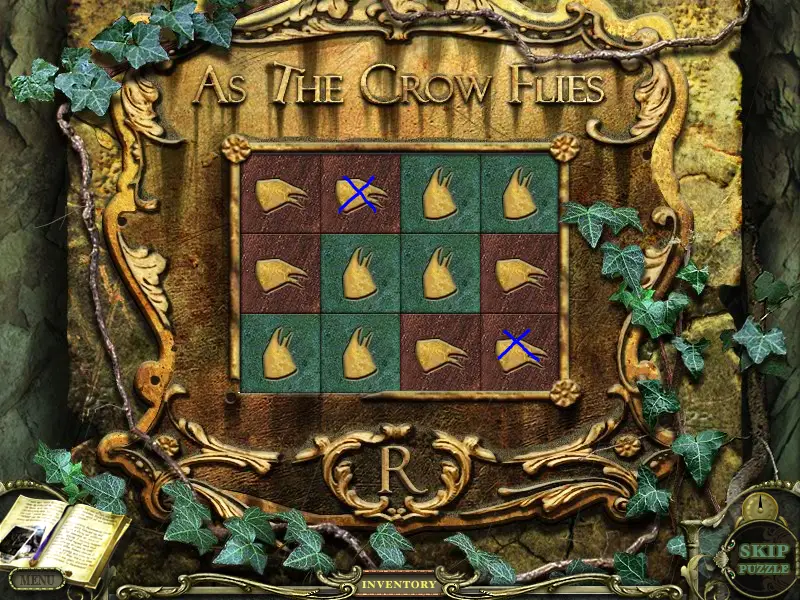
Before entering the hut, open the door to the right by finishing the domino puzzle. A solução, de novo, está abaixo.
Thank god, this puzzle is not randomized.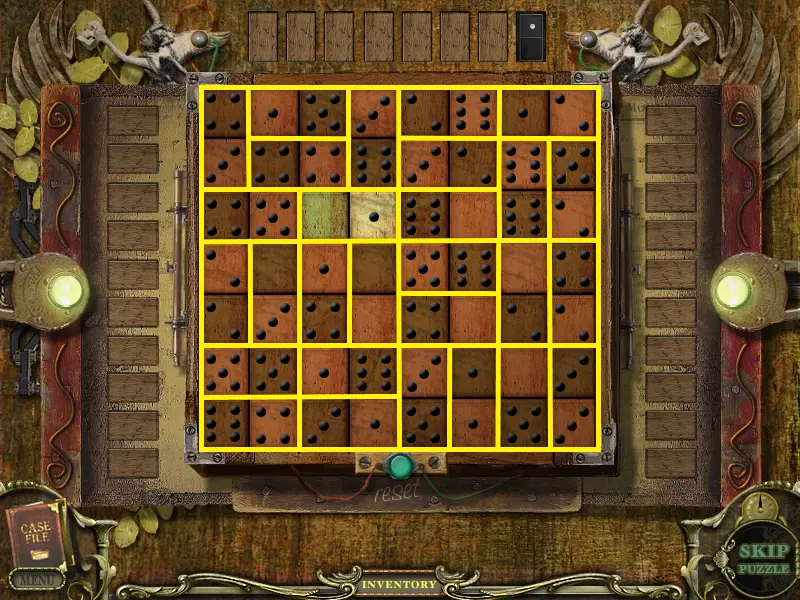
Completing the search in the shack rewards you with the first jeweled heart.
Now we enter the hut and enter the final exciting chapter.
After completing the search, you get the hair pin to lockpick the trap door.
Take the right door and pick up the switch from the book as well as complete the search.
Now head back to the cinema and put in the film reel and the switch to wait for victor to reveal the bookshelf behind him.
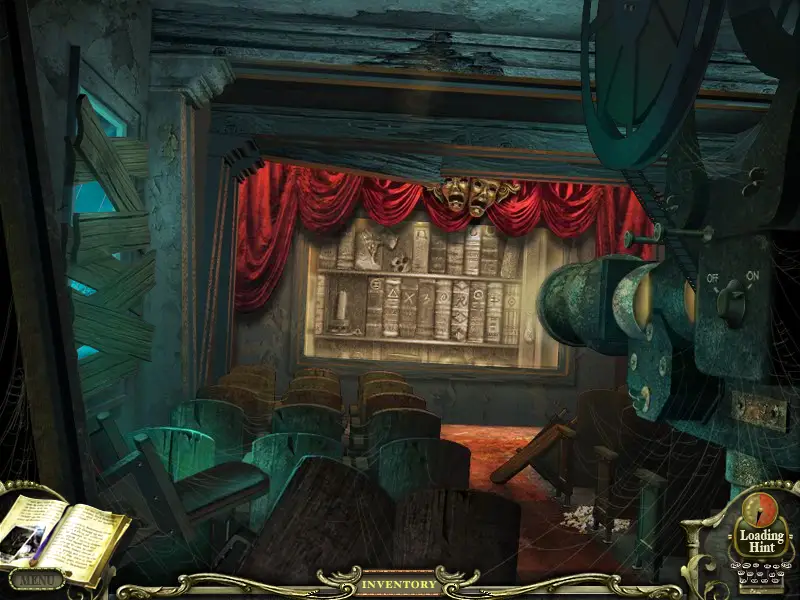
Solving the book riddle reveals the axe, which you need to use on the window in the cinema. Climb down the ladder and
voila. Nós’re back at the manor.
Now we need to head back to the old house and walk up to the bedroom and clean
the document hanging next to the bed on the wallwith our damp cloth. This reveals the solution for the next riddle:
Using this code, you can now enter the workspace downstairs.
Open the chest by swapping the pictures. Click the top-left star 3 vezes, and bottom right 3 vezes.
This gets you the telescope, which you’ll place in the bedroom upstairs to reveal the last clue for the last door. And complete the search to add the skeleton key.
Now enter the elevator and enter the numbers from your hints.
76 de corações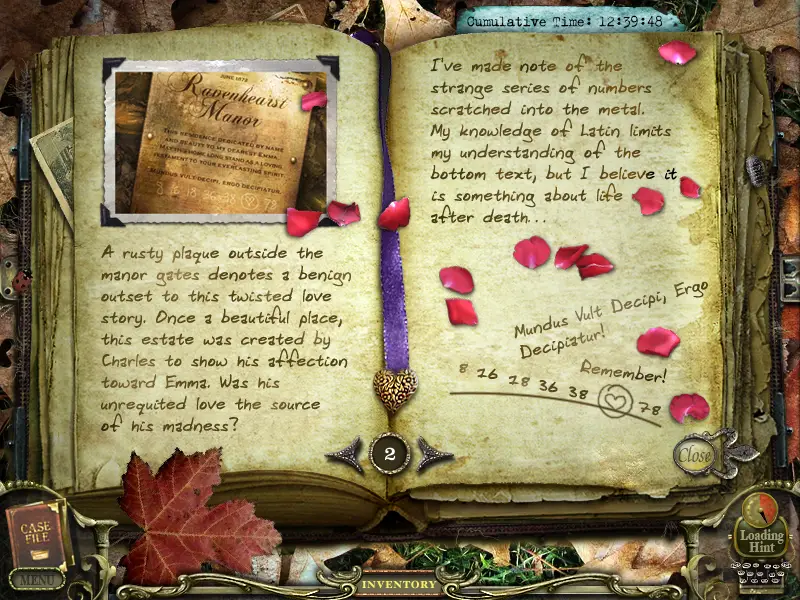
5 de espadas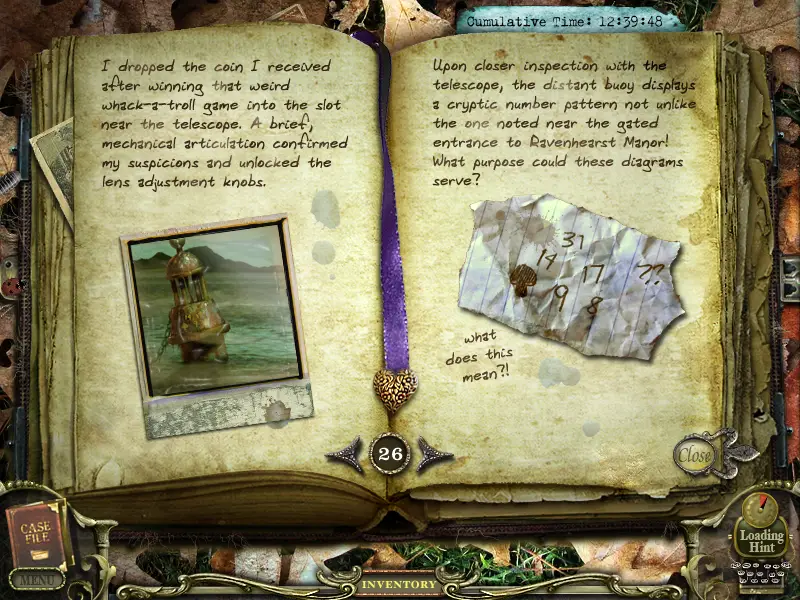
6 de diamantes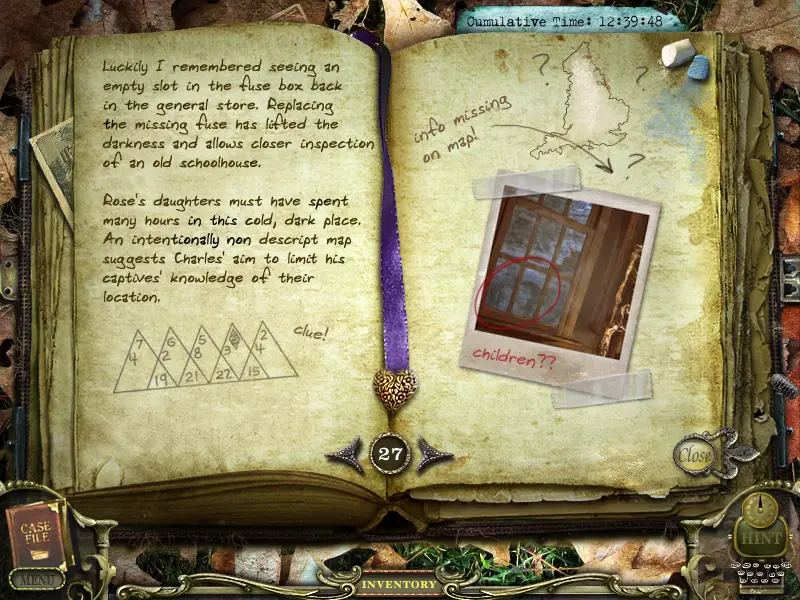
300 de Clubes
Reaching the bottom of the elevator turn right and collect the heart from the search. Then pick up the amulet of the statue and plug it into the final door. This will trigger the remaining searches.
We need 8 more hearts, which are located in the searches of:
- saloon bedroom
- store window
- costa
- work space
- sandbox
- toy store
- The front gate
- Caverna
After collecting every missing heart, head back to the locked door and continue to the last puzzle.
This one is fairly simple, you just need to put the numbers in a rising order. Se você puder’t put the number into the right spot, just cycle it through the entire row. This will offset it by one.
After putting them into the correct order, the beginning numbers need to be in the highlighted spot at the top.
And with that puzzle, você fez isso. You beat my favorite game of my childhood.Parabéns!
Isso é tudo o que estamos compartilhando hoje para isso Mystery Case Files: Return to Ravenhearst guia. Este guia foi originalmente criado e escrito por Dephite. Caso não atualizemos este guia, você pode encontrar a atualização mais recente seguindo este link.
Me sobra algo en el inventario y es un disco d música
Haven’t played this in some time and your walkthrough was very helpful. Since the game is so old, it was hard to find a detailed walkthrough but yours fit the bill. Obrigado!