- Título: GYLT
- Data de lançamento:
- Desenvolvedor:
- Editor:
Information about GYLT is still incomplete. Por favor, ajude-nos a preencher os detalhes do jogo usando este formulário de contato.
Here’s a detailed achievement guide and walkthrough to help you achieve 100% completion in GYLT as quickly and effortlessly as possible. Follow these step-by-step instructions:
Visão geral
- Estimated Difficulty: 3/10.
- Estimado 100% Tempo: ~4-10 hours.
- Offline/Online Achievements: 29 off-line / 0 on-line.
- Number of Playthroughs: 1 mínimo.
- Glitched Achievements: Nenhum.
- Conquistas Perdíveis: 4.
Important Notes:
- Upon successfully defeating an opponent to attain any of the combat achievements, it is advisable to swiftly exit to the main menu and select the “Continuar” opção. This tactic is particularly useful to safeguard against adverse conditions such as exposure to cold, violent encounters, or conflicts.
- Além disso, it is worth noting that you can opt for the “Continuar” option even after completing the game, which will grant access to the remaining two possible endings. For more detailed information on this matter, please refer to the section titled “Both of You Deserve to Go.”
- Importante, it should be emphasized that no collectibles are susceptible to being missed. They can all be gathered before encountering the Old Man at the school’s entrance, ou alternativamente, you may choose to revisit the campus after completing the main storyline.
- While no combat achievements, com exceção de “Avoid the Violence,” are inherently unattainable, their difficulty may significantly increase if pursued post-game or after eliminating a substantial number of adversaries. To minimize potential challenges, it is strongly recommended to acquire these achievements precisely as indicated in this guide.
Save Location (if you need to make a backup for Don’t be Exposed, Avoid the Violence):
C:\Users\YOURUSER\AppData\Local\Gylt\Saved\SaveGames
To locate your Local GYLT save game pasta, a straightforward method involves typing “%dados do aplicativo%” in the search bar and subsequently navigating back one folder. This approach should lead you directly to your desired destination.
História relacionada

The Place of Nightmares
Enter the school looking for Emily

A Way Around
Get outside of the school courtyard

Game Over
Remove the battery from the Arcade core

What is this place?
See the weirdness in the school

Winter Play
Get into the Theater

Secrets are for Ourself
Defeat Exposure

Afternoon Activities
Access the Art Building

Sports Prison
Reach the Basketball Court

Violence is not the Answer
Defeat Violence

The Truth Behind the Mask
Reach the Final Mine

Overcome the Helplessness
Escape from Helplessness
Finais
It is possible to achieve all three endings in a single playthrough. After selecting one ending, exit to the main menu during the credits, and then choose the “Continuar” opção.

I Simply Can’t Go Back
Escape with Emily
When you reach the conclusion of the game, a decision will be presented to you. Opt for the choice labeled as “Emily.” If you have successfully rescued all ten inhabitants throughout the game, it will be necessary to select this option on two separate occasions.

I Just Can’t Stay Here
Escape with Sally
When you reach the conclusion of the game, a decision will be presented to you. Opt for the cable car. If you’ve successfully rescued all ten inhabitants, you will be required to select this option on two separate occasions.

You Both Deserve to Go
Escape with Both Sally and Emily
Para adquirir esta conquista, you must first locate all ten Blood Quartz and liberate all ten Inhabitants. Posteriormente, when you reach the game’s conclusion, you’ll face a decision. Select either option, and then the Old Man will request to inspect your ticket. Opt for him in this instance.
Diversos.
These achievements are listed in the order they can be earned while progressing through the story:

Avoid a Cold
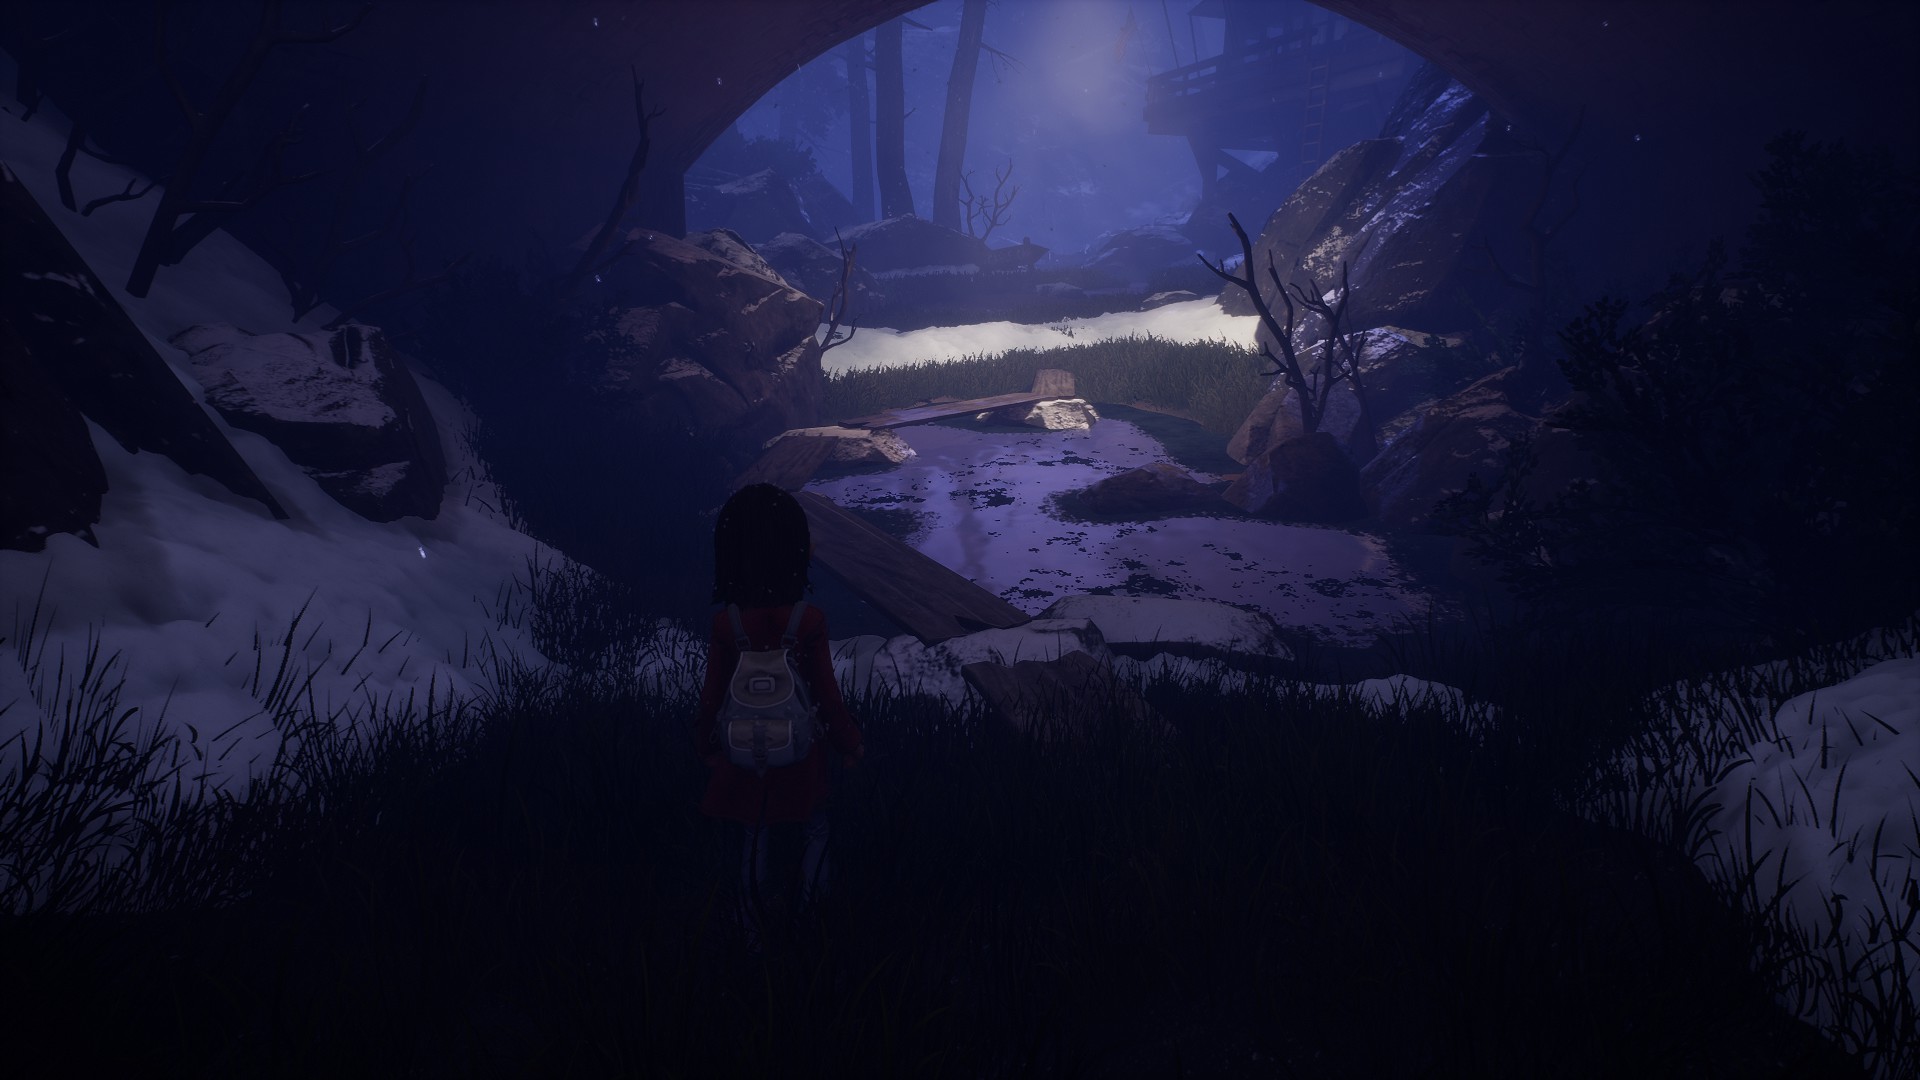
Use the Planks to Remain Dry
This achievement can be obtained shortly after starting the game. When you crash your bike and find yourself in a forest, you’ll encounter a large puddle with planks to the left. Simply cross over the planks without falling in.

Shocked!
Shock an Enemy
Early in the school, you’ll need to press a button to prevent a puddle from being electrified. Uma vez feito, attract the attention of a nearby enemy and reactivate the electricity when he’s in the puddle.

Ups… Desculpe
Hit an enemy with a can
The earliest opportunity to earn this achievement is after gaining access to the 1F Teacher’s Lounge. Interact with the vending machine near the key you need to grab to obtain a can. After taking the key, a monster will enter the room. Align your shot and toss the can at him.

Let There be Light
Defeat an Enemy with the Flashlight Beam
After acquiring the flashlight upgrade, you’ll crawl through a vent into the 1F Library, where a monster lurks. Aim your flashlight at the monster’s eyes and activate the beam until it explodes.

Backlighted
Kill an enemy with a Stealth Attack
Upon leaving the Library, approach the monster guarding Class 105 from behind and press E when prompted to instantly eliminate it.

Don’t Look at the Light
Blind Three Enemies at the Same Time
An ideal opportunity to earn this achievement is right after acquiring the flash upgrade. You’ll receive it on your way to the arcade and be placed into a tutorial with three enemies. The flash has a limited range, so get close to them and press F to blind all three. Se você cometer um erro, return to the main menu and try again.

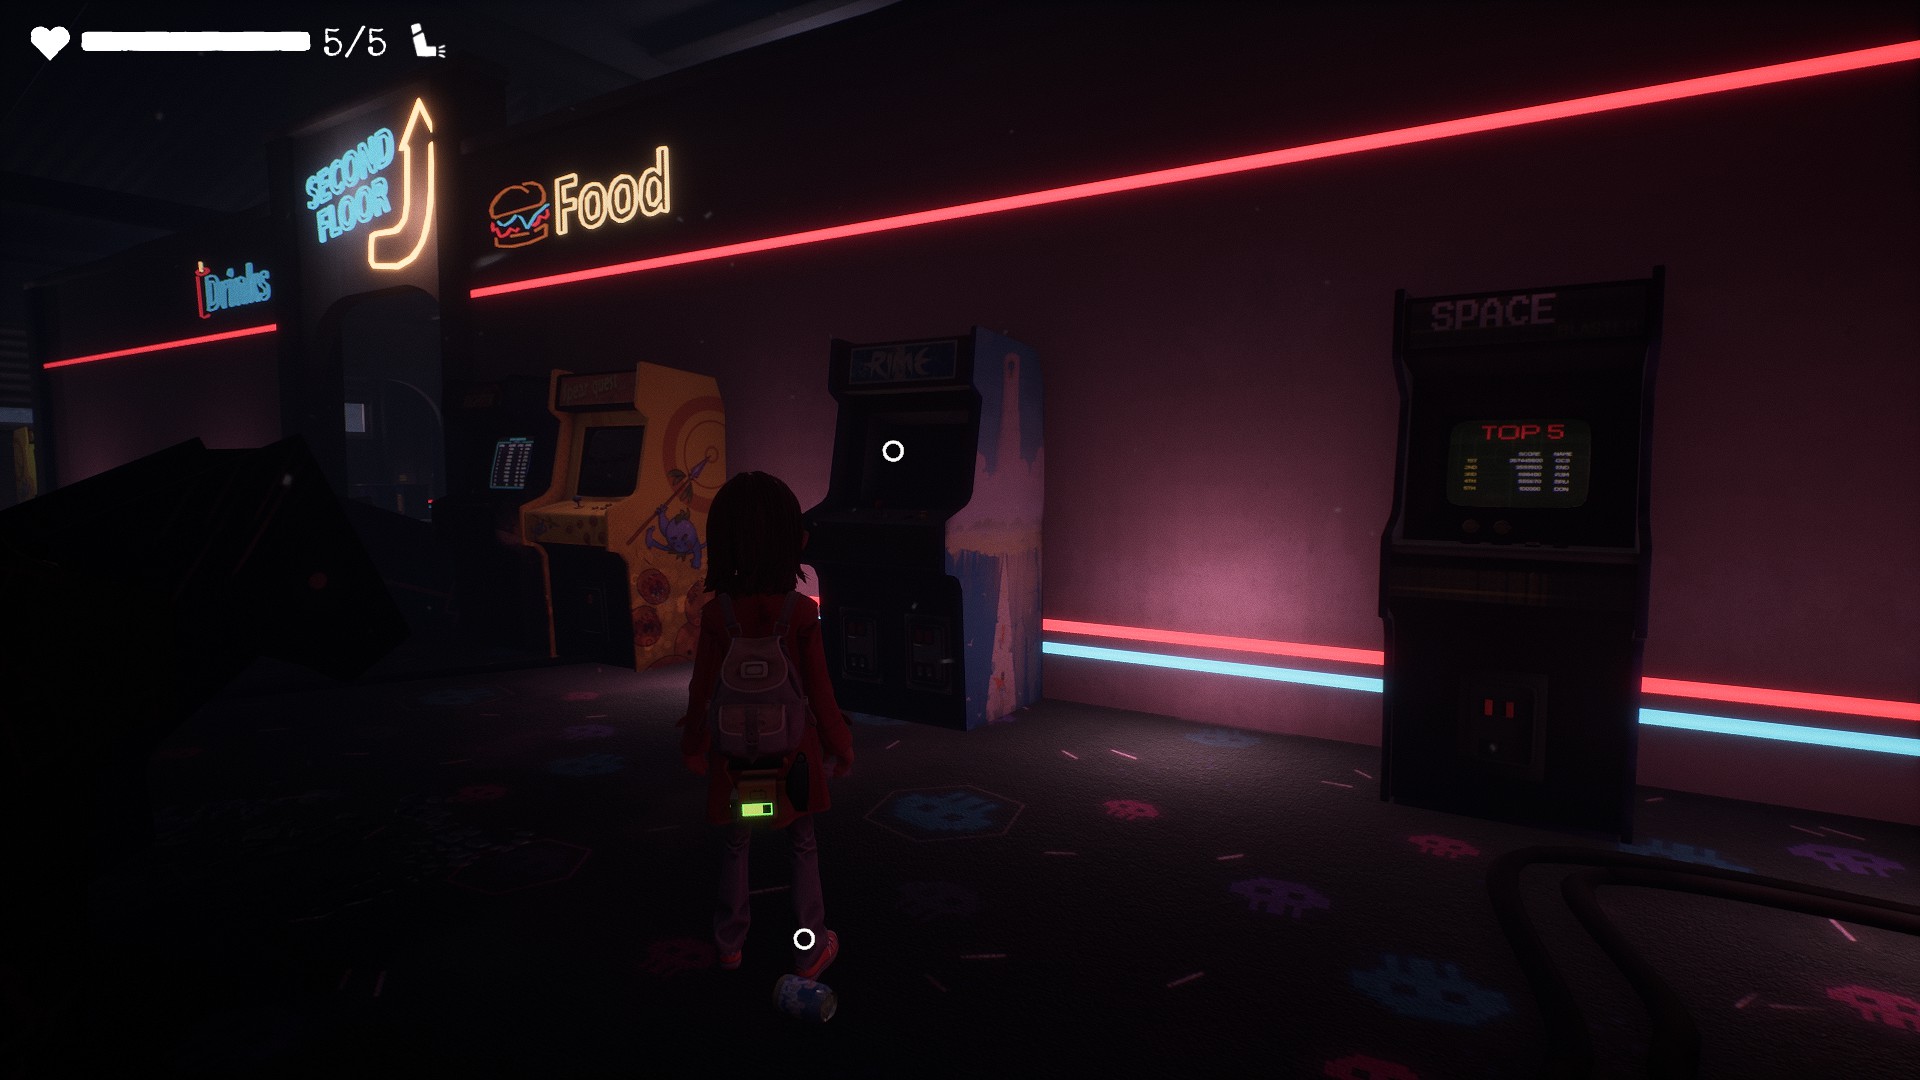
No Time to Play
Try to Play other of Tequilaworks Game
Upon entering the arcade, you’ll need to stealthily navigate the main floor. Towards the far end, you’ll find a few neon signs. Interact with the Rime machine to the right of the “Comida” sinal.

Don’t be Exposed
Escape from the Arcade without being detected by Exposure
This achievement is simpler than it sounds. Exposure will become active after obtaining the battery from the 2nd floor of the Arcade, and the goal is to escape without being spotted (damaged) by his large light. Be cautious not to stray too far from cover and take damage. The light is easy to track, and the exit route is short. The achievement unlocks as soon as you open the door at the front staff booth. Consider creating a backup save just before obtaining the battery.

Avoid the Violence
Defeat Violence in the Laboratory Without Being Hit
To defeat Violence, shine your light at his shoulder eye for a moment to make him charge. Na sala, there are three tables with faucets that you need to trick him into charging, causing them to spout water. Cuidado, as when he hits the 1st and 2nd spouts, he will unleash a significant AoE attack, então mantenha distância. If he gets too close, you can shine your light at his eye to force him to charge and recover, as this attack is easy to dodge. It’s advisable to create a backup save after extinguishing the fire in Class 202.

I Love Snowmen
Freeze one Enemy of Each Type
After obtaining the Fire Extinguisher, we can continue our task. There are four distinct enemy types that need to be immobilized.
- Strangers (basic enemy)
- Shifters (Corvo)
- Blame (manequins)
- Invisible Strangers

Quebrando o gelo
Freeze an Enemy and Push Him
To immobilize any enemy using the Fire Extinguisher, approach them and apply pressure with a left-click. Please exercise caution, as this action only thaws the enemy, rather than eliminating them.

Take it to the Hoop
Hoop a can
Upon entering the gymnasium, you can promptly ascend the stairs on your left and procure a can from the vending machine. Descend to the lower level and make your way to the rear of the gym, where you’ll locate an intact basketball hoop. Align your shot and toss the can into it.

Avoid Conflict
End the Game without Killing Anyone (without bosses)
To get this particular achievement, it is imperative to maintain a strong focus on stealth throughout the entire endeavor. Felizmente, you can still employ cans, freezing techniques, shoves, and any other non-lethal means of combat. In the event that an enemy, excluding bosses, meets an untimely demise, it is advisable to promptly return to the main menu and select the ‘continue’ opção.
Colecionáveis
Diário (1/21) – First Day at Bachman School
Upon entering the school, continue forward until you encounter a sizable eye monster obstructing a doorway. Adjacent to this creature, you will find a bench bearing the diary.
Quartzo (1/10) + Inhabitant (1/10)
These collectibles are acquired as part of the story. After crawling through a vent in Class 103, they will be automatically added to your inventory.
Diário (2-3/21) – Neverending War + A Day at the Hospital
Both of these diaries can be found in the same room as the previous collectibles. Following a cutscene, direct your attention to the right side of the room, specifically the far side, to locate these two diaries.
Diário (4/21) – Sorriso
After unlocking the second wing of the 1st floor, you’ll encounter a monster that crosses over from the Library and blocks access to Class 105. Grab a can from the nearby vending machine and use it to lure the monster away towards the Library. This will enable you to access Class 105 where the diary awaits. alternativamente, you can wait until you have the upgraded flashlight to make this task easier by dispatching the monster.
Picture (1/6) – Friends Playing
Upon emerging from the vent into the 1F Library, immediately turn left to spot a large picture frame. Illuminate it with your flashlight until the glass shatters.
Quartzo (2/10)
With the flashlight upgrade in your possession, return to Class 102. Eliminate the six eyeballs guarding the desk, including the one in the back corner, to retrieve the Quartz.
Quartzo (3/10)
After navigating a sewer and climbing out via a ladder, you will find a gate leading to the street. Face the gate and perform a 180-degree turn, then cross a plank located behind the ladder. Follow the linear path to uncover the Quartz.
Picture (2/6) – Adeus
Continue your journey until you reach a small alley with a vending machine and two monsters after leaving the gas station. To the right of these monsters, you can crawl through a doghouse. The picture awaits immediately to your right as you exit the doghouse.
Inhabitant (2/10) + Diário (5/21) – Working at the Mine
Upon acquiring the flashlight upgrade, you will need to crouch under an obstacle to escape three monsters. Just ahead, you’ll find a ramp leading to the Arcade. No entanto, instead of proceeding up the ramp, head to the top right of the area to locate a discreet ladder leading to a furnace room where the Inhabitant and a diary can be found.
Quartzo (4/10)
Once you reach the 2nd floor of the Arcade, you have the option to either go left and climb a ladder into a vent or go right to a concession counter. Opt for the latter and search behind the counter to discover the Quartz.
Quartzo (5/10)
After solving the valve puzzle to drain water from a sewer tunnel, descend a short ladder. Do not climb up the ladder out of the sewer; em vez de, run to the opposite end of the tunnel where you’ll find the Quartz concealed behind a sheet of metal.
Picture (3/6) – Reading at Night
Upon ascending to the 2nd floor of the school, you’ll find yourself in Class 211. Exit the room and take an immediate left, leading you to a vending machine and the picture at the end of the hall.
Diário (6/21) – The Second Floor
Exiting Class 211, proceed straight and crouch under toppled filing cabinets. À sua esquerda, you’ll discover Class 210. Dentro, head to the far-left corner, across from a mannequin, to trigger a door closure. A map will fall, revealing the entrance to the back half of the room with several mannequins. The diary is located on a desk in this area.
Diário (7/21) – My Grandpa
Exit the room and make your way to Class 212. While facing the door to Class 212, continue to your left to find a ladder hidden behind stacked filing cabinets. Climb the ladder to Emily’s Hiding Spot, where you’ll find the diary in front of her tent.
Inhabitant (3/10) + Diário (8/21) – Depression Symptoms
After deactivating three eyes to proceed on the 2nd floor, you’ll arrive in a room resembling a kitchen. Instead of heading right towards the ladder leading to the 2nd-floor landing, exit through the top left door and eliminate a nearby eye to gain access to Class 208, where these collectibles can be found.
Canary (1/6)
Following a cutscene involving Emily entering Class 202, navigate a series of steam pipes to reach Class 204. As you crouch under the final pipe, immediately look to your left to locate the cage atop the red lockers, indicated by the bird’s chirping.
Diário (9/21) – She’s Missing
After turning off the steam, granting access to the other wing of the 2nd floor, toss a can through a window to deactivate the electricity. Once the power is off, enter the same room to find the diary.
Quartzo (6/10)
After solving the puzzle in Class 206 to obtain a key, a group of enemies will patrol the hallway. Align yourself with the door to the previous collectible, then head to the far right side of the hall to discover an accessible vent. Follow it to reach a secret room, distinguishable as a lone square on the map just above the boiler room. The Quartz is located within.
Canary (2/6)
Following your encounter with Violence, proceed across a plank towards the Auditorium. Instead of heading right into the Auditorium, look left and identify a large statue. The cage is held in its hand.
Inhabitant (4/10) + Diário (10/21) – The Rock People
Directly behind the statue lies the entrance to a hedge maze. The collectibles can be found on the left side of the maze, which is straightforward to navigate, requiring no specific directions.
Blood Quartz Radar
Located on the opposite side of the hedge maze from the previous collectibles.
Inhabitant (5/10) + Diário (11/21) – Homeless
Upon entering the Auditorium, immediately turn left and follow the path to the far left room. The collectibles are situated at the back of the room.
Diário (12/21) – In the Spotlight
Upon entering the Auditorium, ascend the right staircase and drop off the ramp. À sua esquerda, you should spot the diary on a bench.
Picture (4/6) – At the New House
After destroying the eye on the 1st floor of the Auditorium, ascend the right staircase to the 2nd floor, then descend the opposite staircase.
Canary (3/6)
Before crawling through the small hole into the Projection Room, look over the stack of chairs near the mannequin to spot the cage.
Quartzo (7/10)
This Quartz can be found in the same room as the Theatre Key
Inhabitant (6/10) + Diário (13/21) – A Mina
After repairing the elevator in the Arts Center, enter it and press the button to send it to the 2nd floor. Quickly exit the elevator before it ascends completely. You can then drop into a maintenance area. Follow the linear path to locate these two collectibles. It is advisable to do this now to avoid dealing with numerous enemies in the area later.
Canary (4/6)
Upon repairing the elevator and reaching the 2nd floor of the Arts Center, turn to your right to find a ladder. Suba, and as you drop into the next room, immediately look below you to spot this collectible.
Quartzo (8/10)
Once you acquire the Fire Extinguisher, return to the 1st floor of the Arts Center and enter the Office. Use the Fire Extinguisher to extinguish the puddle inside and then collect the Quartz.
Diário (14/21) – Observers
After extinguishing the fire to access the second half of the Art Center’s second floor, you will come across a Crow and a Doll next to a mural featuring fruits and a crow on a plate. There are eyes to the left and right of the mural, as well as one in the vent to the left. The eye on the right can be challenging to hit without alerting the Crow, so consider dealing with the Crow first. Once you destroy the barrier, climb the ladder and enter the Art Storage Room. Unlock the nearby door, obtain a can from the vending machine outside, and proceed to the back of the room. You will find a yellow bucket that you can toss the can at, revealing the diary.
Inhabitant (7/10) + Diário (15/21) – Tanoeiro
Inside the Gym, make your way down to the lower basketball courts and enter the leftmost room at the far end, directly above the Control Room. Uma vez dentro, locate a vent on your left leading to the cut-off cell. You’ll find these collectibles inside.
Picture (6/6)
Exit the previous room and proceed to the room below the Control Room. As soon as you crouch under the boards, look to your right to spot this picture.
Canary (5/6)
After solving the power puzzle in the Control Room, exit by crouching out from under the boards and enter the door to your left (left of the Isolation Cell on the map). The cage will be on your right as you enter.
Diário (16/21) – Classe de ginástica
Exit the previous cell and traverse the Gym. Enter the first open cell on this side (the middle cell on the top part of the map) and crouch into the hole in the wall. You will immediately come across the diary as you proceed. alternativamente, you can enter the cell containing the diary directly through its door.
Canary (6/6)
Cross the area once more and enter the Lockers section. Freeze the pipes and proceed until you receive a tip that the pressure isn’t sufficient to dislodge the key. Face the key, then turn to your right and crouch under the broken tiles. As you exit, you’ll notice a ladder on your left and a lamp on your right. Take the path where the lamp is. Eventualmente, you’ll encounter a couple of timed steam pipes to pass. After getting past them, turn the corner and look up. You’ll spot the final cage just above a hole you can crouch through. This hole leads to a dead end overlooking a mine where Lock Key #1 will be found after solving a puzzle.
Quartzo (9/10)
Head back and climb the ladder this time. Uma vez no topo, immediately turn the corner to your left and look behind the large crate to find this Quartz.
Diário (17/21) – Get Lost
After inserting all three keys into the Basement door, Em vez de passar por isso, return to the School Courtyard. Locate the large statue that previously held a Canary. Interact with the front of the statue to place all six Canaries inside, opening a secret stairwell. Descend the stairwell to discover the diary.
Inhabitant (8/10) + Diário (18/21) – We Did This
Open the lone door just beyond the last diary to find these two collectibles in the room.
Inhabitant (9/10) + Diário (19/21) – Caged
After climbing onto the roof and observing Emily with a group of Dolls, refrain from going in to save her immediately. Em vez de, continue circling the roof to find a fire that you can extinguish and a gate that you can open. These collectibles are just beyond the gate.
Diário (20/21) – The Old Man
After the series of cutscenes on the roof, descend the newly unlocked ladder. You should spot the diary on a bench in the corner.
Quartzo (10/10)
Directly across from the diary will be the final Quartz. Para acessá-lo, primeiro, freeze the steam on the left side of the shed, then quickly sprint over to the right side and freeze that steam as well. The pressure will dislodge a gear. Retrieve the gear and take it to the corner near the Quartz. Freeze the gear in place and wait for the door to open.
Inhabitant (10/10) + Diário (21/21) – Here’s The Truth
Return to the school and head up to the 2nd floor. Go to the only uncleared spot on the map (inferior direito). Extinguish the fire and enter the stairwell. These collectibles can be found below.
Soluções de quebra-cabeças
Arcade Door Power
Hit the dials in the following order:
- 1(P)
- 2(E)
- 3(E)

Sewer Valves
- Left x1, Right x1.
Art Center Valves
- Turn off right valve.
- Pull cart into place.
- Turn on right valve.
- Turn off center and left valves.
Elevator Power
Hit the dials in the following order:
- 1(E) x3
- 2(E) x2
- 3(E) x2
- 4(P)
- 5(P) x2
- 6(E)
- 7 x3

Gym Power
Hit the dials in the following order:
- 1(E)
- 2(E)
- 3(E) x2
- 4(E)

Mine Power #1
Hit the dials in the following order:
- 1(E) x2
- 2(E)
- 3(E)
- 4(E) x2
- 5(E)
- 6(E)

Mine Power #2
Hit the dials in the following order:
- 1(E)
- 2 x3
- 3(E)
- 4(E)
- 5(P)
- 6(E) x2
- 7(E) x2

Isso é tudo o que estamos compartilhando hoje para isso GYLT guia. Este guia foi originalmente criado e escrito por Steve. Caso não atualizemos este guia, você pode encontrar a atualização mais recente seguindo este link.