Do you have lots of rocks and logs cluttering up your space? Do you want to tidy up? You can use this helpful guide to learn how to create a magical storage spot called a “quantum stockpile” that can hold an endless amount of stuff in just one square with only a few resources and some help from dwarves. Quando você terminar, everything will be automated, giving you and your dwarves plenty of free time for FUN activities.
What’s a Quantum Stockpile?
A quantum stockpile is like a secret trick for keeping a ton of items in just one small spot. It’s super handy for things that can’t fit into bins or barrels and for things you make a whole bunch of. You can use quantum stockpiles in a few different ways to organize your fort.
Só para você saber, quantum stockpiles are a bit like a special trick, so you can decide how many different things you want to use them for. I’d recommend using them to stash your logs and big stone boulders, since those don’t fit well in regular bins.
Neste guia, I’ll show you how to set up a quantum stockpile that keeps going all by itself, no need for you to do anything once it’s set up. You can even start it on the very first day if you want!
Requisitos
To create our automatic quantum stockpile, Você precisará do seguinte:
- 1 anão
- Either a carpenter’s workshop or a stoneworker’s workshop
- Some wood or stone to build the workshop and other stuff
If you’re doing this on the first day, your dwarf might have to cut down a tree or mine some stone to get the items you need. Não se preocupe, it’s not a big use of resources; one tree will give you everything you need for this project.
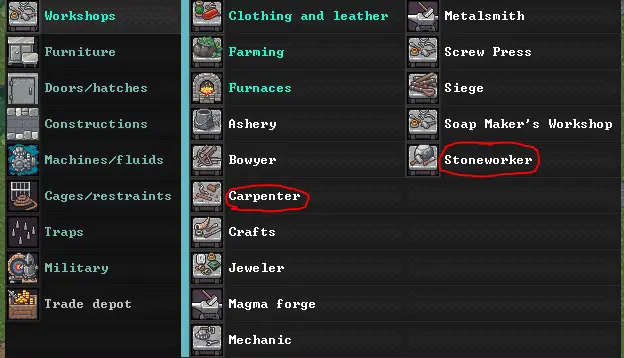
Etapa 1: Creation of Workshop and Items
Primeiro, you’ll need to build either a Carpenter’s Workshop or a Stoneworker’s Workshop. You can do this by going to the structures menu and selecting the workshop that matches the materials you have. If you have wood, go for the carpenter’s workshop, and if you have stone, opt for the stoneworker’s workshop. If you’ve just arrived at your location, make sure to chop down a tree to get the wood you need.
Próximo, create a minecart. Para fazer isso, click on your workshop and select “add new task.” Procurar “minecart” and build one. It doesn’t matter who builds it or what material you use; wood works just as well as stone. Your screen should look something like this:
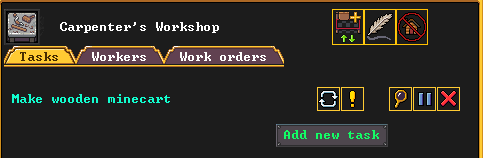
Once the minecart is built, you should see it at the bottom of the workshop screen.

Etapa 2: Setting Up the Stockpile
Agora, let’s set up the stockpiles you need for the quantum stockpile and a track stop. Here’s what you should do:
- Create your feeder stockpile: Choose a space where you want your feeder stockpile to be. This is where your dwarves will place items that are ready for transport into the quantum stockpile. It can be as small as one square, but a good size is either 3×2 or 3×1 to save space.
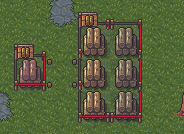
- Create your quantum stockpile: This stockpile will store all the items in one tile. Create a 1×1 stockpile right next to your feeder stockpile, but keep them one tile apart. This spacing is crucial.
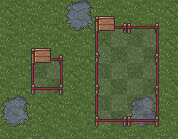
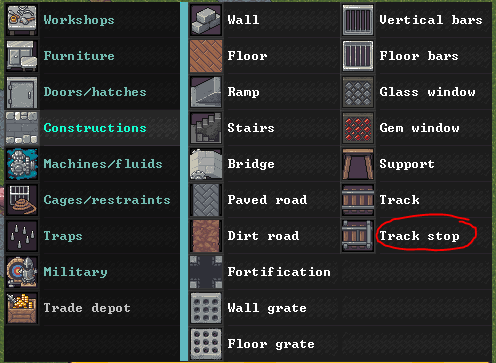
- Build a track stop: The track stop is where your minecart will go. To create it, go to constructions and look for the track stop option.
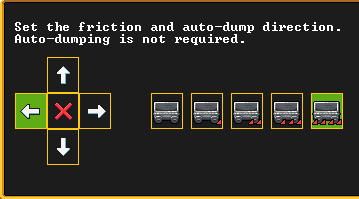
When you click on it, you’ll see a menu indicating the dumping direction. Click on the arrow that points toward your quantum stockpile (the 1×1 stockpile) compared to your feeder stockpile. Por exemplo, if your quantum stockpile is to the left of your feeder stockpile, click the LEFT arrow.
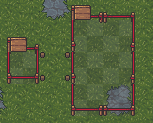
Once you have the right direction, place the track stop in the space between both stockpiles. A dwarf will come along and build it out of either wood or stone, depending on your resources. It should look something like the image on the left.
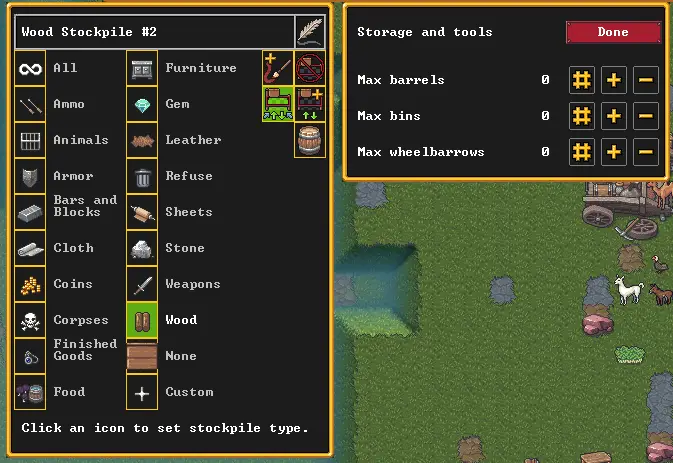
- Set up stockpile filters: On both stockpiles, configure what you want to store in the quantum stockpile. You can get as detailed as you like, but for this tutorial, we’ll focus on storing wood. Make sure both stockpiles have the same settings.
Nota importante:
If you click on the barrel icon, you can specify how many bins/barrels and wheelbarrows are used in the stockpile. Wood and stone don’t use bins/barrels, so if you’ve selected them, the count should be 0. Quantum stockpiles work best without bins/barrels. Wheelbarrows can also be set to 0 unless you’re moving something very heavy, like rocks. Nesse caso, assigning a few wheelbarrows to a stone feeder stockpile is a good idea, and you can build them at the carpenter’s workshop.
If your game is unpaused, your dwarves may have already filled both stockpiles with items, which is okay. If everything has gone smoothly, you should now have something similar to the image on the left. You’re almost there!
Etapa 3: Preparing the Minecart
Agora, let’s set up the minecart for action. Siga estas etapas:
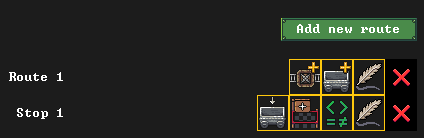
- Add a new hauling route: Head down to the hauling routes at the bottom of the screen. You might not have used this screen if you’re new to the game, mas não se preocupe, we’re focusing on just a few things.

Clique em “add new route.” You can name the route something like “Quantum Stockpile Wood” by clicking on the quill icon.
- Add a stop to the route: Click on the first button among the three, and then click on the track stop you built between both stockpiles. Your setup should look like this:
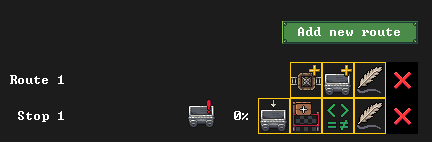
- Add minecart filter: Click on the first button in the row that appears (the minecart with the arrow), and select the same item you set for the stockpiles. In your example, it would be wood on the left and then ALL on the right. This step is crucial; de outra forma, your items won’t move.
- Add a linked stockpile: Click on the second button (the stockpile), which will open a submenu. Click on the middle button and then select your feeder stockpile (the larger one you created). Clique “done.” It should look like the image below:

- Remove conditions: Click on the third button (the green math symbols), which opens a submenu. Since we don’t need any math here, remove all of them. Clique “feito” when the screen is blank.

- Add the minecart: Click on the second button in the first row (the minecart with the + sinal) and find the minecart you built earlier. Tick the box next to it. This action will prompt a dwarf to place the minecart on the track stop. You should see a little symbol next to the stop line.
Etapa 4: Witness the Magic
Agora, it’s time for the magic to happen:
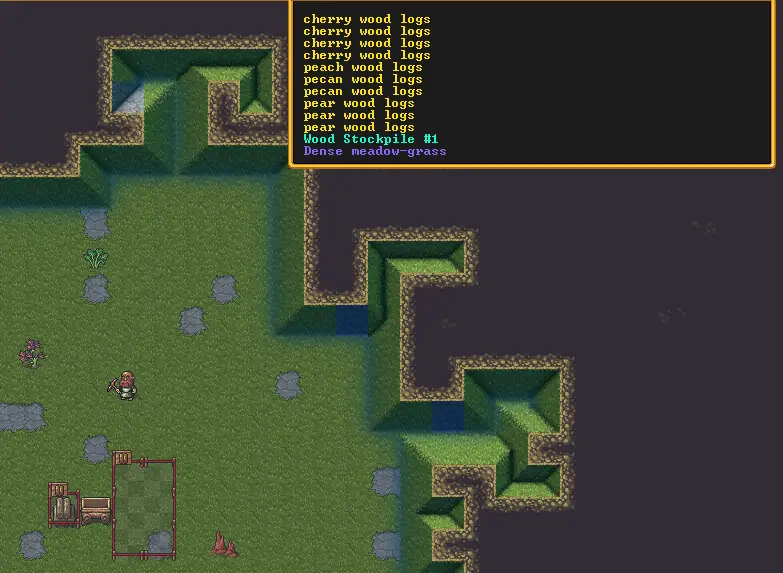
Neste ponto, a dwarf will put the minecart on the track stop. If everything is set up correctly, dwarves will come to the stockpiles, load items from the feeder stockpile into the minecart, which will then eject the items into the 1×1 quantum stockpile. If you hover over the quantum stockpile, you should see a list of multiple items and, esperançosamente, an empty feeder stockpile. If you see this, Parabéns! You’re officially a dwarf scientist who can create quantum stockpiles.
Your dwarves will keep moving items from the feeder stockpile to the quantum stockpile, and it should all happen automatically. Enjoy the efficiency of your new storage system!
Troubleshooting Tips
Stockpile filters
If your quantum stockpile isn’t working as expected, it’s likely due to some filter settings being missed or not matching correctly. Também, ensure that you’ve assigned the minecart to allow the items you want to store; de outra forma, those items will just stay in the feeder stockpile.
Food and Drink
Food and drink items can spoil relatively quickly if not stored in barrels or pots. Barris, potes, and bins usually don’t work well with quantum stockpiles. It’s best to use regular stockpiles for storing food and drink items to keep them fresh.
Heavy Item Storage
Heavy items, such as rocks, can slow down your dwarves when moving them if not assisted. Make sure you assign wheelbarrows to the feeder stockpiles to speed up the hauling process for heavy items. Wheelbarrows are only used when items are heavy enough to require them, and they help move items to the stockpile, not away from it. If you need to move heavy items to workshops, consider setting up a separate “pegar” stockpile closer to your stone-related workshops with a wheelbarrow in it to increase hauling efficiency. This will help ensure that your dwarves don’t spend too much time moving heavy rocks slowly.
Isso é tudo o que estamos compartilhando hoje para isso Fortaleza dos Anões guia. Este guia foi originalmente criado e escrito por Slippy. Caso não atualizemos este guia, você pode encontrar a atualização mais recente seguindo este link.