- Tytuł: Sword Art Online Re: Hollow Fragment
- Data wydania:
- Wywoływacz:
- Wydawca:
Information about Sword Art Online Re: Hollow Fragment is still incomplete. Pomóż nam wypełnić szczegóły gry za pomocą tego formularz kontaktowy.
To successfully unlock the achievement called “MMOs that use a level system are unfair that way” and access all the post-game content, osiągnięcie poziomu 200 is necessary.
Contrary to the achievement description stating a requirement of Level 150, this information is inaccurate. The achievement descriptions were derived from the Vita version, whereas the achievement criteria were sourced from the PS4 version, resulting in this confusion.
EXP Gain Mechanics
Let’s delve into the mechanics of experience (DO POTĘGI) gain in Hollow Fragment for a better understanding.
Typowo, defeating regular enemies yields a mere 10 DO POTĘGI, rendering it practically inconsequential.

If you aim to increase your level, engaging in battles with enemies that are at least ten levels higher than you is crucial. This strategy is advantageous because for each level difference, you receive a bonus of 400 DO POTĘGI. The maximum bonus you can obtain is 4000 DO POTĘGI, and this bonus plays a vital role in your leveling progress.

Utilize the enemy radar feature to your advantage and ensure that all the enemies displayed on the map are represented by the darkest color icon. This indicates that they are at least ten levels higher than your current level.
Dodatkowo, you have the opportunity to earn an extra EXP boost of up to 50% by swiftly defeating enemies using sword skills. Dlatego, it is advisable to prioritize finishing off enemies with sword skills as frequently as you can.
EXP Boosts
You can enhance your experience gain further through specific items and skills in the game.
The Experience charm, available at the shop on Floor 86, the Clover Ring, and the Fairy Cape, both found at the shop on Floor 93, possess the “EXP Up” efekt. Equipping any of these items will increase your EXP gain by 10%. It is worth noting that this effect can be stacked twice, resulting in a total increase of 20%.
Dla optymalnych rezultatów, consider equipping the powerful Infinity Ankh charm, which can be obtained by defeating the Floor 98 boss but before facing the Floor 99 boss on Floor 76. Once equipped, you can combine it with either the Clover Ring or the Fairy Cape to benefit from the EXP Up effect.
Ponadto, investing in the Searching skill tree will grant you two EXP boosts. The passive skill within the tree provides a 10% EXP increase, while the active skill called “Gain EXP” grants a 15% zwiększyć.
To further maximize your experience gain, utilize EXP Flagons and Grand EXP Flagons. These consumable items temporarily increase your EXP gain by 15% I 25%, odpowiednio. They are particularly useful when employing Method 1, where you continuously engage different groups of enemies.
Accuracy Boosts
Maintaining accuracy is of utmost importance when battling enemies significantly higher in level, as your attacks are prone to frequent misses.
To mitigate this issue, it is recommended to wield either the Gae Bolg spear or the Demonic Sword Gram, as they possess the True Strike effect, ensuring your attacks never miss. These weapons can be obtained through Implements. Zwłaszcza, acquiring Gram is highly advantageous for efficient grinding, thanks to the area-of-effect (Aoe) capabilities of the 2H Sword skills it offers.
In the event that you don’t have access to either of these weapons, the Perfect Style skill from the Precision skill tree grants you a temporary True Strike ability, improving your accuracy for a limited duration.
Dodatkowo, consider obtaining ACC potions from vendors, as they can be purchased and provide a more extended True Strike effect, further enhancing your accuracy during battles.
General Gearing Advice
- Broń – Demonic Sword Gram: The 2H Sword skills it offers are ideal for area-of-effect (Aoe) ataki, and its True Strike effect ensures your attacks never miss.
- Głowa – Ace Pendant: This equipment provides beneficial stat buffs without any drawbacks.
- Ciało – Legion Storm Jacket: Equipping this grants you the Attacker role, increasing your damage output while decreasing your defense. It also offers significant strength (STR) buffs and boosts to your Attack/Damage Value.
- Herb – Crimson Gauntlets: These gauntlets allow your attacks to bypass enemy armor, providing a substantial damage boost. Since the Attacker role already reduces your defense to 0, the trade-off is negligible.
- Nogi – Legion Storm Boots: These boots provide the same STR/Attack/Damage Value buffs as the Legion Storm Jacket. Dodatkowo, they grant the Soul Connect buff, which enhances your movement speed, attack interval, recovery time, and SP regeneration. These boots are considered the best in the game, and there is no reason to opt for any other option.
- Z powrotem – Fairy Cape: This item grants the EXP Up buff, increasing your experience gain. If the buff is not needed, you can consider using the Assassin’s Cloak, which offers a significant damage increase and immunity to poison, paralysis, and bleeding. Keep in mind that it results in a significant decrease in defense, but since your defense is already at 0 due to the Attacker role, this drawback is inconsequential.
- Waist – Assassin’s Shenti: Similar to the Assassin’s Cloak, this equipment has no downside for your current build and complements it effectively.
- Czar – Infinite Ankh: Equipping this charm provides a substantial increase in ATK/DEF and minor boosts to all other stats. The downside is a reduced chance of dealing critical damage, but this drawback is negligible.
- Pierścień – Clover Ring: This ring offers an additional EXP buff. Alternatywnie, you can consider using the Resonant Ring, which increases all attributes by 5%.
General Ability Advice
Okrzyk wojenny, Last Resort, Wytrzymałość, Vitality for ATK increases.
Soulful Stand to increase SP, and SP Charge to refill it.
Hyper Armor and Protective Armor for invulnerability.
Perfect Style for 100% accuracy (True Strike)
Gain EXP for personal EXP buff, Crime Servant to give your EXP to your partner.
Effect Booster to double the duration of abilities.
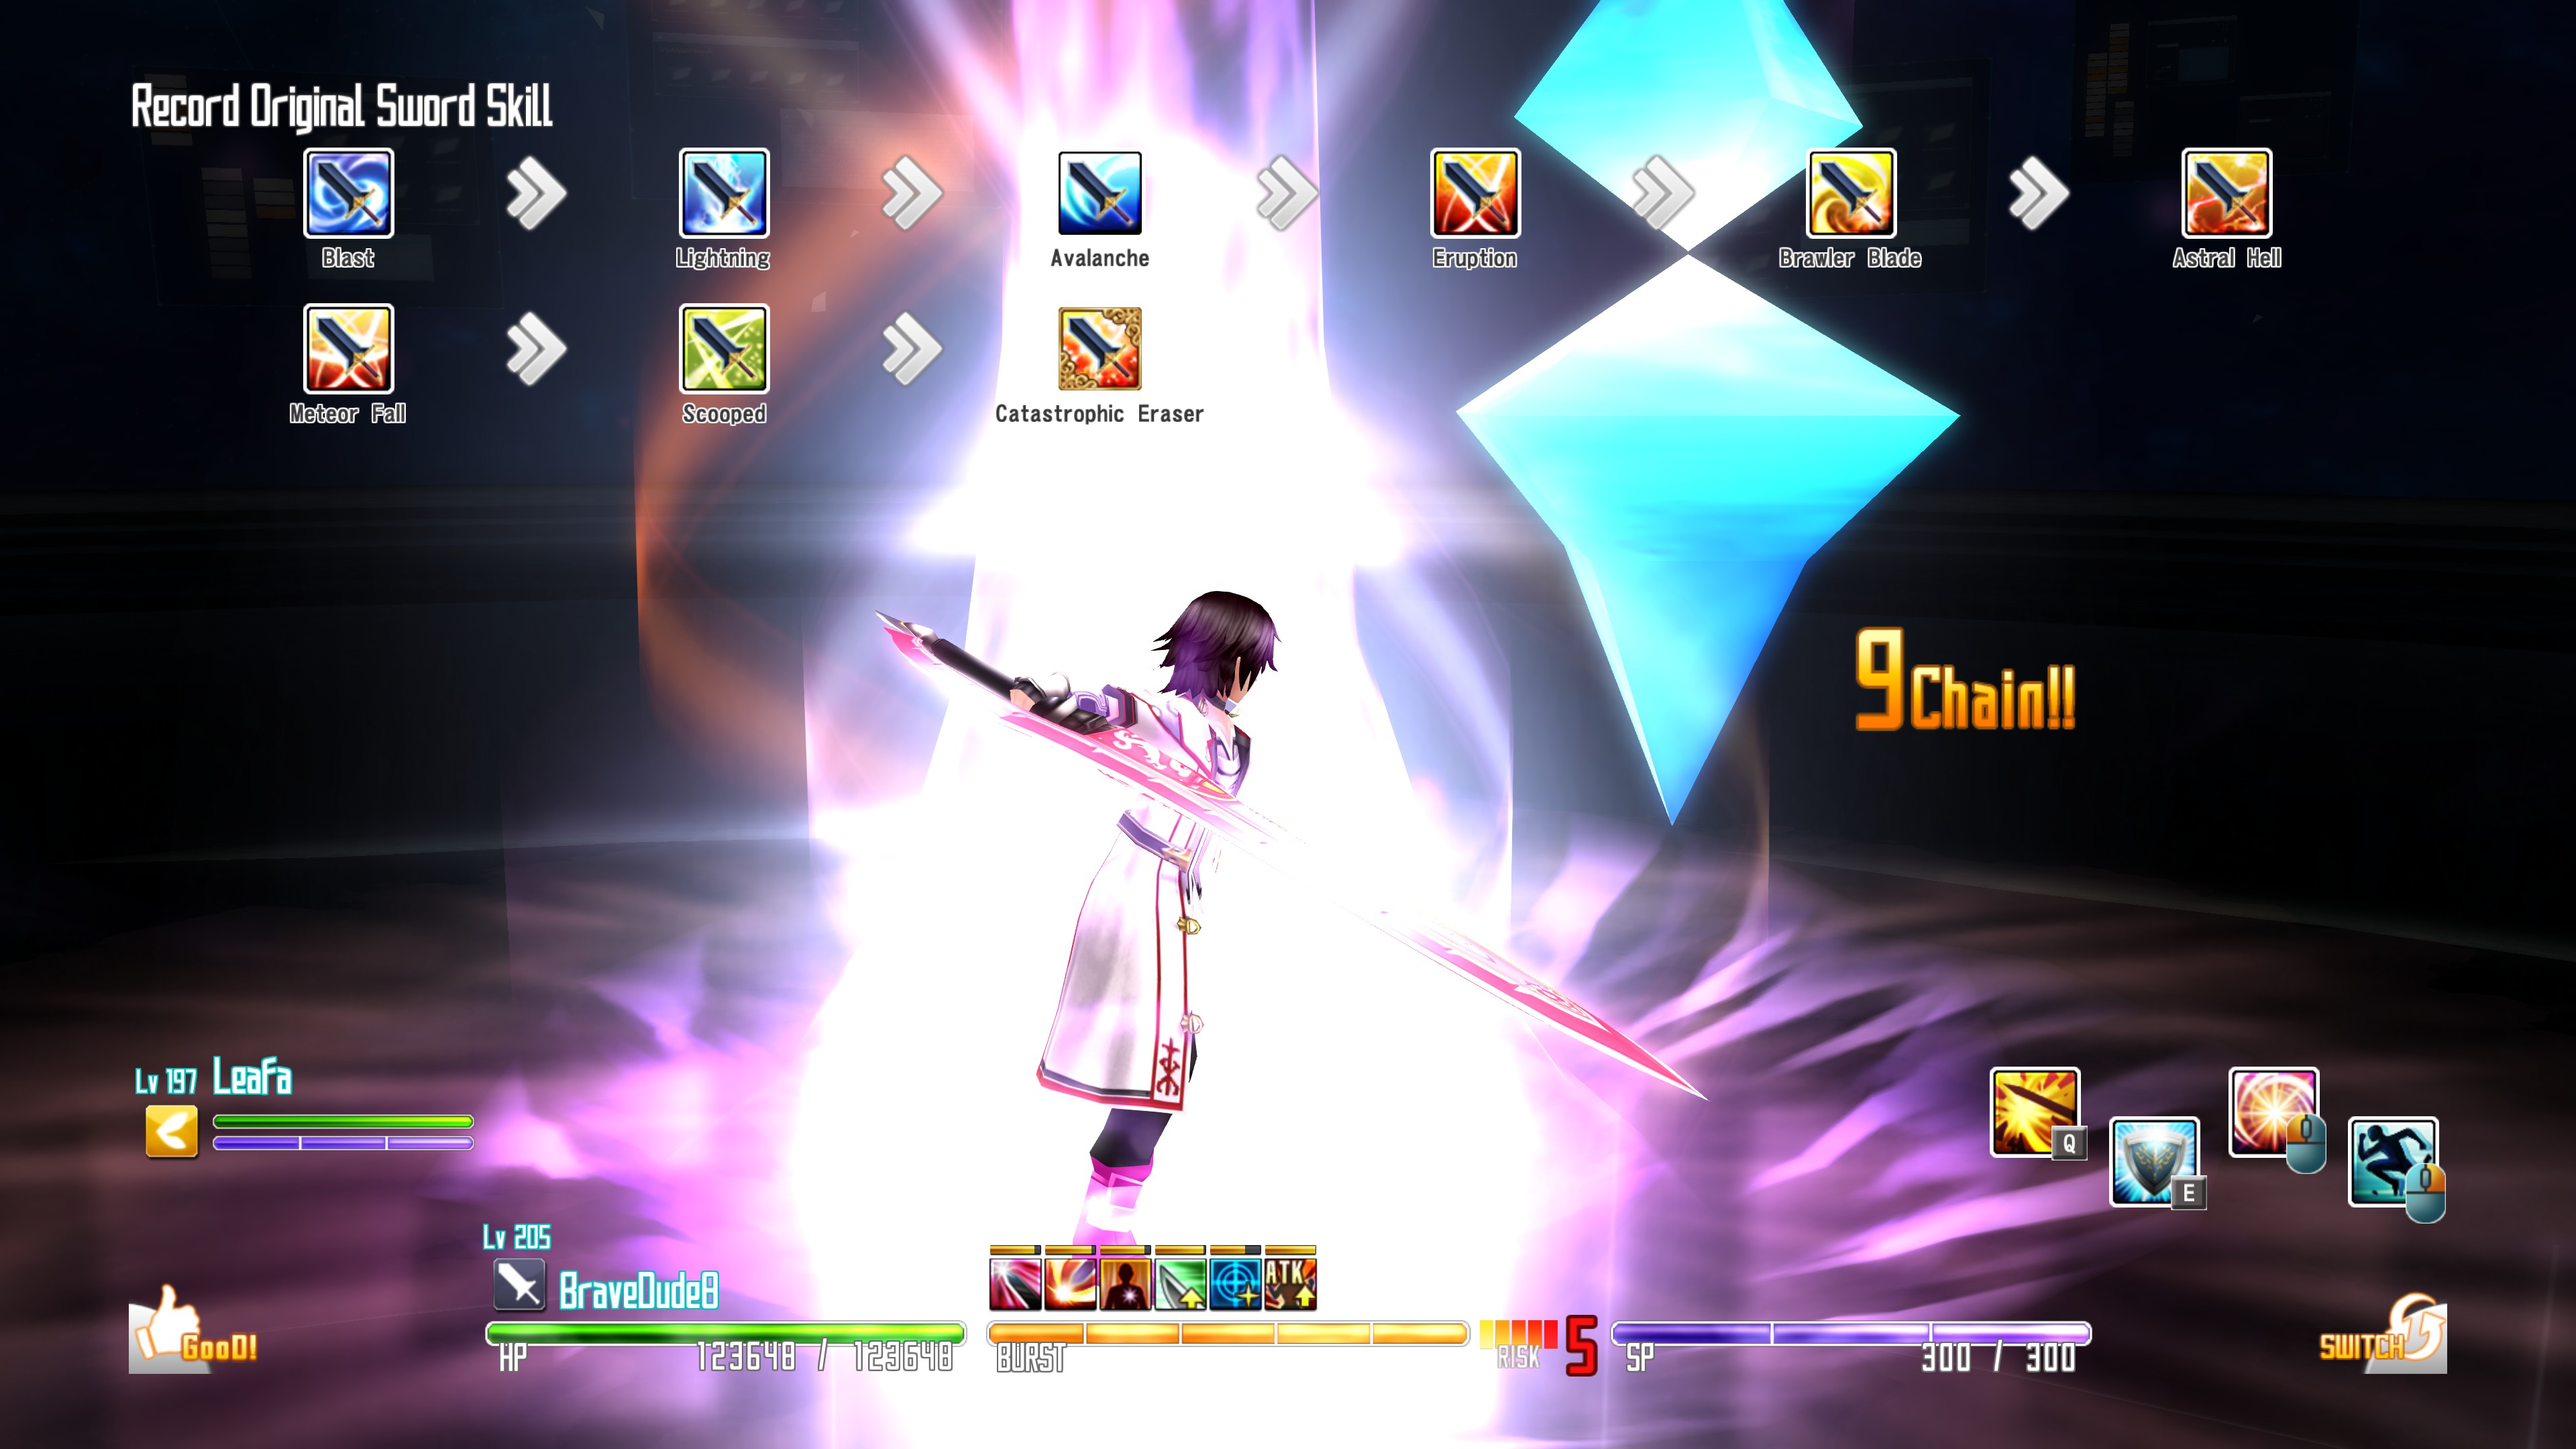
OSS Chains
By completing the “Odblokować – Multiple Sword Skill Chaining with OSS” implement, you gain the ability to chain more than two Sword Skills together. Dodatkowo, I recommend completing the Recast Reduction implements, as they offer a combined 30% cooldown reduction, which can greatly improve your combat efficiency.
Creating an OSS Chain (Order Skill Set Chain) facilitates easier execution of a specific sequence of Sword Skills by extending the input window for the next Sword Skill. It is highly recommended to set up an OSS Chain for optimal performance.
For a 2H (Dwuręczny) OSS Chain, the following sequence is preferred:
- Podmuch
- Błyskawica
- Avalanche
- Eruption
- Brawler Blade
- Astral Hell
- Meteor Fall
- Scooped
I suggest practicing this sequence in the training room to familiarize yourself with the timing and ensure consistent execution against enemies.
Multiplayer Difficulty
Engaging in multiplayer gameplay, even in solo mode, results in a significant increase of 20 levels to all enemies. Ponadto, each difficulty setting raises enemy levels by an additional 50, allowing for potential increases of 20/70/120 in enemy levels. This feature proves advantageous since finding high-level enemies for efficient grinding can be challenging in single-player mode. Dodatkowo, multiplayer enables you to bring along three additional partners who will also gain experience points (DO POTĘGI) during grinding sessions. Ponadto, it provides an opportunity to unlock outfits for your main partner through grinding.
Another benefit of multiplayer is that if you happen to perish, your progress remains intact. W przeciwieństwie do tego, in single-player mode, death results in the loss of progress, resetting you to the state when you last changed maps. Jednakże, w trybie wieloosobowym, Jeśli umrzesz, you will be sent back to the hub area without any penalty, allowing you to resume your activities without setbacks.
Metoda 1 – Beedance Sprawl (Poziom 100-200)
On the standard difficulty, all the mobs are set to approximately level 110. Jednakże, if you choose the hard difficulty, they will be set to level 160, and in the Death Game mode, their levels will be raised to 210.

When exploring the main square of the map, it’s advisable to avoid dead ends as they tend to have higher level enemies. It’s best to keep moving forward without getting delayed since the main enemies respawn faster than you can defeat them.
The bees in this game pose a significant threat as they can deal heavy damage, potentially reducing your health by half with a strong attack. To eliminate them safely, it’s recommended to focus on one bee at a time and employ the OSS chain technique to defeat them.
Another option is to select the “Love is Light” Hollow Mission. Activating this mission allows you to enhance any rank 1 implement while simultaneously gaining experience points.
Feel free to explore the entire map at your leisure, but remember to periodically return to the hub area and exit multiplayer in order to save your progress.
Metoda 2 – Shrine of Frozen Obliteration (Poziom 190-290)
On the normal difficulty setting, all the mobs are approximately at level 200. If you choose the hard difficulty, their level increases to 250, and in the Death Game mode, they are maxed out at level 300.

To successfully execute this method, it is crucial to have the Demonic Sword Gram, as well as the Protective Armor and Hyper Armor skills for temporary invulnerability. When entering the multiplayer lobby, wybierz “Buffer” role to extend the duration of the invulnerability skills. For efficient utilization of these skills, please refer to the provided guide.
Within the area, jest w sumie 17 golems divided into four groups. The objective is to aggro all the golems without getting hit by any of them, as even a single hit can quickly lead to your demise. Once all the golems are aggroed, activate the Protective Armor skill to grant invulnerability to your entire party. Następnie, lure the golems into one location and perform a backward dash to initiate your OSS chain. The purpose of the backdash is to move out of range, ensuring that your chain continues uninterrupted even if your initial target is defeated. After eliminating the golems, exit the area to the west and conveniently teleport back to the hub area using the nearby teleport stone. This will cause all the mobs to respawn, allowing you to immediately teleport back and reenter the zone.
Each rotation of this strategy takes approximately two minutes and yields approximately 150k EXP. If executed flawlessly, you can gain ten levels in an hour starting from level 200.
It’s important to note that this strategy carries a high level of risk, and you should expect to die multiple times when you first attempt it. If you trigger one of the hyperarmor skills while the other one is already active, To nie zadziała, resulting in your demise.
If you happen to get hit by any of the golems at any point, it is imperative to quickly activate a hyperarmor skill. Failure to activate it promptly will result in your death.
Dodatkowo, if your hyperarmor expires while you are in the middle of executing a sword skill, you will also meet your demise.
To wszystko, co dzisiaj udostępniamy w tym celu Sword Art Online Re: Hollow Fragment przewodnik. Ten przewodnik został pierwotnie stworzony i napisany przez BraveDude8. Na wypadek, gdybyśmy nie zaktualizowali tego przewodnika, możesz znaleźć najnowszą aktualizację, postępując zgodnie z tym połączyć.