This guide will provide all the necessary to create a clothing mod for Project Zomboid.
Wymagania
- Blender (v2.92+ recommended)
- Male model
- Female model
- Clothing Assets
- Mod used in this guide
Blender
If you’re new to Blender and aren’t familiar with it, here’s a brief overview of what it is and how to use it. Blender is a free and open-source 3D computer graphics software. It’s a versatile toolset that allows you to create fantastic 3D models for Project Zomboid. But before diving in, it’s essential to grasp some fundamental aspects.
I understand you’re eager to get started and might not want to spend too much time on this, but as Yoda wisely said, “If you don’t want to get stuck, you must read the manual.”
These are fundamental concepts you need to grasp to begin crafting models. Feel free to study the manual extensively to enhance your modeling skills.
In this tutorial, we will employ a male model to construct a jacket model.
Modeling
Aby rozpocząć, open Blender and bring in the FBX file named “Male_Body_10_redo.fbx.”
I suggest adjusting the Field of View (FOV) to prevent the mesh from disappearing when it’s very close. You can do this by pressing N, then going to View, and setting Clip Start to 0.001 M.
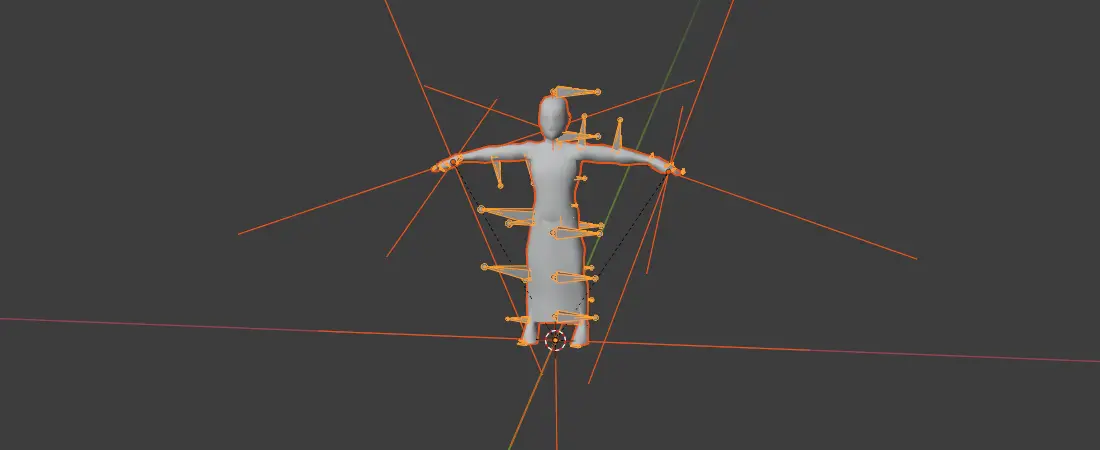
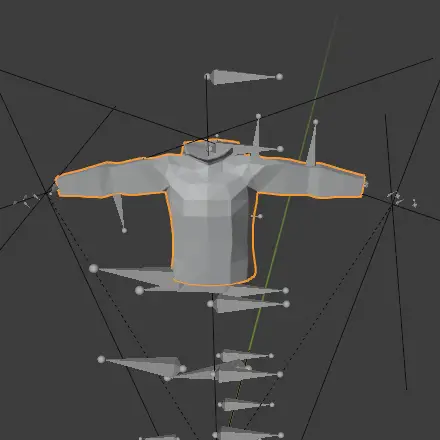
Następny, import the “Bob_JacketPaddedDOWN.fbx” file from the Clothing Assets and link it to the bip01 armature of the model.
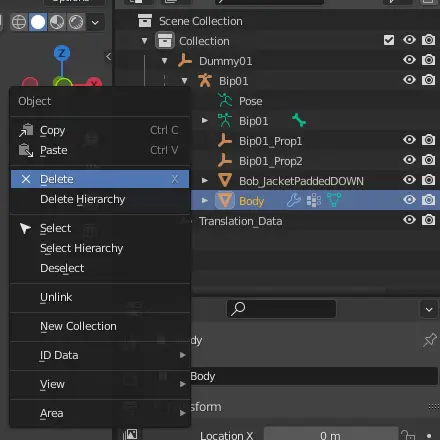
Teraz, you can remove the Body model because it was only used as a reference for the placement of the clothes you’re going to create.
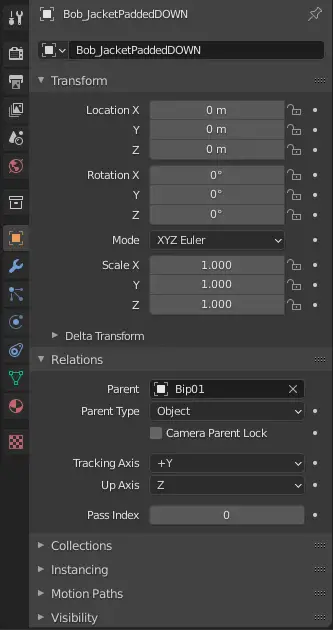
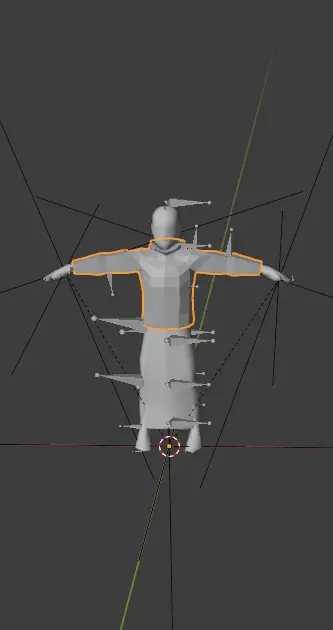
Aby to zrobić, wybierać “Bob_JacketPaddedDOWN,” go to Object Properties, then Relations, and set the Parent to “Bip01.”
W końcu, add the Bip01 armature to the model.
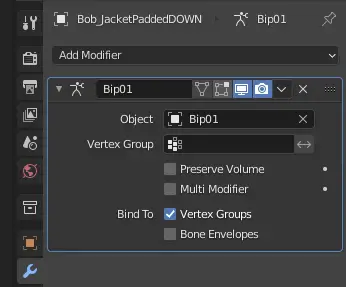
Bob_JacketPaddedDOWN → Modifier Properties → Armature → Obiekt: Bip01
W tym momencie, your clothing is prepared for export to the game. You have the flexibility to make any modifications you desire to the model. Jednakże, Przed kontynuowaniem, it’s crucial to grasp some fundamental concepts to ensure your clothes have no imperfections.
Vertex Weight
These tools enable your clothing to deform and animate along with the player. One of these methods is Weight Paint. Jednakże, I personally don’t recommend it for Project Zomboid models because they have highly simplified geometry.
Objects Mode → Weight Paint
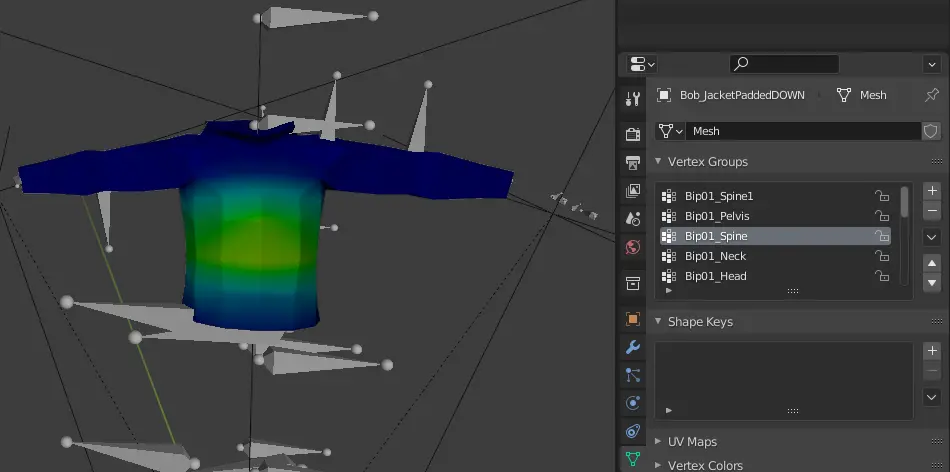
Another method is through Vertex Weight, which needs to be done manually. While it can be a tedious process, it’s the safest way to ensure accurate results.
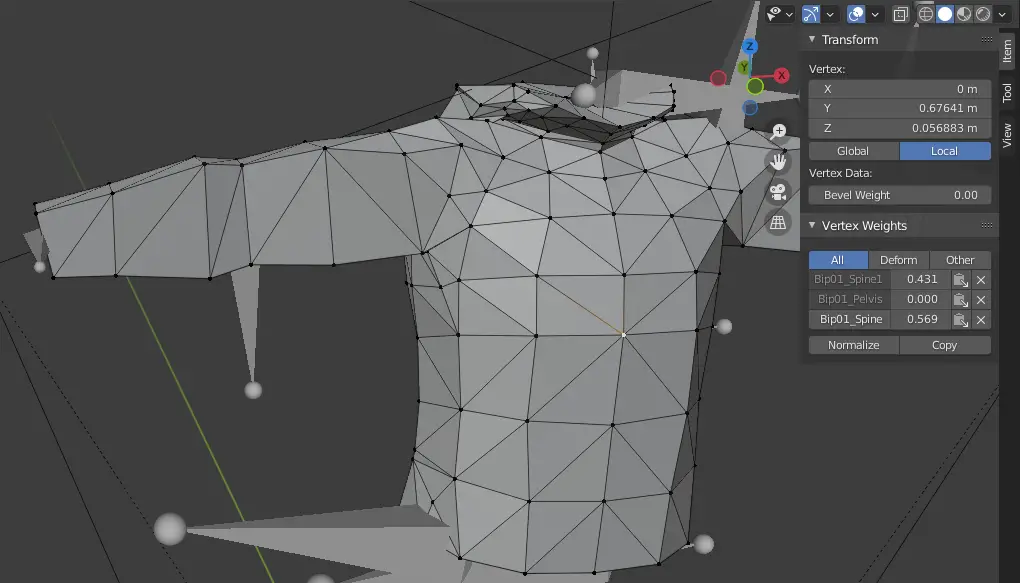
Objects Mode → Edit Mode → Select Vertex → Press N → Przedmiot → Vertex Weight
With this particular model, setting the weight should not be necessary since it’s already configured by default. Jednakże, if you intend to add new vertices or create a model from the ground up, be sure to add and configure them accordingly.
UV Mapping
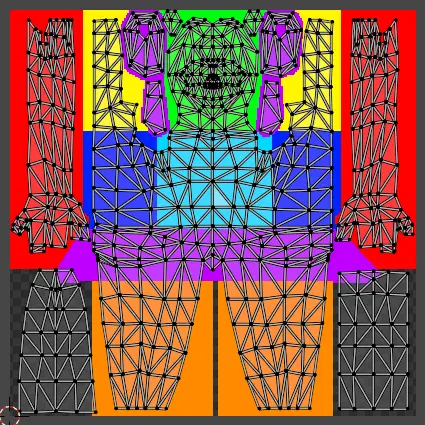
To incorporate blood, dirt, or holes into your model, it’s important to adhere to specific mask patterns. You’ll be able to view all the nodes on the UV map by selecting all the vertices of your model. This will help you create the desired effects accurately.
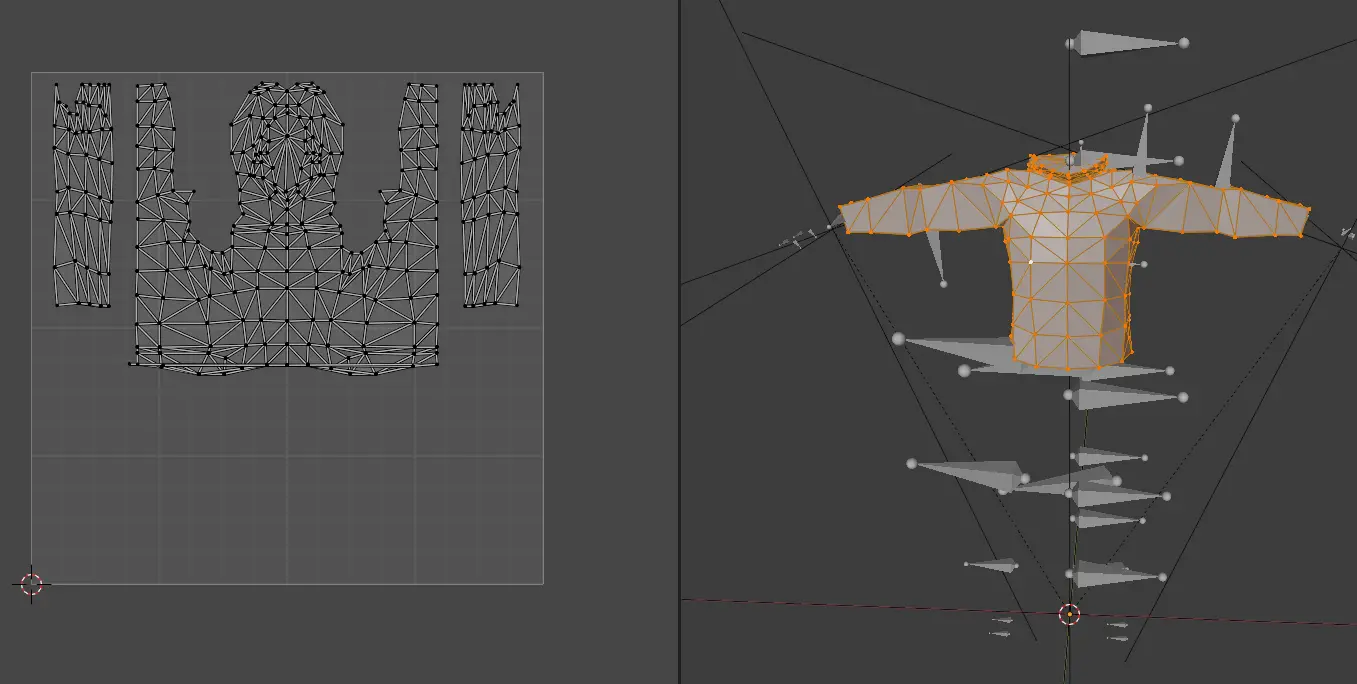
Select Bob_JacketPaddedDOWN → Press TAB → Press A
Here’s a visual reference: po lewej, you have the UV map with the texture of the male model, i po prawej stronie, you can see the representative mask that you should aim to follow when designing clothing. This will help ensure your clothing integrates seamlessly with the male model.

It’s important to keep in mind that the model we obtained from the game already has defined vertex weights and UV mapping. When you create your own model, you will indeed have to set these up yourself, which can be quite labor-intensive. As a recommendation, consider selecting a model from the Clothing Assets library and use it as a foundation for your own creations. This can significantly streamline your workflow.
Odzież
Następny, it’s time to establish the mod folder where you’ll place your newly crafted clothing. Generate a folder within C:\Users\***\Zomboid\Workshop. The structure of your mod should resemble something like this:
Warsztat
└───SteamGuideClothing
    ├───preview.png
    └───Contents
        ├───mody
        └───SteamGuideClothing
            ├───mod.info
            ├───poster.png
            └───media
                ├───odzież
                │   └───clothingItems
                ├───models_X
                ├───skrypty
                └───textures
While you’re inside the “media” falcówka, go ahead and create a file named “fileGuidTable.xml.” This file is where you will register the paths for the clothing items you’ve created.
<?Wersja XML ="1.0" kodowanie ="UTF-8"?>
<fileGuidTable>
<akta>
<ścieżka>media/clothing/clothingItems/Jacket_SteamGuide.xml</ścieżka>
<guid>babfa388-ef98-455b-bbbd-79753ea8ea36</guid>
</akta>
</fileGuidTable>
You can generate a GUID in guidgenerator.
In the path designated in the “fileGuidTable.xml,” create a file named “Jacket_SteamGuide.xml.” In this file, you’ll configure the paths for the respective male and female models, their textures, and other relevant features. This is where you define the characteristics of your jacket model.
<?Wersja XML ="1.0" kodowanie ="UTF-8"?>
<clothingItem>
<m_MaleModel>Skinned\Clothes\MyFirstJacket</m_MaleModel>
<m_FemaleModel>Skinned\Clothes\MyFirstJacket</m_FemaleModel>
<m_GUID>6323458d-94a0-4526-9147-7c3cc24b4704</m_GUID>
<m_Static>FAŁSZ</m_Static>
<m_AllowRandomHue>FAŁSZ</m_AllowRandomHue>
<m_AllowRandomTint>FAŁSZ</m_AllowRandomTint>
<m_AttachBone></m_AttachBone>
<m_Masks>13</m_Masks>
<m_Masks>14</m_Masks>
<m_Masks>3</m_Masks>
<m_Masks>5</m_Masks>
<textureChoices>Clothes\Jacketpadded\WhiteTexture</textureChoices>
</clothingItem>
To know the properties of your clothing, you can use existing in-game clothing files as references. Dla tego przewodnika, you can simply copy and paste from “Jacket_PaddedDOWN.xml” and make the necessary adjustments.
Teraz, to make your clothing usable in the game, create a file named “SteamGuide_clothingItems.txt” in the path “..\media\scripts\clothing.” This file will define the usable item that allows players to wear the clothes you’ve created.
module Base
{
item Jacket_SteamGuide
{
Type = Clothing,
DisplayName = My First Jacket,
ClothingItem = Jacket_SteamGuide,
BodyLocation = Jacket,
Icon = SteamGuideJacket,
BloodLocation = Jacket,
RunSpeedModifier = 0.89,
CombatSpeedModifier = 0.96,
BiteDefense = 10,
ScratchDefense = 20,
NeckProtectionModifier = 0.5,
Insulation = 1.0,
WindResistance = 1.0,
WaterResistance = 0.60,
Weight = 3,
WorldStaticModel = JacketSteamGuide_Ground,
}
}
It’s crucial to be particularly cautious when handling variables like “Typ,” which defines the item as a clothing item, “ClothingItem,” which links the item to your clothing XML file, I “WorldStaticModel,” which represents the 3D model on the ground. There are more additional variables for your item, but this serves as a basic guide to creating clothing. Further research may be necessary for more advanced customization.
Wreszcie, place the 3D model in “..\media\models_X\Skinned\Clothes” and the texture in “..\media\textures\Clothes\Jacketpadded.” Ensure that the texture resolution is 256×256 pixels. (Note that the paths may vary depending on what you specify in the ClothingItem XML files.) This will complete the process of adding your clothing to the game.
World Items
There are various approaches you can take, but I’ll present the quickest and most effective method for creating the model when it’s on the ground.
Begin by duplicating your Blender file and opening the duplicate. Następnie, select the model and move it outside the Dummy01 object. Delete both the Dummy01 object and the Translation_Data. Dodatkowo, set the cursor to the world origin. This will help prepare the model for the next steps.
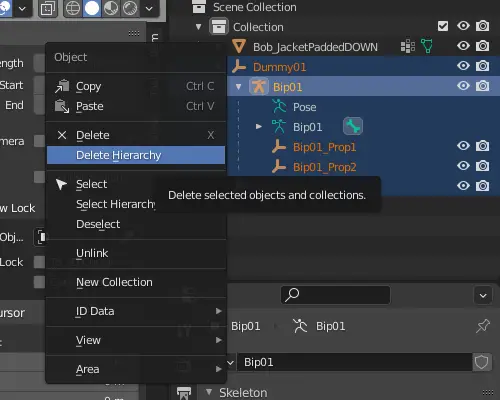
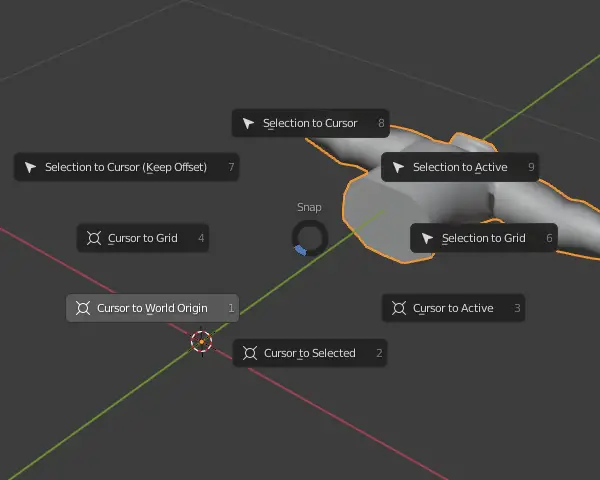
Interaction Mode → Object Mode → Press Shift + S → Cursor to World Origin
To continue, select the model and align it precisely with respect to the world origin. Następnie, reshape it to resemble a rag as closely as possible. Jeśli, for any reason, the model appears too large within the game, you can resize it in Blender to ensure it fits appropriately.
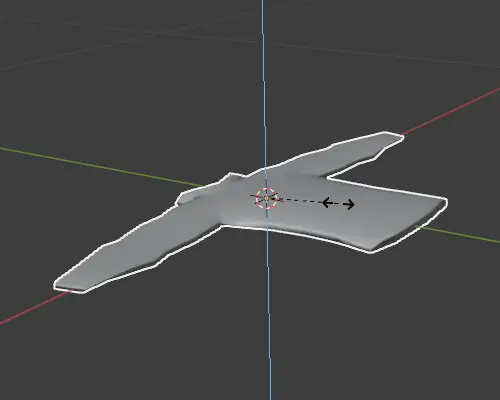
Bob_JacketPaddedDOWN → Press S → Press Z
The model is ready, put it on ..\media\models_X\WorldItems\Clothing and create the file SteamGuide_modelsItems.txt in ..\media\scripts
module Base
{
model JacketSteamGuide_Ground
{
mesh = WorldItems/Clothing/MyFirstJacket_Ground,
scale = 1
}
}
Testowanie
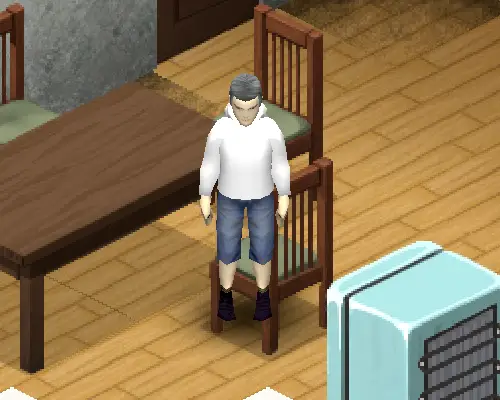
Teraz, open Project Zomboid, start a new game, and activate your mod. Use the debug mode to spawn your item and test it within the game environment. This will allow you to verify that your clothing item functions as intended.
To wszystko, co dzisiaj udostępniamy w tym celu Projekt Zomboid przewodnik. Ten przewodnik został pierwotnie stworzony i napisany przez Tchernobill. Na wypadek, gdybyśmy nie zaktualizowali tego przewodnika, możesz znaleźć najnowszą aktualizację, postępując zgodnie z tym połączyć.