
This is to share the product of my fumblings and teach you how to make Musashi’s RPG Overhaul let you choose less than the maximum number of specs. Opmerking: this requires editing the code and hence recompiling it. Not an ini edit
Basic Setup
Just like if you were making your own mod, you’ll need to download and setup the SDK.
I won’t go into that here because that’s not what this is about but here’s a link to where you can find a setup gids.
That link also has instructions on using the Highlander in a mod, this is needed for RPGO.
Ook, make sure that you use the appropriate version of the SDK and Highlander which for RPGO is WOTC.
Making an RPGO Modbuddy Project
Once you got the SDK and Highlander setup, you’ll need a mod project for RPGO. you can actually download the project from Github here.
You’ll have to import the project from within modbuddy by clicking “open mod” and put the RPGO-master folder in that location and then going inside the folder and selecting the .sln file
Down to the Nitty McGriddy
With the project ready you’ll have to go to Src/XCOM2RPGOverhaul/Classes and we’ll need to edit two files with an optional third.
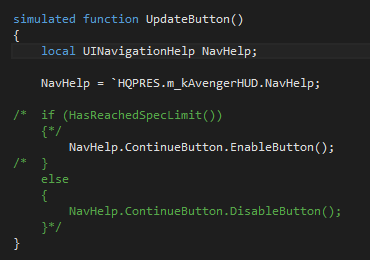
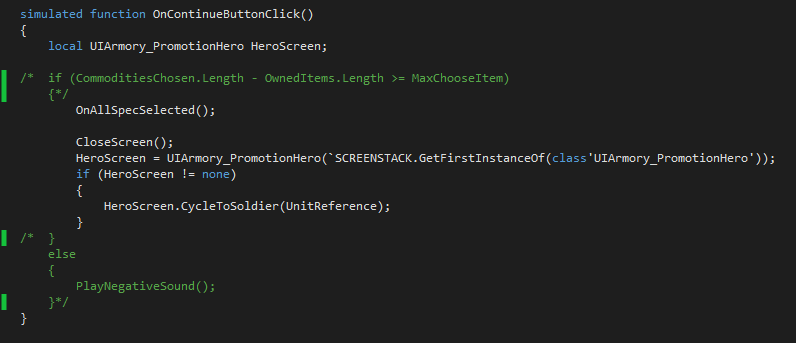
first UIChooseCommodity.uc
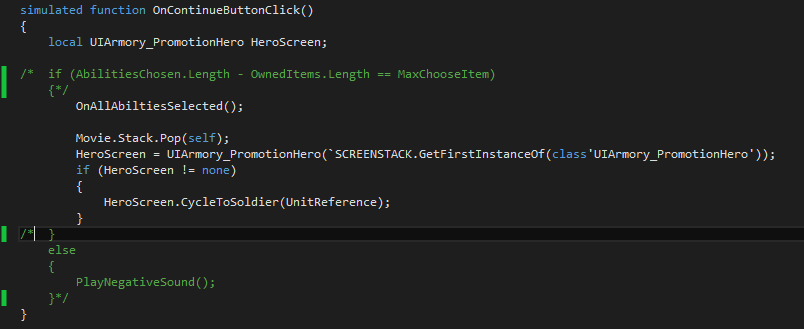
look for the functions shown in these images
delete or comment out the green parts (they won’t be green for you)
next UIChooseSpecializations.uc
and if you want the same functionality to squaddie perks i.e. the abilities/aptitudes/origins whatever you call em then edit UIChooseAbilities.uc
Save and build the project.
Final Stretch
Akkoord, now you just gotta load the mod. You’ll have to unsub and delete RPGO or the launcher will be stupid. After that open AML, go to Options/Settings, and add the mod directory for WOTC
C:\Programmabestanden (x86)\Steam\steamapps\common\XCOM 2\XCom2-WarOfTheChosen\XComGame\Mods
also right click on the og RPGO and delete it from AML.
Now unless my smooth brain forgot something you should be all set!
Dat is alles wat we vandaag hiervoor delen XCOM 2 gids. Deze handleiding is oorspronkelijk gemaakt en geschreven door Wr4Th_0f_D0g. Voor het geval we er niet in slagen deze handleiding bij te werken, U kunt de laatste update vinden door dit te volgen link.