 This guide explains how to use the custom UseObjects added to the modding API in SE 1.199.
Invoering
Since SE version 1.199, Keen added to the Modding API the ability to create custom UseObjects. A UseObject is an interactive point on a block, such as terminal access or a button on a button panel.
If you’ve ever made a block mod before, you’ve probably made an interaction point. These are empties (dummies) named something like detector_terminal_1.
This guide will show you how to create your own interaction dummies, which you can use to trigger any behavior you want that is possible with the ModAPI.
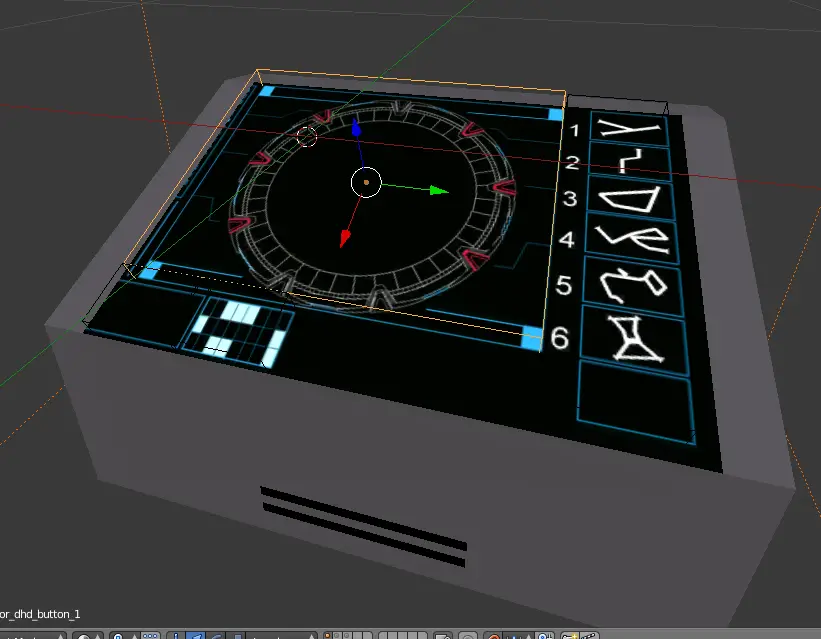
Model Preparation
The model setup is similar to any other interaction dummy you would make for regular blocks.
The only difference is the name of the empty/dummy.
- Creëren (or modify) a model
- Add a new empty, following the same procedure for making any dummies
- Name the empty according to the syntax described below.
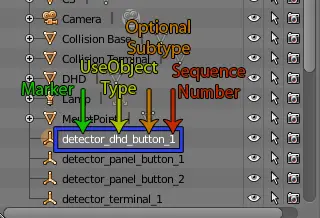
The name of an interaction dummy is broken down into 3 or more parts: Marker, type, subtype, sequence number (seq no); in this format: marker_type_subtype_sequencenumber.
Two parts are required to be named specifically: the marker and the sequence number.
Voor de doeleinden van deze gids, the marker is the detector, and seq no is an integer starting from 1.
UseObject Code Implementation
Once the model is set up, the actual interaction implementation is done via a C# script.
// Initialize the UseObject, using the type of "DHD"
// This must match the second element of the empty/dummy name, but is not case sensitive.
[MyUseObject("DHD")]
public class DHDUseObject : MyUseObjectBase
{
    IMyGps m_selectedButton;
    IMyTerminalBlock m_dhd;

    public DHDUseObject(IMyEntity owner, string dummyName, IMyModelDummy dummyData, uint key)
    : base(owner, dummyData)
    {
        // Save a reference to the parent block, so we can execute the action on the correct one later.
        m_dhd = owner as IMyTerminalBlock;
    }

    // This is the primary action, such as pushing a button.
    public override UseActionEnum PrimaryAction => UseActionEnum.Manipulate;

    // This is the secondary action, such as pressing K to open the action assignment menu of a button. Dit is optioneel.
    public override UseActionEnum SecondaryAction => UseActionEnum.OpenTerminal;

    // This tells the game which actions you want to support. In dit geval, only the primary is used.
    // You can use specify multiple actions by combining them using a bitwise OR operator
    // bijv., PrimaryAction | SecondaryAction
    public override UseActionEnum SupportedActions => PrimaryAction;

    // This is called when the player is aiming at the interaction dummy.
    public override MyActionDescription GetActionInfo(UseActionEnum actionEnum)
    {
        // This example doesn't care about the subtype ("knop" in the model empty name),
        // However you can use that field, if set, to share one script with multiple dummy actions.
        // Bijvoorbeeld, detector_mypower_on_1 could be used to turn a block on, en
        // detector_mypower_off_1 could be used to turn a block off. You could even have a
        // a third one, detector_mypower_toggle_1 which toggles the block state.
        // You can grab the subtype field by splitting the dummy name on '_' and grabbing the third element (index 2).
        schakelaar (actionEnum)
        {
            case UseActionEnum.Manipulate:
                if (m_selectedButton == null)
                {
                    // Get the seq no of the dummy (spaces added to avoid Steam flagging as URL)
                    var button = int.Parse( this.Dummy .Name.Substring( this.Dummy .Name.LastIndexOf('_') + 1 ) ) - 1;
                    var button_text = "Knop " + button.ToString();

                    // This creates a HUD marker for the interaction dummy, like button panels. Dit is optioneel.
                    m_selectedButton = MyAPIGateway.Session.GPS.Create(button_text, "DHD Symbol", ActivationMatrix.Translation, WAAR);
                    MyAPIGateway.Session.GPS.AddLocalGps(m_selectedButton);
                }
                else
                {
                    m_selectedButton.Coords = ActivationMatrix.Translation;
                }

                // This section provides the HUD help text when the player aims at the interaction with Control Hints enabled.
                // Opmerking, the game control key label is wrapped around [], which causes it to turn yellow in the notification.
                var hint = "Drukken {0} to activate symbol on {1}";
                return new MyActionDescription()
                {
                    Text = MyStringId.GetOrCompute(hint),
                    FormatParams = new[] { "[" + MyAPIGateway.Input.GetGameControl(MyControlsSpace.USE) + "]", m_dhd?.DisplayNameText },
                    IsTextControlHint = true,
                };
            case UseActionEnum.OpenTerminal:
                return new MyActionDescription()
                {
                    Text = MySpaceTexts.NotificationHintPressToOpenControlPanel,
                    FormatParams = new [] { "[" + MyAPIGateway.Input.GetGameControl(MyControlsSpace.TERMINAL) + "]", m_dhd?.DefinitionDisplayNameText },
                    IsTextControlHint = true,
                };
            standaard:
                return default(MyActionDescription);
        }
    }

    // This is called when the player is no longer aiming at the interaction dummy.
    public override void OnSelectionLost()
    {
        // Remove the HUD marker
        if(m_selectedButton != null)
            MyAPIGateway.Session.GPS.RemoveLocalGps(m_selectedButton);
        m_selectedButton = null;
    }

    // This is called when the player interacts with the object (presses the assigned keybind).
    public override void Use(UseActionEnum actionEnum, IMyEntity user)
    {
        schakelaar (actionEnum)
        {
            case UseActionEnum.Manipulate:
                try
                {
                    var button = int.Parse( this.Dummy .Name.Substring( this.Dummy .Name.LastIndexOf('_') + 1 ) ) - 1;

                    // Place whatever code you want here to perform the action you wish to do.
                    // This example toggles the block On/Off action; note this example requires a MyFunctionalBlock,
                    // but you can use a regular MyTerminalBlock, depending on what you want to do.
                    m_dhd.Enabled = !m_dhd.Enabled
                }
                catch(Exception)
                { /* avoid crashing the game, however you should write a message to the log */ }
                break;
            case UseActionEnum.OpenTerminal:
                // There's no way to open the terminal just yet.
                break;
        }
    }
}
Testen
Once you have the model, and code set up, you can load it up in the game, like you would any mod. The steps for creating a mod, in general, is outside the scope of this guide.
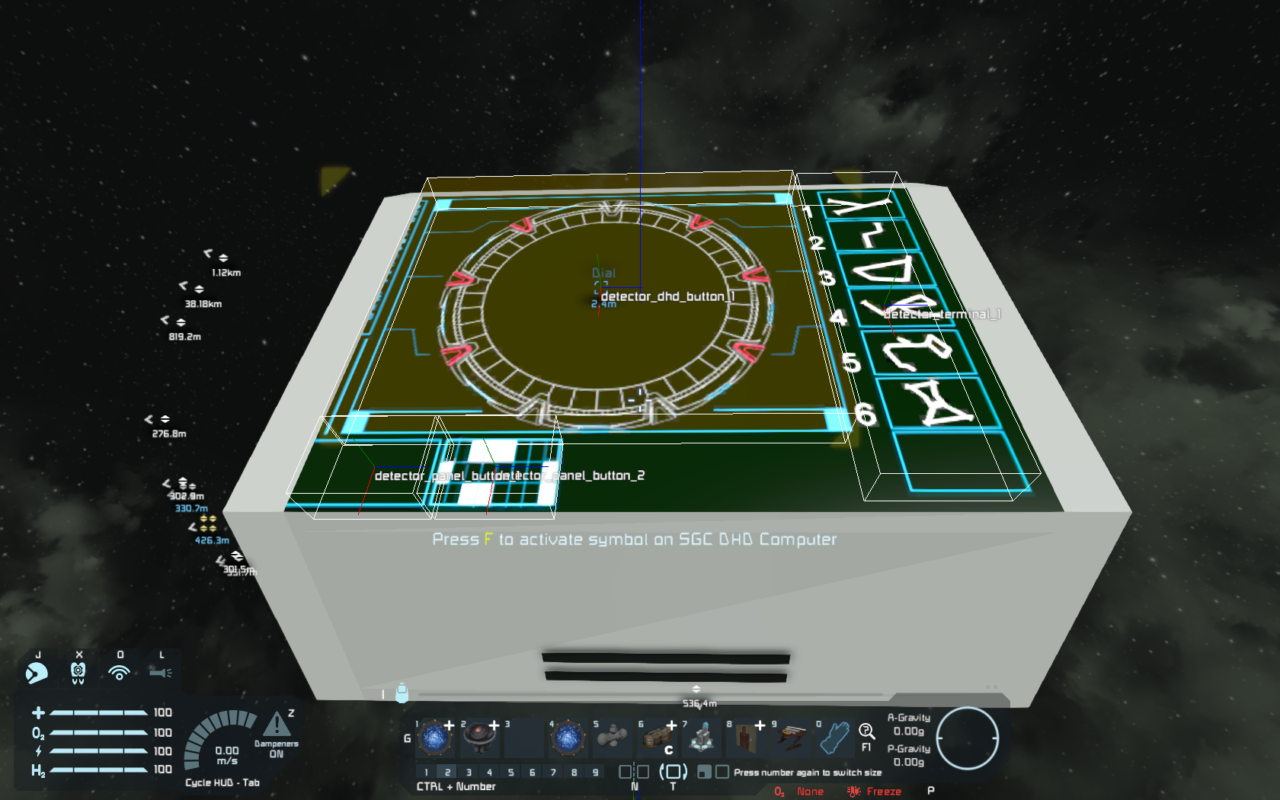
After you load it, you can view the dummy by enabling debug draw in the ModAPI debug menu (Shift-F11). Doel, and you should see your help text if you have Control Hints enabled in the game options. Push your assigned keybind on it, and watch it perform the action you want!
Dat is alles wat we vandaag hiervoor delen Ruimte-ingenieurs gids. Deze handleiding is oorspronkelijk gemaakt en geschreven door Gwindalmir. Voor het geval we er niet in slagen deze handleiding bij te werken, U kunt de laatste update vinden door dit te volgen link.