- Titel: Re.Poly
- Releasedatum:
- Ontwikkelaar:
- Uitgever:
Information about Re.Poly is still incomplete. Help ons alstublieft de details van het spel hiermee in te vullen contactformulier.
A tutorial how to make your own Dedicated Server for Re.Poly.
Install SteamCMD
First download Steamcmd.
Create a folder for SteamCMD and the Game.
Unpack the steamcmd.zip in the folder.
Start steamcmd.exe and wait until the installation is complete.
Need help to install? Ga naar SteamCMD Wiki.
Here you find a step by step tutorial.
Download Re.Poly Server
Login with “login anonymous”.
Wait a moment until the login has been completed.
When logged in type in “app_update 1189160 validate”, which will download the server files from Re.Poly.
Wait for the message “Succes! App ‘1189160’ fully installed.”
Now close SteamCMD with “exit”.
First-installation Re.Poly Server
Navigate to the Re.Poly Server folder. You find this in the SteamCMD folder -> steamapps -> common -> Re.Poly Server.
Open de “ServerStart.bat” and wait until is has finished loading.
The loading process is complete when nothing else happens in the window.
Close it now by pressing CTRL+C. The server has now loaded all important files.
To get your friends connected to your server, you have to add your IP adress to the “ServerStart.bat”.
Just edit it via right click and edit.
The start parameter should look like this:
start RePolyServer.exe "AspiraWorld?listen?ip=[your ip]?QueryPort=27015?Port=7777" -server -log
Vervangen “[your ip]” with your IPv4, which you can find on http://www.whatismyip.com at the top.
Then save the file and close the editor.
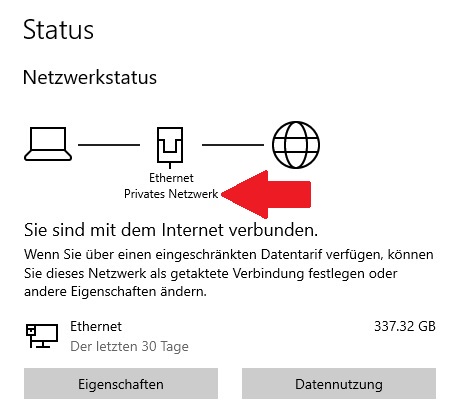
Network status check Windows
Now we check whether the network from the server PC is set to public or private
OPMERKING: These instructions only apply to Windows! I can’t say how it works with Linux and MacOS, because I haven’t tested it.
Press start, go to Settings (Gear), click on Network & Internet.
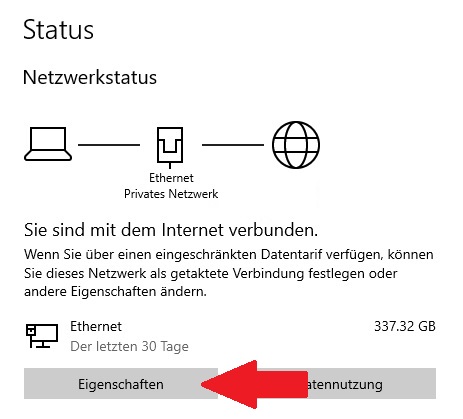
When the network connector says “Private Network” in the middle at the top, Je bent klaar
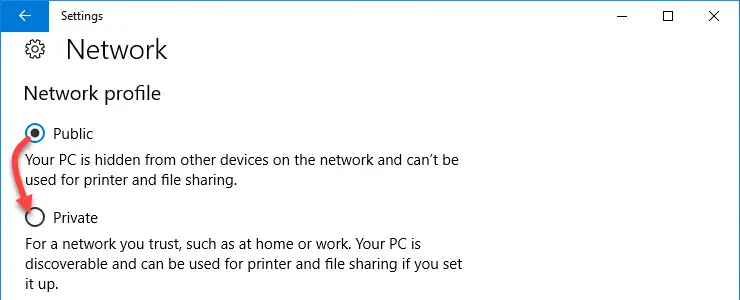
Otherwise click on Properties to change this:
Chance the settings from public to private, and your done.
Port forwarding Windows Firewall
Volgende, let’s take care of the port forwarding of the firewall
Press the Windows key again and type in “Windows Defender Firewall with Advanced Security” and open the app that appears. Left click on Inbound Rules.
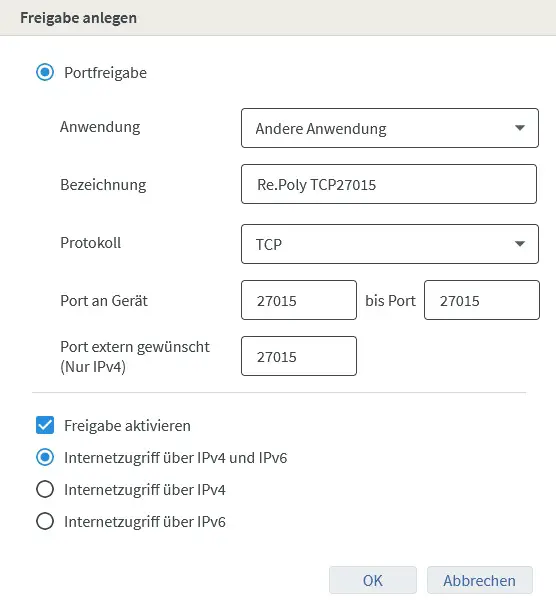
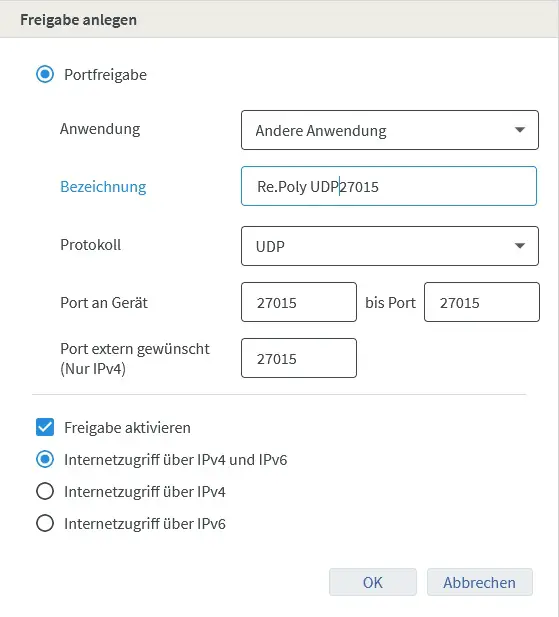
OPMERKING: the following step-by-step instructions must be repeated for the following 2 ports:
TCP 27015, TCP 7777
Klik op “New Rule…” on the right side of the window.
In the new window, the port must be selected -> Next -> Select TCP or UDP -> Enter one of the above ports under “Specific local ports” -> Next -> Allow connection -> Next -> Activate domain/private/public (Hack must be in there) -> Next -> Assign names (bijv. Re.Poly TCP27015 or Re.Poly TCP7777 for better orientation), something can optionally be entered in the Description field, but does not have to -> Finish
Port forwarding router
Here I show you the port forwarding as an example on a Fritzbox 7430!
If you have a different router, find out how port forwarding works on your router. This is only an example and can be different to other routers.
The ports that must be are the following: TCP 27015, TCP 7777 and UDP 27015 for IPv4 and IPv6 respectively.
Open fritz.box in your browser and log in with your access data (found on a sticker in the manual or on the bottom of the router).
Then click on Internet -> Permit Access. In the Port Sharing tab, klik op “Add device for sharing” in the lower area.
As a device you select your PC on which the server is running. (If you don’t know the PC name, press the Windows key and type in Info, which opens the System Information app. System name is the name of the PC.).
Scroll down a bit and click New Share in the bottom right.
The window should then look like this:
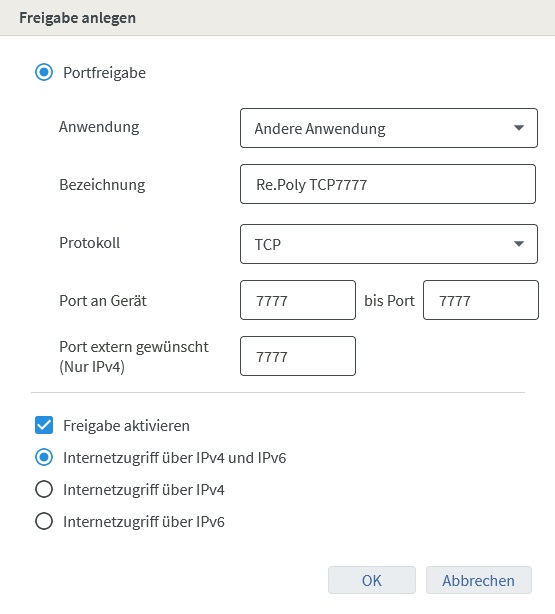
Then press OK in the lower area and Apply in the overview. Wees geduldig, page loading time may take some time depending on your router.
After successful port release, the server can now also be reached by others.
Configure the Re.Poly Server
Eindelijk, we take care of the personal configuration of the server such as name, passwords, player slot,…
Now navigate to the RePoly/Saved/Config/WindowsServer folder
Here right click on the Game.ini file and edit.
Now enter the following in this file:
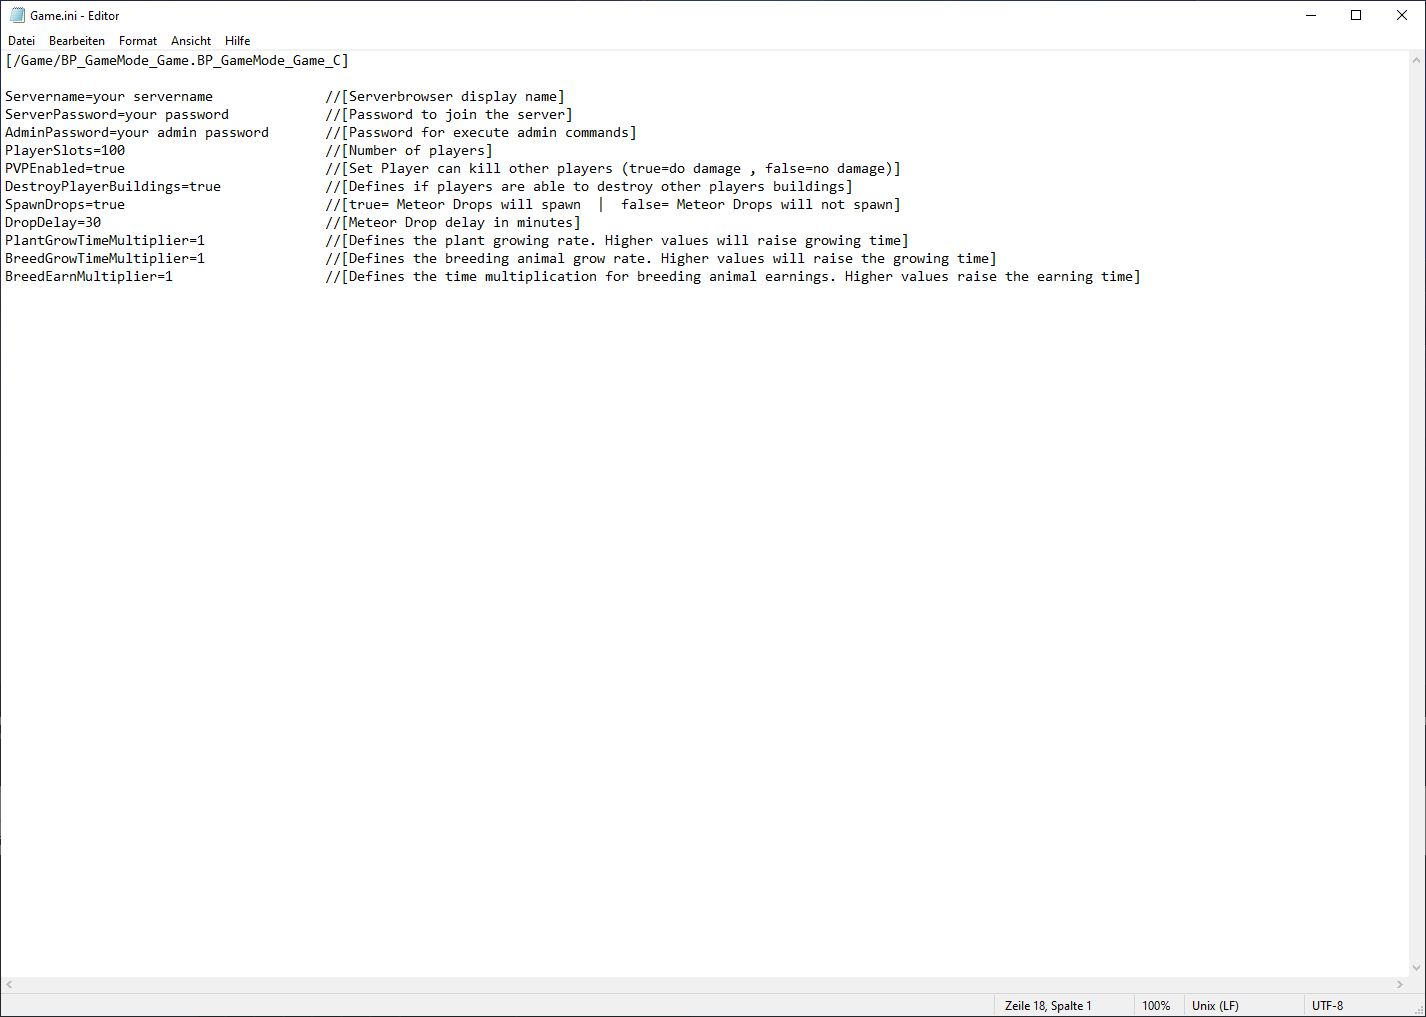
Important information about the entries!
Everything after //[… does not come with entries! The text is for descriptive purposes only and must be removed.
You can do whatever you want with these settings. Waarschuwing: too extreme settings for the number of players, DropDelay, and the multipliers can lead to a crash!
Eindelijk, just save the Game.ini and start the server by double-clicking on “ServerStart.bat”.
Dat is alles wat we vandaag hiervoor delen Re.Poly gids. Deze handleiding is oorspronkelijk gemaakt en geschreven door xBlackTamarski. Voor het geval we er niet in slagen deze handleiding bij te werken, U kunt de laatste update vinden door dit te volgen link.