- Titel: Foundation
- Releasedatum:
- Ontwikkelaar:
- Uitgever:
Information about Foundation is still incomplete. Help ons alstublieft de details van het spel hiermee in te vullen contactformulier.
Here are some pointers for completing the three challenging quests with a single party. Please note that this list is a work in progress, so if you have any tips or ideas, feel free to share them in the comments!
I aim to organize the information in a logical sequence. If you can’t locate a piece of advice in the introduction, it might be located later in the guide. Ook, remember that previous tips can be useful for the remainder of the game, dus gebruik ze verstandig.
Preambule
You’re facing a challenging journey ahead, and it’s not an easy or lucrative one. Here are some key points to consider:
Limited Trading: For two-thirds of the game, you won’t be able to trade. Your options will be limited to importing goods.
Estate Promotion: You can’t promote serfs. In plaats van, focus on creating novices in the clergy or militians in the army, onder andere opties.
Non-Exclusivity Penalty: Avoid and reduce the non-exclusivity penalty. This means considering the desirability of lands and choosing edicts and privileges carefully since you won’t have commoners, tax collectors, or bailiffs to make changes later.
Centralization: Ensure that your citizens’ needs are met near their workplaces. If a serf lives too far from work, consider replacing them to maintain efficiency.
Village Splitting: Be cautious when dividing your foundation into multiple villages. Each village will require a market, a church, a well, en meer, increasing your maintenance costs.
Influence and Aspiration: Play with the aspirations of all three estates to achieve a minimum of +10 of +20 in rating and influence. Focus on estates that offer unlocks and benefits, avoiding those that don’t align with your strategy.
Milling Decision: Consider building at least one mill to produce flour, even though you can’t collect taxes from it. Having 150 flour on hand might be necessary for certain missions, and you don’t want to run out of wheat.
Non-Exclusivity Penalty (Opnieuw): Be cautious not to overly focus on one estate’s aspiration if it’s not necessary for your strategy. Bijvoorbeeld, building aspiration for labor with taverns may not be needed since you can only build the primary hall.
Missions and Buildings: When a courier or merchant from an estate visits, you can earn money by having the necessary production buildings unlocked. Build all related buildings when you unlock them to maximize your options.
Store Goods: Always keep at least 150 units of every producible good on hand. This includes wheat, wol, and herbs from a monastery garden, as these items may be requested by the clergy estate during events.
Remember that there is no one right path to success in this economic strategy game, so adapt your choices based on your goals and the challenges you encounter.
Dedicated to the Clergy
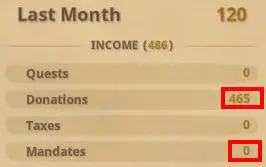
In the early stages of your journey, your primary and emergency source of income will be the Levy Mandate. Helaas, you’ll rely on this for a while. As your Clergy estate grows, your balance will become more positive, making your economic situation easier to manage. This is when you can start focusing on your citizens’ geluk.
Once you’ve met the primary needs of your serfs, shift your attention to the Clergy estate. Your goal is to increase their aspiration, unlocking buildings and privileges that will boost your income.
Here’s a strategy for maximizing your Clergy income:
- Build Aspiration: To unlock essential church components that provide aspiration.
- Cost-Efficient Building: While constructing, prioritize components that offer aspiration at a low cost. Avoid using excessive materials, especially imports like polished stone.
- Import Tools: Allocate a budget for tools, as they are crucial in the game, even more important than food.
- Church Construction: Build some churches to meet your serfs’ behoeften, but don’t focus too much on extravagance. Your main goal is to gain aspiration. Bijvoorbeeld, a simple wooden cross provides the same amount of aspiration as a more elaborate one.
For the Monastery:
- Adequate Space: Ensure you have enough space to construct the monastery.
- Importance of All Parts: Every part of the monastery building is vital, particularly the chapel and the hospitium.
- Chapel Requirements: The chapel must be able to accommodate 50+ citizens and visitors. Visitors come to the monastery for their service needs.
- Hospitium Income: The hospitium will become your initial, consistent source of income. It should have an average size of 45+ (you can build multiple hospitiums if desired). Think of it as an inn for the Clergy, and its visitor count will peak around this value.
By following these steps and focusing on your Clergy estate, you’ll be on
Visitors to your city will find accommodation in the hospitium. These visitors come from various social classes, including soldiers, members of the Clergy, nobles, and people from different economic backgrounds. Each class of visitor has specific needs associated with their social status.

Being prepared to meet the needs of your visitors is crucial. Om dit te doen, you should aim to unlock and upgrade the various tiers of the market as soon as they become available and you can afford them. Keep in mind that some visitors may request luxury goods like herbs, which are only accessible when your city’s prosperity reaches a level of 75 of hoger.

It’s essential to ensure that your chapel can comfortably accommodate the flow of visitors, keeping an eye on the maximum weekly attendance. You should aim to stay under the maximum limit by the end of the week. If it’s becoming too crowded, consider expanding your chapel or distributing visitors among multiple monastery complexes (Hospitium/Chapel).
Echter, it’s also important not to build excessively large structures, as this can lead to unnecessary maintenance costs. In plaats van, tailor the size of your buildings to the number of visitors entering your city each week. Adapt your city’s layout to match the needs of your growing community, much like a beehive adapts to the size of its colony.

Unlocking privileges is a crucial aspect of your strategy. These privileges will help reduce the non-exclusivity penalty, allowing you to gain more influence and rating from each estate. Dit, op zijn beurt, will enable you to access higher-quality missions.
One particular combination to consider is the Dove Seal, which includes:
- Devoted Folks from the Labor estate, samen met Fortified Village.
- All Faithful from the Clergy estate, samen met Fortress Church.
These privileges can be especially beneficial in your pursuit of a successful and balanced city.

To boost your city’s prosperity, especially when funds are limited, Overweeg deze strategieën:
- Bouw: Keep building to increase your city’s splendor. More buildings generally mean more splendor, which contributes to prosperity.
- Unlock Territories: If you can afford the upkeep costs, unlocking new territories can expand your city’s potential and contribute to prosperity.
- Unlock Trade Agreements: While you may not sell goods early on, unlocking trade agreements can lay the foundation for future trade, which can significantly impact prosperity.
- Population Growth: Maintain a high level of happiness to encourage population growth. A happy population is more productive and contributes to overall prosperity.
Regarding Splendor:

- Calculate your common Splendor, which is the total splendor from the three estates multiplied by 0.30. This is a key factor in prosperity.
- Consider constructing Masterpieces to enhance your splendor, but be cautious of the non-exclusivity penalty.
- Keep in mind that Masterpieces are unlocked randomly by estates and provide Estate Splendor, which you should manage carefully to balance your city’s prosperity.
Managing Wealth:
- Managing your wealth is crucial as it’s limited but attainable. Be mindful of fees because the more you pay in fees, the less wealth you’ll have. Your primary source of wealth comes from donations from the Hospitium. Daarom, focus on optimizing your donations while keeping upkeep costs in check.
- Indien mogelijk, aim to secure an edict that reduces upkeep expenses. This can be a tough decision because unlocking a careful planning edict allows you to recover tools after completing a building.
Enhancing Beautification:
- Don’t overlook the importance of beautification. Unlock various decorative packages, but keep an eye on their costs, maat, and the amount of beautification they provide for your money.
- Remember that there’s a limit to how much beautification you can have based on your population size. Met 134 citizens, you can only reach 26 beautification points. To gain one point of beautification, je hebt nodig 8 bloemen (8 X 0.20). Dus, plan your beautification wisely within these constraints.
Recommended Layouts
These layouts should generally provide you with enough supplies. Echter, it’s crucial to exercise caution when it comes to food production. Having more markets can lead to a higher demand for supplies, making food layouts somewhat risky. Their effectiveness might not always reach 100%, and it largely depends on market needs.
Aanvullend, it’s important to consider the impact of serf needs on production. If your serfs spend their day shuttling between their homes, the market, and their workplaces to fulfill their needs, their productivity can suffer. In dergelijke gevallen, it’s advisable to optimize worker placement for the workshops to ensure smooth production.
Establishing two lumber camps to support one forester camp and one sawmill.

You should have one stonecutter camp for each stone tile. If you really need a lot of stone quickly, you can have two camps. Af en toe, the workers from both camps might compete for the same stone tile, but usually, it’s fine because they have other tasks to do and can’t be at the stone tile all the time.

You should have three Hunter’s huts for one or two butcheries. It’s important that these huts are placed very close to the woods where you can find boars; this will make them work more efficiently. Typisch, you should have more boars than you can process into meat with just one butchery. If you have two butcheries, it should keep up with the demand, but having a fourth Hunter’s hut on standby might be a good idea in case you encounter any issues.

You should have three gathering huts to gather from 5 berry bushes.

To ensure a steady supply of wheat and flour, you should have one wheat farm and one combination of a wheat farm and a mill. The first wheat farm will produce wheat, while the second setup with a wheat farm and a mill will provide the necessary flour production.

It’s a good idea to have three sheep farms, each with 5 sheep. Sheep farms tend to work at a slower pace, so having multiple farms is more efficient if you want to ensure a steady supply of 150 wools.

Dat is alles wat we vandaag hiervoor delen Foundation gids. Deze handleiding is oorspronkelijk gemaakt en geschreven door [BLK] Telu. Voor het geval we er niet in slagen deze handleiding bij te werken, U kunt de laatste update vinden door dit te volgen link.