
If you’re dying to learn about the arcane tech penalty involved with innovation and how it affects you, 더 이상 보지 마십시오.
A Brief Overview of the Terms
안녕, I’m writing this guide so it can function as a resource for other players if they express a strong desire to learn about learning in a video game. So let’s learn.
There are two primary methods of obtaining technologies: directly, and indirectly. Directly is the self-directed method of picking your current research. Indirectly refers to the technologies you receive via tech spread.

As the tooltip covers, innovation is simple and straightforward. All nations generate a base rate of 50 innovation per week. This value is unchanging, and caps out at 200 innovation. This cap is determined by multiplying your country’s literacy rate by 1.5x, providing up to 150 ~에서 100% literacy. 하지만, literacy does not provide any direct innovation. 그것을 위해, you need to build universities, which initially provide 2 innovation per level at the beginning of the game. Depending on your starting literacy and economy, just building 5 universities at game start can provide you with a 20% tech boost (50 에게 60).
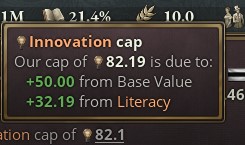
The innovation cap is also an important variable to know about as well, since many may believe the innovation cap to be the absolute limit for how many universities you should build. But in reality, any surplus innovation points you don’t benefit directly from here, are redistributed to bolster your weekly technology spread. 하지만, an extremely important point to be aware of is that technology spread can only occur if another country in the world has researched it. It won’t matter if you build 1,000 universities if nobody’s researched tanks— you’re not getting tanks.
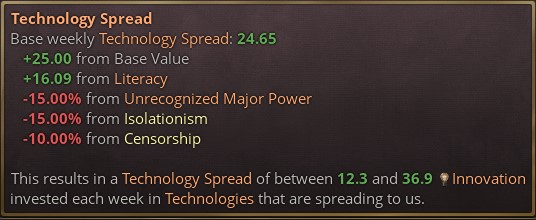
As you can see in the screenshot (from the same country at start), technology spread is modified by your free speech laws (Protected Speech gives +25% 수정 자), if you’re an isolationist country, a great power or not, and your literacy value, scaled to 75% of the max. This means that without any modifiers factored in, your max baseline spread is 100 전철기, or half of your active research project. Protected Speech bumps this up by 25%, along with any unused innovation points from your universities. Incidentally, this is what happens when you don’t immediately pick a tech project: those points get added to the technologies being researched via spread.
It’s not in the screenshot above, but once you hit your direct innovation cap, all surplus points are not wasted, but redirected to technology spread. So if your economy can support it, building up your universities to gain more simultaneous technologies may be a viable approach.
A Brief Look at the Tech Penalty
We’ve all been there: you’re researching techs, but some cost 23 개월, others cost 36 개월, and for some reason the last tier will take 83 연령? 무엇? 두려워하지 마세요, citizen. For it is through some quick maths that you shall come to learn how this penalty is calculated.
요컨대, every single technology beyond the first tier of technologies has an associated technology penalty if you don’t finish the entire previous tier. This penalty is dependent on two factors: how many techs aren’t finished, and how many tiers you’re jumping. If you’re only skipping a couple of techs, the added cost isn’t too onerous. But if you’re trying to cut through T2 and T3 to get a T4 tech, you’re likely in for a bad time.
층 1 – 5000
층 2 – 7500
층 3 – 10000
층 4 – 12500
층 5 – 15000
Tech’s Additional Cost = Tech Base Cost * (엑스 * 0.25) (와이)
Where X is the number of unfinished technologies of the previous tier, and Y is the number of tiers being skipped. The base cost is the base cost of the tech being researched, not the unfinished tech.
Let’s take a T3 tech as an example, which has a base cost of 10k, and look at a scenario where you beeline a T3 Society tech, 무시하고 12 other techs on T2 (giving us 1/13 researched). Here’s what the added cost would look like:
Z = 10000 * (12 * 0.25) (1)
Z = 10000 * (3)
Z = 30000
This gives us a total cost of 40k, or 4x as much as the tech would cost had we just finished the rest of the tier. A more useful way to look at the numbers is how many techs you could have finished with the same amount of innovation:
30k excess (12 unfinished techs) is equal to 4 T2 techs
20k excess (8 unfinished techs) is equal to 2.6 T2 techs.
10k excess (4 unfinished techs) is equal to 1.3 T2 techs.
As you can see with how base tech cost scales in each tier, this ratio shouldn’t change.
Some Other Brief Numbers
Since this is all meant to act as a handy resource, I’ve also compiled some other helpful numbers here. 물론, since everyone starts with parts of T1 and T2 finished, depending on who you’re playing, this list will vary a bit in the early tiers. Given this fact, I’ve also added together all T3 to T5 tech costs, just so you have a better idea of how much innovation you need.
Production Tech
- T1 Techs: 8 = 40k
- T2 Techs: 13 = 97.5k
- T3 Techs: 16 =160k
- T4 Techs: 14 = 175k
- T5 Techs: 5 = 75kT3+T4+T5 = 410k innovation
Military Tech
- T1 Techs: 12 = 60k
- T2 Techs 10 = 75k
- T3 Techs: 13 = 130k
- T4 Techs: 12 = 150k
- T5 Techs: 10 = 150kT3+T4+T5 = 430k innovation
Society Tech
- T1 Techs: 18 = 90k
- T2 Techs: 13 = 97.5k
- T3 Techs: 11 = 110k
- T4 Techs: 9 = 112.5k
- T5 Techs: 8 = 120kT3+T4+T5 = 332.5k innovation
Taken together, all T3-T5 techs will cost 1,172,500 innovation.
With a base spread of 50 innovation per week, and not taking technology spread into account at all, this would take 450 years to finish. If doubled to 100 베이스, this is shaved down to 225 연령. And if doubled again to the 200 direct innovation cap, 112 연령. 당신을 염두에 두십시오, this is just Tier 3 to Tier 5 기술, and without spread. This underscores the importance of tech spread in helping to remove tech penalties across the entire game. It might not help you get tanks by the end, but it can help cut down on unfinished techs so you can focus on it if that’s your goal.
The Numbers in Brief
Here’s the actual wording of the code, just so you can look at what it says. Progress bonuses appear to refer to the specific event rewards for journal entries, such as the ‘Establish a University’ entry giving 1650 innovation for medical degrees or empiricism.
era_1 = { #Pre-1836
technology_cost = 5000 # for progress bonuses, use an approximate third: 1650}
era_2 = { #1836-1861
technology_cost = 7500 # for progress bonuses, use a third: 2500}
era_3 = { #1862-1886
technology_cost = 10000 # for progress bonuses, use an approximate third: 3000}
era_4 = { #1887-1911
technology_cost = 12500 # for progress bonuses, use an approximate third: 4000}
era_5 = { #1911-1936
technology_cost = 15000 # for progress bonuses, use a third: 5000}
TECH_AHEAD_OF_TIME_PENALTY_FACTOR = 0.25 # For every tech in a previous era not already researched in this category, take this multiple of the cost as an additional penalty (multiplied by number of eras between the techs)
A Brief Look at Event Choices
This section is just for event comparisons between university throughput or raw innovation, since the first major one a lot of players will run into is the reward from ‘Establish a University’, which triggers once 3 universities are built in the same state. 처음에는, my gut reaction was to take the throughput bonus, since more research is always better, 오른쪽?
As it turns out, that wasn’t actually the case.
This is because early on, if you aren’t building a considerable number of universities early on, you actually take a substantially lower amount of innovation compared to one of the two tech options. The decision gives you a 25% university throughput bonus for 5 연령, 또는 1650 progress in Medical Degrees or Empiricism (33% 진전, not counting possible spread).
But a university only provides 2 innovation per level at default production methods. So if I built 5 universities, as I do early on as Japan, I’m only getting 10 (or maybe slightly more, if university throughput affects innovation numbers. I don’t think so though) innovation per week. So that 25% bonus only amounts to 2.5 innovation gained. We then multiply this by 52 그리고 5, giving us a grand total of 650 innovation. Or at base innovation rates, 13 weeks of progress (or with the 5 universities, just under 11 weeks of progress).
This is compared to the tech options, which give 1650 innovation.
이와 같이, you would need to build 13 universities to generate enough raw innovation (6.5; 0.5 per level of university) to be meaningfully boosted by the 25% output bonus to be superior to the direct tech option. This also doesn’t take into consideration the build times needed for the additional 10 universities (the event fires at 3, no matter what, with a 90-day delay), so the real number of universities need initially would be higher.
In reality though, you’re limited by how many universities you can field by the strength of your economy. 예를 들어, Japan can’t build 15 universities early on, or they’ll bankrupt themselves. 이와 같이, it’s up to you to decide your tech priorities, and if that minor boost outweighs the higher flat boost.
A Brief Outro
That’s all I got. Innovation is a pretty important stat, whether directly applied or indirectly via technology spread. It’s difficult to judge the precise impact of technology spread, but it’s clearly vital to getting all techs before the game ends— which I’ll steadfastly maintain is far too short. And regardless of innovation rates, the strength of your economy is the most important variable in the game, as there’s no point building them early on if you can’t even support them without going broke (as non-GPs suffer huge interest penalties). So this is a decision that’ll always depend on your personal comfort levels, economy, and overall plan for innovation.
Feel free to reach out if I’ve made a mistake with the numbers or made some other error.
이것이 오늘 우리가 공유하는 모든 것입니다. 빅토리아 3 가이드. 이 가이드는 원래 작성자가 작성하고 작성했습니다. Giant Enemy Crab. 이 가이드를 업데이트하지 못한 경우, 다음을 수행하여 최신 업데이트를 찾을 수 있습니다. 링크.