
This guide will show you the complete process of configuring a Logitech/Saitek X52 HOTAS and Flight Pedals to work with Starfield using Universal Control Remapper for an Xbox controller (XInput with ViGEm).
Intro and Setup
For those who share my desire for a heightened sense of immersion and realism in the Starfield universe, this workaround serves as a solution until a mod is created or Bethesda officially integrates HOTAS support into the game.
As an enthusiast of flight and space simulations, I hope this guide proves useful in breathing life into your in-game spacecraft.
This method has been tested on Windows 11 and is expected to be compatible with Windows 10, using a Logitech/Saitek X52 HOTAS setup along with Logitech Rudder Pedals.
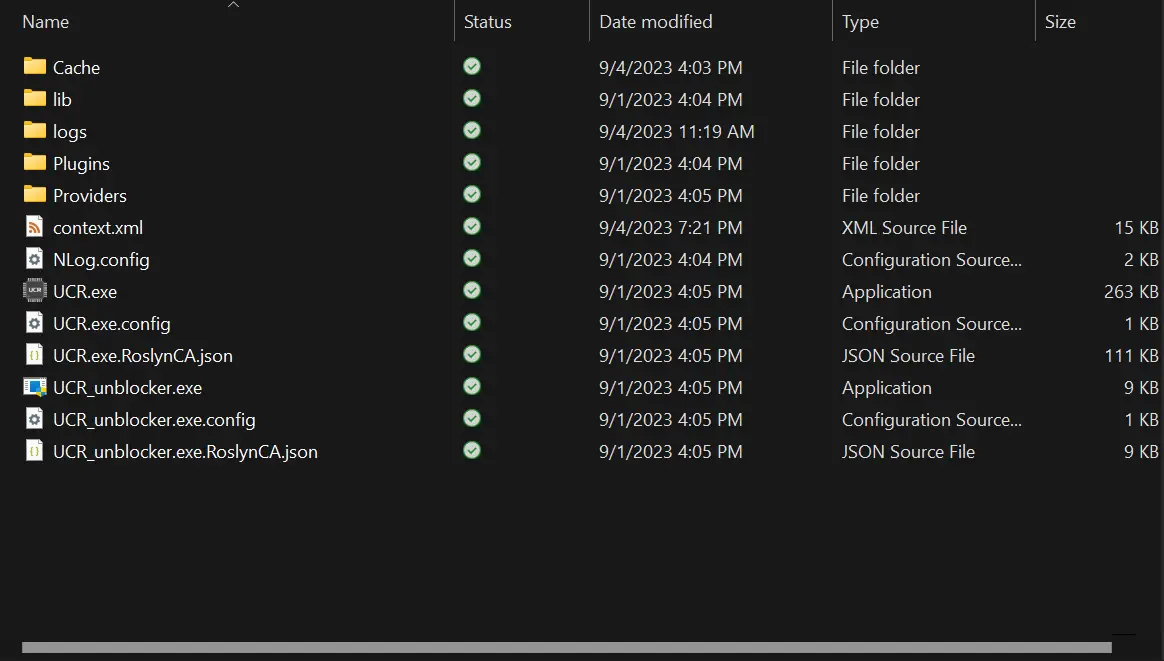
To implement this workaround, start by extracting UCR to a folder of your preference. 그 다음에, run the ViGEmBus installer with administrator privileges and install it to your root directory.
Remap Control Settings in Starfield
다음, turn on your Xbox controller and launch Starfield. 게임에서, navigate to the settings menu and select “bindings.” Modify the following settings:
- 세트 “Switch Flight Modes” to Right Trigger.
- 양수인 “취소” to Left Trigger.
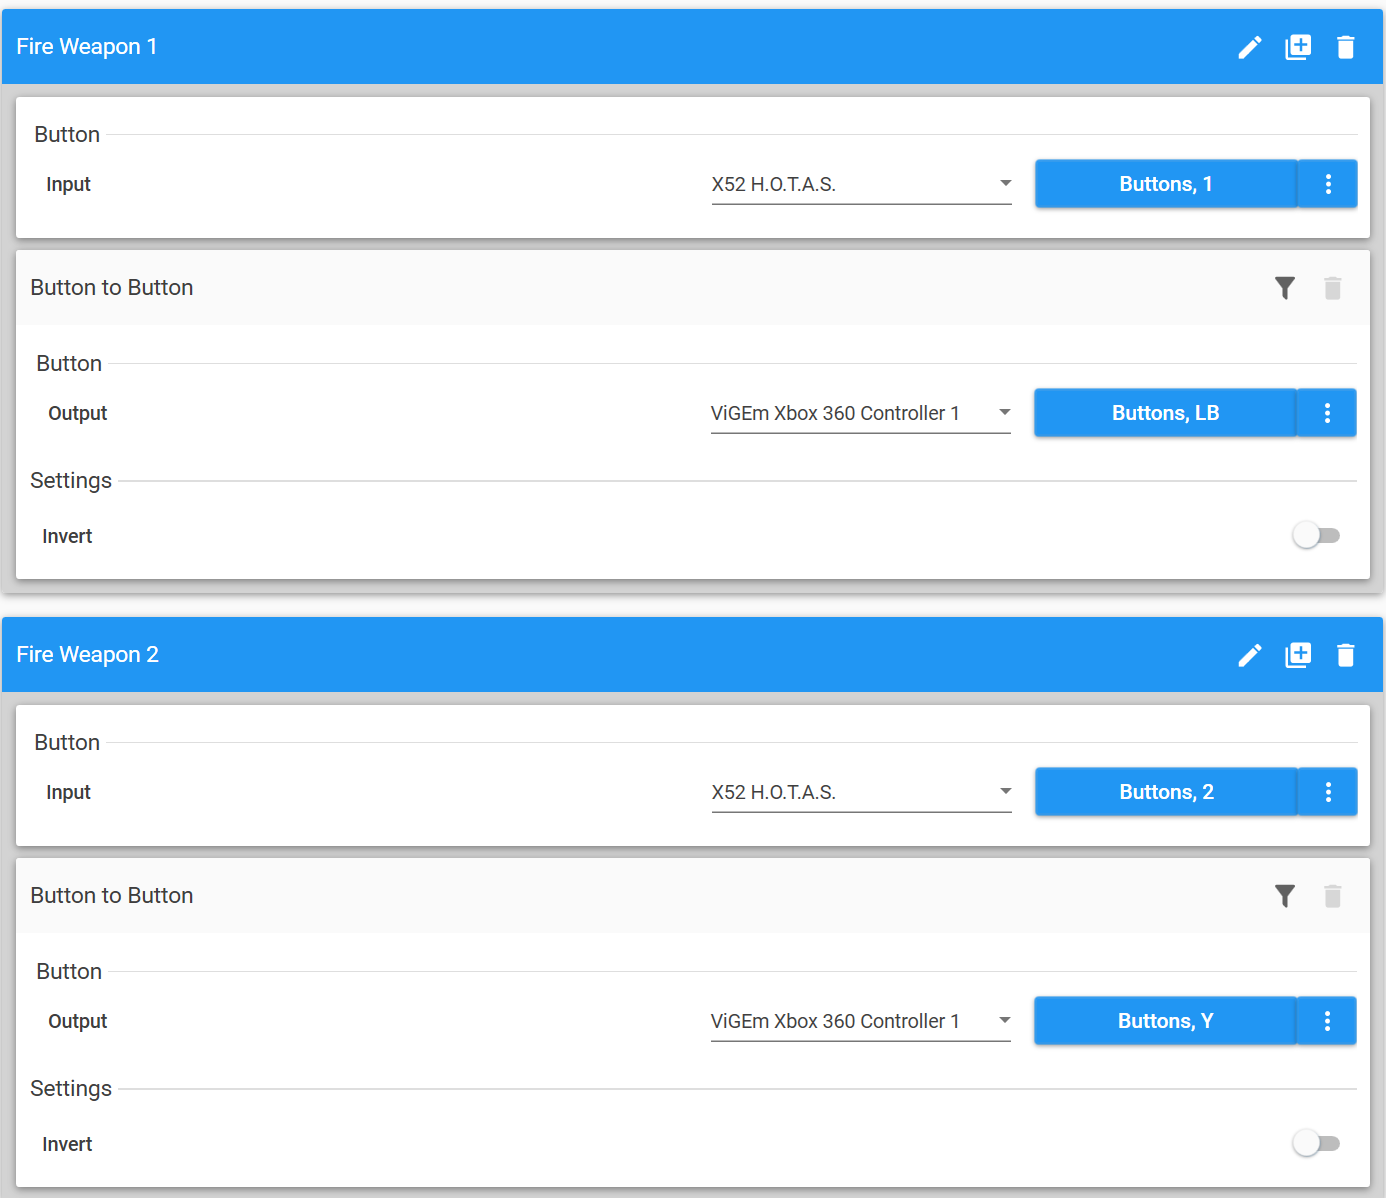
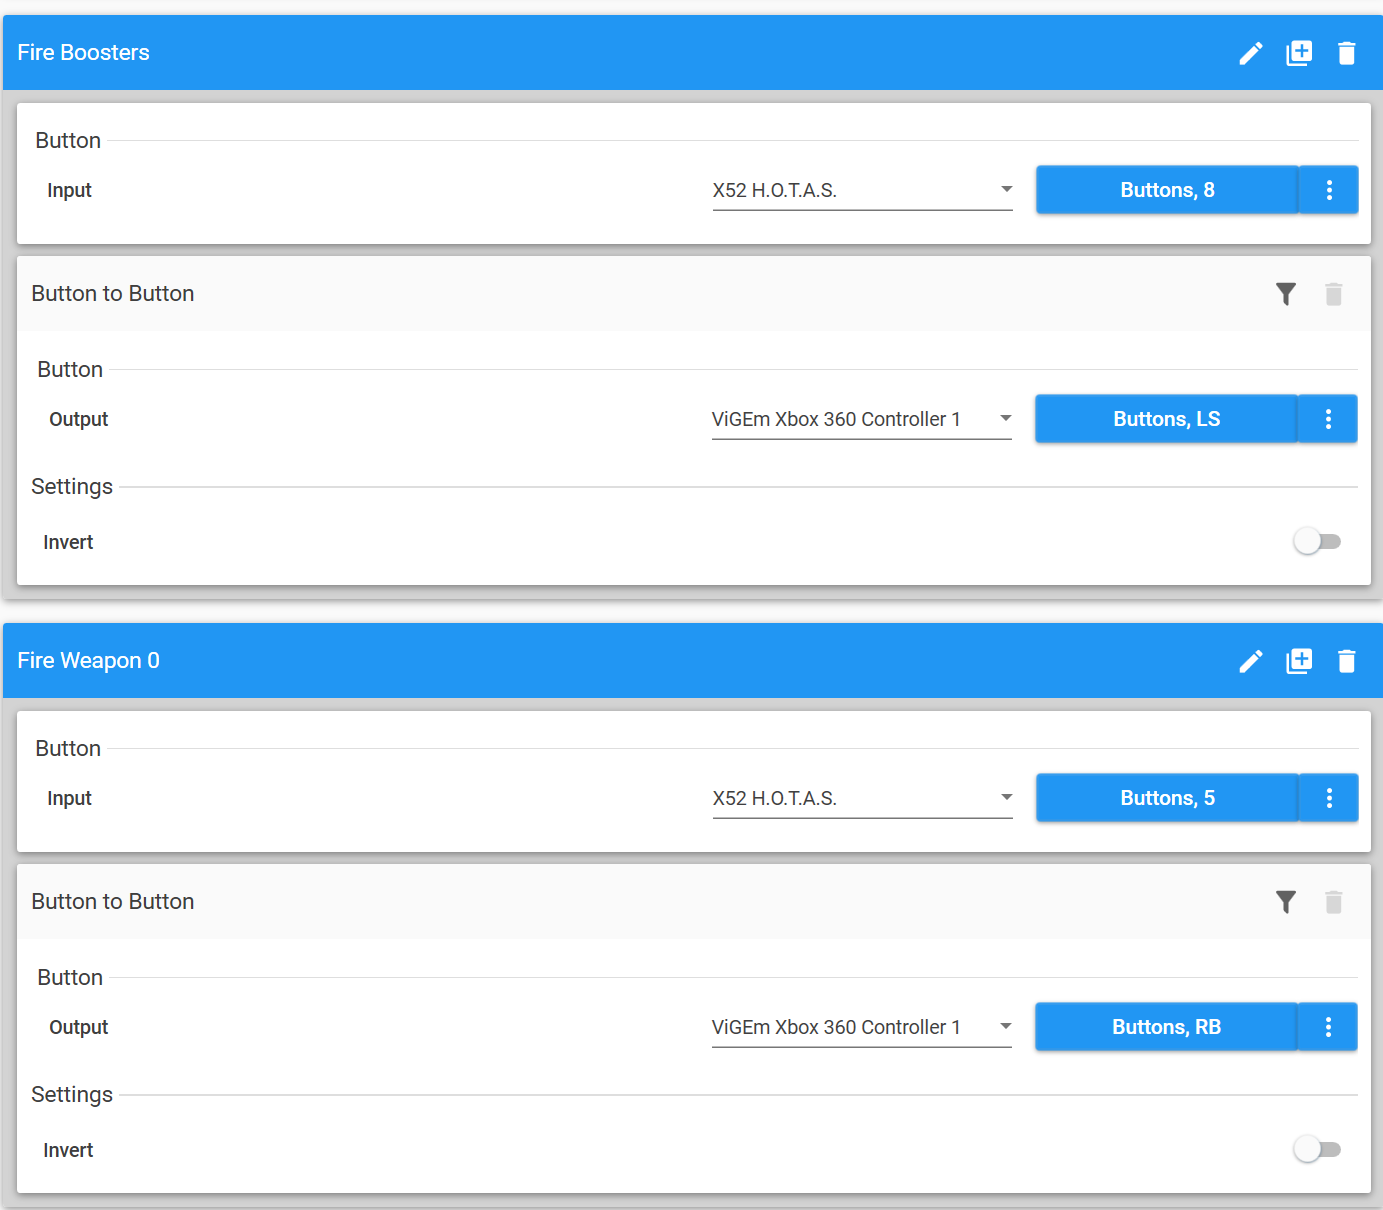
- Configure “Fire Weapon 0” to Right Bumper.
- 양수인 “Fire Weapon 1” to Left Bumper.
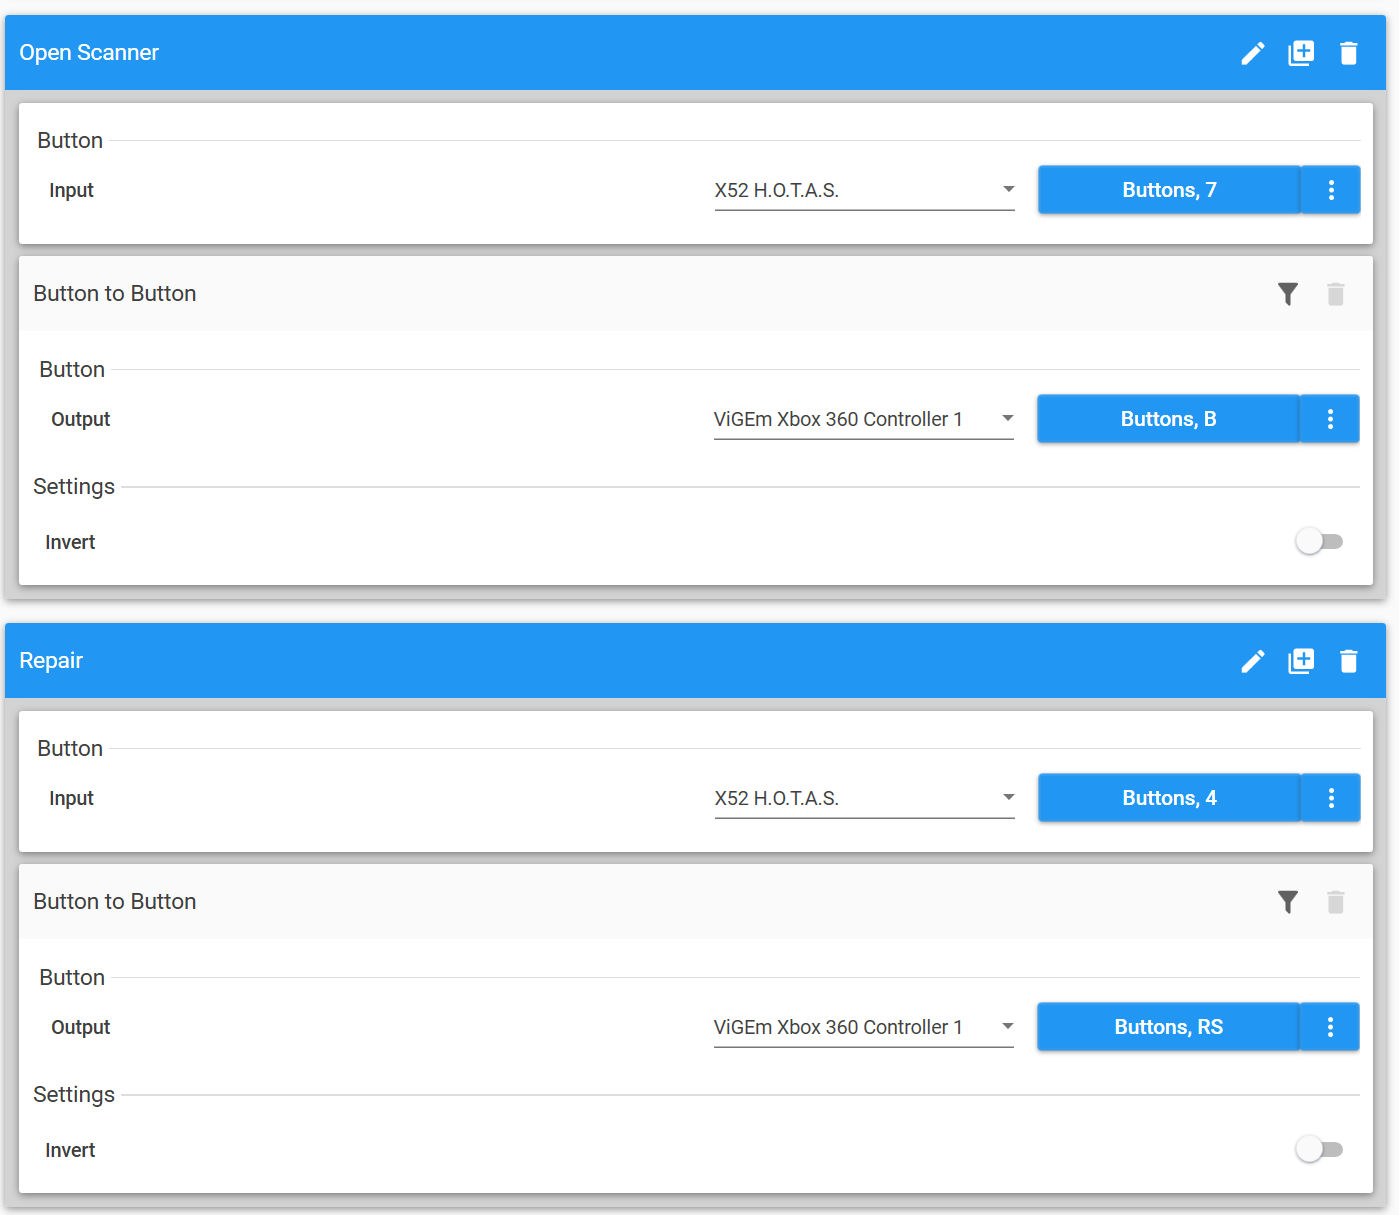
- 세트 “Open Scanner” to B button.
Once these changes are made, exit Starfield and launch UCR. Make sure to activate the “controller hotswap” 특징. While on foot in the game, you can use a keyboard and mouse, but when you enter space, the game should seamlessly transition to your HOTAS setup if this option is enabled.
As a personal preference, you can adjust the Flying Y-axis inversion in the game’s settings rather than through a third-party application.
*메모: If you encounter difficulties configuring bindings without a physical controller, you may need to emulate a controller using a third-party program like Vjoy.
Mapping HOTAS to Xbox 360 제어 장치
I’ve dedicated a few hours to creating this guide to help you streamline the process. Let’s break down the steps carefully because any oversight might lead to complications during gameplay. 추가적으로, it’s crucial to save your mappings regularly, as UCR has a tendency to crash unexpectedly.
단계 1: Begin by connecting your HOTAS (그리고, if applicable, your rudder pedals). For this setup, I’m assuming you’re using a Logitech/Saitek X52 with Logitech rudder pedals.
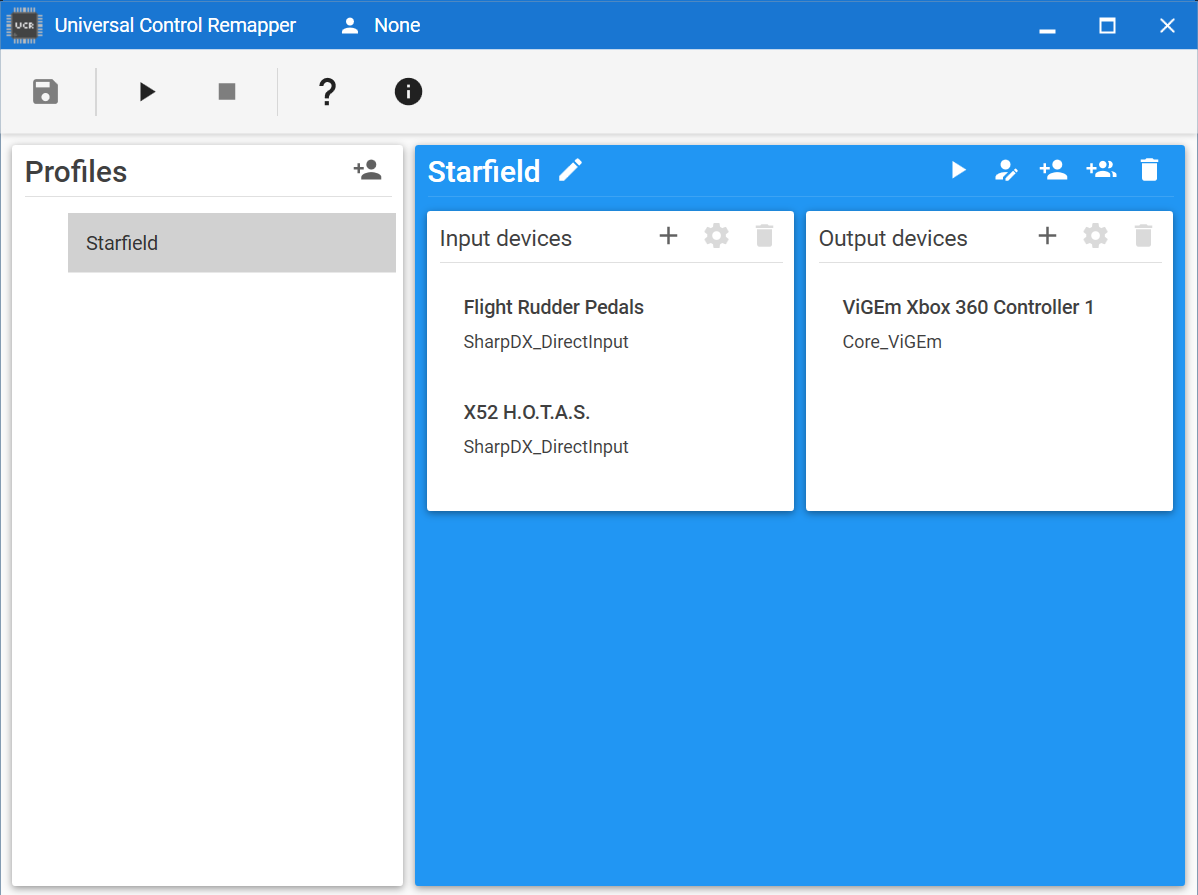
단계 2: 다음, initiate the creation of a Starfield profile. In this profile, designate your input devices as your HOTAS setup, and set the output devices to ViGEm Xbox 360 제어 장치 1 (Core_ViGEm). This configuration will ensure that your controls are properly mapped for a smooth gaming experience.
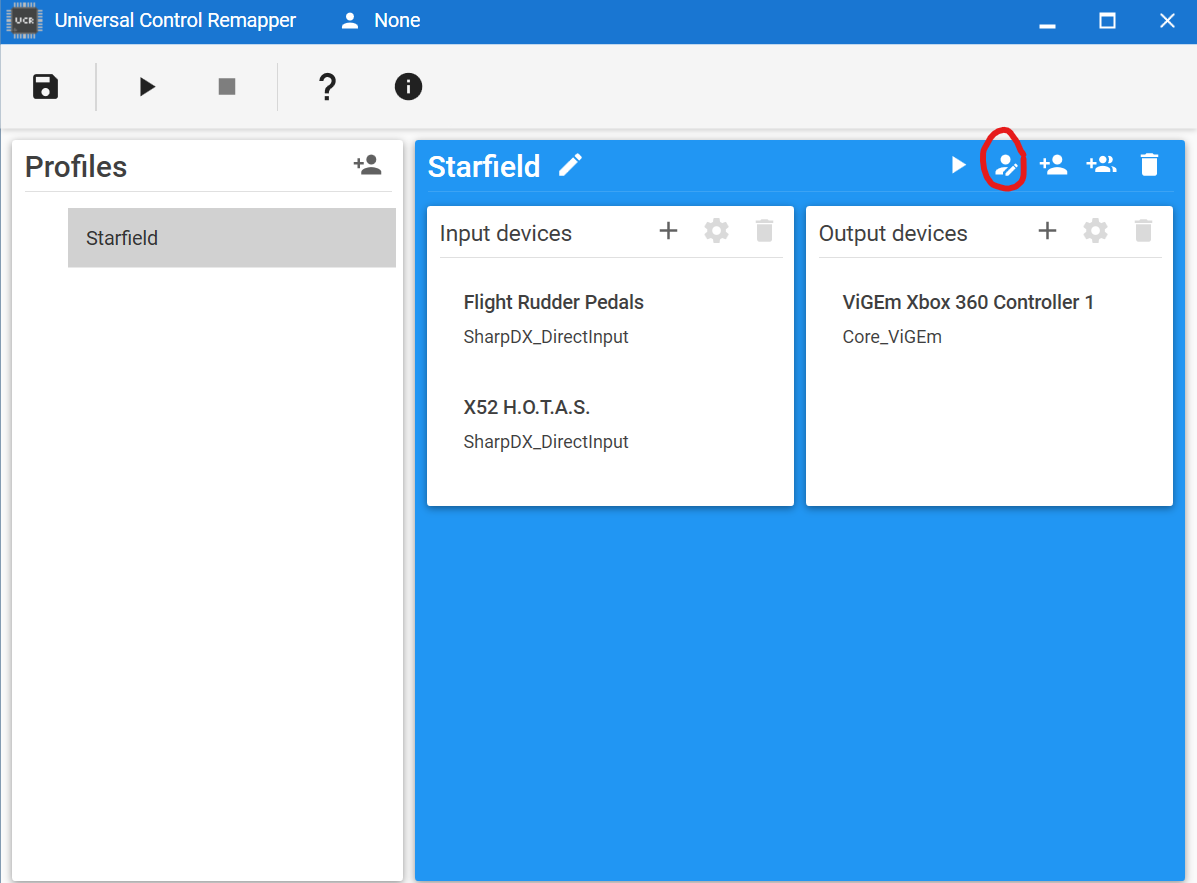
단계 3: Start the mapping of your HOTAS by clicking on the icon depicting a small figure holding an editing pencil. When you hover over this icon, it should display the label “edit profile.” This action will enable you to customize and fine-tune your control settings effectively.
단계 4: Upon clicking the icon as mentioned in the previous step, you’ll be directed to a dialog box. This box will present “플러그인” on the left side and a vacant space on the right. Instead of delving into an explanation of the various plugins, I’ll guide you through the process of mapping each control element individually. This method will ensure a more straightforward and comprehensible approach to configuring your controls.

단계 5: Begin Mapping HOTAS
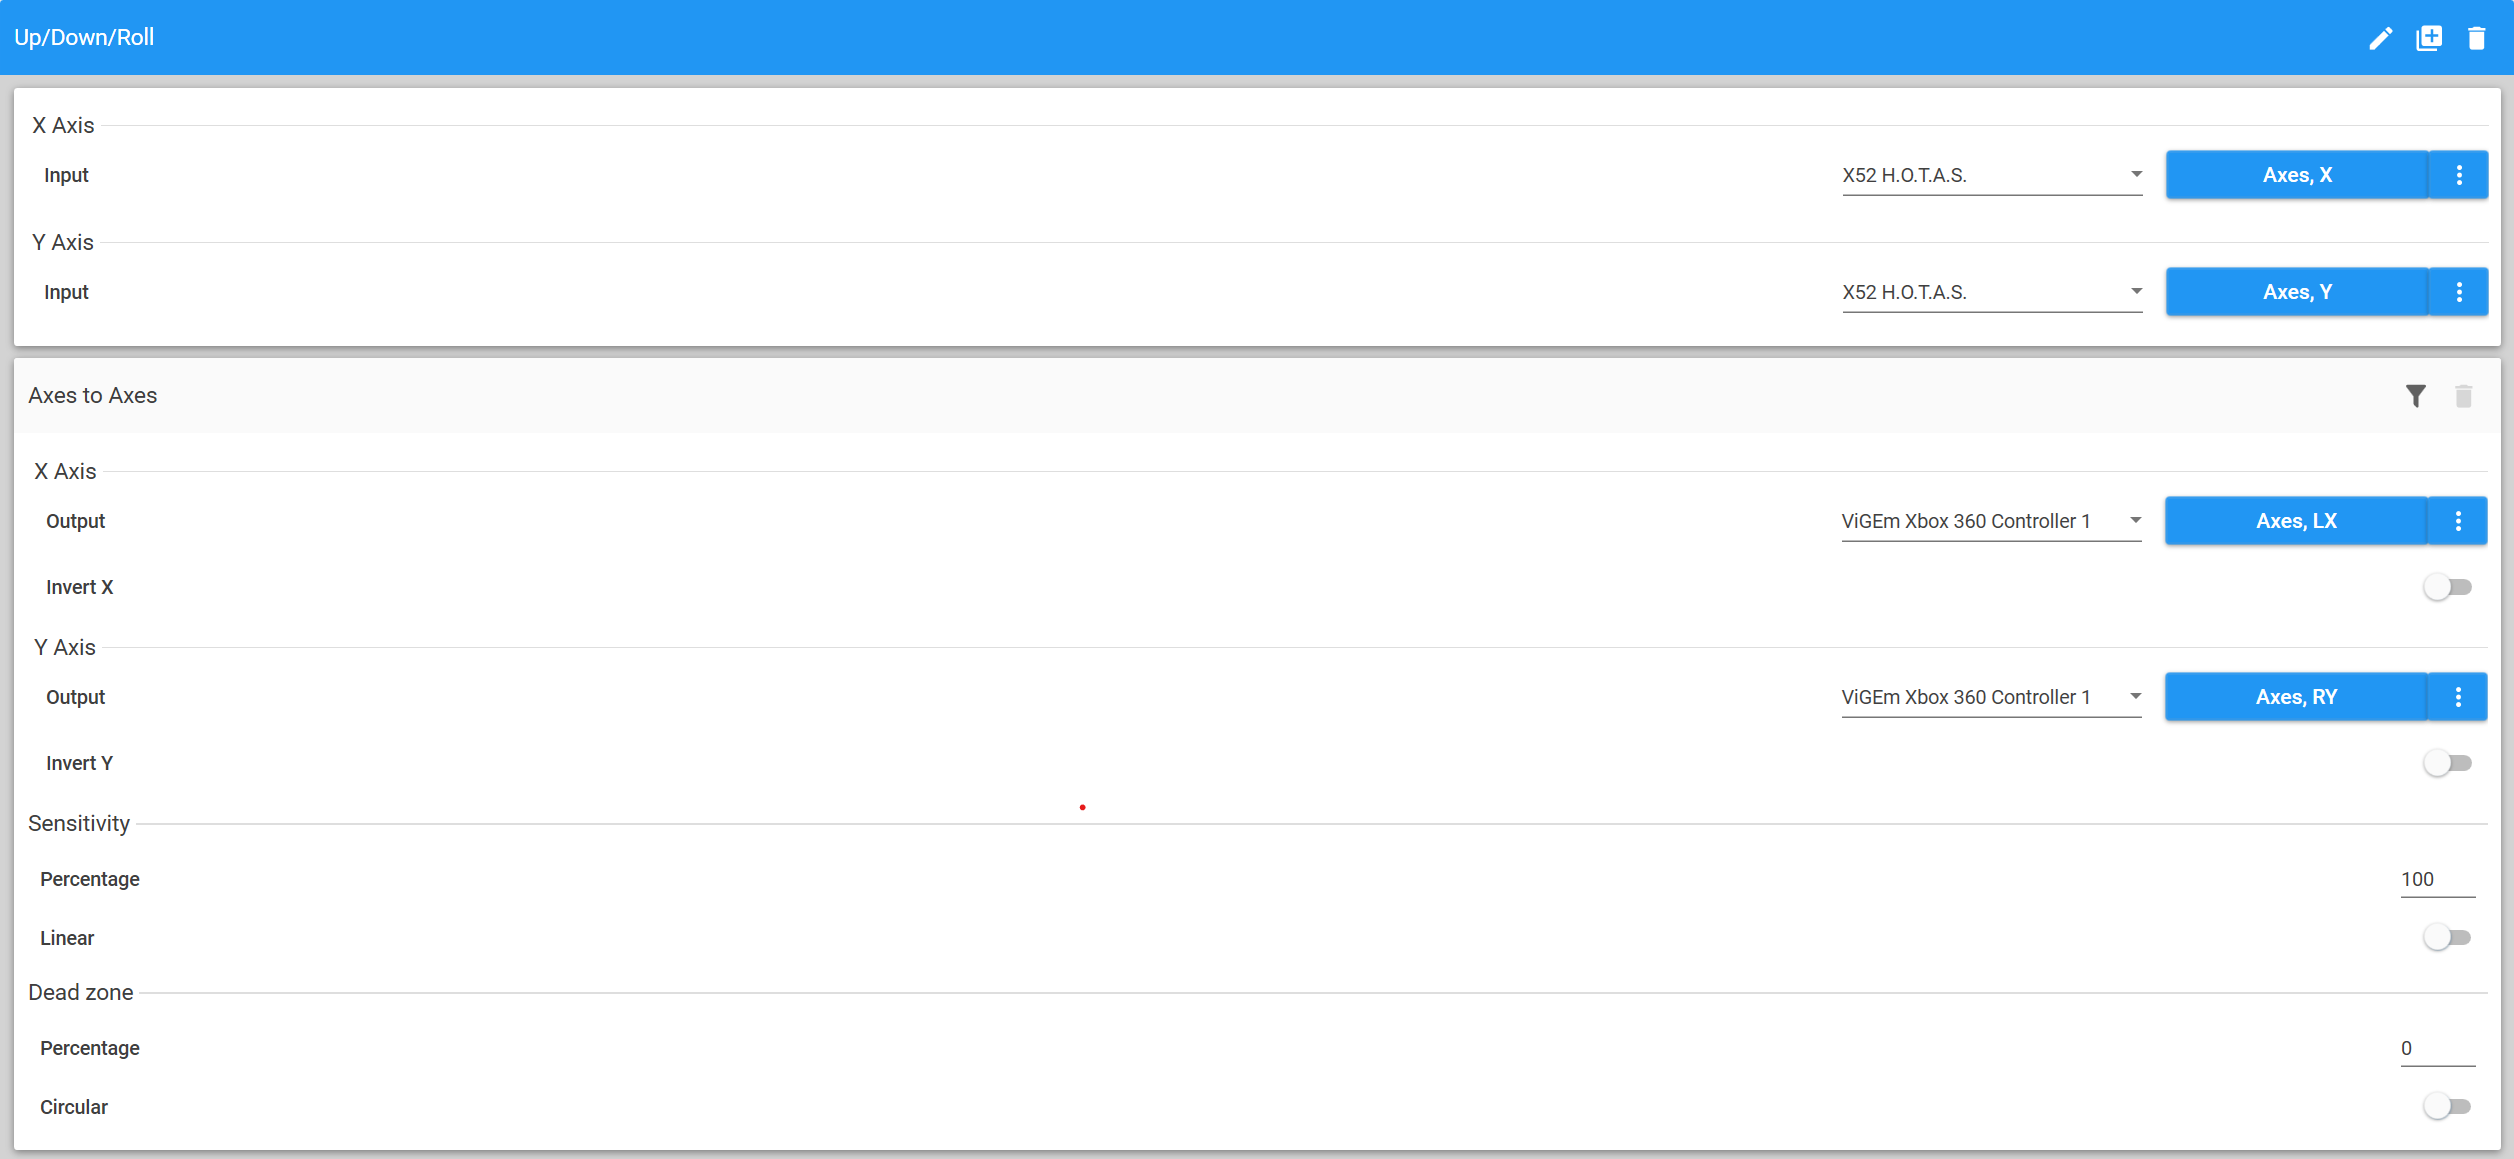
Flight controls (위로, 아래에, 연타):
To configure your joystick settings for Up/Down/Roll on the controller sticks, 다음 단계를 따르세요:
- In UCR (Universal Control Remapper), 으로 이동 “Axis” 부분.
- Click on the plus sign icon next to “Axes to Axes” (복수) within the plugins section.
- Adjust the settings to match the configuration shown in the screenshot below.
Flight controls (Yaw):
Please click the plus button next to “Axis to Axis” (singular) within the plugins section. Below are the settings for both pedals if you have them or for the Z-axis on your joystick:
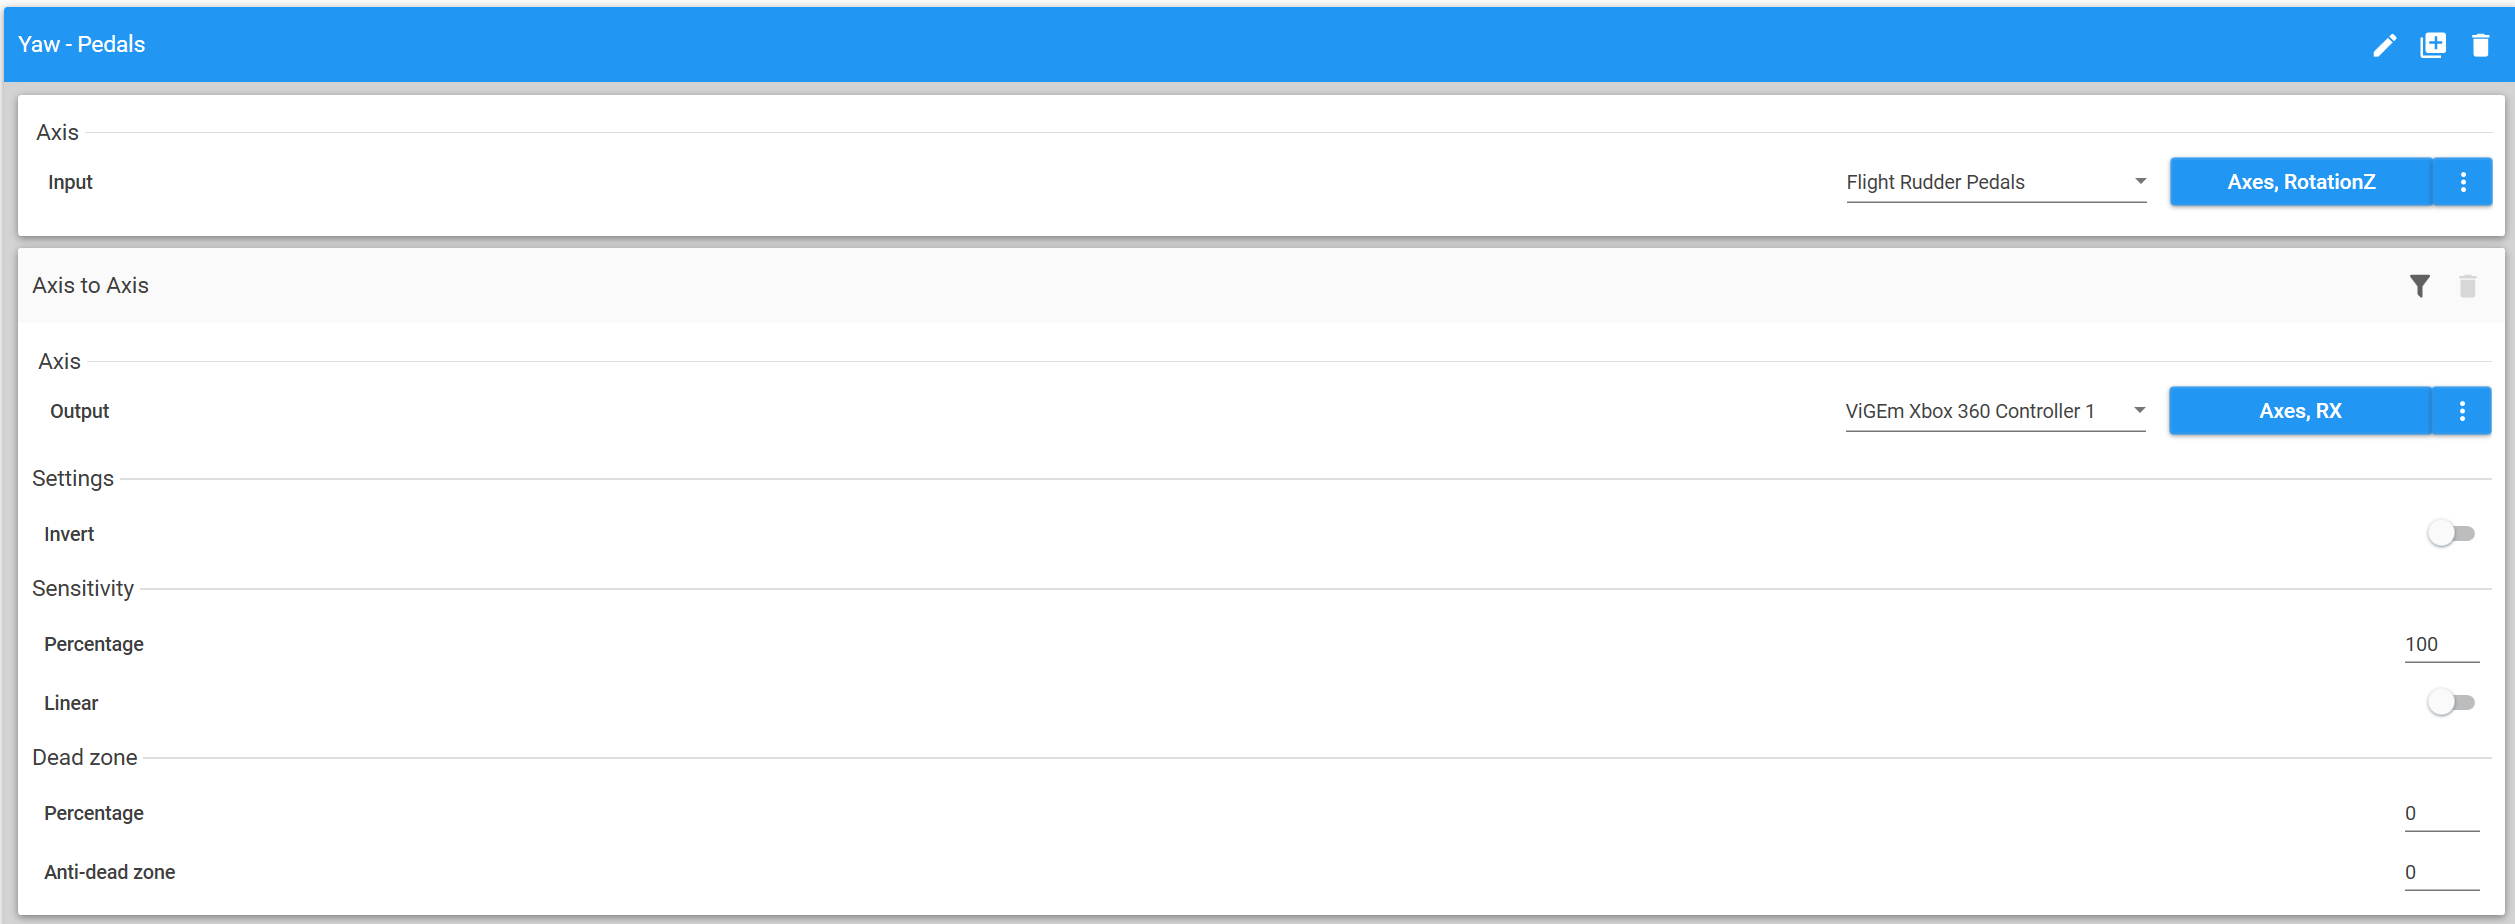
또는: 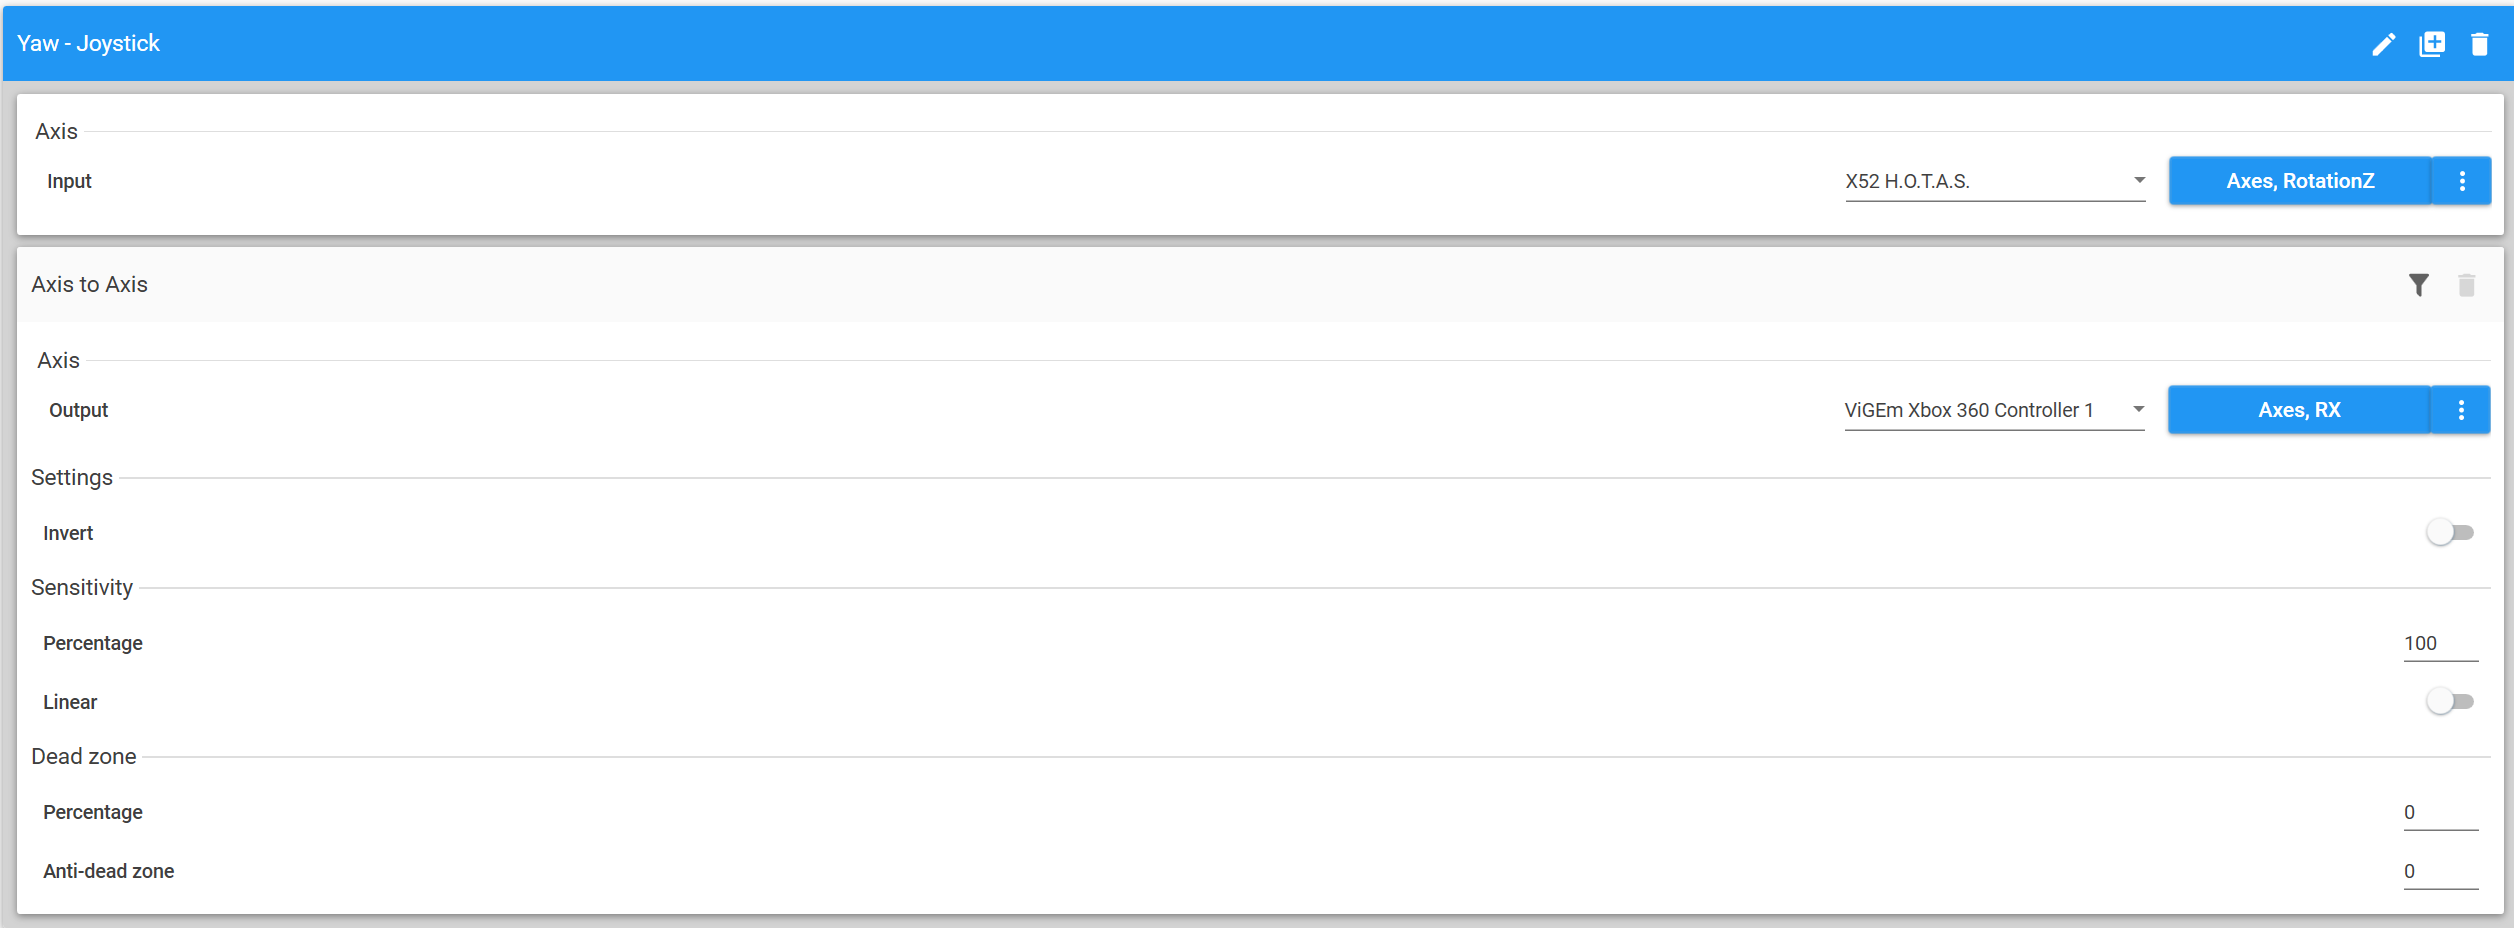
Acceleration/Deceleration controls:
Let’s proceed to configure the Thrust/Throttle Controller. Please click the plus button next to “Axis to Axis” (singular) within the plugins section. Refer to the settings below:

System Power controls:
These controls will be mapped to your POV hat on the joystick using the “button to button” 방법, allowing us to map it to the D-pad. Please refer to the bindings below:
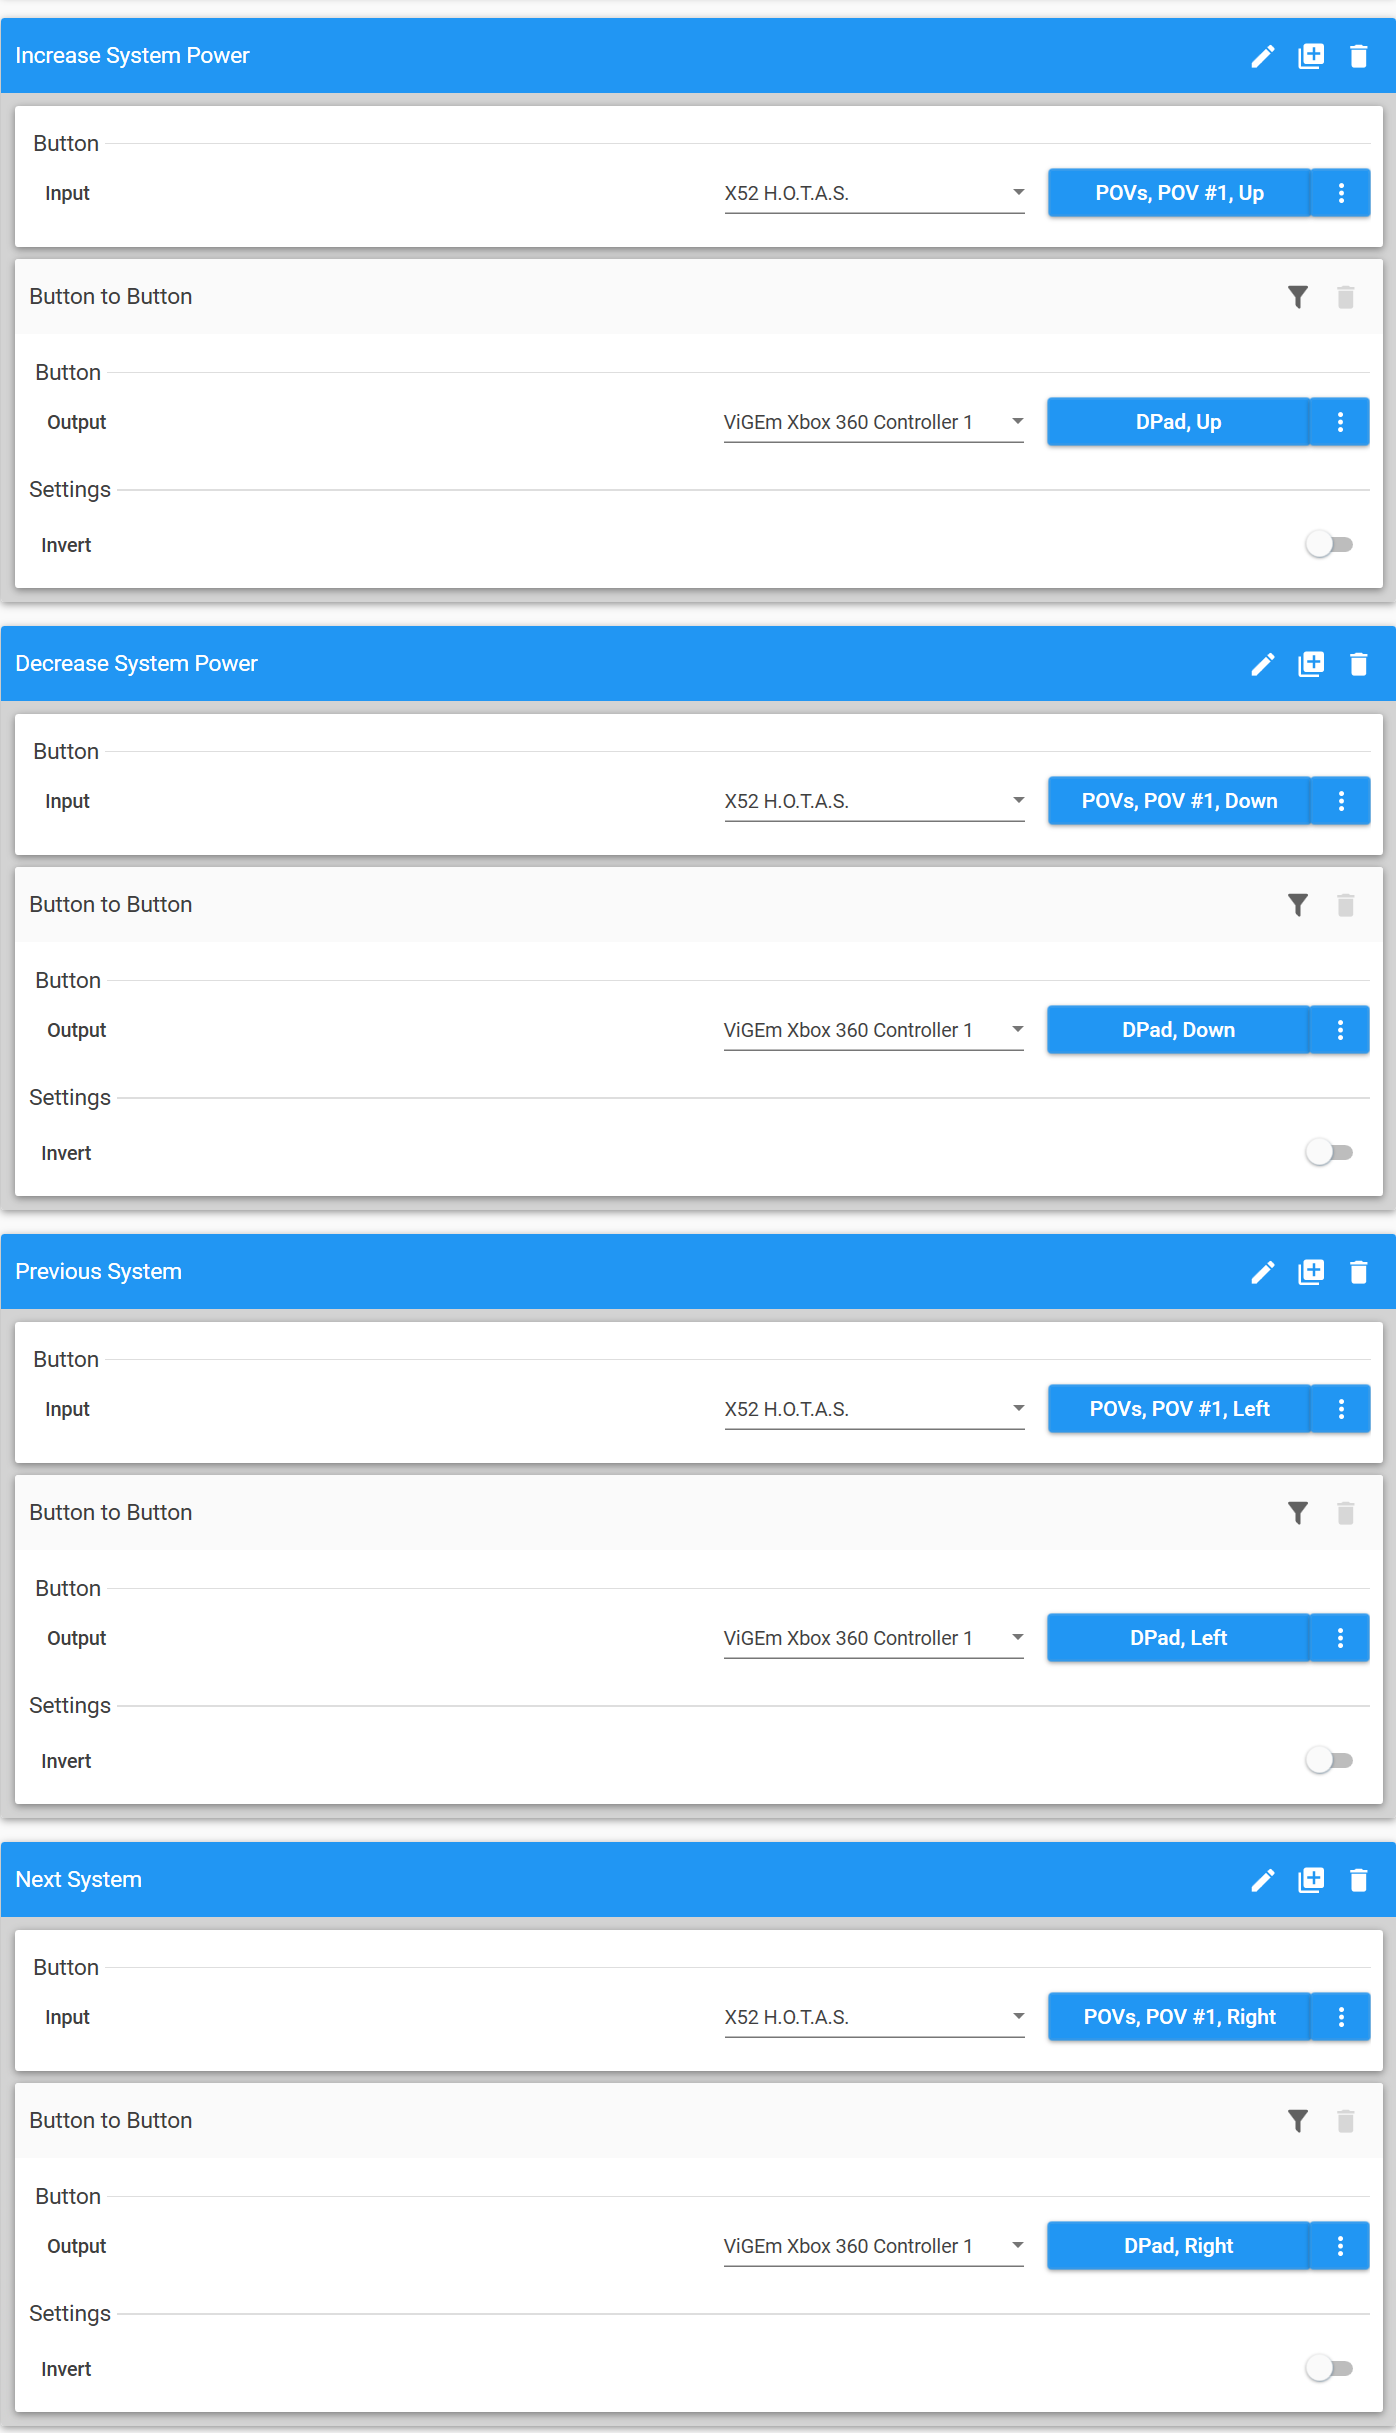
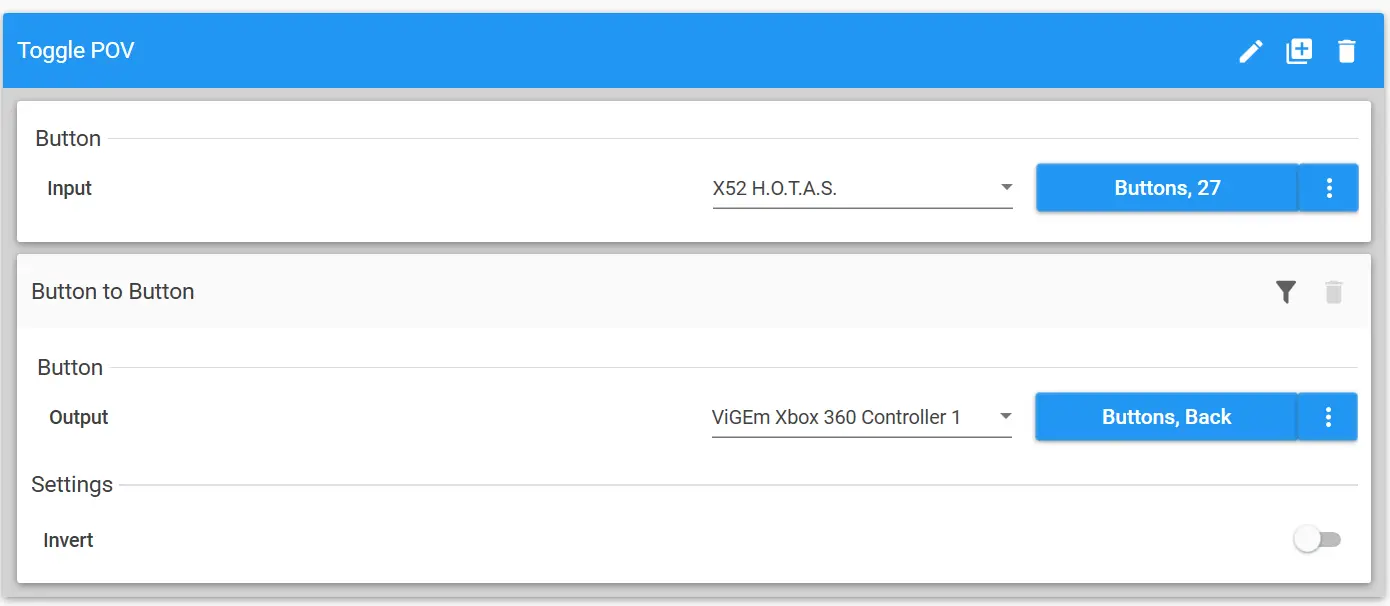
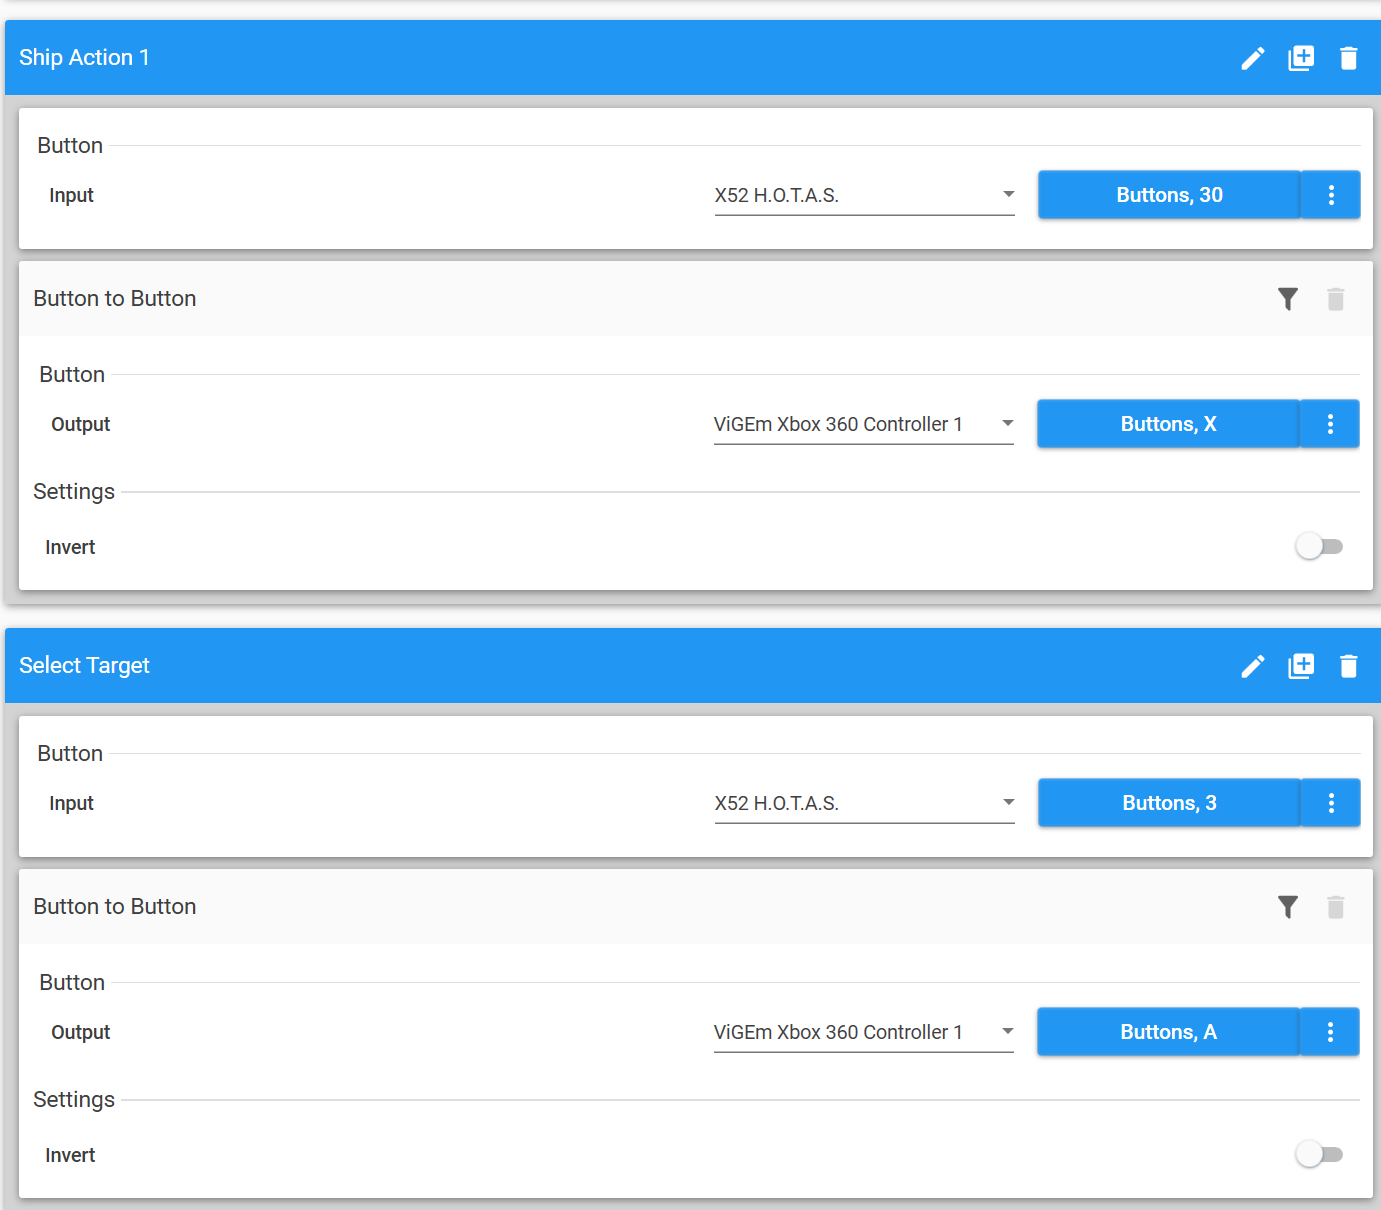
“Button to Button” 통제 수단:
Home stretch now, see settings below:
“방아쇠” axis controls (bugged):
These settings are provided with a disclaimer to use them at your own risk. 추가적으로, if you’re primarily a keyboard and mouse player, the cancel button and strafing might not be as essential for your gameplay, especially in comparison to games like Elite: Dangerous or Star Citizen, 내 생각에는.
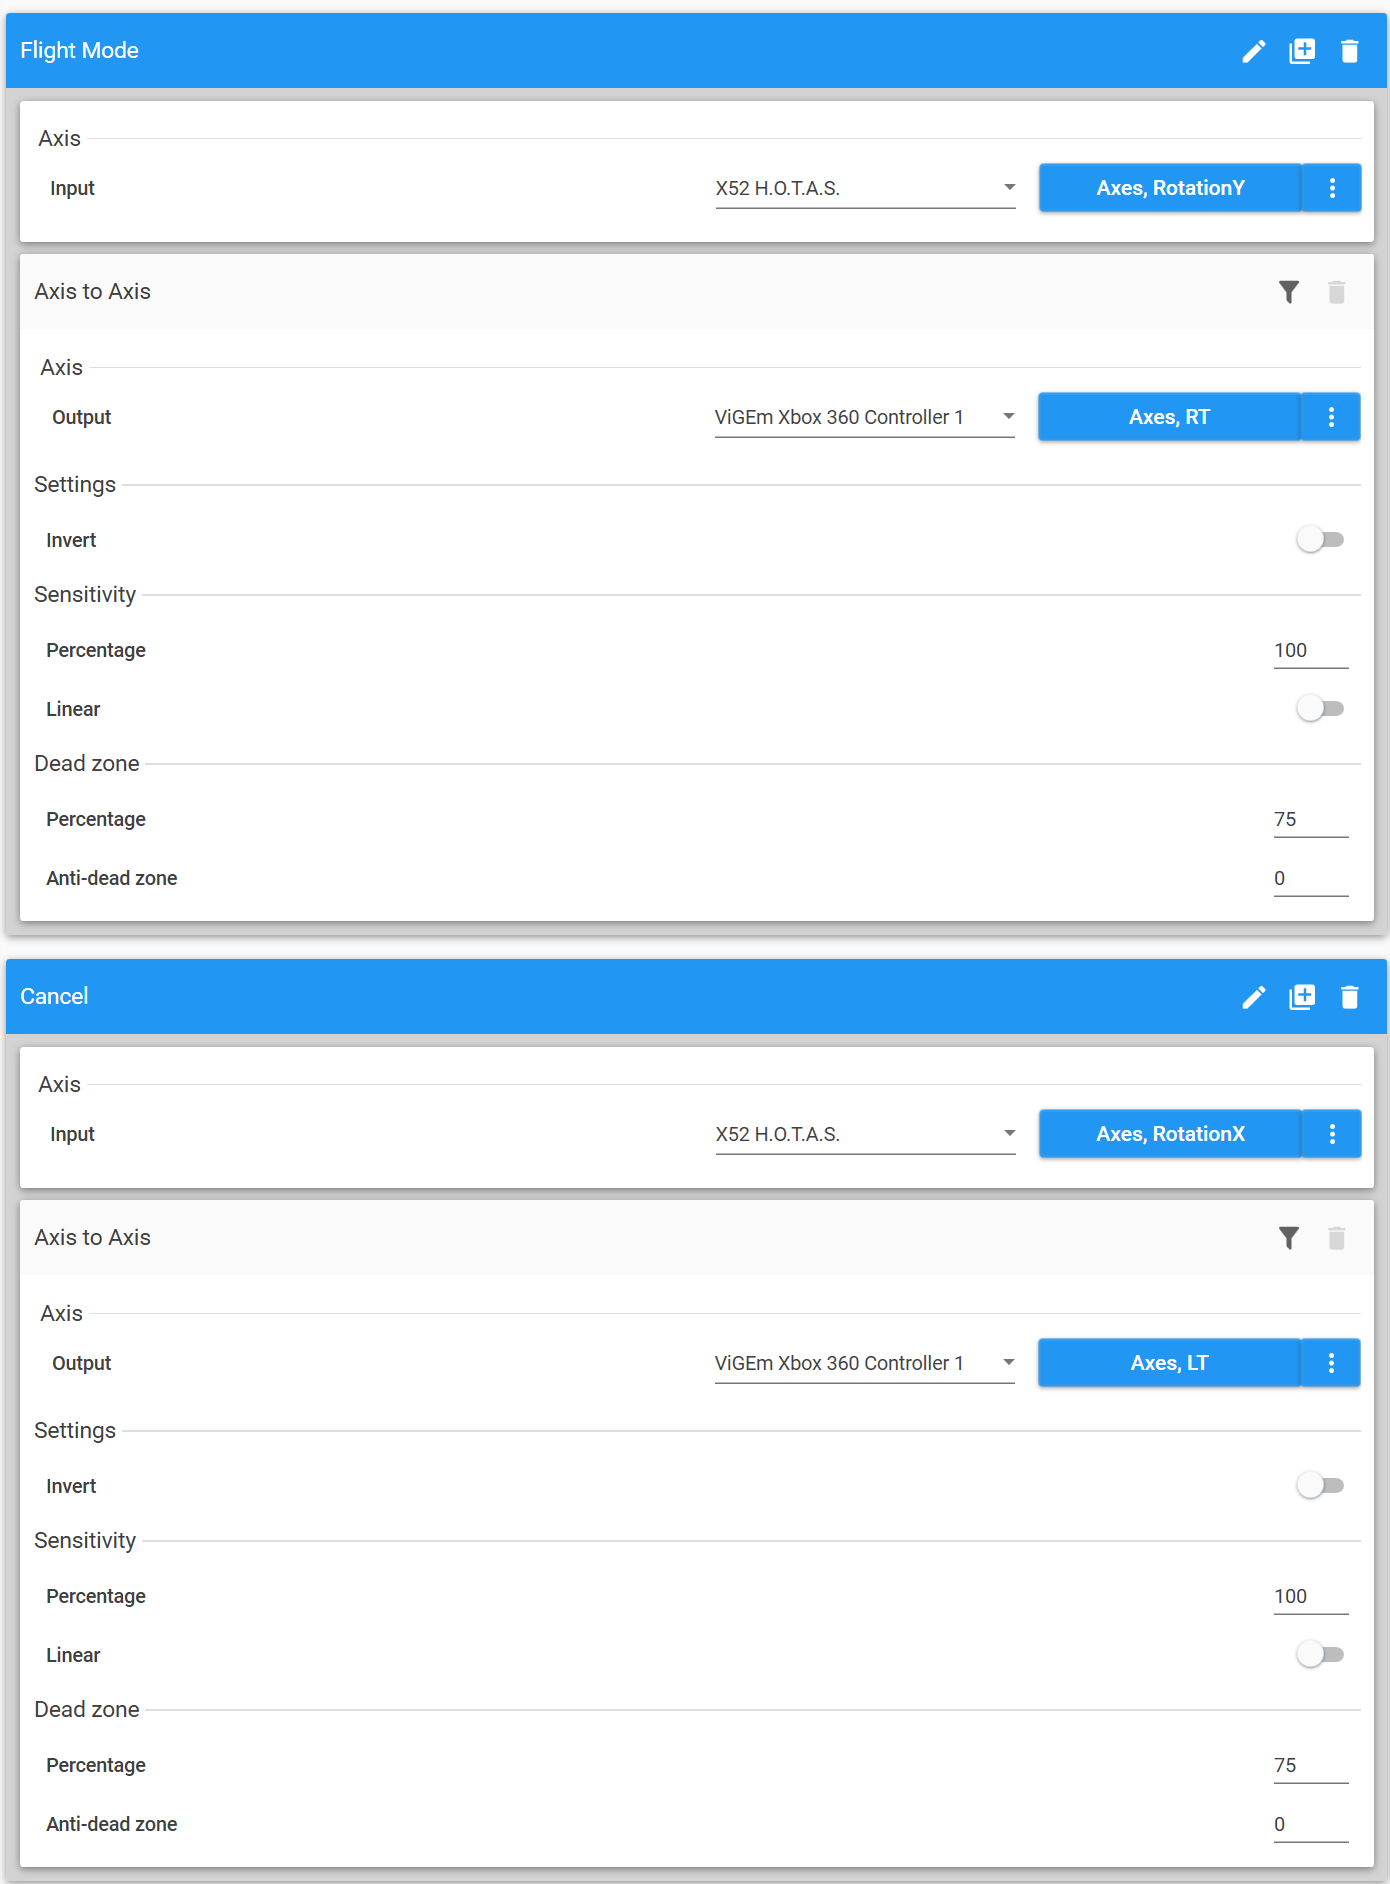
When combining all the settings, your HOTAS setup should resemble the configuration shown below:
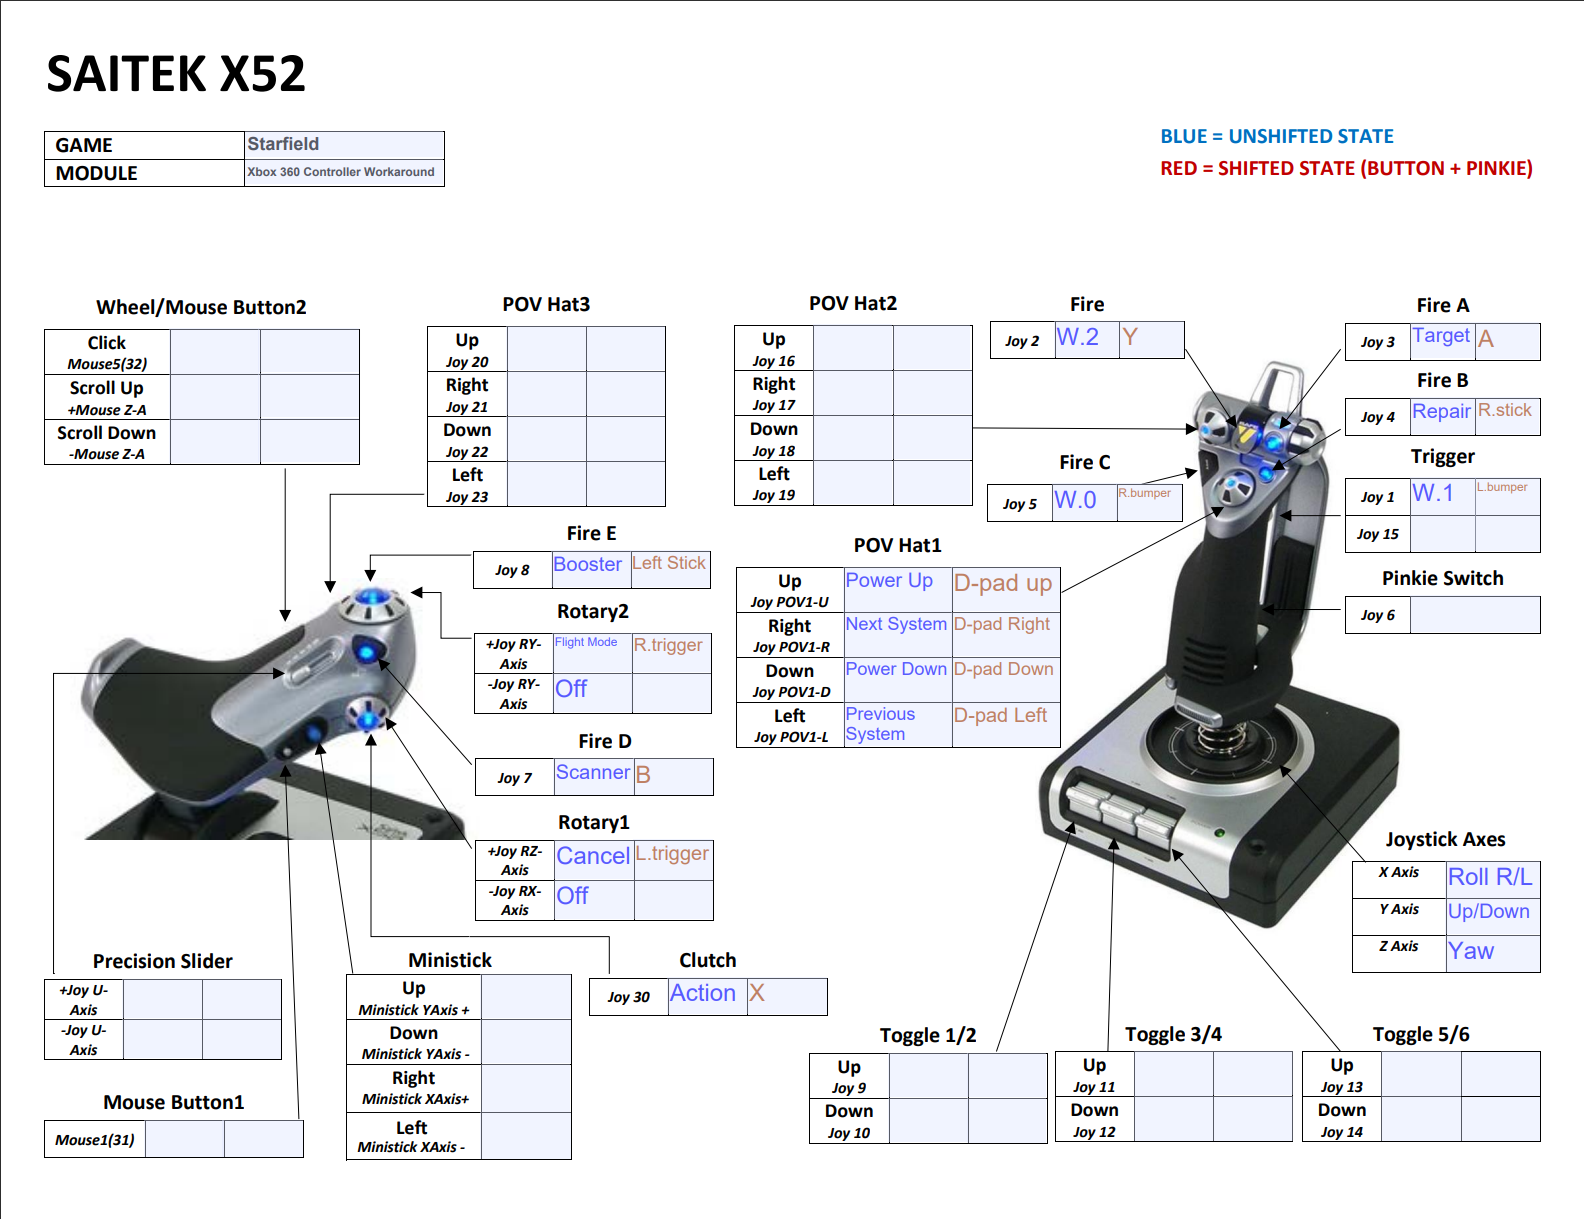
The listing does not include information about the throttle and button 27, 로도 알려져 있습니다. “기능” 단추, for the POV switch.
Link to Steam and Starfield
To enable compatibility with Starfield, 다음 단계를 따르세요:
- Click on the Steam logo located at the top left corner of the screen.
- 선택하다 “Settings.”
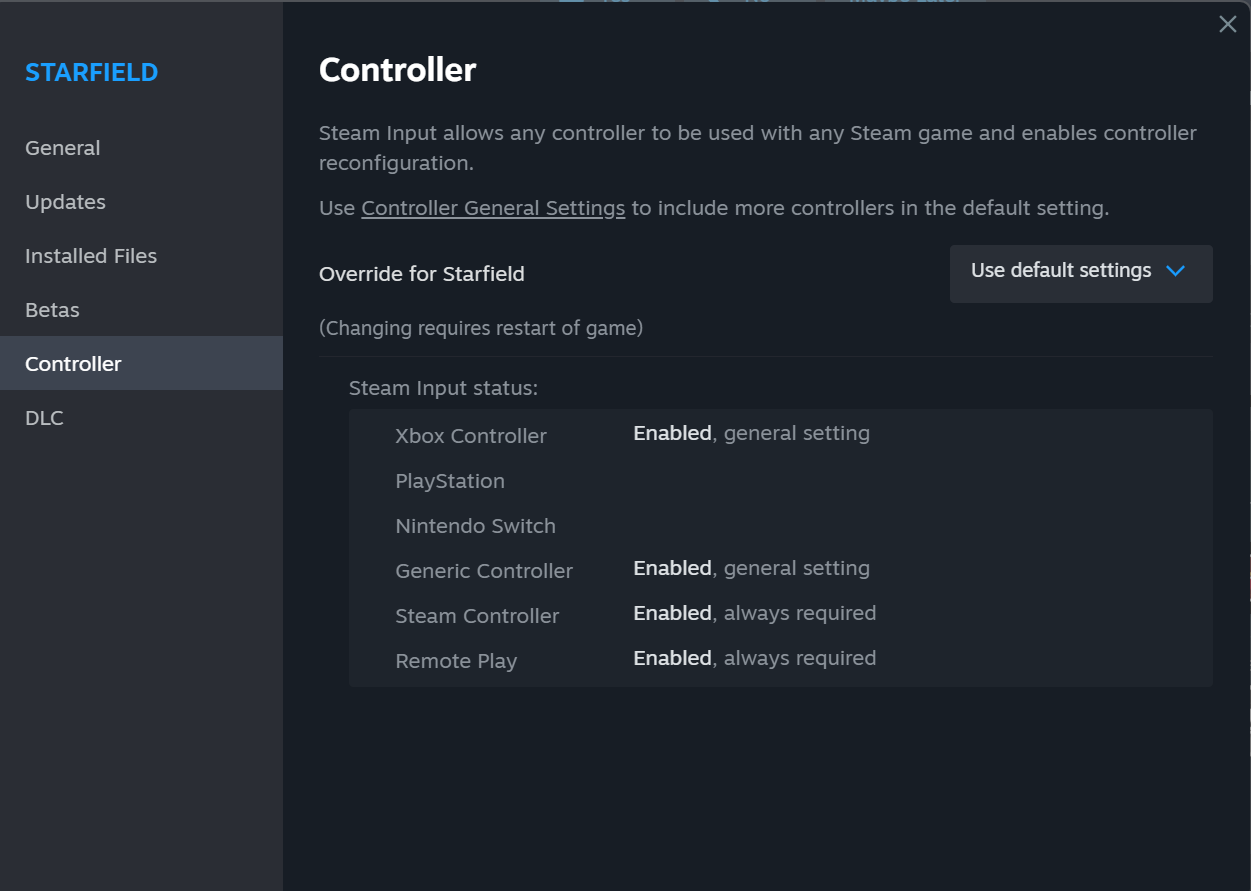
- 다음으로 이동하세요. “Controller Tab.”
- 다음을 확인하세요. “Steam Input for Xbox controllers” is selected.
- 또한, make sure to check the box labeled “Enable Steam Input for generic controllers.”

기후, make sure it is chosen in the Starfield properties as well. Using the properties menu when you right-click Starfield, go to the controller section, where you should see something like this:
그것으로, you’re ready to play with HOTAS support.
Leave UCR open and hit the play button:
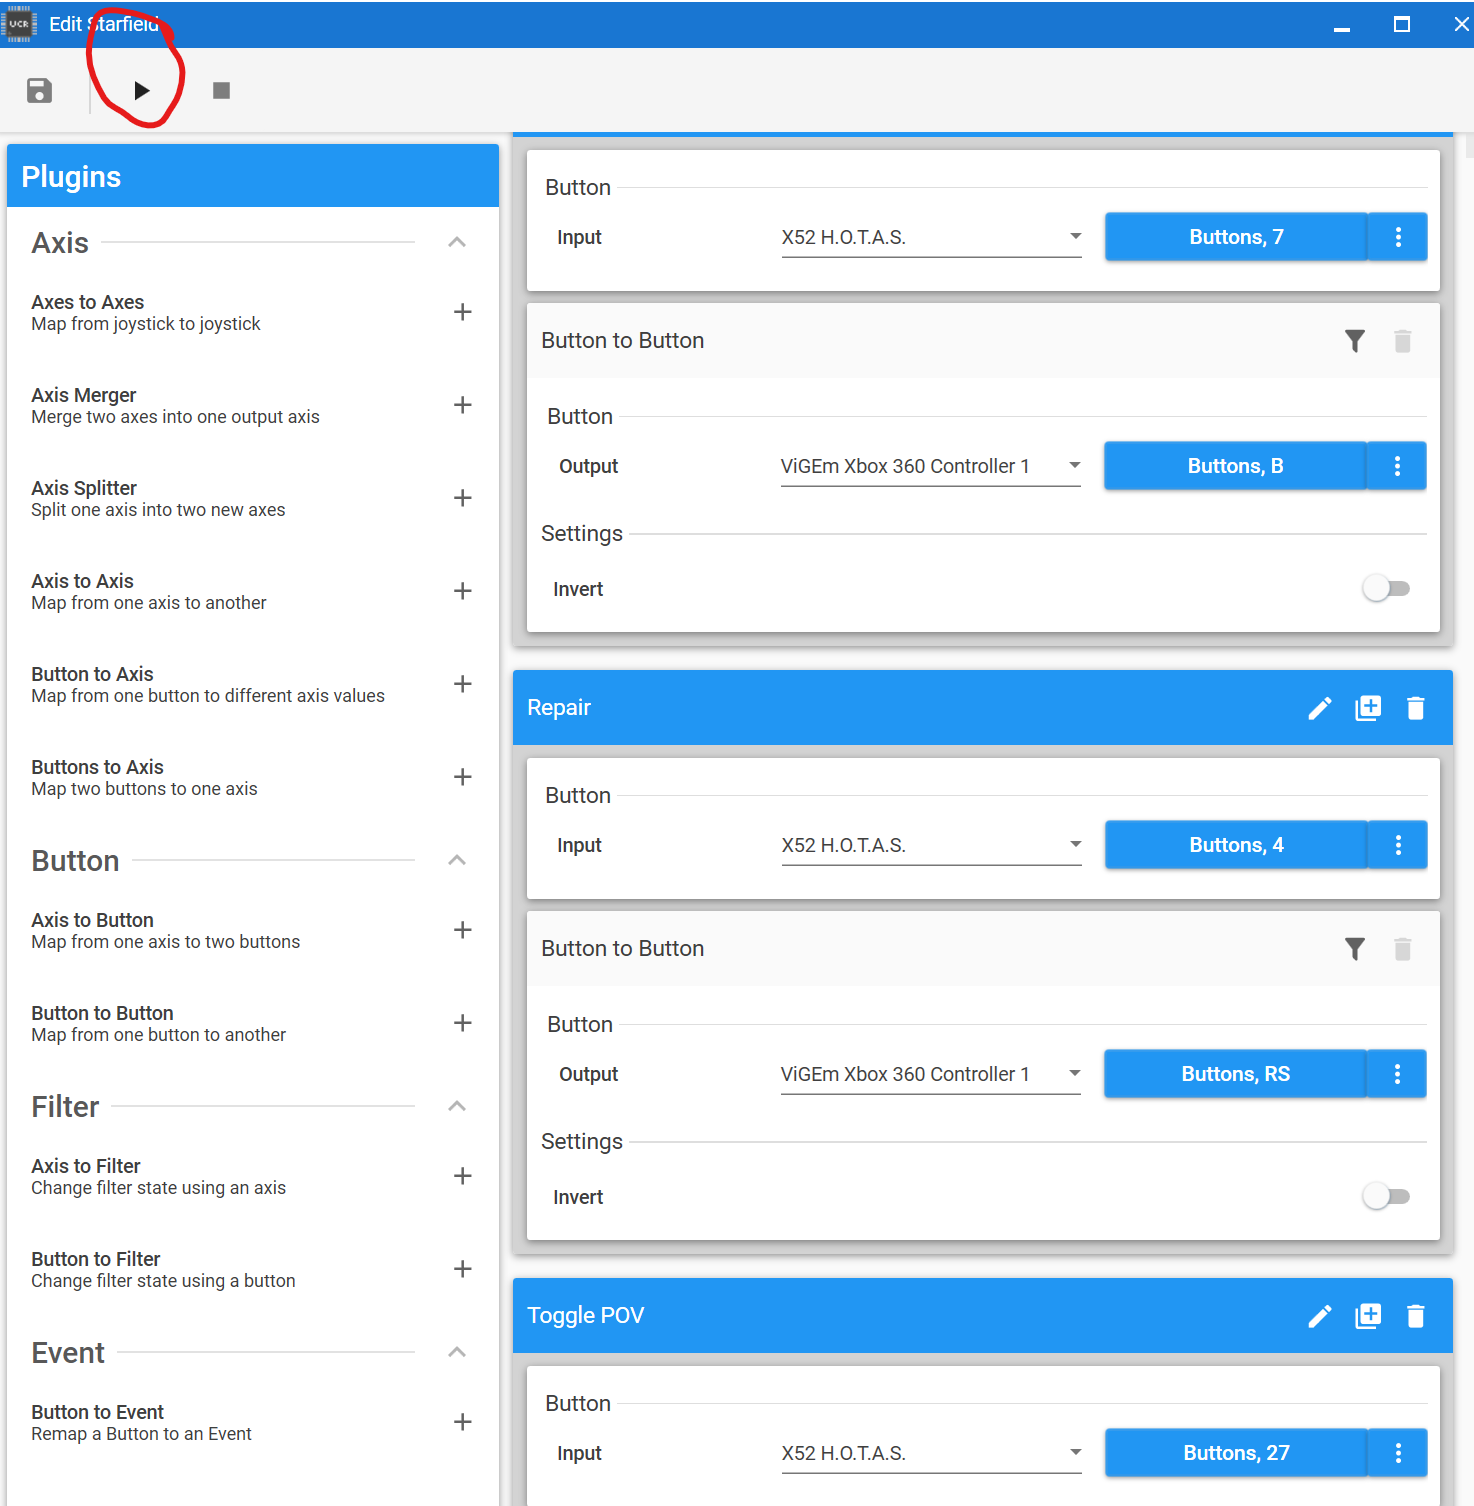
Load up Starfield and head into space to test out your controls.
버그
버그:
- I can’t seem to get the Z-axis on the joystick to work properly for some reason; I’m checking the sensitivity and dead zone settings in hopes of finding a solution soon.
- The triggers are obviously a temporary solution while I find out how to make them function.