- 제목: Revita
- 출시일:
- 개발자:
- 발행자:
Information about Revita is still incomplete. 이것을 사용하여 게임의 세부 정보를 입력할 수 있도록 도와주세요. 문의 양식.
Quickest way to farm a Red Mimic. 경고를 받다, it’s gonna be a bit of a slog.
소개
There’s no easy way to do this. It’s gonna be a grind, and you’re gonna have to get lucky, and it’s gonna be a slog. But after attempting many things with tons of dedication for WEEKS, I truly think this is the fastest way to encounter a Red Mimic.
This guide is for people who’ve almost 100%’d all other achievements and yet the single Red Mimic you need to finish The Librarian’s Journal for the “학생” 그리고 “Old and Wise” achievements still eludes them.
설정
1. Use Custom Shards to play on Shard 25. The reason for this is to get the +3 Relic Rarity boon which increased Red Chest odds. You can easily make a Custom Shard setup that does not impact your gameplay as you will never be reaching a boss or collecting any relics, so things you might typically avoid such as Brutal Bosses +4 or Relic-Lock are fine takes. Just as an example, this is more or less what mine looked like with Miniature being the only thing you may or may not want depending on preference of play (I like it cause it makes rooms go by faster, imo) 그만큼 Bolded ones are mandatory:
Cheap Bosses (2) Miniature (3) Secluded Statues (2) Strained Security (3) Expensive Shops (1) Expensive Repairs (1) Sold Out (3) No Repairs (3) Cursed Start (3) Local Customs (3) Abandoned Artifacts (2) 부착 (1) Enraged (1)
2. Make sure you have the following Custom Shards:
- Secluded Statues (2)
- Cursed Start (3)
- Local Customs (3)
We don’t want statues to exist so the loot pool has ZERO opportunities besides the Chests themselves to decide if a legendary will exist. This also means you should not talk to the Huntsman about fighting the miniboss for their relic or enter ANY rooms that could have a relic. No shops, no Keydiot, no Challenge rooms, the goal is to get to Chest Room(에스) as fast as possible then reset when it’s not a Red Mimic.
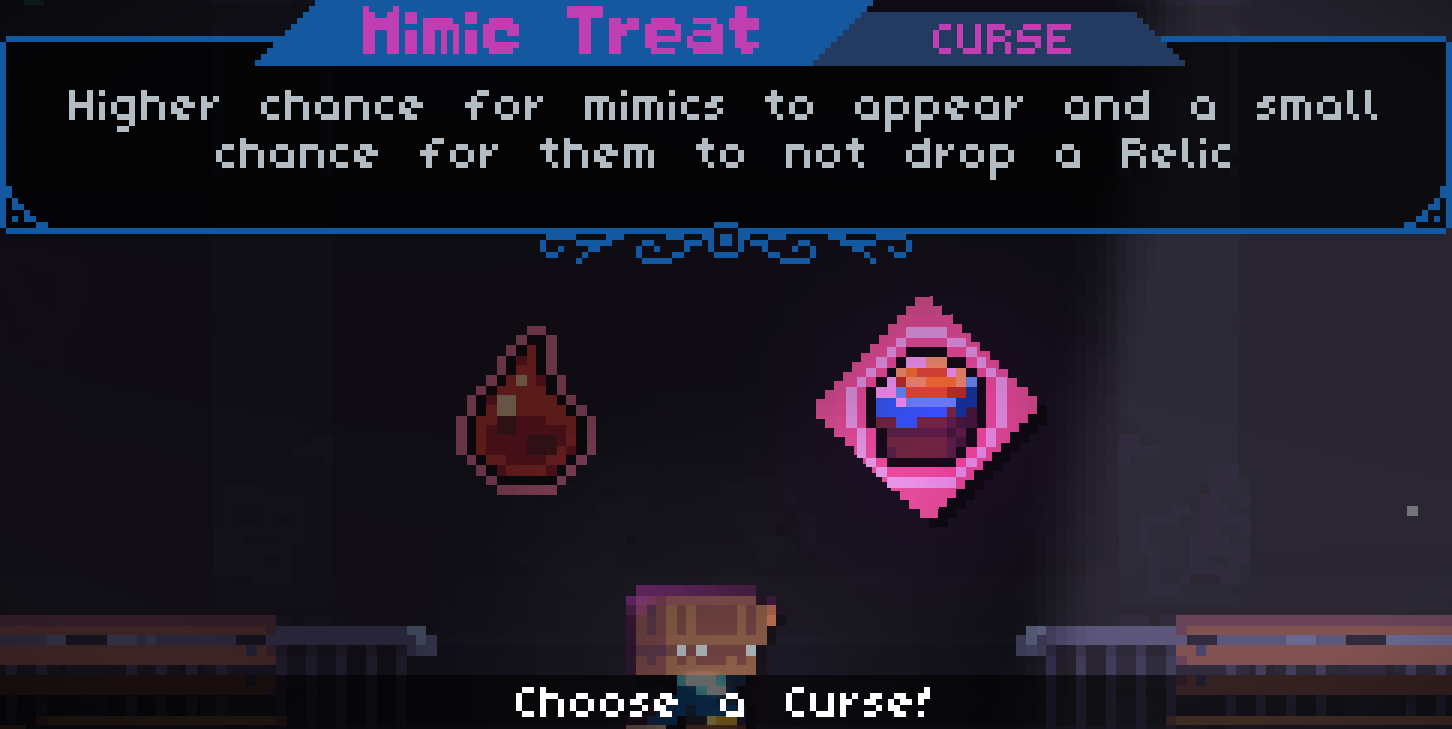
3. Start a run and reset until you get Mimic Treat. The Cursed Start and Local Customs are the most important part here, and the most tedious. You want to pick up a Mimic Treat curse either from the Cursed Start or the Local Custom. If you don’t get it, Pause and Restart the run. This can take a while. Usually I’d get a Mimic Treat after about 10 시도, but it could go on longer if RNG ain’t liking you.
To make this go by faster and avoid accidentally missing as many Mimic Treats as possible, I started always taking the left curse no matter what it was, not even looking at it, and keeping my eye on the right curse only to see if it was a Mimic Treat and selecting that before I mash past it like a (열쇠)diot.
The Grind
4. Once you have at least one instance of Mimic Treat, you’re off to the short-lived races! Now you have a choice. Do Gazing Grove or teleport to Hollow Hives. Hives will be slightly trickier as enemies will have more HP, but Hives has two Chest Rooms instead of the single chest room in Gazing Grove. You’ll need to get a bit lucky and nab a key to open the 2nd Chest Room, but it happens most of the time in my experience. If you got a Mimic Treat as your Local Custom, just do Gazing Grove since the Local Custom won’t carry over to Hollow Hives.
Choose a gun that you feel you can clear out rooms quickly and reliably. Blast Guns are strong picks for their piercing qualities, Rockets are good for their high damage and splash damage potential but they’re riskier. I started with Freeze Blast Gun and ultimately switched to Twin Missile Rocket Launcher but I’d only suggest that weapon if you’re comfortable with it. 결국, the end goal here is fighting a potentially CURSED Red Mimic, which is no joke.
5. It’s now a simple matter of avoiding everything on a floor and getting to the Chest Room, entering it, seeing if it’s Red and shooting it and resetting if it’s not. It is VERY important to avoid ALL other room types that could even possibly have a relic inside them. Cause what we’re doing here is abusing the game’s “Pity Legendary” mechanic to bump up the odds of the chest being Red.
I don’t know the inner workings of the Pity Legendary mechanic, but using this strategy you should expect to see a Red Chest about 3-5% 시간의, which is way higher than seeing one normally or even with High Relic Rarity.
Mimic Treat odds of turning a chest into a mimic seem to be about 20% from my own small sample size of data. So you’re really looking at a 1% 가능성, maybe less, per Chest Room to nab the Red Mimic, and it’ll likely take 5 minutes or more between times you see it between physically getting there and also resetting until you get a Mimic Treat. Like I said, it’s going to be a long slog, but it is legitimately still the most efficient way of doing this by FAR if you’re not willing to get “lucky” in the field.
Final Notes
- Resetting constantly activates a strange glitch where most of the game’s audio won’t work anymore unless you pause and un-pause. I just learned to deal with it, but it’s weird.
- If you choose to do Hives for the two chests, remember you can break the first chest for an extra chance at a key drop. Also the small chest that replaces the Mother Statues from the Secluded Statues shard can also drop loot such as keys.
- Hives IS more challenging! The Red Mimic you fight there may have a lot more health than expected, ESPECIALLY if it’s Cursed. The Red Mimic I got WAS a Cursed Hives one and it really could’ve killed me if I played any worse than I did. I didn’t get lucky in the fight, but it was not a freebie fight.
- Do NOT enter secret rooms either. Secret rooms can also have relics in them. And it just slows things down for the most part.
- I skipped ALL pickups that weren’t keys unless they were right next to me. Unless you feel you need them, it just slows down the whole process.
This guide was written on Patch 1.0.3e. If any significant changes are made to how Legendaries are obtained or how to manipulate Red Chest appearances, I will try to update this guide.
이것이 오늘 우리가 공유하는 모든 것입니다. Revita 가이드. 이 가이드는 원래 작성자가 작성하고 작성했습니다. OnniHopeDream. 이 가이드를 업데이트하지 못한 경우, 다음을 수행하여 최신 업데이트를 찾을 수 있습니다. 링크.