- 제목: Rail Route
- 출시일:
- 개발자:
- 발행자:
Information about Rail Route is still incomplete. 이것을 사용하여 게임의 세부 정보를 입력할 수 있도록 도와주세요. 문의 양식.
Guide to the Cantwell Belt Railway map on the Steam Workshop
소개

Big cities come with big challenges, one of which is moving freight. This morning you’re on duty as the Cantwell Belt Railway dispatcher! The map may look a bit complicated, so let’s take a tour quick before you jump on in.
The Cantwell Belt Railway serves as a connection to many major railroads in and out of Cantwell. Almost all freight trains use the CBRY to traverse the city. The line runs North-South, the northern most point being Bargersville, Bargen Park, and Tower B12 in the top left of the map. 그 동안에, the southern terminus of the line is Cantwell Yard and the Felton Branch, both of which are on the lowest row of the map.
관심 장소 (1/2)
Our tour starts at Bargen Park, a large intermodal yard. Trains to and from the North terminate here and generally transfer cars onto trains bound for other destinations along the CBRY. There is also some run-through traffic such as grain and oil unit trains. Some manifest trains also stop here, but the majority of trains are intermodal containers or stack trains. Bargen Park sees some commuter traffic, all of which goes to or comes from Tower B12.

Just below Bargen Park is Bargersville. While Bargen Park sees a majority intermodal trains, Bargersville is mostly merchandise trains, or manifests. These are general freight ranging from chemicals to lumber and anything else in-between. There is a small intermodal ramp here, so a few intermodal trains will originate and terminate here. There is also a considerable amount of unit grain and oil trains. 그 말은, most of the traffic is manifest trains and transfer runs to other yards and railroads along the CBRY. Bargersville sees a few more commuter trains than Bargen Park, again all of them going Tower B12.
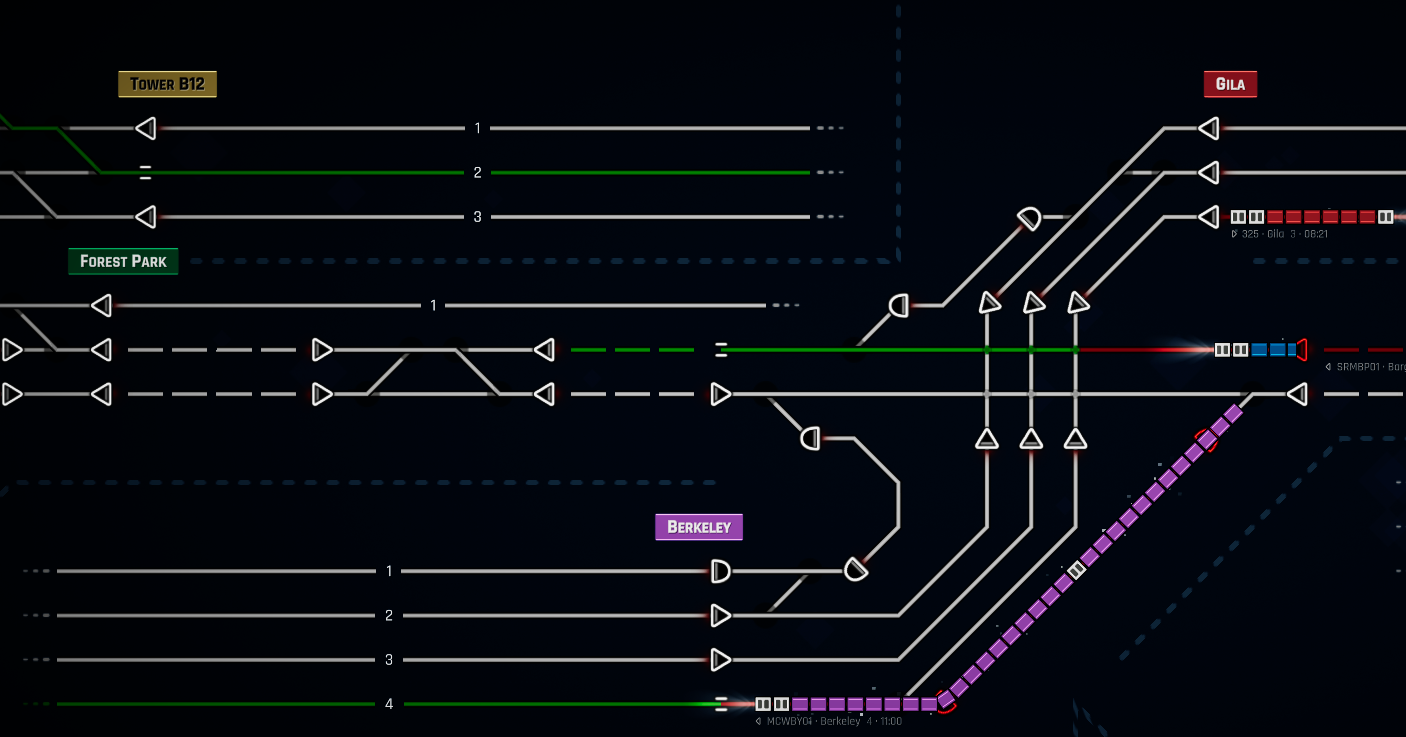
Tower B12 sits just across from Bargersville and Bargen Park. For the most part, Tower B12 is passenger train heavy. A flow of commuter trains are always making their way downtown or making trips back out to the suburbs. Don’t be deceived however, as there are a small number of freight trains that will go to or come from Tower B12. Some will simply terminate at Bargersville or Bargen Park, however a few trains will be going all the way to Cantwell Yard. This requires them to back up from Tower B12 so they can run engines first down the CBRY. These trains are still fairly long and take a long time to clear the junction, 그러니까 조심해. 당신은 경고를 받았습니다.
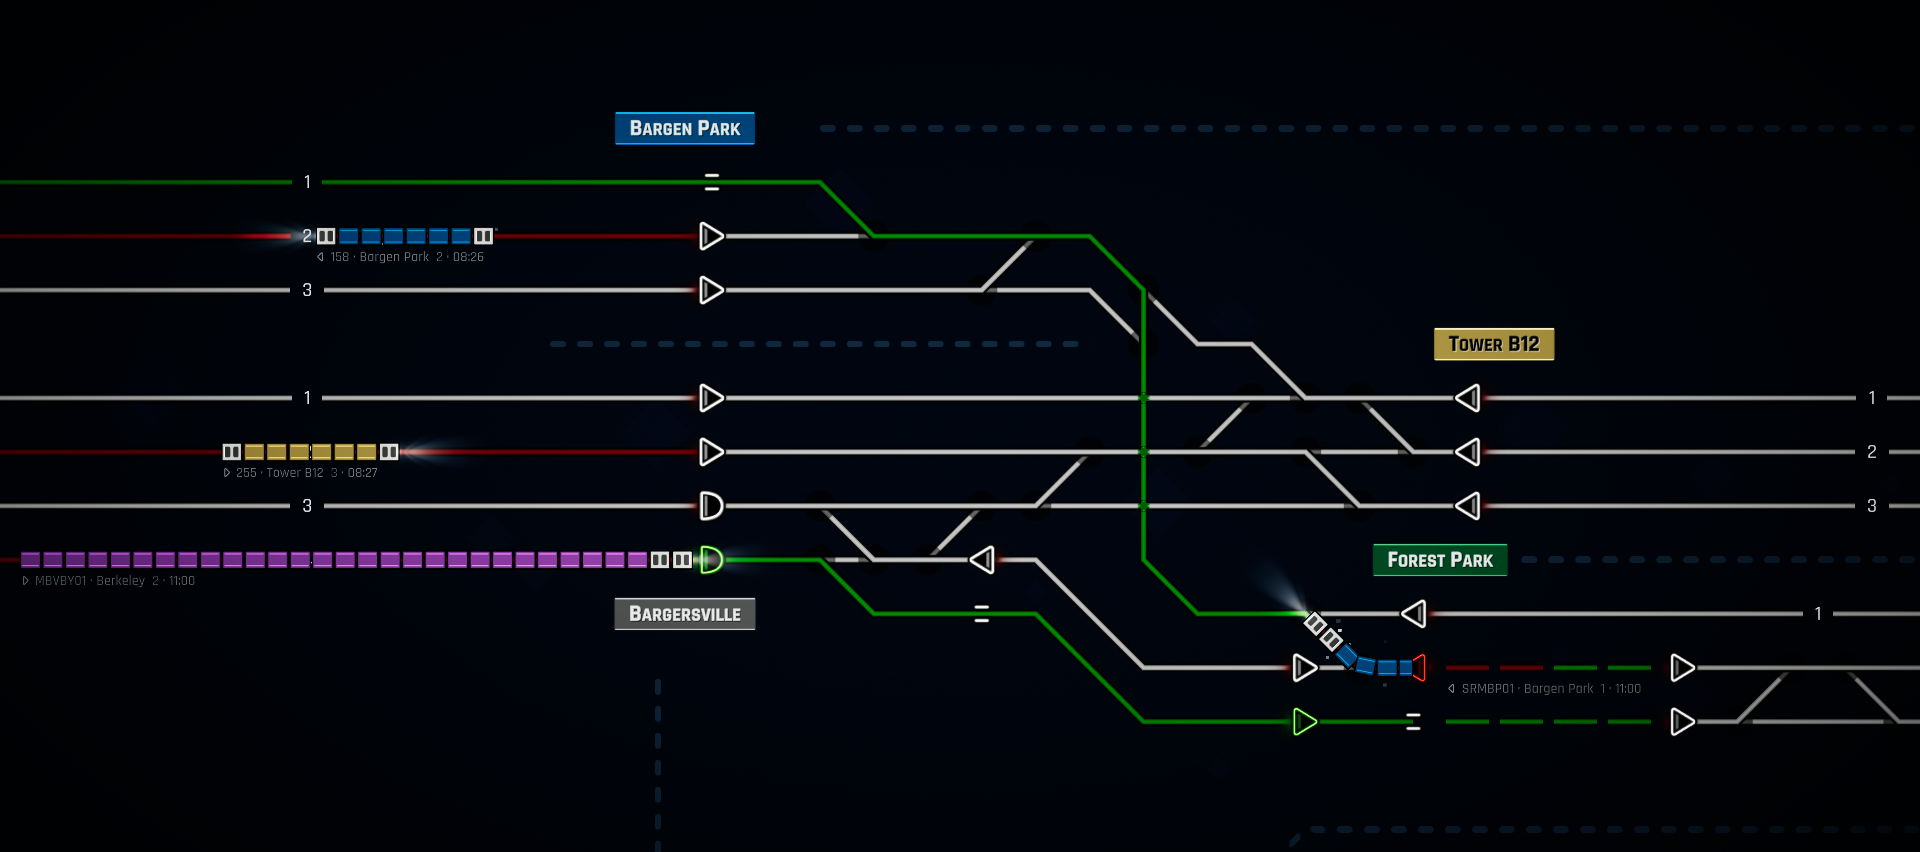
Forest Park lies just under Tower B12 and sees very minimal amounts of traffic. Some trains go to and from Bargen Park, mostly stack trains, and a local runs down the line to serve industries.
Now we have entered onto the mainline of the Cantwell Belt Railway. The first railroad that we cross is a busy triple-tracked commuter line that always seems to be busy. A majority of traffic here is commuter trains, but occasionally a freight train will pop by. Sometimes these freight trains will be going straight across the diamonds, and sometimes they will be headed onto the CBRY. On the eastern side, there’s Gila, a station for commuter trains. On the western side is Berkeley, which happens to also be a station. Berkeley is right at the edge of a yard, but since the line is owned by another railroad, all you control are the trains crossing the CBRY.
The Gila-Berkeley line is busy, but it’s only the second busiest line to cross the CBRY. That title goes to this next crossing. Another triple tracked line, once again filled to the brim with commuter trains. Finding an opening to slide CBRY trains through is going to be tough, but I know you’re up to the task. This line hosts a few more freight trains than the previous one, with a few more bound for destinations on the CBRY. La Porte is not a stop for commuter trains, but Streator is. Streator also happens to be a small yard where local trains interchange cars for the CBRY and crew changes occur for trains headed onto or off of the CBRY. 마지막으로, this line sees a plethora of intercity trains. A pair of regional trains will run near both the start and end of your duty. Then there are the two long distance trains. During your duty, you’ll see both trains headed out West and their counterparts arriving at Cantwell, their final destination.

관심 장소 (2/2)
With that top row done, we’ve left behind the northern lines and have entered into the middle section of the Cantwell Belt Railway. The first crossing of the row is a low density freight line. The line travels from the Southeast at Zenda to the Northwest at Berwyn. The line sees only freight traffic, no passengers trains. There is a mix of everything here, ranging from manifests and stack trains, to unit grain and oil trains. For the most part, these trains will just go across the diamonds. However on rare occasions a trains will be destined for the CBRY, so be on the lookout.
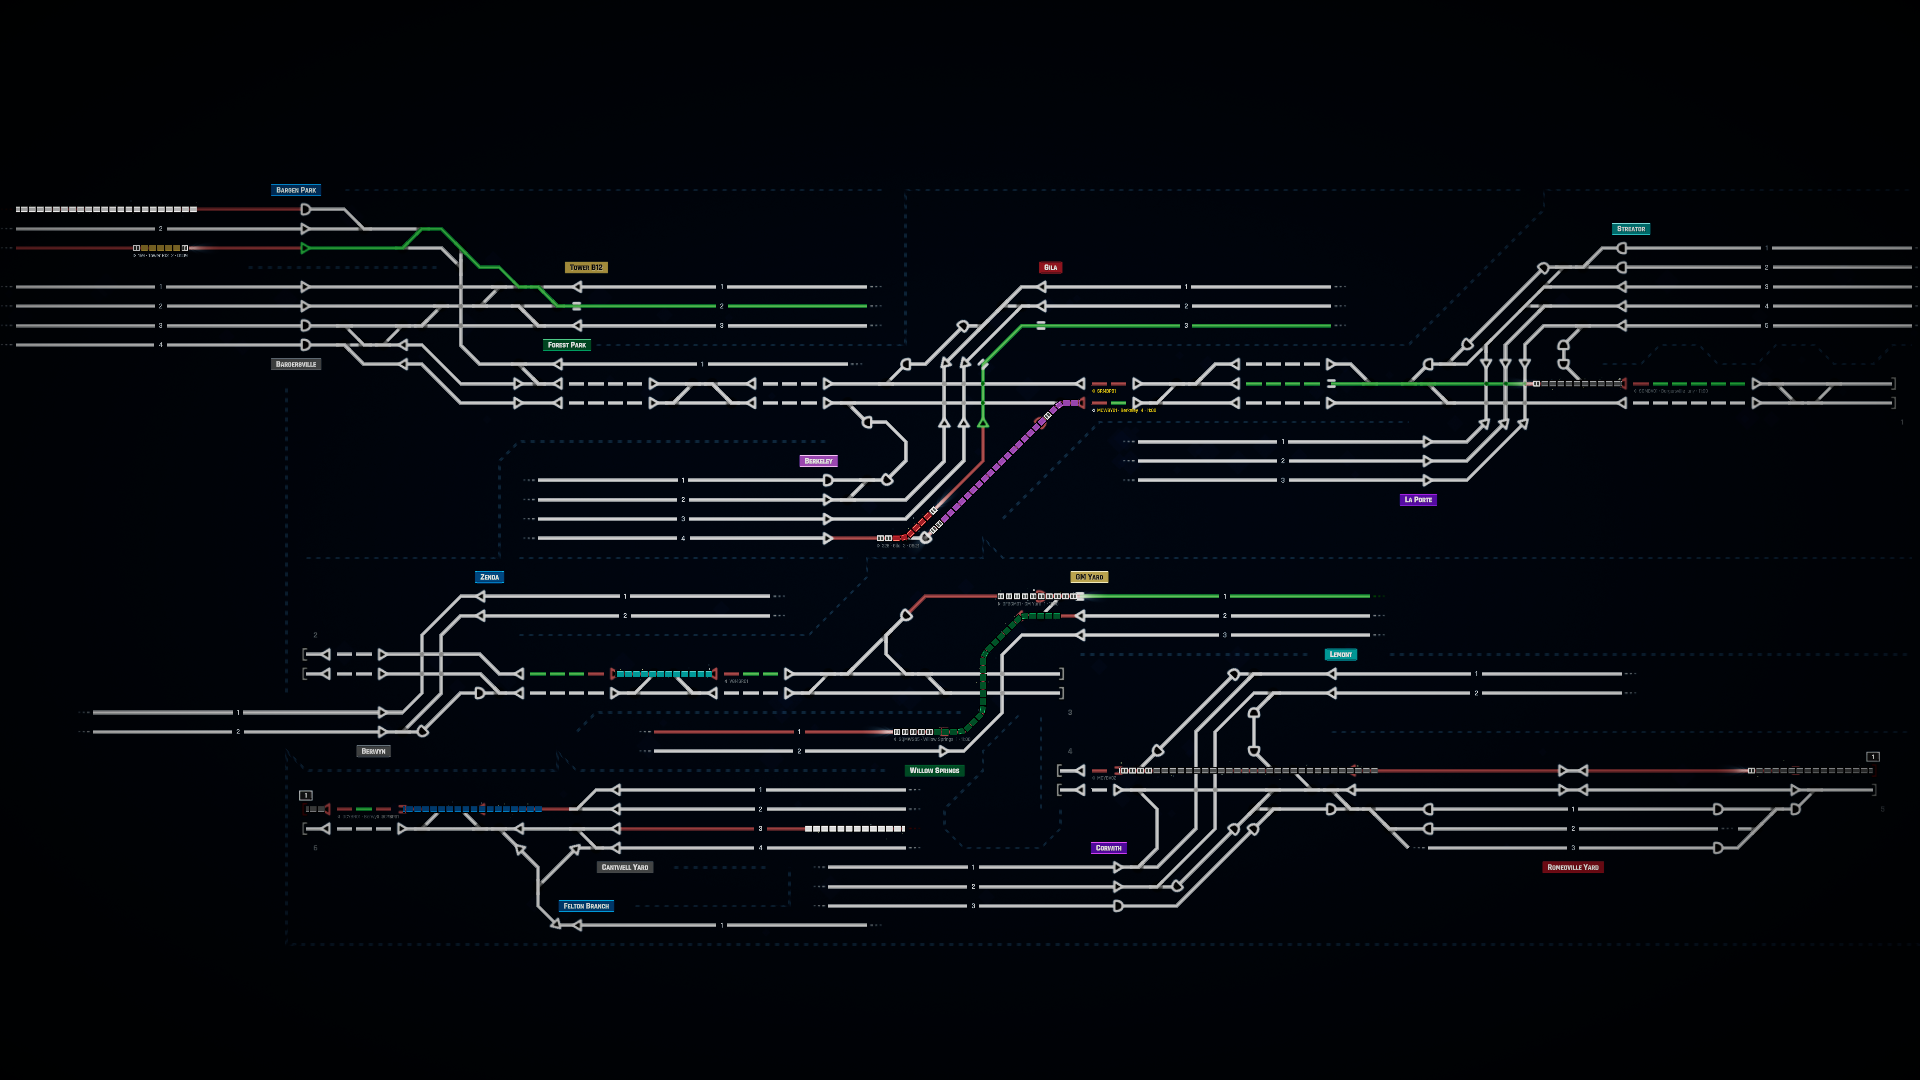
After the Zenda-Berwyn route is a higher density freight route. 다시 한 번, there are no passenger trains along this line, but the number of freight trains is far greater. The line sees almost solely intermodal traffic headed to the West Coast. These trains are all high priority and should not be held up. The western side is Willow Springs, and the eastern side is GM Yard. Most intermodal trains will continue past GM Yard without stopping, but a few intermodal trains and most local and manifest traffic will either stop or terminate there. This is also where a lot of intermodal traffic on the CBRY is destined for.
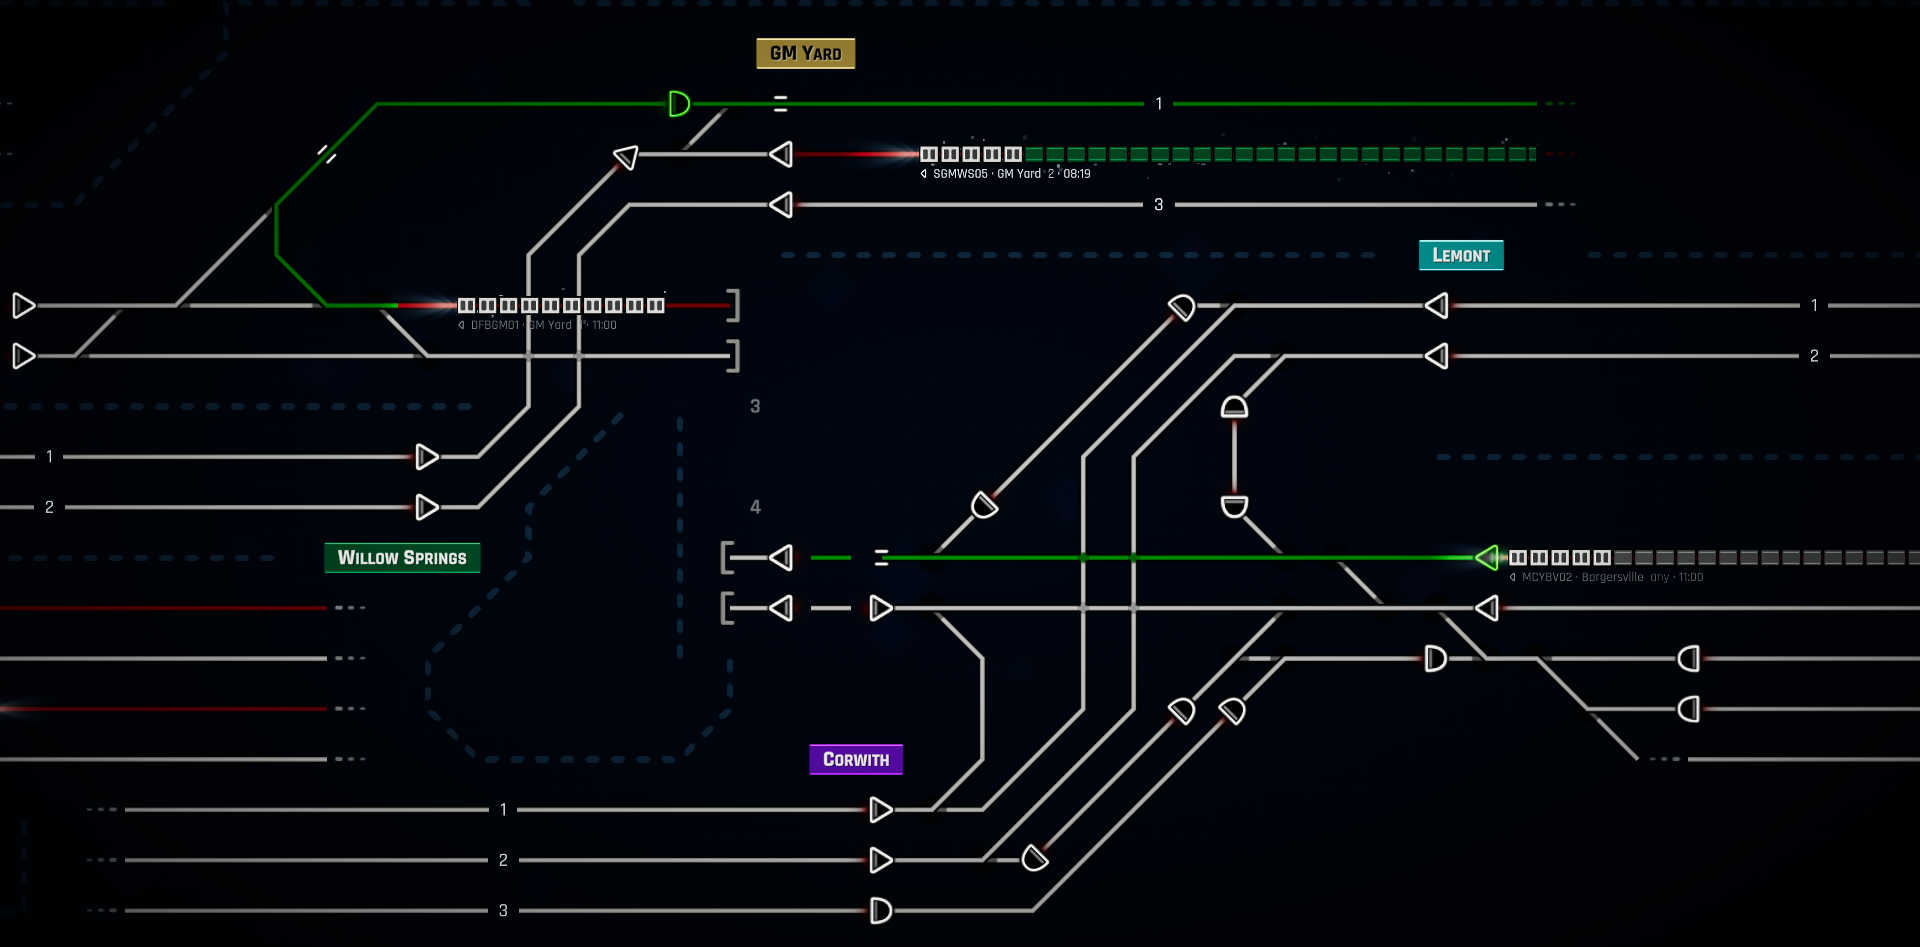
Not far from the heavy intermodal line is a slightly less busy mixed service line. Traffic here is split 50/50 between passenger and freight services. Corwith, the western side of the line is not a passnger station, while Lemont, the eastern side of the line, is a station. Not only does this line see regular, although infrequent commuter service, there also is a set of regional intercity trains and a long distance route. As with other long distance intercity trains, your duty time will see both the departing train and the arriving one. The Lemont-Corwith line also sees a fair amount of freight trains. Minimal freight trains simply cross the diamonds, most freight trains here utilize the CBRY. Stack trains from Lemont regularly act as transfers between intermodal terminals further East and other yards such as GM Yard and Bargen Park, the main intermodal facilities on this map. The line sees a fair amount of local traffic doing work at industries and working nearby Romeoville Yard.
잘, that’s a good segue into Romeoville Yard. While not a huge yard by any means, it still sees a fair amount of traffic. Local trains from Lemont and Corwith do switching and interchange cars with the CBRY here. Manifest trains stop at Romeoville Yard to make pick-ups and drop-offs before continuing on to points further along the CBRY. A nearby chemical plant requires an oil train to originate out of Romeoville Yard. 사실은, there is an oil train scheduled to depart Romeoville fairly soon. 마지막으로, there is an intermodal transfer train to take container traffic out of Romeoville Yard.
Almost at the end of the tour, just two simple things to finish off with! The Cantwell Yard is the main classification yard of the Cantwell Belt Railway. Most manifest trains along the CBRY enter Cantwell Yard to be broken up and sorted for destinations along other railroads. I’m sure if you squint at the pixels hard enough, you’ll see a freight car from an earlier train that has made its way on to an outbound train later on in your shift. Since Cantwell Yard is the start of the CBRY mainline, all trains need a crew change here before continuing North. Run through trains from other railroads will go through Cantwell Yard as well. These are mainly going to be grain and oil trains, as intermodal trains tend to go via the Felton Branch.

Speaking of the Felton Branch, it is our final place of interest! The Felton Branch is a small branch line that leaves the Cantwell Belt Railway mainline in order to bypass the busy Cantwell Yard. More recently, the Cantwell Belt Railway, in conjunction with other railroads, built a new intermodal terminal to ease congestion at other terminals. Hence why a majority of the traffic along the Felton Branch is now stack trains. Also thrown into the mix are unit grain and oil trains. These usually run via the Felton Branch if Cantwell Yard is too clogged up to handle them. Trains coming from the Felton Branch do not need a crew change, they are good to go.
Useful Information
And that’s everything! 꽤 간단하다, 오른쪽? 아니요? Well here’s a simple trick to figure out where trains are going. All trains have a unique code to describe the type of train, origin, 목적지. In the event that multiple trains have the exact same info for the first three parts, a number is given to each train to differentiate it from previous and future trains of the same symbol. 그래도, here’s a list of the train types, destination codes, as well as some examples. Commuter trains are simply given a number, however that number corresponds to the route the train takes. Intercity trains use a combination. The letter ‘P’ denotes that it is an intercity train, and a number differentiates it from other intercity trains.
Train Types (first letter):
중 – Manifest trains. These have general merchandise traffic. Usually limited to 80 km/h.
에스 – Stack trains. 다시 말해서, intermodal containers and piggy-back traffic. Tend to be either 100 또는 120 km/h.
영형 – Oil trains. 대개 80 km/h.
G – Grain trains. 대개 80 km/h.
와이 – Yard trains. These generally are transfers between two nearby yards. 어느 하나 80 km/h or 40 km/h.
엘 – Local trains. Local trains work industries and yards. 대개 80 km/h.
씨 – Coal Trains. 대개 80 km/h.
디 – Diesel engines. Sometimes a yard may end up short on engines to power trains. In these cases, a set of engines may be transferred from one yard to another. Tend to be 100 km/h.
다섯 – Vehicle trains. These are autorack trains, carrying new cards destined for dealerships around the world. Tend to be either 100 또는 120 km/h.
피 – Intercity passenger trains. 언제나 120 km/h.
Destination Codes:
BP – Bargen Park
BV – Bargersville
TB – Tower B12
FP – Forest Park
BY – 버클리
GL – Gila
LP – La Porte
SR – Streator
ZD – Zenda
BN – Berwyn
WS – Willow Springs
GM – GM Yard
LE – Lemont
CW – Corwith
RV – Romeoville Yard
CY – Cantwell Yard
FB – Felton Branch
Commuter Services (언제나 120 km/h):
1더블 엑스 – Bargen Park <-> Tower B12
2더블 엑스 – Bargersville <-> Tower B12
3더블 엑스 – 버클리 <-> Gila
4더블 엑스 – Streator <-> La Porte
5더블 엑스 – Streator <-> La Porte
6더블 엑스 – Corwith <-> Lemont
이것이 오늘 우리가 공유하는 모든 것입니다. Rail Route 가이드. 이 가이드는 원래 작성자가 작성하고 작성했습니다. RB 스태프. 이 가이드를 업데이트하지 못한 경우, 다음을 수행하여 최신 업데이트를 찾을 수 있습니다. 링크.