
This guide will show you the complete step-by-step process on how to get all achievements in Picayune 꿈. This guide might have spoilers, so be careful if you haven’t played the game yet. I recommend playing the game a few times before reading this because a big part of the fun is figuring things out on your own through trial and error. While most achievements can be earned just by playing, I still made this guide, even though it might not be needed.
To keep it short, I won’t talk about achievements you get by finishing the game on Overdrive 5 or anything tied to leveling a weapon to 8.
Uncommon Achievements

선구자
Bring the head of the 1st boss the final boss.
It’s not that difficult if you follow the build guide. By the time you defeat Yuzu, you’re almost set to breeze through the rest of the game effortlessly. To slow down the head, just stop right in its path. To further decrease its speed, enable bullet time to get closer to its center of mass. Bosses get defeated so quickly that she barely moves away, but if you need to retreat, remember where you left her.

I’m in!
Enter debug mode.
Super easy – just press tab + F1 in the menu or during the game. Not sure if you need to clear the game once to access it. You can also use this menu for cheat codes, but using them might disable achievements, and I don’t know any codes anyway, so you’ll have to look elsewhere.

Vlambeer
Go to the configuration and set Screen Shake + Hit flashes to 2. Useful if you want to trigger epilepsy in real life.

뱀
Kill the worm without splitting it.
It’s a good idea to turn off autoaim and aim at the boss’s head constantly. Just be cautious if Parasight somehow latches onto a center piece; it can potentially split the boss due to focused single-target damage. This achievement usually comes naturally with the mentioned build.
Stat-Based Achievements
Keep an eye on these using the info dock, and you can add to them with drills if you don’t want crit. Endless runs are also an option if you don’t reach the target.

Armed
Beat a run with 10+ Blackhole slots.
You’ll naturally get this with Scavenger.

출혈
Beat a run with 200%+ 활력.
Get an IV bag and put points into Meal to Go, 좋은 것들, and Organic Salvage. You can potentially go all-in with Eating Green, Cannibalistic, and Strength is Power for that specific run.

속도
Beat a run with 200%+ Velocity.
Make the Overcharged Engine go vroom vroom even harder. You’ll probably have Marathon and Exponential Expedition to help without committing to a full run, especially if you want to cheese the bosses.

Enlarge
Beat a run with 200%+ Attack Size.
Pick up injection. It’s a fantastic passive anyway.

도달하다
Beat a run with 200%+ Pickup Size.
Go for Pleonexic Crown and any skills on the tree that increase XP radius. Exponential Experience alone gives a 50% radius boost by the end of the run.

총알
Beat a run with 200%+ Projectile Speed.
Get the Energizing Battery.
Build-Based Achievements

Experimental
Beat a run without upgrading CORE.
No need to specifically dedicate a run to this; you can easily focus on others first.

Lightgun
Beat the game with Core, UltraBuster, Eye2 and Hunter’s Bow.
Follow my build guide, and you’ll achieve this.

Mob Grinder
Beat the game with Slime Spike, 체인 벤트, LegSaw and Hydrocillator.
You can probably pair this with the Manual achievement for no auto-aim.

공격
Beat a run without using Halos or IVBags.
Just avoid grabbing them. It’s not that difficult to achieve.
Armed
Beat a run with 10+ Blackhole Slots.
You naturally get this through the Scavenger skill.

Revolution
Beat a daily.
Unlock this by clearing the game once. 나는 이것을 얻었다, along with the following three achievements, by going for the loop at the end, and it still counted.

Deja Vu
도달하다 30 Mortality.
Just walk left and survive, 형.

Into The Unknown
도달하다 40 Mortality – See above

Conqueror of the Abyss
도달하다 50 Mortality – See above

instance_destroy(obj_boss_ghost);
Defeat the Ghost.
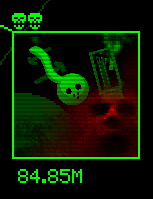
To fight the boss, enter a zone with the mutation that spawns the ghost with a funny face that kills you in one hit if it touches you. The zone looks like this.
다음, lure the ghost onto an HP vial to spawn the secret boss. The best way is to grab the passive Meal to Go, which spawns HP capsules on a boss kill, enter the zone, run back to the capsules, lure the ghost, and get close to the materialized boss. It’s RNG-dependent, so you might have to attempt it a few times. If going for a no-hit run, avoid this boss because it can be challenging.

instance_destroy(obj_boss_yuki);
Defeat Yuki.
To fight the secret boss, chain bomb the Gambler statue. Look for a zone with this statue.

She’s a pretty simple boss that gives rewards for killing her. 몸소, I try to go for the kill as long as the enemies in the zone aren’t a hassle. Dodge the icicles she fires, stay across from the field, and watch out for her charge attack during phase 2. Pay attention to which side she’s going to pop out and try to gain distance quickly. Probably the easiest boss to flawless next to Bunny.

Well Rested
진정한 결말을 참조하십시오.
이 업적을 달성하려면, flawlessly defeat the first 4 bosses and then defeat Picayune (it’s okay to get hit during this fight). Flawless means not getting hit during any of the boss fights and not using a black hole. If you follow the build guideline, this should be easy. The only boss that might pose a challenge is Demon, as getting into position to dodge her patterns can be tricky.
때때로, accidentally triggering her teleport by running too far away can kill the run, but with good RNG, you can defeat her before it becomes an issue. Once Demon is defeated, the next step is to kill the final boss, and you can get hit as many times as you want. I accidentally got hit every phase due to brain fog, and I still triggered the true ending sequence.

완벽한
Beat the game without being hit by an enemy or boss or bullet.
Contrary to the achievement name, you don’t actually need to get a flawless rating on boss kills, so feel free to use black holes if you think you’re about to get hit.
Since this is a roguelike, achieving this will require a bit of RNG and planning.
Start by filling out your item list. Hitting the item cap gives you more chances to level up the items you want earlier on. Don’t hesitate to grab a Discipline statue and ban items you don’t want if applicable.
Pay attention to statues – there will likely always be at least 1 chain bomb that spawns to blow up a statue. 몸소, I blow up each one, not worrying too much about curse. Notables to watch out for include:
- 맹렬한: Raises curse but raises 3 random stats.
- 결과: Gives free levels at the cost of making the next boss harder. It’s essentially free 4 level ups if you grab it for the 1st, 2nd, or 3rd boss. Avoid grabbing for Demon.
- Distribution: Allows you to swap an item you don’t like for whatever shows up on the side.
- Discipline: Useful to lower the item limit and speed up your build.
- Gambler: Spend your dice for a level up. Blowing it up for the secret boss gives even more levels and a drill enhancement.
- 거래: Spend your last tap on a chain bomb in case you don’t find one for the rest of the level, getting a free level up.
Pay attention to your build and what you need. Focus on getting things for wave clearing early on while building your setup. Try to get a weapon you’ll use for the entire run when loading into the game. Don’t waste rerolls; reset if you don’t see what you want. Prioritize weapons over passives at the start, except for the UltraBuster. Once you control the horde, focus upgrades on weapons for faster boss kills.
Regarding curse, I usually don’t worry about it with my build. 하지만, if you’re having issues, skip blowing up statues or grab ones with the curse aura.
If you feel confident, go for modified areas. They aren’t as intimidating as they seem, and the only one to worry about is wisps on death if you lack AoE. More XP means more levels, more wave clear, and faster boss kills.
Plan your route effectively. Whenever you enter a new zone, the enemy shown in the corner starts to spawn for the rest of the run. Here’s my personal enemy tier list:
Avoid picking:
- Droid: Can fire a projectile, and the risk is accidentally walking into other enemies while dodging bullets.
- 저격병: Similar to Droid, with the danger of inadvertently walking into mobs while dodging bullets.
- Warper: Once your build allows for AFK gameplay, they become more manageable. 하지만, be cautious as they can teleport in front of you, potentially causing accidental collisions while collecting items if you’re not paying attention.
A little sketch:
Okay to pick, but be mindful of your own build and the stage of the game.
- Dorito: Normally not an issue but can be troublesome early game as they can suddenly dart straight out of a pack right into you.
- Shielder: Makes other mobs tanky. If you lack the damage, your worst nightmare is a cursed fish with a shield charging straight at you.
- Wibbler: Just don’t move, and you’re fine, but in the early-midgame, if you lack the damage to screen clear, they can easily close the distance and tag you.
- 거미: Similar to Wibbler, not as bad but can be challenging in the early-midgame without enough damage.
- 얼굴: Not recommended to encounter early on. Hitting them once activates them to move much faster. If you lack the damage to kill them quickly and hit an unactivated face at point-blank range, the sudden speed increase can throw you off and end the run. Along with other high-speed enemies, it can get pretty annoying when they start shoving each other towards you.
지금, to wrap it up, here’s an example video where I meet the conditions for both achievements in a single run, originally intended to showcase a specific build.
I had a moment of distraction around 9:16 and almost took damage, but it worked out in the end. By the 11-minute mark, I started to feel more comfortable with full AFK+autoaim as the run progressed. The bosses essentially died before their second attack pattern, significantly reducing the difficulty of this achievement.
Since the bosses explode in my demo, you can refer to the mentioned guide for advice on boss patterns. I won’t repeat the information here. It remains that Demon has the potential to end the run due to her teleport and homing projectiles. If aiming for a no-hit run, just blackhole it away. If going for the true end, either DPS away or learn how to dodge.
이것이 오늘 우리가 공유하는 모든 것입니다. Picayune 꿈 가이드. 이 가이드는 원래 작성자가 작성하고 작성했습니다. Tripflag. 이 가이드를 업데이트하지 못한 경우, 다음을 수행하여 최신 업데이트를 찾을 수 있습니다. 링크.