
- 제목: 페르소나 3 가지고 다닐 수 있는
- 출시일:
- 개발자:
- 발행자:
페르소나에 대한 정보 3 휴대용은 아직 미완성. 이것을 사용하여 게임의 세부 정보를 입력할 수 있도록 도와주세요. 문의 양식.
페르소나 3 Portable has a number of optional fights that you’re able to tackle, and unlike later Persona games, you’re given the choice to challenge all of them on your first playthrough. This guide aims to provide a breakdown of how to encounter every optional boss fights, and inform you what’s the best way to defeat them.
The Reaper
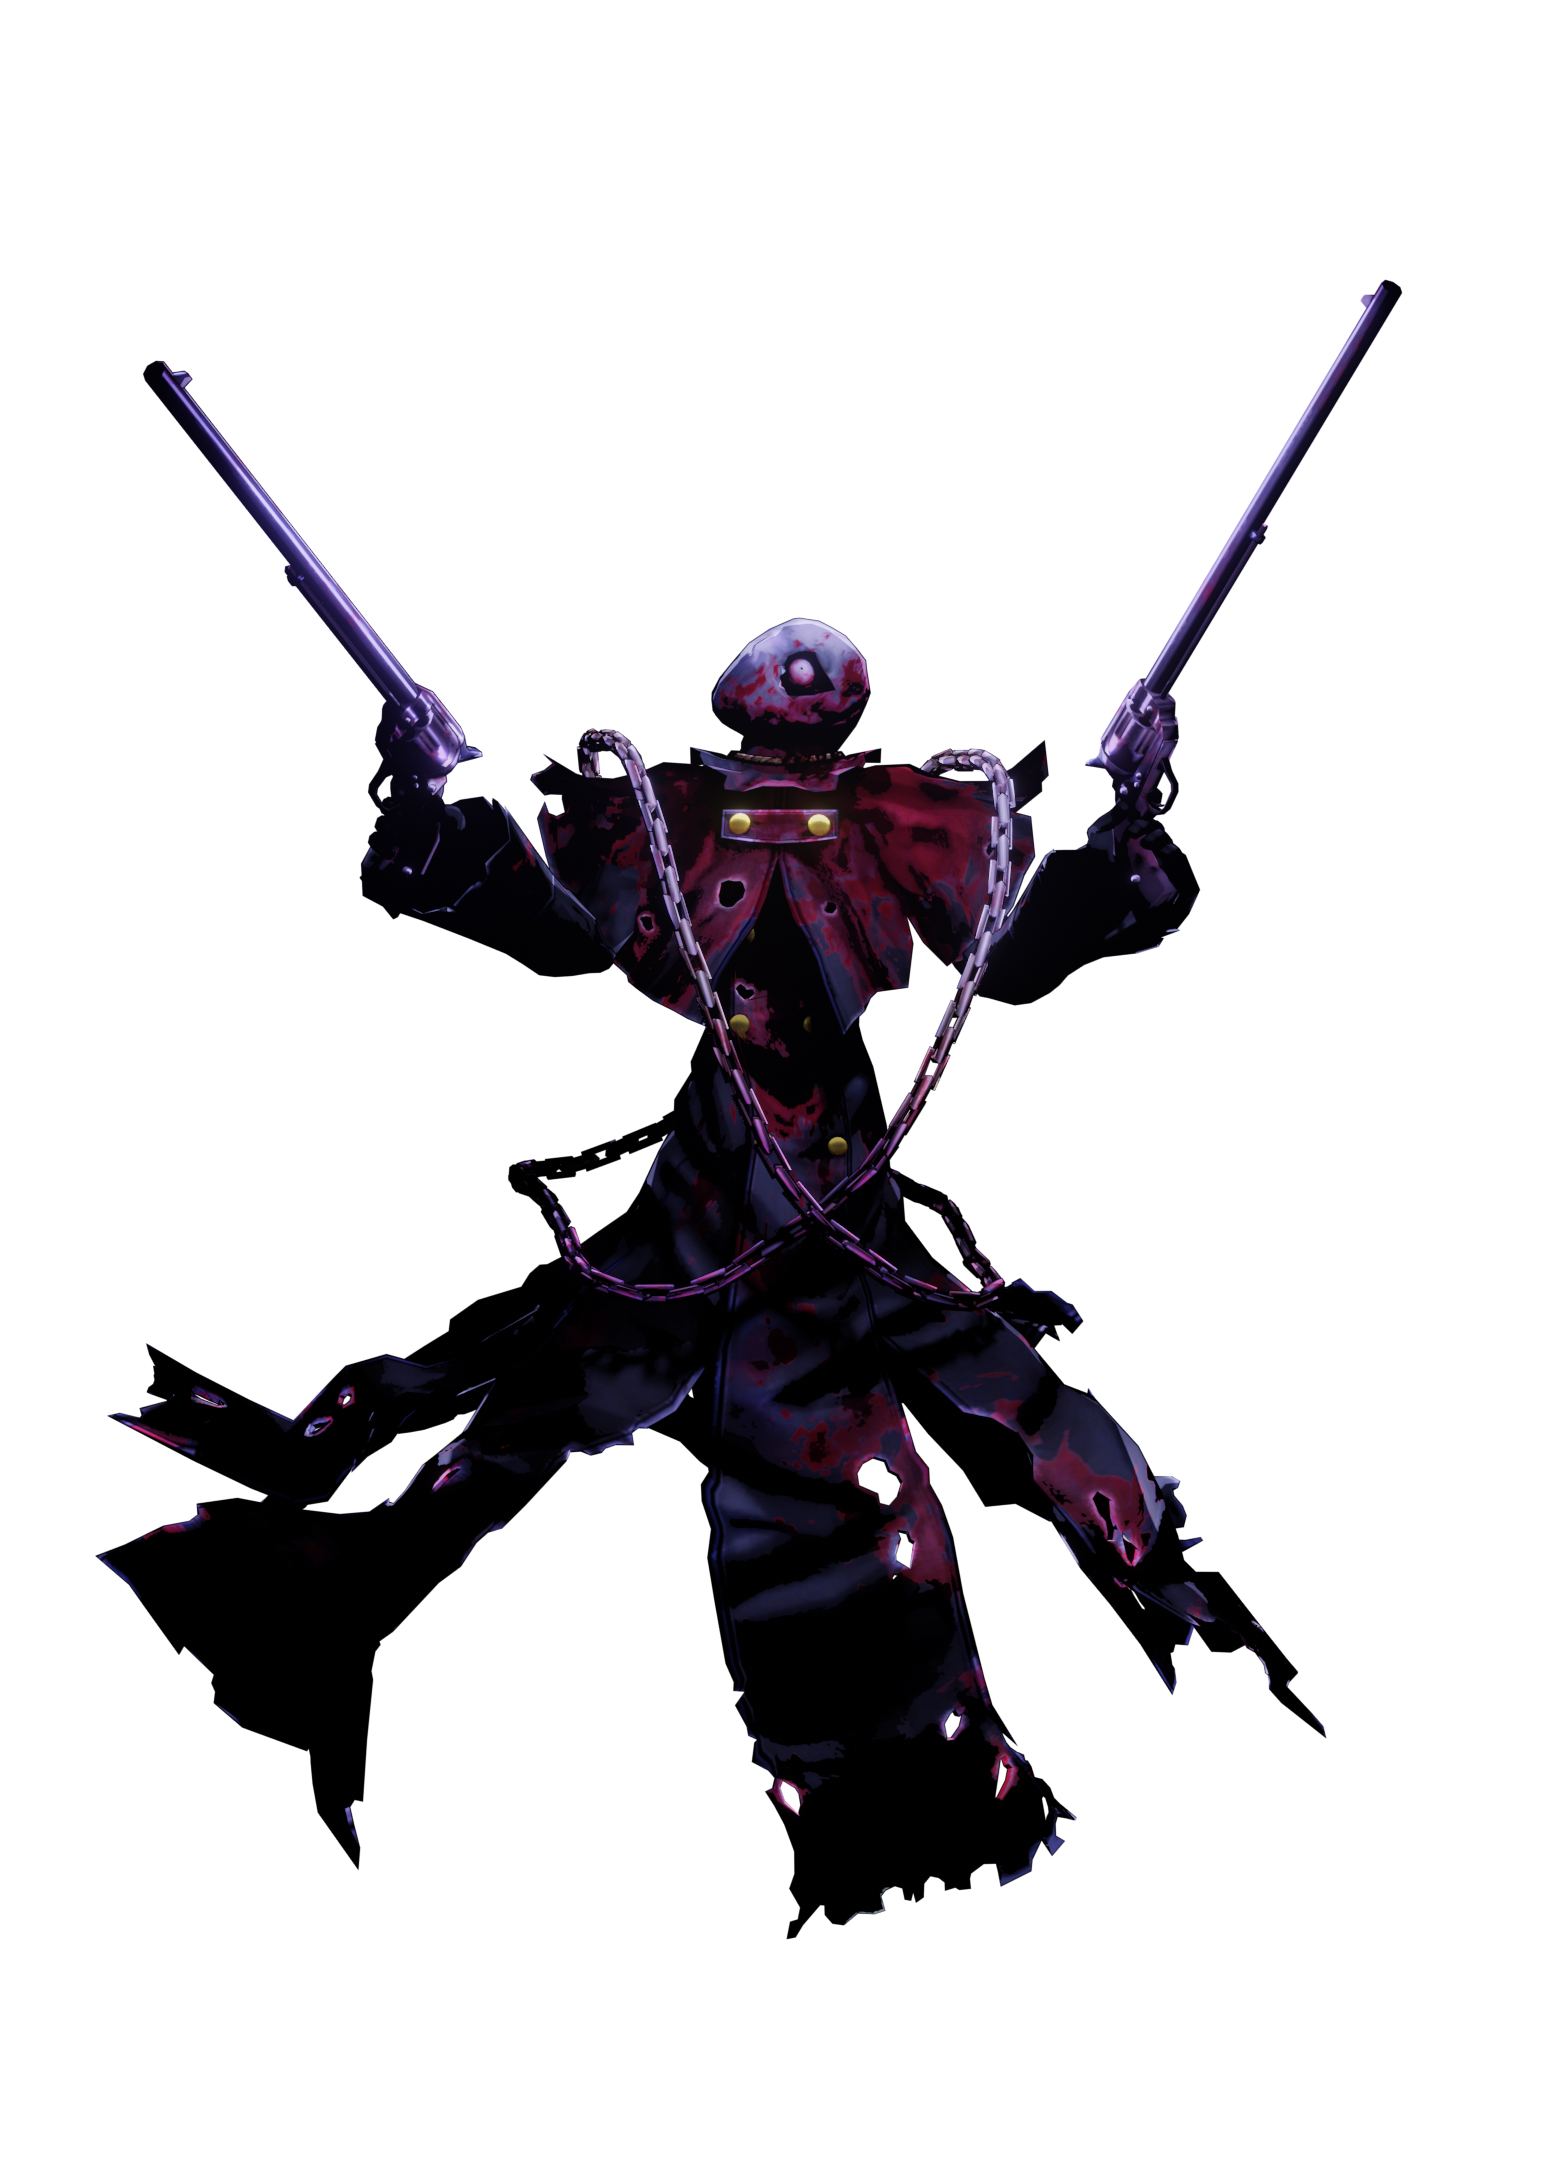
While technically not a secret boss since you’ll most likely encounter the Reaper at least once during your playthrough, it’s worth mentioning because it’s a difficult boss that appears in Tartarus and needs to be defeated to complete request #53 (available on 1/1), which in turn allows you enter Monad and unlocks request #55 (Elizabeth/Theodore fight).
To spawn the Reaper, simply hang around in a floor that can spawn shadows and wait. The time it normally takes for the Reaper to spawn can range from 3-12 minutes depending on the floor size. This timer can be further lowered if any of the following conditions are met:
- Choose a cursed card during Shuffle Time
- Be on a regular floor with no Shadows
- Be on a floor with powerful (빨간색) 그림자
- Be on a floor that’s filled exclusively with gold Shadows or rare chests
Mitsuru or Fụuka will warn you, 그리고 그 이후 30 초, they’ll either repeat the warning or alert you that the Reaper has spawned. When it approaches, you’ll be able to hear the sound of rattling chains and see him on the minimap when he draws near. Be aware that it can even climb up small ramps. The only safe zone is the stairs leading to the next floor.

Now let’s talk about how to deal with the Reaper.
일반적으로 말하자면, there’s two ways people kill it. The cheese, and the head-on fight.
For the cheese, it’s quite simple. Just use an Armageddon (보장 9999 손상). If you’ve farmed 99 Malachites and 10 Rubies, you can purchase one from the Shinshoudo Antique. 그 말로, you’ll want to have an Armageddon for the Elizabeth/Theodore fight in the future, so I recommend doing the fight legitimately.
For a normal fight, your party should be at least level 70+, and you’ll want to bring buffs and debuffs (at least attack up and def down) to make it easier for yourself. The best strategy is to fuse Odin with Elec Amp & Elec Boost, then go to town on the Reaper with Thunder Reign – paralyze the Reaper for guaranteed crit from physical attack, follow up with a physical attack crit, all out attack.
Here’s a couple general tips related to the Reaper as well:
- Make sure to have a few Homunculus if you don’t null Light or Dark, you don’t want to get insta-killed (Melchizidek & Thanatos Heart Items grants Null Light & Null Dark respectively)
- If you’re bringing teammates that have elemental weaknesses, give them an accessory that improves their evasion against their weakness (can easily pick them up from Police Station).
Monad (Elizabeth / Theodore Prerequisite)
Starting on 1/1, 요구 #53 will be available. Once you complete it, you’ll be able to enter Monad from Tartarus 1F and also take on request #55.
Monad has 10 바닥, and it’s the best place to level grind as all shadows there are in the high 80s to 90s level range. Here’s a list of their important elemental affinities.
Elizabeth / 테오도르

To unlock the Elizabeth/Theodore fight, you’ll need to have accepted request #55 and reached the top floor of Monad. This is widely considered the hardest fight in the game, even harder than the Margaret fight that was added in Persona 3 가지고 다닐 수 있는, so you’ll need to prepare some things before even taking on the challenge. I’ll be referring to the attendant you battle as Elizabeth for simplicity sake, but Theodore’s fight is exactly the same.
This battle is a 1v1, so you’ll only need to concern yourself with your own gear and persona setup.
Let’s start with equipment:
- Male Protagonist Weapon – Lucifer’s Blade (Weapon Fuse Lucifer)
- Female Protagonist Weapon – Vel Vel Muruga (Weapon Fuse Kartikeya)
- 갑옷 – Armor of Light (Messiah Heart Item)
- 신발 – Shoes of Light (Messiah Heart Item)
- 종범 – Divine Pillar (Alilat Heart Item)
*갑옷 & Shoes of Light are two of many Heart Items you can get from Messiah, so fuse him, get him to level 96, register him to the compendium, and repeatedly level him to 97 till you get the right equipment.일단 당신이 이것을 가지고 있습니다, you’ll also need to prepare a few items:
- Infinity x10 (Shinshoudo Antiques – 4 Malachite, 4 진주)
- Armageddon x1 (Shinshoudo Antiques – 99 Malachite, 10 루비)
- 20+ Beads (보물 상자)
- 1-2 Precious Eggs (보물 상자)
- 3-4 Somas (보물 상자)
- 20+ Homunculus (보물 상자)
- An IRL Calculator (Surprise Math!)
다음, let’s work on your persona…
Orpheus Telosis your best bet, but if you can’t fuse him because you weren’t able to max all the social links in one playthrough to receive the Colorless Mask, I’ll provide an alternate build using Hokuto Seikun.
Orpheus Telos Skills:
- Salvation
- Unshaken Will
- Sharp Student
- High Counter
- 마인드 차지
- 불 / 얼음 / Elec / Wind Amp
- 불 / 얼음 / Elec / Wind Boost
- 라그나로크 / Niflheim / Thunder Reign / Panta Rhei
*Take your pick on what elemental skill you want to use, just make sure to grab the correct amp & boost skill as well.Hokuto Seikun (영형. Telos Alternative) 기술:
- Salvation
- Unshaken Will
- High Counter
- Resist Ice
- Resist Wind
- Resist Slash
- Resist Strike
- Resist Pierce
*This looks absolutely clown, but it’ll get the job done.일을 더 쉽게 하기 위해, I’ll list how to acquire skill cards for skills listed above, then talk about fusion inheriting Mind Charge + 라그나로크 / Niflheim / Thunder Reign / Panta Rhei for O. Telos.
Skill Card Info:
- Salvation: Vishnu (레벨 87 – 해)
- Unshaken Will: 아수라 (레벨 93 – 해)
- Sharp Student: Zouchouten (레벨 19 – Chariot)
- High Counter: Siegfried (레벨 67 – 힘)
- Fire Amp: Kumbhanda (레벨 58 – 은자)
- Fire Boost: Hua Po (레벨 25 – 마술사)
- Ice Amp: Titania (레벨 55 – 연인)
- Ice Boost: Jack Frost (레벨 14 – 마술사)
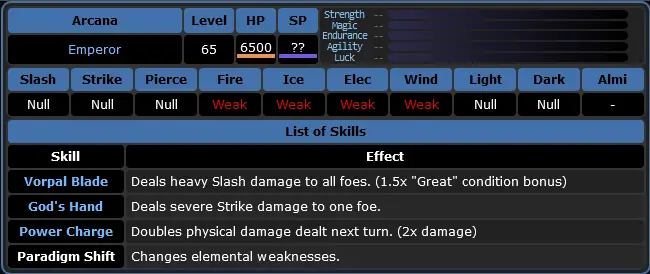
- Elec Amp: 오딘 (레벨 66 – Emperor)
- Elec Boost: Take-Mikazuchi (레벨 31 – Emperor)
- Wind Amp: Ganesha (레벨 65 – 별)
- Wind Boost: Kusi Mitama (레벨 35 – 행운)
- Resist Ice / 바람: Sapphire x2, Pearl x1 (Shinshoudo Antiques)
- Resist Slash / 스트라이크 / Pierce: Sapphire x1, Diamond x1 (Shinshoudo Antiques)
To fuse O. Telos, you’ll need Messiah, 지옥, Metatron, Chi You, Asura and Thanatos. You’ll basically want to cram as many of the skills you want on O. Telos into those 6 personas (duplicated across them is even better for higher odds) to have at the end to have the highest chance of rerolling the correct skills during fusion. There’s many ways to get fuse O. Telos in the end, so I’ll just offer a few suggestions for your fusion experience to be less hellish.
- Get rid of as many Mudo skills from Thanatos as you can, or they’ll keep showing up.
- Asura can only inherit Ragnarok, and not the other elemental skills.
- 지옥 & Chiyo can’t inherit any elemental skills.
By the end of all this, you’ll want to make sure you’re level 99 (for max HP and SP), and that your persona has max stats to help you bulk up and do as much damage as possible.
As an extra bonus, you can also consider bringing a Persona with Auto-(Ma)Tarukaja/Rakukaja/Sukukaja for extra damage on your early turns (Start the fight with it, and switch to O. Telos/Hokuto Seikun. Just make sure the persona you’re giving those auto buffs to doesn’t Null/Absorb/Reflect any type of attacks.
Now that you’re ready, let’s talk about the battle plan (having great status here doesn’t hurt either).
시작하려면, Elizabeth has a couple
Rules of Engagementthat you’ll need to adhere to throughout the fight. 그렇지 않으면, you’re immediately rewarded with a Megidolaon instant death.
- You may not use any equipment or Personas with Null, Absorb, or Reflect. This includes using the Omnipotent Orb, as well as Makarakarn/Tetrakarn (or Mirrors).
- You may not spend more than 80 turns defeating her.
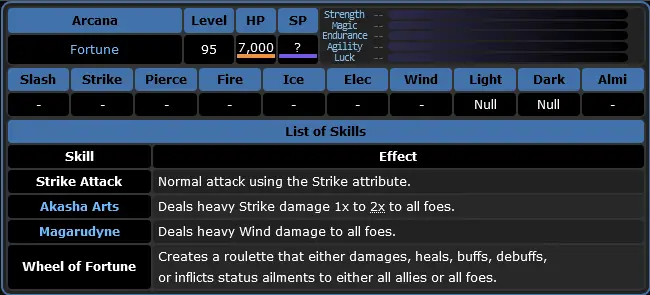
Elizabeth has 20,000 HP and wields 9 personas which she will switch every turn. She also gets to act twice per turn. Her pattern overall is very simple, so here’s how it goes:
에서 20,000 HP to 10,000 HP
- Surt – Maragidyne / 물리적
- Jack Frost – Mabufudyne / 물리적
- 토르 – Maziodyne / 물리적
- Cu Chalainn – Magarudyne / 물리적
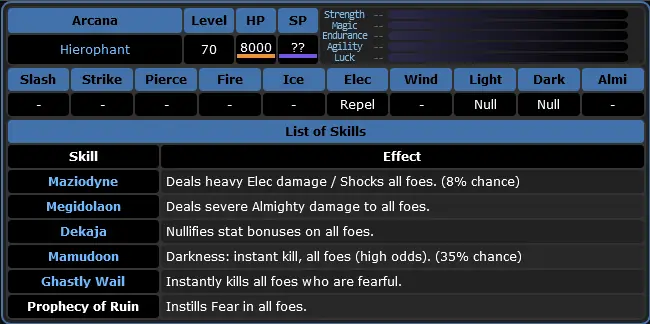
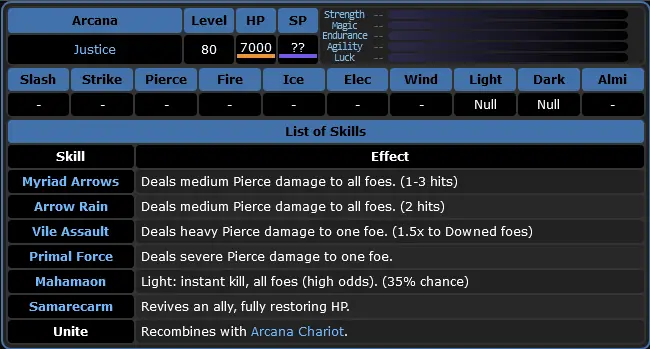
- Metatron – Mahamaon / 물리적
- 앨리스 – Mamudoon / 물리적
- Nebiros – Status Ailment / 물리적
- Masakado – Megidolaon (9999 Insta-kill)
*After Megidolaon, she returns to Surt and repeats the cycle.
아래에 10,000 HPPixie – Diarahan*She’s fully healing herself!!! AHHHHH!
Time for your preparations to pay off, here’s what you’ll have to do to win against Elizabeth:
>회전하다 1 오직:
- 마인드 차지 (If you brought auto-buffs, switch to O. Telos first)
- Niflheim / Thunder Reign / Panta Rhei / Physical Atk
- 라그나로크 / Thunder Reign / Panta Rhei / Physical Atk
- 라그나로크 / Niflheim / Panta Rhei
- 라그나로크 / Niflheim / Thunder Reign / Physical Atk
- Physical Atk / 마인드 차지
- 마인드 차지 / Physical Atk
- 무한대
- DON’T ATTACK (Heal with Bead/Soma, Salvation if poisoned)
*Repeat from step 1 ~ 후에. Skill priority is from left to right (depends on your persona setup), and you may heal on any turn of the pattern except for when you need to use Infinity중요한:Keep track of how much damage you have dealt to Elizabeth! When she’s around 10,500 – 10,600 HP (dealt 9,500 – 9,600 dmg), stop attacking. Since she uses Diarahan when she’s under 10,000 HP, and Armageddon only does 9,999 dmg, we have to rely on High Counter so she ends her turn with less than 10,000 HP. Once you counter her physical attack on her second move of the turn and she’s under 9,999 HP, use that Armageddon you’ve been holding to win the fight.
Vision Quest (Margaret Prerequisite)
~에 1/1, Elizabeth/Theodore will call you and let you know that their sister wants to test you. Head to Tartarus any time after this call, and you’ll find a new door on Tartarus 1F. When you enter it, 당신은 찾을 것이다… Maragret!
여기, 당신은 찾을 것이다 13 문, with the top row of 8 corresponding to the 8 Full Moon Shadow bosses you fought, and bottom row of 5 corresponding to each of your persona stats. The boss doors will be the same bosses you fought before except stronger, 그리고 5 stat doors will be strategy/puzzle based.
It’s recommended that you have your active party at level 80+ before tackling Vision Quest to ensure you have all their skills learned. And as a side note, reaching level 99 on any character will max out their HP and SP to 999, which can be helpful if you find yourself struggling.
Party Conditions:주역, Junpei, 유카리
Like the original fight, this boss is fairly simple. The boss will summon 2 미니언, which you’ll want to focus down before dealing with the boss.
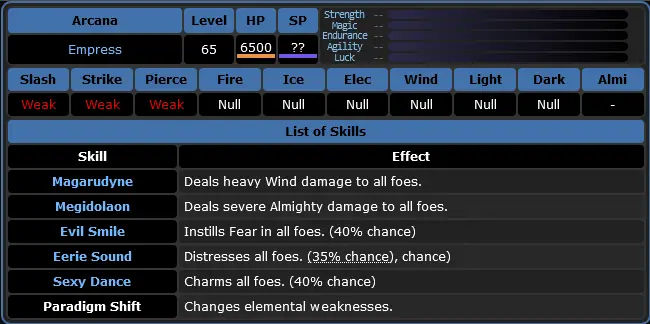
Party Conditions:주역, Junpei, 아키히코
Use physical attacks on the Empress to find weakness, and then elemental on the Emperor until you get lucky with finding both weaknesses for an All Out Attack. Rinse & 반복하다. Or just Almighty to skip their entire mechanic.
Party Conditions:주역, 유카리 + Pick 2> Junpei, 아키히코, 미츠루
You’ll be using Me Patra Gems after Prophecy of Ruin to remove fear from your party. Defending can also block PoR’s fear. You can consider equipping a persona with Unshaken Will to make the fight easy.
Party Conditions:주역, 유카리 + Pick 2> Junpei, 아키히코, 미츠루
Main risk is your party getting Charmed, so watch out for that. Not too much else to note other than the fact that you can throw in Makarakarn for some repel damage.

Party Conditions:주역 + Pick 3> 유카리, Junpei, 미츠루, 아키히코, aigiis
The fight is more or less the same…

Party Conditions:주역 + 어느 3 except Junpei
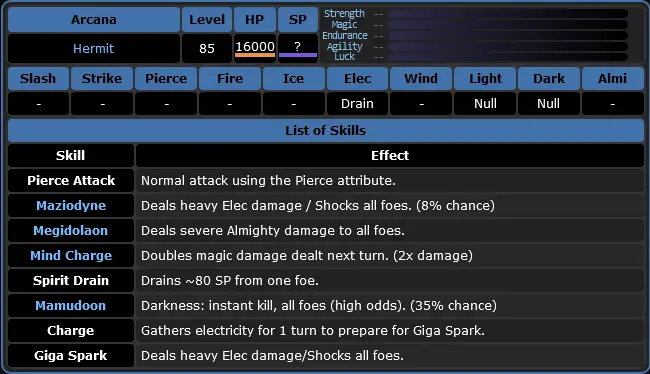
This fight is a jump in difficulty compared to the previous ones so far. It’ll follow Charge with Giga Spark, and Mind Charge with Maziodyne/Megidolaon. Elec Break + Mirrors will do nicely here.
Party Conditions:주역 + 어느 3 except Shinji or Ken
Unlike most bosses, these are actually vulnerable to Ghastly Wail, 그래서… just insta-kill after self-inflicted fear. ㅋㅋㅋ
Party Conditions:주역 + 어느 3 except Shinji
Probably the least changed fight, it just has higher tier skills and more HP so fight will take longer.
*All Full Moon boss fights here have a special activation requirement for an extra reward at the end of the fight. This one in particular is worth nothing because it rewards you with 10x Armageddon, which is really nice and even necessary for the Elizabeth/Theodore battle. To meet the requirement, you need to let Hanged Man detonate one of the Mayas and take damage from it (infinity won’t work).

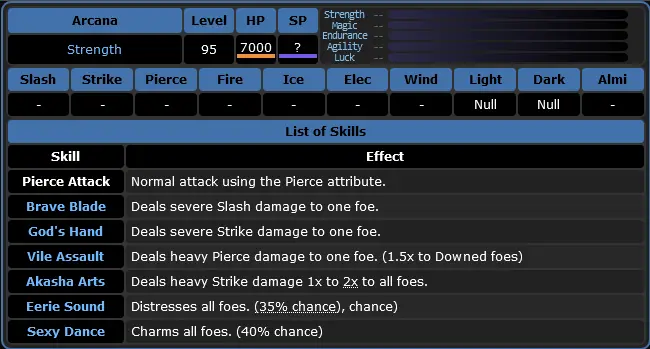
이것들은입니다 3 patterns the Guardians can change into each time they’re hit:
The Guardians won’t attack at the start until you’ve hit them, so we’ll be abusing this to set up an All Out Attack on all 3 즉시. Using the pattern table above, attack one Guardian at a time until you’ve set all 3 of them to drain Slash. 이 시간 동안, have Shinji Power Charge and wait. 일단 3 Guardians are set, have Shinji drop Akasha Art and finish them off.
대안으로, pick them off one by one to play it safe.
Switch persona to Raphael and Makarakarn to infinity. Wait for Hamaon repels.
있다 3 catches here:
– Do not cast Dekaja / Dekunda
– Do not cure poison
– Do not take more than 11 회전
Start by having Mitsuru dispel Charm if you’re Charmed and have her Mabufudyne spam; Akihiko will be on debuff spam duty (Masukunda & Marakunda) and otherwise Maziodyne spam; 유카리 + you will be on Magarudyne spam (with occasional heal) to dizzy the Red Guardian. The White and Black Guardians have 0 정확성, so they will always miss and slip when they try to attack you. Get those All Out Attacks when all 3 Guardians are down, and hope you don’t miss too many times.
The Guardian here has 4 different patterns it can choose, and you’ll have to follow the following steps depending on which one it picks (based on the first move). 일반적으로 말하자면, the plan will still fail if the Guardian crits you, or if you miss important attacks.
회전하다 1: 전력 충전
- Defend
- 페르소나: Mothman -> Primal Force
Bead - 페르소나: Saki -> God’s Hand
God’s Hand - 페르소나: Pixie -> 삭감
Bead - Gale Magatama
페르소나: Sarasvati -> Garudyne - 페르소나: Pyro Jack -> Shock Magatama
Bead - Frigid Magatama
페르소나: Jack Frost -> Bufudyne - Flame Magatama
페르소나: Pyro Frost -> Agidyne
회전하다 1: 마인드 차지
- 페르소나: Jack Frost -> Slash Attack
- Flame Magatama
페르소나: Pyro Frost -> Agidyne - Frigid Magatama
페르소나: Jack Frost -> Bufudyne - Shock Magatama
페르소나: High Pixie -> Ziodyne - Gale Magatama
Bead - 페르소나: Saki Mitama -> Bead
- God’s Hand
God’s Hand
회전하다 1: 생명력 소모
- Slash Attack
- 페르소나: Narcissus -> Brave Blade
Defend - 페르소나: Pixie -> Bash
Bead - 페르소나: Mothman -> Primal Force
Bead - Flame Magatama
페르소나: Pyro Frost -> Agidyne - Frigid Magatama
페르소나: Jack Frost -> Bufudyne - Shock Magatama
페르소나: Narcissus -> Bead - Gale Magatama
페르소나: Sarasvati -> Garudyne
회전하다 1: Spirit Drain
- Slash Attack
- Gale Magatama
페르소나: Sarasvati -> Garudyne - 페르소나: Pyro Jack -> Shock Magatama
Bead - Frigid Magatama
페르소나: Jack Frost -> Bufudyne - Flame Magatama
페르소나: Pyro Frost -> Agidyne - 페르소나: Mothman -> Primal Force (Pierce)
Defend - 페르소나: Saki Mitama -> God’s Hand (스트라이크)
God’s Hand or Bead - 페르소나: Narcissus -> Brave Blade
Brave Blade - Brave Blade
Brave Blade (Pray GG)
Defend.
If it says 1, use Mudoon.
If it says 2, use Hamaon.
마가렛
To unlock the Margaret fight, you’ll have to clear the 13 doors in Vision Quest. 완료되면, Pandora’s Door appears and you can challenge her.
운 좋게, this battle is easier than facing Elizabeth/Theodore, since you’re working with a full party, instead of just your protagonist. 하지만, this also means more gear prepping…

Let’s start with equipment:
- Male Protagonist Weapon – Lucifer’s Blade (Weapon Fuse Lucifer)
- Female Protagonist Weapon – Vel Vel Muruga (Weapon Fuse Kartikeya)
- 갑옷 / Aigis Armor – Armor of Light / Soul of Athena (Messiah Heart Item)
- 신발 / Aigis Shoes – Shoes of Light / Swan Legs (Messiah Heart Item)
- 종범 – Divine Pillar (Alilat Heart Item)
- Aigis Accessory – Lightning Gloves (Thor Heart Item)
*A ton of Heart Items necessary from Messiah, so fuse him, get him to level 96, register him to the compendium, and repeatedly level him to 97 till you get the right equipment.**I won’t list all party member’s best weapon fusion, since that seems a bit excessive. 원래, most your equip will be from Messiah, with some slight changes on Aigis because she can’t use Armor & Shoes of Light.While we’re on the subject on party members, you should decide who to bring to the fight. I advise against Junpei and Koromaru because of High Counter, since Margaret can absorb certain physical attacks during parts of the fight. Aigis is nice, and I advise using her due to her providing Matarukaja and Marakukaja; just keep in mind she can’t use Divine Pillar due to her elec weakness.
Once you have the gear, you’ll want to prepare a good number of elemental gems/magatama, 20 Homunculus, and an Armageddon. Most of this is optional but they’ll make the fight go quicker.
마지막으로, there’s Personas.
Bad News: You’ll most likely need to build more than 1 persona for this. Though technically you can easily clear with just a specialized almighty build (I’ll provide both setups).
Good News: Unlike Elizabeth, you can equip Null/Absorb/Repel personas without any worry; and you’re not restricted to any specific personas, you just need to have the right skills.
페르소나 0 – Almighty SpamHere’s the deal, you don’t want to deal with Margaret’s mechanics and just want to beat her. 그런 경우에는, it’s time to build an Almighty spammer. Satan’s Black Viper is the strongest Almighty skill, so let’s work with that (you can use Helel as well with his Morning Star, which is slightly weaker but he comes with more resists).
- Black Viper
- 마인드 차지
- Absorb Wind
- Unshaken Will
- Spell Master
- Salvation
페르소나 1 – Physical AttackerSiegfried looks nice here. Give him the following skills:
- Arms Master
- Apt Pupil
- 전력 충전
- Vorpal Blade
- Repel Dark
- Unshaken Will
페르소나 2 – Magic AttackerYou’ll want any persona with the four elemental -dyne skills: Agi, Bufu, Zio, Garu. Throw in a few elemental buffing passive skills (refer to Elizabeth/Theodore section for some detail on the skill cards), and avoid elemental repel.
Same as Elizabeth/Theodore fight, make sure your active party is max lvl, and the same goes for your persona stats being maxed.
Now let’s talk about Margaret’s attack pattern and combat plan (having great status here doesn’t hurt either).
첫 번째, Margaret has a few of her own
Rules of Engagementthat you’ll need to adhere to for the fight. 그렇지 않으면, you’re immediately rewarded with a Megidolaon instant death.
- You may not equip Omnipotent Orb
- You may not use Infinity
- You may not spend more than 50 turns defeating her
- You must deal 5,000 damage every 10 회전 (damage requirement is cumulative, so it’s okay to deal 6,000 damage on first 10 회전, and only 4,000 damage on the second 10 회전)
- Using Armageddon and not ending the fight on that turn
Margaret has 30,000 HP and wields a total of 22 personas. She acts twice per turn, and her moveset can be split into to 5 phases, with each phase taking 10 회전 (she will not skip to the next phase even after you reach the damage threshold.
단계 1: Physical Attacks (Turns 1-10 / 25,000 HP Threshold)
This is generally regarded as the hardest part of the fight, so pay careful attention.
Margaret will hit your party with physical attacks. You’ll want to remember what attack she ended her turn with, as that will determine what she absorbs. Here’s a list of attacks and what physical damage type they are.
- Vorpal Blade (삭감)
- Brave Blade (삭감)
- Akasha Arts (스트라이크)
- God’s Hand (스트라이크)
- Myriad Arrows (Pierce)
- Primal Force (Pierce)
Since Margaret can only take physical damage that she doesn’t absorb (and almighty damage), teammates that can’t do damage can be on support duty with heals and buffs, or otherwise on defend mode to minimize the odds of being downed from crit.
For players with almighty spam, just do Mind Charge > Almighty nuke.
For players with a physical attacker persona, go with Vorpal Blade, and Power Charge if Margaret absorbs slash attack.
단계 2: Status Ailments (Turns 11-20 / 20,000 HP Threshold)
Margaret will change her strategy to applying ailments on your entire party. She will cast Stagnant Air, and attempt to Charm/Poison/Enrage your team. Unshaken Will on your persona will prevent Charm and Enrage, so at least one member is guaranteed to be able to act each turn to dispel it (you don’t want your teammates healing her). Salvation and remove ailments as necessary, otherwise follow the strategy from Phase 2. She only nulls Light and Dark, which shouldn’t matter to you.
단계 3: Elemental Attacks (Turns 21-30 / 15,000 HP Threshold)
Margaret has taken a page out from the Elizabeth/Theodore fight and will only take damage from one specific element each turn. She will use each turn to cast an AoE followed by a single target elemental skill, pay attention to what element that is, and use the opposite element:
- Agi (불) ⇄ Bufu (얼음)
- Zio (Elec) ⇄ Garu (바람)
If you’re almighty spam, you can just ignore this and do Mind Charge > Almighty…
Your teammates will most likely be on buff support duty, and can throw out an elemental nuke for extra damage when possible, or use elemental gems/magatama which I mentioned you should prepare. This will probably be the slowest phase due to the limited damage sources.
단계 4: 전력 충전 / 마인드 차지 (Turns 31-40 / 10,000 HP Threshold)
Margaret will always open this phase with Power Charge & Mind Charge on the first turn. 이 후, she’ll use a mixture of Charge, debilitate skills, and offensive skills. You’ll mainly want to watch out for Marakunda and Evil Smile (AoE Fear) + Ghastly Wail Combo for debilitate skills, and her offensive skills are mostly comprised of physical attacks, plus Megidolaon (not insta-kill version). Attack Mirrors/Tetrakarns are nice to have here, and you can use any attack to hurt her because she only nulls Light and Dark.
*If she uses Tetrakarn/Makarakarn, have a party member do a regular attack/use a weak single target gem to remove it.
**If you have an Armageddon, feel free to use it here. Be absolutely sure that Margaret has less than 10,000 HP, as you’ll be immediately punished with instant death if Armageddon doesn’t finish her off.단계 5: 본뜨다 (Turns 41-50 / 5,000 HP Threshold)
마지막 스트레칭이다. Margaret will imitate what the protagonist does if elemental magic is used, and she’ll equip the same personas that were used in the Elizabeth/Theodore fight (don’t cast heal either lol). 다음을 참조하세요. “Elizabeth / 테오도르” section for what element to use. If you’re using almighty strat, she now resists it. Party members should follow phase 3 strats and (de)버프 + 보석.
이것이 오늘 우리가 공유하는 모든 것입니다. 페르소나 3 가지고 다닐 수 있는 가이드. 이 가이드는 원래 작성자가 작성하고 작성했습니다. 하야테 버틀러. 이 가이드를 업데이트하지 못한 경우, 다음을 수행하여 최신 업데이트를 찾을 수 있습니다. 링크.