- 제목: 님비 레일스
- 출시일:
- 개발자:
- 발행자:
Nimby Rails에 대한 정보는 여전히 불완전합니다. 이것을 사용하여 게임의 세부 정보를 입력할 수 있도록 도와주세요. 문의 양식.
How to use the Beta Branch Path Signals to plot your Points and Junctions in NIMBY Rails.
Path Signals were recently introduced to NIMBY Rails as a recent update to the beta branch. You need to move over to the branch or wait for 1.2 to roll on to the main for this guide to make sense to you.
There are three main types of signals recently introduced to NIMBY Rails as of 1.2.9: 간단한 블록; 꼬리표; and Path Signal. There’s another fantastic guide available for how to use the first two of these signals in addition to One Way and Station Stop objects, which are self-explanatory.
This guide will give you basic coverage for Path Signals, what they mean, and why they’re needed.
The Old Way
Pre Beta 1.2.9, the best way to signal points was to place two Simple Block signals to the entrance to the split, and then another Simple Block signal to end every other point. You’d have to determine which route was your more popular route, and then place a Block Balise signal between the two main paths of this line.
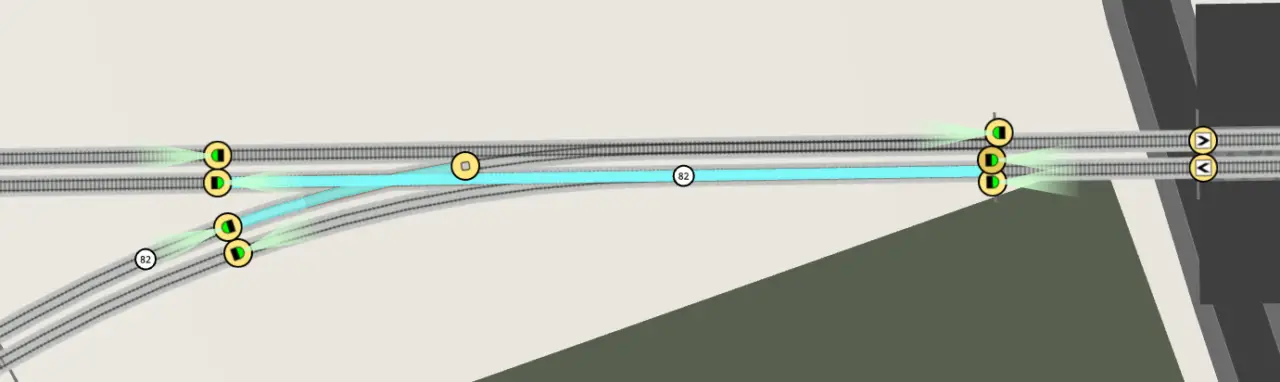
우리가 볼 수 있듯이, the blue line visible travels across the lower horizontal line, and the Block Balise signal stops any train on this section of track interfering with the upper horizontal line. 하지만, imagine if a train came from the bottom up to the upper horizontal line, and another train was also on the upper horizontal line, both traveling right? Who would have the right of way? Would the signals make a train stop? Keep in mind that trains cannot stop at Block Balise signals!
좋아요! Both trains would collide with each other, because the Block Balise signal stops the signals from talking to each other, informing them of trains being on the track. 사실은, to the far right is a station. If a train is in that station waiting for pax or any other reason, and another train comes up to the back of it, as long as that train clears the Block Balise signal the bottom track going into the station will not tell trains to stop! This is bad.
The New Way, with Path Signals
The new way to signal this junction is by using Path Signals. A few are needed, and if you’ve placed one and looked at the options it might be confusing. Using the same junction as before, let’s tidy it up and put Path Signals in where they should be.
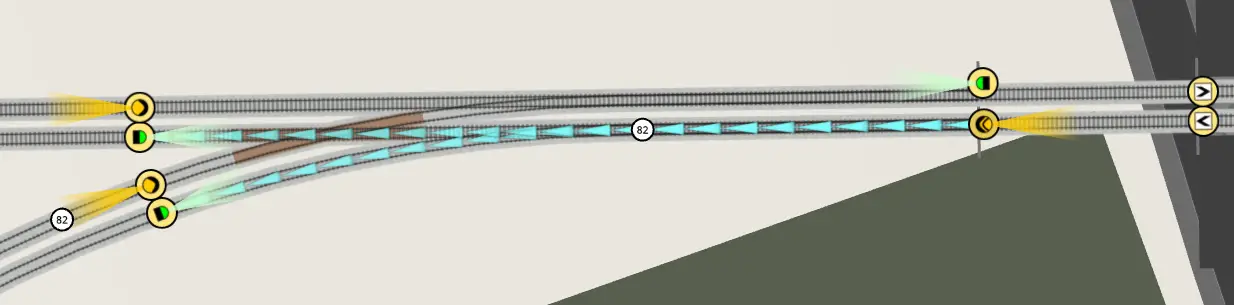
우리가 볼 수 있듯이, we’ve one less signal, and three new signals with orange lights. These are our Path Signals and I’ve selected the right-most one to demonstrate how it works. Note we’ve also got rid of the Block Balise signal separating both paths.
시작하려면, there is an additional option with Path Signals over Simple Block signals, which is the Limits Path: 옵션. This has two settings: Always and Only for the same direction. If it’s set to Always, it will never let a train pass this signal if any of its paths are occupied with a train. If it’s set to Only for the same direction, it will only let trains pass if they’re not following the path that is occupied. This last bit is perfect for what we need. These two options have different graphics, ‘Always’ being a solid color, and ‘Only same’ having a black stripe in it. The Path Signal to the right is set to ‘Only for the same direction’.
If a train leaving our station goes West or SouthWest, this signal will allow it as long as the path in that direction is not occupied.
Picture this: A train has left the station going West and has become blocked by some unknown means. If the next train to leave the station wishes to go SouthWest, it can pass the Path Signal controlling the junction to allow this to happen.
What About those Other Signals?
I hear you cry?
The two Path Signals to the left of the above image are set to ‘Limit Path: Always’. This means that if the block that the path occupies intersects with a block that a train is in, the signal will turn red when a train approaches this Path Signal.
It reads more complex than it is. Picture this: Train A is traveling into the station from the West, going East. The station is already occupied by a train filling with pax. Train A can travel forwards and wait patiently at the signal before the station. Train B has just approached, joining the queue to the station, coming from the SouthWest. Because of the Path Signals utilized, the SouthWest Path Signal will disallow trains from entering the junction, because its path is occupied by Train A. 하지만, a train leaving the station and traveling West can do so! The SouthWest Line is not occupied by Train B!
This might be an easier example:
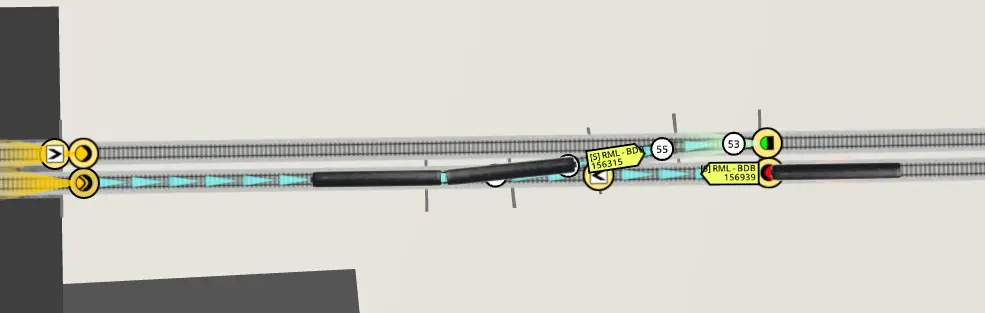
The above image should explain a little better. The train on the Left has just departed the station and is taking this Path Signalled junction to get on the upper line to continue East, yet there’s a train waiting at their Path Signal (which is now red, not amber), until the path that signal control is clear. Note that the Path Signal set to ‘Limit Path Always’ on the upper line of the station is also required, it will be red as this train is moving onto that path, preventing any trains from departing the station and colliding with the train taking its path to the upper line. 하지만, it will also be green when the train on the right proceeds into the station because its path is clear. A regular Simple Block signal will work but will be red when technically the path is clear because the block it controls also extends to the lower line. See below for how not to signal this type of point.

Hope this helps understanding simple junctions. Don’t forget that complex junctions are just lots of simple junctions chained together.
As a general rule of thumb: Use Path Signals for every entrance to a branch/point/junction. Where the lines split into different directions, set that Path Signal’s Limit Path to ‘Only for the same direction’, with every other Signal that doesn’t split, is set to ‘Always’. For the exit to junctions, use Simple Block signals, or Block Balise if you really want to.