

- 제목: METAL GEAR SOLID V: THE PHANTOM PAIN
- 출시일:
- 개발자:
- 발행자:
Information about METAL GEAR SOLID V: THE PHANTOM PAIN is still incomplete. 이것을 사용하여 게임의 세부 정보를 입력할 수 있도록 도와주세요. 문의 양식.
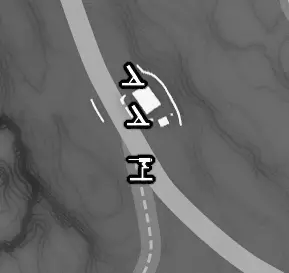
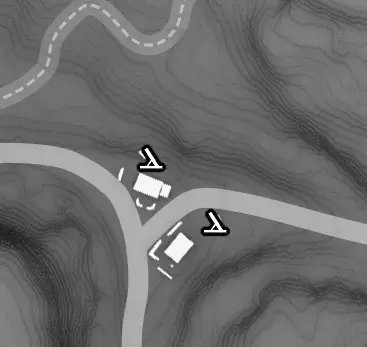
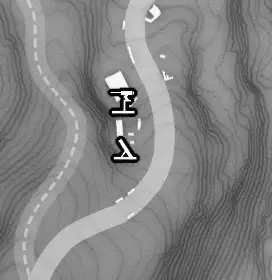
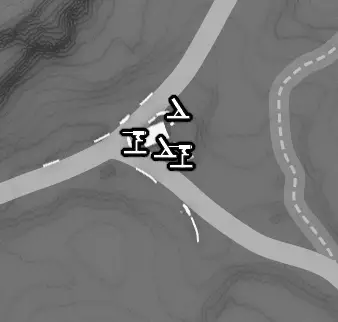
List and maps of the locations of all mortars, machine gun and AA emplacements, along with vehicle locations and patrol routes.
이 가이드 정보
있다 5 different weapon emplacements and 4 different vehicles that are found by default in Free Roam. Fultoning these items will help add to your PF score and can help unlock certain Challenge Task List rewards. The lists and maps in this guide only display what is available in Free Roam, because different missions will add or remove certain vehicles and weapons are generally consistent, so that if you Fulton all the machine guns from a specific outpost, visiting that outpost during a mission will see them still missing. 뿐만 아니라, 그만큼 “Eliminate the Armored Vehicle Unit” 그리고 “Eliminate the Tank Unit” Side Ops will add 1 또는 2 mortars within the mission area, but the Side Ops are random and repeatable so I didn’t include them here.
If you select DD as your buddy, he can help identify weapons and vehicles from 120m away, but he often has difficulty marking them if there are a lot of guards present, so I thought this guide would be a good reference in place of DD.
From my testing, weapons respawned after 5 임무, but vehicles respawned after 모든
사명 (stationary and patrol vehicles). This means if you end missions by leaving the hot zone on land instead of by chopper, you can hijack a vehicle and take it to your next mission, which will capture the vehicle and send any other previously captured vehicles back to Mother Base. And then you can do the same thing again with the same vehicle before your next mission. If you want a bunch of vehicles, it’s a good way to easily add to your totals.
First is a table of the total quantities of each weapon.
Then there’s a list of every outpost/guard post with an index of what’s available at each location.
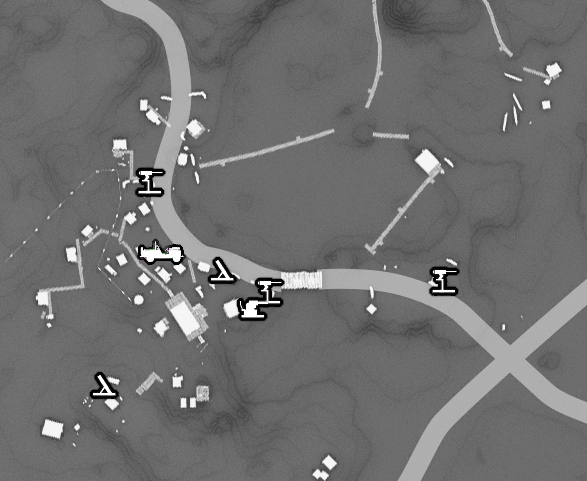
Then there are maps of the patrol vehicles routes.
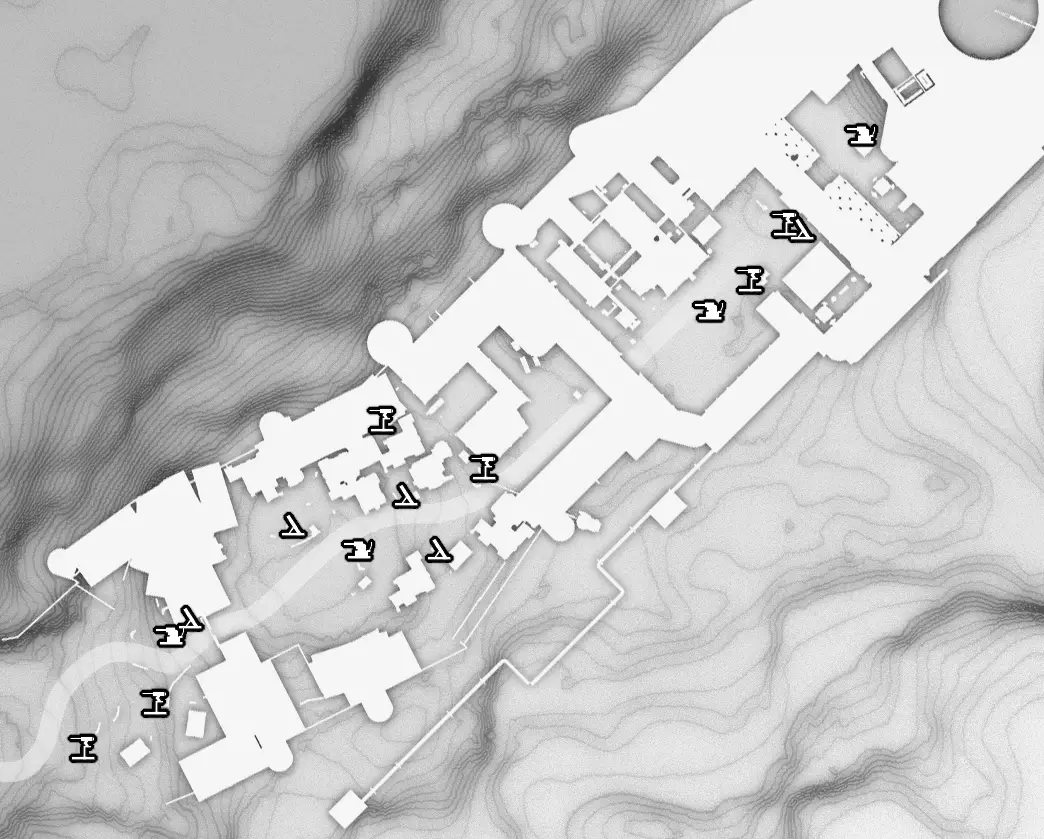
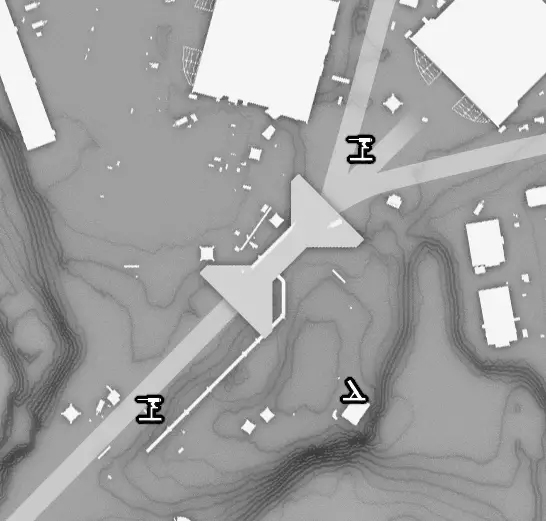
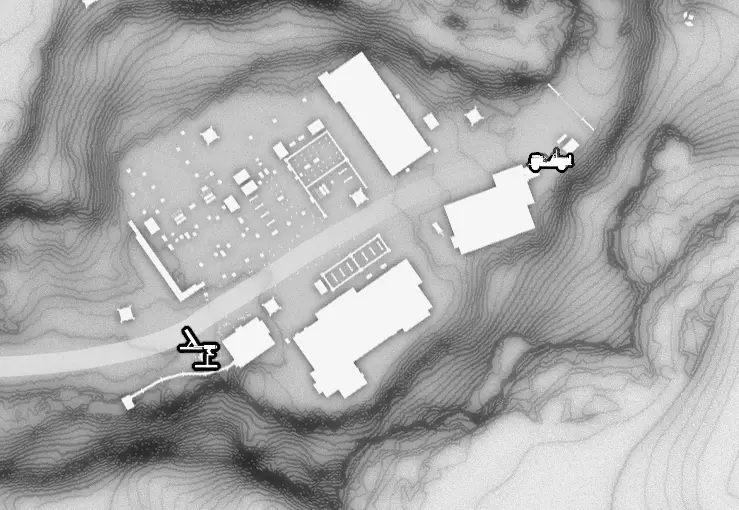
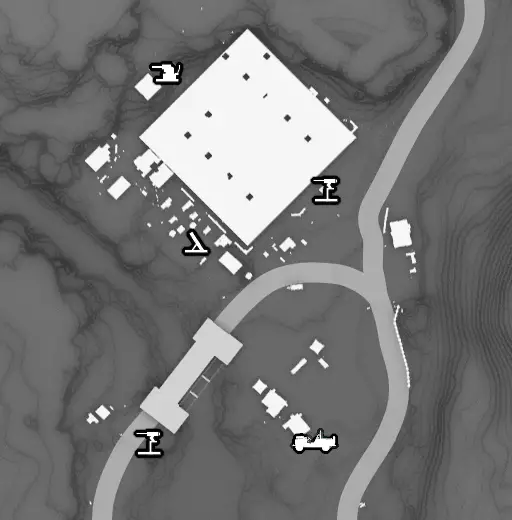
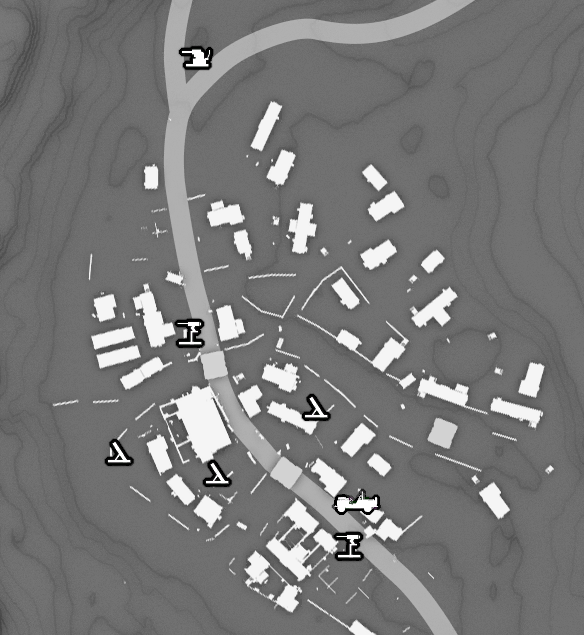
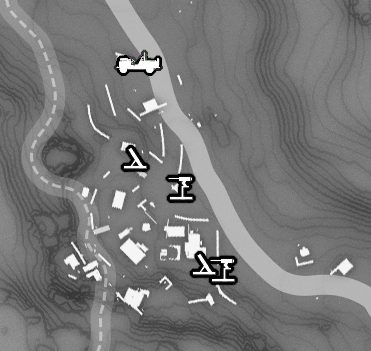
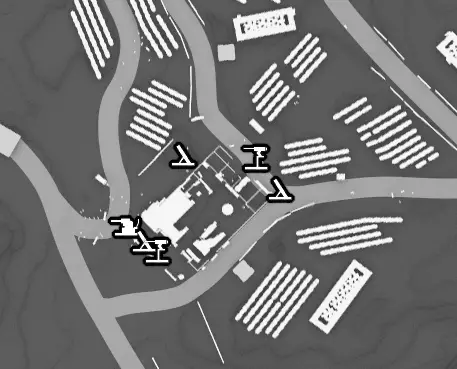
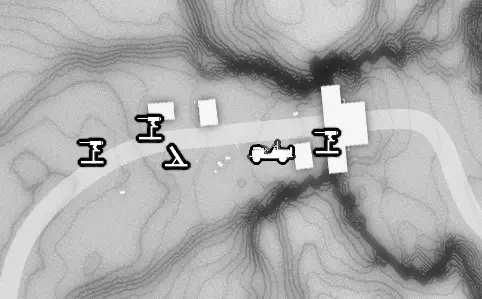
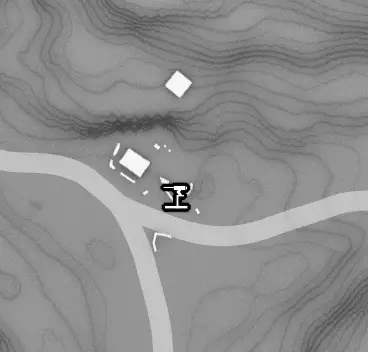
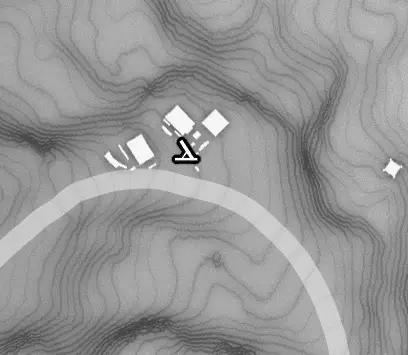
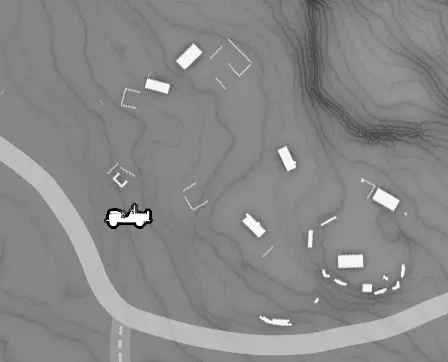
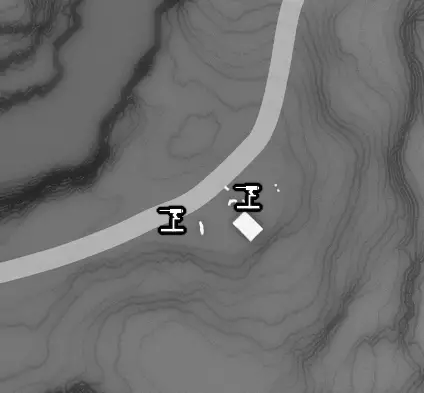
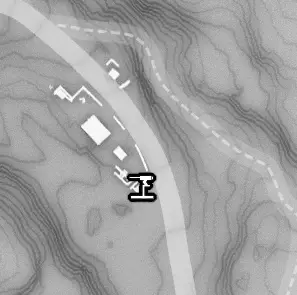
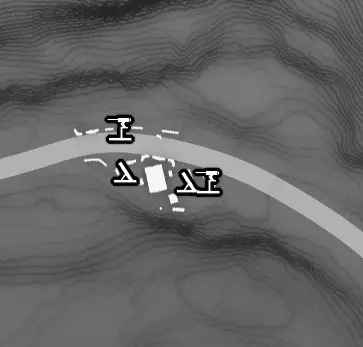
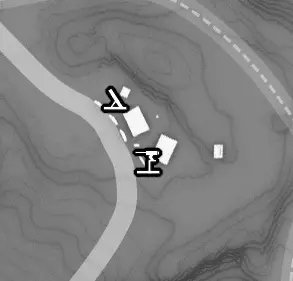
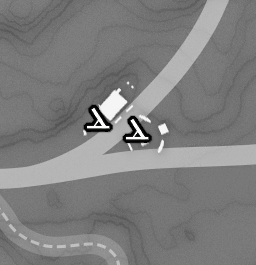
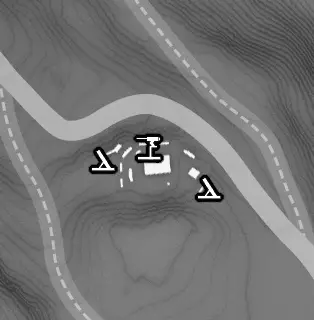
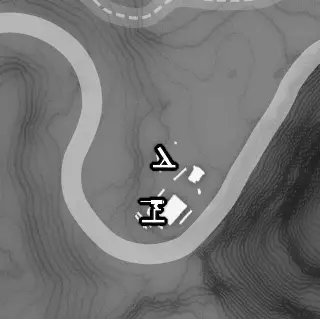
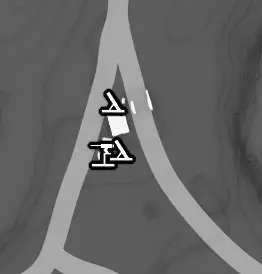
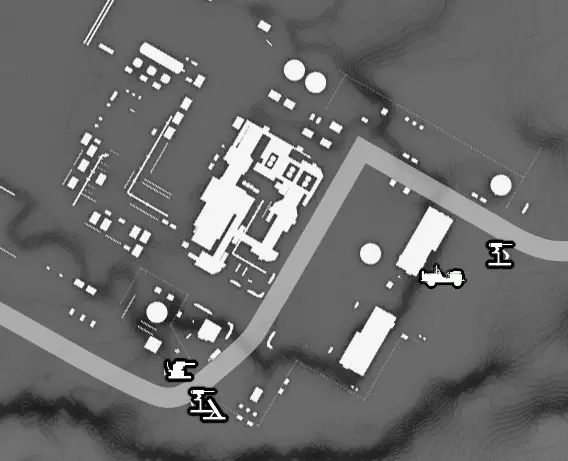
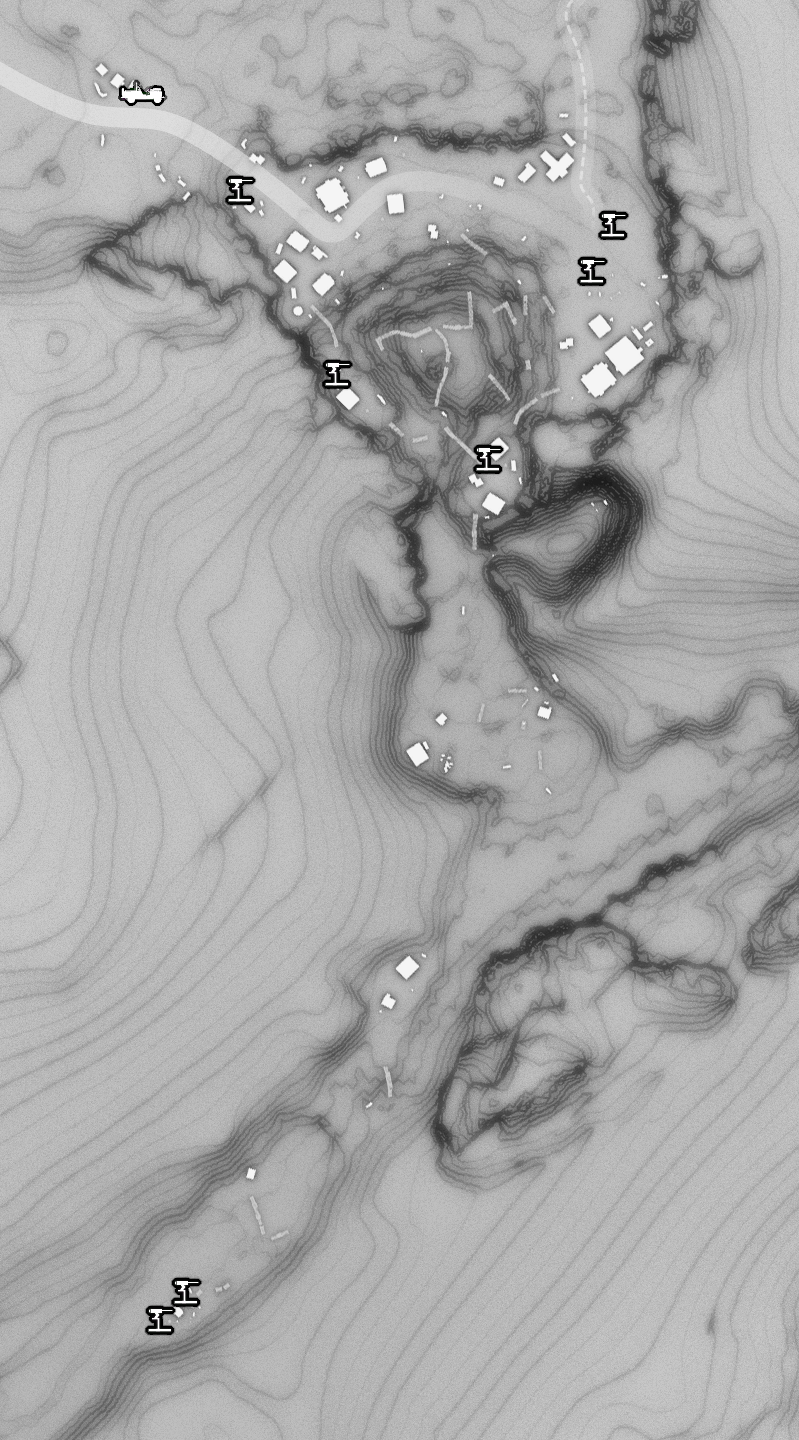
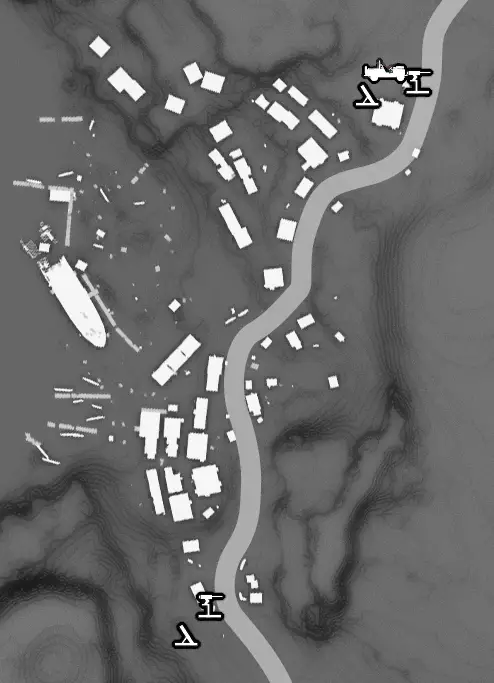
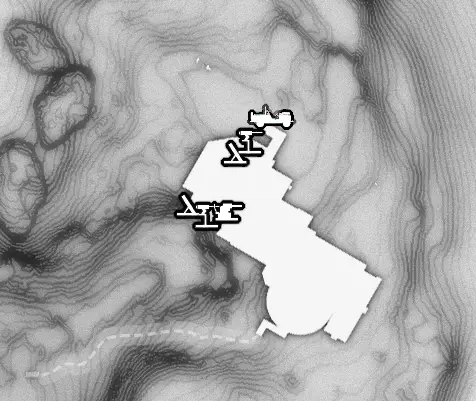
마지막으로, there are individual maps of every outpost/guard post with weapon and vehicle locations marked.
Total Weapons / Vehicles Per Region
첫 번째, here’s a list of the total number per region. Aside from mortars, there are two variants of each weapon/vehicle but only one appears in each region, so if you’re looking for a specific variant, make sure you’re in the right AO. Also listed are abbreviations used for the rest of this guide.
*0 변화 없는, 6 patrol vehicles
*3 변화 없는, 7 patrol vehicles.
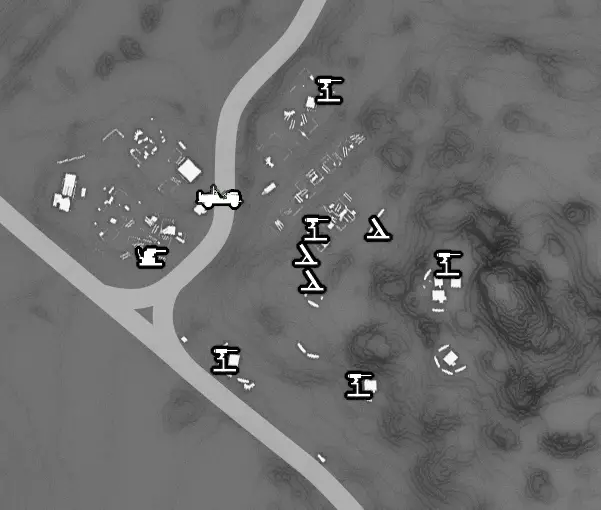
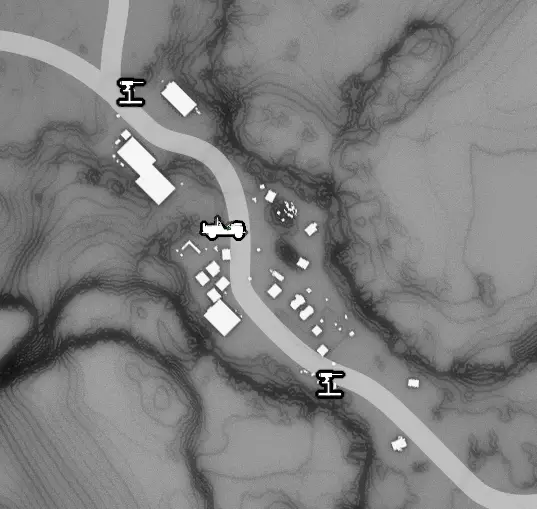
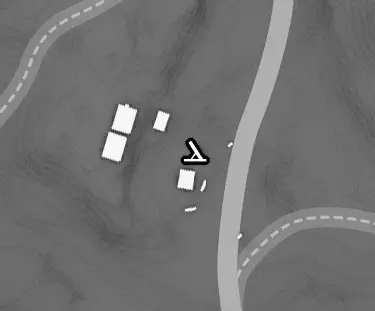
Index of Items Per Outpost (아프가니스탄)
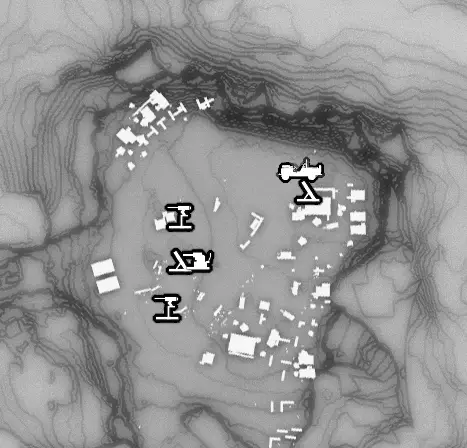
OKB Zero / Qarya Sakhra Ee / Wakh Sind Barracks
OKB Zero / Wakh Sind Barracks
OKB Zero / Wakh Sind Barracks / Da Ghwandai Khar
OKB ZeroMTR x5
VOL x6
ZHZ x4
Afghanistan Central Base CampMTR x1
VOL x2
Serak Power PlantMTR x1
VOL x1
Aabe Shifap Ruins없음
Yakho Oboo Supply OutpostMTR x1
VOL x2
ZHZ x1
ZAZ x1
Qarya Sakhra EeMTR x5
VOL x3
ZAZ x1
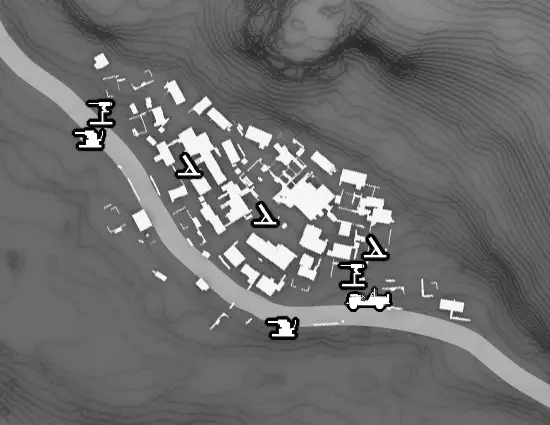
Wakh Sind BarracksMTR x5
VOL x5
ZHZ x2
ZAZ x1
Da Smasei LamanMTR x2
VOL x2
ZHZ x1
ZAZ x1
Da Ghwandai KharMTR x3
VOL x2
ZHZ x2
ZAZ x1
Lamar Khaate PalaceMTR x2
VOL x2
ZHZ x1
ZAZ x1
Mountain Relay BaseMTR x2
VOL x2
ZHZ x1
ZAZ x1
Da Wialo KallaiMTR x3
VOL x2
ZHZ x1
ZAZ x1
Eastern Communications PostMTR x2
VOL x2
ZAZ x1
Da Shago KallaiMTR x3
VOL x2
ZHZ x1
ZAZ x1
Spugmay Keep없음
전초 01MTR x1
VOL x3
ZAZ x1
전초 02VOL x1
전초 03MTR x1
전초 04ZAZ x1
전초 05VOL x2
전초 06MTR x2
전초 07MTR x1
VOL x1
전초 08MTR x1
VOL x1
전초 09VOL x2
전초 10VOL x1
전초 11MTR x2
VOL x2
전초 12MTR x1
전초 13MTR x1
VOL x1
전초 14MTR x2
VOL x1
전초 15MTR x2
VOL x1
전초 16MTR x2
전초 17MTR x1
VOL x1
전초 18MTR x2
VOL x2
전초 19MTR x2
전초 20MTR x2
VOL x1
전초 21MTR x1
VOL x1
전초 22MTR x2
VOL x1
전초 23없음
전초 24MTR x1
전초 25MTR x2
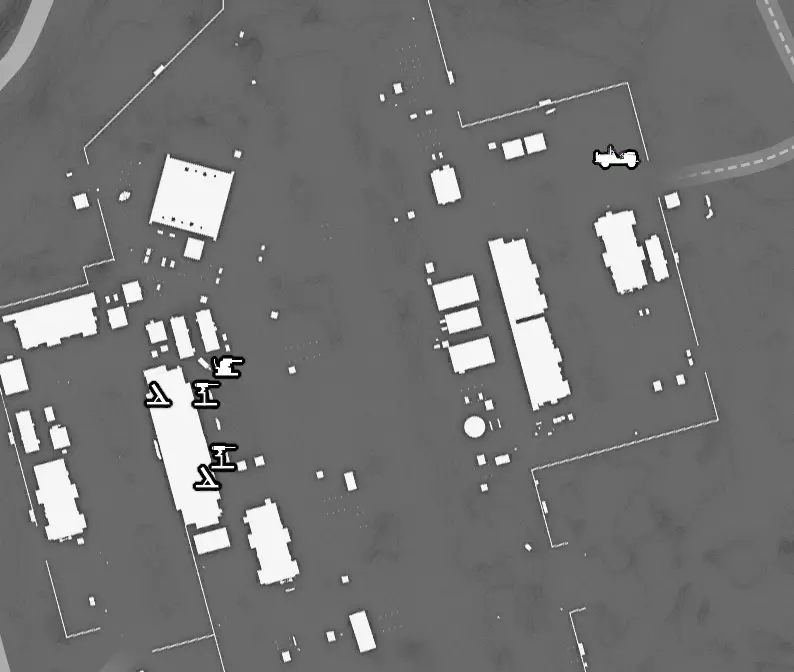
Index of Items Per Outpost (Angola-Zaire)
Ditadi Abandoned Village / 가드 포스트 10
Kungenga Mine / Bampeve Plantation / Ditadi Abandoned Village / 가드 포스트 19
Mfinda OilfieldMTR x1
WIN x2
GAT x1
APE x1
Bampeve PlantationMTR x1
WIN x5
APE x1
Kungenga MineWIN x7
APE x1
Kiziba CampMTR x2
WIN x3
GAT x1
APE x1
Bwala ya MasaMTR x2
WIN x2
APE x1
Lufwa ValleyMTR x2
WIN x2
GAT x1
APE x1
Ditadi Abandoned VillageMTR x3
WIN x5
GAT x1
APE x1
Nova Braga AirportMTR x2
WIN x2
GAT x1
APE x1
Munoko ya Nioka StationWIN x2
APE x1
가드 포스트 01MTR x1
가드 포스트 02WIN x2
APE x1
가드 포스트 03MTR x1
WIN x2
가드 포스트 04WIN x2
가드 포스트 05WIN x2
가드 포스트 06MTR x1
WIN x1
가드 포스트 07MTR x1
가드 포스트 08MTR x2
WIN x2
가드 포스트 09MTR x2
BOR x1
가드 포스트 10MTR x5
WIN x2
가드 포스트 11MTR x1
WIN x1
가드 포스트 12BOR x1
가드 포스트 13MTR x1
WIN x1
가드 포스트 14MTR x1
WIN x1
가드 포스트 15MTR x1
WIN x2
가드 포스트 16WIN x2
APE x1
가드 포스트 17없음
가드 포스트 18WIN x2
가드 포스트 19MTR x2
WIN x4
가드 포스트 20없음
가드 포스트 21MTR x1
WIN x1
가드 포스트 22없음
가드 포스트 23BOR x1
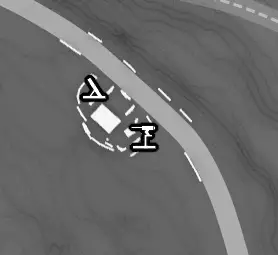
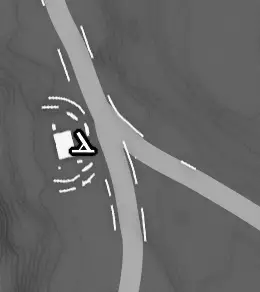
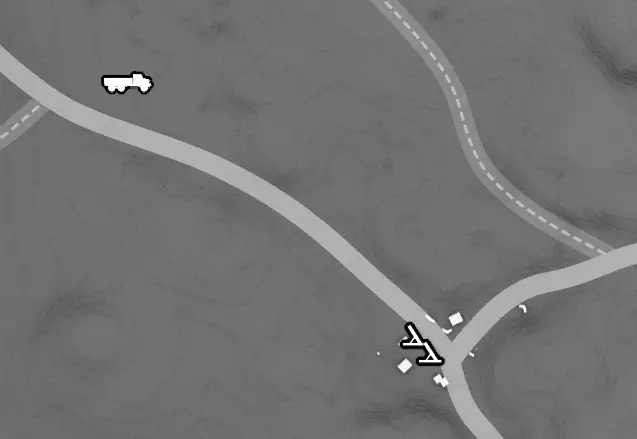
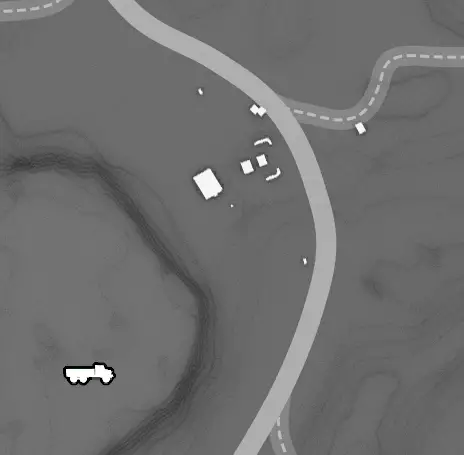
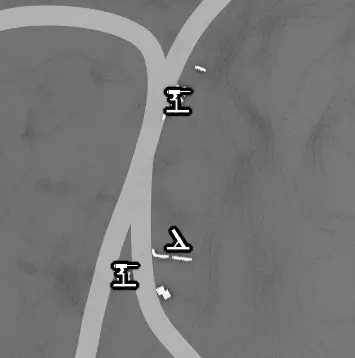
Vehicle Patrol Route Maps
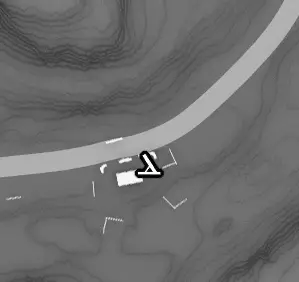
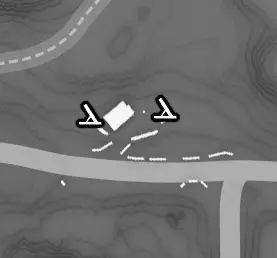
Patrol routes are drawn as red paths and stop points are drawn as blue dots. Vehicles will travel along their route until they reach a stop point and then the driver and guard will park and exit the vehicle for a short time. Then they will get back in and drive until the next stop point or they will hit the end of their route and turn around. Some paths are circular or cross over, so the directions they travel are indicated with arrows in those cases, otherwise the vehicle will travel back and forth along the same path.
The best place to catch up to them is at their stop points or when they are going through guard posts, as they will slow down quite a bit.
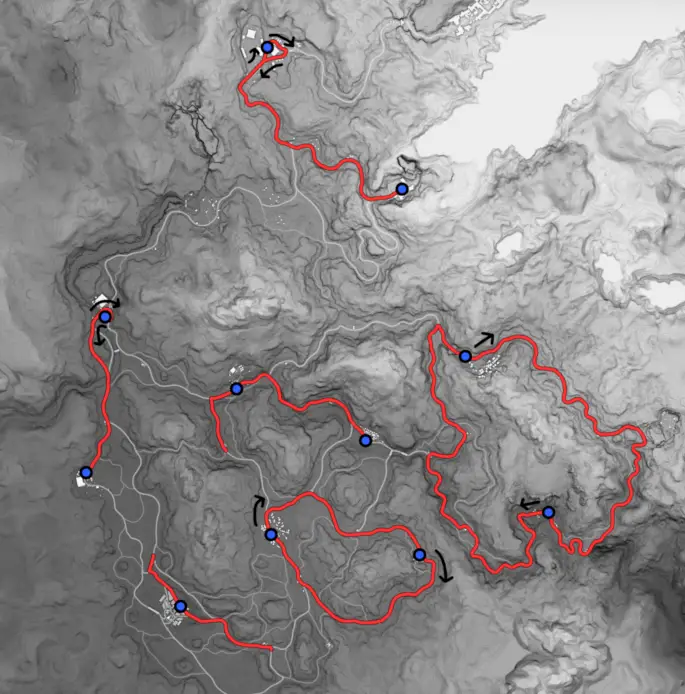
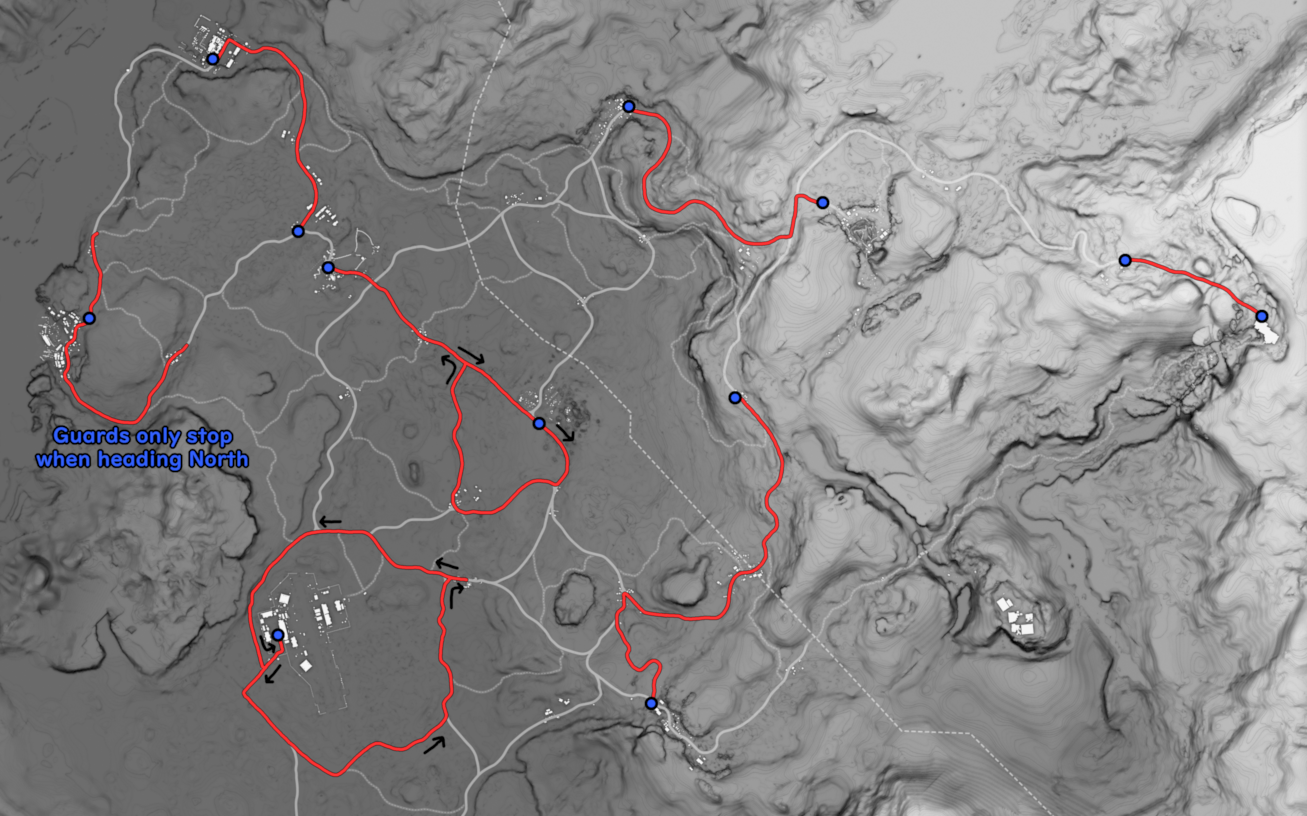
As indicated on the image, the vehicle patrol that goes through Bwala ya Masa will only stop and exit the vehicle at its stop point when it’s travelling North. When going South it will keep driving until it turns around at the end of its path.
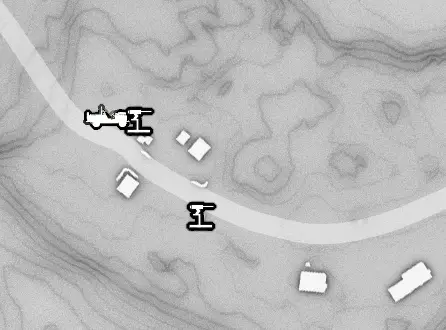
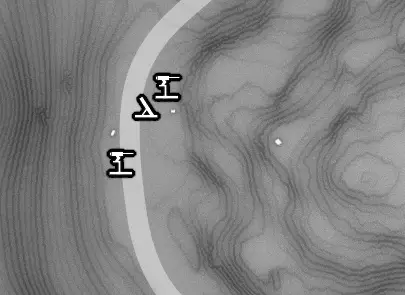
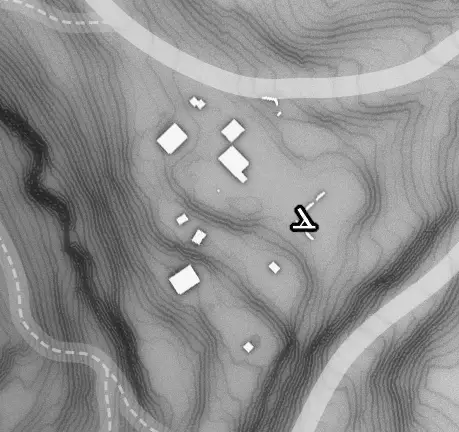
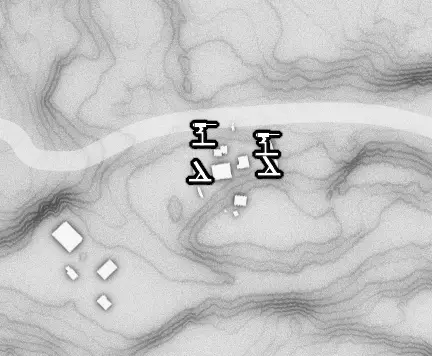
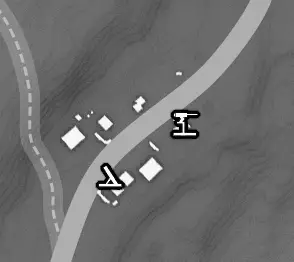
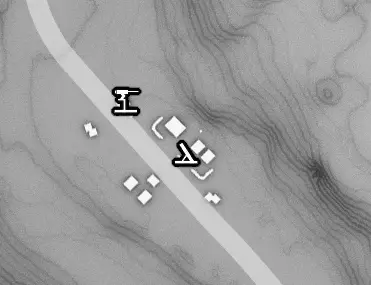
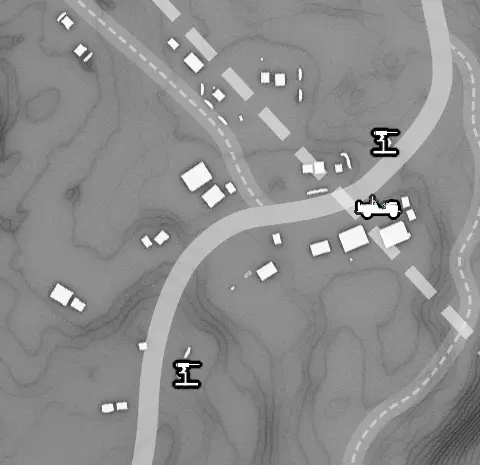
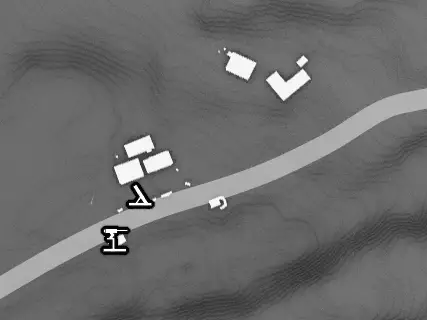
Afghanistan Outposts Maps
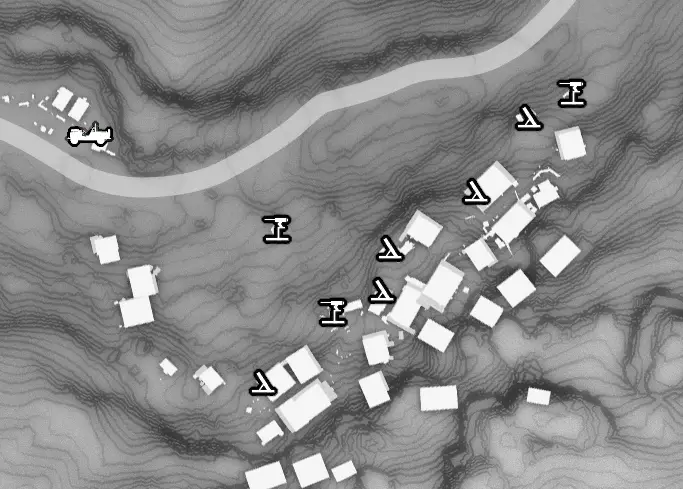
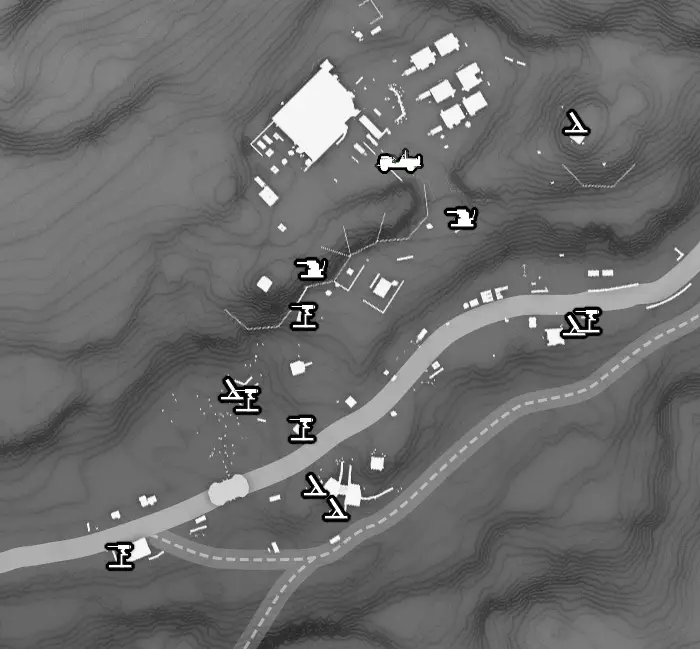
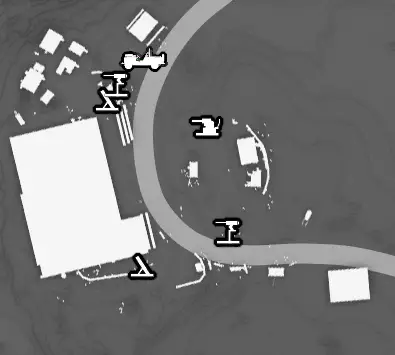
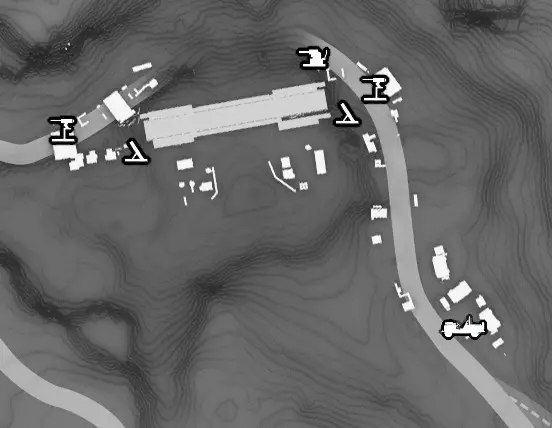
Afghanistan Guard Posts 01-05 지도
Afghanistan Guard Posts 06-10 지도
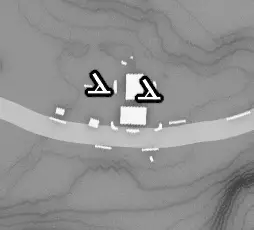
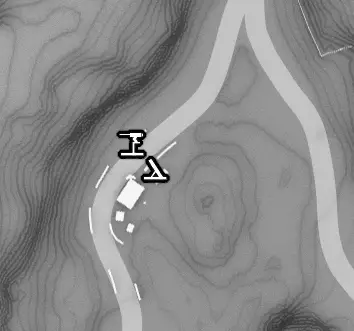
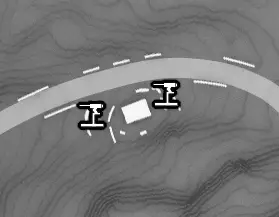
Afghanistan Guard Posts 11-15 지도

Afghanistan Guard Posts 16-20 지도
Afghanistan Guard Posts 21-25 지도
없음
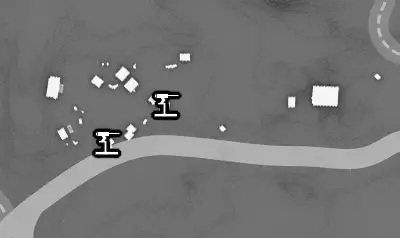
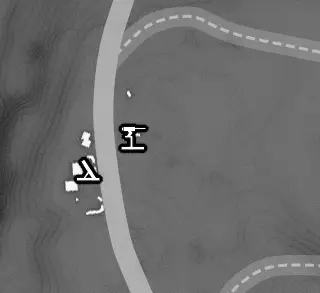
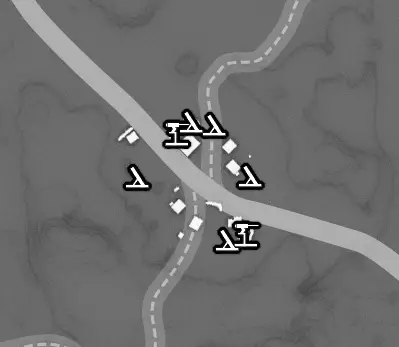
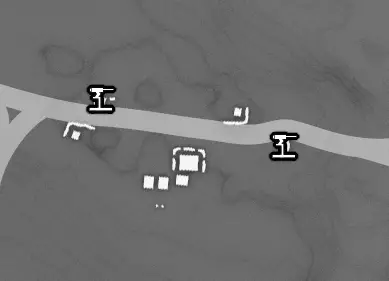
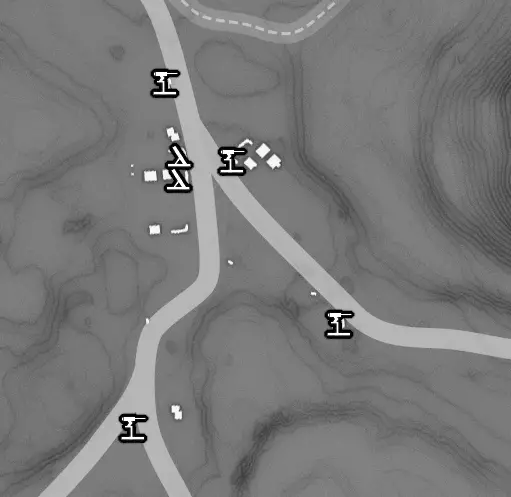
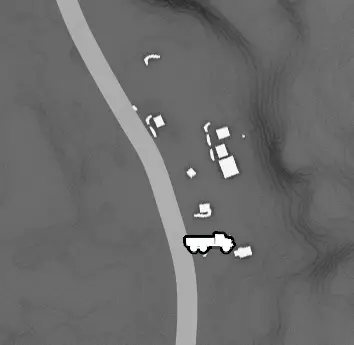
Angola-Zaire Outpost Maps
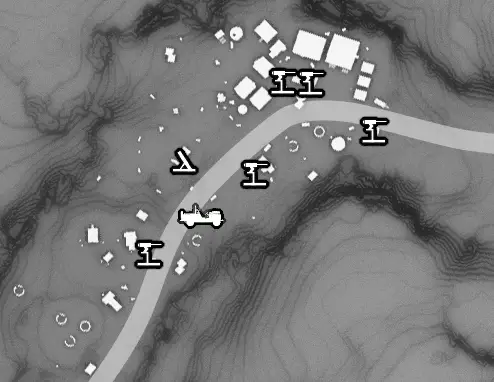
Angola-Zaire Guard Posts 01-05 지도

Angola-Zaire Guard Posts 06-10 지도
Angola-Zaire Guard Posts 11-15 지도
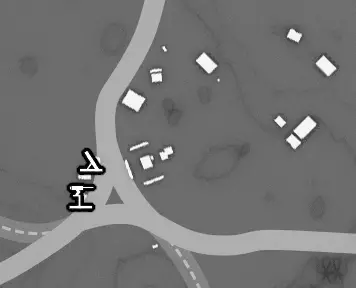
Angola-Zaire Guard Posts 16-23 지도
없음
없음
없음
폐쇄
I double checked every location and the surrounding areas for any stray weapons or vehicles and I believe I got them all. 하지만, if I missed any, please let me know and I’ll do my best to get it updated quickly.
이것이 오늘 우리가 공유하는 모든 것입니다. METAL GEAR SOLID V: THE PHANTOM PAIN 가이드. 이 가이드는 원래 작성자가 작성하고 작성했습니다. pumpkinkake. 이 가이드를 업데이트하지 못한 경우, 다음을 수행하여 최신 업데이트를 찾을 수 있습니다. 링크.