This guide will show you the best composition of skills and weapons to play with the most underrated perk in the entire game.
The Perk
The survivalist perk is a generalist who can use any weapon with a certain amount of efficiency.
It’s also very tanky with its heavy armor and general damage resistance.
Don’t be fooled by the generalist status this perk has, because it can dish very high amounts of damage and be one of the most resilient perks in the entire game.
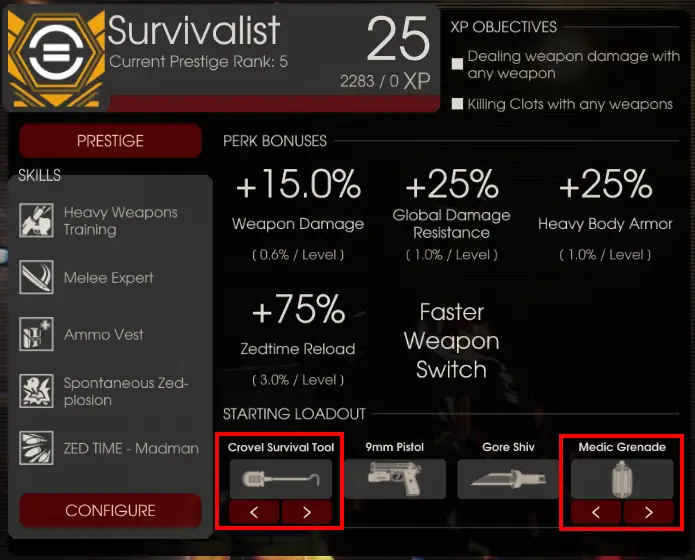
The Start
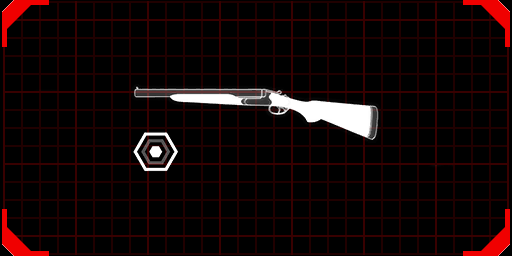
Before Starting the match, be sure to select your favorite starting weapon and grenade-like shown in the image below.
It matters little what weapon or grenade you choose, 하지만, the Crovel, 윈체스터 1894, Caulk n’ Burn and medic grenades are, 내 생각에는, the best ones for starting.
The weaponry
For this build, all you need is the Crossbow, the Hemoclobber, and the HRG Kaboomstick. All of these weapons will work in conjunction with each other, giving you the most amount of damage and survivability possible
The Crossbow
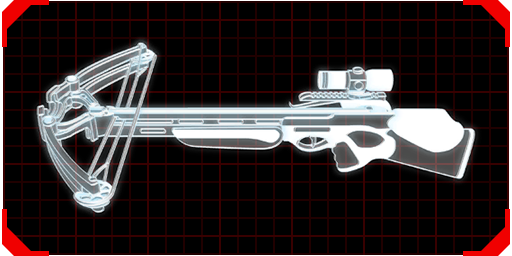
The crossbow is a tier 2 Sharpshooter weapon and will be the first weapon you will be buying. It’s cheap, precise, deals tons of damage, and can have its ammo re-collected from the ground, granting you a sort of infinite ammo, and don’t be afraid to aim downwards for the legs and abdomen, that will make it easy to recover all of your bolts (mainly in open maps).
Its best uses are against Bloats, Husks and Gorefiends, and Sirens, all of which will be decapitated with a single bolt! It’s also an extremely good weapon to fight Scrakes, as the first headshot will always stun and the high piercing damage can make short work of them, making the crossbow one of the best weapons to solo Scrakes.
Just be aware, that the crossbow bolts can pierce through several zeds, be careful not to enrage any big zed behind the line of fire!
Be sure to upgrade it to tier 4, 또는, 층 5 가능하다면.
The Hemoclobber
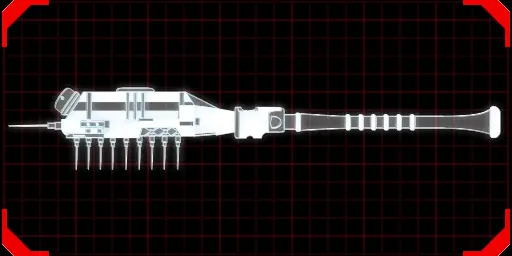
아, the hemoclobber. Once an extremely overpowered weapon, 지금, a still very capable and powerful melee weapon in the right hands.
It will be the second weapon you will buy. It can easily deal with any trash zeds and medium ones too, 하지만, its principal usage will be in the heavy attack, in which you will recover 15 health and deal a tremendous amount of damage on the target and the zeds around it, but its main usage is survivability and team play, Being able to freely heal teammates and yourself and land very effective parries are the strongest points of the weapon, but feel free to use it as an ammo saver if needed, 그냥 기억해, the heavy attack uses ammo but still can be used with its magazine empty. 또한, as you buy this weapon, it’s recommended to change your grade to the flashbang as you will already have a pseudo healing granade.
The HRG Kaboomstick
This will be the last weapon you will buy. It’s very powerful against hordes of trash zeds and cleaning the way forward for your team, but its best usage is for killing either quarter and fleshpounds, who will be shredded with few shots.
Its amazing alternative fire (shooting both barrels at the same time) is the best quality of it. It can help get out of dangerous situations with its propulsion potential. Try to use it to never let a Fleshpound hit you while at the same time dealing damage to it.
Never be afraid to spam it if in a pinch!
Upgrade this weapon only once, to tier 4.
기술
Phase one: pre KaboomstickThe skill you will be using will synergize with the weapons you will be using.
You be using Heavy Weapons Training, Melee Expert, Ammo Vest, Spontaneous Zed-plosion, and for zed time skill, Madman.
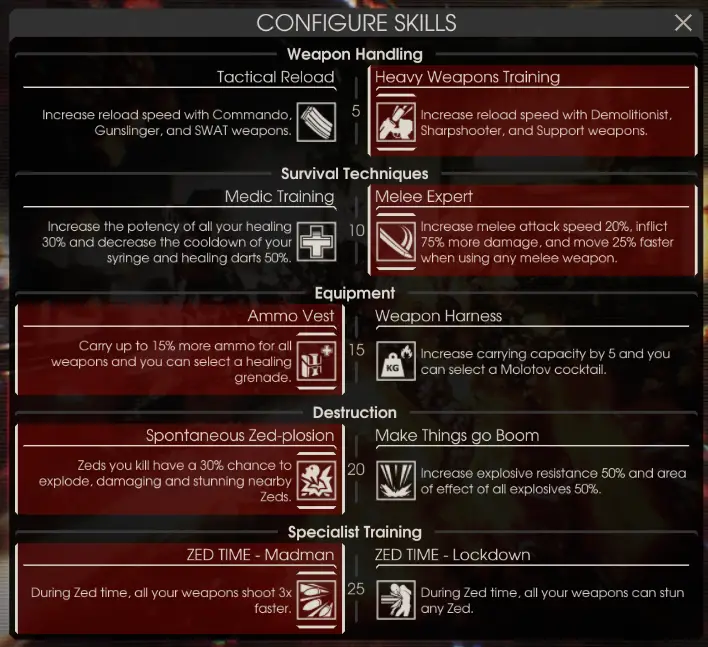
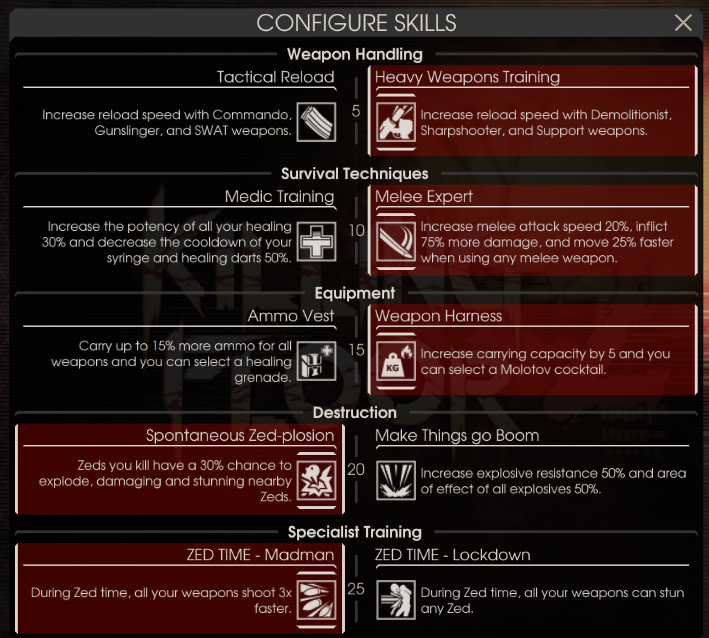
단계 2: KaboomstickAfter buying the Crossbow and the hemoclobber, you will still be needing to buy another weapon, the kaboomstick, and for this, we change the skill Ammo Vest for the skill Weapon Harness for the sweet 5 inventory capacity, thus allowing we to have all three weapons at the same time!
The Gameplay
With this loadout, don’t be afraid to be on the front you will be tanky, fast, and have a really reliable way to heal yourself in a pinch. be proactive and aware of everything that’s happening. try to deal with Scrackes as fast as possible, as you can easily solo them, always be there using your kaboomstick against fleshpounds, don’t be afraid to use your ammo as it is cheap and one of your weapons can have its bolts re-collected, 그리고 필요한 경우, you can always heal your teammates with the hemoclobber os simply use it to run away from danger with your melee speed boost.
기억하다: Not even the best of skills and load-outs can help if you don’t have the necessary experience.