
- 제목: 이슨 조
- 출시일:
- 개발자:
- 발행자:
Information about Isonzo is still incomplete. 이것을 사용하여 게임의 세부 정보를 입력할 수 있도록 도와주세요. 문의 양식.
이 가이드에서는, I aim to help you understand what the various icons in-game mean, and how they can help you in the middle of a match.
소개
You’ve probably played Isonzo before viewing this guide and wondered “What do these icons mean?”. Or you may be wanting to buy Isonzo soon and are researching the game before you do so (good job on ya). 잘, you are in luck; I have made this guide to help everyone understand what the icons in-game mean; both new players, veterans, and those who may want to get into the game, but wish to know some basics beforehand.
Forward Posts and Main Points
You probably know what a forward post/main point is, however you may have noticed 2 icons below it; one with three bullets, the other with crossed grenades.
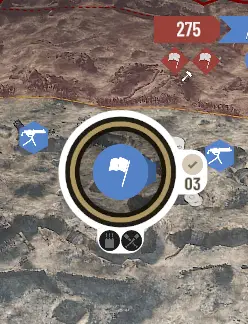
These are bonuses. When spawning on points when these bonuses are active, you spawn with buffs depending on what bonus is active. The ammo bonus gives anyone who spawns on the point extra ammo. Rifles get 95 rounds in their reserve, however I do not know the number for automatic weapons. The bonus still applies to them however. To activate an ammo bonus, a rifleman who has the Ammo Carrier perk equipped needs to build an ammo crate in or near the point (Or FP). They can do this by pulling out their shovel (3 기본적으로) and holding Right-Click. This brings up the build menu, and when you can place the crate, it will be highlighted green. When your ammo crate is in the right position, the words “Ammo Bonus” will appear in the middle of the menu, with a flag icon above it.
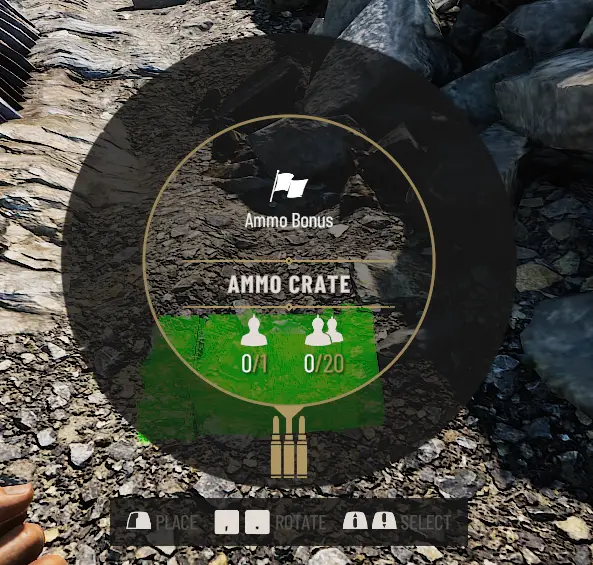
This activates the ammo bonus for the point/post, and anyone who spawns on this point will have extra ammo in their reserves. They can also resupply ammo from the crate, so be sure to place these down ASAP, these are immensely helpful for your team. When the bonus is active on a point, you will see this
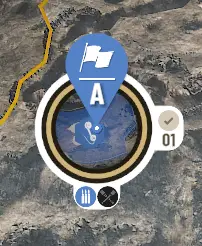
The active bonus will be filled in, so you can tell at a glance whether or not a bonus is active, and which one is active.
The grenade bonus requires an Assault player with the Grenadier perk equipped to build a grenade crate. The process for doing so is the same as the rifleman, so please refer to the steps above.
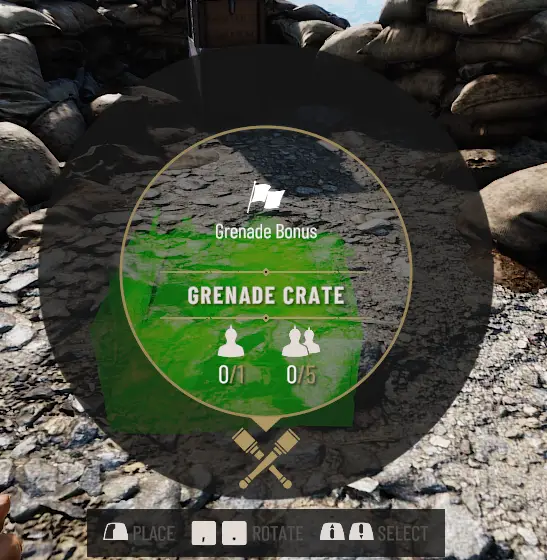
The grenade bonus provides anyone who spawns on the point/post with an extra grenade (This bonus only applies to those who have equipped grenades, 즉. 폭행, 소총병, and Engineer, and this does not affect rifle grenades). Grenade crates allow your team to resupply grenades up to their maximum (not counting the extra grenade on spawn).
다시, these crates are extremely important to your team, as it can keep them supplied without them having to die, especially for marksmen (I know I know, no one likes marksmen, but we have to acknowledge that they can impact a match greatly if they’re competent (I’m looking at you officers, keep your heads down and your cannon fodder close)).
One more thing; there is a limit to how many of these crates can be built. This limit can be seen underneath the name of whatever you’re building, and there’s two limits respectively; the one with the single man is your personal limit, this is how many you yourself can build before you have to destroy one to make another. The limit with 2 men is the limit for the entire team, this is how many total can be made. Keep this in mind when you’re about to build a crate.
Sectors
지금, when you play, you will notice a bar at the top, it looks like this:

There is very valuable information here, and I will explain what each icon means.
The number on the first arrow indicates attacker tickets. These tickets indicate how many casualties the attackers can take before they lose the game. 대안으로, if the attackers are contending a point, either by arming a sabotage objective, or having men on the capture point, the game will enter overtime. Attackers will need to keep putting pressure on either point and capture/sabotage them to continue the match. If the defenders clear the attackers off the point, attackers will have 5 seconds to regain a foothold until the game ends.
The flags on the sector bar indicate capture points. These are points you need to capture fully. Capture areas are designated by the blue/red area underneath a flag on the map. When an attacker enters the area, the area will be contested, and the point will go in favour of whoever has more men on the point.
Sabotage areas are symbolised by a spool of wire. These points need to be armed with dynamite by attackers. Defenders need to keep this from happening, and if the point is armed, they need to defuse the charge before it explodes.
Whenever either point is being contested, the sector bar for them will become striped, and will either fill or deplete, depending on which side the point is going in favour of.

The diamonds on either side of the sector bar are inactive sectors. These are sectors that are not currently in play. Sectors on the left of the bar are previously active sectors. These sectors have been captured by attackers. Sectors on the right of the bar are upcoming sectors, these are sectors that the defenders fall back to once they lose the active sector. The last diamond is a sector that doesn’t have any objectives and is purely for spawning once the attackers reach the actual last sector. An example is the sector behind the last point of Dolomiti.
마지막으로, the flags underneath the sector bar are Forward posts. There are icons next to them that indicate their status. Red and empty icons indicate a currently inactive post. These will be accompanied by a hammer icon if it’s a friendly FP. The sector they are underneath indicate whether they are friendly or enemy FPs. Enemy FPs will not be accompanied by a hammer icon.
Friendly FPs that have been built will have a shield icon next to it, whereas enemy FPs that have been built will have a gear with a diagonal line going through it, like the sabotage symbol on other fortifications (MGS, 전선, Mortars.).
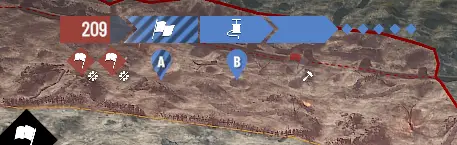
This will allow you to ascertain whether or not your FP or an Enemy FP is up. 추가적으로, whenever a post is being built or sabotaged, the icon will pulse white continually until the action is complete. Keep an eye on this, it can help you react to enemy sabotage.