- 제목: 철 폐
- 출시일:
- 개발자:
- 발행자:
Information about Iron Lung is still incomplete. 이것을 사용하여 게임의 세부 정보를 입력할 수 있도록 도와주세요. 문의 양식.
This will be a quick and vivid explanation of how to get all of the achievements in Iron Lung. I will give my explanation of the achievement, followed by the game’s explanation of the achievement, followed by the lore of the achievement.
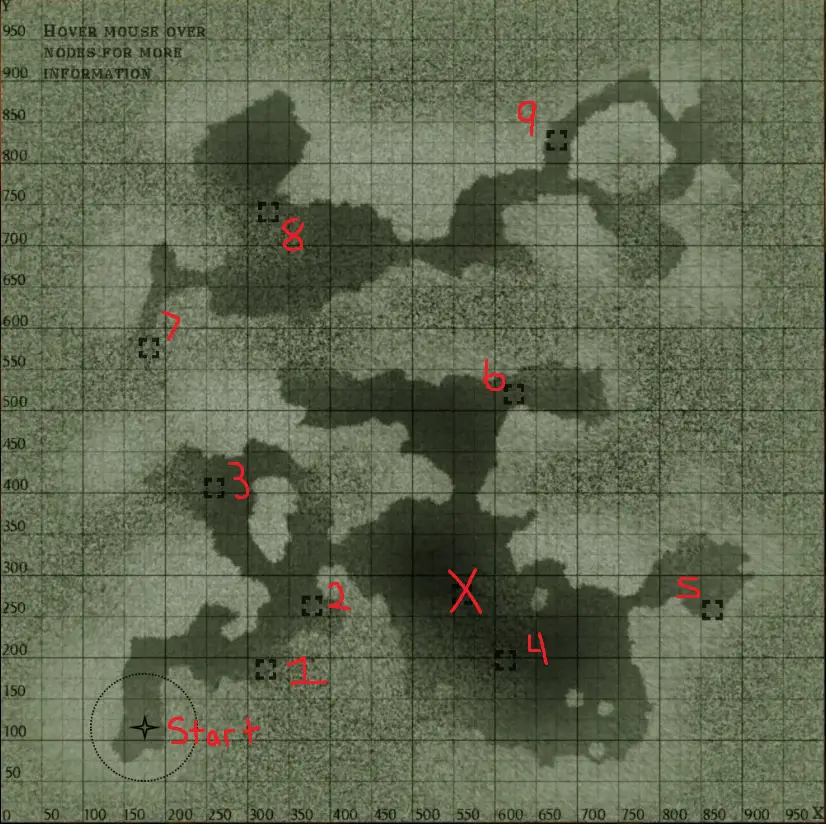
For coherence reasons, locations are expressed as {(엑스, 와이) A = deg}, which explains the x, 와이, and angle of a location.
To follow which anomaly I’m talking about, refer to the only picture posted with the guide.
마지막으로, you will notice an ‘anomaly’ has an x over it. This is not a real anomaly, but rather the game’s way of luring you into a jumpscare. Keep in mind that after photographing that location it will still show up as a completed anomaly. Do not ever refer to this ‘anomaly’ as an anomaly.
I really hope this guide makes sense, as it is the first guide I’ve ever made. 행복한 게임!
Normal Achievements
1) 자유
This achievement is given after you read the piece of paper on the floor of the Iron Lung.
“Read what the last person left”
This note was left by a previous convict that explains that your chances of making it out of the ocean alive are low, and that freedom is 100% waiting for you at the end of your exploration.
2) Spatial Awareness
This achievement is given after crashing the Iron Lung.
“Crash into a wall”
This achievement is decently loud, as crashing the Iron Lung plays a very loud crashing sound. Be ready for it. It will jumpscare you if you’re not ready. XD
3) Not a Whale
This achievement is given after photographing the skeleton, normally the 4th anomaly you will find. Approximate location is (560, 277) A = 243 deg
“Photograph the complete skeleton”
This skeleton is believed to be a similar species of the creature that is hostile towards you.
4) ???
This achievement is given after photographing the light beam, normally the 7th anomaly you will find. Approximate location is (182, 576) A = 184 deg
“Photograph the anomaly”
The lore here is that you’re looking for the remains of the SM-1, a ship that had been believed to be torn apart by a large beast. The light beams you see at this anomaly are believed to be a type of radiation that is able to warp time and space. The radiation was believed to be kept contained on the SM-1 during its destruction. The motion blur combined with the rattling of the Iron Lung is believed to be what the character sees in response to this radiation. 추가적으로, you can see this theory of warping time and space shortly after leaving the anomaly, as you will be teleported to a different location upon moving a few meters away after photographing the anomaly.
5) 베일 너머
This achievement is given after attempting to photograph the 9th anomaly.
“게임을 완료하세요”
Notice how i didn’t say normally 9th anomaly- this is because you only complete the game after attempting to photograph the 9th anomaly. 의미, the order you go in has nothing to do with the completion of the game. Keep in mind though, that events will still occur regardless of your progress in photographing the anomalies.
Hidden Achievements
6) Burner Subs
This achievement is given after entering SM-8 in the C.O.I.
“—————————————”
참고로, the C.O.I. is the computer in the back of the submarine. A lot of data and lore can be found here. Notice as you use the C.O.I. all words or phrases in yellow are possible entries for the C.O.I.
7) You’ve Played This Before
This achievement is given after successfully photographing the normally 9th anomaly.
“—————————————”
This anomaly looks a lot like the 5th anomaly. Notice that you will only be able to photograph 8 anomalies per game. This is because the game ends before you are able to photograph the 9th anomaly. To get around this, simply go straight to the normally 9th anomaly and photograph it to earn this achievement. If you are attempting to get all achievements in one go, be sure to leave either anomalies 1, 2, 3, 5, 6, 또는 8 as last- this way you photograph anomalies 4, 7 그리고 9 which are mandatory for their respective achievements.