
기술과 지식을 향상시키려는 게이머를위한 끊임없이 진화하는 가이드에 오신 것을 환영합니다.! 이 안내서는 상자 외부 전략으로 채워진 포괄적 인 리소스를 제공하는 것을 목표로합니다., 기본 팁, and guides suitable for players of all levels in 헬다이버 2. 개선을 원하는 초보자이든 신선한 관점을 찾는 노련한 베테랑이든, there’s something valuable here for you. 뛰어들어보자!
기본 팁
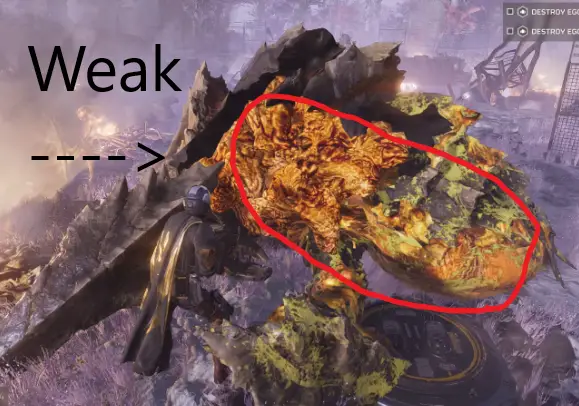
Explosive weapons do more damage to weak points. Explosive weapons, which are specifically designated with the “explosive” 통계, deal increased damage to vulnerable spots like the backs of Chargers, the vents of Hulks, or the exposed flesh beneath destroyed armor plating. Understanding your weapon’s strengths is crucial for effective combat. 하지만, it’s important to be mindful of the self-damage these weapons can inflict, so exercise caution when engaging enemies at close range.
Samples, requisition slips, 메달, and super credits are all shared no matter who grabs them. When it comes to acquiring samples, requisition slips, 메달, and super credits, all players benefit regardless of who collects them. These resources are automatically added to your account upon collection, eliminating the need to evacuate to deposit them. 하지만, it’s worth noting that samples require a player to evacuate while holding them, unlike the other resources mentioned.
Common samples are highest priority. Despite their seemingly ordinary nature, common samples take precedence over rare samples due to their extensive usage in ship upgrades. In higher difficulty levels (7-9), skilled players prioritize collecting at least three super samples per mission. 하지만, the majority of ship upgrades demand a substantial quantity of common samples, making them invaluable. Given the choice between acquiring 10 common samples or three super samples, prioritize gathering the commons for long-term progression. Keep an eye out for updates regarding new sample types, as strategies may evolve accordingly.
Use the laser dog instead of the gun dog; the gun dog sucks ass. While I aim to avoid ranking weapons or strategies, it’s evident that the Laser Rover Dog surpasses the 돌격소총 Drone Dog in utility and effectiveness. The Laser Rover Dog boasts faster “다시 장전하다” 타임스, lower friendly fire damage, superior damage output against both bugs and automatons, and more consistent accuracy. Whether or not to utilize a drone is a personal choice, but if opting to do so, I strongly recommend selecting the Laser Rover for optimal performance.
You can shoot spore spewers to destroy them. Spore spewers, which cause low visibility on bug-infested planets, can be eliminated by gunfire. These mushroom-like structures are slightly smaller than small nests and emit a faint glow in the fog. To locate and destroy them, approach within approximately 100 meters and utilize any means of damage, including shotgun rounds, explosives, or lasers. Treat them like immobile bugs that require their health reduced to zero. While orbital strikes or eagles can be used if deemed necessary, they’re typically not required.
A single grenade to the monitor will finish the terminate illegal broadcast objective. Completing the “terminate illegal broadcast” objective can be swiftly accomplished with a single grenade thrown at the monitor. Although the game guides players to activate the terminal and complete two short steps, throwing a grenade directly at the terminal effectively finishes the mission. Destroying the monitor alone is sufficient. While grenades are the most resource-efficient method, an orbital strike or eagle can also be used to destroy the monitor, fulfilling the side objective requirement.

Super Samples spawn always spawn at this rock. Super Samples consistently spawn at a specific rock location, particularly on difficulties 7-9 where it’s guaranteed. These valuable samples are exclusive to this rock and do not spawn elsewhere. 하지만, it’s essential to note that there exists a counterfeit version of this rock, devoid of any samples. Both rocks are marked with diamond indicators on the map, making it easy to mistake one for the other. 다행스럽게도, the fake rock often contains ammunition and stims for replenishment, but lacks Super Samples.

Expert Tips
Jump pack is good if you know how to use it. The jump pack can be a valuable asset if utilized effectively. It allows for safe mid-air reloading of support gear or deployment of stratagems without risking danger. 게다가, it provides access to locations inaccessible to bugs, and clever usage can even facilitate attacking Titans from advantageous positions. Expect potential buffs in the future due to its currently low usage rate, possibly including faster recharge rates and extended jump capabilities.
Tanks make your stratagems mobile. Utilizing tanks effectively can enhance the mobility of your stratagems. Mounting an HMG on top creates an unstoppable mobile gun platform, while placing a tesla tower transforms it into a mobile choke-point disruptor. Avoid using regular sentries, as they become vulnerable targets on the tank and can explode. 박격포, 하지만, are suitable for deployment. Consider adding a shield stratagem and resupply, although maintaining ground atop a moving target may not always be advisable amidst enemy fire.

Chargers are dumb. Chargers can be reckless but useful, plowing through anything in their path, including enemy bugs. 재미있게, if they collide with a nest, both the nest and the charger are instantly destroyed. Titans exhibit similar behavior but do not perish from team-killing actions.
Flamethrower melts chargers. The flamethrower proves highly effective against chargers, dispatching them in mere seconds. 하지만, exercise caution to avoid setting yourself ablaze. Diving can extinguish flames, and keep in mind the brief reignition delay after a period of inactivity. Utilize strategic bursts of flames to maintain continuous firepower.
Split your team into a 3 man and a solo. Although it may seem counterintuitive, splitting the team into a group of three and a solo player reduces enemy spawns, making engagements more manageable. The solo player can focus on critical objectives while the larger group tackles threats. Prioritize distributing resources and coordinating objectives effectively among team members.
Make tactical retreats. Employ strategic retreats, especially through narrow passages, to gain distance from overwhelming enemy forces. Utilize offensive tools like strafing runs, mines, and LMG sentries to eliminate pursuing bugs while regrouping. Recognize when outnumbered and leverage tactical retreats to maintain control of engagements.
Dump gear at evac. Take advantage of evac points to unload surplus gear such as extra weapons, 보초, and samples. Deposited items remain accessible and can serve as defensive measures or resource caches for subsequent missions. Position mortars near the center next to the evac terminal to avoid friendly fire incidents, and place regular sentries strategically to cover blind spots without endangering teammates.