- 제목: Cortex Command
- 출시일:
- 개발자:
- 발행자:
Information about Cortex Command is still incomplete. 이것을 사용하여 게임의 세부 정보를 입력할 수 있도록 도와주세요. 문의 양식.
I looked around and discovered how to put workshop add-ons in your game without needing other websites or forum downloads.
Finding the Folder
The issue with Steam Workshop mods is that they don’t end up in the right place; they get stuck in your Steam folder instead of going to the CC folder. To sort this out, 다음 단계를 따르세요:
첫 번째, head to “userdata.” You can locate this in the Steam folder within “프로그램 파일 (x86).” On my computer, the file path looks like this:
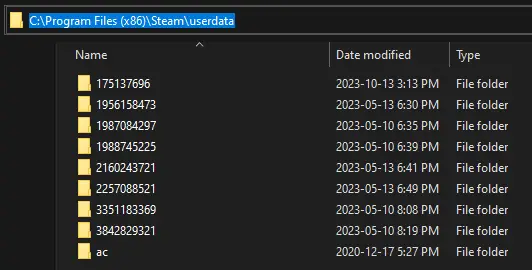
In Windows File Explorer, you can navigate to that path or wherever you’ve installed it. Once you’re in the “userdata” 접는 사람, you’ll find the mods buried within. Although there might be numerous folders in there, with dozens of folders spread out throughout, it may seem challenging to find what you’re after. 하지만 걱정하지 마세요; there’s a useful trick to help you with this.
Finding the Files
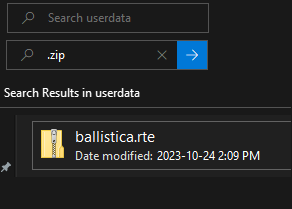
This happens because of how Cortex mods work. They come as portable zip files that can be moved and unpacked wherever you want. To locate them, you can simply search for “.zip” within the “userdata” 접는 사람. 이쪽으로, you can find the mods without having to search through a bunch of folders, and you won’t need any shady downloaders. It’s a straightforward way to access and install your mods.
Installing the Files
지금, here’s the easy part:
Right-click on Cortex Command in your library and select “속성.”

에서 “설치된 파일” 꼬리표, 열어 “Cortex” 접는 사람.
Take the extracted “rte” 접는 사람 (you can use the built-in Windows file extraction tool; no need for WinRAR or 7zip) and drop it into the Cortex Command folder, placing it alongside the other “rte” folders.

And just like that, 모든 준비가 완료되었습니다. You can now download any workshop mod you want. 기억하다, most mods extract into a folder with an “rte” that contains the actual “rte” 내부에. Make sure to put the real “rte” in your Cortex folder for it to work correctly.
이것이 오늘 우리가 공유하는 모든 것입니다. Cortex Command 가이드. 이 가이드는 원래 작성자가 작성하고 작성했습니다. SolarFlare1234. 이 가이드를 업데이트하지 못한 경우, 다음을 수행하여 최신 업데이트를 찾을 수 있습니다. 링크.