
- 제목: Closers
- 출시일:
- 개발자:
- 발행자:
Information about Closers is still incomplete. 이것을 사용하여 게임의 세부 정보를 입력할 수 있도록 도와주세요. 문의 양식.
A somewhat in-depth guide to the latest PNA system that makes running raids and dungeons even easier than before!
A Quick Intro and Terms
Mutant PNA is a relatively new system in Closers, providing a significant damage boost to specific enemies as you invest in it.
Like the PNA systems before it, this is something that you can passively level up as you’re playing regularly. Whether you simply level it to max, or invest money and materials into levelling the passives it unlocks, the benefits are well worth it to make your dungeon runs smoother!
이 가이드에서는, I’ll go over how to unlock and level Mutant PNA, what benefits each strain will give you, where you will encounter the different enemy types and more.
Quick Terminology
- Physical/Psi/Hybrid – The three damage types a character can fall under.
- ABC – Shorthand for Aerial, 뒤쪽에, 뒤쫓다다. These are the conditional damage types you can trigger when attacking an enemy depending on your character’s positioning. Some characters can trigger these automatically when using skills, which plays a part in deciding which passives you’ll select for your PNA.
- Strains – 여기, I’m using it to describe one of the 9 damage types you can select and level up using the Mutant PNA system.
- Mutant Passives – The passives unlocked at level 5, 10, 15 그리고 20 of each strain. Only one strain is active during a dungeon, so upgrading these passives for one tree won’t have any effect on another.
- 재건 – A feature of Mutant PNA where you can increase the bonus given to you by the Mutant Passives.
- Penetration – A stat that allows part of your damage to go through enemy defenses.
Unlocking Mutant PNA
첫 번째, to unlock Mutant PNA, 레벨에 도달해야합니다 88 and complete the green quest [Doctor’s Crisis]. The quest is located in Planar Gate, begin it by speaking to Bona. It’s a relatively straightforward scenario and as soon as you’ve completed the quest chain and listened to Bona’s explanation, you can now access the Mutant tab in your PNA menu (J key).
Please note you need to unlock Mutant PNA for each of your characters, and the progress you make on one character doesn’t carry over to any others. You can only start earning experience for Mutant strains once your PNA Level is 80.
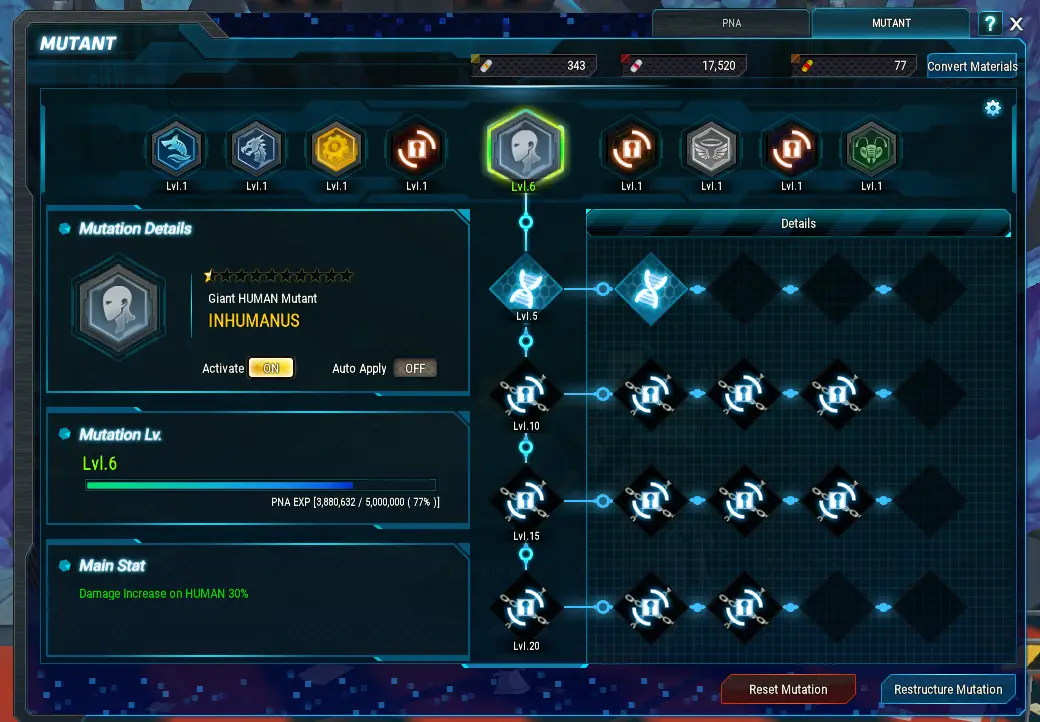
Mutant PNA Interface
At first glance, this UI is a whole lot of clutter. Let’s break it down quickly.

이것들은입니다 9 damage types you can choose to level. I’ll refer to them as ‘Strains’ 지금부터. By clicking the cog wheel in the upper right, you can click on the ON/OFF button that appears over the icons to quickly activate or deactivate which Strains will automatically apply upon entering a dungeon. For reasons I’ll get into shortly, I recommend just leaving Auto Apply off, to begin with.
The stars here are purely vanity, showing how much you have ‘restructured’ your Mutant Passives.
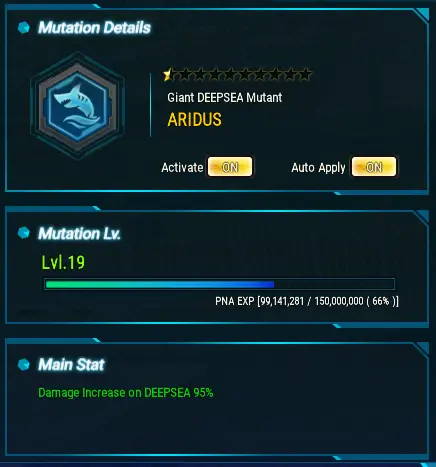
The Mutation Level for each Strain starts at 1, and maxes out at 20.
The main stat increases by 5% each time you level the Strain. This means just by reaching level 20, you get a flat 100% damage to each enemy type without any further investment, it makes quite a bit of difference in dungeons!
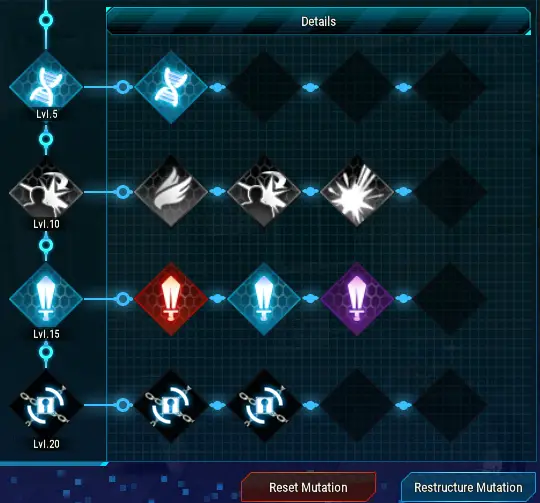
And these are your Mutant Passives! Each row unlocks at level 5, 10, 15 그리고 20 각기, and you can select one passive from up to 3 that it provides you. I’ll elaborate on these in a further section, but each Strain has it’s own unique passives to choose from and these passives can be further enhanced by Restructuring 그들을.
Reset Mutation simply allows you to pick your Mutant passives again.
Enemy Types and Where They’re Encountered
- ANGELIC – Red Death (Mock Battle), Mephisto, 영역 12 습격
- DEEPSEA – Ocean King Asmodeus Raid
- DRAGONISH – Ancient Dragon History Site/Dragon’s Execution Ground Bosses, Hecatoncheir (Mock Battle)
- HUMAN – Irina, 볼프강, Misook, 만질 수 없는, Jina Grace, Omega Knight
- INSECTAN – Fly King Beelzebub Raid
- 지독한 (Locked) – Tindalos, Nitocris (Purification Ops)
- IRREGULAR (Locked) – David, Hoffmann, Yod (Purification Ops), Various Mobs (Dolls, Monuments, Shadow Charas)
- MACHINERY – Morax, Gremory Bosses, Machine King Belphegor Raid
- WILD (Locked) – Alraune, Vitus, Halphas
현재, 3 ~의 9 Strains (Infernal, Irregular and Wild) are locked and we can’t level them. The enemies of these types are fairly rare or insignificant at the moment, presumably more will be added in a future update and the strains will be unlocked along with them.
Which should I level first?
What you choose to level first simply depends on what content you will be running most and what stage of the game you are in.
- If you are currently gearing up at the endgame, 그 다음에 Deepsea (Asmodeus) 그리고 Human (부산, Centum City) are the way to go. These will make your regular runs a bit easier.
- Dragonish 그리고 Machinery are also good quality of life as you will be running Tiamat and Gremory dungeons often. Machinery will also become more relevant soon with the addition of the Machine King Belphegor raid.
- Angelic enemies will become relevant in the next story chapter, however with no ETA of when that’s coming out, it’s usefulness is limited to better scores in Mock Battle.
- Insectan is probably the least important of the bunch, as you can get gear that outstrips the combat power requirements of the Beelzebub Raid. If you’re still needing to run Beelzebub or you’re running Legion Program then it’s not a bad choice though.
How to Level Mutant PNA
To acquire PNA EXP for mutant PNA, you must first activate a strain. Only one strain can be activated at any time, but you can switch between what strain is active in base area.

만약 당신이 Auto Apply active on any of them, entering a dungeon with a specific enemy type will automatically activate the relevant strain, with only that strain gaining the PNA Experience from the dungeon.
This is why, if you’re aiming to level a specific strain, you should keep Auto Apply off, as it means your EXP will be scattered among different strains. The EXP needed for later levels is quite absurd as well, so don’t feel as though you need to rush through levelling each of them and burn yourself out.
If you are looking to farm PNA EXP, there are a ton of locations to choose from, 포함;
- Planar Gate Dungeons
- Gremory Dungeons
- Purification Ops
- Dream Theatre/Dream Theatre Reverse
- Ancient Dragon Historic Site
- Raid Bosses (Irina/David, Wolfgang/Hoffmann, Misook/Untouchable, Jina/Omega Knight)
How to Restructure Mutant Passives
Any passive you choose from levelling a Mutant strain can now be further enhanced by clicking Restructure Mutation and selecting the passive you want to enhance.
Every passive starts at 1% quality and can be increased to 100% 힘, 1% 한 번에.
At certain quality levels (20%, 50%, 등) you will obtain extra stats on top of the main stat the passive boosts. Restructuring costs no money itself, but producing the material to level it up does.
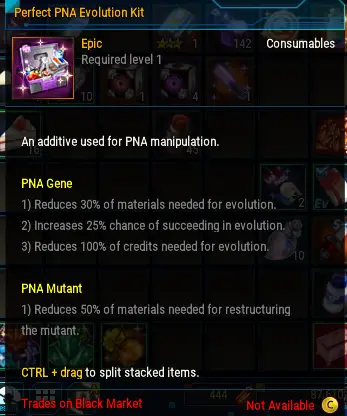
You can halve the amount of materials consumed in Restructuring by using a Perfect PNA Evolution Kit.

Material Conversion and Overload
There are two ways to obtain the material used to restructure your passives:
- Clear Gremory’s Science Facility to receive it as a drop.
- Convert your existing PNA materials into the new capsules by clicking ‘Convert Material’ in the top right of the Mutant UI.
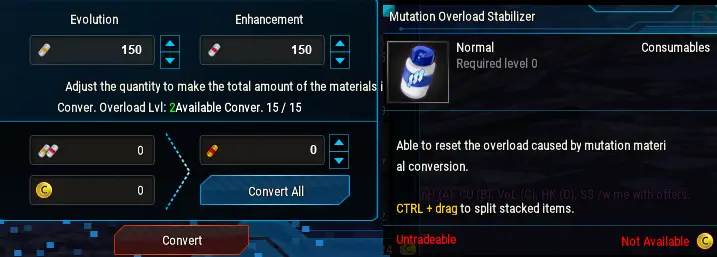
Conversion
You can convert your old PNA materials into the new one. You can adjust the ratio however you like based on how much of the old materials you have.
초과 적재
모든 15 materials you make via Conversion, the Overload level will increase, which increases the amount you need to consume to create the restructuring material, as well as the money required.
Overload level automatically resets to Level 1 each day, or you can reset it manually using the Mutation Overload Stabiliser 목.
- Overload Lv.1 – 100 Total Materials
- Overload Lv.2 – 300 Total Materials
- Overload Lv.3 – 500 Total Materials
- Overload Lv.4 – 1000 Total Materials
The Strains and Their Passives
UNIVERSAL PASSIVES
Here’s the big stat section. You can skip to the next section for a TL;박사.
Each strain shares the same passive options for Level 5 그리고 20, though Level 5’s passive has different reconstruction bonuses depending on the strain. To check the bonuses, simply hover over the passive.
수준 5: Phase Impression
Damage to [Enemy Type] 10.10% (20% 맥스에서)
Reconstruction Bonus is unique to the strain.
수준 20-1: Power Boost
Raw Physical/Psi Power 101.00 (200 맥스에서)
Reconstruction Bonus: Air Damage +10% / Back Damage +10% / Chase Damage +15% (33/66/100%)
수준 20-2: Type Boost
Damage to [Enemy Type] 50.50% (100% 맥스에서)
Reconstruction Bonus: Damage to Enemy Type +10% / +20% (50/100%)
Angelic Passives
수준 10: Judgement Angel Physical/Psi/Hybrid
Physical/Psi Option – 치명타 피해 +15.30%, -50% Crit Rate (45% Crit Damage At MAX)
Hybrid Option – Physical and Psi Crit Damage +12.20%, -40% Physical and Psi Crit Rate (36% Crit Damage at MAX)
Reconstruction Bonus: Respective Crit Rate +10% / +10% (50/100%)
수준 15: Great Blessing / Great Grace
Flat HP, HP Regen / Flat MP, MP Regen
Reconstruction Bonus: 15% Skill Cost Reduction, Flat HP/MP+ (50/100%)
Deepsea Passives
수준 10: Submarine Steam Air/Back/Chase
ABC Crit Damage +10.30%, -50% ABC Defense Penetration (40% Crit Damage at MAX)
Reconstruction Bonus: ABC Penetration +10% / +10% (50/100%)
수준 15: Deep Sea Blessing: Physical/Psi/Hybrid
Physical/Psi Option – Total Physical or Psi Power +1.04% (5% 맥스에서)
Hybrid Option – Total Physical and Psi Power +0.83% (4% 맥스에서)
Reconstruction Bonus: Respective Total Damage +2% / +3% (50/100%)
Dragonish
수준 10: Dragonic Breath Air/Back/Chase
ABC Crit Damage +10.30%, -50% Crit Rate (40% Crit Damage At MAX)
Reconstruction Bonus: Respective Crit Rate +10% / +10% (50/100%)
수준 15:Dragon Scale/Dragon Horn
Flat HP/MP
Reconstruction Bonus: Flat HP/MP, Total HP/MP +5% (50/100%)
Human
수준 10: Mercy Physical/Psi/Hybrid
Physical/Psi Option – Total Physical/Psi Power +1.03%, -50% Defense Penetration (4% Power At MAX)
Hybrid Option – Physical and Psi Power +0.82%, -40% Physical and Psi Defense Penetration (4% Power at MAX)
Reconstruction Bonus: Respective Penetration Rate +10% / +10% (50/100%)
수준 15: Evolved Macrophages HP/MP/Phase Force
Flat HP/MP/Phase Force Charge Speed
This row of passives has an extra buff that applies in battle, giving 1% HP, MP or Phase Force regen per second depending on which you choose.
Insectan
수준 10: Gnawing Colony Physical/Psi/Hybrid
Physical/Psi Option – Total Physical/Psi Power +1.02%, (3% Power At MAX)
Hybrid Option – Physical and Psi Power +0.82% (2.40% Power at MAX)
Reconstruction Bonus: No Bonus
수준 15: Exoskeleton/Brain Evolution
Total HP/MP 1.04% (5% 맥스에서)
Reconstruction Bonus: Total HP/MP +2% / +3% (50/100%)
Machinery
수준 10: Improved Body Reaction/Overload
공격 속도 +1.04% (5% 맥스에서)
초과 적재: 공격 속도 +2.08% (10% 맥스에서), Skill Cooldown/Cost Reduction -50%
Reconstruction Bonus (For Overload Only): Skill Cooldown Reduction +10% / Cost Reduction +10% (50/100%)
수준 15: Elecromagnetic Field Alpha/Beta
Skill Cost/Cooldown Reduction +10.10% (20% 맥스에서)
Reconstruction Bonus: Cooldown/Cost Reduction 10% / 10% (50/100%)
TL;DR on Picking Strain Passives
Long story short, choosing which passive to take per tree is fairly simple and you can pick whichever will make your runs comfortable, or help you to round out your stats.
일반적으로, for level 20 passives it’s preferable to go for the extra Enemy Type damage.
- When choosing Air, Back or Chase, I usually just pick whichever conditional the character I’m playing can easily proc with their skills.
- HP, 국회의원, Phase Power Charge boosts can just be used depending on what you’re comfortable with. I usually prefer HP, however MP is handy if you don’t like spamming potions as frequently and phase power charge can be used to spam your awakening for more MP as well.
- Be wary of the passives which come with debuffs such as Crit Rate -50%, take them if you can offset the loss of stats without too much trouble. Using Crit Rate as our example, losing that 50% from one area might not be as bad if you have high ABC crit rate to make up for what you lose.
Since you can reset your passives at any time, don’t be afraid to switch them around if something isn’t working for you.