- 제목: 염색체 악
- 출시일:
- 개발자:
- 발행자:
Information about Chromosome Evil is still incomplete. 이것을 사용하여 게임의 세부 정보를 입력할 수 있도록 도와주세요. 문의 양식.
A comprehensive guide to Chromosome Evil, providing an overview of its fundamental concepts. This walkthrough aims to help players comprehend the game’s basics more effectively, leading to more successful playthroughs.
소개
Chromosome Evil combines elements from This War of Mine, squad-based gameplay, and a zombie apocalypse scenario. Though initially straightforward, the game can quickly become challenging for players who lack knowledge or understanding of how to navigate its numerous surprises and obstacles.
To assist both new and experienced players, I have compiled this guide and manual. While the in-game tutorial and tooltips are valuable resources, having an understanding of the game’s overall mechanics can be beneficial.
통제 수단
While exploring in Chromosome Evil, 컨트롤, although relatively straightforward, are not displayed on the screen.
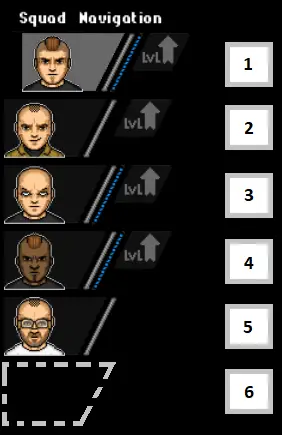
게임 시작시, you will have two squad members, but you can increase this number to a maximum of six. To switch between different characters, you can utilize the numeric keys 1 ~을 통해 6 키보드에서.
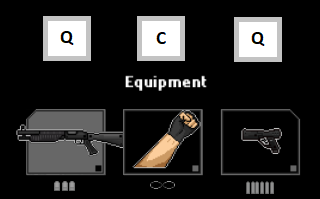
To toggle between your primary and secondary weapons, 누르다 “큐” 열쇠. If you need to reload your weapon, simply press “R.” 추가적으로, 누르는 것 “씨” will allow you to select the melee option. 하지만, it’s important to note that engaging in melee combat is not advisable unless the squad member belongs to the soldier class and has at least one armor upgrade. 그렇지 않으면, they may sustain health damage from enemies. It’s worth mentioning that you can select all squad members simultaneously by clicking and dragging, and then pressing “씨” to instruct everyone to enter melee mode. This tactic can be particularly useful when extracting your team from a map to conserve ammunition.
Resources Review
Balancing plays a significant role in Chromosome Evil, as many aspects of the game require careful management. Players must find a balance between their ammunition usage and the number of zombies they encounter. They also need to weigh their need for specific resources against the risk of waiting too long and facing an ever-increasing zombie population. 추가적으로, players must prioritize which resources to obtain first, all while fending off hordes of zombies and other creatures.
The following is a basic hierarchy, based on my opinion, that outlines the importance of each resource. Understanding the significance of each resource and the reasons behind it can assist players in making informed decisions during in-game events and exploration maps. 예를 들어, at the beginning of the game, players are presented with a choice between ammunition and a combination of resources such as antibiotics, 목재, and tools, as well as fuel and food. 내 생각에는, it is advisable to prioritize either ammunition or fuel, as these are two of the most crucial resources in the game.
연료

Fuel holds immense importance in Chromosome Evil for three key reasons:
- If you run out of fuel during zone transitions, you will have to collect fuel from a parking lot while simultaneously battling enemies. This not only depletes various types of ammunition but may also result in the unnecessary use of antibiotics if your squad members get injured.
- Your aggro level, which we will discuss when covering the zone map, will skyrocket and immediately reach its maximum upon starting a new zone map. 따라서, every exploration map becomes significantly more difficult, hindering resource gathering and leading to increased ammunition wastage due to the substantial rise in enemy encounters.
- To reduce aggro, you need to utilize a researched ability called scouting, which consumes Action Points (AP) 그리고 음식.
These factors underline the critical importance of fuel. Running out of fuel can have an immediate impact on your ammunition supply, potentially affecting antibiotics, 음식, and other resources, both through excessive use and the decreased ability to gather more resources.
Shotgun Ammo

Shotgun ammo holds the highest significance among all ammunition types, as I will elaborate further in the weapons section. While rocket ammo could be important, it is less abundant, and only one weapon type uses it, limiting its chances of being used in your game, even if you have the free weapon DLC. 말할 것도 없이, ammunition of all types, especially shotgun and pistol/rifle ammo, ensures the survival of your squad members while they gather crucial resources.
Pistol and Rifle Ammo

Pistol and Rifle Ammo, which I’ll refer to as Pistol Ammo, is utilized by a wide range of weapons. 권총, submachine guns, rifles, and miniguns all require Pistol Ammo. If you run out of Pistol Ammo and shotgun ammo, you can still gather resources, but the amount will be significantly reduced, and life will become considerably more perilous for your squad.
Weapon Components

This game adheres to the adage “the best defense is a good offense.” By eliminating enemies more efficiently, you can prevent them from causing armor or health damage. 게다가, this allows you to dedicate more time to opening doors, gathering intelligence, and collecting resources.
Armor Components

Armor holds importance, especially for your soldiers. 하지만, engineers and medics do not gain armor points from armor upgrades; 대신에, they receive additional health and immunity to hazards such as fire, 출혈, and poison. 따라서, armor components are best utilized for upgrading your soldiers, particularly in the early stages of the game, where the first upgrade enables them to withstand hits without suffering health damage. Keep in mind that armor regenerates during exploration mode, but avoid keeping soldiers engaged in melee combat for too long, as enemies can strip their armor and inflict health damage.
Tool Components

Tools serve three primary purposes. They are used to upgrade your engineer’s abilities (turret and barricades), enhance your APC’s capabilities (such as expanding crew capacity), and construct traps on exploration maps. Not all traps are equally effective, so carefully assess the importance of the location. If placing a trap at a strategic bottleneck using 20 tools allows you to acquire a significant amount of fuel or ammunition, it may be worthwhile. 하지만, if you are only 30 tools away from obtaining a prelude or another beneficial APC upgrade, and the map does not contain many high-priority resources, it is best to refrain from using tool components to build a trap.
항생제

항생제, like tools, serve three main purposes. They are used to upgrade the medic’s abilities (medkit and booster), fully heal your entire squad on the zone map (at an additional AP cost), 그리고, although not recommended, can be used by a medic to heal during an exploration map. 하지만, healing efficiency during exploration is considerably lower, requiring a significant amount of antibiotics to fully heal squad members. 가능할 때마다, prioritize healing on the zone map rather than during an exploration map.
음식

Although it is ranked relatively low, food holds its importance. Without food, you cannot recruit, scout, 치유하다, 나머지, or perform other vital actions. The reason it is ranked lower is that it is usually abundant and often considered a lower priority when gathering resources.
Wood or Materials

Referred to as wood on the zone map but typically as materials on exploration maps, this resource is primarily used for two purposes. Engineers use it to build barricades, and it can also be used as ammunition for bows. Even though it is ranked lower, it is essential to always have some on hand, as certain main missions become significantly easier when you can construct barricades.
Research Points

Research points are initially valuable but become less important as the campaign progresses. These points are used to unlock specific abilities. Prioritize research bonuses that enhance Action Point generation, scouting, 치유, and resting based on your current needs. Certain unlocks are necessary for upgrading weapons and armor.
Rocket Ammo

앞서 언급했듯이, rockets can deal substantial damage to enemies. 하지만, since the chances of finding soldiers equipped with rocket ammo or the weapon itself are low, it is unlikely that you will end up using them extensively.
Weapons Review
In my personal opinion, the variety of weapons available in the game includes shotgun, rocket launcher (RPG), katana, minigun, 절하다, rifle, chainsaw, melee, 권총, and submachine gun. Each weapon has its own strengths and weaknesses, which I will discuss further below. It’s worth noting that during a typical playthrough, you’ll usually only have enough resources to fully upgrade one weapon or partially upgrade a few.
Peacekeeper

This shotgun variant is incredibly powerful and is particularly effective against large groups of zombies. It can be argued that it’s the best long-range weapon in the game. 하지만, its upgrades are more expensive compared to the regular shotgun.
산탄총

The normal variant of the shotgun is still highly useful for clearing enemies of all types. It has an area-of-effect (Aoe) attack similar to the Peacekeeper but with a shorter range. It doesn’t consume Pistol Ammo like some other weapons or the bow.
RPG or Rocket Launcher

The RPG or Rocket Launcher is an extremely potent weapon that can take out a significant number of enemies and deal heavy damage. Its only limitations are its limited ammo capacity and its availability through soldiers or weapon crates if you have the DLC.
카타나

If you come across a soldier wielding a katana or find one in a weapon crate, you’ll have an unlimited supply of ammo. With its fast attack speed and high damage, it easily dispatches enemies, especially when used by a soldier at a doorway or bottleneck. It’s undoubtedly the best melee option available. Keep in mind that melee weapons, including the katana, can’t be used behind barricades.
미니 건
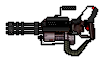
The minigun is the most powerful weapon that uses Pistol Ammo. 하지만, it has a warm-up time before firing and consumes a significant amount of ammo. 이러한 단점에도 불구하고, it’s capable of clearing large numbers of zombies.
절하다

The bow is a very effective weapon that exclusively uses wood as ammo. Its main downside is that it’s best suited for killing a few enemies at a time. Unlike other weapons, you can fire the bow while moving. Just be cautious not to exhaust all your wood supply, as you’ll need it for building barricades.
소총

The rifle is a versatile weapon that uses Pistol Ammo and has good range. It’s recommended to have at least one soldier equipped with a rifle for all-purpose combat.
전기톱

The chainsaw consumes fuel, which makes it less desirable due to the scarcity of fuel resources. 하지만, it deals substantial melee damage when necessary. Be cautious about when and how you use it, 만약에 전혀, due to its fuel dependency.
난투

Ranked lower than the chainsaw in terms of damage output, regular melee attacks can still be effective in killing enemies. It’s advisable to use melee attacks with soldiers who have upgraded armor. While it may not eliminate enemies quickly like the katana, it can save ammo when used strategically.
권총

The pistol serves as the basic weapon for engineers, medics, and is an option for soldiers. It inflicts the least amount of damage and is primarily useful in the early stages of the game.
기관단총

몸소, the submachine gun is my least favorite weapon. It consumes a large amount of ammo, has a short range, but can deal a decent amount of damage. I prefer using either a rifle for long-range engagements or a minigun if I anticipate firing many rounds. 전반적인, I tend to overlook the submachine gun during my playthroughs and opt for the pistol instead.
Zone Map Review
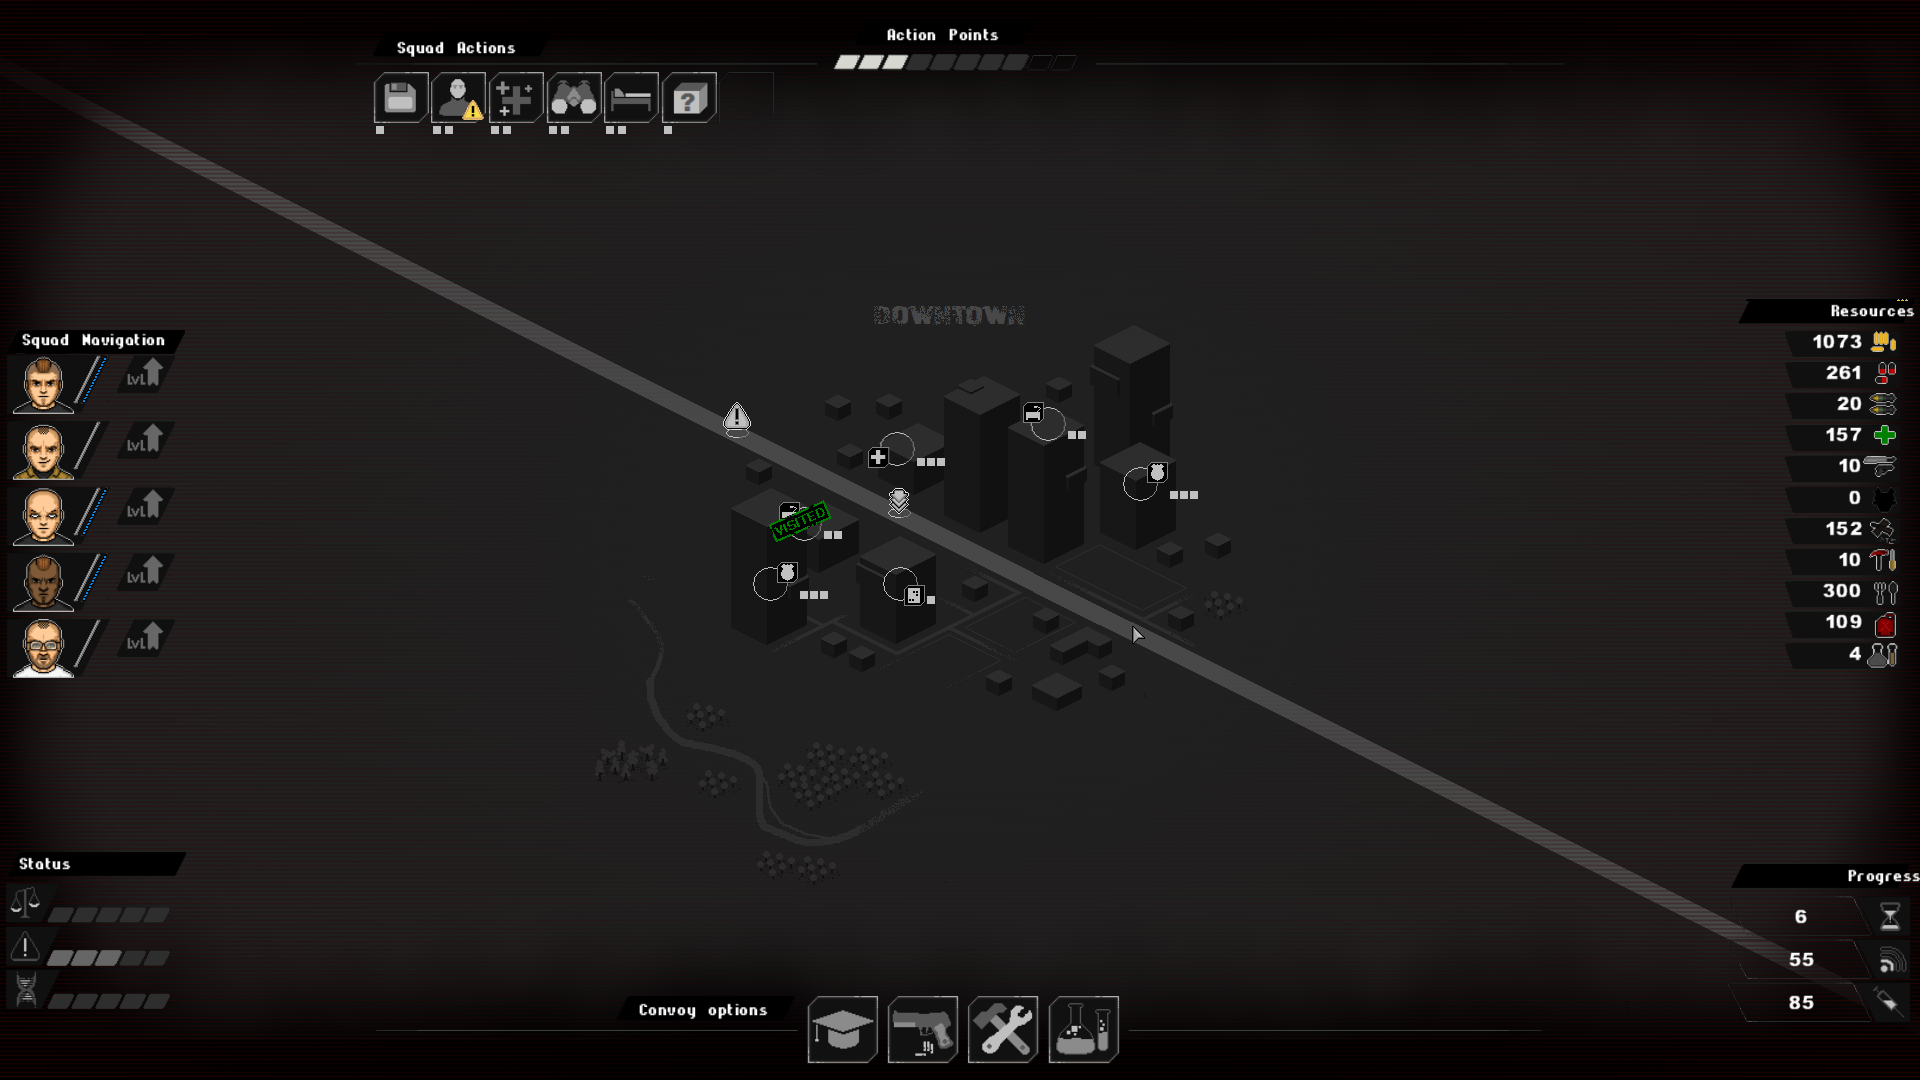
This map represents a specific zone, namely Downtown.
There are three types of zones: 주거용, 산업용, and Downtown. Residential zones allow recruitment with 1 Action Point (AP) and usually contain a good amount of food, 목재, 그리고 항생제. Downtown zones allow recruitment of squad members with 2 AP, and they are rich in ammo, 갑옷, 무기, 그리고 항생제. Downtown is the only zone where vaccine progress is possible, along with opportunities to advance satellite progress. Industrial zones, the third type, require 3 AP for squad recruitment. These zones are the best for finding fuel, 도구, and advancing satellite progress.
At the top left, you can find all the actions that consume AP once they are unlocked: 구하다, 모집, 치유하다, 스카우트, 나머지, and Scavenge.
In the top middle, you can see your available AP pool. Grey AP represents used AP, white AP represents remaining AP, and yellow AP indicates the amount of AP used for a specific action, including exploration sites.
The far right side displays your list of resources.
At the bottom right, you can see the number of days remaining, satellite progress, and vaccine progress. To achieve the best outcomes, you’ll need to reach 100% progress in both satellite and vaccine.
The bottom center provides various character and research options, leading to corresponding screens.
At the bottom left, you’ll find the campaign status bars: morale, 화남, and evolution.
Campaign Status Bars
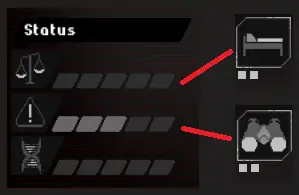
Morale is represented by scales and indicates the happiness of your squad. The more bars displayed (5 being the worst), the unhappier your squad is, resulting in increased RNG challenges during events or encounters. 휴식, symbolized by a bed, can improve morale and is unlocked through research.
Aggro is represented by a caution symbol and determines the number of enemies that spawn in exploration maps, ~와 함께 5 being the highest number. This can be reduced through certain events and the use of the scout skill, represented by binoculars.
Evolution is symbolized by a DNA symbol and influences the strength and advancement of enemies when they appear. It is affected by mission choices and successes. 일반적으로, if your squad performs poorly, the evolution level increases, making enemies more formidable.
Different Hourglass Icons
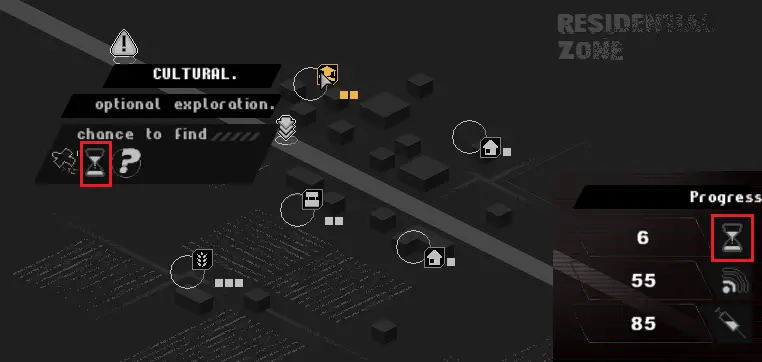
마지막으로, I’d like to clarify the distinction between the hourglass symbol used in exploration locations and the one in the Progress Legend. The hourglass at an exploration location indicates the presence of at least one AP desk. Interacting with the desk grants bonus AP (+1 또는 +2) to use in the zone, but it does not provide additional days. It can be confusing since both symbols use the same hourglass icon. 반면에, the only way to increase your remaining time is at the beginning of the game when you have the option to choose between three options, one of which is leaving earlier. Selecting to leave earlier grants +1 낮, which I recommend over extra training or early gear.
Exploration Mode Review
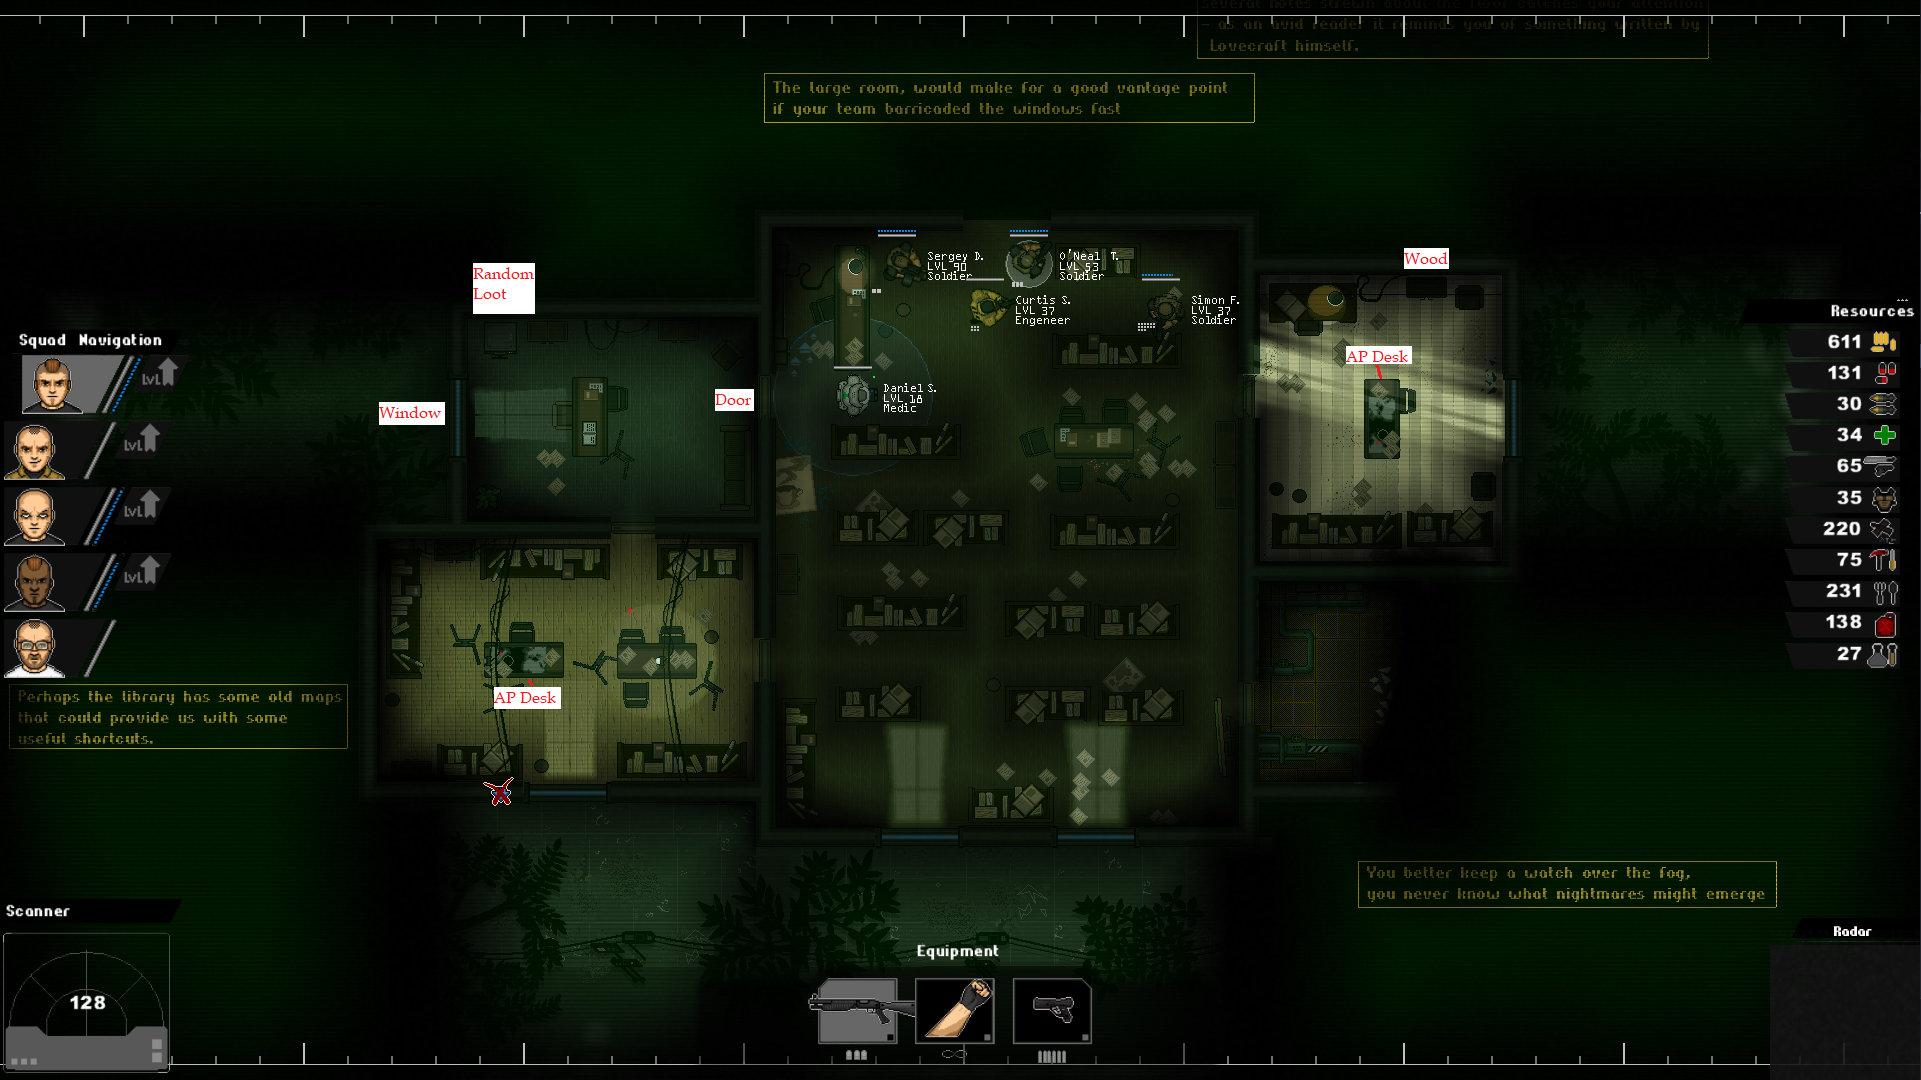
This is an example of an exploration map, specifically a library.
A few important details to highlight are that, at this stage of the game, the squad has unlocked the pause function, indicated by the green hue. This allows me to give orders to the squad without the prelude timer decreasing in the scanner. 추가적으로, the scanner in the lower left corner has been unlocked, showing the remaining prelude time before enemies spawn. The radar, which displays various information depending on its upgrade level, currently only shows my squad members as green dots since no enemies have spawned yet.
While the scanner and radar are not essential, the pause function is incredibly useful, and I highly recommend using it.
Take note of the squad’s initial spawn location and the overall layout of the rooms.
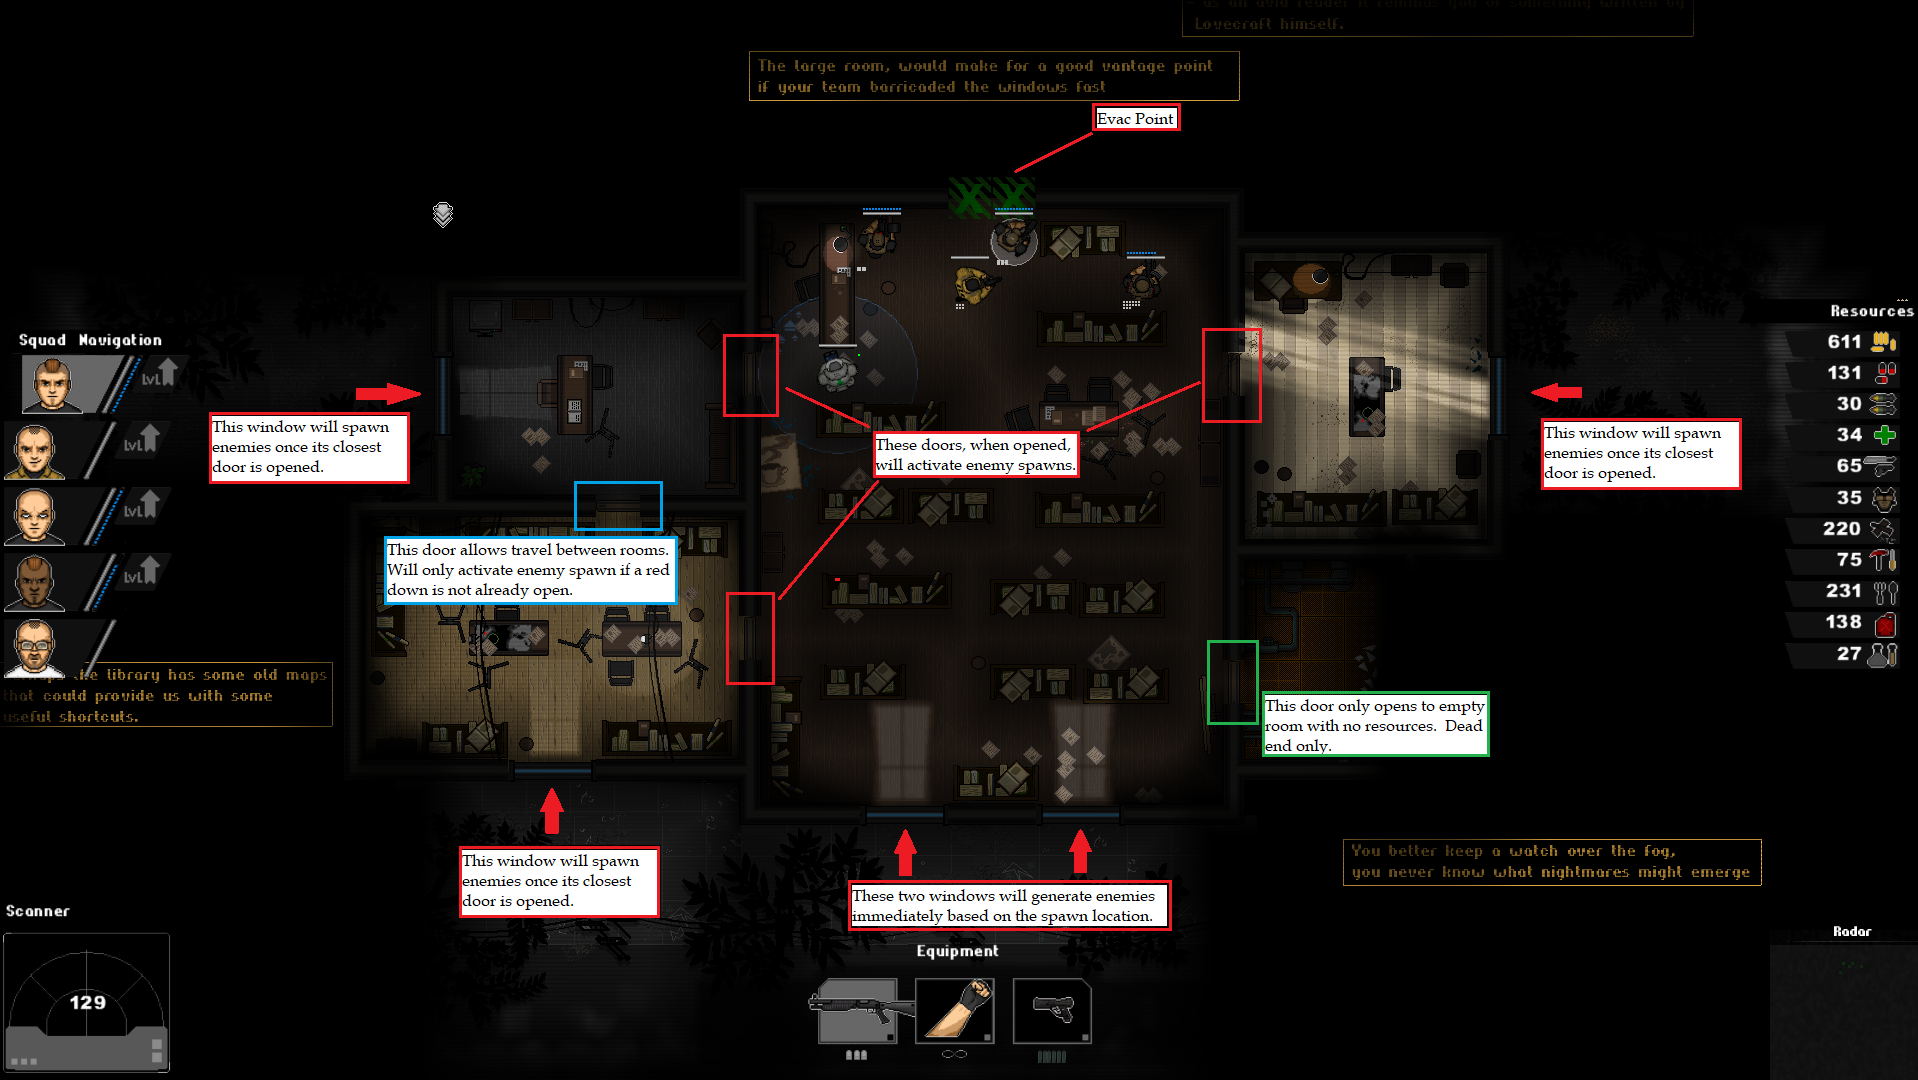
이 경우, the squad has spawned in a room with windows. As soon as the prelude timer ends, indicated by the countdown timer on the scanner and/or the appearance of zombies (it’s quiet during the prelude), waves of zombies will start coming through the two bottom windows.
It’s important to understand that not all maps follow this pattern. Some maps start with all rooms closed, and there are even rare instances where no enemies spawn at all.
Since zombies can only enter through rooms that your squad has accessed, opening new doors will create new zombie spawn locations. 그러므로, when you begin an exploration map, take a moment to familiarize yourself with the surroundings, identify valuable loot and its corresponding room, and determine where zombies will emerge once you start opening doors. Opening all doors at once is generally not a wise strategy, as it becomes challenging to eliminate all incoming zombies without becoming overwhelmed. Prioritize high-value rooms, open them, gather the loot, and then retreat. If you have a soldier equipped with a katana or someone with decent melee and ranged abilities, they can guard the door while you focus on other rooms.
Two important tips to keep in mind:
- Always maintain a clear path to your evacuation point. 이쪽으로, if you become overly ambitious, you can still retreat with your entire squad intact.
- Opening a new room after zombies have started spawning will unleash all the zombies that were waiting for the room to open. Be prepared for a large group of zombies right away in such cases.
Resources on Exploration Maps
Here are examples of how resources appear on an exploration map. Pay close attention to the type of desks. 가끔, when the zone map indicates a possible satellite desk, you may find AP desks instead on that particular exploration map. Please note that you can typically find additional types of resources beyond what is displayed on the zone map, although this occurs more frequently in higher AP cost locations compared to 1 AP locations.
마지막으로, avoid interacting with a satellite desk when you have reached 100% satellite progress, as it will have no effect and waste valuable resource gathering time. The same applies to vaccine desks and research desks if you have 100% vaccine progress and have unlocked all researchables.
Satellite Desks


These desks are found in offices in both downtown and industrial zones. They have a notable blue screen and can only be interacted with by the engineer class.
Vaccine Desks


You can find these desks exclusively in hospitals and clinics within downtown zones. They are recognizable by their green screen and can only be interacted with by the medic class.
AP Desks


These desks can be found in any zone and are characterized by having lots of paperwork but no screens. They can be interacted with by any class. 사실은, multiple characters can use the desk simultaneously to unlock AP faster.
연구 데스크


These desks are present in both downtown and industrial zones and can only be interacted with by the engineer class.
Trojan

This item can be found in main missions and is interactable by any class. It provides a permanent +1 AP for use on zone maps.
Pistol Ammo Crate

Contains pistol ammunition and comes in various sizes.
Shotgun Ammo Crate

Contains shotgun ammunition and comes in various sizes.
Weapon Component Crate

Contains weapon components and comes in various sizes.
Armor Component Crate

Contains armor components and comes in various sizes.
Antiobiotic Container

Contains antibiotics and comes in various sizes.
음식

Food can be found in all zones and is usually contained in containers of various sizes, potentially appearing in the greatest variety of container sizes among all resources.
연료

Fuel is represented by a barrel, although industrial areas may have larger fuel tanks as well.
Wood or Materials

Material crates come in different sizes, but they are generally longer in shape and are often positioned against a wall or under desks.
Tool Container

Tool containers are typically small and can have a gray color like the example provided or an orange/red coloring.
Random Loot Container

These containers come in gray or blue variants and can contain various items, ranging from different types of ammunition and components to food and, importantly, 연료. The specific resource type is determined by the generation of the exploration map.
일반 팁
Here are some additional tips and tricks that can help improve your playthrough:
Zone Map Tips:
- Test recruiting events and character order by using saves or autosaves. 이쪽으로, you can reload and recruit in a residential zone to see the same sequence of events without spending unnecessary AP. This is useful when you’re specifically looking for a particular class, like a medic or engineer.
- Avoid spending food and AP to lower aggro in a zone if you’re about to run out of fuel and you’re not in an industrial zone. Lowering aggro won’t have a significant impact since it will increase again as soon as you leave the zone. Always strive to have sufficient fuel (150 units or more) to avoid this situation.
- Recruit additional characters when you have plenty of AP or when it only costs 1 AP. 이쪽으로, you can efficiently utilize your resources.
Event Tips and Tricks:
- Be cautious when choosing to gain a permanent +1 AP over more expensive workshop upgrade costs. Doubling the upgrade costs for just +1 AP can be detrimental to your game progression. 예를 들어, the cost of upgrading capacity once increases from 100 tool components to 200 tool components. Opting for the +1 AP can make it 200 tools initially and 400 for another member.
- After rescuing Beta Squad Trojan APC driver, selecting to move quickly to the next map doesn’t cost any AP. 하지만, choosing to take time to explore costs 1 AP (without losing any days) and reveals a farm on the map (와 3 AP cost for the location). Only choose to take time if you have unlocked the AP bonus and don’t need to recruit. 그렇지 않으면, you won’t have enough AP to visit the farm and miss out on valuable resources like food, 연료, 그리고 탄약.
- 다음을 선택하세요. “leave early” option at the start of the game to gain +1 낮. Although the other options provide nice bonuses, the extra day, especially with a larger AP pool, translates to acquiring more resources, 경험, and additional time for vaccine and satellite progress. 선택 +1 day is highly recommended for hard difficulty playthroughs.
- It’s generally advisable to explore the zone you need instead of pursuing the main missions. 이쪽으로, you can focus on gathering the resources you require the most at any given time. The game will eventually force you to take main missions once you’ve exhausted a certain amount of flexible time. 그래서, prioritize the zones you need when necessary, especially if you’re running low on ammo or fuel. If you’re not in need of either, feel free to pursue the main missions. After completing each main mission, you’ll be randomly assigned to a zone type: residential, industrial, or downtown.
Exploration Map Tips:
- TV Traps can electrocute barricades, although their usefulness is limited. You can set up traps at certain TVs using tools, but other traps like gas traps tend to be more effective.
- Beware of fire and poison pools (red embers or green puddles) as they can quickly kill characters without resistances or immunity. Characters with high Body stat have more resistances, and medics gain immunities to Bleed, then Poison, and finally Fire at max armor. Upgrading a medic to max armor is not recommended. Engineers gain immunities to Poison, 출혈, then Fire in a similar manner.
- If you have some spare time on an exploration map and encounter an extra resource or a door that a low-level character can interact with, grab it while heading towards the evac point. Each interaction with an item grants experience, even for doors that you don’t actually need to open.
- Multiple characters can interact with resources, AP desks, and doors if there’s a spot next to the target. Utilize this mechanic to speed up the process of accessing these objects.
- If you don’t hear moaning yet, there’s no immediate need to position characters to defend chokepoints. 하지만, once you start hearing moaning, be prepared for incoming enemies.
- Remember that character levels and stats are not as crucial as ensuring you have enough ammo and that your team members stay alive. Avoid taking unnecessary risks that can put your squad in danger. Situations that seem “under control” can quickly spiral “out of control” and result in the death or injury of your squad members.
- Always strike a balance between using ammo to fight off enemies and the amount of resources you can recover. If you find yourself using more ammo than the resources you gather, it’s time to leave the area. 사실은, you should have left a few minutes ago to avoid wasting valuable resources.
결론
물론, it’s impressive to see how much enjoyment and depth can be packed into a game created by a small team. It’s clear that you had a fantastic time playing, and your manual provides valuable insights and tips for other players to enhance their own experience.
기억하다, as you embark on your playthrough, to embrace the challenges and enjoy the process of saving the world from the Ancient One. With the knowledge and strategies you’ve acquired, may you find success and satisfaction in your endeavors. 행운을 빌어요, and may your gaming journey be filled with excitement and triumph!
이것이 오늘 우리가 공유하는 모든 것입니다. 염색체 악 가이드. 이 가이드는 원래 작성자가 작성하고 작성했습니다. Vampiresbane. 이 가이드를 업데이트하지 못한 경우, 다음을 수행하여 최신 업데이트를 찾을 수 있습니다. 링크.