In this guide you’ll find what are the best practices for a proper calibration, proper well-lit environment and Tips and Tricks for better tracking.
How Do I Calibrate Animaze?
1. Launch Animaze
2. 클릭하세요 “Calibrate”, just below the camera feed.
에이. PRO TIP: you can use a shortcut to bring up the calibration screen: CTRL 키 + 씨.
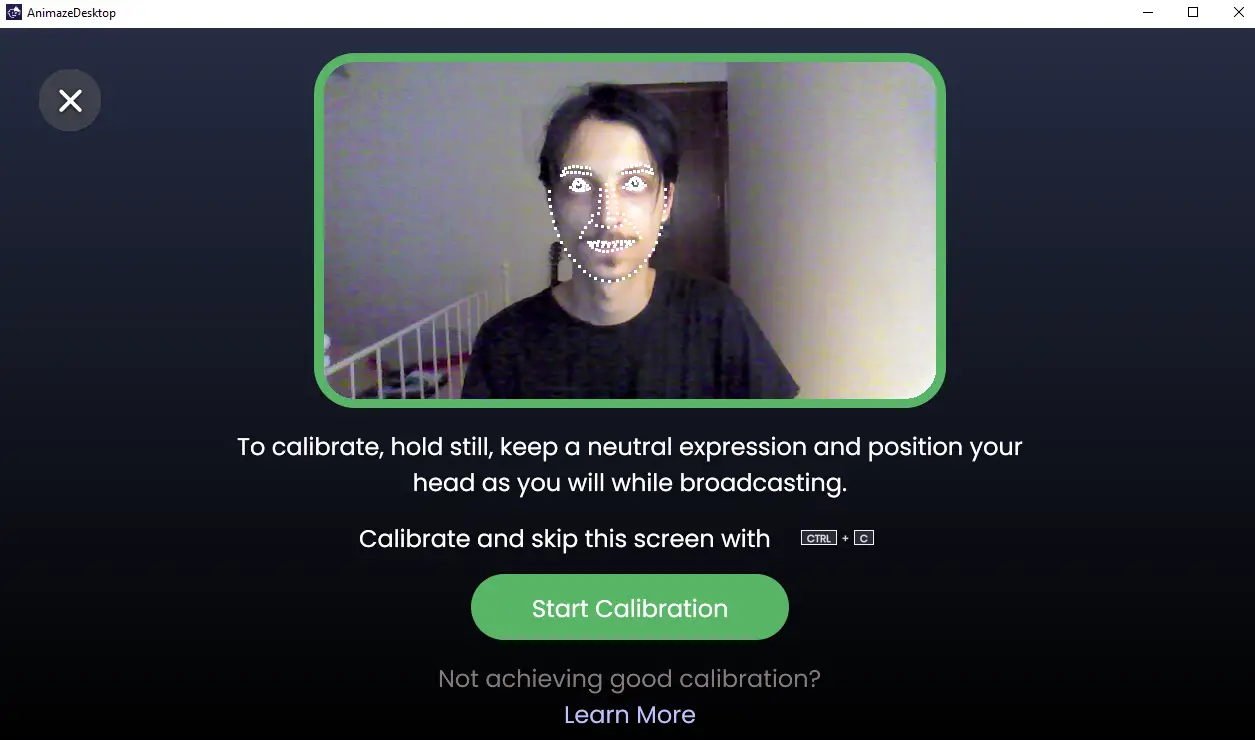
3. This will open the calibration screen.
4. Make sure you are facing the camera head-on and your expression is neutral.
5. Click on the green Calibrate to calibrate the tracker while staying still and maintaining your neutral expression.
How to Calibrate Properly
A proper calibration starts with a well-lit environment. Light your face with an ample amount of light, as equally as possible. Hard shadows and lighting major differences between the right and left side of your face will reduce calibration quality. 마지막으로, maintain a neutral pose and look at the screen (not at the camera) for the entirety of the calibration process.
Tips and Tricks For Better Tracking
Below are some tips and tricks to help you get the best experience out of Animaze’s tracker.
Light your face from the front. Avoid placing the light source behind you or partially illuminating your face. Backlighting and partial lighting cast shadows, which are difficult for the Animaze tracker to interpret.
Too much or too little light on your face will over illuminate or under-illuminate it. Both extremes result in an improper light distribution causing the tracker to misinterpret your features. We recommend that you use the user feed in the top left corner to monitor your lighting.
Frame yourself such that your head covers about 50% of the camera’s feed height. We recommend that you use the user feed in the top left corner to monitor your framing.
Webcam resolution and FPS are also important. We recommend favoring higher frame rates over higher resolutions and clear (non-grainy/noise) images. Higher resolutions will not necessarily produce better results, but will eat up more CPU. 예를 들어, a resolution setting of 640×480 @30 will FPS work, but a 720p resolution @60 FPS likely will have better results.
If the tracking gets lost, you have to recalibrate Animaze. 그만큼 “Calibrate” button will pulsate blue light when the tracking experience is suboptimal and needs recalibration.
In Settings > General you will find Tracking Profile Defaults. This feature has presets for the most common web camera profiles. If you have a web camera capable of recording 60 FPS, start with the High setting. For medium quality web cameras, start with the Mid setting. For lower-end cameras, bad lighting, or experience a lot of jittering, start with the Low setting.
Have your camera in front or above your head. Do not have it situated below you.
Further mentions
Keep in mind that if you want to reset your tracking settings, you can always use the quick calibration option. 그렇게함으로써, Animaze will automatically change all of them.
동시에, if you worked a lot in creating your perfect tracking settings, it would be best to avoid using the quick calibration option as it would reset everything.
이것이 오늘 우리가 공유하는 모든 것입니다. 애니메이즈 가이드. 이 가이드는 원래 작성자가 작성하고 작성했습니다. stroie_animaze. 이 가이드를 업데이트하지 못한 경우, 다음을 수행하여 최신 업데이트를 찾을 수 있습니다. 링크.