
This guide will show you how to properly add and install custom assets in Amnesia: The Bunker.
Downloading the Assets
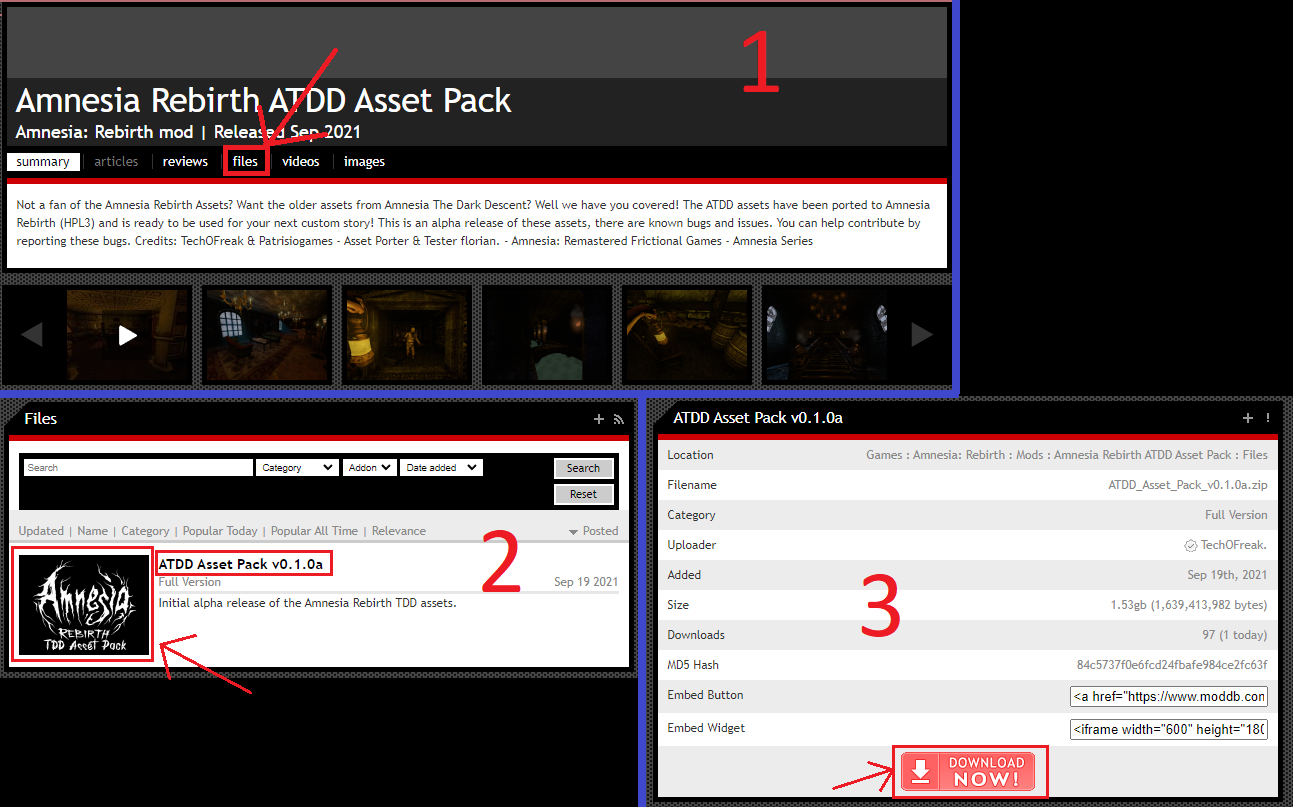
이 가이드에서는, we’re using the Amnesia Rebirth ATDD Asset Pack created by TechOFreak & Patrisiogames.
To get a file from moddb, 다음 단계를 따르세요:
- 방문 “파일” 부분.
- Select the desired file.
- 다음을 누르세요. “지금 다운로드” 단추.
Assets Installation
To add the assets to your mod in Amnesia: The Bunker, 다음 단계를 따르세요:
- Unzip the file and navigate to the “자산” 접는 사람 (refer to image 1).
- Choose the folders you want and move them to: Amnesia The Bunker\mods\YOUR MOD\ (refer to image 2).
Make sure NOT to copy the “models” 접는 사람, as it’s designed for Amnesia: Rebirth and won’t function correctly in Amnesia: The Bunker. Avoid placing assets in: Amnesia The Bunker\mods\YOUR MOD\Assets; they should go directly into the mod’s root directory.
영상 1

영상 2

Adding More Required Files
To make the assets work, you need to create specific files. Follow these steps:
resources file
- Make a new .txt file called resources.txt in your mod’s main folder: \Amnesia The Bunker\mods\YOUR MOD
- Open the file and paste the directories you want. 예:
<자원>
<Directory Path="/billboards" AddSubDirs="진실"/>
<Directory Path="/config" AddSubDirs="진실"/>
<Directory Path="/entities" AddSubDirs="진실"/>
<Directory Path="/graphics" AddSubDirs="진실"/>
<Directory Path="/지도" AddSubDirs="진실"/>
<Directory Path="/음악" AddSubDirs="진실"/>
<Directory Path="/sounds" AddSubDirs="진실"/>
<Directory Path="/static_objects" AddSubDirs="진실"/>
<Directory Path="/텍스처" AddSubDirs="진실"/>
</자원>
- Save the file as resources.cfg.
lookUpDirs file
- 이름이 지정된 폴더를 만듭니다 “editor” in your mod’s root directory: \Amnesia The Bunker\mods\YOUR MOD
- 열기 “editor” 접는 사람.
- Make a new .txt file called lookupdirs.txt.
- Open the file and paste the categories you want. 예:
<Directories>
<Dir Category="StaticObjects" Path="assets/static_objects" />
<Dir Category="Entities" Path="assets/entities" />
<Dir Category="Billboards" Path="assets/billboards" />
<Dir Category="Particles" Path="assets/particles" />
<Dir Category="소리" Path="assets/sounds" />
</Directories>
- Save the file as lookupdirs.cfg.
WIPMod file
- Ensure you have run LevelEditor.exe at least once.
- C로 이동:\Users\YOUR USER\Documents\HPL3
- Create a new .txt file called WIPMod.txt.
- Paste your mod’s entry.hpc file location between “” (quotation marks). 예:
<WIPmod Path="씨:\프로그램 파일 (x86)\Steam\steamapps\common\Amnesia The Bunker\mods\YOUR MOD\entry.hpc" />
- Save the file as WIPMod.cfg.
You can then delete the unnecessary .txt files.
이것이 오늘 우리가 공유하는 모든 것입니다. Amnesia: The Bunker 가이드. 이 가이드는 원래 작성자가 작성하고 작성했습니다. Kiviviki ♪. 이 가이드를 업데이트하지 못한 경우, 다음을 수행하여 최신 업데이트를 찾을 수 있습니다. 링크.