- タイトル: ウォーハンマー 40,000: Dawn of War - Soulstorm
- 発売日:
- 開発者:
- 出版社:
ウォーハンマーに関する情報 40,000: Dawn of War - Soulstorm is still incomplete. これを使用してゲームの詳細を記入するのにご協力ください。 お問い合わせフォーム.
このチュートリアルでは, you will learn how to create your own badges and banners for the Army Painter in the game Dawn of War.
What You’ll Need
- An image conversion program that supports TARGA (.tga) ファイル. I recommend using GIMP, as it is free and user-friendly. このガイド全体, I will be using GIMP.
- An image editing program or website. GIMP covers this requirement, but you can use any image editor such as Photoshop, BeFunky, Ezgif, or Lunapic.
- An image to work with. You can create your own or find one online, as long as it is compatible with your chosen image editing program.
- オプション: A dedicated folder to organize your finished badges and banners. This is not necessary for adding them to the game, but it is advisable to have a designated location in case you need to reinstall the game or transfer them between expansions.
要件
To successfully incorporate your image into Dawn of War or its expansions, it must meet the following criteria. If your image satisfies these requirements, the game should recognize and apply it to your forces.
- TarGA file format (.tga)
- Dimensions of 64×64 pixels for badges, or 64×96 pixels for banners
- File name that does not conflict with any existing files
- No RLE compression
- Includes an alpha channel
- Located in the Badges folder or Banners folder of your game installation
ステップ 1
Select an image you want to use as your badge or banner. It can be a self-created image or one sourced from the internet. The file format of the image is not crucial, but using a PNG file with a transparent background is recommended. 必要に応じて, make any desired edits to the picture using your preferred image editing program, or resize it to 64×64 for badges or 64×96 for banners using one of the aforementioned editing websites.
ステップ 2
Launch GIMP and navigate to the File menu, then click on New. If you are creating a badge (the image displayed on your army’s shoulder pads and tanks), set the Image Size to 64×64 ピクセル. For banners (the image on your strategic points flag), set it to 64×96. Once you have selected the appropriate size, click Ok. 次, go to File again, but this time choose Open As Layer, locate your image file, and click Open. Your image will now appear as a layer on top of a white background.
ステップ 3
On the right side of your screen, locate the Channels panel and add an alpha channel to ensure compatibility with the game. さらに, delete the white background to avoid having a large white square on your troops’ shoulder pads. The white background is no longer necessary.
ステップ 4
Once you have adjusted the size of your picture, added an alpha channel, and removed the white background, proceed to the File menu and select “Export As.”
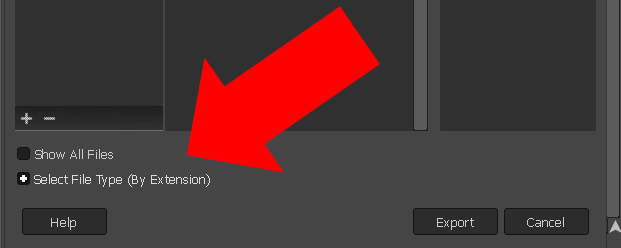
Navigate to the desired location for your image, それから選択してください “Select File Type (By Extension)” オプション. Scroll through the list until you locate “TarGA image” (.tga), which can be found at the bottom of the dropdown menu. ついに, をクリックしてください “輸出” to save your file.

After clicking the button, a window will appear displaying options for RLE compression and the origin. While the origin setting is not significant, it is important to ensure that the box for RLE compression is unchecked. Failing to do so may result in the game being unable to detect the image.
ステップ 5
おめでとう, プロセスは完了しました. The final step is to copy your finished file to either the “バッジ” または “Banners” folder within your Dawn of War game directory. It is important to ensure that you place the files in the appropriate folder, as badges will not function properly if placed in the banners folder, そしてその逆もまた然り. さらに, remember to give your files a suitable name. Now you are ready to create your own customized armies!

追加メモ
- Please note that the Army Painter information does not carry over between different expansions of the game. 例えば, if you place a badge in the badge folder of Dark Crusade, it will not appear in Soulstorm. If you want your badge to be visible in all expansions, you will need to manually copy it to each expansion’s folder.
- Regarding multiplayer, custom badges and banners are indeed compatible. しかし, there is a known bug in versions 1.3 と 1.4 where they may stop appearing in consecutive matches. これを解決するには, you can select a different army and then switch back to your custom one, which should restore the visibility of your badges and banners.
- If you have a picture that you would like to use as a badge or banner but cannot find a version without a background, を使用できます “Transparent Background” tool in Lunapic. This tool can remove the background with a single click. さらに, Lunapic provides an “消しゴム” tool that allows for manual removal of specific elements from the image.
これが今日私たちがこの目的で共有するすべてです ウォーハンマー 40,000: Dawn of War - Soulstorm ガイド. このガイドは元々、次の者によって作成および執筆されました。 Ghazghkull. このガイドを更新できなかった場合, これに従って最新のアップデートを見つけることができます リンク.