- タイトル: The Hand of Merlin
- 発売日:
- 開発者:
- 出版社:
Information about The Hand of Merlin is still incomplete. これを使用してゲームの詳細を記入するのにご協力ください。 お問い合わせフォーム.
Extensive and detailed guide to adding new Units in The Hand of Merlin, written by its game designer Mat.
序章
このガイドでは, 私たちは’ll talk about adding more Units to our game. This can be both new characters or new enemies.
What is a Unit?
で The Hand of Merlin, a Unit is a dynamic entity capable of taking actions. It has attributes, including Health and Armor, and is always part of a Warband, ある “側” – Player or Enemy.
Every unit is described with two files: a Unit Params and a Unit Class.
Unit Params
A Params file (from parameters), with the extension .ep, is where we house most of a unit’s visual information and identification.
You can create one with the Create menu (CTRL+N). Go to the Generic group, and browse the (Merlin) Unit params type.
それから, save the file under the Content/Merlin/Heroes folder for playable units and Content/Merlin/Enemies for those that are not. Using the Heroes folder allows a unit to show up in the roster selection screen in the Lobby.
今, させて’s take a good look at a Unit Params file, and explain how each entry works.
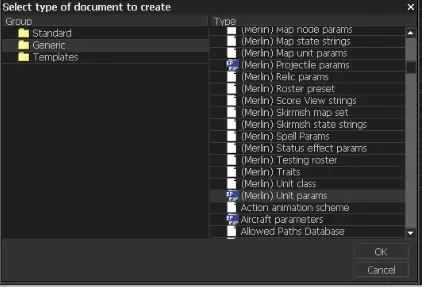
初め, we have the unit’s identification.
- Identification is used in encounters to refer to a specific unit, also note the Traits in the middle of the document, where you can put “personality traits” for this hero to be queried in encounters.
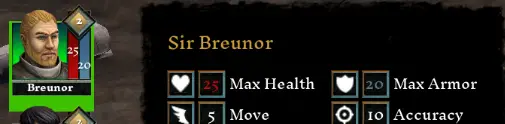
- Names are used to represent the unit wherever it is. Short names are usually on portraits, and the full name in the book and larger tooltips. In Breunor’s case, his full name is “Sir Breunor”
- Finally you got the Biography, shown in the Book, which tells a small story about the character.
Note that because these are text entries, they need to have both an identifier and an actual text, to facilitate translations.
Then we come to #1, ユニット’s Skirmish behavior.
- Unit Class determines a unit’s attributes, starting abilities, and passives. それ’s an important aspect, そして私たち’ll talk about that later in this document. Note that every single unit params has a unique class in our design, but this is not obligatory.
- Unit Size determines if the unit will be a 1×1(通常) or a 2×2 (大きい) ユニット.
- Unit Species, used in a myriad of effects, like Holy Desecration. We save “alien” for the monstrous abominations you fight, but all of your heroes and the bandits are “humans”.
In category #2, あなた’ll find Portraits. We got a ton of those, so feel free to check the ones already made to find out the right sizes and styles.
- Skirmish portraits are used in battle, shown in the portrait bars to the left and right. You can put multiple ones in the “生きている” category if you want them randomized per unit (we do that with bandits!). And the “死んだ” 1つ (which we usually just make a skull will only show if you set it on the checkbox above. さもないと, the portrait will simply disappear once the unit dies.
- Map Portraits are used in the book, for the warband page and in encounter options.
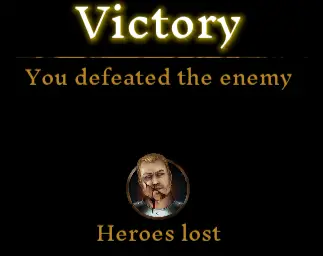
- Score View is saved for the banner that happens when you finish a fight, such as showing the unit you lost when the fight is won.
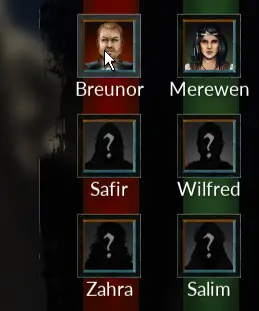
- Highlight と Silhouette are seen in the Hero selection screen, if a character is hovered or still locked.
その後, you have several entries about the unit’s ビジュアル. The .mdl entry handles the actual model and animation information, but the rest configure how the unit behaves in the map. Take particular care when using Shoot Target と 起源, as this governs how the unit interacts with projectiles – where other units try to shoot it, and where its projectiles originate from.
ご了承ください Quote Map と 兵器 are deprecated.
ついに, we reached #3 – Unlocking behavior.
The first is the requirements to unlock a hero – nothing here means the character is already unlocked. ここ’s how Rana, 例えば, is set up:

This is a complex entry where you can determine what sort of in-game event needs to happen for a character to be unlocked. Note the obvious 説明 エントリ, but the magic happens when you determine the Event Type. Each event type describes how it works, and then the final 4 entries determine how the event is checked. For the above example, we are listening for >=5 instances of “Spend Currency” イベント, but we reset the tracker at the end of every run/session.
To qualify the event, we use the Inspectors. For Rana’s unlock, we set up two: One describes that the currency we’re looking for is マナ, and the other describes that we can only check for events that happen in a specific zone, Albion. ここ’s how we did it:
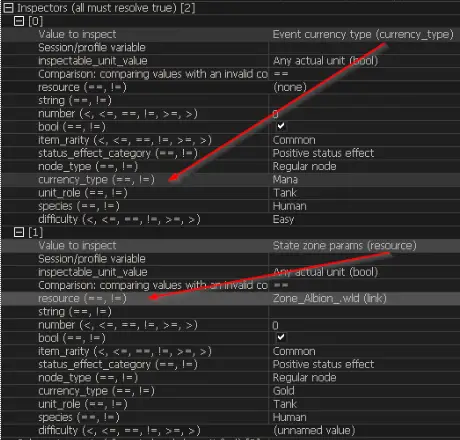
Once you set a Value to Inspect, あなた’ll see written in it the information of which other entries we need to fill, as noted in the image above. This takes a bit of trial and error to get right, but all the required information is laid to you in the descriptions (ありがとう, MarkoP!)
今, B-side Unlocks (Called “Prowess unlocks” ゲーム内) work in a similar way.

But besides how you actually unlock it (ところで, we use the same unlocking for all characters: just have it complete a run without dying. Check any of our heroes in the Heroes folder for how we set it up), you can put a 名前 for this alternate version, add some bonus attributes, and even put an alternate model/texture.
Unit Class
さあ、しましょう’s work on the クラス. You can use the Create menu, but I suggest you just click on the appropriate entry in the Params file and select “新しい”. それから, remember to save the new file – we use the Content/Merlin/UnitClasses folder for that.

今, the Unit Class file is a bit simpler, but it houses many important configurations. Take a look at Breunor’s:
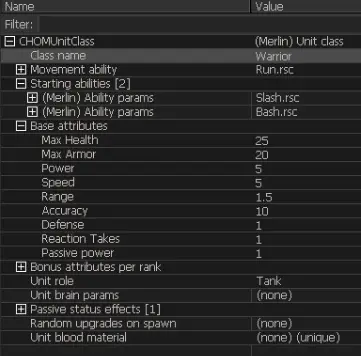
初め, あなたは持っています Class Name. This is only for show. If you want to specify if this class is to be considered a 戦士, レンジャー または Mystic for ability and AI purposes, を使用してください Unit Role エントリ, assigning タンク, nuker と サポート それぞれ.
それから, you have to decide which abilities the unit is able to perform. あ Movement Ability, most likely Run.rsc, and then the Starting Abilities. For player characters, we recommend only 2 能力, a base attack (スラッシュ,Singe and Shoot are our examples) and an extra one, like Bash for our Breunor example.
もし, しかし, you are working on an enemy unit, 気が狂う. We recommend up to 5 abilities to keep the AI reasonable.
それから, you got your Base Attributes, where you can define your unit stats. Pretty self-explanatory if you know the game, but note: “防衛” refers to evasion, “Reaction Takes” is not used in the current design, と “Passive Power” is a hidden attribute you can use to scale things behind the scenes, but the player has no knowledge of that.
今, note Bonus Attributes per Rank and Random Upgrades on Spawn. This is how units get stronger or have small variety in their stats.
Bonus Attributes per Rank is only used for player characters. It’s a flat increase added whenever the units level up. 今すぐ, this has been set to 0, but you can change that and even add fractional numbers if you want. Enemy units, unable to rank, are not affected by the entries here.
Rankup Bonus (not visible on the screenshot) creates cards on rankup which allow the player to choose which attribute to increase. It’s currently set as 2HP or 1 Armor with an added random card choice between Power, 回避, 範囲, 正確さ, Movement every 4 レベル. Enemy units also do not gain this.
In The Hand of Merlin, we scale enemy power per zone index, in a file attached to the Random Upgrades on Spawn entry. そのためには, we use a structure similar to the Blacksmith Upgrades, where every zone represents a new tier.
例として, ここ’s MinorAbominationUpgrades, used on マンドレイク, ワイバーン と Redcap. You can find all others in the Merlin/Enemies/BlacksmithUpgrades フォルダ.
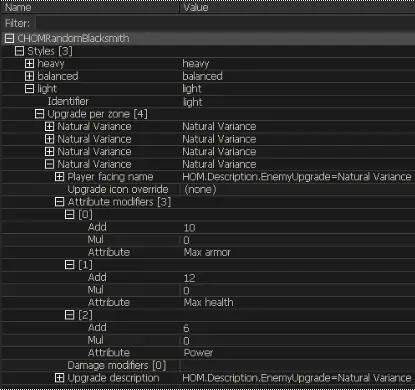
がある 3 “スタイル”, to generate some variety. Each style has 4 upgrades *for each zone – Albion, Marca Hispanica, Al-andalus, エルサレム). Each entry has a few attribute modifiers. The expanded entry above means that 1 in every 3 Minor Abominations spawned in Jerusalem will have +10 Max Armor, +12 最大体力, と +6 Power added to their base stats.
Pretty easy to adjust, I hope!
ついに, if your unit is an enemy unit, assign a 脳 param. We talk more about those in their own guide – Artificial Intelligence.
Adding Enemies to a level
大丈夫, last bit. させて’s add a character to a level as an enemy, so we can see it spawn. While the creation of maps is covered in another guide, ここ’s a quick rundown on how to add an enemy to one. I recommend checking Content\Merlin\Examples\Gameplay\GameplayTest as a baseline.
- Create/find the Script Object. それ’s represented in-world as an orange cube, but you can press the N key and search for it.
- Duplicate any of the Unit Variables. Inside the script there’s a few CHOMUnitParams already. Just duplicate one and work on the double.
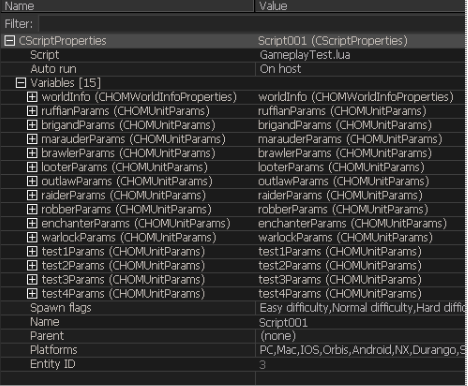
- Browse a new Unit Params file

- Do a bit of scripting inside the .lua file after the initial set up, type in the command
homSpawnUnit(worldInfo, XXXXXX, wbEnemyWarband, worldInfo:GetEnemySpawnPoint(“”, 0))
Where XXXXXX is the name of the params, like warlockParams or test1Params.
とてもシンプルです, whenever that skirmish start, the unit will be spawned on a spawnpoint. Make sure there’s no other ones set to the same spawn point, as seen on the Creating new Levels guide.
Testing Characters
A few tips to test out your characters:
- When starting a level from the editor instead of going through the Lobby/Main menu, the game assigns you the characters in the Content\Merlin\Databases\TestingRoster.rsc document, so you can change those characters to the ones you are working on.
- To test enemies, you can use the console to type hom_dbg_bDisableAI = 1, allowing you to control the enemy warband
New units will make your experience even more varied. 楽しむ!
これが今日私たちがこの目的で共有するすべてです The Hand of Merlin ガイド. このガイドは元々、次の者によって作成および執筆されました。 Mids. このガイドを更新できなかった場合, これに従って最新のアップデートを見つけることができます リンク.