- タイトル: 衰退の状態 2
- 発売日:
- 開発者:
- 出版社:
Information about State of Decay 2 まだ不完全です. これを使用してゲームの詳細を記入するのにご協力ください。 お問い合わせフォーム.
The Heartland game mode has 27 unique achievements. This guide lightly details the steps to obtain them as well as giving more detailed descriptions of each of the recruitable characters.
Table of Contents/Overview
For ease of use, I will lay the guide out in order of missions and when they become available. All of the skills/facilities that I reference for each character are the max levels. Here is the list of the achievements and which sections they are located in:
Non-Story Locked Achievements
- They Grow ‘Em Big Around Here
- Trumbull Valley Choir
- Hunting the Hunters
- Playing Doctor
- Heal Thyself
- Two Heartlands Beat As One
- Shots in the Dark
チュートリアル: Larisse
- Max Would Be Proud
- The City-Raised Farmer
- The Crafty Scoundrel
チュートリアル: Quincy
- Such Wonderful Toys
- The City-Raised Farmer
- The Eager Inventor
Mid-Game: Vic & Issac
- The Desperate Husband
- The Mournful Father
Mid-Game: ダイアナ & Reba
- The Shy Maker
- The Grumpy Hunter
Mid-Game: Chavez, Captain Logan, & Izzbee
- The Lonely Survivor
- Tear Down That Wall
- The Last Soldier
- The Helpful Hacker
- CLEO Can You Hear Me?
- フルハウス
Delta Squad’s Fate – Echo Labs Guns
- Shots in the Dark
End-Game
- Undeadly Efficiency
- The Walls Came Tumbling Down
- Plot Armor
- Heartlandia
- How Red Was Our Valley
Non-Story Locked Achievements


These three should be attained simply by working on the rest of the achievements. You can focus on grinding them if needed.


These will take a long time of playing or grinding. I’d suggest allowing yourself to become infected whenever possible to add to the numbers (instead of doing any infection therapy).

Simply join or host a game. The community can be kinda dead at times, so it could take a while. There is an additional achievement for beating the game in a multiplayer session (see End-Game) – these could both be attained by seeking help for the final plague wall.
Be advised – there is an achievement for completing Heartland alone.You can beat the game alone and then reload the save – this will take you back to right after you destroyed the third plague wall. Then you can have someone join and destroy the fourth plague wall (to obtain both multiplayer achievements) if you wish to save on play time.

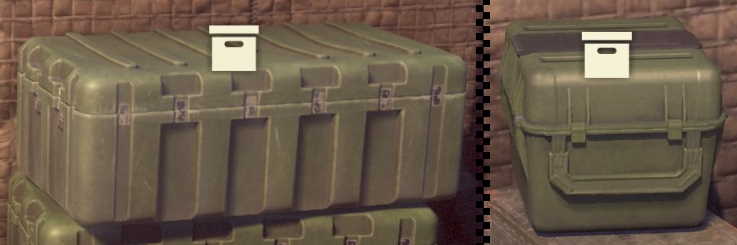
This can technically be started as soon as you begin the game. As other guides have mentioned, you can find them in various military camps/crates:

しかし, there are set locations where each gun spawns (as part of the Delta Squad’s Fate mission) – を見てください “Delta Squad’s Fate – Echo Labs Guns” このガイドのセクション.
チュートリアル: Larisse
You begin the game as either Larisse & Aunt Fi or Quincy & Helena – each have their own specific missions and person specific achievements. The first three missions are the same for both characters. そこから, the missions split off.
特徴
- Made Her Own Way: +20 最大体力
- Car Chopper: Affects Skills
- Hard Driving: +50% Vehicle Endurance
スキル: Car Chopping
- +25% Fuel Efficiency
- +50% Vehicle Stealth
Hero Bonus
- Brash Confidence: +100 Influence Per Day
施設: Vehicle Depot (Workshop Upgrade)
- Weapon Salvage & 修理
- Craft Toolkits
- Craft Advanced Toolkits
- Craft Scraps of Circuitry
- Craft Vehicle Upgrade Kit (ライト, 中くらい, 重い)

Craft one of each of the vehicle upgrade kits (can only be completed once the vehicle depot has been upgraded). To complete all three, you will need a total of:
- 30 Scraps of Circuitry
- 255 部品
- 12 材料
特徴
- High School Principal: +1 労働
- Ran Every Day: +20 最大スタミナ
- Patient Caretaker: +15 士気
スキル: 管理
- -25% Food Consumed Overall (マックス -75%)
- +50% Build Action Speed
Hero Bonus
- Daily Inspiration: Offers Inspiration (via the Radio)

The first mission of the game. Kill the blood feral and take Malik back to his base.

Once back to Malik’s base, clear the zombies.

Malik joins your group once you have finished clearing the base.
特徴
- Urban Explorer: Sprint for free when lightly encumbered
- Old Skating Injury: -15 Max Carrying Capacity
- Settled in the Valley: Affects Skills
スキル: Subsistence Farming
- +1 Food Per Day
- +1 Meds Per Day
Hero Bonus
- Gathering Routine: +1 Meds Per Day
施設: Farming Complex
- +8 Food Per Day
- +2.5 Meds Per Day
- Water Access for this Facility
- Accepts Garden Mods

Create Plague Cure.

For this mission, you travel to the marked location and survive the zombie attack (1 分, 5 秒). その後, you bring Brock back to the Wilkerson base.

After completing the prior quest, あなた
しなければならないreturn to base and upgrade the vehicle depot (5 circuitry).

Travel to the Industrial Steel Supply Company and clear the plague heart. それから, search the containers to find the detonators. Return to the Wilkerson base with these detonators.

The option will come up to recruit Brock. (You can always recruit him at a later date as well by traveling back to the Wilkerson base and choosing “recruit to community”). You are also able to recruit Brock as Quincy as well – simply travel to the Wilkersons and interact with him. 費用がかかります 1500 influence to do so.
特徴
- Outlaw Chemist: Affects Skills
- Tests Things on Himself: +20 最大体力
- パーティーアニマル: +50% Food Consumed Per Day
スキル: Outlaw Chemistry
- +5 Max Ammo Storage
- +5 Max Fuel Storage
Hero Bonus
- Fuel Additives: +25% Fuel Efficiency
施設: Outlaw Chem Lab
- Craft Explosives & デコイ
- Thrown Explosives & Incendiarie (Soda Can Bombs, Pipe Bombs, Molitovs, Fuel Bombs)
- Advanced Incendiaries & デコイ (Thermite Grenades, Napalm, Flashbangs)
- Thrown & Placed Decoys (爆竹, 花火)
- Craft Weapon Attachments
- Craft Performance Enhancers & Produce Ammo
- Chemistry Experiment: Gain Random Rare Items

Follow the directions of the quest and then choose to either fight Xander or Mickey.
チュートリアル: Quincy
You begin the game as either Larisse & Aunt Fi or Quincy & Helena – each have their own specific missions and person specific achievements. The first three missions are the same for both characters. そこから, the missions split off.
特徴
- Robbed Office Buildings: +50% Search Speed
- Dreamed of Retirement: +25% Standing Rewards
- Survived in Prison: +20 最大体力
スキル: 武器鍛冶
- +15% Weapon Durability
- -33% Weapon Repair Parts Cost
Hero Bonus
- Lockpick Lessons: Anyone can sprint or open locked doors while crouched
施設: Weapons Depot (Workshop Upgrade)
- Weapon Salvage & 修理
- Craft Toolkits
- Craft Scraps of Circuitry
- Craft Melee Weapons (Lead-Filled Bat “Danforth Slugger”, Rebar Club, Mower Blade Sword, Transmission Mace, Crow’s Beak, Razor-Edge Machete, Rebar Blade, Coffee Can Mace)
- Craft Ranged Weapons & ボルト (Suppressed Bolt-Action Rifle, Homemade Assault Rifle, Masterwork Assault Rifle, Homemade Crossbow, Homemade Scoped Crossbow, Standard Bolt, Light Bolt)
- Convert materials to parts

Craft one of each of the Network Weapons (can only be completed once the weapon depot has been upgraded). To complete all four (Lead-Filled Bat “Danforth Slugger”, Suppressed Bolt-Action Rifle, Homemade Assault Rifle, Masterwork Assault Rifle), you will need a total of:
- 2 Scraps of Circuitry
- 925 部品
- 11 材料
特徴
- Small-Town Deputy: +20 最大スタミナ
- Watched Cop Shows: +25m Enemy Detection Range, +30% Container Visibility Range
- Bright-Eyed Recruit: +15 士気
スキル: Police Procedure
- -50% Chance of Search Crash
- Extracts Plague Samples More Often
Hero Bonus
- Regular Patrols: +2 ベッド
The first mission of the game. Kill the blood feral and take Malik back to his base.
Once back to Malik’s base, clear the zombies.
Malik joins your group once you have finished clearing the base.
特徴
- Urban Explorer: Sprint for free when lightly encumbered
- Old Skating Injury: -15 Max Carrying Capacity
- Settled in the Valley: Affects Skills
スキル: Subsistence Farming
- +1 Food Per Day
- +1 Meds Per Day
Hero Bonus
- Gathering Routine: +1 Meds Per Day
施設: Farming Complex
- +8 Food Per Day
- +2.5 Meds Per Day
- Water Access for this Facility
- Accepts Garden Mods
Create Plague Cure.

Travel to the marked location and find the note. This will take you elsewhere and then you will be required to turn in 25 部品.
After completing the prior quest, あなた
しなければならないreturn to base and upgrade the weapons depot (5 circuitry).

Travel to the marked location and protect Xander

Travel to the Industrial Steel Supply Company and clear the plague heart. それから, search the containers to find the note. Return to Santos with the Note.

The option will come up to recruit Keesha. (You can always recruit her at a later date as well by traveling back to the Santos Auto Shop and choosing “recruit to community”). You are also able to recruit Keesha as Larisse as well – simply travel to the Santos Auto Shop and interact with her. 費用がかかります 1500 influence to do so.
特徴
- Invents Things for Fun: Affects Skills
- Competitive Gymnast: +1 労働
- チェーンスモーカー: -30 最大スタミナ
スキル: Bomb-Making
- +2 Item Stack Size
- -33% Weapon Repair Parts Cost
Hero Bonus
- オートメーション: +50% Facility Action Speed
施設: Demolitions Lab
- Craft Explosives & デコイ
- Advanced Mines & デコイ (スモークグレネード, Land Mines, Pursuit Mines, C4 Charges)
- Thrown Explosives & Incendiarie (Soda Can Bombs, Pipe Bombs, フラググレネード, Molitovs)
- Box Mines (Box Mines, Whistling Box Mines, Remote Box Mines)
- Thrown & Placed Decoys (爆竹, 花火)
- Craft Weapon Attachments
- Craft Rounds & Produce Ammo
Mid-Game: Vic & Issac
After the “チュートリアル” section has completed, the story lines converge to be the same for either character.

Travel to the location to meet and speak to Captain Logan. He will send you to collect a note from a supply drop. There is a blood juggernaut that is optional to kill.

Return to base to fight off the siege (3 分). This will be triggered by whichever faction you were working with previously (The Wilkersons or The Santos Auto Shop) – there will also be a follow up quest later in regards to this.

Find Isaac – he is always at the location furthest South West:
This quest will normally give you either Isaac or Vic. After speaking to Isaac, you return to Vic. What you tell Vic determines which will join your community.

Telling Vic the truth will give the option to recruit Vic to your community. Isaac then leaves the area.

Lying to Vic will give the option to recruit Isaac to your community. Vic then leaves the area.
Once you have chosen, you will need to bring the new person back to base. This will complete the quest.
There is an achievement for recruiting each character:

特徴
- Veteran Firefighter: +20 最大スタミナ
- Sharpened by Grief: Affects Skills
- Revs the Engine: -50% Vehicle Stealth
スキル: Paramedicine
- Offers Medical Advice (via the Radio)
Hero Bonus
- Survival Training: +20 最大体力
施設: Trauma Pharmacy (Infirmary Upgrade)
- Craft First Aid Kits
- Craft Chemicals
- Physical Therapy (Community: Heal All Injuries & Trauma)
- 迅速な回復 (Active Character: Health Regen for 1h)
You can chose to leave this character as an enclave instead of recruiting.
しかし, Vic is broken and once you leave Marshall, his enclave will disappear permanently (leaving you unable to get enclave benefits nor recruit him).
The Empty Nest
- Enclave Benefits: Training and Advice (Experience Bonus)

特徴
- Bioengineering Professor: +100 Infection Resistance
- Obsessed with Plague: +30 最大スタミナ
- Ready to Give Up: -30 最大体力
スキル: Plague Pathology
- Extracts Plague Samples More Often
- +50 Infection Resistance
- Offers Medical Advice (via the Radio)
Hero Bonus
- Obsessive Cleaning: +50 Infection Resistance
施設: Plague Annex (Infirmary Upgrade)
- Craft Plague Consumables
- Craft Chemicals
- Community Infection Therapy (Community: Heal All Infection)
- Plague Crafting Experiment (Gain Random Plague Item)
You can chose to leave this character as an enclave instead of recruiting.
The Lonely Outpost
- Enclave Benefits: Hoarded Medications (Meds Income)

There exists a glitch to keep both characters.Complete the quest up until the point that you are meant to bring the chosen character back to base. Instead of returning to base, take them along with you to the next main story quest – “Retaking Trumbull: Handle with Care.” Chose the “Agree to accompany Logan” オプション – you will then get the following prompt:
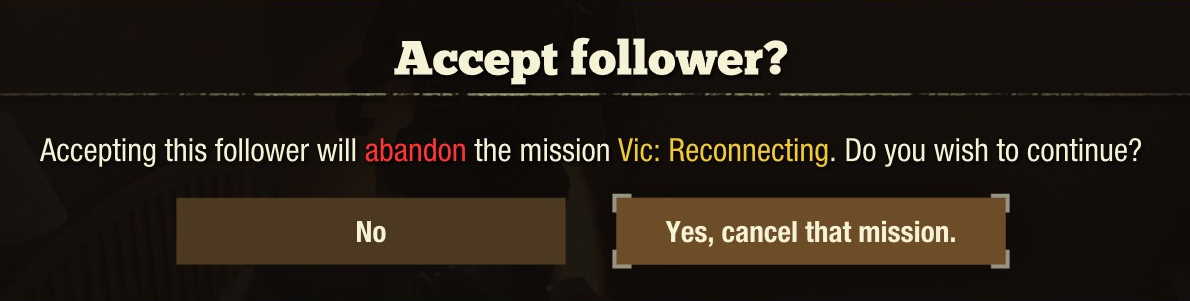
Chose “はい, cancel that mission.” This will send the person you have following back to base automatically and reset the “Vic: Reconnecting” クエスト. Doing this allows you to have both in your community, or you can chose to leave the second option as an enclave. Be advised – Vic is broken and will always de-spawn from the area if you chose to leave him as an enclave instead of recruiting.
Mid-Game: ダイアナ & Reba
To obtain Diana, there is three missions associated. They can be triggered in these areas:
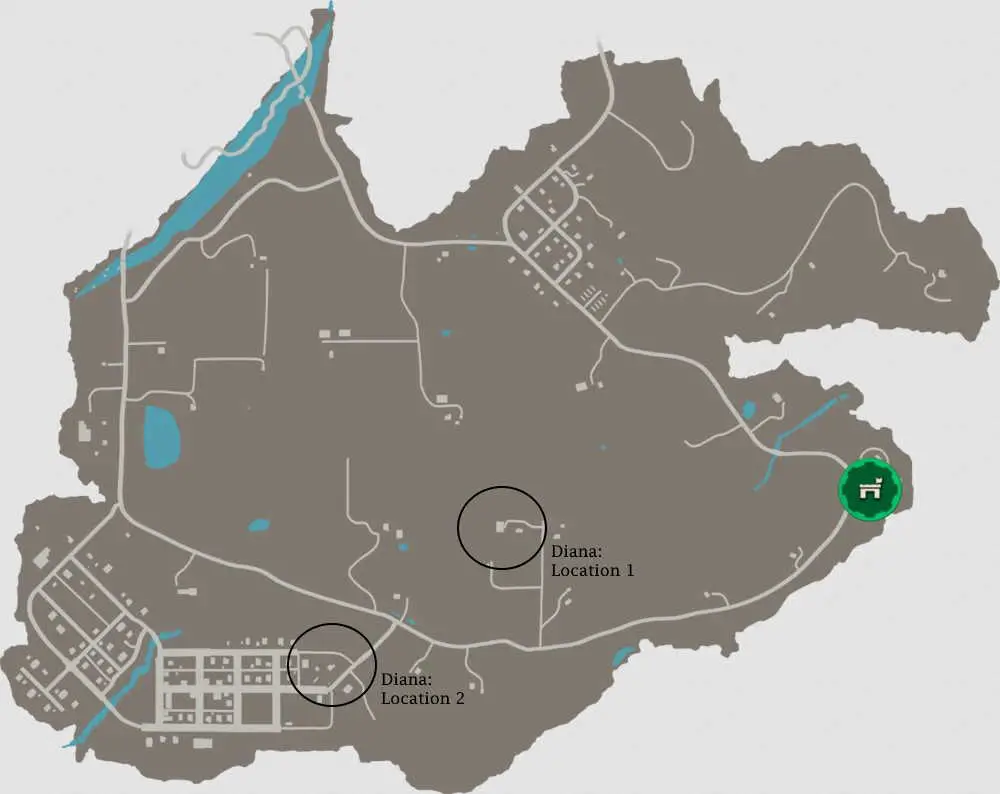

You must be within rage to trigger this mission. Once you have triggered this mission, complete it ASAP – the quest can fail if you do not help soon enough and you will be unable to get this follower.
Clear out the zombies and speak to Diana.

After completing the first mission, some time must pass before you can start this one. You must be within rage to trigger this mission as well. もう一度, you must assist immediately because there is a chance to fail this quest and miss the follower.
もう一度, clear the zombies and speak to Diana.

Sometime after completing the prior two quests, this quest will pop up at base. Return to base and speak to Diana to chose if you recruit her or not.

特徴
- Avid Cosplayer: Affects Skills
- Hoards Things: +10 Max Materials Storage
- Standoffish: -50% Standing Rewards
スキル: 製作
- +15 Light Carrying Capacity
- +1 Item Stack Size
Hero Bonus
- Scavenging Runs: +1 Materials Per Day
施設: ファブリケーター (Requires Small Lot)
- +50% Weapon Durability
- +2 Item Stack Size
- +20 Light Carrying Capacity
- +20 Max Carrying Capacity
- Craft Backpacks (Eight-Slot Hiking Packs, Ultralight Six-Slot Packs)
- Craft Pro Muzzle Attachments
- Craft Parts
You can chose to leave this character as an enclave instead of recruiting.
The Old Factory
- Enclave Benefits: Zero Cost Followers, Recycling Expertise (Parts Income)


This mission can be very difficult. It only popped up 50% of the time for me – it seems like if the dialog to start it gets interrupted by another mission, then it gets cancelled and the game seems to forget to restart the mission. I am not sure how to fix this if it happens – I was unable to get the enclave to be allied and they forever stayed at their temporary location.
Once you have the mission, go to the original enclave location and clear the plague heart. Completing this will ally the enclave with you providing benefits:
The Santos Auto Shop: Vehicle Delivery (Radio Command)
The Wilkersons: Incendiary Delivery (Radio Command)
You must travel near her house to trigger this quest line (easy to miss when playing as Quincy).
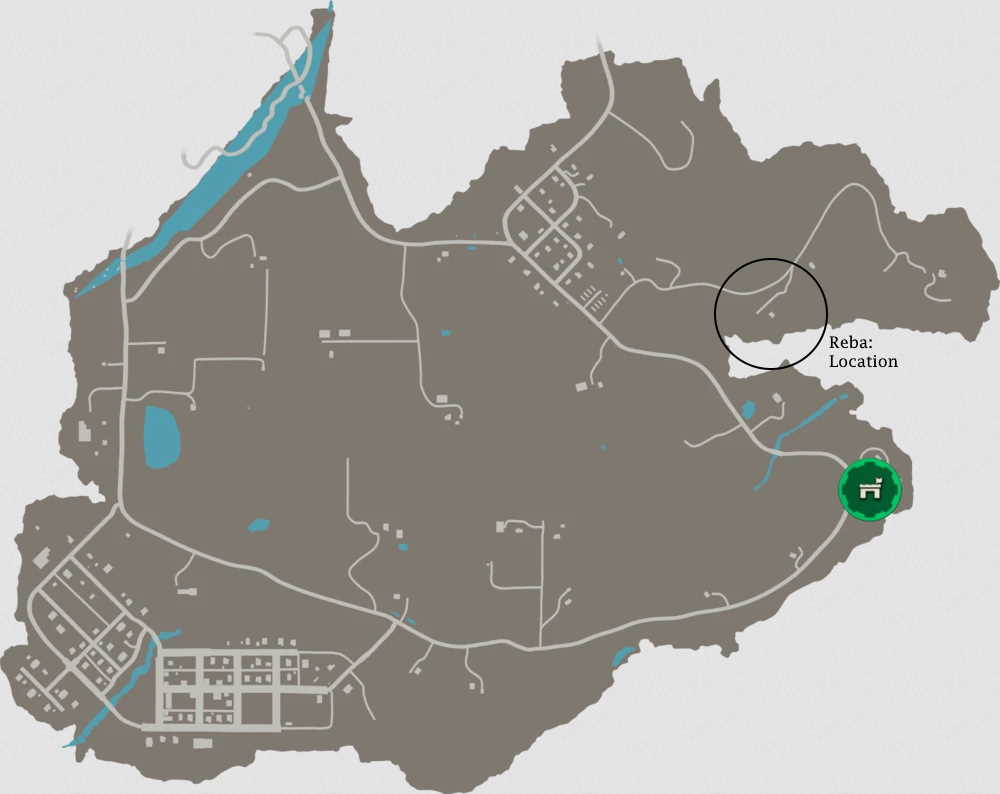

Travel to the location and collect the filling machine. Return it to Reba

This quest will automatically pop up after some time. Travel to the location and collect the water cooler. Return it to Reba

Sometime after completing the prior two quests, this quest will pop up at base. Return to base and speak to Reba to chose if you recruit her or not.

特徴
- Ran Her Own Diner: Affects Skills
- Survival Hunter: -50% Food Consumed Per Day
- Doesn’t Get Along: Keep their Moral at 30+ to avoid conflicts
スキル: Game Hunting
- +15% Influence Gained
Hero Bonus
- Hunting Trips: +1 Food Per Day
施設: Hunter’s Kitchen (キッチンのアップグレード)
- -1 Materials Per Day
- +25 Max Food Storage
- Prepare Hunter’s Feast (+30 Max Stamina for 45m, +15 Morale for 1h 0m)
You can chose to leave this character as an enclave instead of recruiting.
The Badass Homestead
- Enclave Benefits: Water Supply (Base-Wide Water)
Mid-Game: Chavez, Captain Logan, & Izzbee

Follow Captain Logan’s directions and collect bloater poison.

This is another mission triggered by approaching the area. You must also respond quickly or Chavez will die (and he is probably the best recruit option).

You must cure Chavez of his blood plague. If you do not have any plague cure on you, the quest will direct you to where his comrades fell to locate some.

特徴
- Red Talon Support: Affects Skills
- Carried Everyone’s Stuff: +15 Max Carrying Capacity
- Survivor’s Guilt: -5 士気
スキル: Pioneering
- +20 最大スタミナ
- +25 Parts Per Day
Hero Bonus
- Water Conservation: +20 最大スタミナ
施設: Utilities Complex (Requires Large Lot)
- Base-wide Power
- Base-wide Water
- Free Upkeep For All Facilities
- Routine Maintenance (Gain Pioneering XP, +3 Morale for 30m)
You can chose to leave this character as an enclave instead of recruiting.
The Lone Survivor
- Enclave Benefits: Munitions Cache (Ammo Income)

Travel with Logan to take out the plague wall

This mission will force you to get this achievement.
Once you have completed the mission, Captain Logan will join you (you have no choice).

特徴
- Former Drill Instructor: Affects Skills
- ローンサバイバー: +20 最大体力
- Preoccupied: +1 Beds Used
スキル: Drill Instruction
- +25% Facility Action Speed
Hero Bonus
- Military Access: +1 Ammo Per Day
施設: Superior Defenses
- One Active Guard
- Second Active Guard
- +20 最大スタミナ
- Defense Drills (Gain Fighting & Shooting XP)

Follow Izzbee’s instructions. She will have you go to certain locations, clear the zombies, and climb up to recite some lines/collect items. 最後に, you can recruit her.

特徴
- Experimented with AI: Affects Skills
- Inside Person: -66% Fighting Experience Rate, -33% Cardio Experience Rate
- Infectious Energy: +15% Influence Gained, +50% Facility Action Speed
スキル: 機械学習
- -15% Most Radio Cooldowns
- +25% Parts Salvaged from Weapons
Hero Bonus
- Crowdsourcing: +1 Outpost Limit
施設: Drone Uplink (Requires Large Lot)
- Call for CLEO Drop (以下を参照してください)
- Drone Hacking (Recon Drone Available for 1h 0m, Attack Drone Available for 1h 0m)
You can chose to leave this character as an enclave instead of recruiting.
The Broadcast Source
- Enclave Benefits: Rooftop Recon (Radio Command)
There is also an achievement associated with the facility that she unlocks (CLEO Drops):

Simply call in 10 CLEO drops. Each CLEO call causes a siege to take place at your base (3 分). You will fight a variety of plague zombies and blood variants – a blood juggernaut typically appears when there is one minute left.

You will have been able to earn this achievement as long as you were able to recruit all the prior characters (it is not necessary to get both Vic and Isaac for this).
Delta Squad’s Fate – Echo Labs Guns

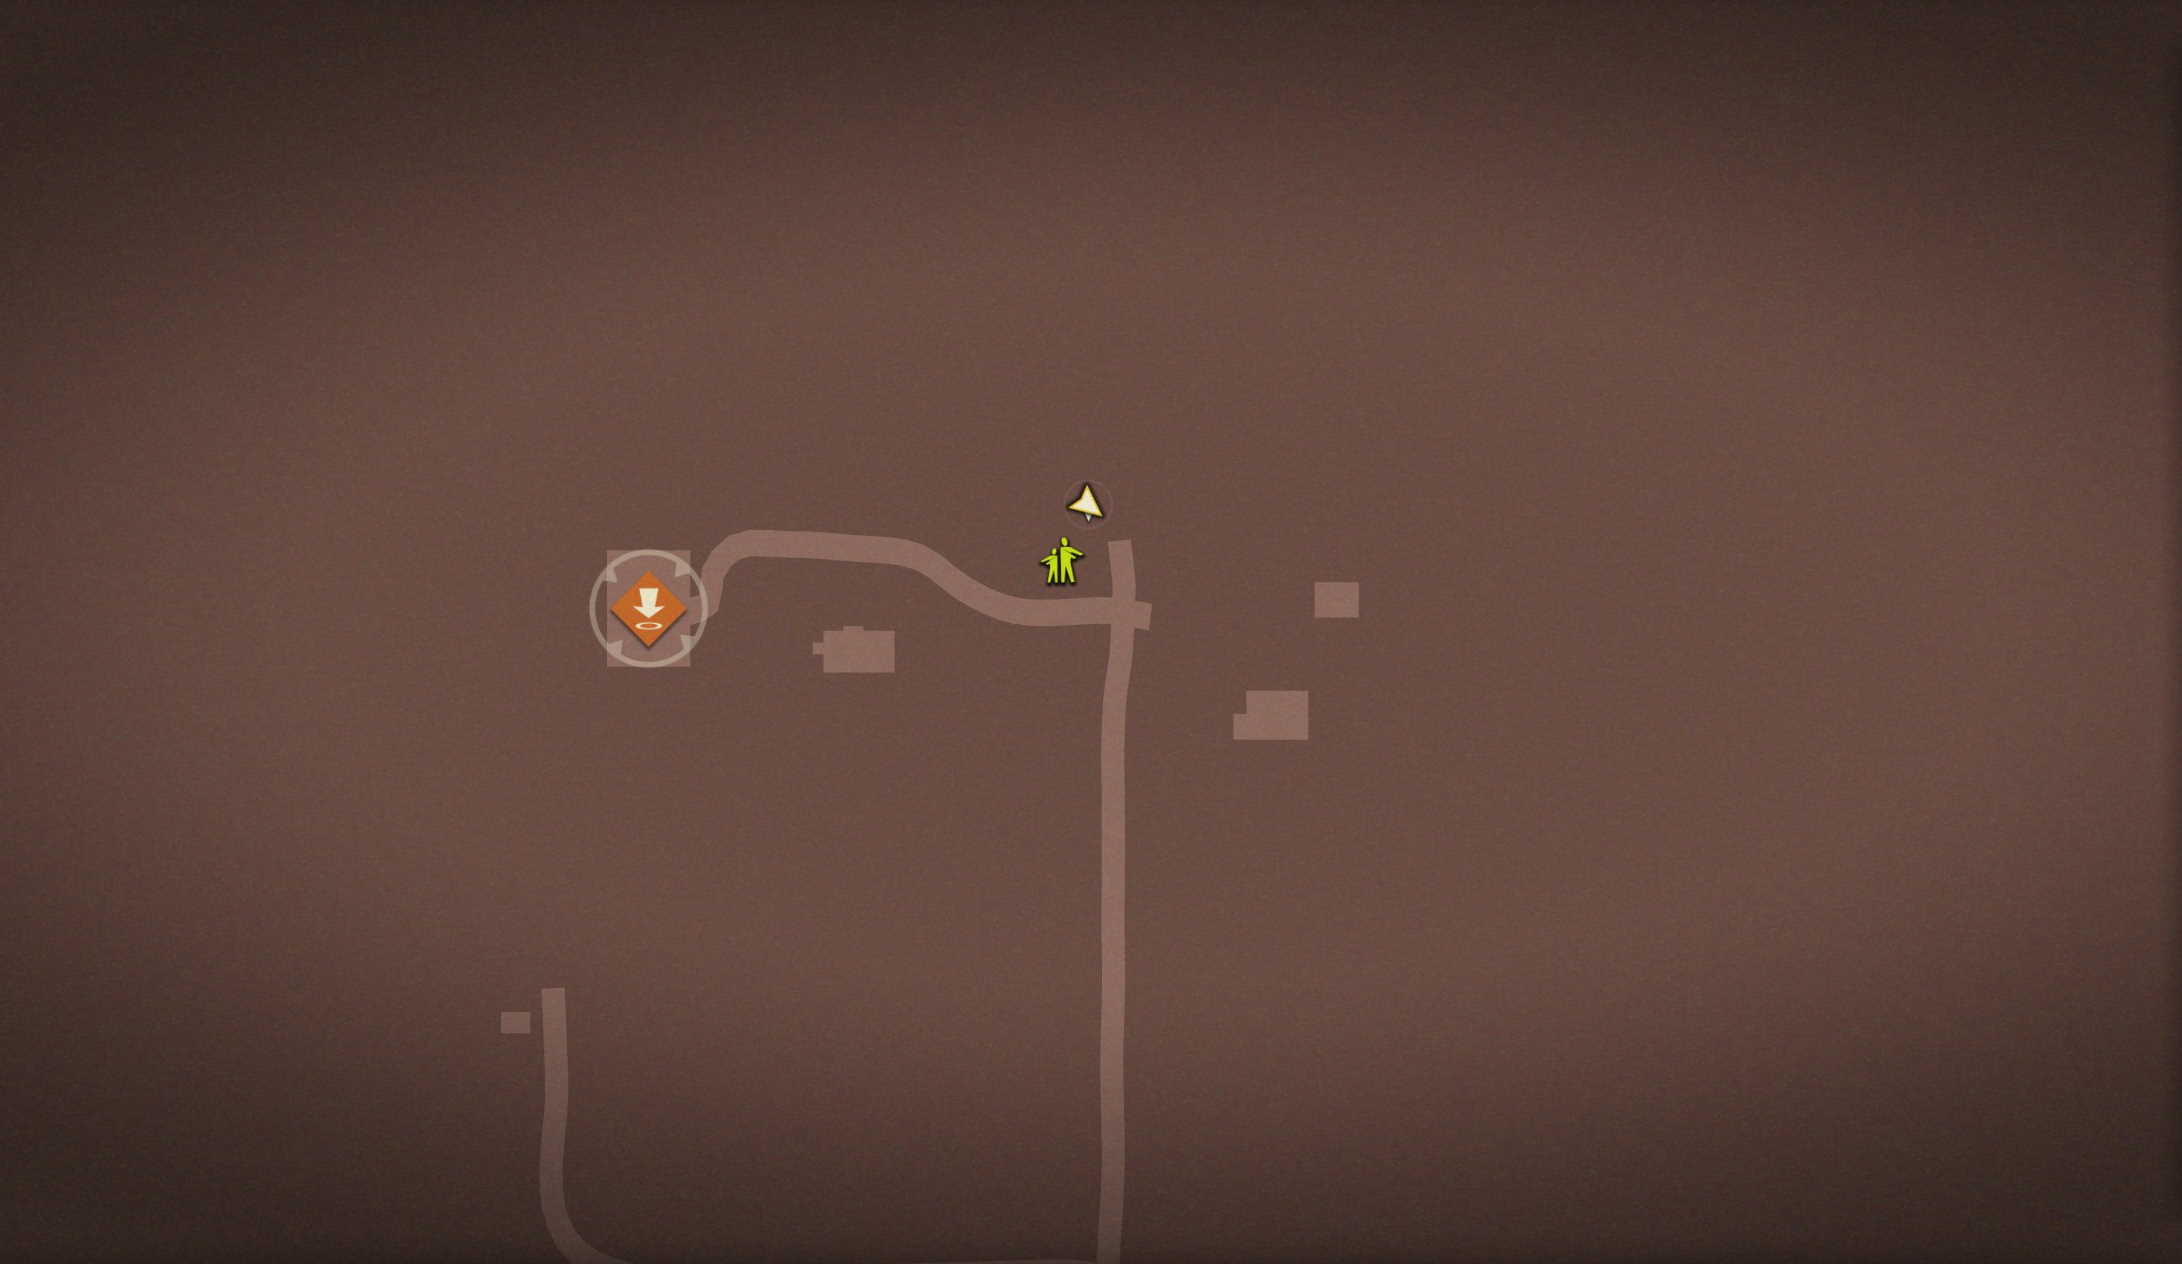
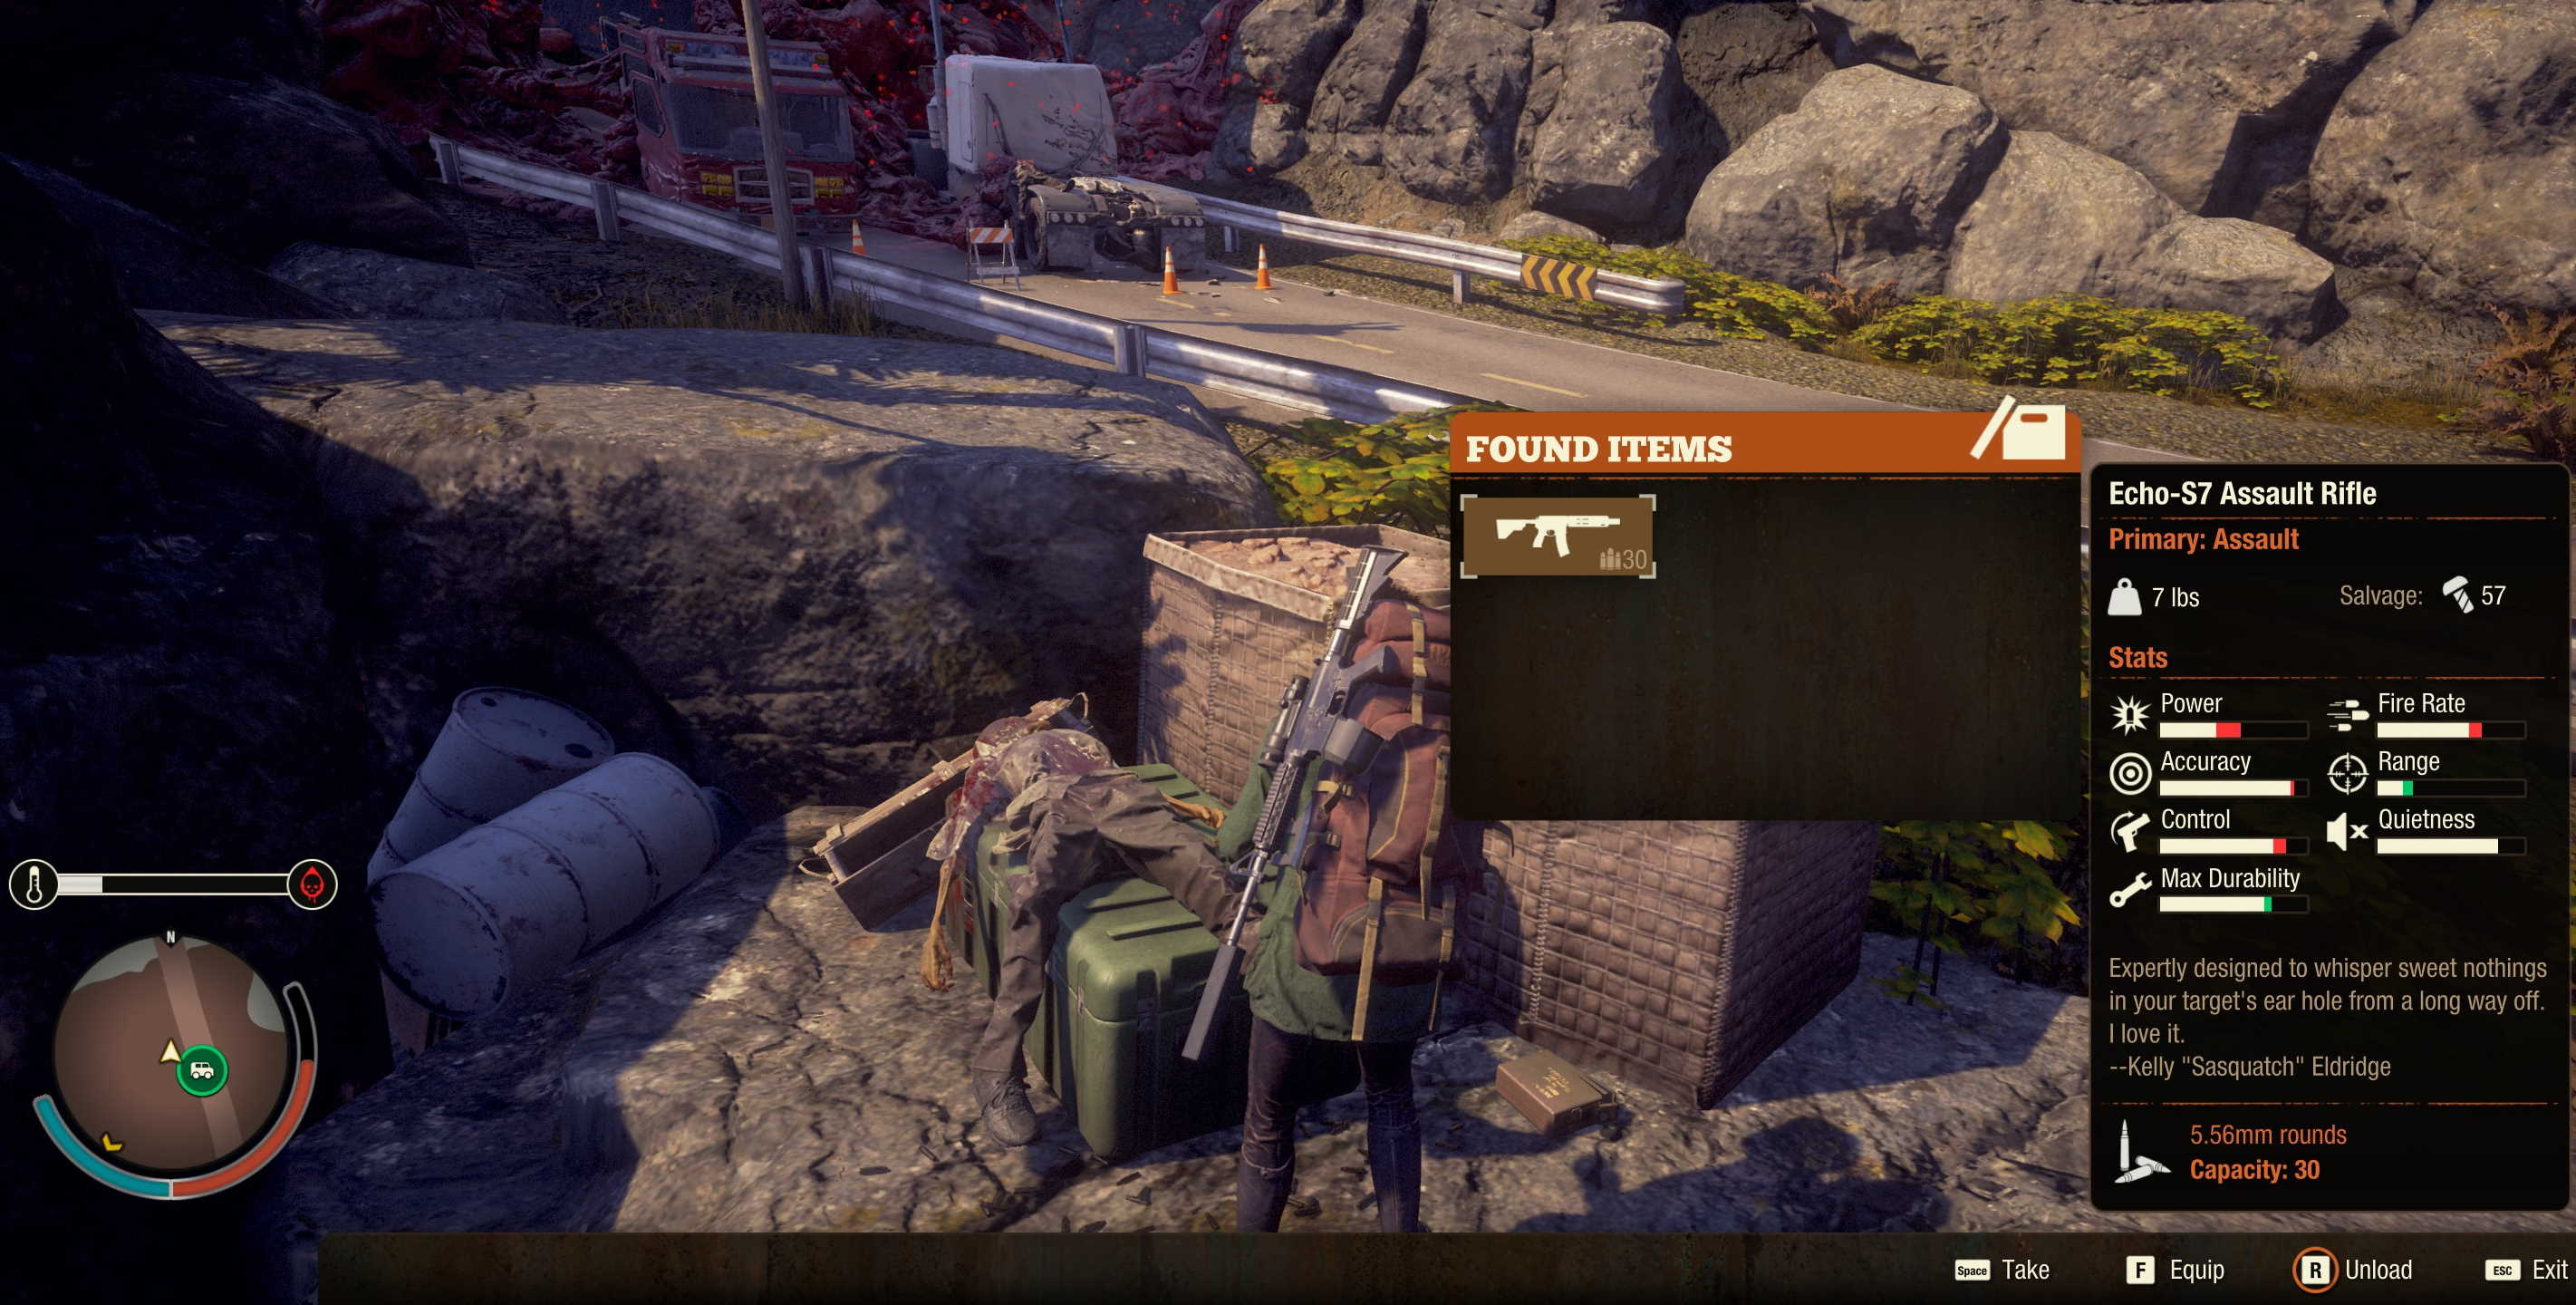
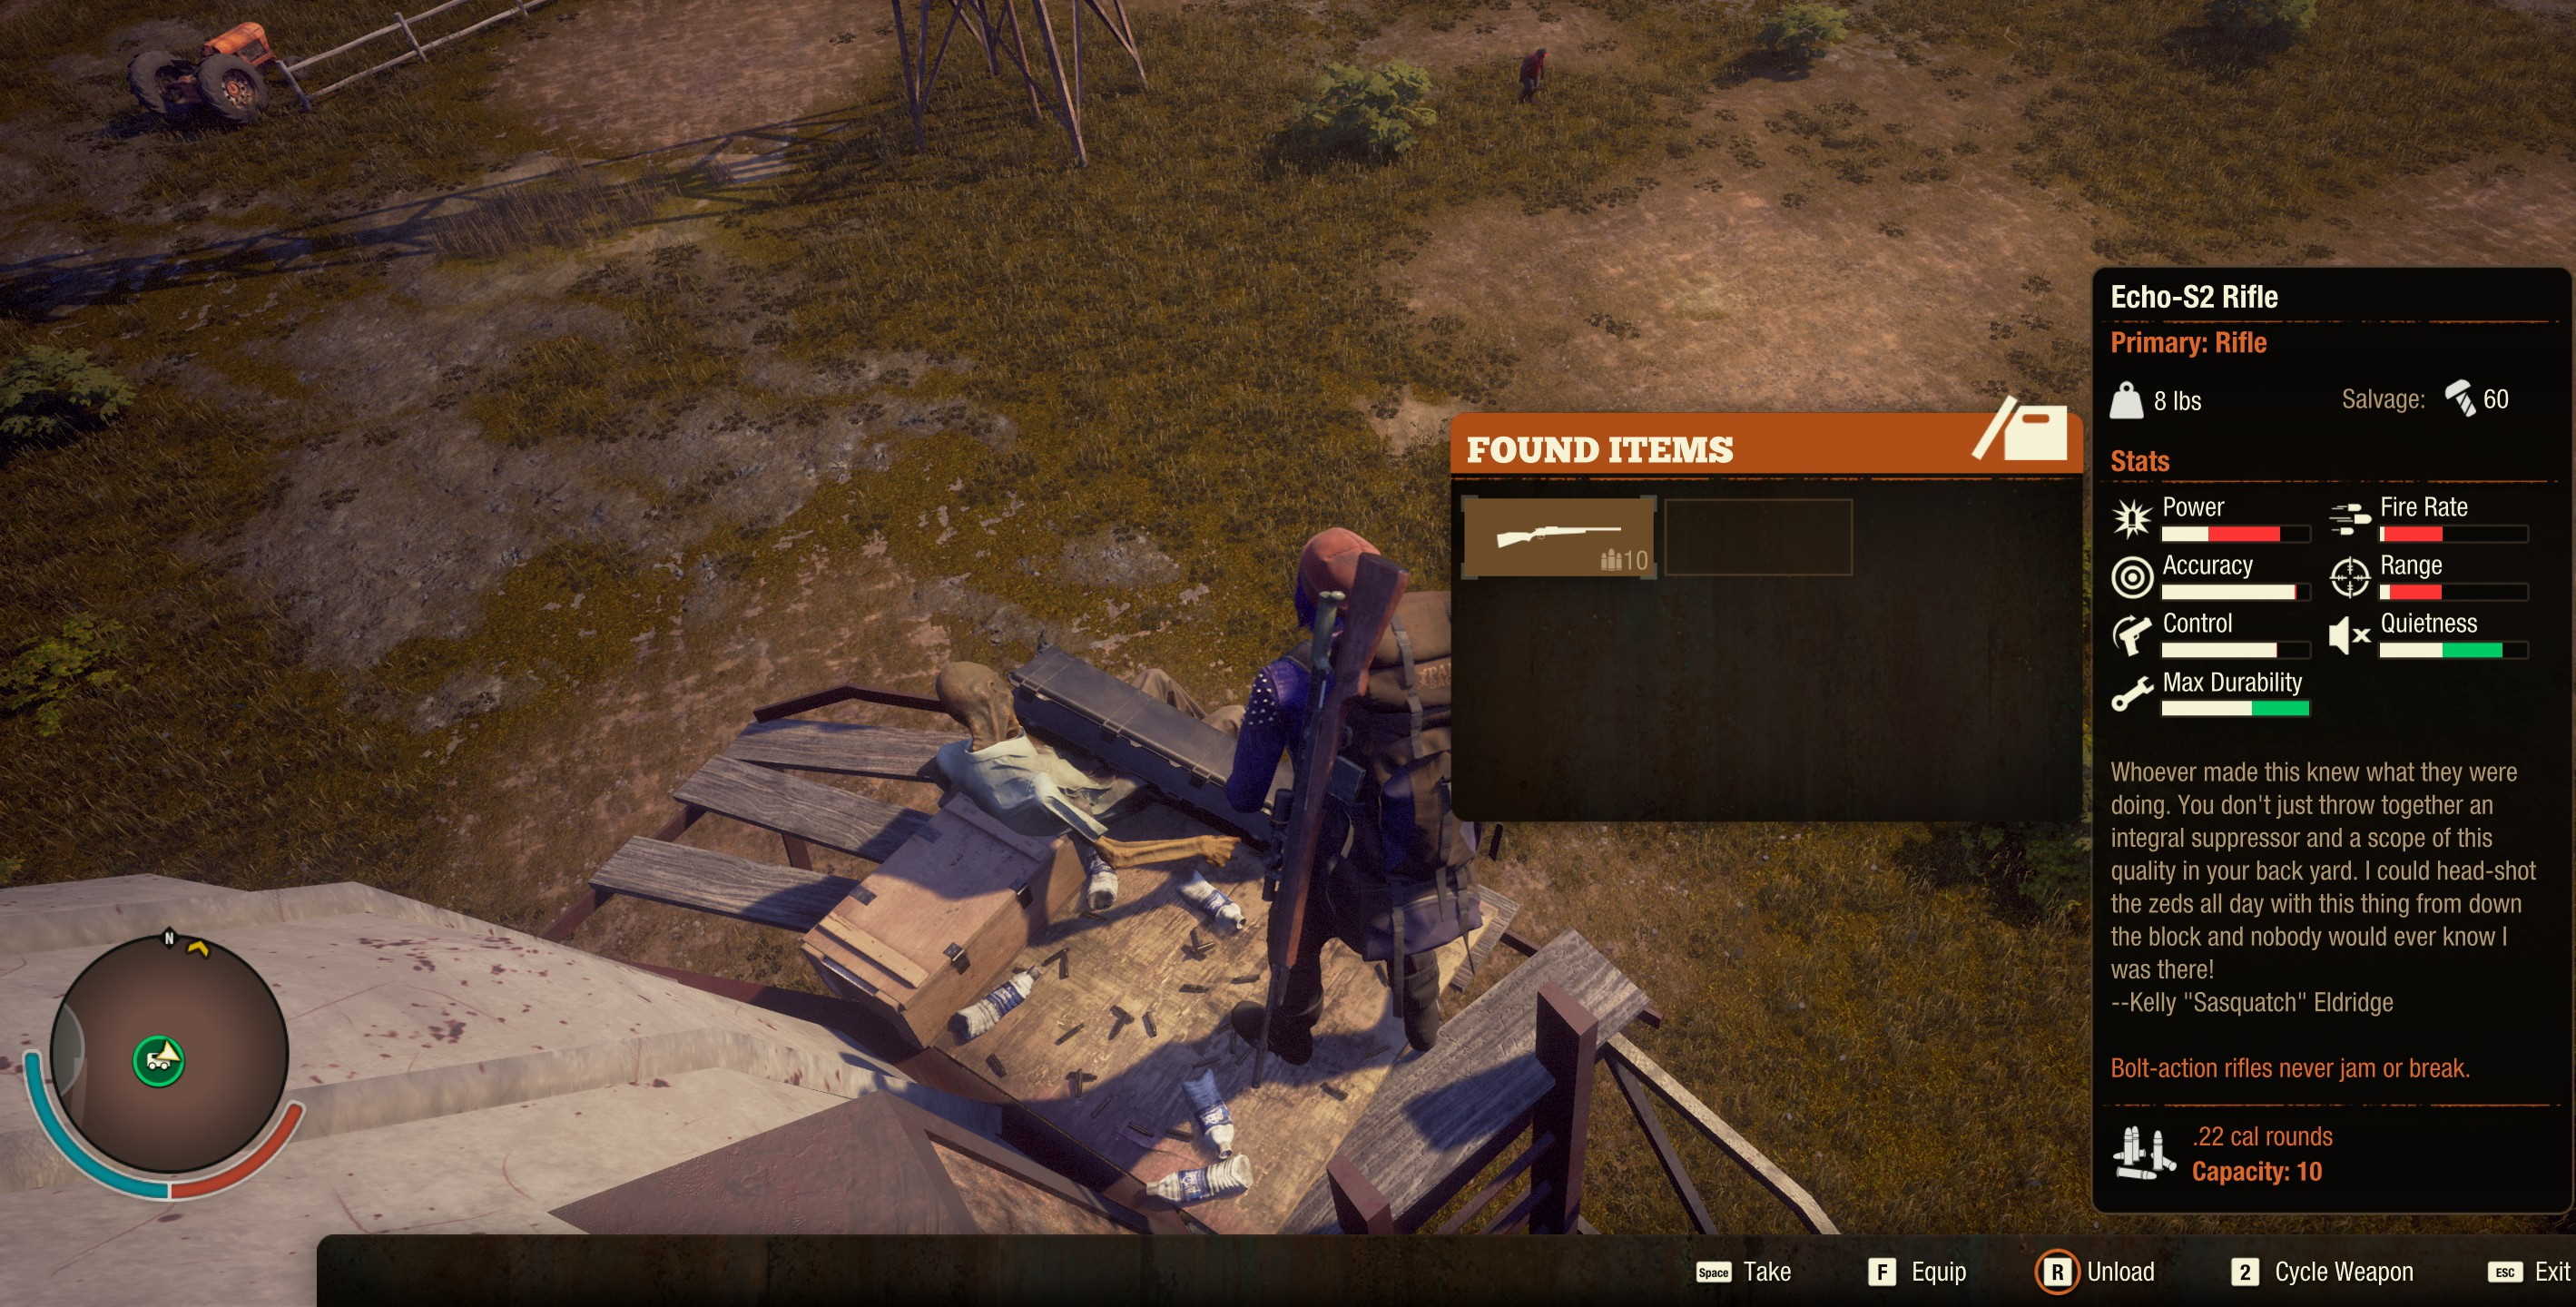
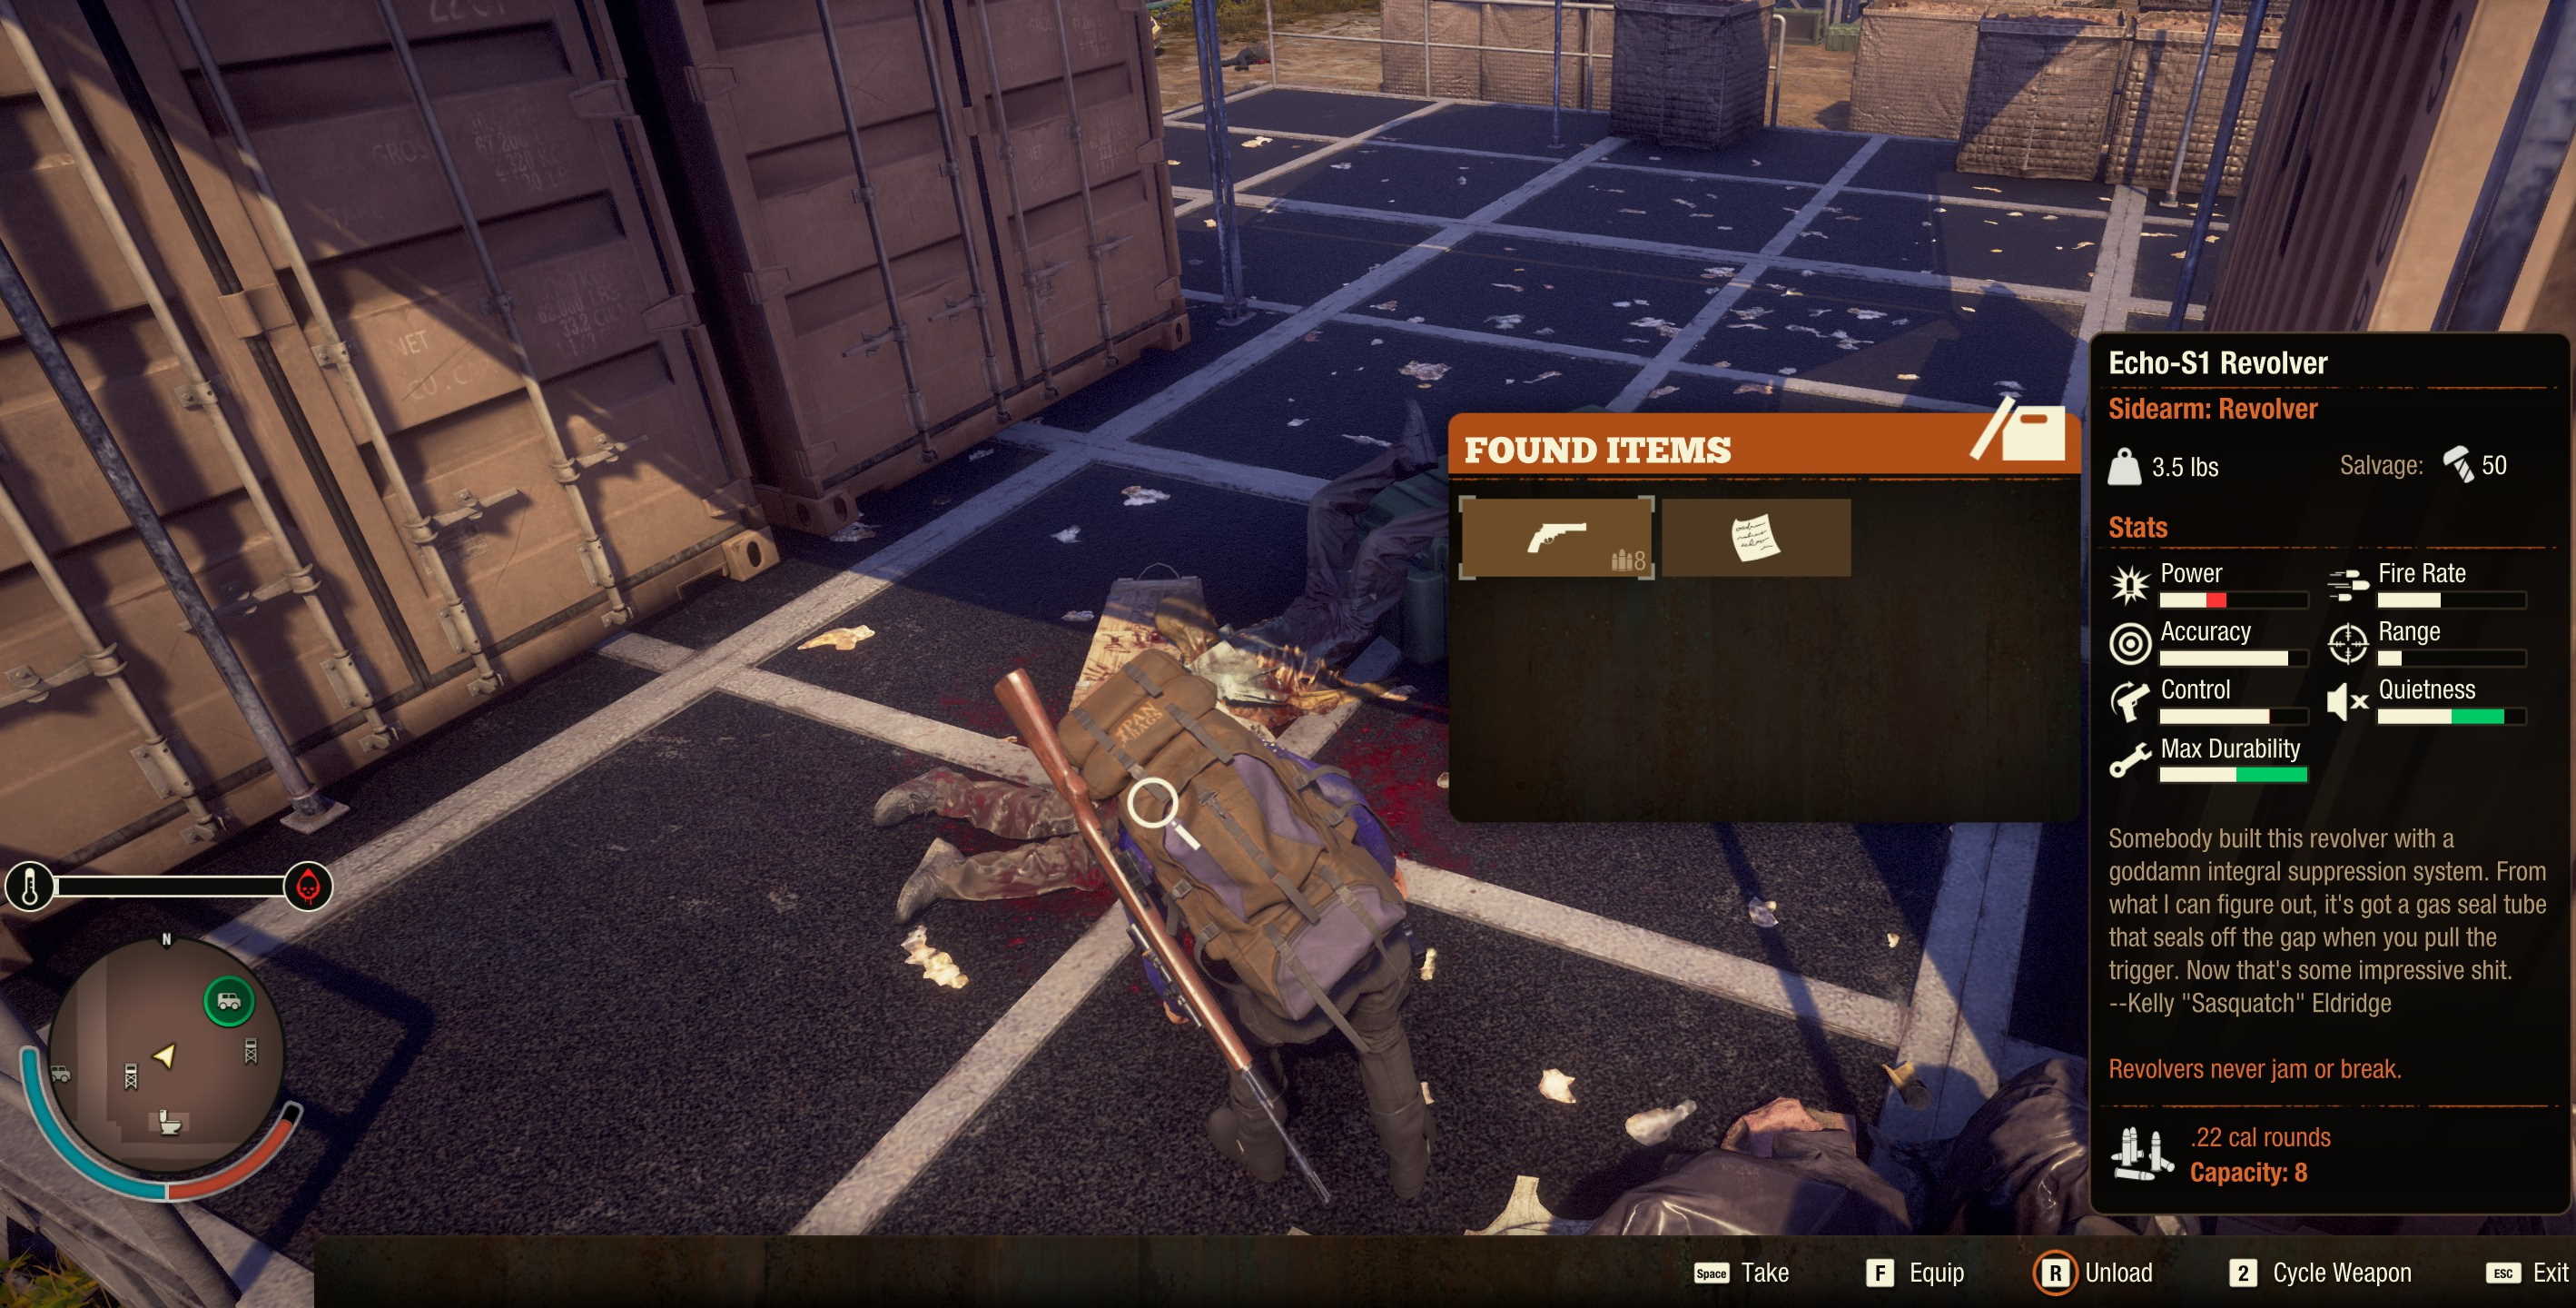
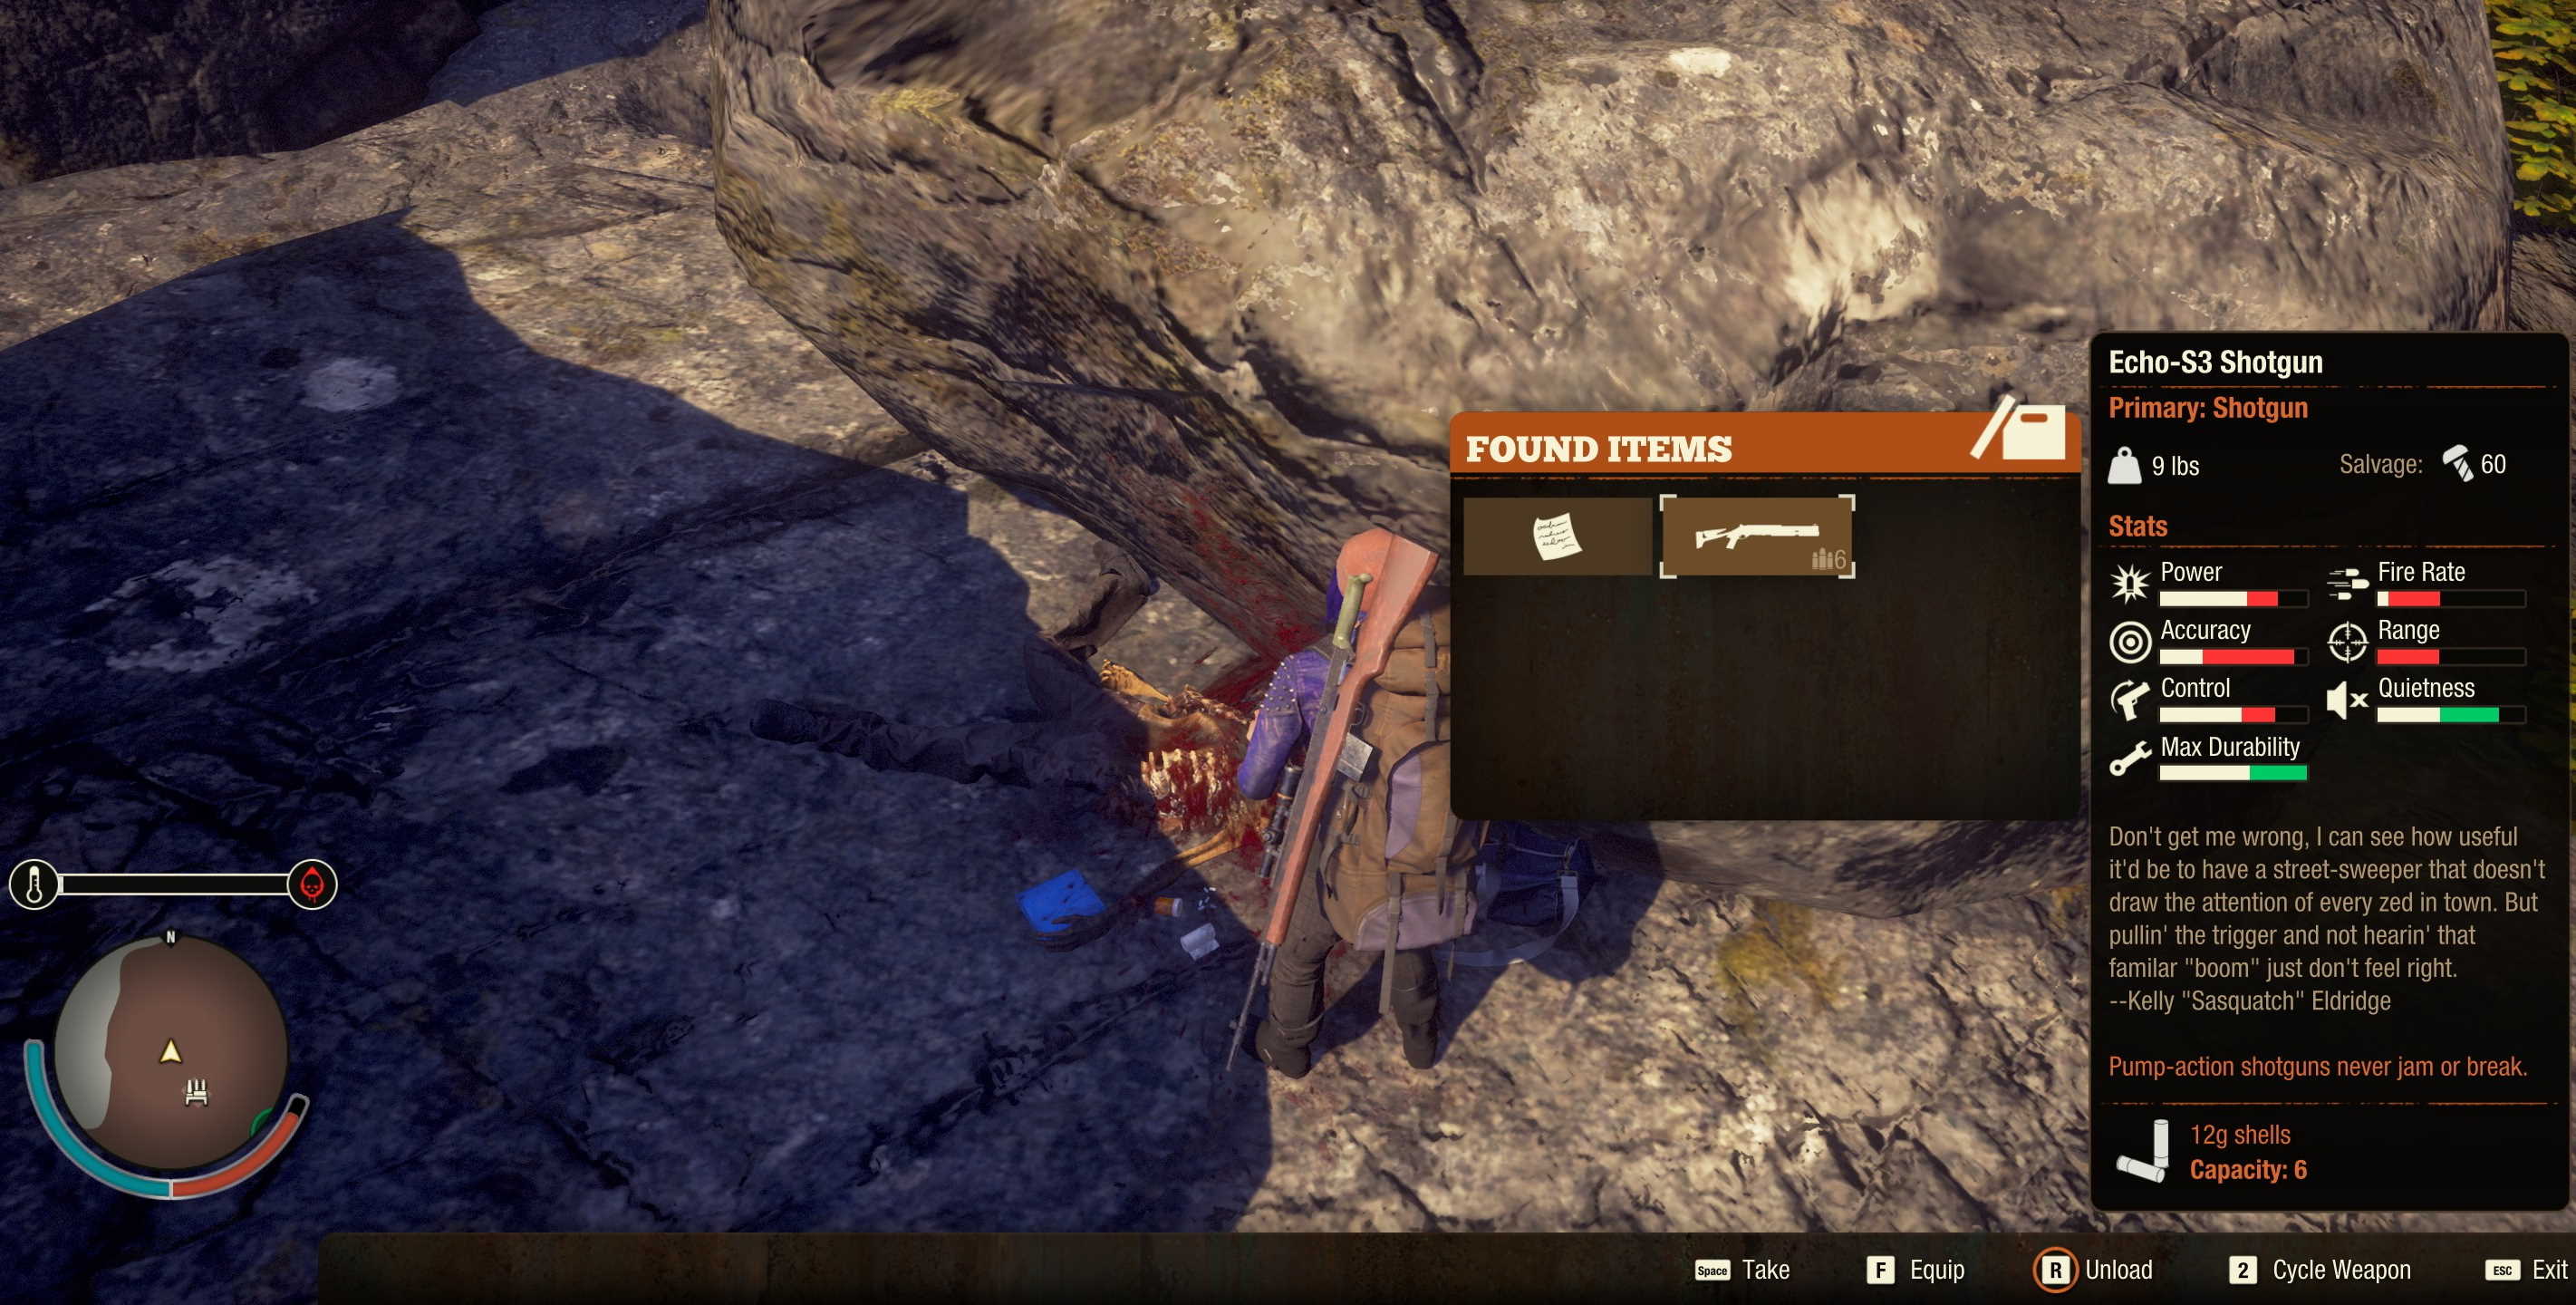
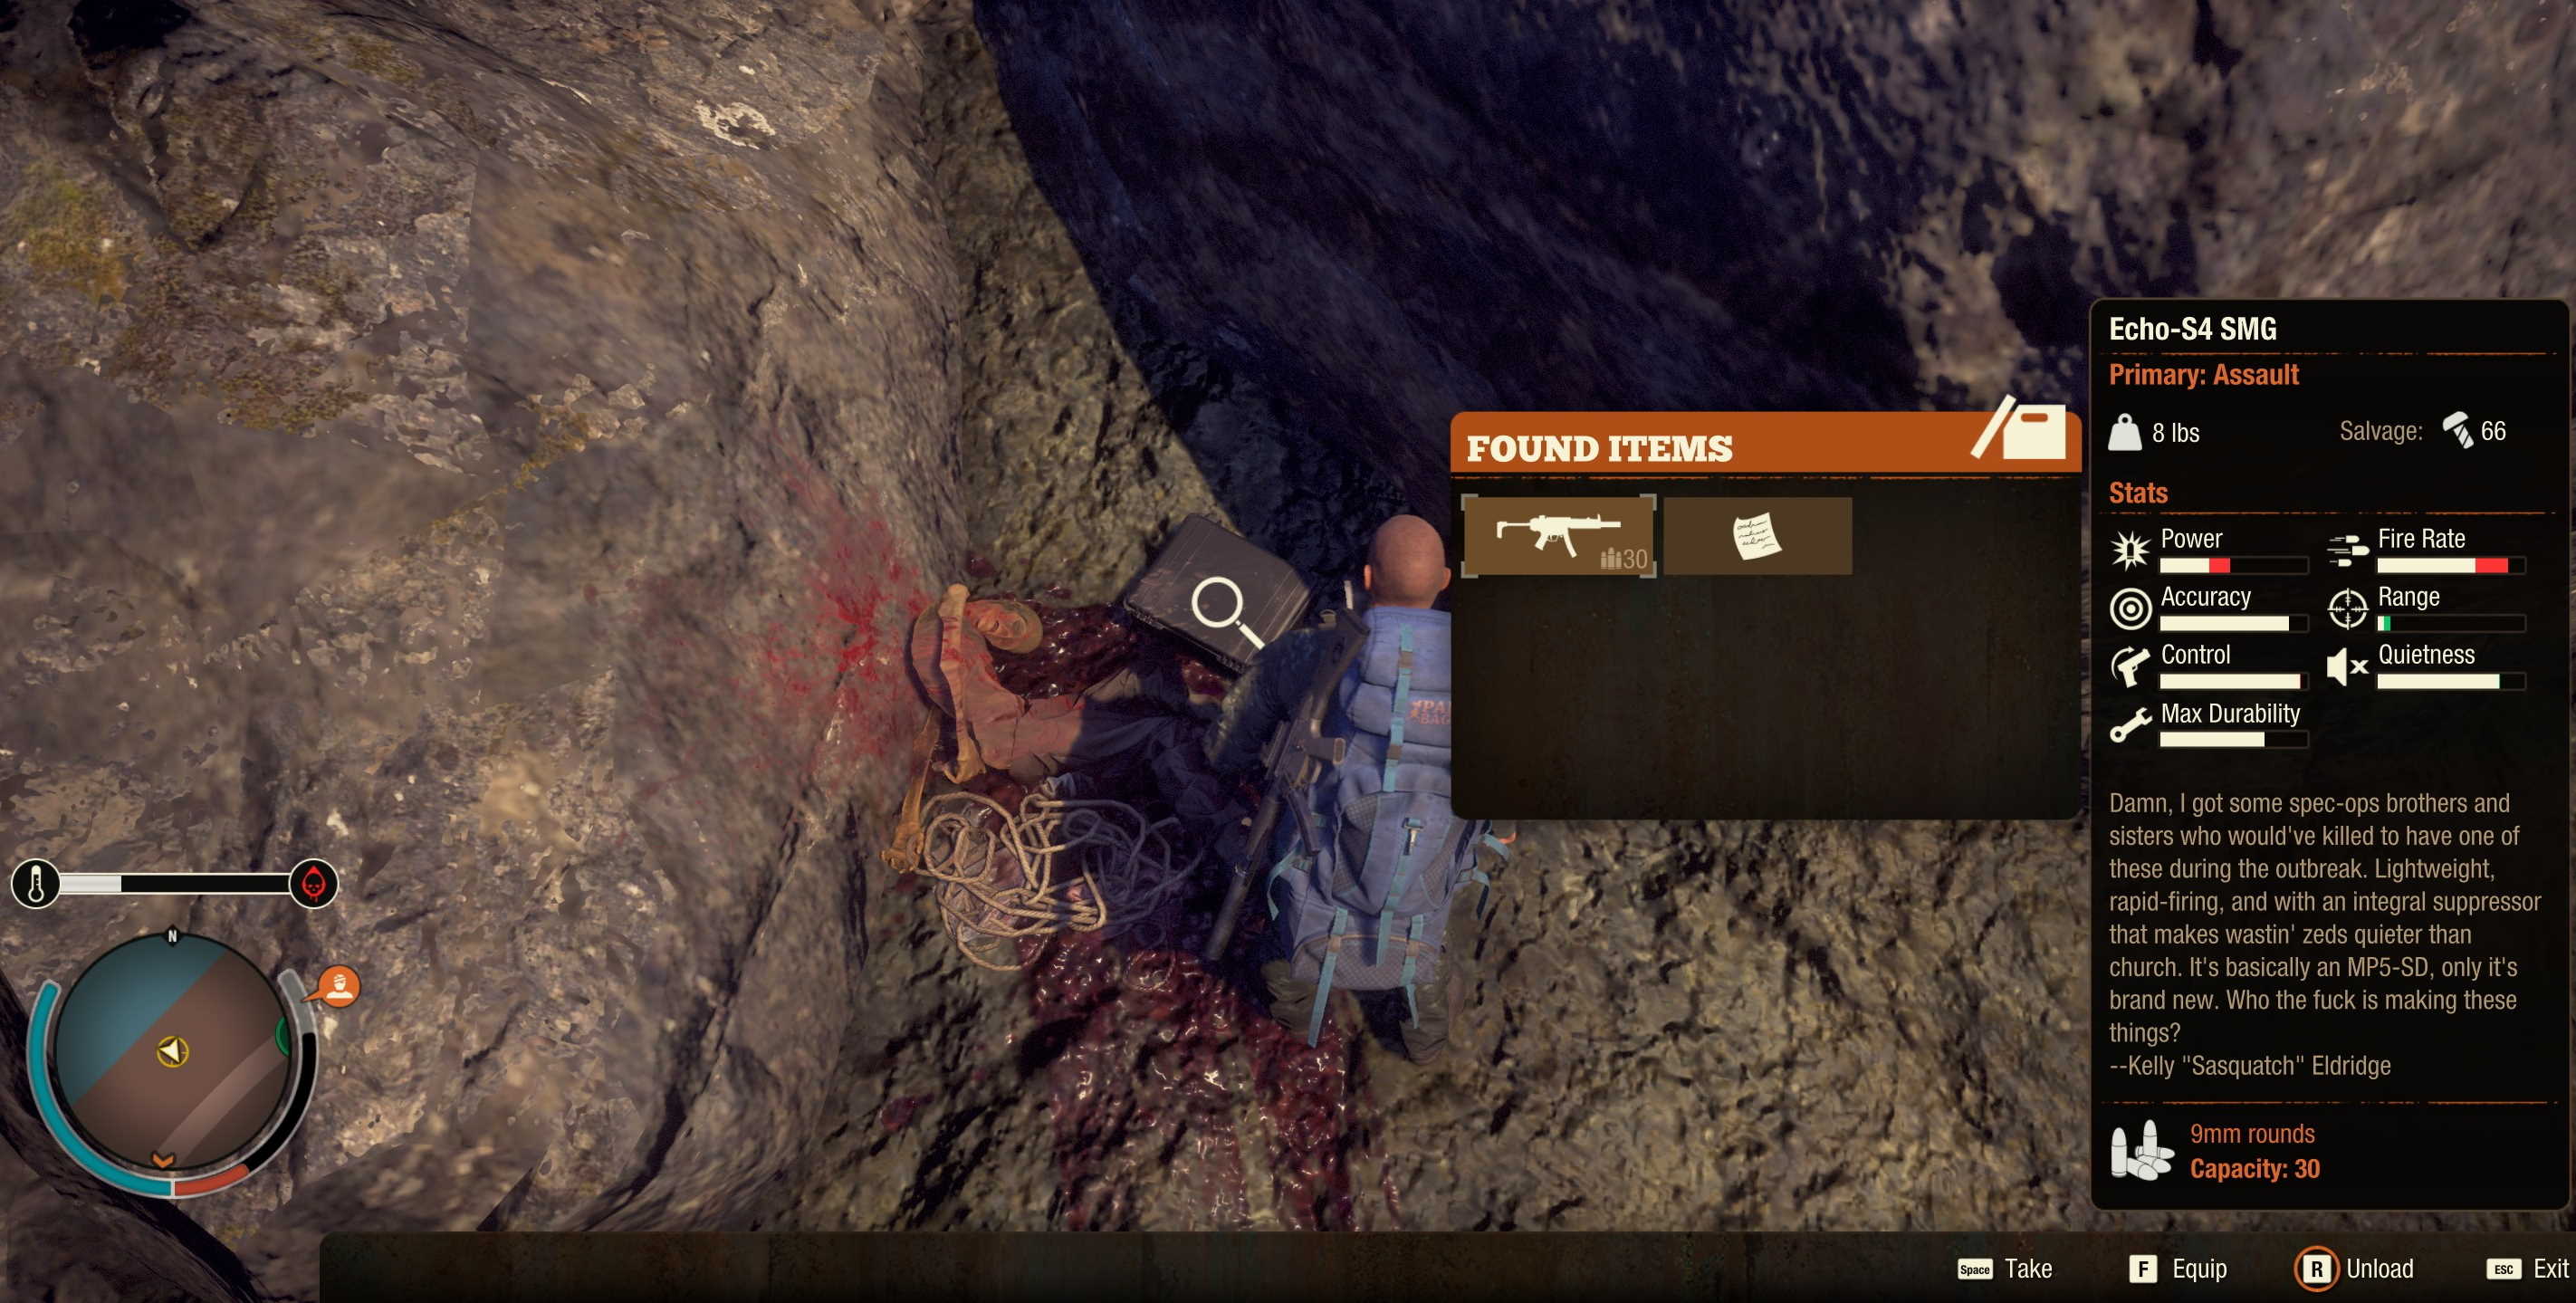
This pops up as a mission near the end of the recruiting phase. It only takes you to the initial location and once you have read the note, it no longer appears as a mission. If you read the notes, you can use the clues to find the location of all six of the delta squad members. On each of these squad members has a different Echo Labs Gun – a set spawn for each. Collecting all of these will earn you the achievement Shots in the Dark:
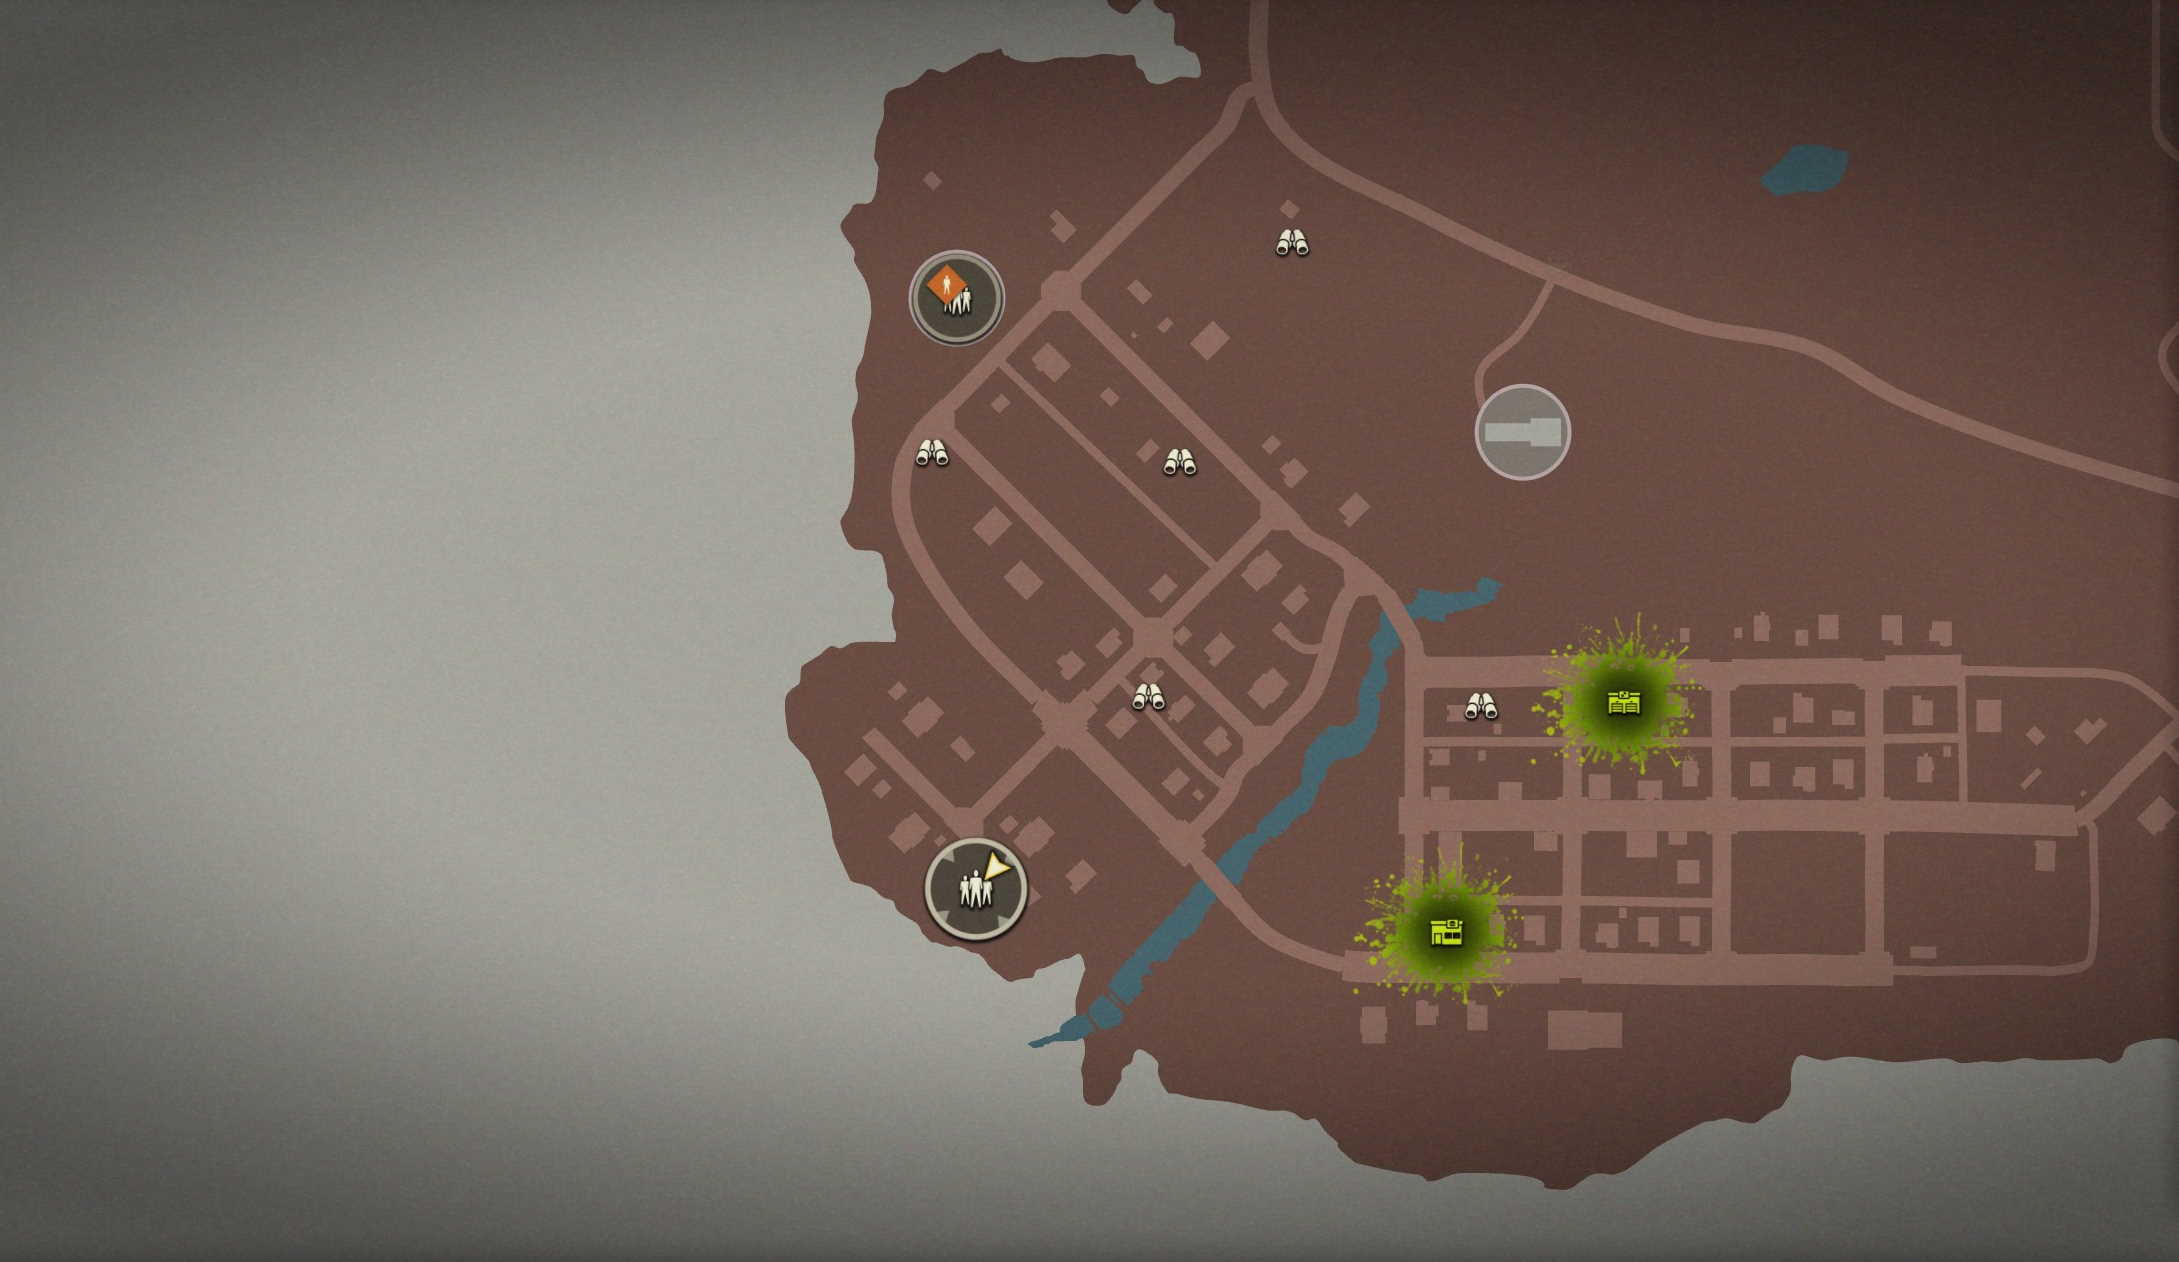
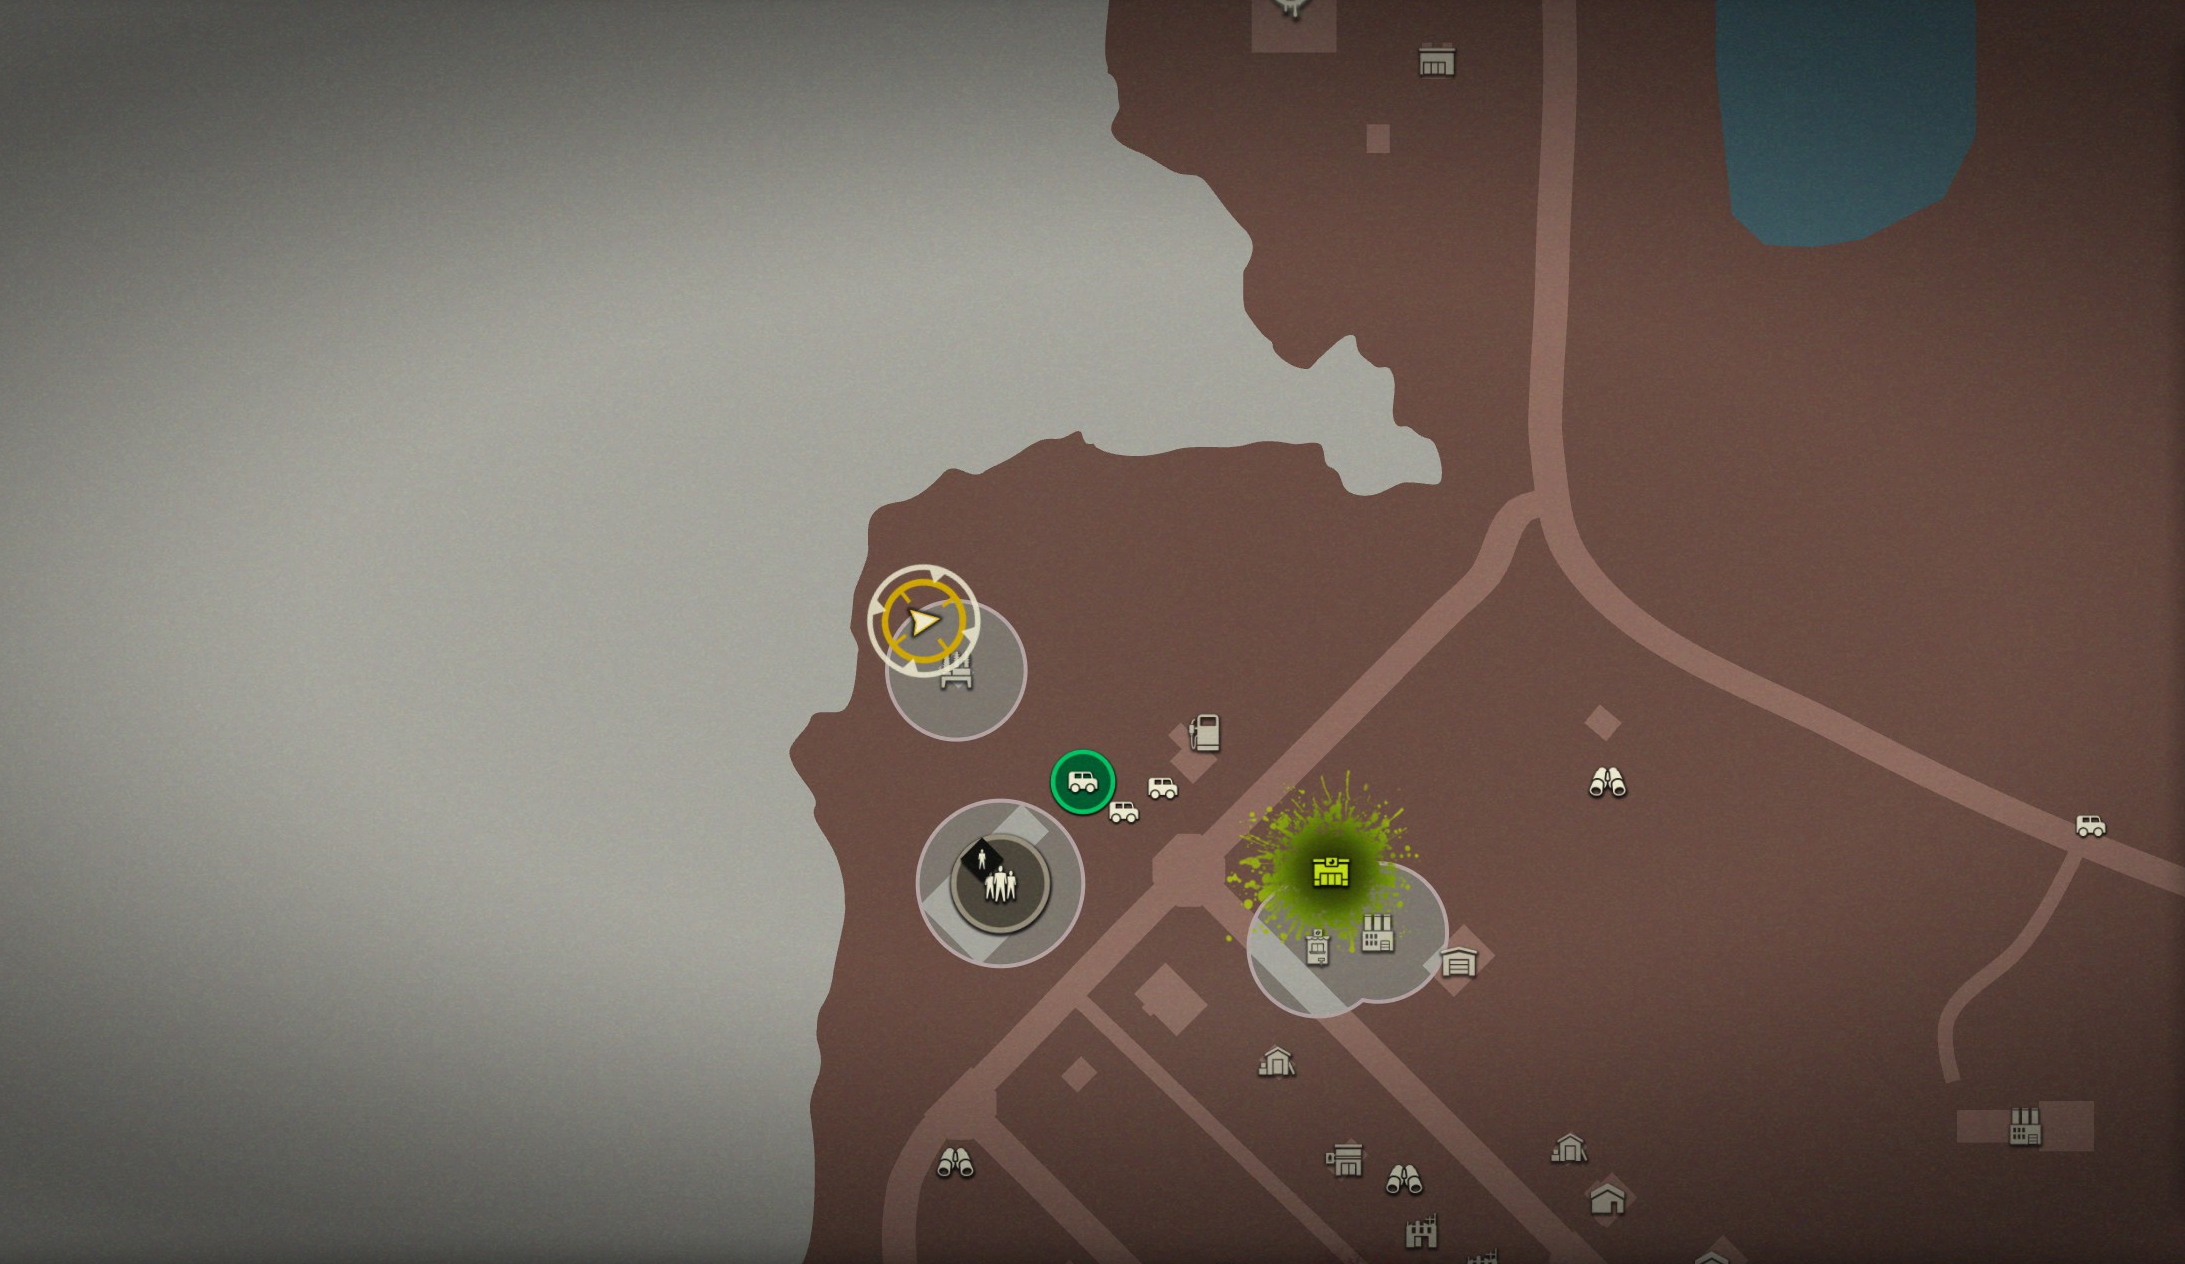
There are a total of six locations – it does not matter the order in which you obtain them, but I will go in order of the notes (as if following the scavenger hunt as the game intended). Here is a map showing the location of each:

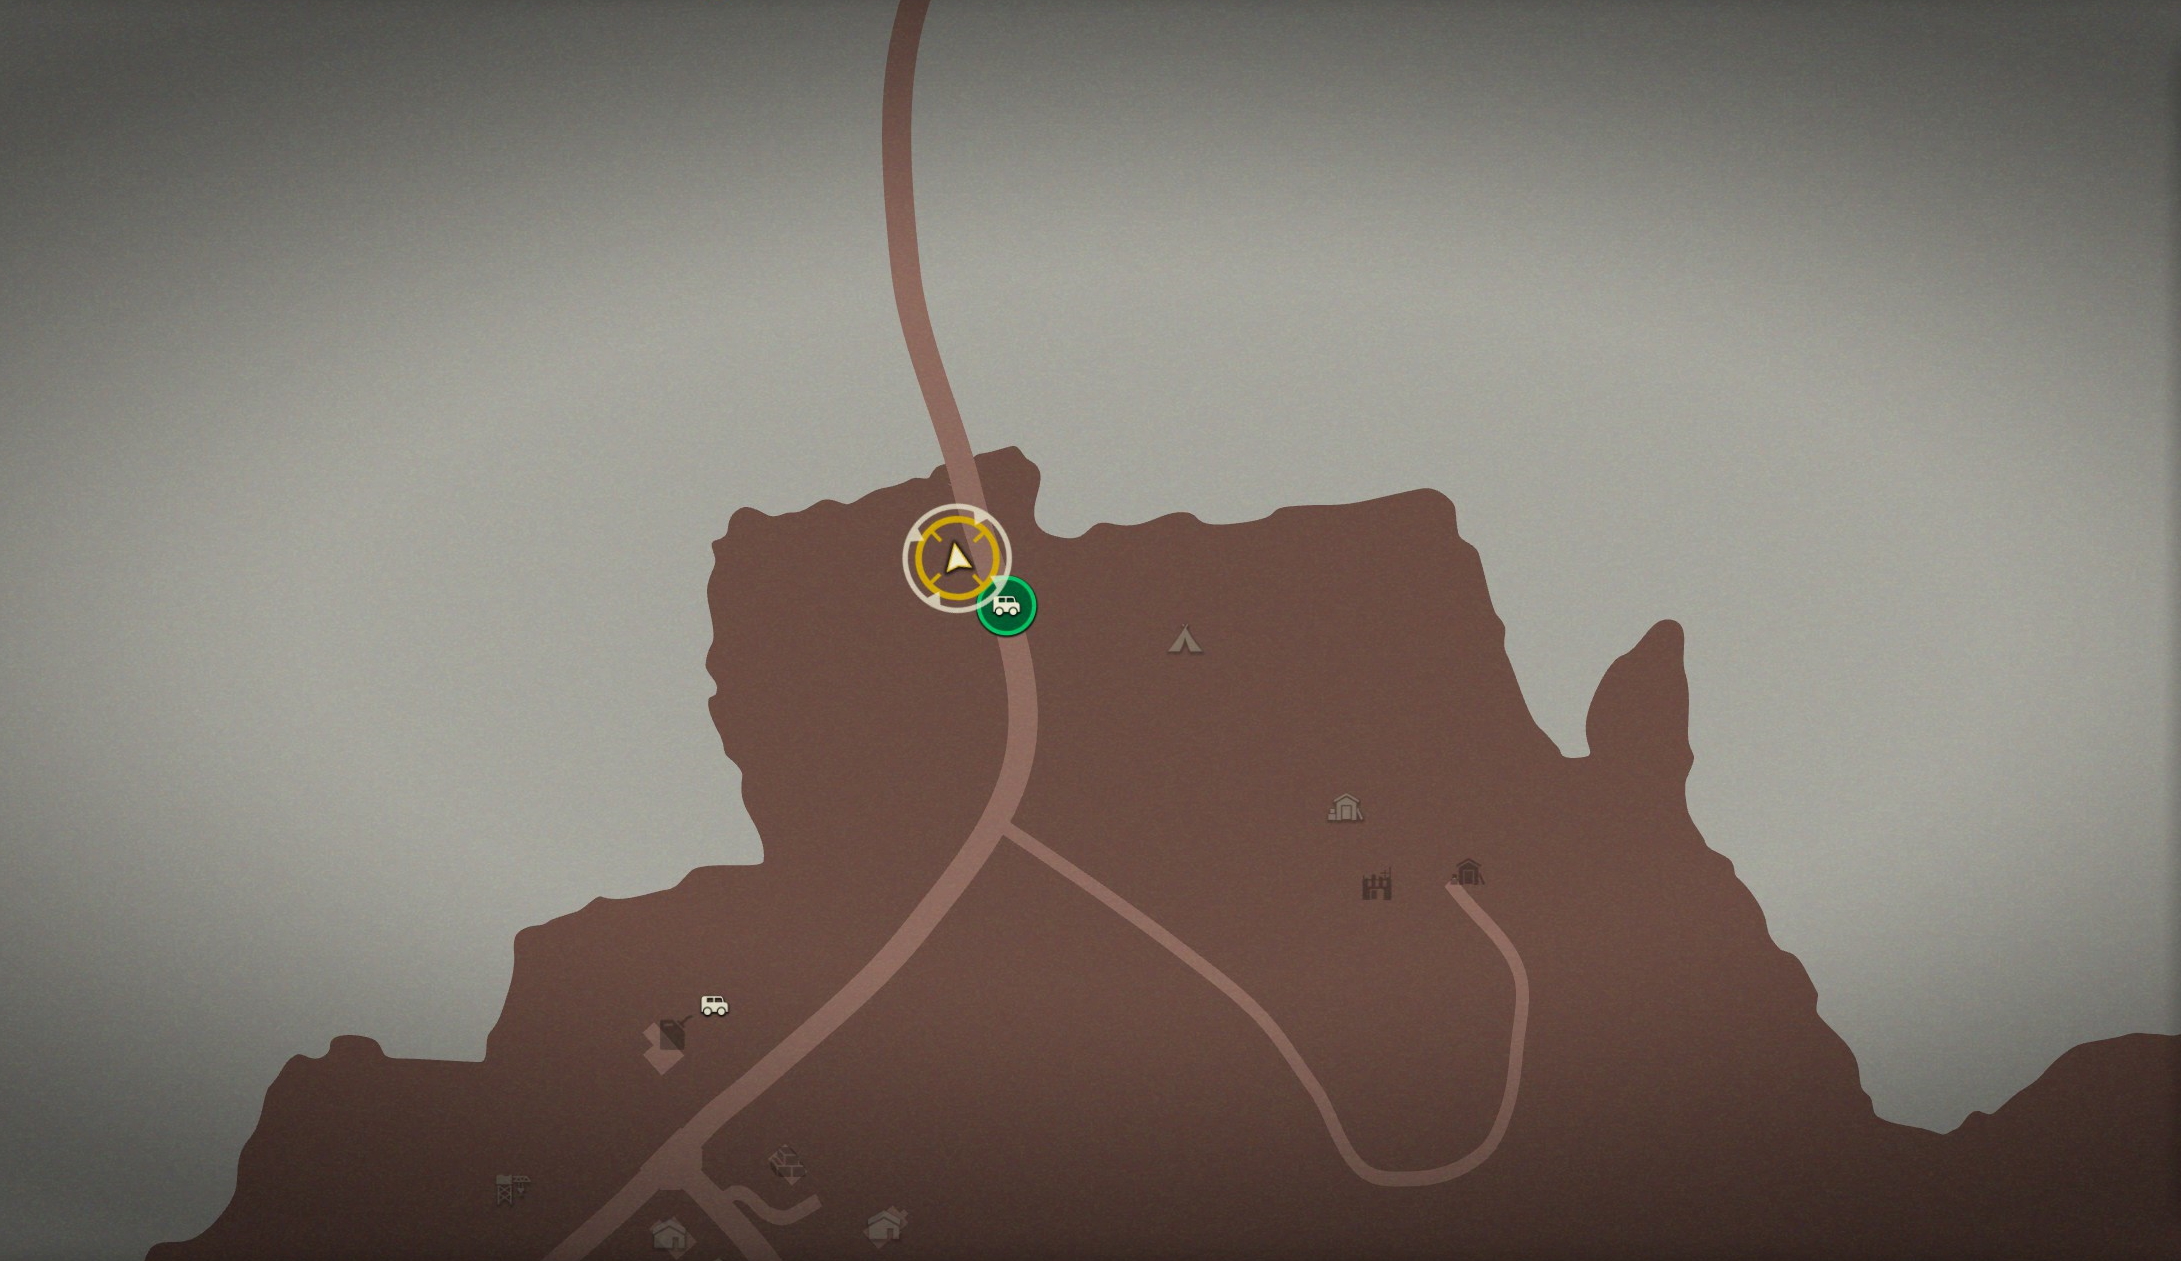
This is the first location – the mission “Delta Squad’s Fate” will take you to this location in the North of the map.
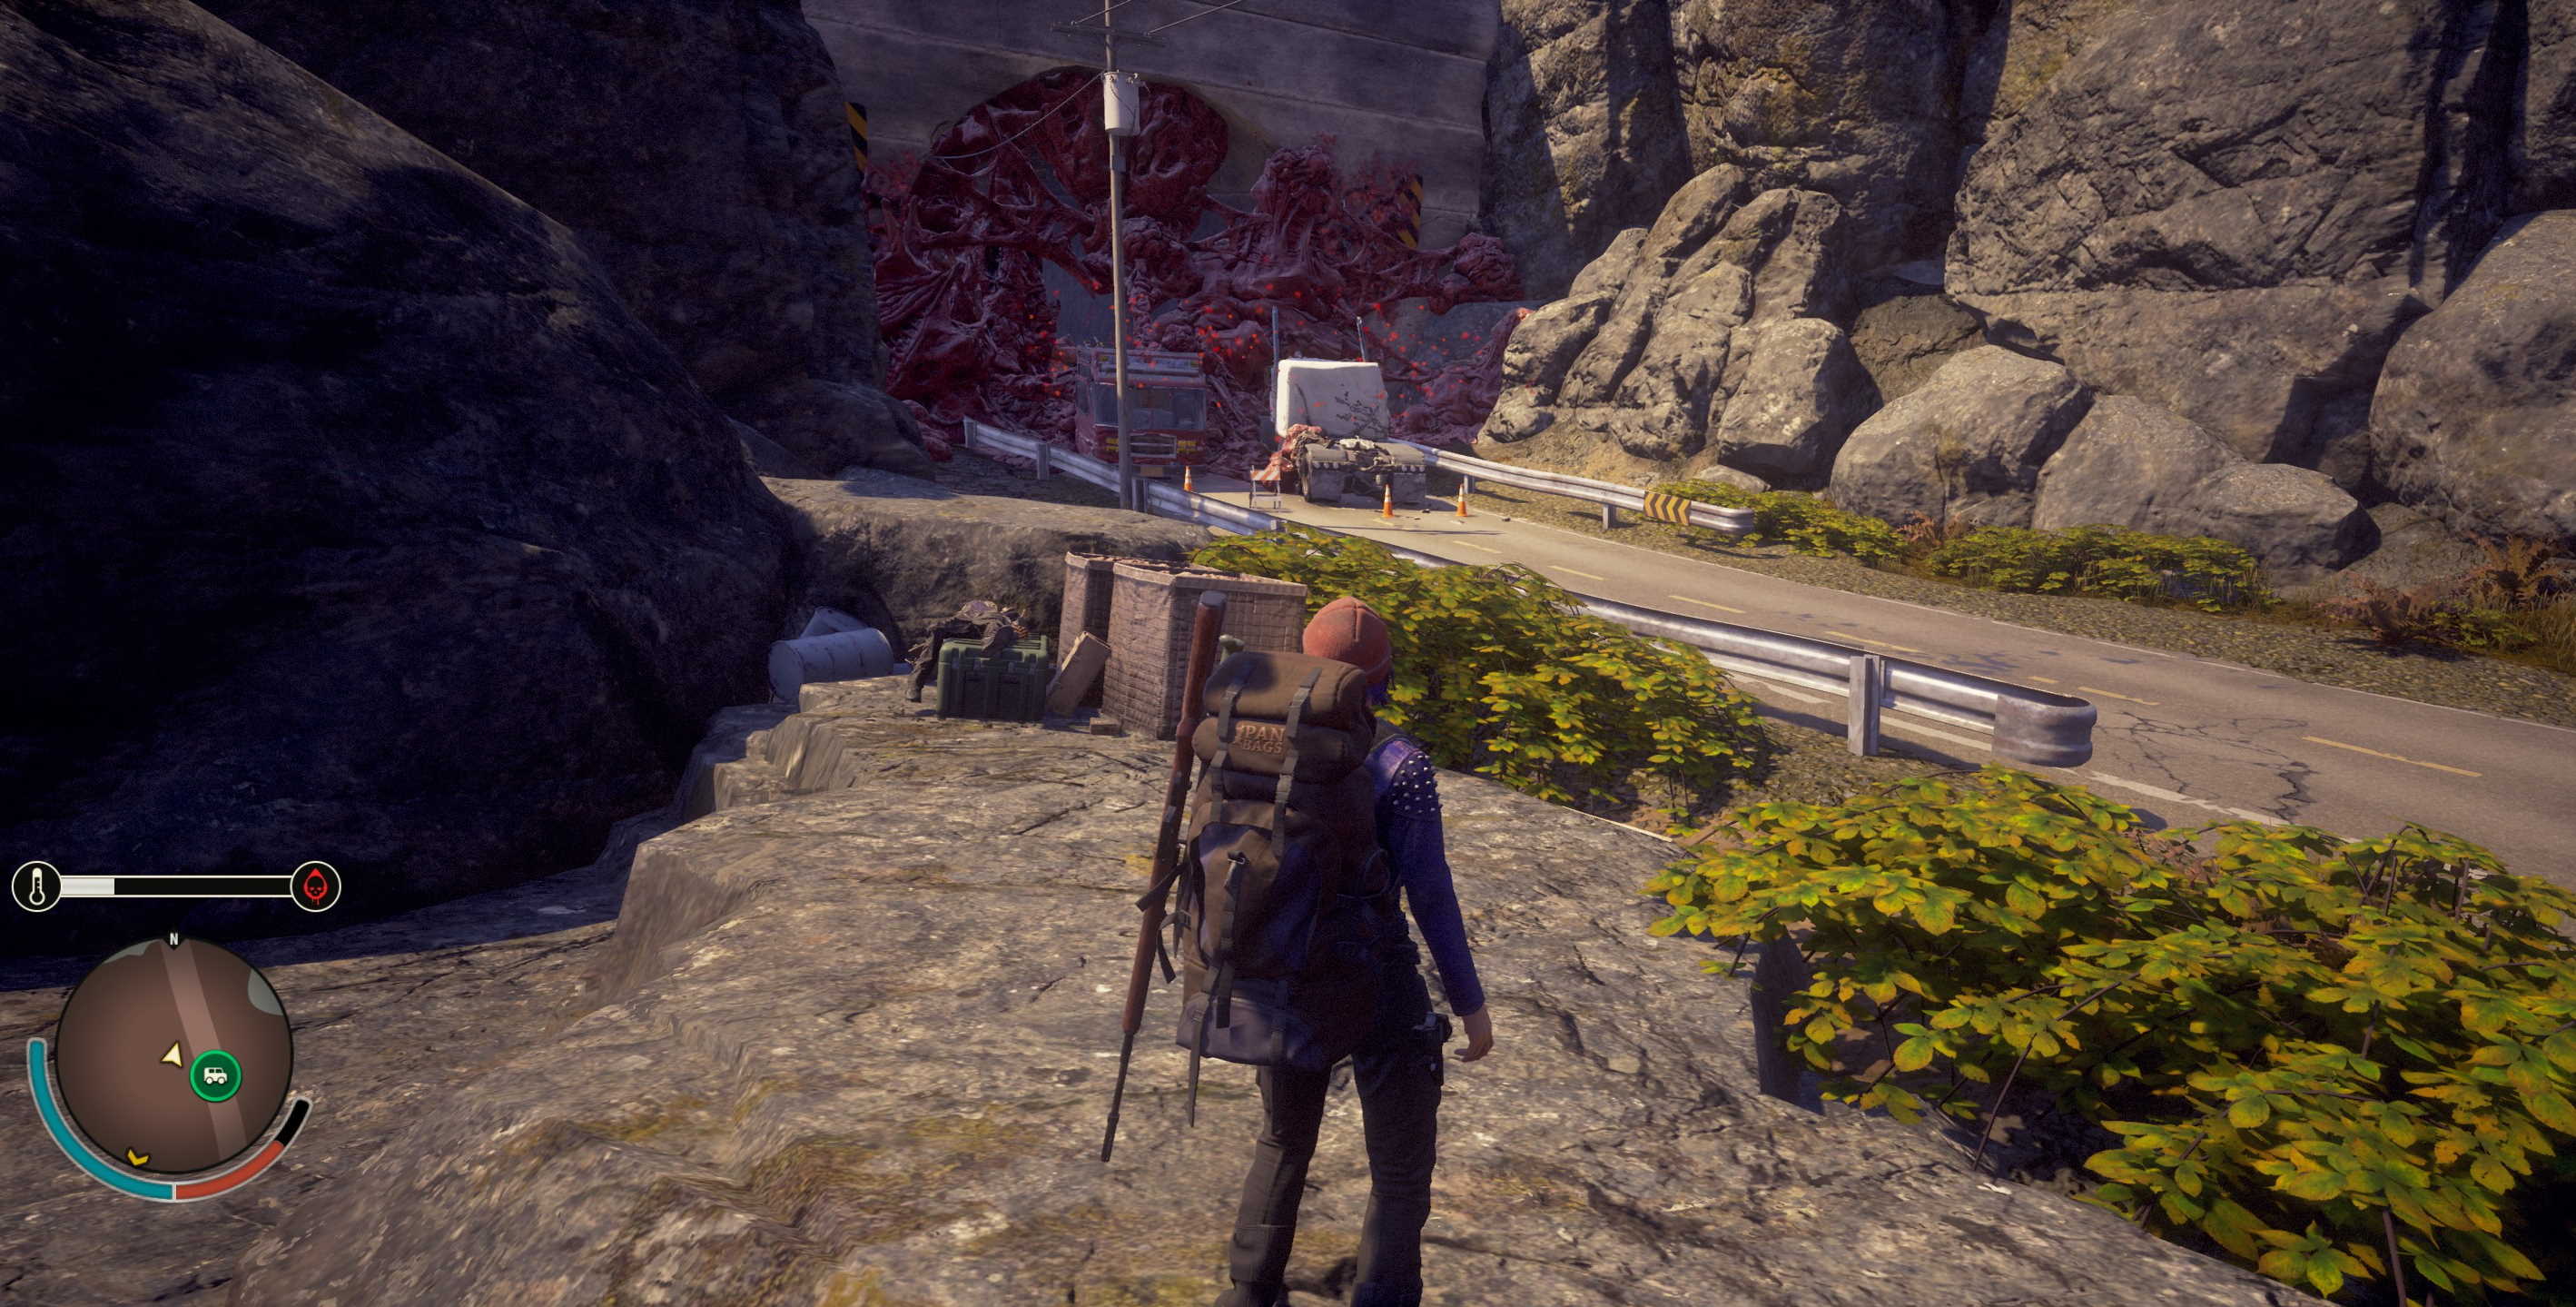
The body to search is on a military crate next to the side of the road.
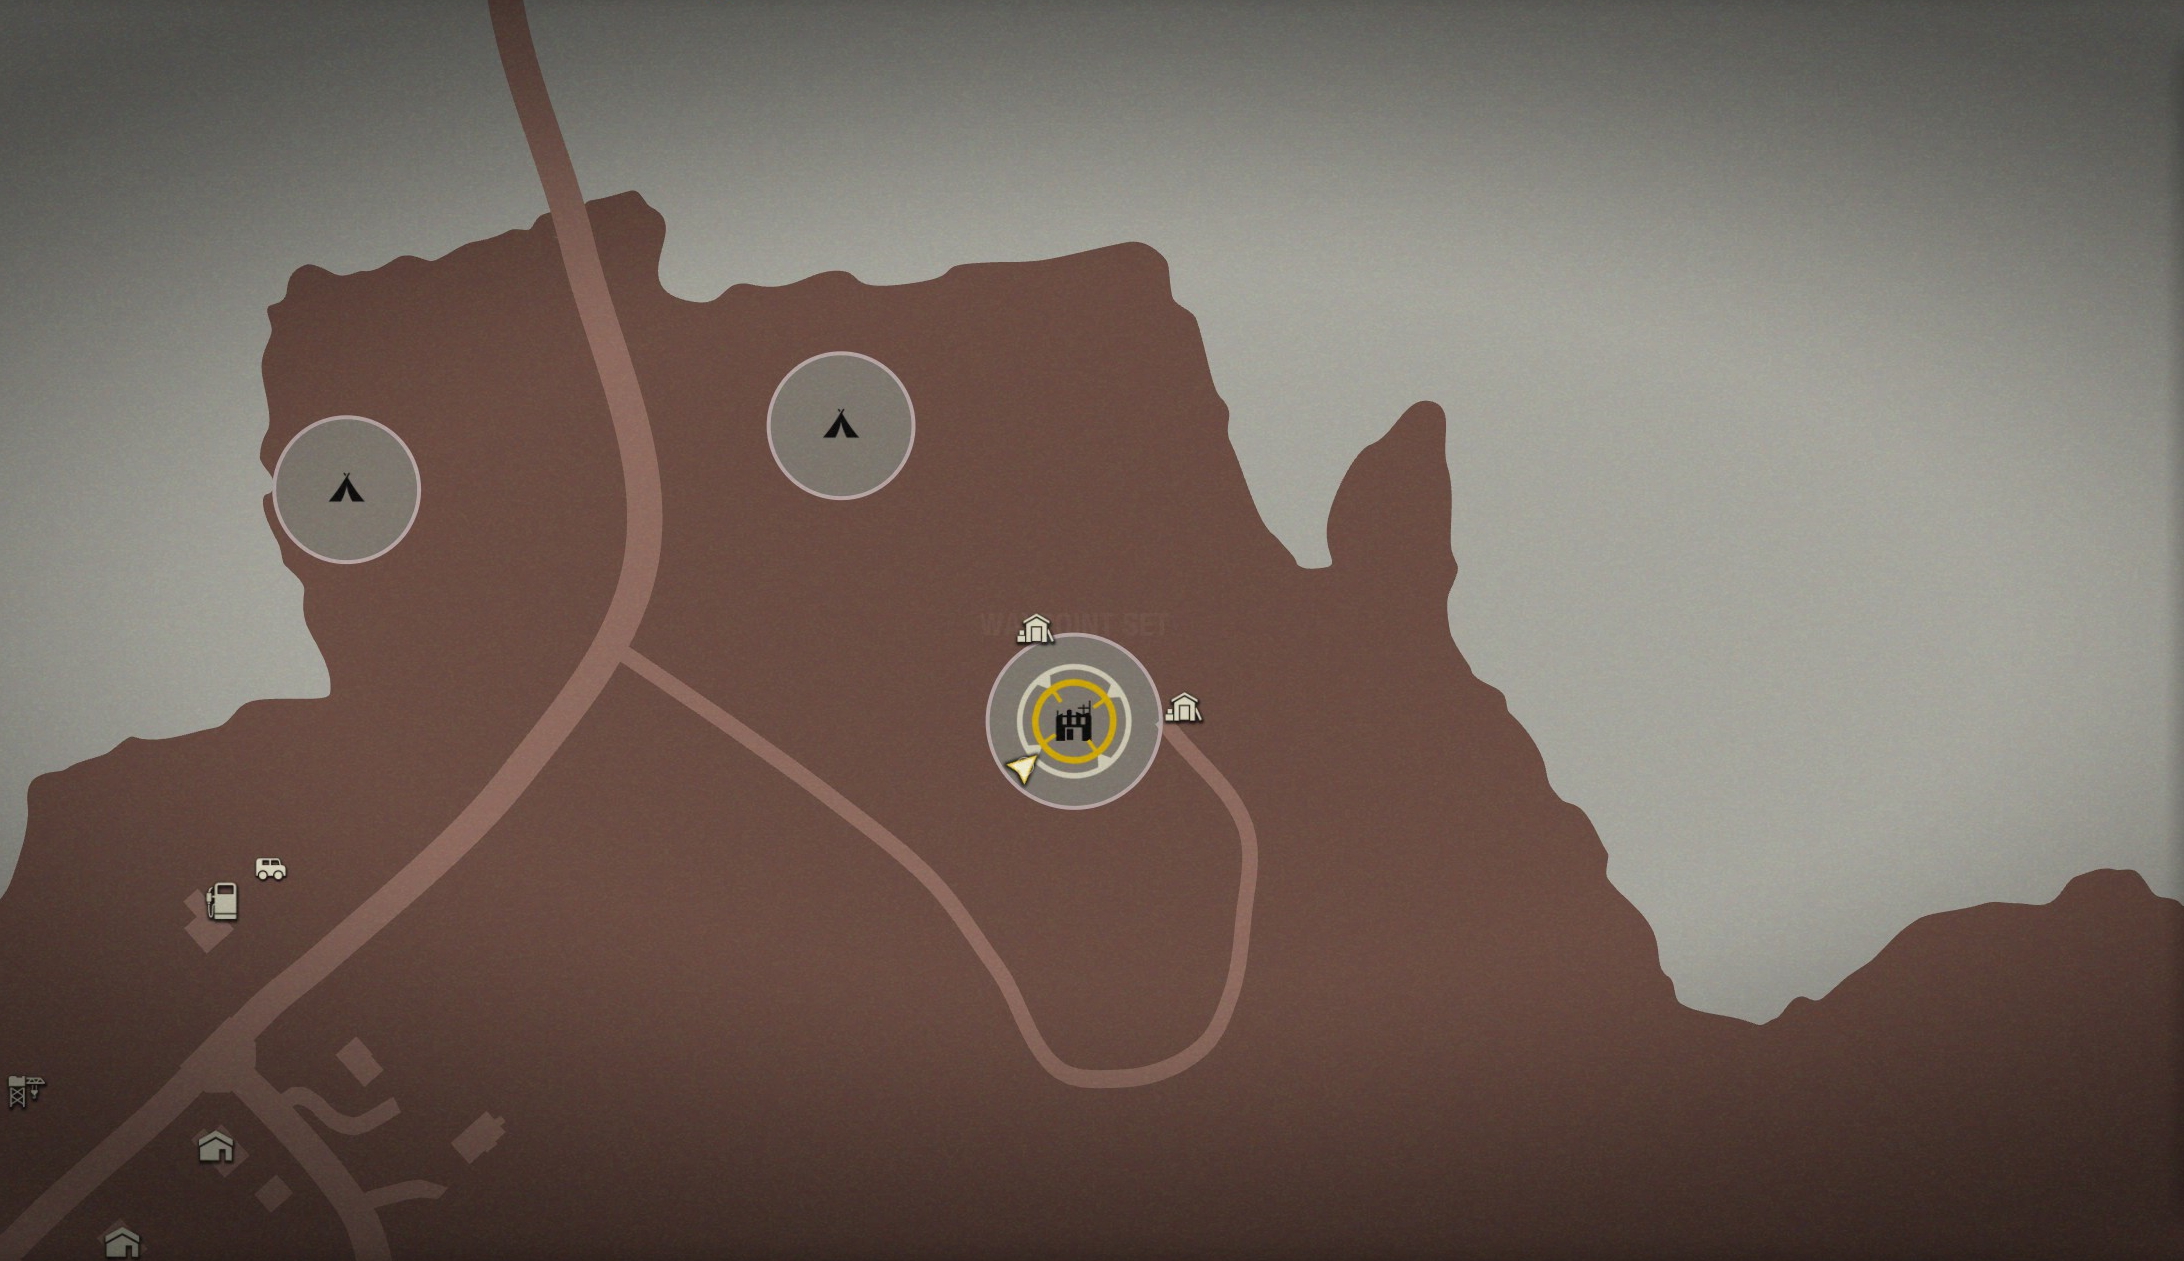
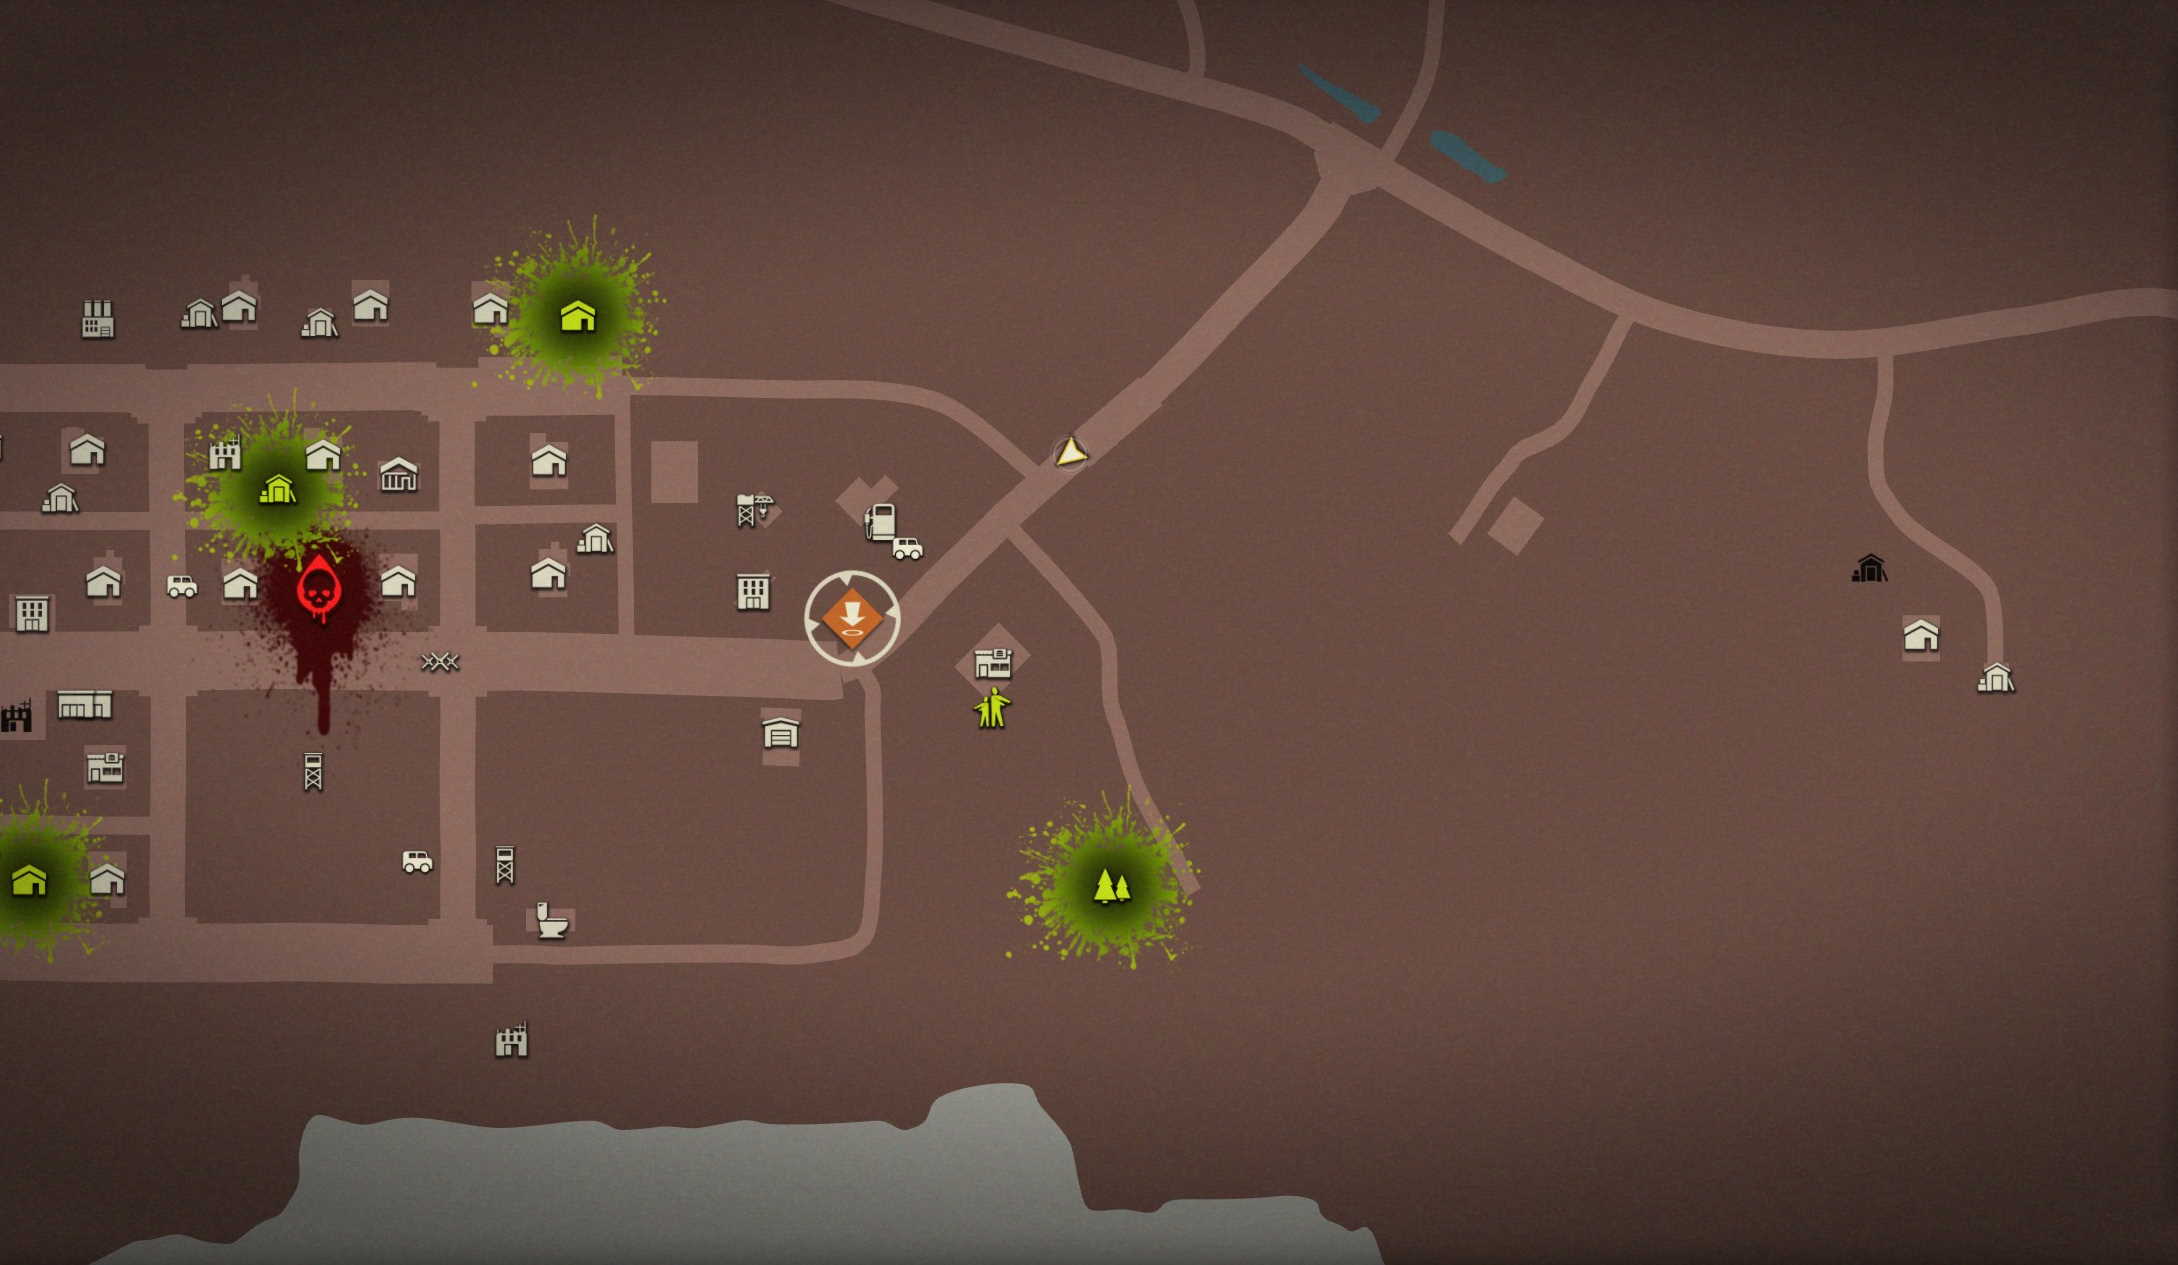
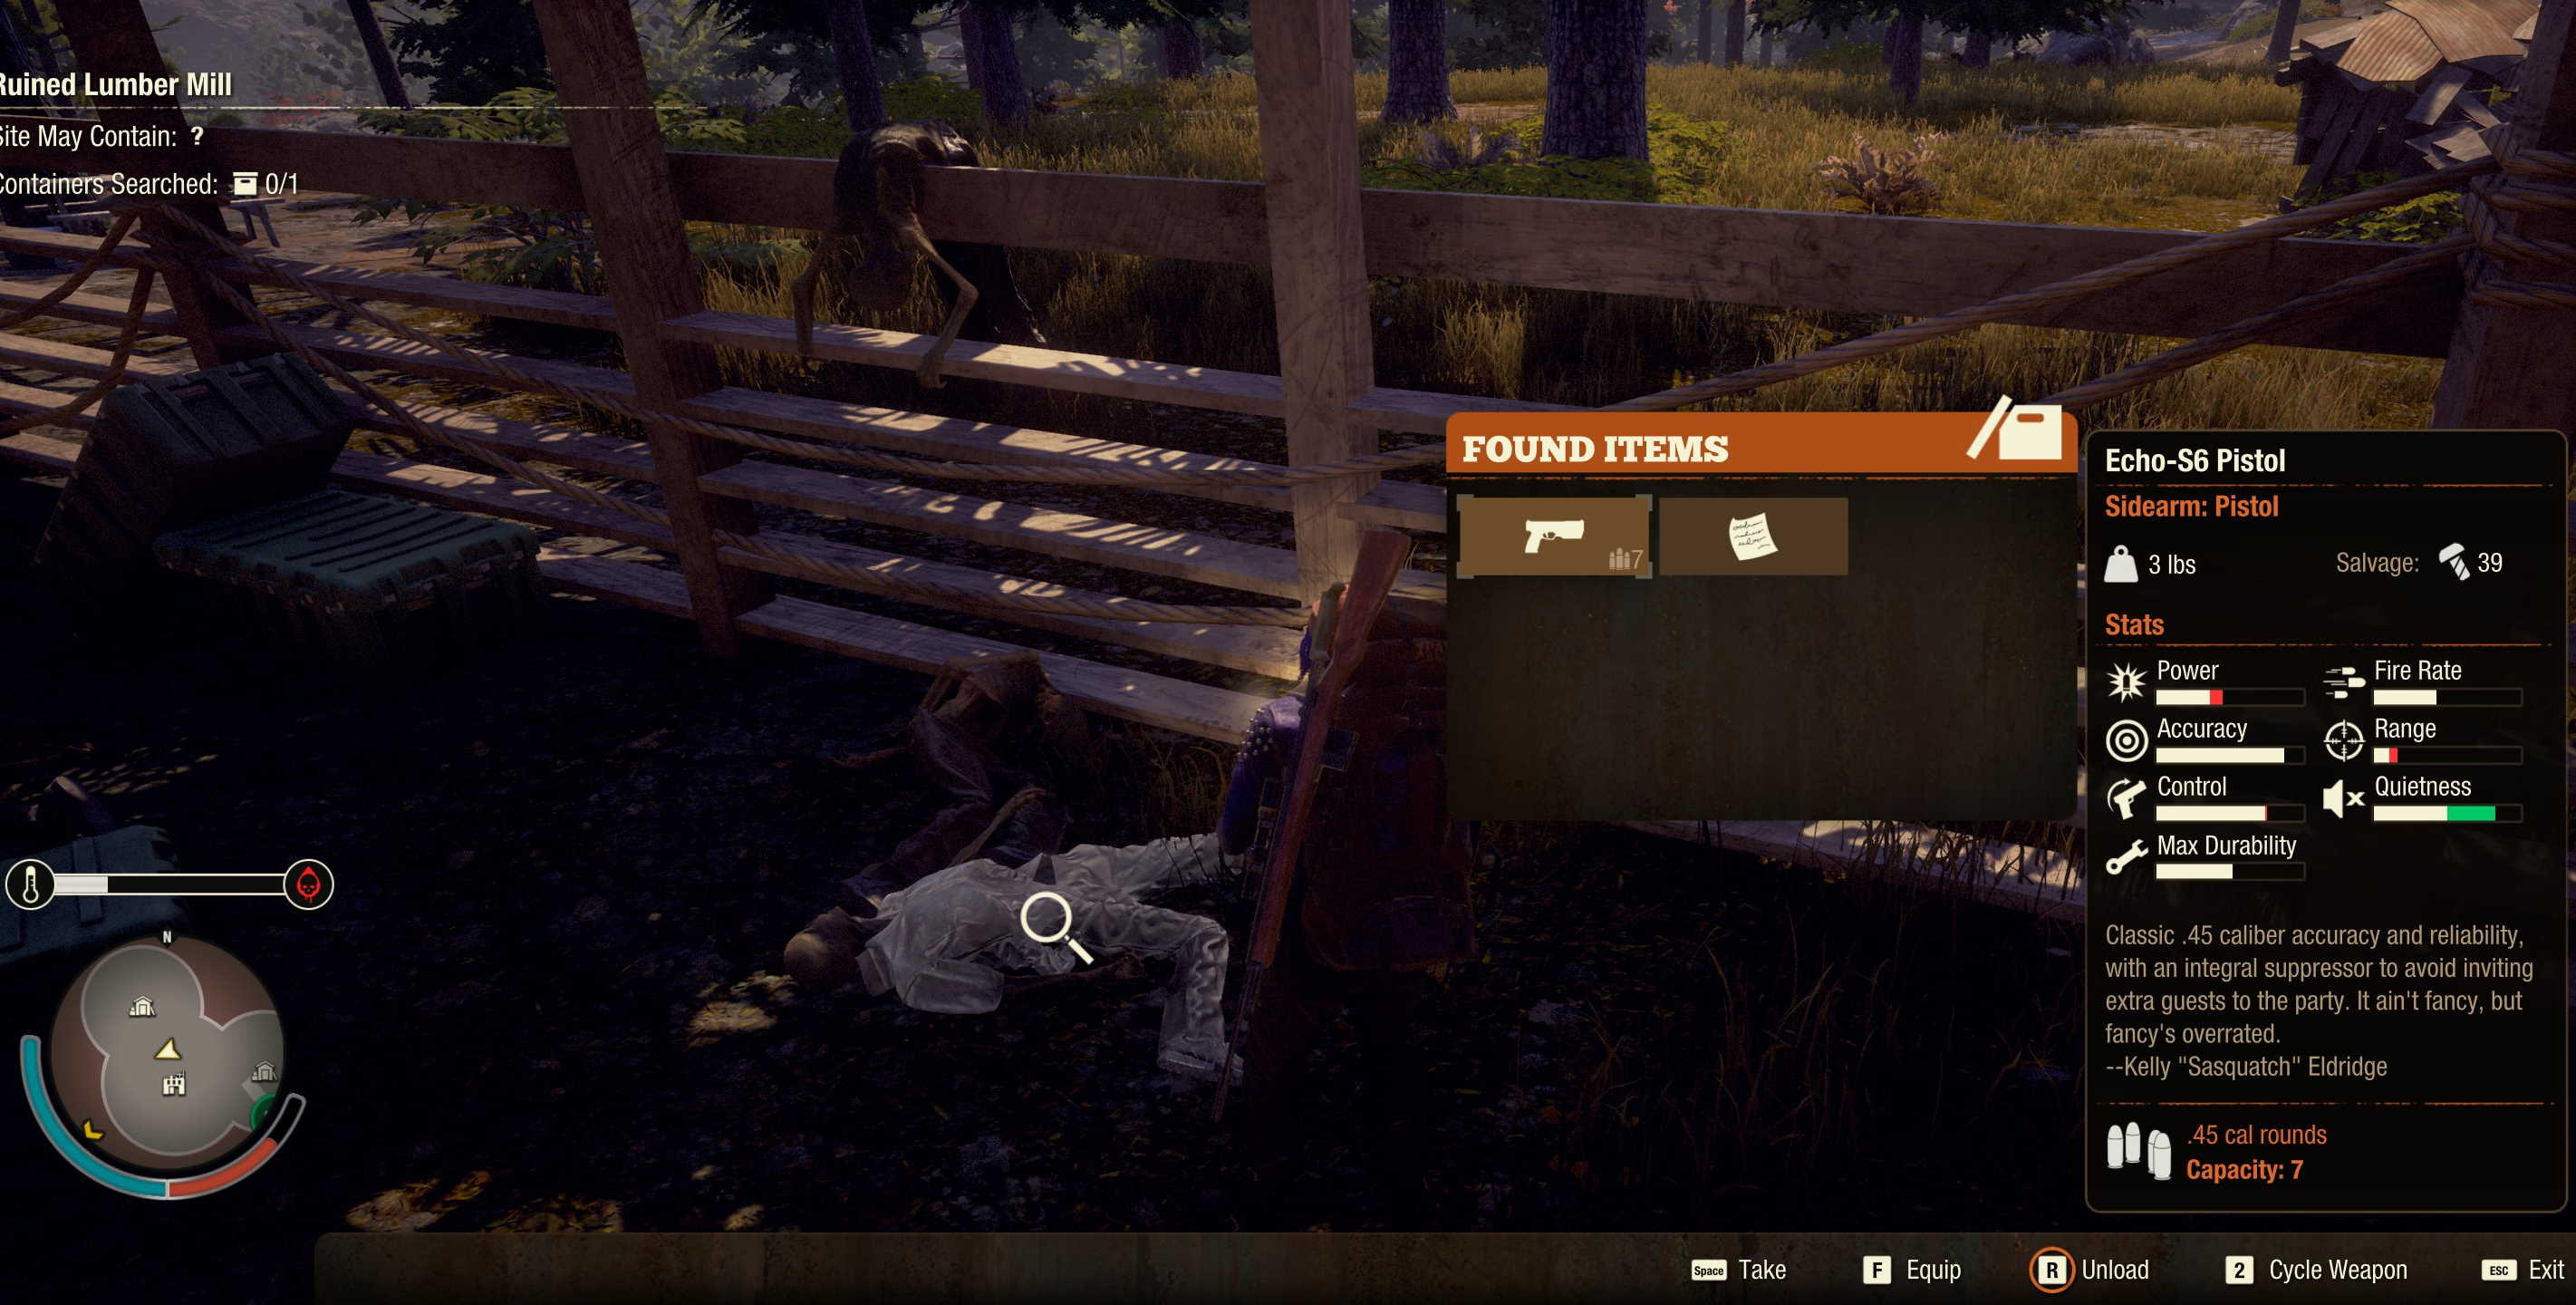
This one is actually inside of the “Ruined Lumber Mill” just South East of the S7.
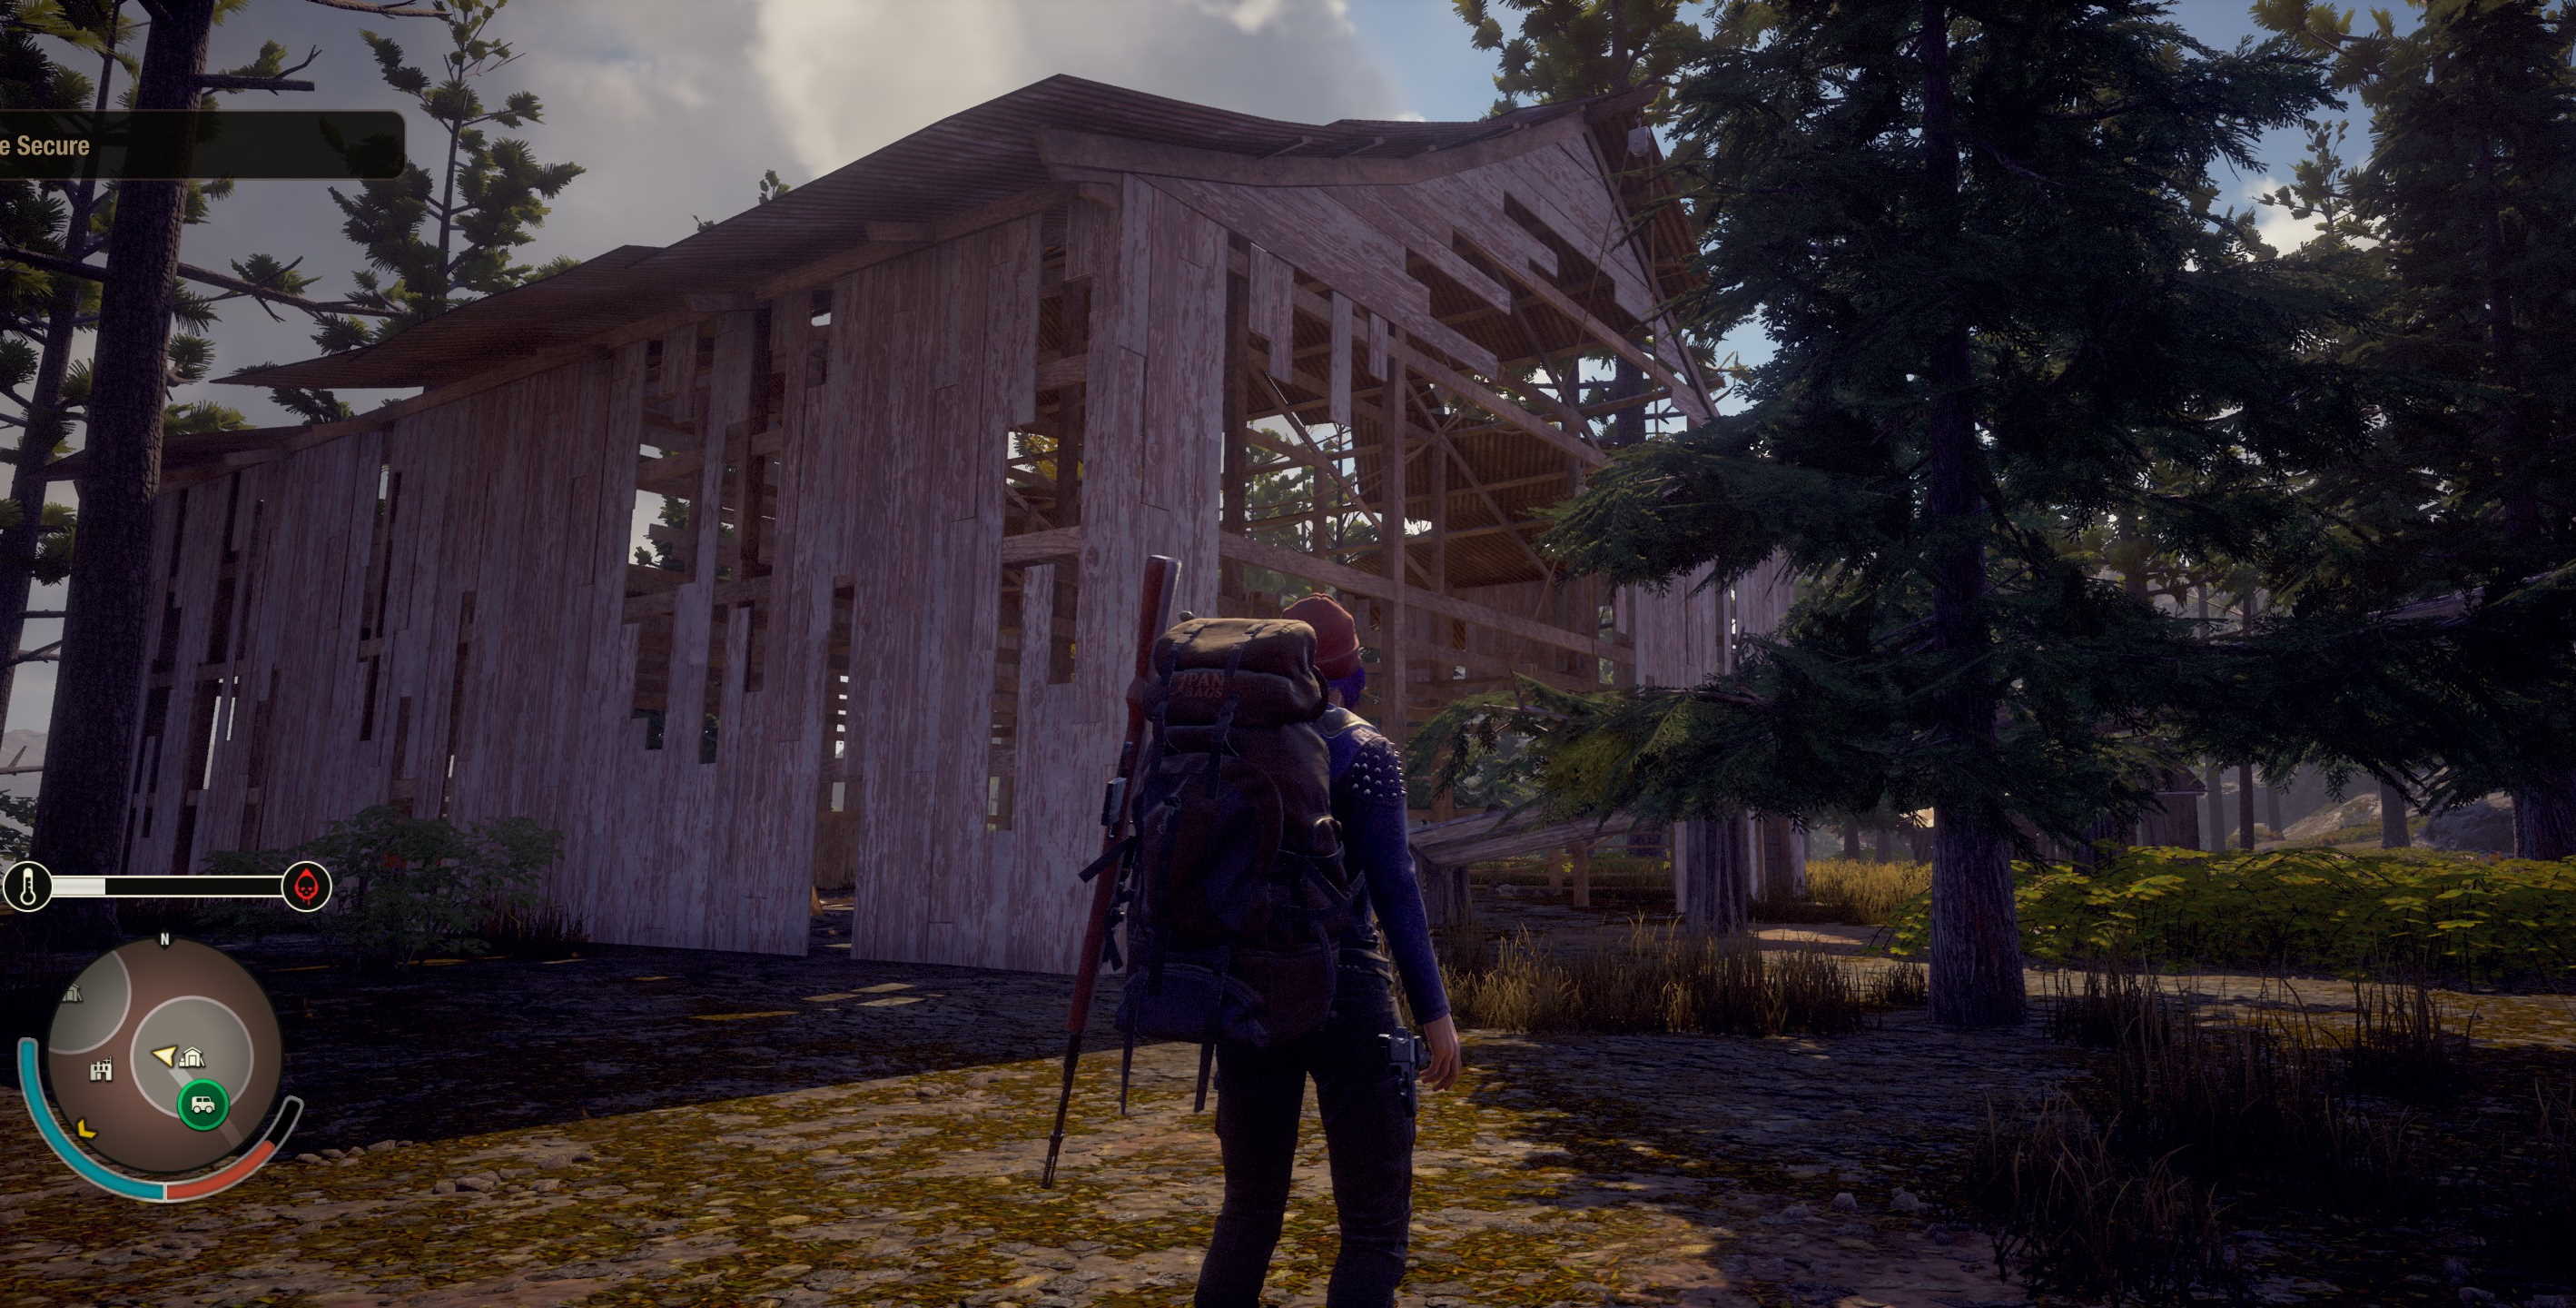
The body is located near the North wall, laying on the ground.
The location is a silo just North East of Marshall. There is a farm house right near by – の “Mossy Pink House”.
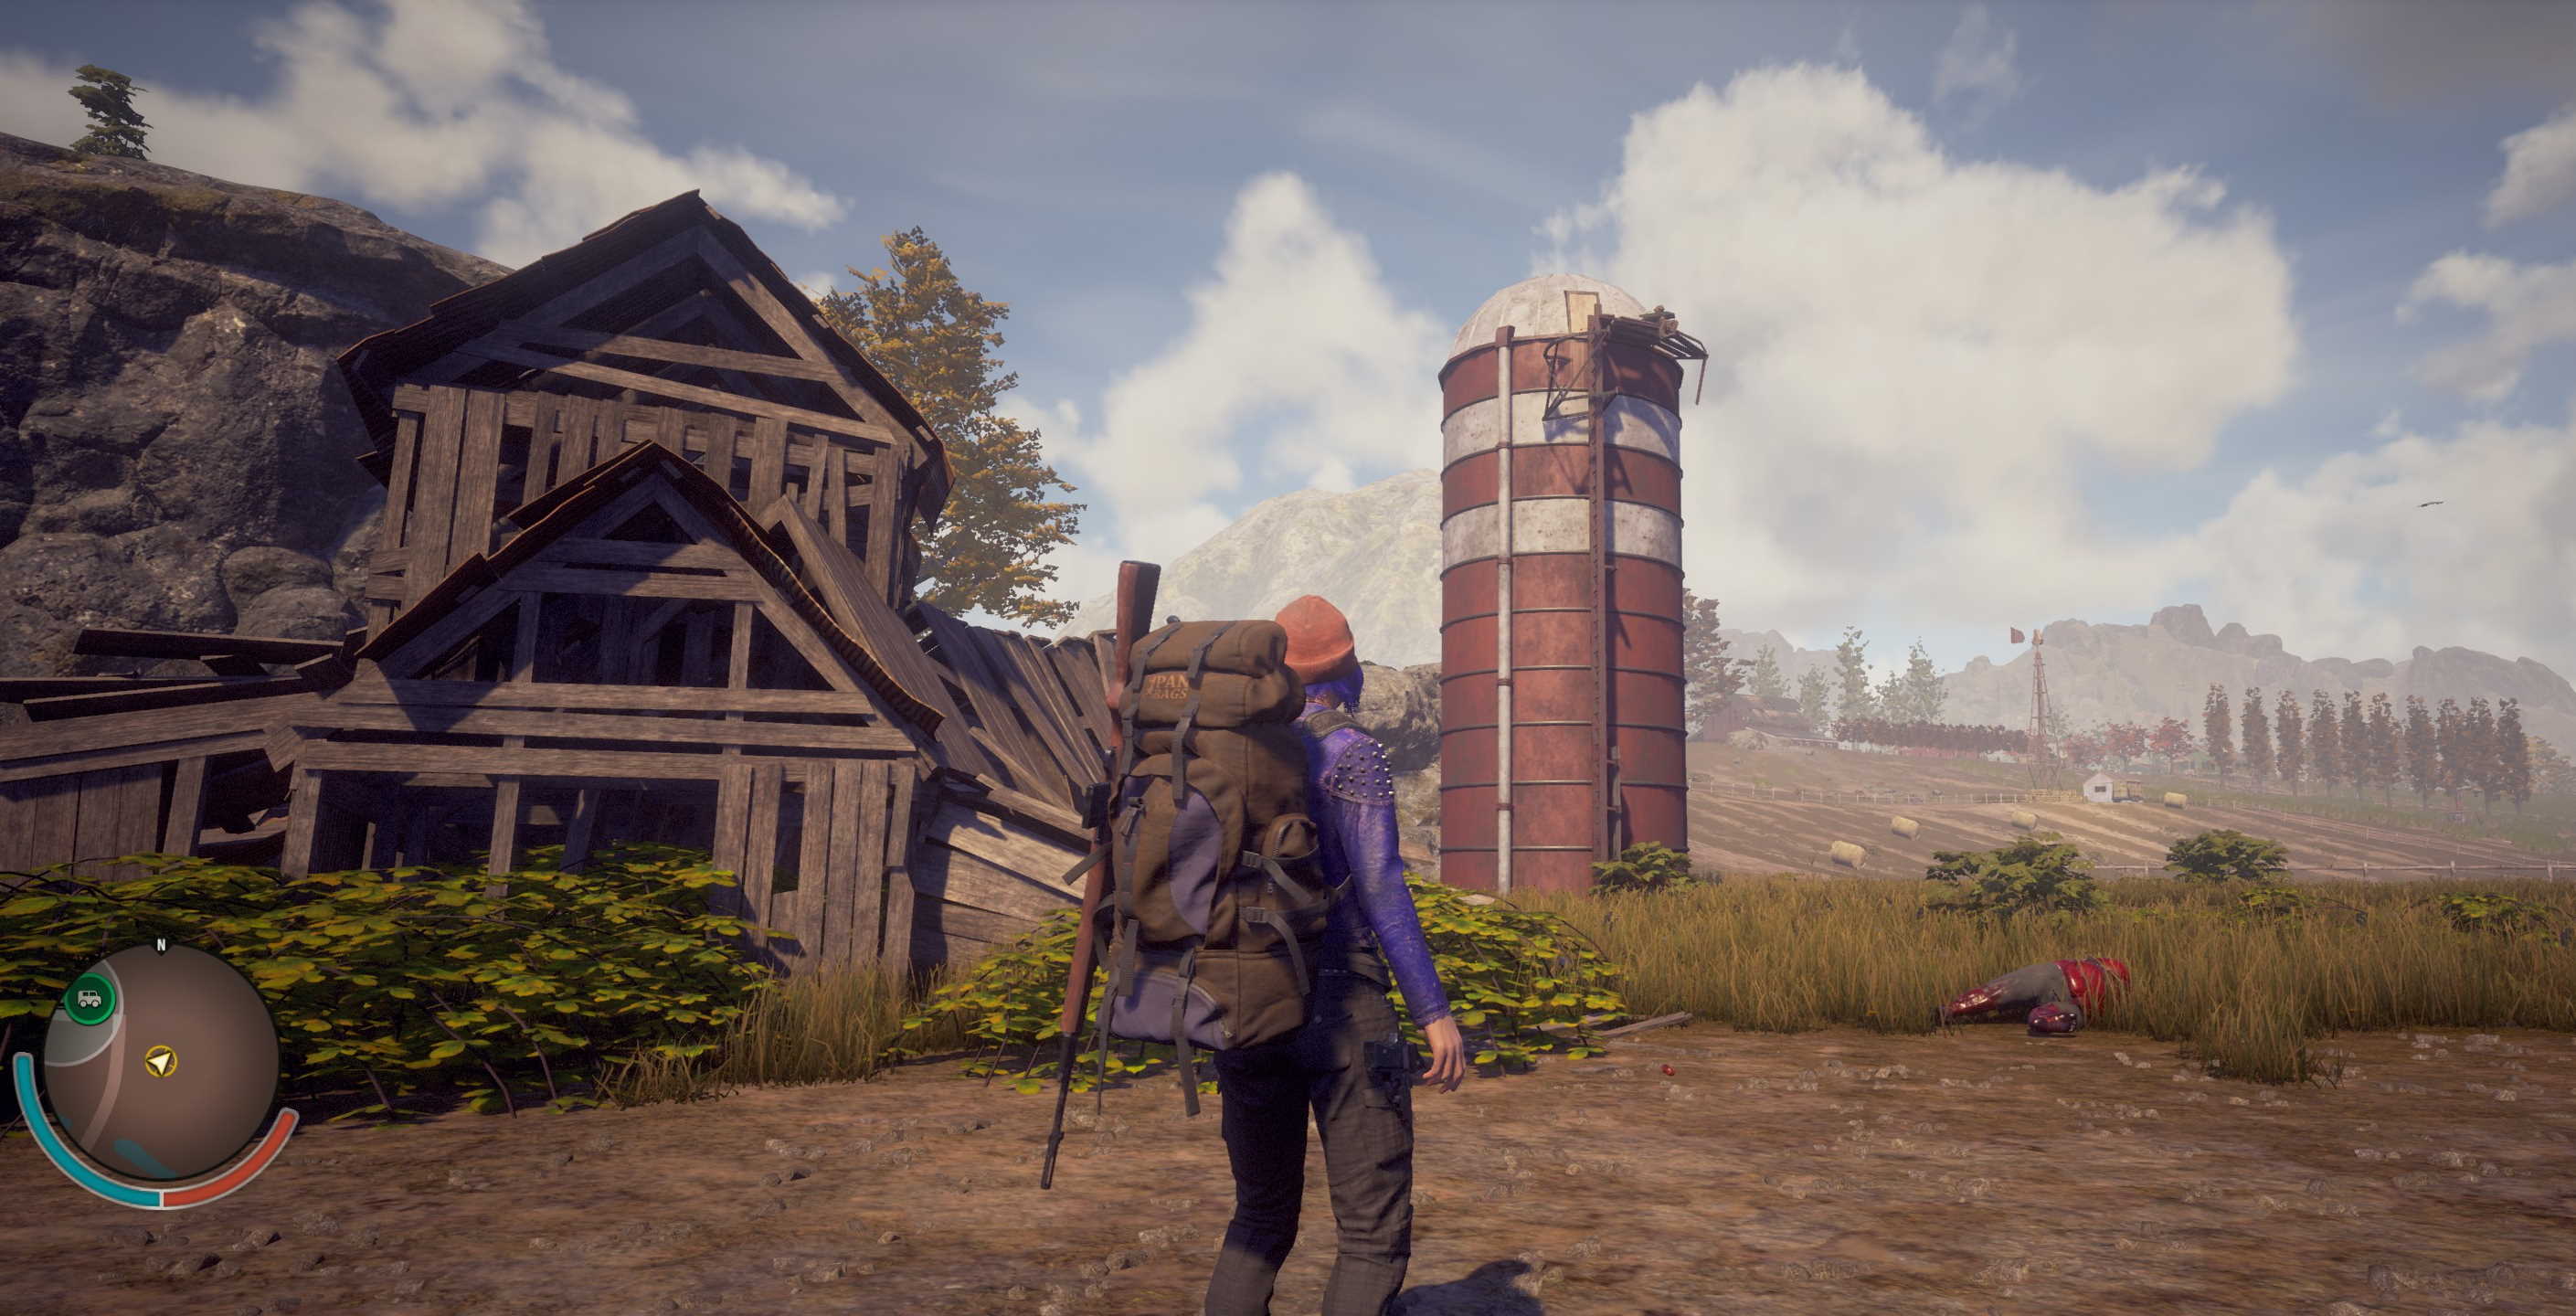
Climb the ladder to the top to locate the body at the top – it is actually a gun case that is searchable in this case.
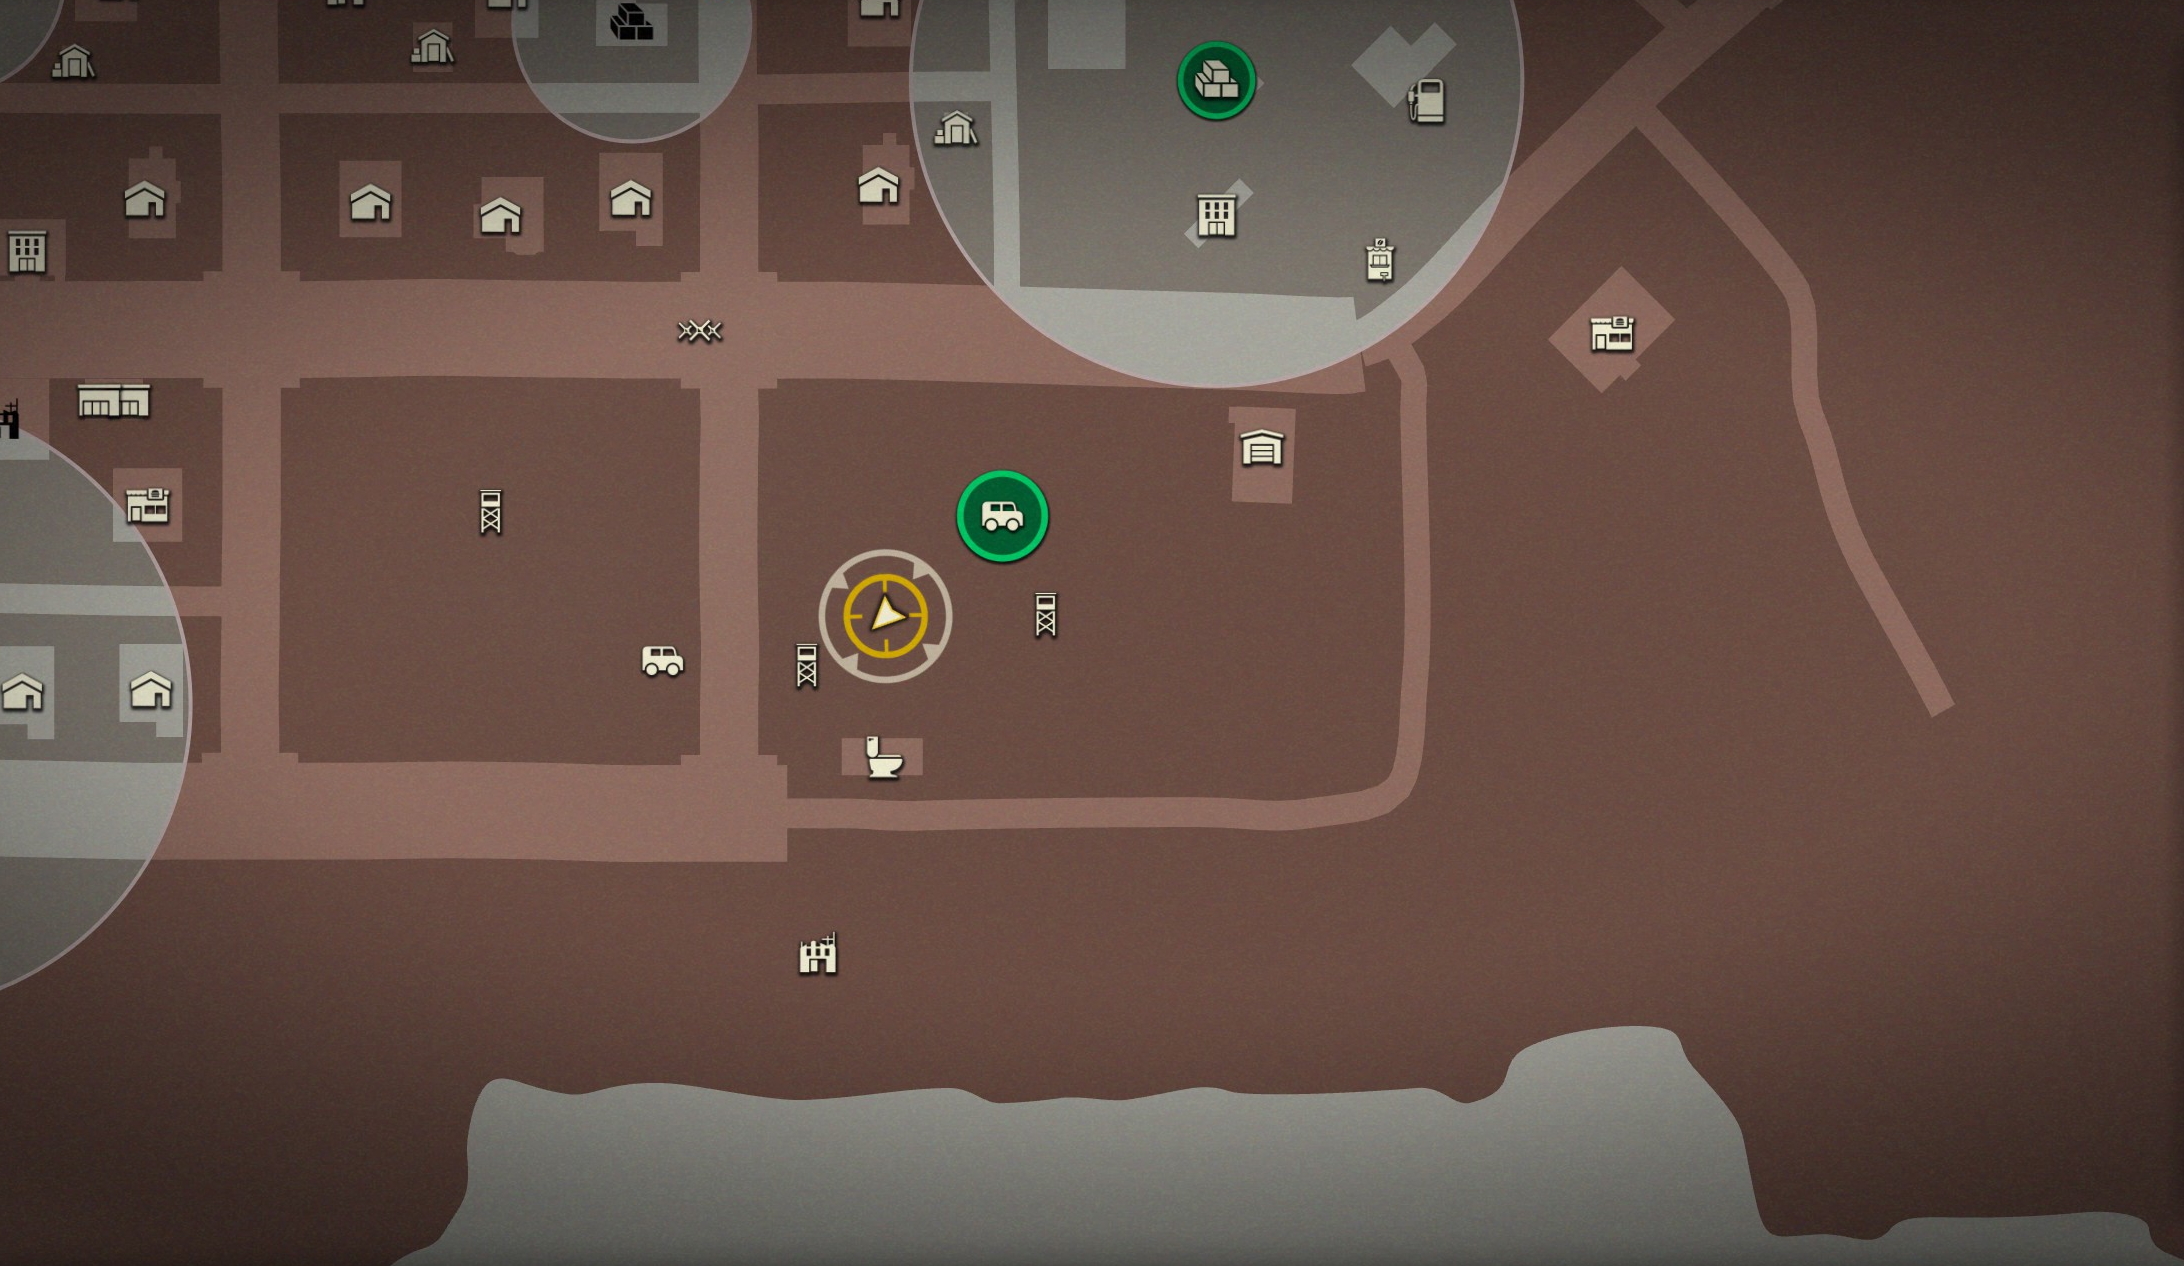
This location is actually the football field referenced during the story mission “Retaking Trumbull: Meet the Enemy” – the location of the body is directly next to the “Army Refugee Camp” where you search for the Plague Toxin Distiller.
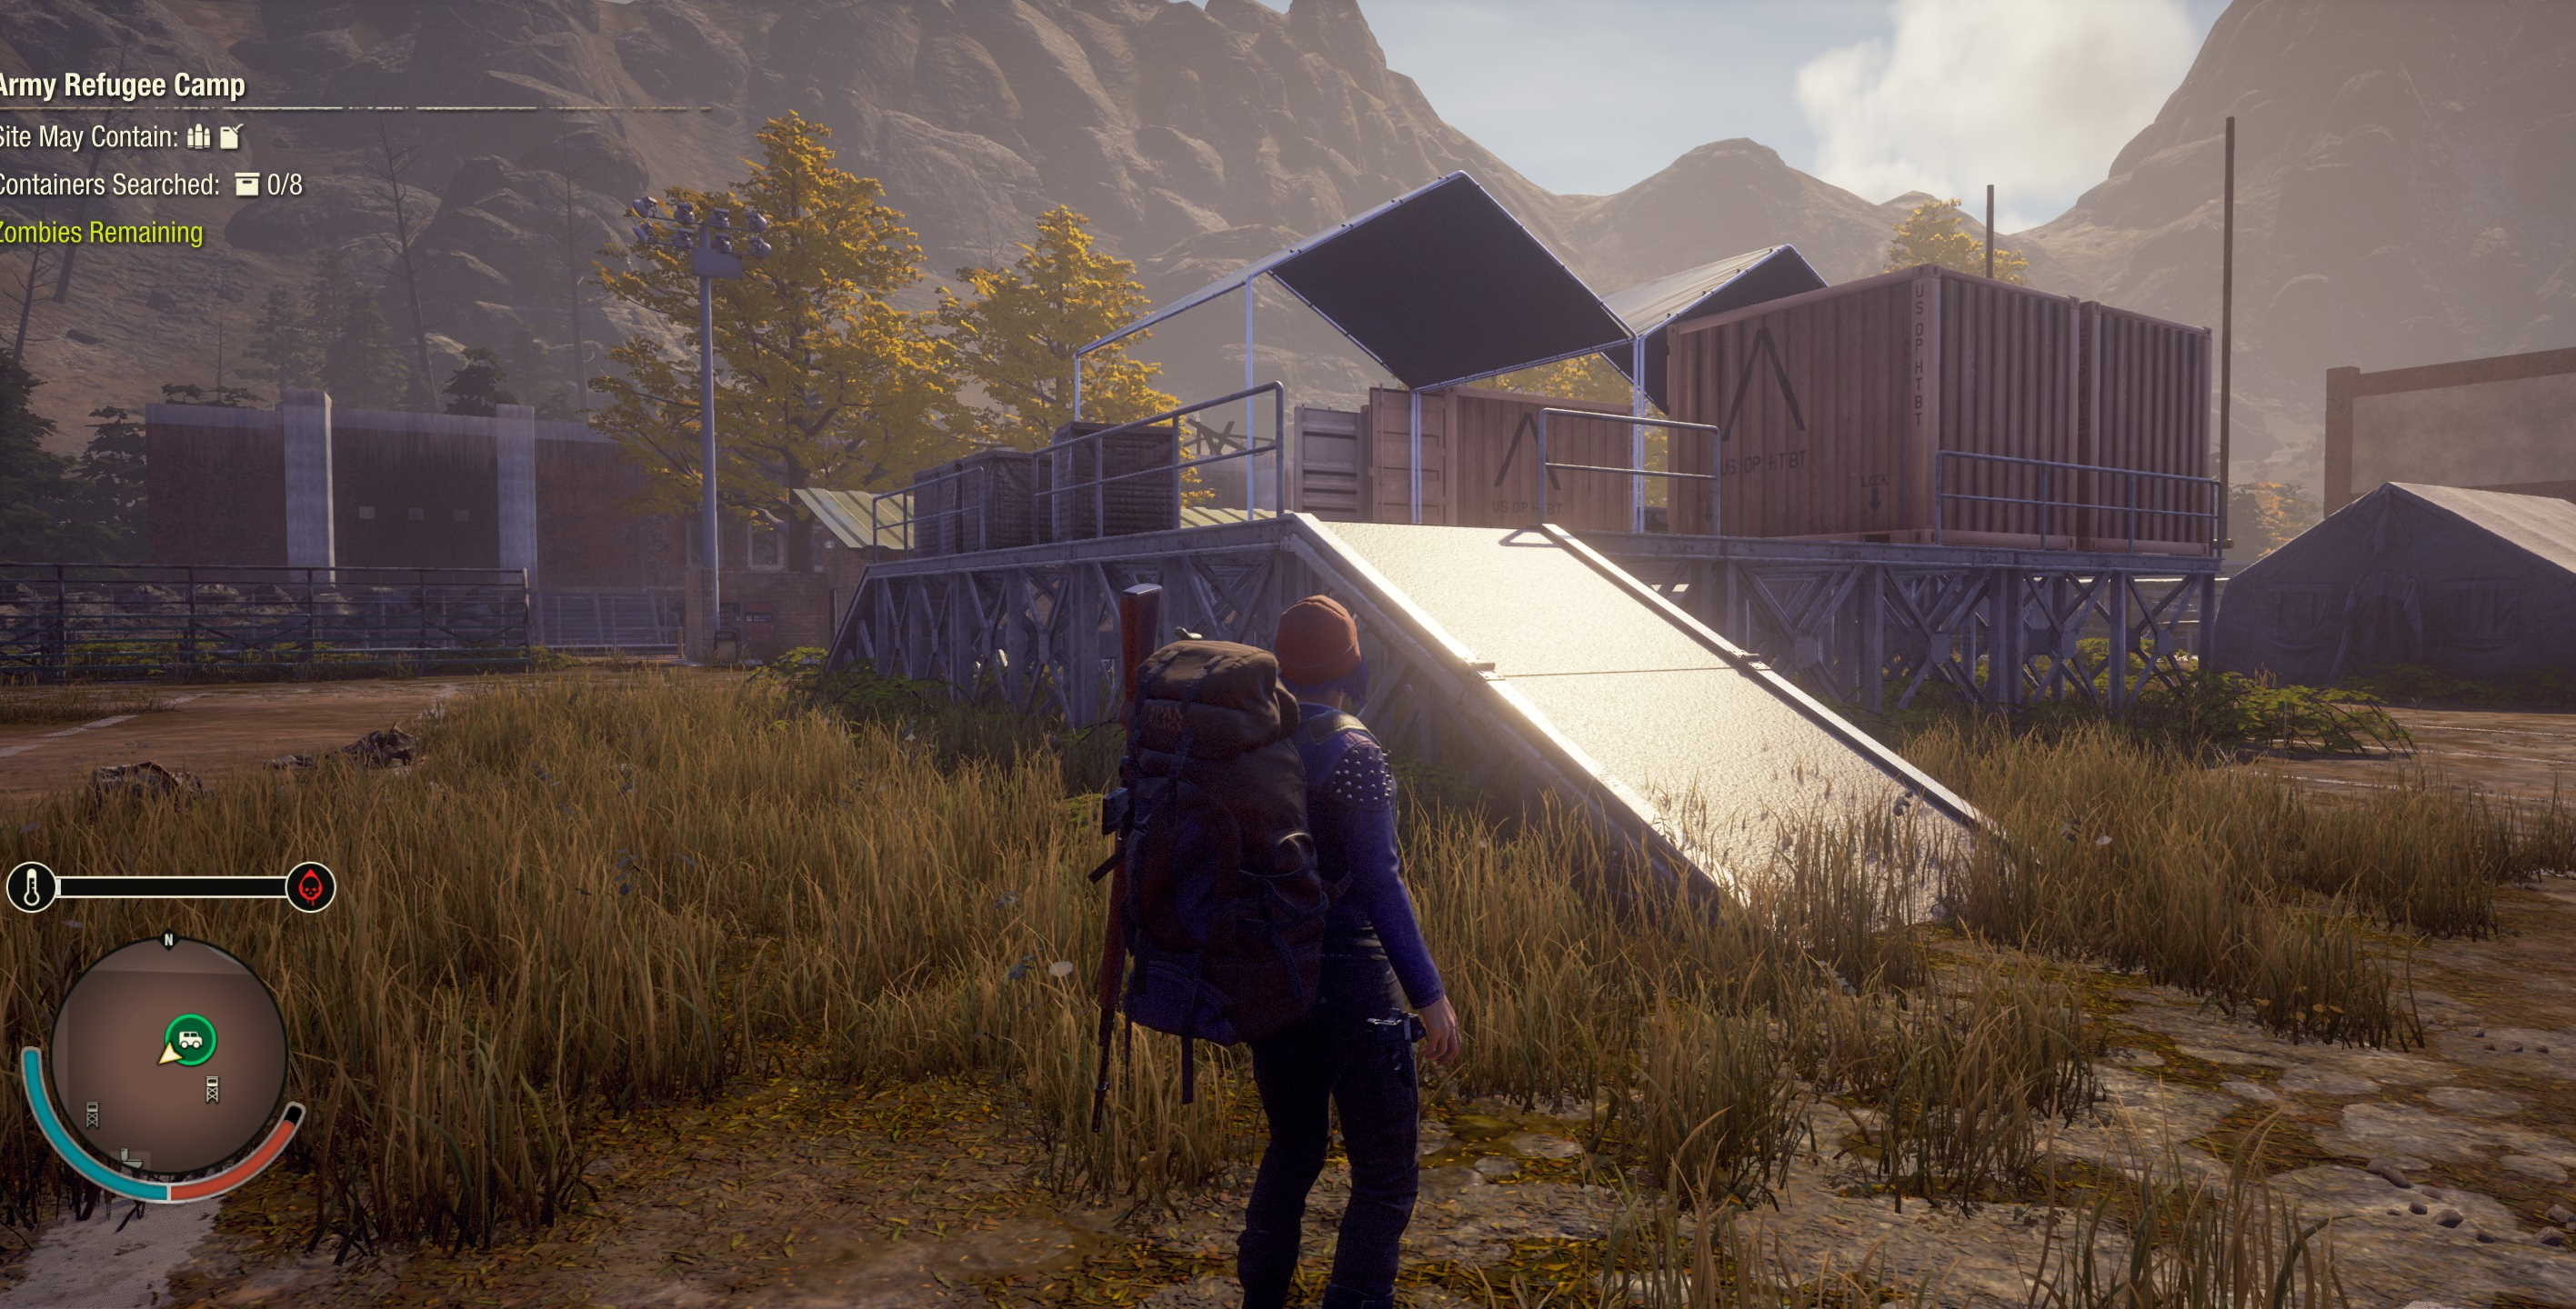
The body is on the platform just West of the aforementioned “Army Refugee Camp”.
This location is just North West from the “Electrical Transformers” on the West edge of Marshall.
The actual body is located up on the rocks along the edge of the map – it can be very easy to miss.
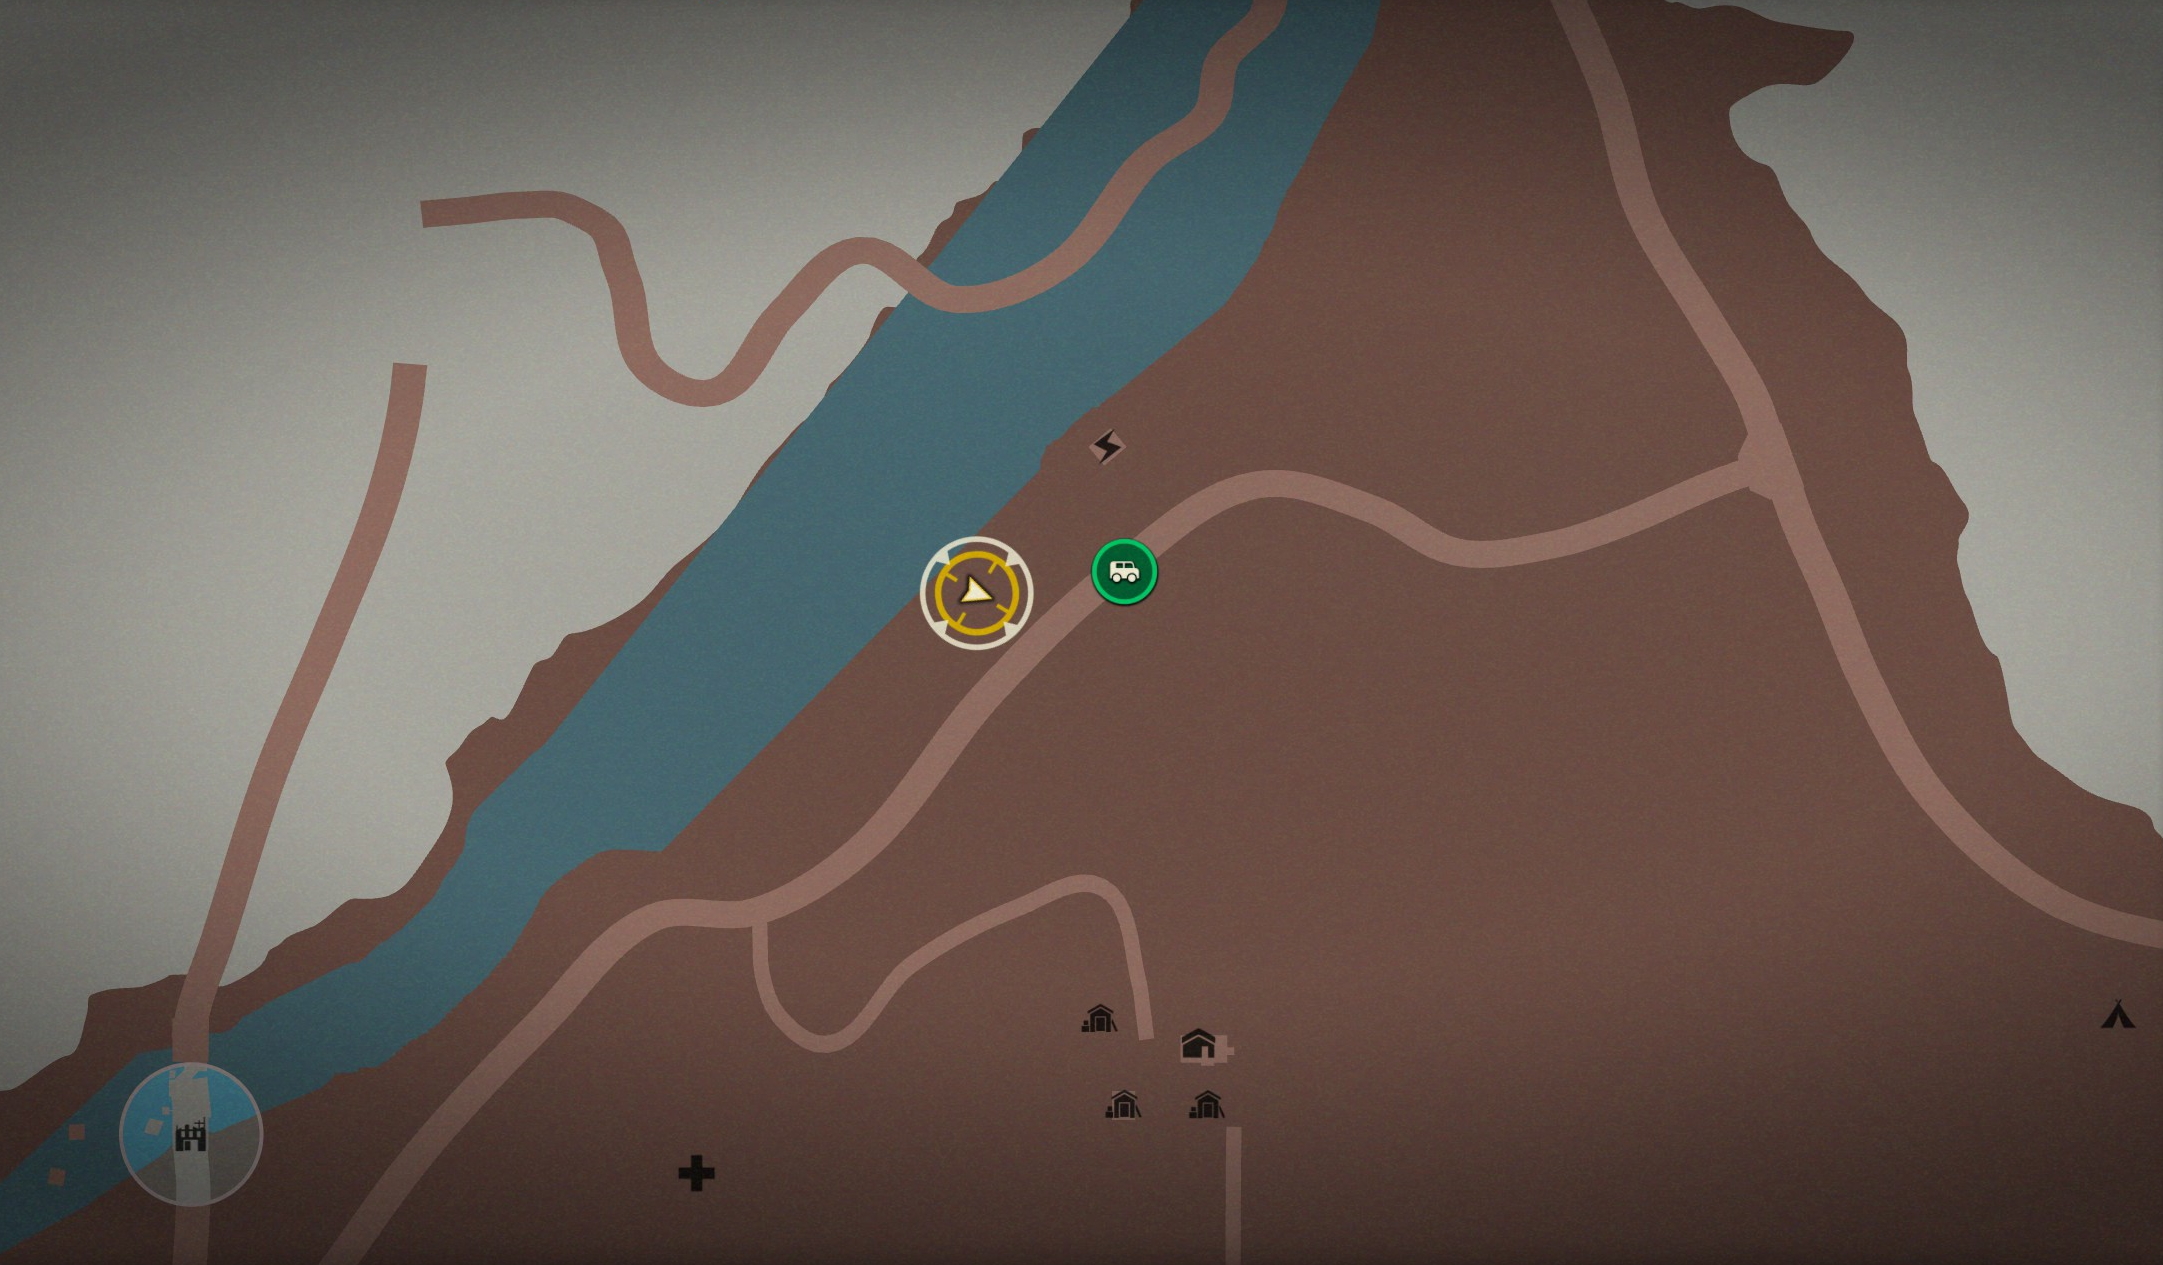
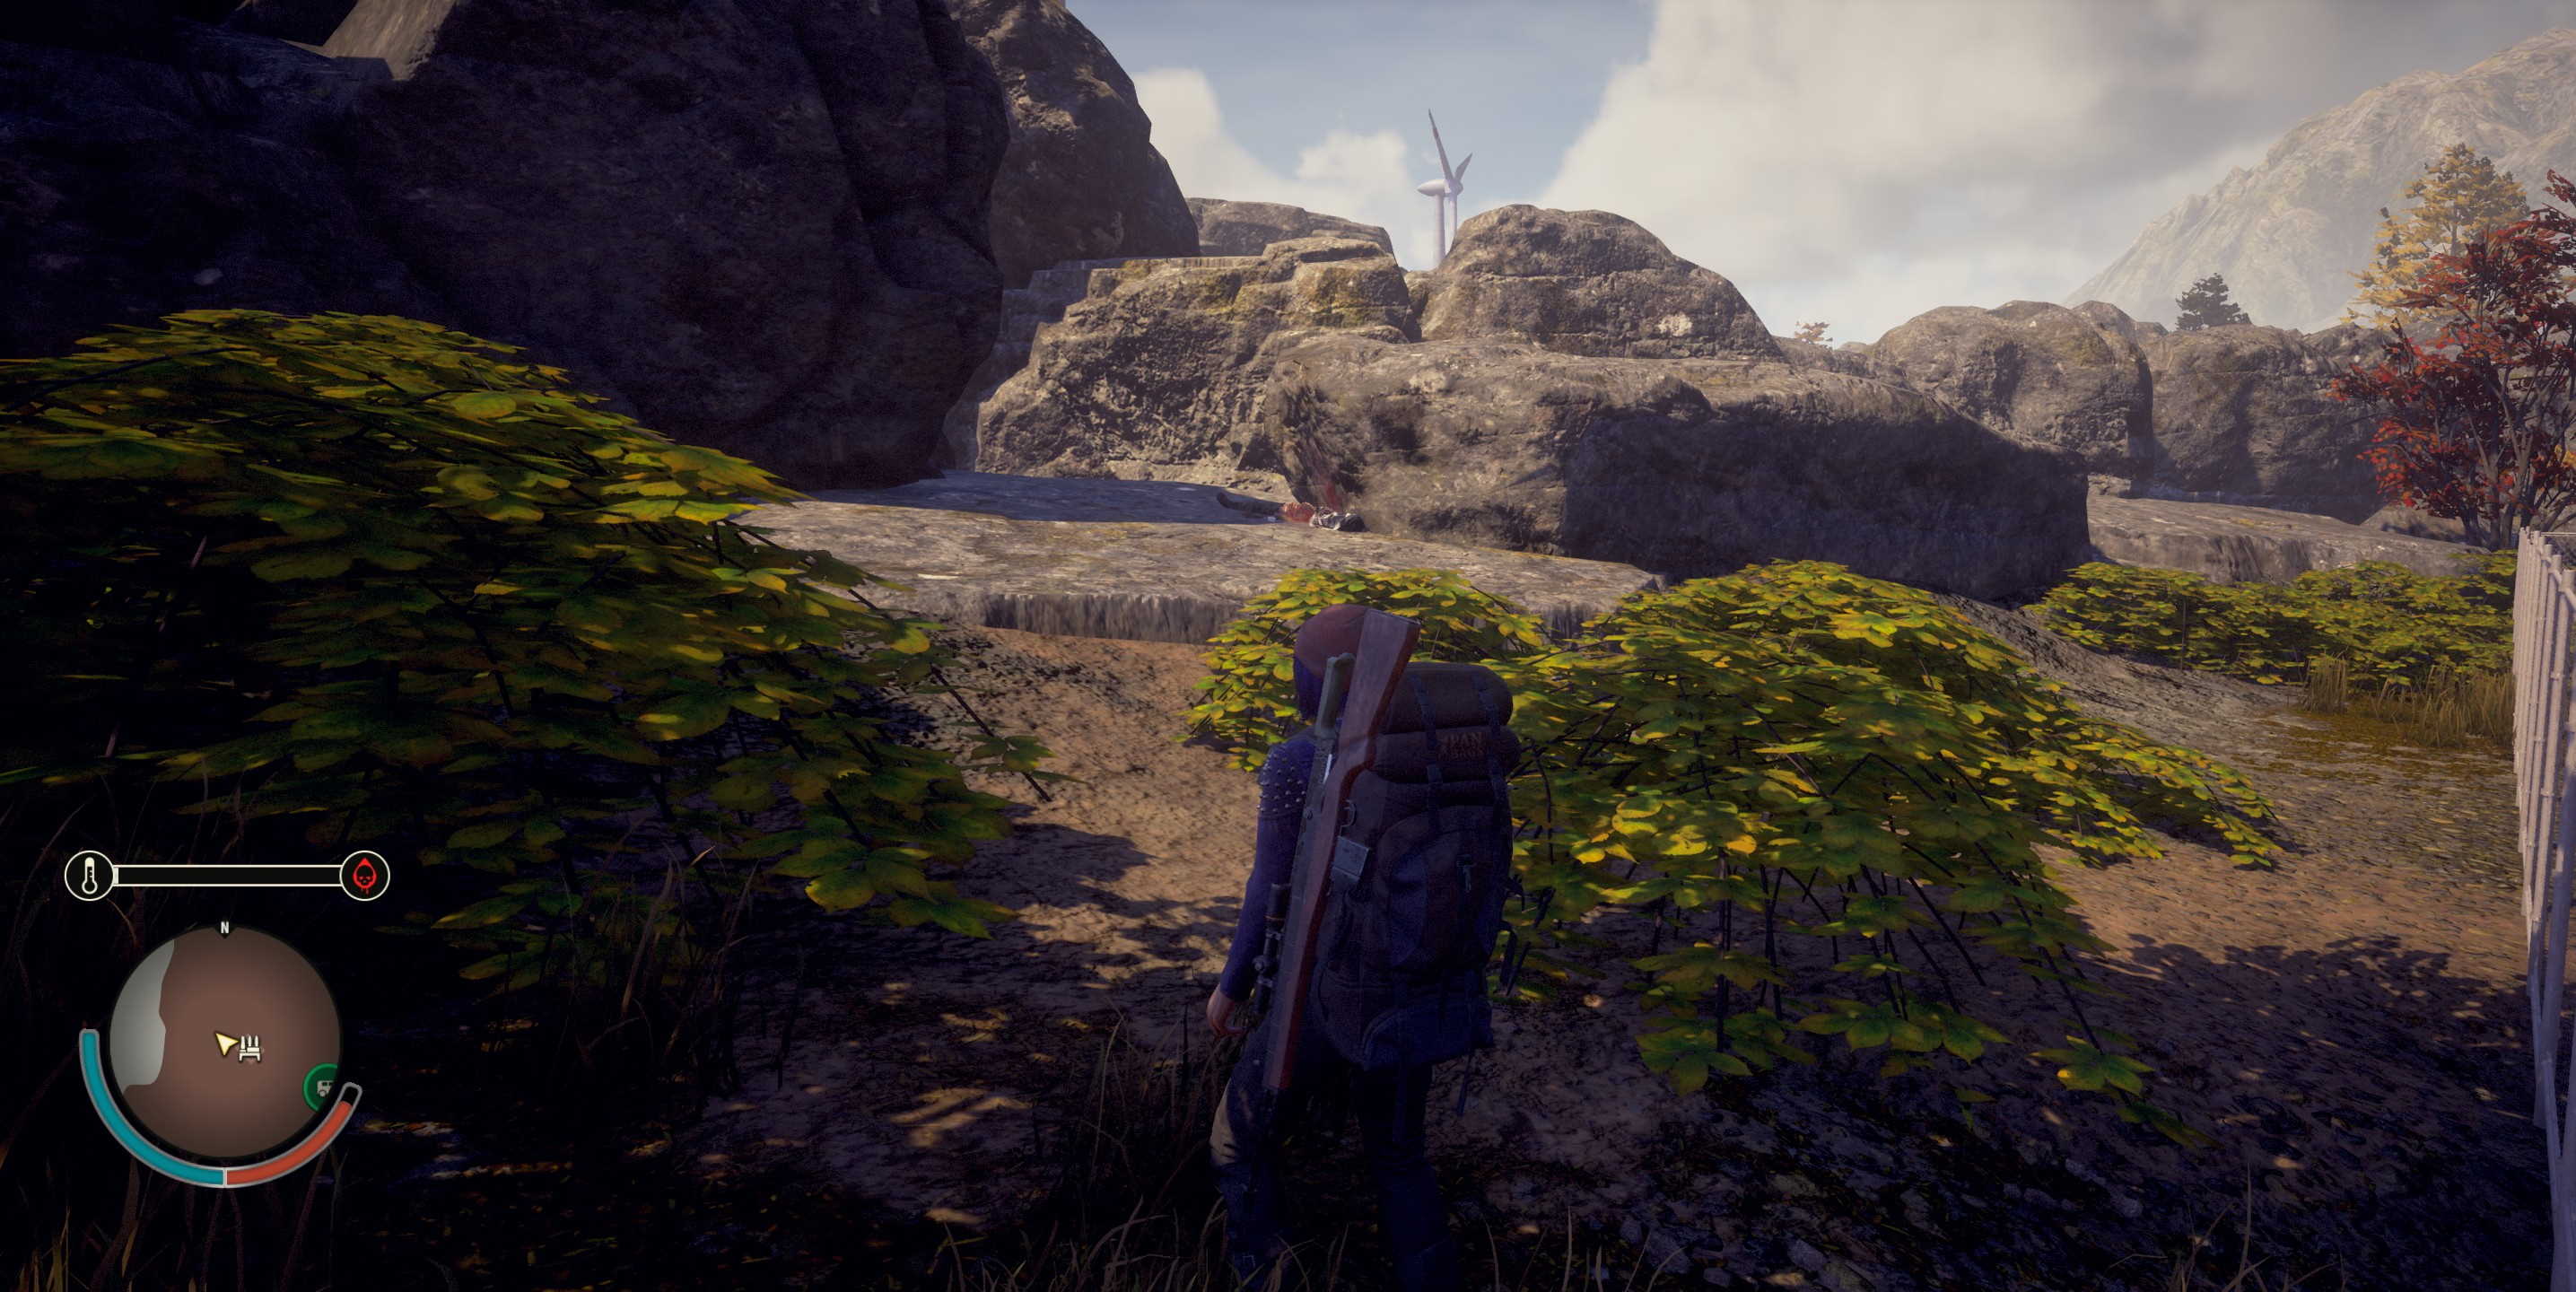
This location is closer to the North West side of the map. it is South of the “Electrical Transformers” 川沿いに.
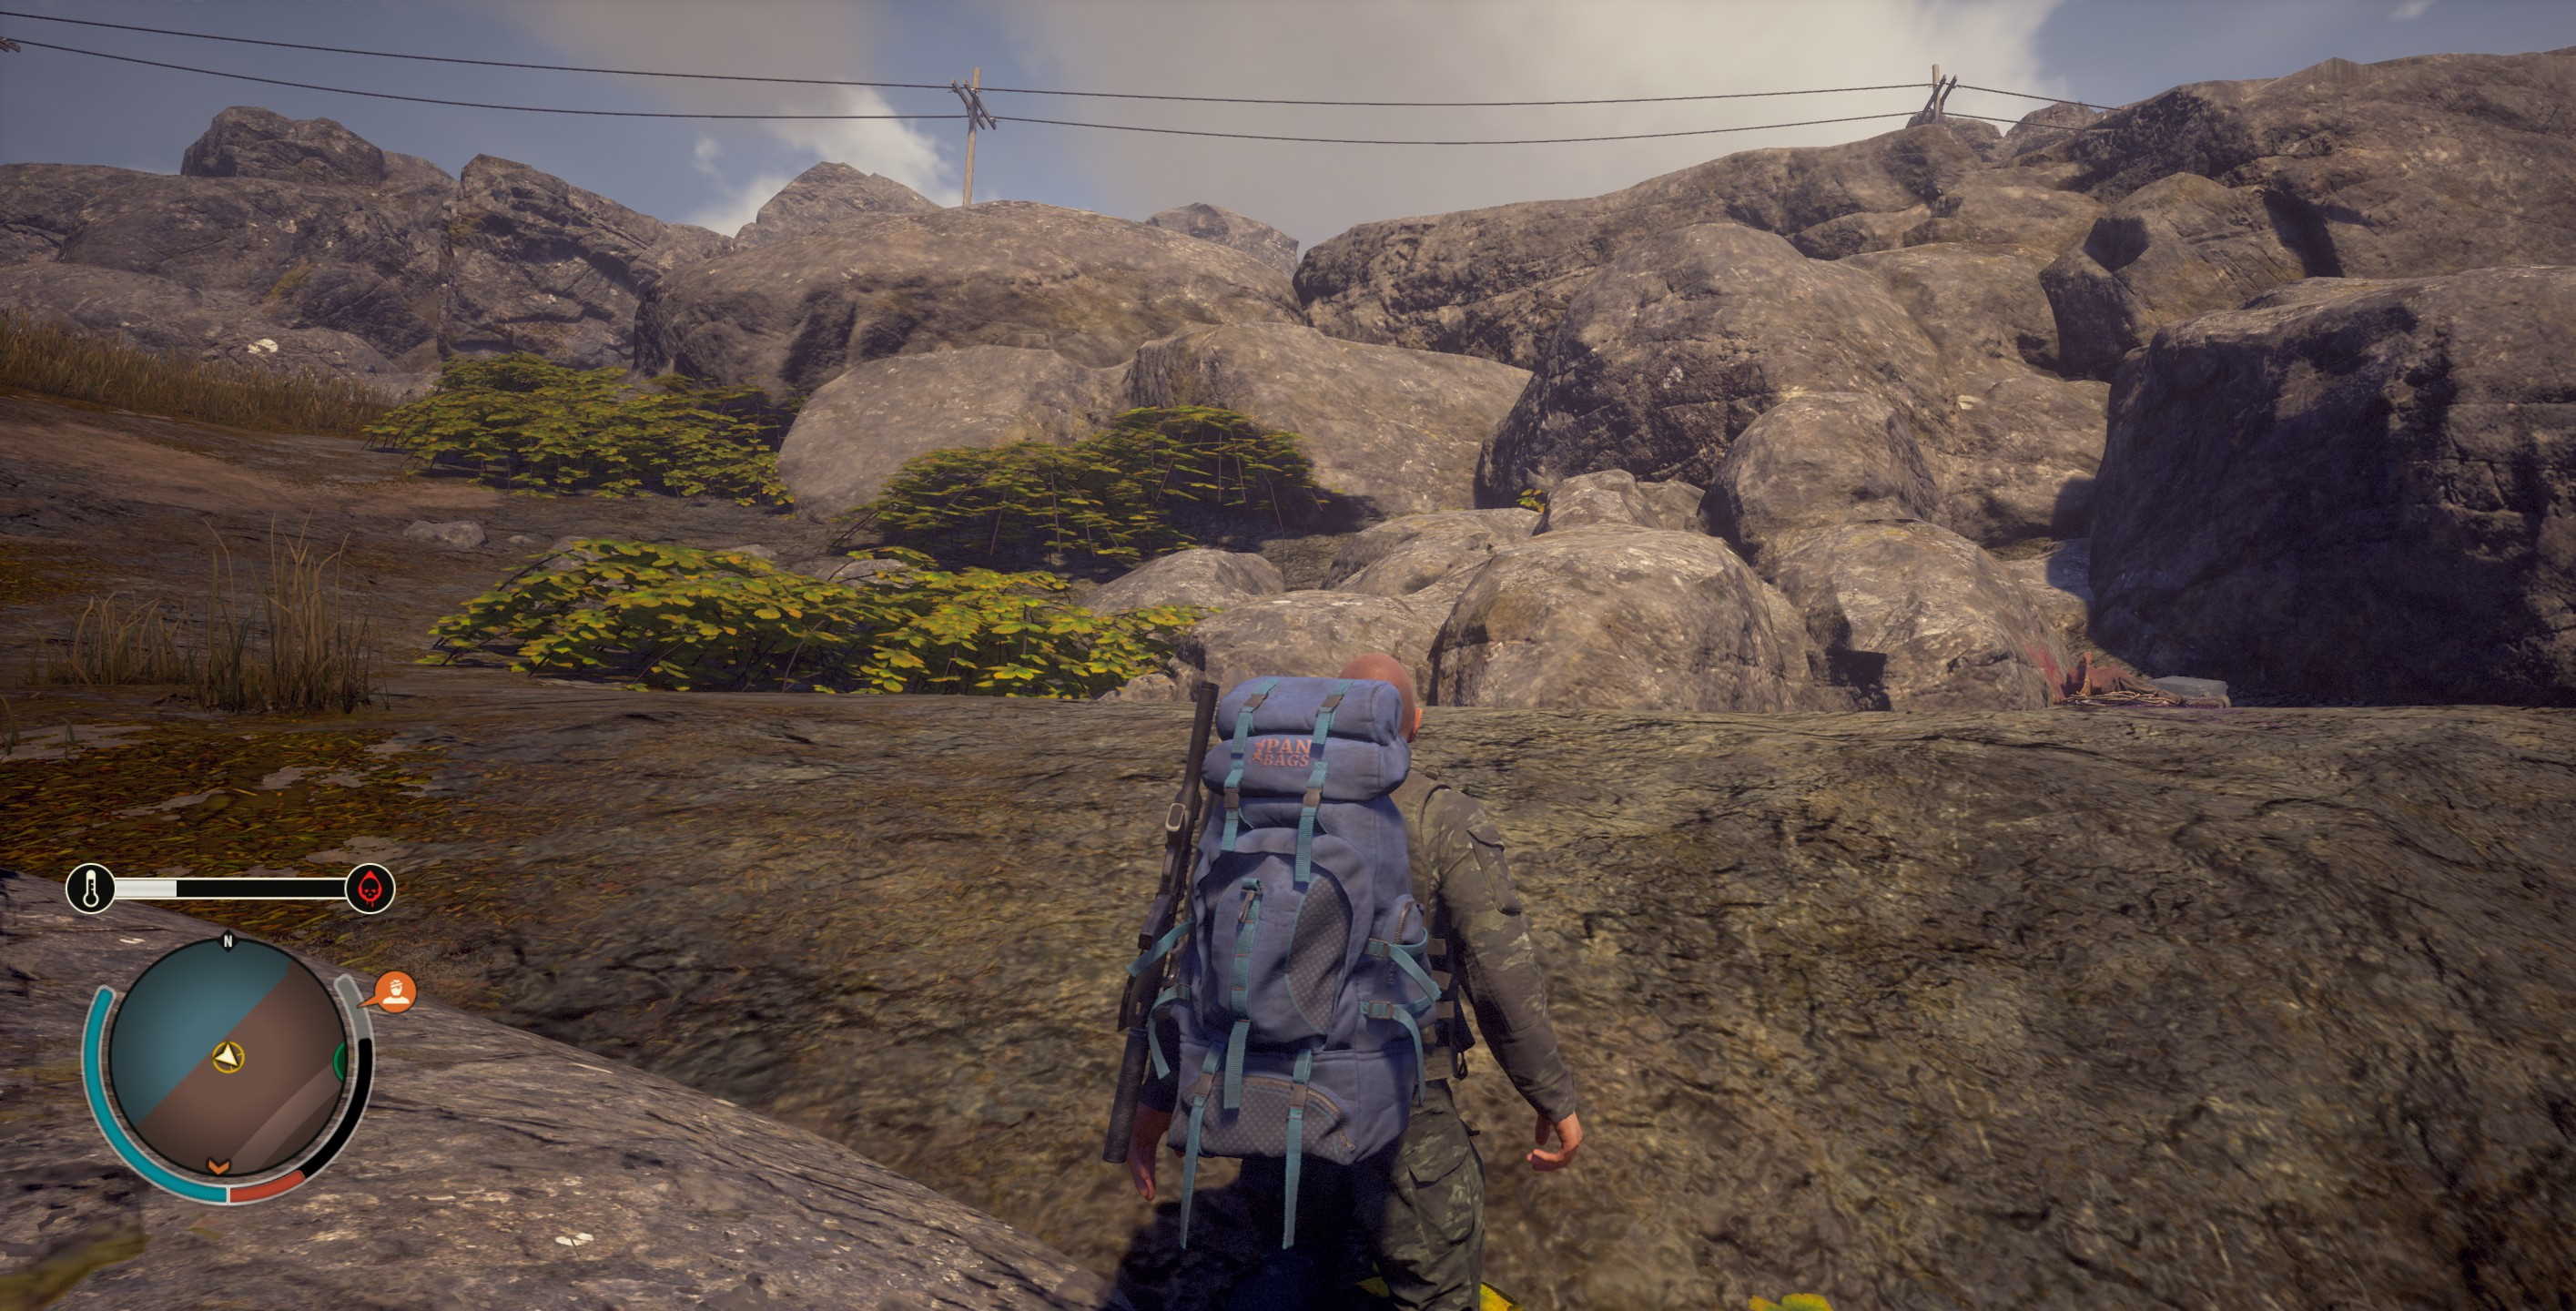
This one is incredibly easy to miss – the body is nestled within the rocks alongside the river’s edge. This one is technically in a case on the body, not the body itself.
End-Game
Now that all the recruiting and such is finished, the game will have you grind on the last story quests basically.

Travel to the “Army Refugee Camp” and find the Plague Toxin Distiller. If you have cleared this location before the mission, ゲームをリロードします – this should cause the distiller should then spawn in a container. You will have to install this in a facility mod slot once to complete the mission.

You can now complete this achievement – simply gather 10+ enemies in a confined area and hit them with the plague buster – it should be a one hit KO for all of them.

Destroy the first wall (three bars of health). Attacking will cause waves of zombies to show up. These waves consist of regular plague zombies and blood screamers.

Destroy the second wall (three bars of health). The waves of this wall will consist of regular plague zombies and blood juggernauts.

Destroy the third wall (three bars of health). These waves consist of regular plague zombies and blood ferals.

Destroy the last wall (three bars of health). All types of zombies will spawn during these waves.
This is the final mission. Once you have completed destroyed the wall, the game mode is “終わり” – you can reload however and it will take you back just before you started fighting the fourth wall (it will have three full bars of health).
There are several achievements to be unlocked upon completing the game:

Complete the mode without having anyone join your session.

Complete the game with another person (whether host or client).

Keep your starting characters alive – either Quincy and Helena or Larisse and Aunt Fi.

破壊する 20 plague walls. You can go through multiple play throughs, join others, or simply redo the final plague wall over and over.
incrivelmente útil e detalhado, obrigaodo.