- タイトル: Romancelvania
- 発売日:
- 開発者:
- 出版社:
Information about Romancelvania is still incomplete. これを使用してゲームの詳細を記入するのにご協力ください。 お問い合わせフォーム.
Welcome to this comprehensive guide on gifts, flair, 兵器, and significant locations for your favorite game! Given the considerable time I’ve dedicated to playing this game, it’s safe to say that I absolutely adore it. Like most indie games, there’s always room for improvement, しかし、恐れないでください! The purpose of this guide is to help you overcome some of the frustrations I experienced before the introduction of maps, so you can enjoy your gaming experience without any worries.
Drac’s Castle Ruins
Castle Ruins Map

As long as you go where all the dots are, you should end this level with a little over $300.
この地図では, がある:
- 4 Moneybags
- 5 チェスト
- 1 武器 (Impaler)
Notable mention: A chamber that reads “Blood Splatter Narrative” can be found where one of the Chests is.
Drac’s Revamped Castle (主要)
Main Hub Map

There’s a lot going on here, so I’ll try to break it down so it’s more digestible. Sections will cover a single Location map at a time, on an Episode by Episode breakdown.
エピソード 1:
You will have access to the bottom 3 tiers of the castle, with the exception of the Library (Unlocks with Fenton’s arrival). This section of the map has:
Nine Locations:
- The Castle Grounds (Cannot access until Episode 2)
- Backstage/The Set (Cannot access until Grim summons you)
- ダンジョン (cannot access until Episode 2)
- Hokkaido + Sol’s Castle (Cannot access until Episode 2)
- The Gallery
- The Ballroom
- The Gold Room (Cannot access until Golden Hour)
Three Shopping Areas:
- Grim’s Shop (two floors above the dining room)
- Theatre Treat Shop (劇場, to the left just before the Fridge)
- Lulu’s Roast Shop (to the right of the Dining Room. Does not arrive until Day 3)
- The Golden Room (技術的に. Just above to The Set and just below The Gallery. Opens during the Golden Hour)
Eight Character Locations:
- Vess (hana): Far right of the map, past the Pool. This is her primary location. She can also be found in the Bar in Episode 3.
- Brocifer: Beginning of Courtyard area, look for the spotlights, enter and go to the right. Becomes available after meeting Vess. This is his primary location. In Episode 2, he can be found just above the entrance to Backstage, and in Episode 3 he can be found in the Pool.
- メデューサ (ギャラリー): Complete the Gallery map and she is at the end on the left. She does not leave this area.
- ルル (エピソード 3): 右の方へ, just past the Dining Room. She does not leave this area. You can buy roasts here.
- Leira (エピソード 3): Far right of the map, just before the Pool. She does not leave this area.
- Nefret (second floor, エピソード 3): She hangs out at the floral arches just above Lulu’s spot. She does not leave this area.
- Fenton (second floor, エピソード 3): He is found almost all the way to the left in the Library. He does not leave this area.
- Ilessa (ダンジョン, エピソード 2): Unlocks with the key you can buy in Stiffs Bar at the Goyle’s Den on your way to recruit Ilessa. She can be found in the bottom-right of the Dungeon map, as well as in front of the Castle in Episode 3.
P. S. エル (Dungeon Episode 3): She can be found just before Ilessa’s room in the Dungeon on Episode 3, as well as in front of the Finale Gazebo on the Castle Grounds most of the time.
One Weapon:
- Grim Reaper’s Scythe
Two Date Locations:
- The Performance (劇場): requires Double Jump. Two Dates available. コスト $25 per Date.
- 心のこもった食事 (ダイニングルーム): Four Dates Available. コスト $15 per date.
One Quest item:
- Ice Garnish for Vess (Fridge, Short-term relationship). If you plan on keeping her past the first Episode, this will not reap as many points as getting the Ice Garnish later at Stiffs.
Eleven Loot spots:
- Three Chests: 劇場 (Double Jump needed), To the Set (左上), ダイニングルーム (右の方へ, after a date),
- Three Gifts: Chocolates (中庭. To the left up the platforms just after meeting Brocifer), Board Game of Death (図書館. Just left from the entrance. Requires Fenton), BFF Bracelet (図書館. Far left of the map. Requires Fenton.)
- Three Crystals: To the Set (右上, Double Jump needed), To the left from where Nefret resides, 劇場 (In front of Date Spot)
- One Treat: Dining Room Table
エピソード 2:
You will have access to the rest of Transylvania now, so there’s not a lot more you can unlock here today until all three contestants have been recruited and Ilessa has her tools back:
Two New Shopping Areas:
- Ability Trophy Shop (above Library)
- ギフトショップ (above Ability Trophy Shop. This is also where you can give Gifts to Contestants)
Seven New Character Locations:
- Fenton (second floor, エピソード 3): He is found almost all the way to the left in the Library. He does not leave this area but to go in his cage.
- ロバート (バー, エピソード 3): He is found all the way to the right. He does not leave this area.
- Vess (バー, エピソード 3): She can be found just past the pool at the bar in the Bar.
- ソル (禅の庭): He is be found all the way to the left. He does not leave this area.
- Brocifer (above To the Set): He can be found here after Ilessa is recruited.
- Ilessa (ダンジョン): She can be found here in the bottom-right of the map after you retrieve her tools.
- Mystery Character (Mystery Area): To the right of the Throne Room. This area is still in development.
26 New Loot spots:
- Sixteen Gifts: Gold Chain (just before Bar entrance), Matching Tattoos (バー, 真ん中に. Double jump behind the palm fronds), Earrings (just before Gift Shop entrance, must speak to Sol), Lock Pick Set (ギフトショップ, $250), Bubble Bath Gift Set (ギフトショップ, $250), Book of 500 Dad Jokes (ギフトショップ, $250), Field Guide to Monster Hunting (ギフトショップ, $250), Name Written in Sky (ギフトショップ, $250), TNT! (ギフトショップ, $250), Fondue Set (ギフトショップ, $250), Crystal Ball (ギフトショップ, $250), Comfy Sweatshirt (ギフトショップ, $250), Temptation Cologne (ギフトショップ, $250), Self Portrait (ギフトショップ, $250), 宝箱 (ギフトショップ, $250), Sports Tickets (禅の庭, above where the Ability Trophy was, Double Jump required)
- Three Crystals: Grim’s Shop (upper-left), Platform to the right of the Gift Shop, just before Benefactor Wing entrance
- Eight Ability Trophies: Damage Increase x4 (Ability Trophy Shop, $200 それぞれ), Damage Increase x2 (Benefactor Wing), Damage Increase (Benefactor Wing, Double Jump required), Blood Tornado (禅の庭, must speak with Sol), Double Jump (Love at First Bite Set after Golden Hour)
One Production Assistant Location:
- Ability Trophy Shop: Must Purchase all Trophies ($200 それぞれ) before the cage to the left unlocks
One Boss Fight:
- Huge Tongue: Lounge area above X-Mas room
エピソード 3:
Now that you have Double Jump, there’s so much to explore! This is just reminders of what you couldn’t access before:
One New Location:
- The Throne Room (Cannot access)
Six New Character Locations:
- Fenton (second floor, エピソード 3): He is found almost all the way to the left in the Library post-recruitment. He does not leave this area but to go in his cage.
- ロバート (バー, エピソード 3): He is found all the way to the right after you return from the Desert. He does not leave this area.
- Vess (バー, エピソード 3): She can be found just past the pool at the bar in the Bar.
- Brocifer (In the Pool): He can be found here for a quick chat
- Ilessa (ダンジョン): She can be found here in the bottom-right of the map after you retrieve her tools. She can also be found on the Castle Grounds to the left of where P. S. Elle is.
- Mystery Character (Mystery Area): To the right of the Throne Room. This area is still in development.
One New Date Location:
- The Performance (劇場): requires Double Jump. Two Dates available. コスト $25 per Date.
Five New Loot spots:
- One Chest: 劇場 (upper-right above entrance),
- One Gift: Sports Tickets (禅の庭, above where the Ability Trophy was)
- One Crystal: To the Set (右上),
- Two Ability Trophies: Damage Increase (Benefactor Wing, second level), Rat Darts III (禅の庭, jump on beams above to a hidden window and go all the way to the right)
Drac’s Revamped Castle (ギャラリー, ダンジョン, Grounds)
Gallery Map

You only really need to come here twice to get all the loot, and all other visits for Medusa:
One Character Location:
- メデューサ: She is in the lower-left corner of the map. She does not move from this area.
Four Loot spots:
- One Chest: mid-right of the map,
- One Gift: Marble Sculpture of Character (mid-right of the map),
- One Crystal: Upper-left corner on a podium,
- One Ability Trophy: Headouken (Lower-middle, must talk to Medusa first)
One Production Assistant Location:
- Upper-right corner of the map. Requires Double Jump
One Boss Fight:
- The Chiseled
Dungeon Map
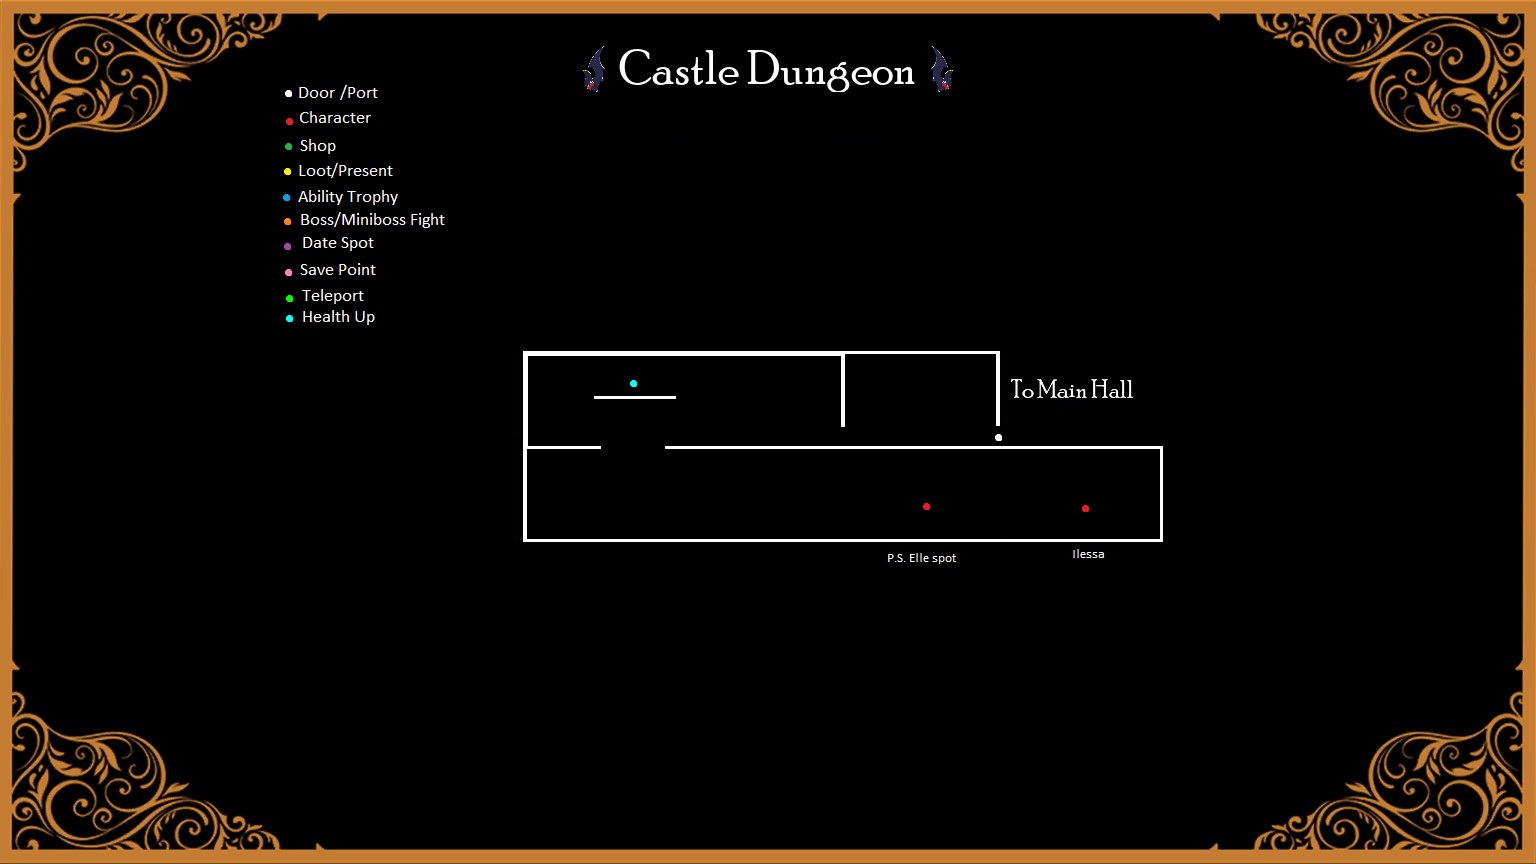
Two Character Locations:
- Ilessa: She can be found on the bottom-right of the map (エピソード 2), or in front of the Castle Grounds (エピソード 4).
- P. S. エル: She can be found here on Episode 3.
One Production Assistant Location:
- Upper-left corner of the map. You must speak to Ilessa and return her tools first.
Castle Grounds Map
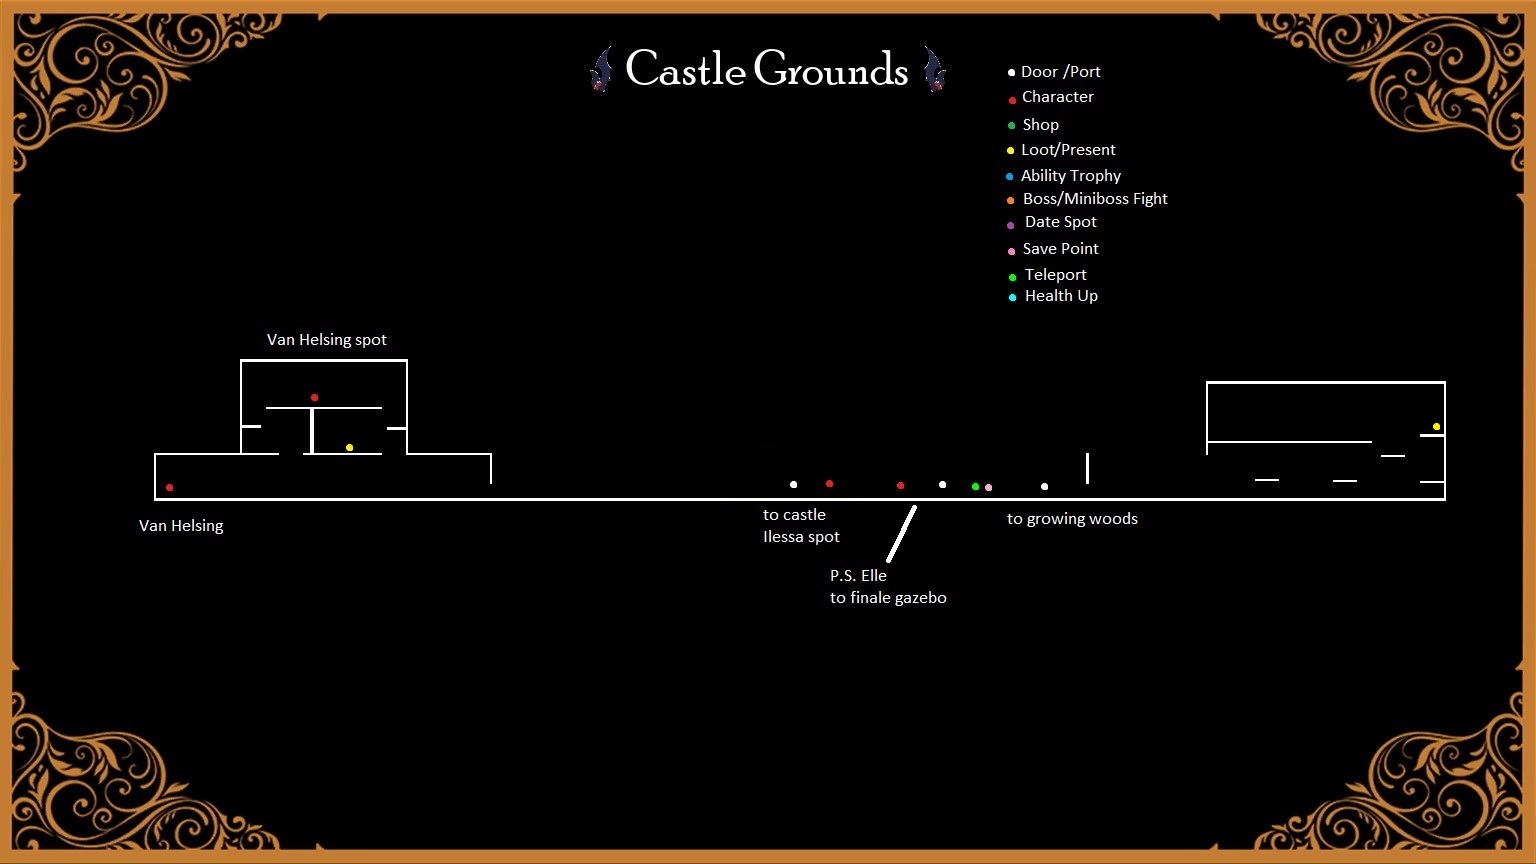
概要:
This area covers a little of Drac’s Castle Ruins (only available if you keep Van Helsing until Episode 3), and the Chapel, where you can find the Van Helsings:
Three Character Locations:
- Van Helsing: チャペル, far-left of the map. This is their primary location. Can also be found in their bedroom upstairs late in Episode 3.
- Ilessa: Can be found just outside the Castle gates feeding on a PA late in Episode 3.
- P. S. エル: Usually stationed to the left of the Carriage.
Two Loot spots
- One Chest: on the far-right of the map, requires Van Helsing
- One Gift: Horse Buggy Ride (third level of Chapel, requires Double Jump)
Drac’s Revamped Castle (The Set/Backstage)
The Set/Backstage Map
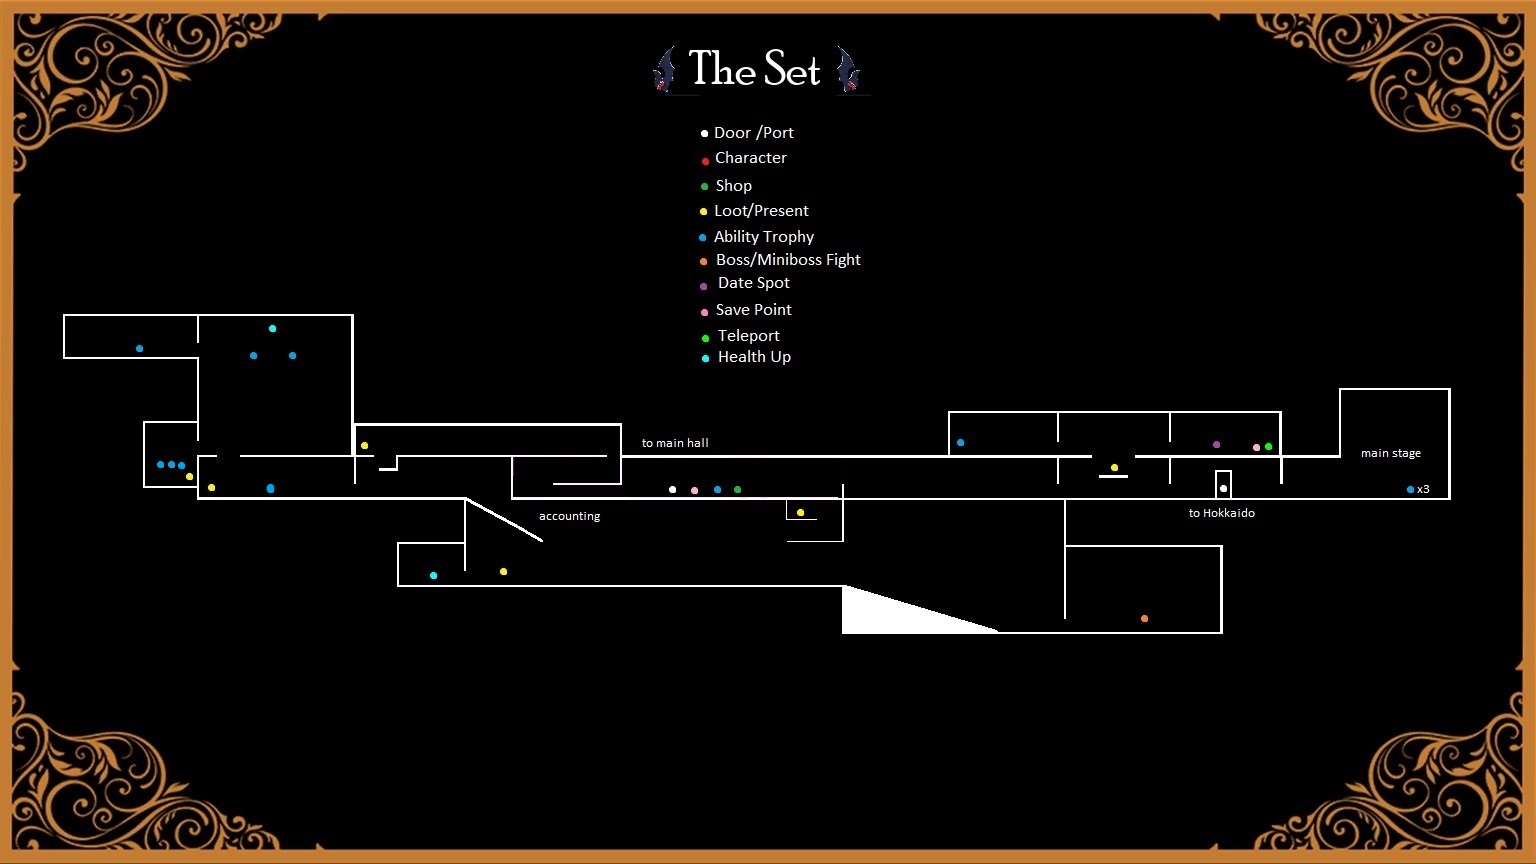
It’s recommended that you visit this area once an Episode that isn’t just going to the Love at First Bite set because there are some goodies that unlock with defeating bosses and some daily rewards.
エピソード 1:
Most of this map is accessible in the first Episode, with a small area only becoming available after acquiring Double Jump:
- Two Locations:
- Hokkaido (through the Wardrobe, accessible Episode 2)
- Sol’s Castle (through the Wardrobe, accessible Episode 2)
- One Shopping Area:
- Trick Shop (on the right before the door to the Stage)
- One Character Location:
- ソル: Through the Wardrobe, past Hokkaido, upper-left of the building on the right in the Sol’s Castle Map. Unavailable until Episode 2.
- One Date Location:
- Sweet Saccharine (Dessert Desert): Two Dates available. Cost is free.
- Two Quest items:
- Backstage Master Key: Reward for defeating Richard
- The Wardrobe: Requires two Sigils (ライオン, 魔女…get it)
18 Loot spots:
- One Chest: To the right in the room with the boss fight rewards.
- Two Gifts: Neither are available until Episode 3:
- Makeup (In the room just before the Wardrobe. Requires Double Jump), Swag Bag (to the left and up from the flames blocking Accounting. Requires Double Jump)
- One Crystal: To the left of the PA that tells you about the ones in red.
- 12 Ability Trophies: Not all of these are unlocked the first Episode:
- There is one unique trophy available at the end of the first two Episodes on the Stage, 右の方へ (Wolf Dash, Double Jump).
- One will unlock after each boss battle pictured on the TV screens (リチャード (1), Pumpkink (2), Glocktopus (3)) in the room to the left of the PA that tells you about the ones in red. Each one is a Damage Increase. 何らかの理由で, you can’t obtain the Trophy for defeating Richard until the next Episode.
- On Episodes 2 と 3, there are two upgrades can be unlocked in the room where you argued with Grim about the budget. エピソード 2 is Bat II OR Holy Hand Grenade II, and Episode 3 is Impale II OR Lightning II.
- Mist Form can be obtained from the PA that told you about the ones in red after speaking with Grim. 手に入れたら, you can obtain the Damage Increase trophy in the upper-left room.
- Durable Drac is unlocked Episode 2 after recruiting P. S. エル, Ilessa, and Sol. It’s located between the Blood Bath and the Trick Shop.
- Two Treats: Just below the first stairway down to Accounting to the left, tucked up in a corner just past said stairwell to the right
Two Production Assistant spots:
- At the top of the large room in the upper-left, in front of the curtain that says “DRINK UP!”
- Once you have defeated Richard, go up the staircase and under the next staircase to a door that is now unlocked.
One Boss Battle spot:
- Richard in Accounting: Bottom-right of the map. A good place to farm Tricks, おやつ, and Ratings.
エピソード 2:
You can unlock Hokkaido and Sol’s Castle today:
Two New Locations:
- Hokkaido (through the Wardrobe)
- Sol’s Castle (through the Wardrobe)
One Character Location:
- ソル: Through the Wardrobe, past Hokkaido, upper-left of the building on the right in the Sol’s Castle Map.
One Quest Item:
- The Wardrobe: Requires two Sigils (ライオン, 魔女)
Four New Loot spots:
- Four Ability Trophies: Damage Up x2 (Defeat Pumpkink before going to the room with the boss battle rewards), Bat II OR Holy Hand Grenade II (unlocked in the room where you argued with Grim about the budget), Durable Drac (unlocked after recruiting P. S. エル, Ilessa, and Sol; it’s located between the Blood Bath and the Trick Shop), Double Jump (given just before the Black Rose Ceremony)
エピソード 3:
We have Double Jump!:
One New Date Location:
- Sweet Saccharine (Dessert Desert): Two Dates available. Cost is free.
Five New Loot spots:
- Two Gifts: Makeup (In the room just before the Wardrobe), Swag Bag (to the left and up from the flames blocking Accounting)
- Three Ability Trophies: Damage Up (defeat the Glocktopus before going to the room with the boss battle rewards), インペイル (in the room two to the left from the date spot), Impale II OR Lightning II (unlocked in the room where you argued with Grim about the budget)
The Set/Backstage (Hokkaido, Sol’s Castle)
Hokkaido Map

These locations are not available until Episode 2, after recruiting P. S. Elle and Ilessa.
エピソード 2:
Not a whole lot of secrets to miss on this map unless you don’t return after getting Double Jump:
One Location:
- Sol’s Castle
One Character Location:
- ソル: Go through Hokkaido and he can be found in the upper-left of the building on the right in the Sol’s Castle Map. He can then be found in the Zen Garden in Drac’s Revamped Castle.
One Date Location:
- あなた, 自分, and Tea (Hokkaido): Two Dates available. コスト $16 each Date.
Two Loot spots:
- Two Chests: Bottom of the stairs to the left of the date spot, to the right of the date spot,
One Boss Battle spot:
- Yojamesbo: to the far right of the map before entering Sol’s Castle.
エピソード 3:
We have Double Jump!:
Five New Loot spots:
- Three Gifts: Small Zen Garden (atop torii before first aka-gawara), Windchimes (on second aka-gawara just before date spot), Massage Stones (two levels above entrance to Sol’s Castle)
- Two Moneybags (Just a reminder that these respawn every time you enter the map): There is one on the top of the first aka-gawara, and one on the top of the fourth aka-gawara.
Sol’s Castle Map
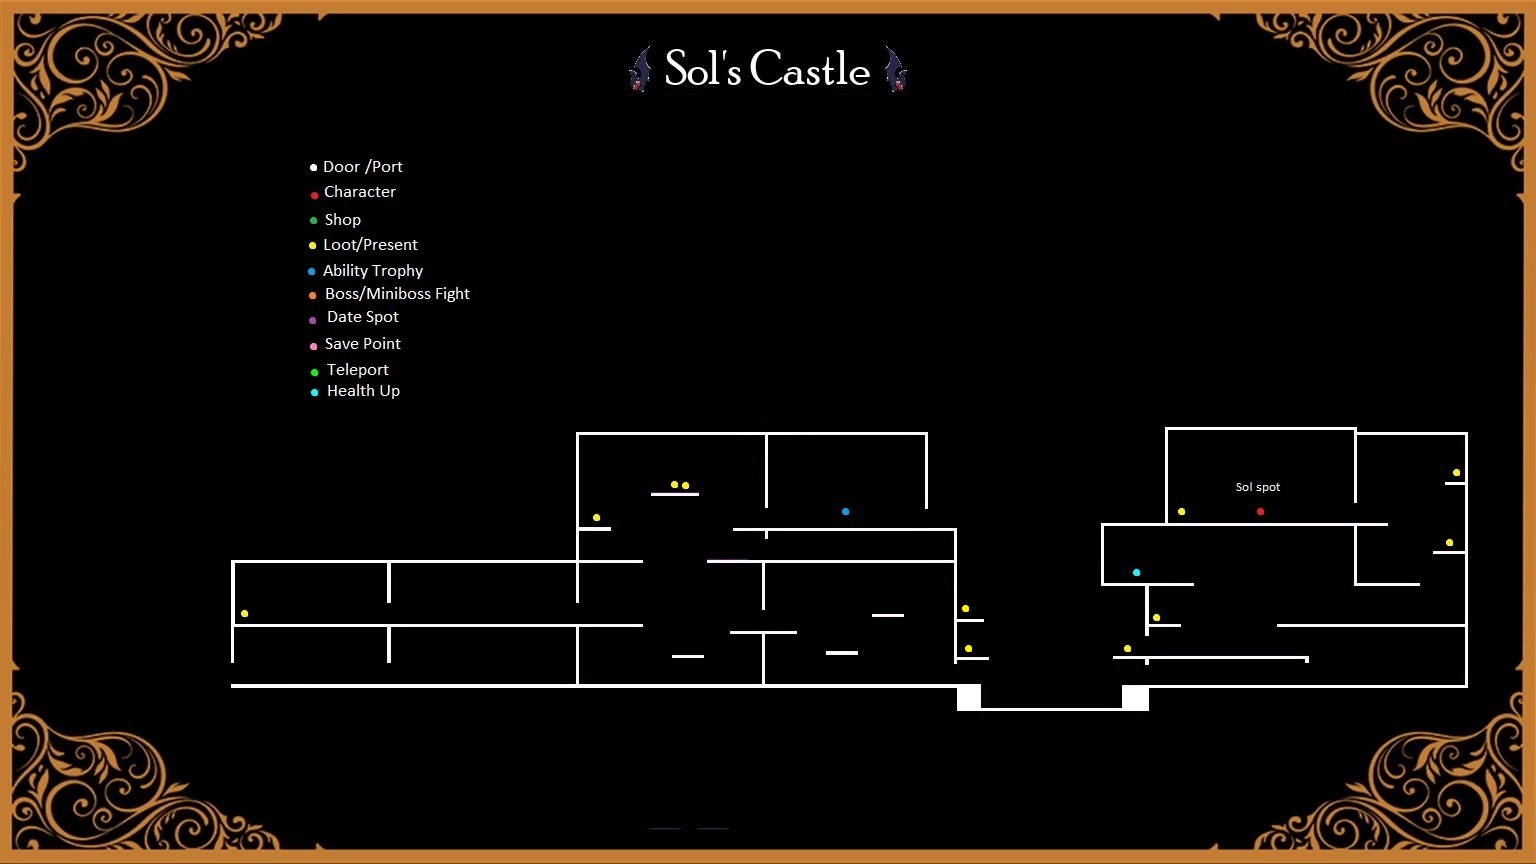
エピソード 2:
Make sure you return after getting Double Jump:
One Character Location:
- ソル: He can be found in the upper-left of the second building. He can then be found in the Zen Garden in Drac’s Revamped Castle.
Eight Loot spots:
- Three Chests: In the top-left of the first building, on the top-right of the second building, in the upper-right corner of the room with the Ability Trophy
- Three Gifts: Teapot Set (In the room just below the Production Assistant), Darjeeling Tea (Left side of the room where Sol is), Samurai Swords (on a platform in the upper-left room of the first building)
- One Ability Trophy: Damage Increase (in the upper-right room of the first building. Requires Double Jump)
- One Moneybag: In the room above the first building’s entrance
エピソード 3:
We have Double Jump!:
Six Loot spots:
- One Chest: on the balcony above the entrance of the second building,
- Three Gifts: Teapot Set (In the room just below the Production Assistant), Darjeeling Tea (Left side of the room where Sol is), Samurai Swords (on a platform in the upper-left room of the first building)
- One Ability Trophy: Damage Increase (in the upper-right room of the first building)
- One Moneybag: on a balcony on the right of the first building
One Production Assistant Location:
- In the room beneath where Sol is. Requires Double Jump
The Growing Woods (主要)
The Growing Woods (主要) 地図

エピソード 2:
There’s not a lot of the world available, so for now it’s just:
Two Locations:
- Smashmounds (東)
- Goyle’s Den (西)
Two Character Locations:
- P. S. エル: 東, to Smashmounds
- Ilessa: 西, Goyle’s Den
One Loot spot:
- One Gift: Garden Tools (to the far-right of the map available, in the shed)
エピソード 3:
We have Double Jump and access to most of the rest of this map. There’s a Bat Blast location accessible after completing Booty Bay:
Four Locations:
- All-Seeing Swamp (東)
- De Nile (西, requires Lightning Flair)
- The Stacks (西)
- Coldheart Caverns (西)
One Date Location:
- Fire Devils (Growing Woods East): Two Dates available. 料金 $36.
Nine Loot spots:
- Four Chests: On top of structure with statues (東), To the right of the barn and just past the Coward (東), underwater in Bat Blast cavern (×2)
- Four Gifts: Canister of Balls (on a platform above the East Carriage), Bird Treats (Bat Blast spot East, inside cave, under cages), Spa Machine (on a arch to the right of the structure with statues. 東), Sports Rackets (To the right of the structures to the right of the barn. 東)
- One Ability Trophy: Weapon Master I (on a platform above the entrance to Smashmounds)
One Production Assistant Location:
- Far-right of the map, in the Bat Blast Cavern
The Growing Woods (Smashmounds)
Smashmounds Map
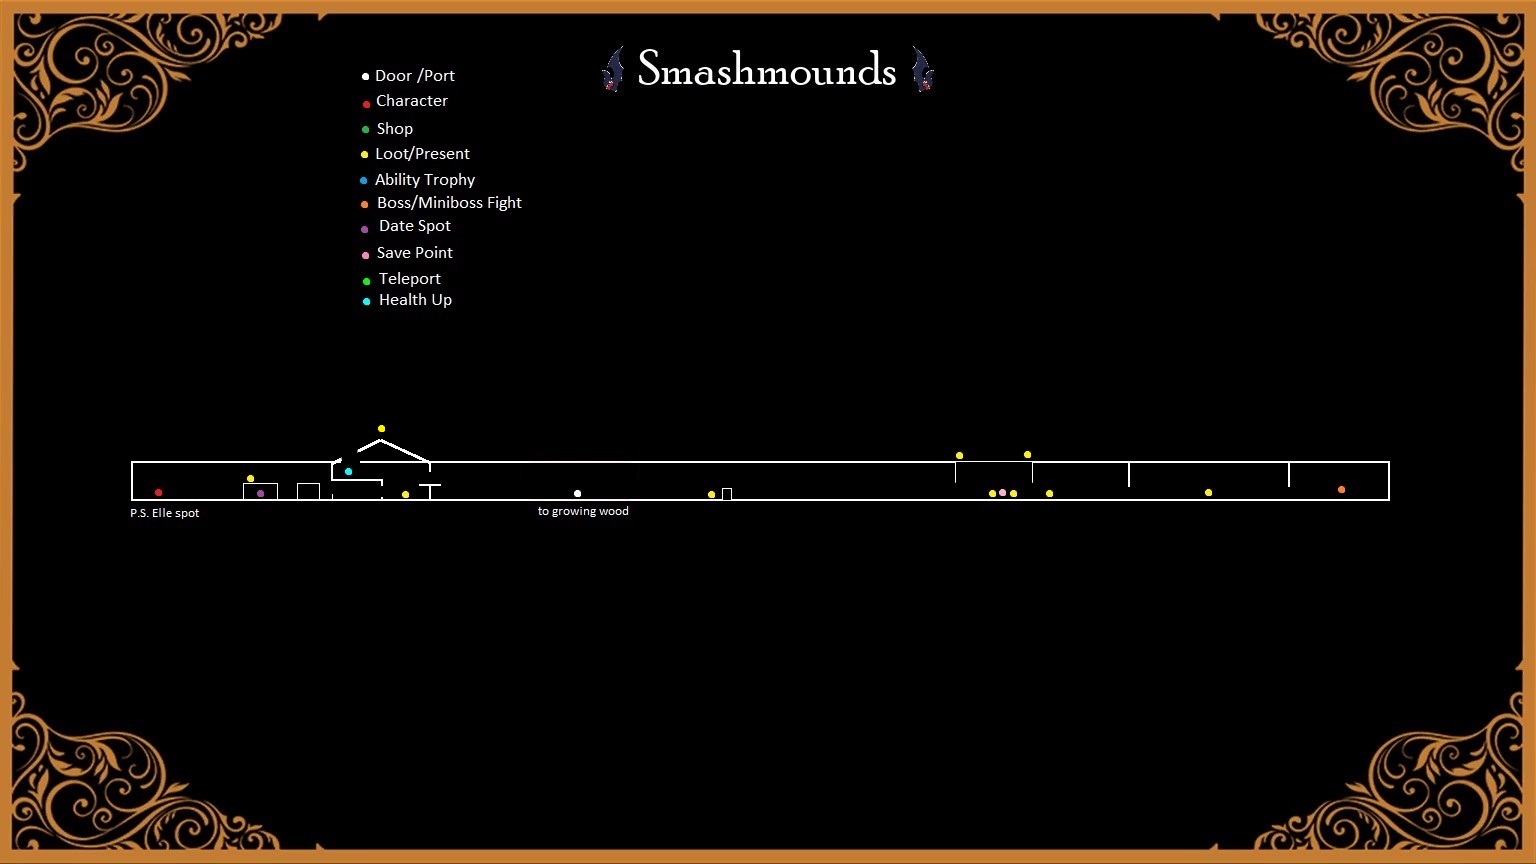
エピソード 2:
This map is just very long, not a lot hiding out of plain sight:
One Character Location:
- P. S. エル: Far-left side of the map
One Weapon:
- スマッシャー
One Date Location:
- Courting with Cortlands: Three dates available. 料金 $20. Unlocks after recruiting P. S. エル.
Five Loot spots:
- One Crystals: Just outside the cave
- Two Treats: In the cave with the Blood Bath
- Two Quest Items: 鍵 (drops from fighting an enemy before the cave), Sloppy Jalopy
One Production Assistant Location:
- Upper-left inside the barn. Get there falling from the roof.
One Boss Battle spot:
- Pumpkink
エピソード 3:
Double Jump time!:
One Date Location:
- Courting with Cortlands: Three dates available. 料金 $20.
Four Loot spots:
- One Chest: On top of cave
- Three Gifts: Exotic Coffee (on top of the cave), ピクニックバスケット (on top of barn), Silver Chain (on top of Date spot)
One Production Assistant Location:
- Upper-left inside the barn. Get there falling from the roof.
The Growing Woods (Goyle’s Den)
Goyle’s Den Map
エピソード 2:
The Skela-Rolls clip through floors, だから気をつけて:
One Location:
- The Blue Room of Doom
Four Shopping Areas:
- STIFFS (Upper level, Basement Crypt Key $100)
- Inner Demon Treats (Just inside)
- Hexed Gifts (Just inside)
- Hexed Power (Far-right)
One Character Location:
- Ilessa: Blue Room of Doom
One Date Location:
- Skin to Win (Heartstoppers): Three dates available. 料金 $25.
16 Loot spots:
- Four Chests: Lower-left level of STIFFS, upper-left room of Inner Demon, upper-right of the room to the right of the entrance to the Blue Room (requires Double Jump), chamber one over left and one down from Hexed Power shop
- Six Gifts: Margarita Blender (Hexed, 料金 $49), Aged Barrel of Spiced Rum (Hexed, 料金 $49), Tomahawk (Axe room), Blood of Thine Enemy (upper-left room of Inner Demon), Leg Lamp (left balcony of Heartstoppers), キャンドル (upper-left of Curtain Call)
- Two Ability Trophies: Masochist I (up and to the right from STIFFS entrance), Damage Increase (Hexed, second room, 料金 $200)
- Three Quest Items: Blood Mirror (Inner Demon, second room), Ice Garnish (STIFFS, lower-right room), Ilessa’s Tools (Blue Room)
- One Moneybag: In the room to the right of the Confessional
One Production Assistant Location:
- Bottom level, room on the far-right. Unlocks after buying Basement Crypt Key (料金 $100) in STIFFen Up.
Two Boss Battle spots:
- Huge Tongue: One before the entrance to Inner Demon, One before the entrance to the Axe Room
エピソード 3:
Just a couple things to get now that we have Double Jump. This section isn’t complete:
Two Loot spots:
- One Chest: upper-right of the room to the right of the entrance to the Blue Room (requires Double Jump)
- __ Gifts:
- One Ability Trophy: ____ (Above the entrance to Curtain Call)
- Blue Room of Doom Map
- I made this map! Since this map is so small, I am listing all items just once. If you want to use this map for your own uses, please credit me (^w^).
One Character Location:
- Ilessa: Far-Left of the map
One Weapon:
- ホイップ
Three Loot spots:
- One Chest: Upper-left of main room, requires Double Jump
- One Gift: Disco Ball (Upper-right of main room, requires Double Jump)
- One Quest Item: Padded Chest (Ilessa’s tools, far-left room, 右側に)
The Growing Woods (The All-Seeing Swamp)
The All-Seeing Swamp Map

エピソード 3:
You may have to return a couple of times to get everything. First time expanding the map, second time after recruiting Lulu, Leira, and Robert, and the last time after acquiring Bat Blast. This section is not complete:
One Location:
- The Real Booty Bay
One Shopping Area:
- Shacked Up: Just to the left of the middle of the map. Defeat Mud Mother to access.
Five Loot spots:
- Two Gifts: Cherry’s Berries (under the spotlight before the Shacked Up shop, 香水 (Just to the right of the big willow tree in the middle of the map)
- Two Crystals: On the leftmost platform, in the upper right room of the Shacked Up shop
- One Ability Trophy: Rat Darts II (in the Shacked Up shop)
One Production Assistant Location:
- Just before the Boss Battle, requires Bat Blast
One Boss Battle spot:
- Mud Mother
エピソード 4:
We’re just here for the Bat Blast spot:
One Production Assistant Location:
- Just before the Boss Battle, requires Bat Blast
The Growing Woods (The Stacks)
The Stacks Map
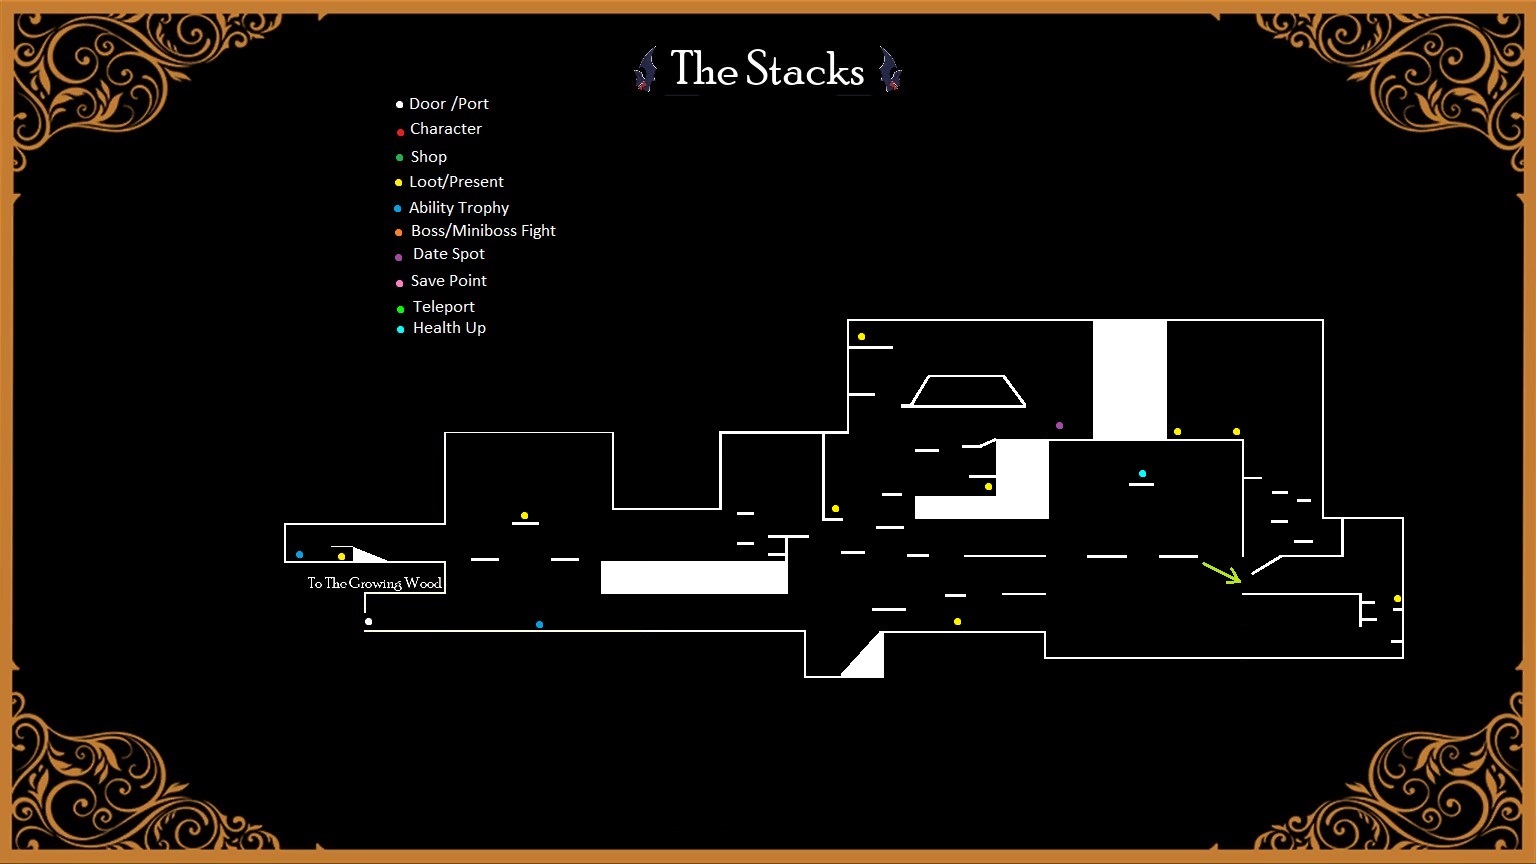
I apologize if this map is inaccurate, I get lost easily on this level. Any pointers are appreciated. Remember to return once you obtain Bat Blast for the PA. This section might be incomplete.
エピソード 3:
BRIEF SYNOPSIS:
One Date Location:
- Perking Up: Two dates available. 料金 $42.
11 Loot spots:
- One Chest: In the chamber with the Book for Fenton
- Four Gifts: パイプ (above the Thesaurus), Guy Firey Cookbook (upper-left of chamber with the date spot. Requires Wolf Dash), A Song Written For You (to the left and down from the date spot), Leatherbound Tome (bottom-right column near the top of the steps),
- Three Crystals: In the room above the entrance, just past the first ramp with the Nervous System, Several platforms up from the last location
- Two Ability Trophies: Weapon Master II (Defeat the Thesaurus), Unholy Hand Grenade Stacks (In the room above the entrance),
- One Quest Item: Book for Fenton
One Personal Assistant Location:
- In the second high-ceiling room, Bat Blast to the top.
East of the Growing Woods: The Real Booty Bay
The Real Booty Bay Map

エピソード 3:
There’s a lot that happens here, so return trips will be necessary:
Two Locations:
- The Salty Sea Weasel
- The Grotto of Ennui
One Shopping Area:
- ギフトショップ: to the right of the date spot, two levels up.
One Character Location:
- ロバート: Salty Sea Weasel
One Date Location:
- Better Where its Wetter (Booty Bay): Three dates available. 料金 $38.
13 Loot spots:
- Three Chests: Tucked into a corner just past the Flagon, three levels below Pouka Shell Necklace, underneath the right dock,
- Six Gifts: Flagon (Left side of the map in a doorway), Trip to the moon (to the right of the date spot, two levels up. 料金 $49), Decorative Soaps (to the right of the date spot, two levels up. 料金 $49), Pouka Shell Necklace (to the right of the Gift Shop), コンパス (underneath the left dock), Hemp Necklace (Wolf Dash above entrance to The Grotto of Ennui), Action Figure (inside the cage you got the PA, 左の方です
- Three Crystals: On the first roof you jump on, on a roof to the right of the Flagon, two levels below Pouka Shell Necklace,
- Two Ability Trophies: Damage Increase (to the right of the date spot, two levels up. 料金 $200), Damage Increase (After getting Hemp Necklace Gift, Wolf Dash + Double Jump to the left)
One Production Assistant Location:
- In the cage, before the Carriage. Get the Booty Bay Cell Key from the Salty Sea Weasel cell.
One Boss Battle spot:
- Can-Can Tuna
East of the Growing Woods: The Salty Sea Weasel and The Neighborhood
The Salty Sea Weasel Map
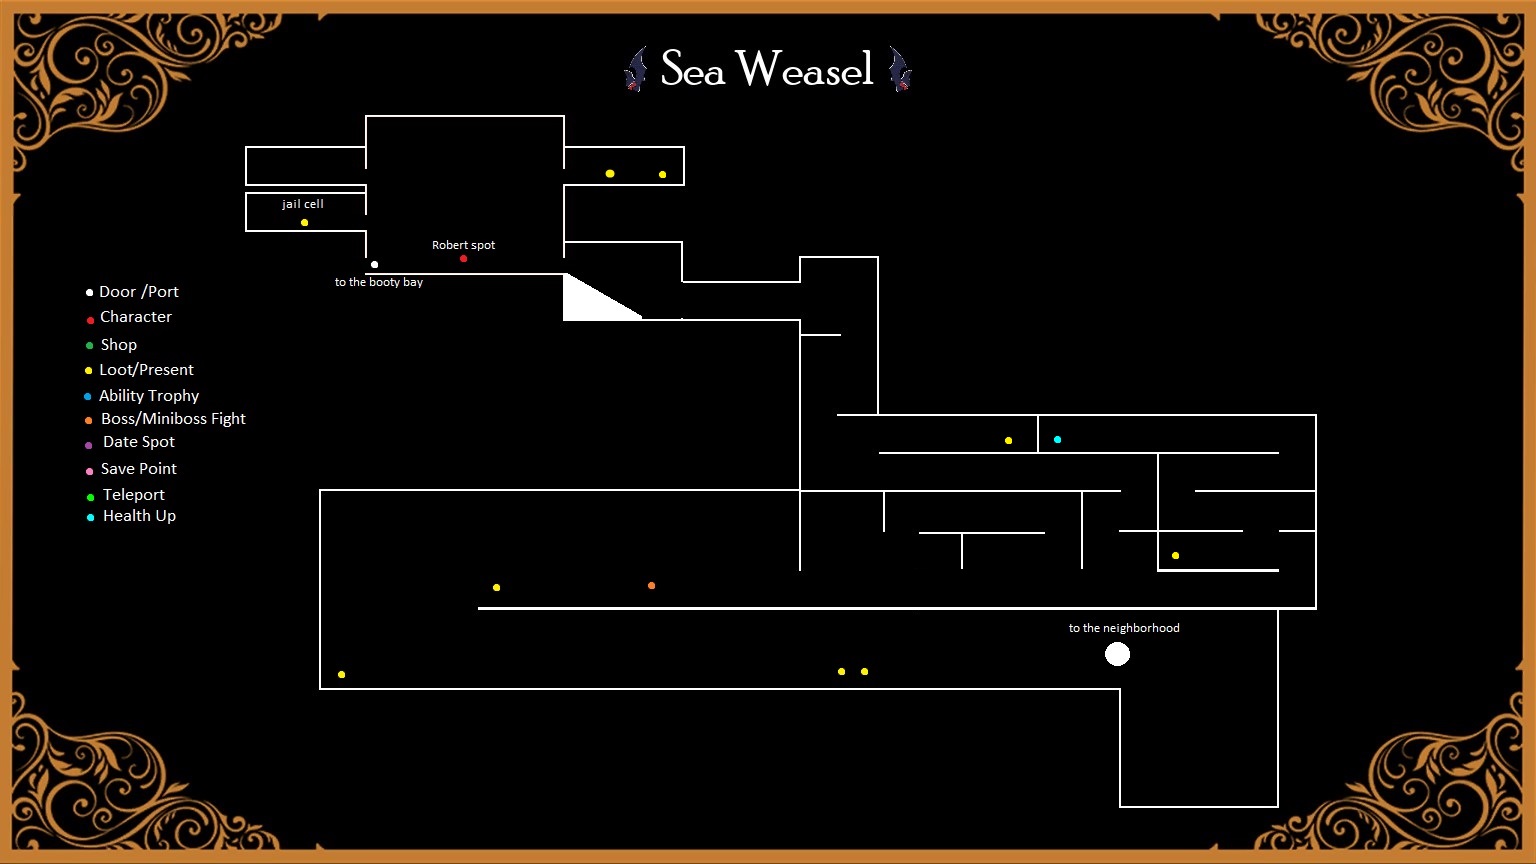
エピソード 3:
This is another map that I’m not super confident on. Any pointers are appreciated and will be properly linked. This section may be incomplete:
One Location:
- The Neighborhood
Two Character Locations:
- ロバート: In the middle of the room when you first enter.
- ルル: The Neighborhood
Eight Loot spots:
- Three Chests: In the right-most room that isn’t the cellar, Follow path into the upper-right corner of Cellar you will see it, Bottom-left of map
- Three Gifts: ワイン (in chamber opposite of PA), ワイン (Far-left-lower side of the Cellar), Homemade Ale (Bottom of map, towards the middle
- One Moneybag
- One item: Key to Booty Bay Cell
One Production Assistant Location:
- 未定
One Boss Battle spot:
- Mud Mother
The Neighborhood Map

I made this map! This is the only time you can visit this location. If you want to use this map, please credit me!:
Two Locations:
- The Neighborhood
- ホームスイートホーム
One Character Location:
- ルル: She is waiting for you
Two Loot spots:
- Two Gifts: Concert Tickets (Inspect radio until Gift spawns), Giant Teddy Bear (on the seesaw)
Home Sweet Home Map
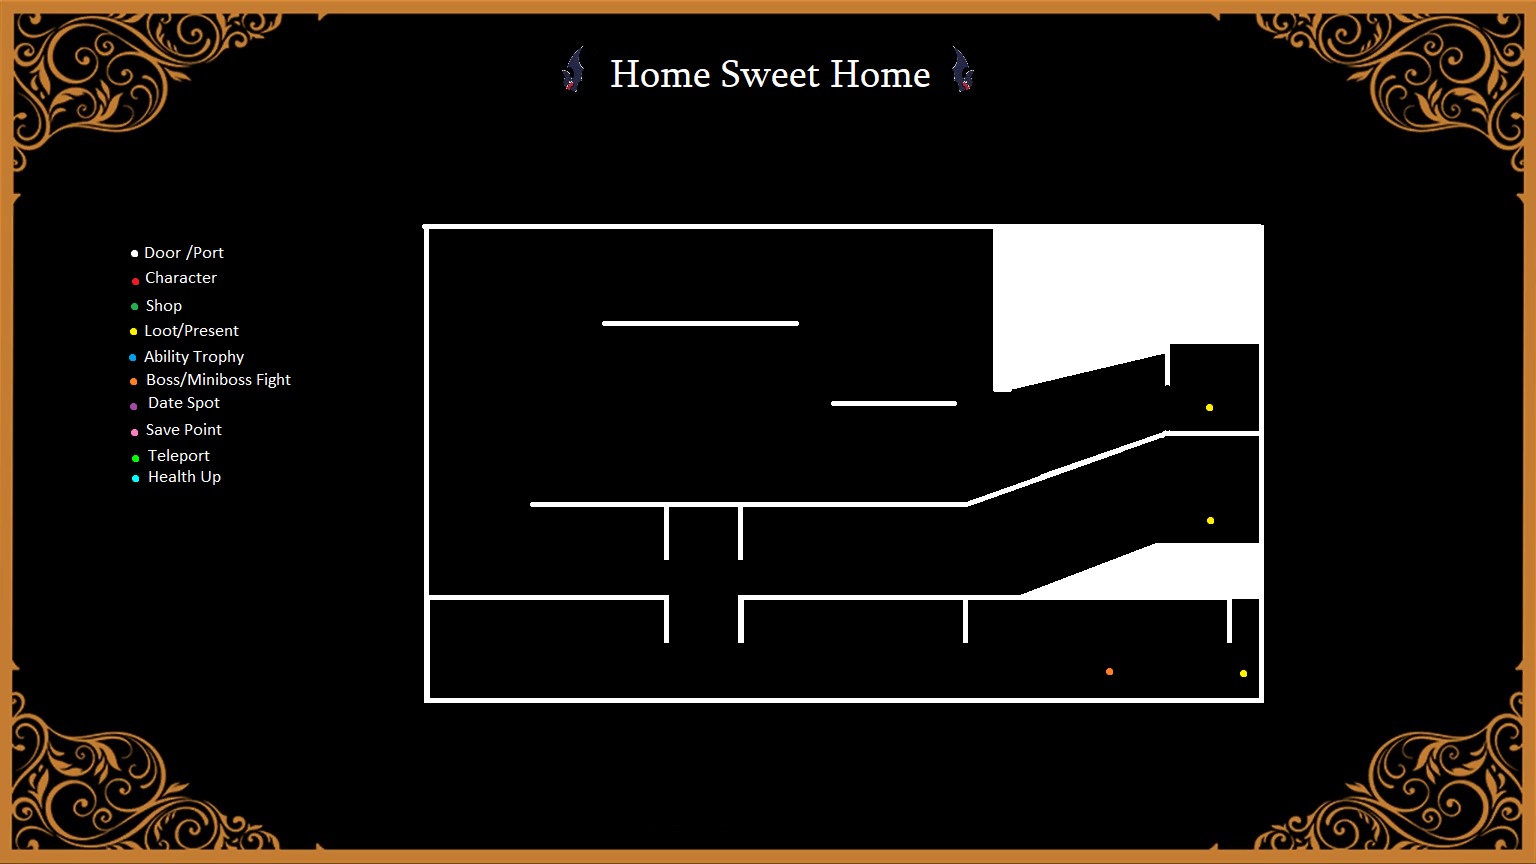
I made this map! This is the only time you can visit this location. If you want to use this map, please credit me!:
One Character Location:
- ルル: She is waiting for you
Three Loot spots:
- Three Gifts: Concert Tickets (Inspect radio until it spawns), Lil Black Book (to the right of the fridge. This room will disappear, so get it right after the conversation), Velvet Bathrobe (Deliver Jello, play piano, go to bathroom), Silk Eye Mask (Second floor far right)
One Boss Battle spot:
- Cthulhulhu
East of the Growing Woods: Grotto of Ennui
このセクションは不完全です
East of the Growing Woods: Dessert Desert
このセクションは不完全です
West of the Growing Woods: Coldheart Caverns
Coldheart Caverns Map

エピソード 3:
This map took a lot of reworking, and I got lost a couple of times, so it may not be 100% 正確な. I know for sure I have missed some items. If anyone has any pointers please message me and I will credit you! This section and map is incomplete:
Two Locations:
- Frostbite Chasm
- Thundercrack Hollow
One Shopping Area:
- Crystal Shop:
__ Loot spots:
- __ Chests:
- __ Gifts:
- Three Crystals: Below the far-left large room (in the water) ×3,
- __ Ability Trophies:
- __ Treats:
Two Production Assistant Locations:
- In the far-left large room, just above where I wrote “木”. Requires Bat Blast.
- In the locked room to the left of the entrance to Growing Woods. Requires the Key in Fenton’s Lavish Chateau.
エピソード 4:
We’re just here for the Bat Blast spot:
One Production Assistant Location:
- In the far left large room, just above where I wrote “木”
West of the Growing Woods: Frostbite Chasm + Lavish Chateau
Frostbite Chasm Map

You can get everything on your first visit:
One Location:
- Lavish Chateau
Two Character Locations:
- Fenton: Lavish Chateau.
- Sully: Lavish Chateau
One Date Location:
- Breathtaking View (Frostbite Chasm): Two Dates. 料金 $25.
Seven Loot spots:
- Three Gifts: Tick Repellant (Above the entrance to Coldheart Caverns), Fluffy Slippers (Above the Carriage), Belgian Hot Chocolate Set (Above the entrance to Lavish Chateau)
- One Ability Trophy: Ice Immunity (Next to Grim)
- One Quest Item: Spiced Cider (Next to Grim)
- Two Moneybags: Both are on the platform to the left of the Carriage.
Lavish Chateau Map
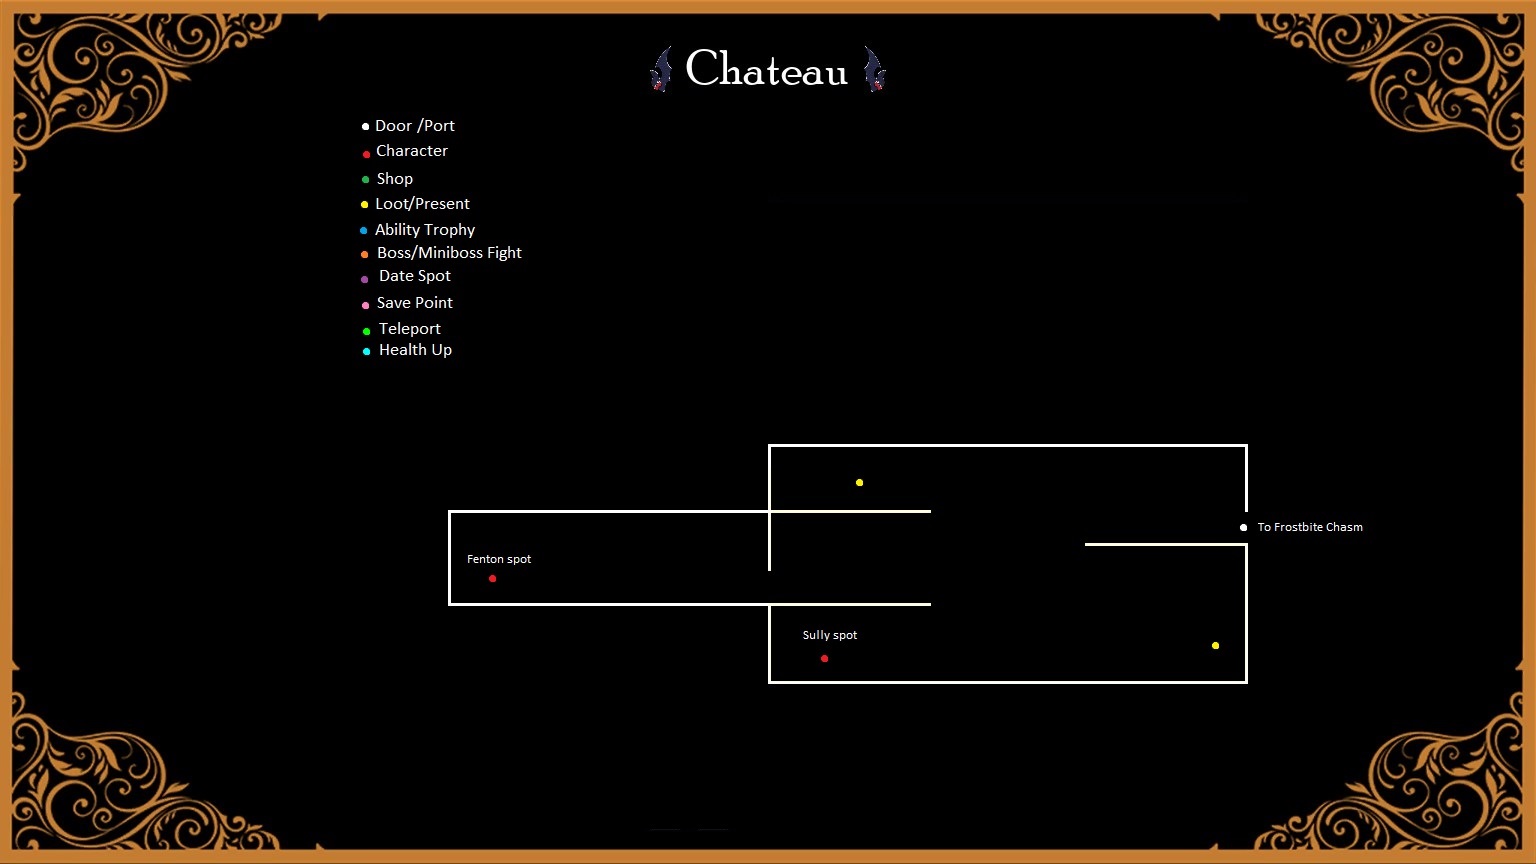
You can get everything on your first visit. Return for Fenton’s Quests:
Two Character Locations:
- Fenton: Far-Left of the map.
- Sully: In the cage in the first room.
Two Loot spots:
- One Gift: Electric Toothbrush (Bottom-right)
- One Key: Coldheart Caverns Key (Upper-left)
East of the Growing Woods: Thundercrack Hollow
Thundercrack Hollow Maps
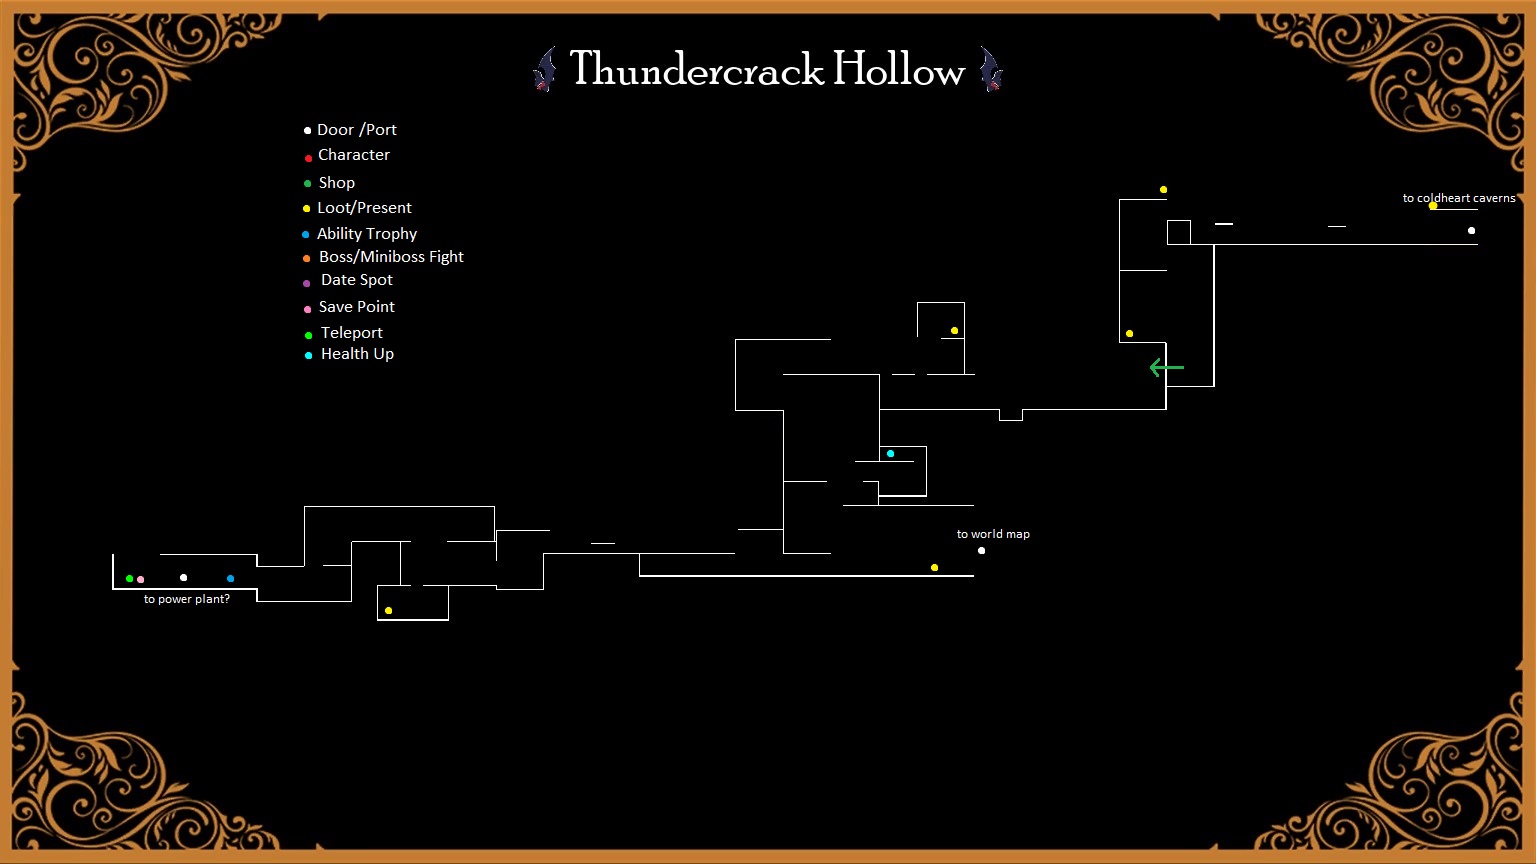
地図 1

地図 2

地図 3
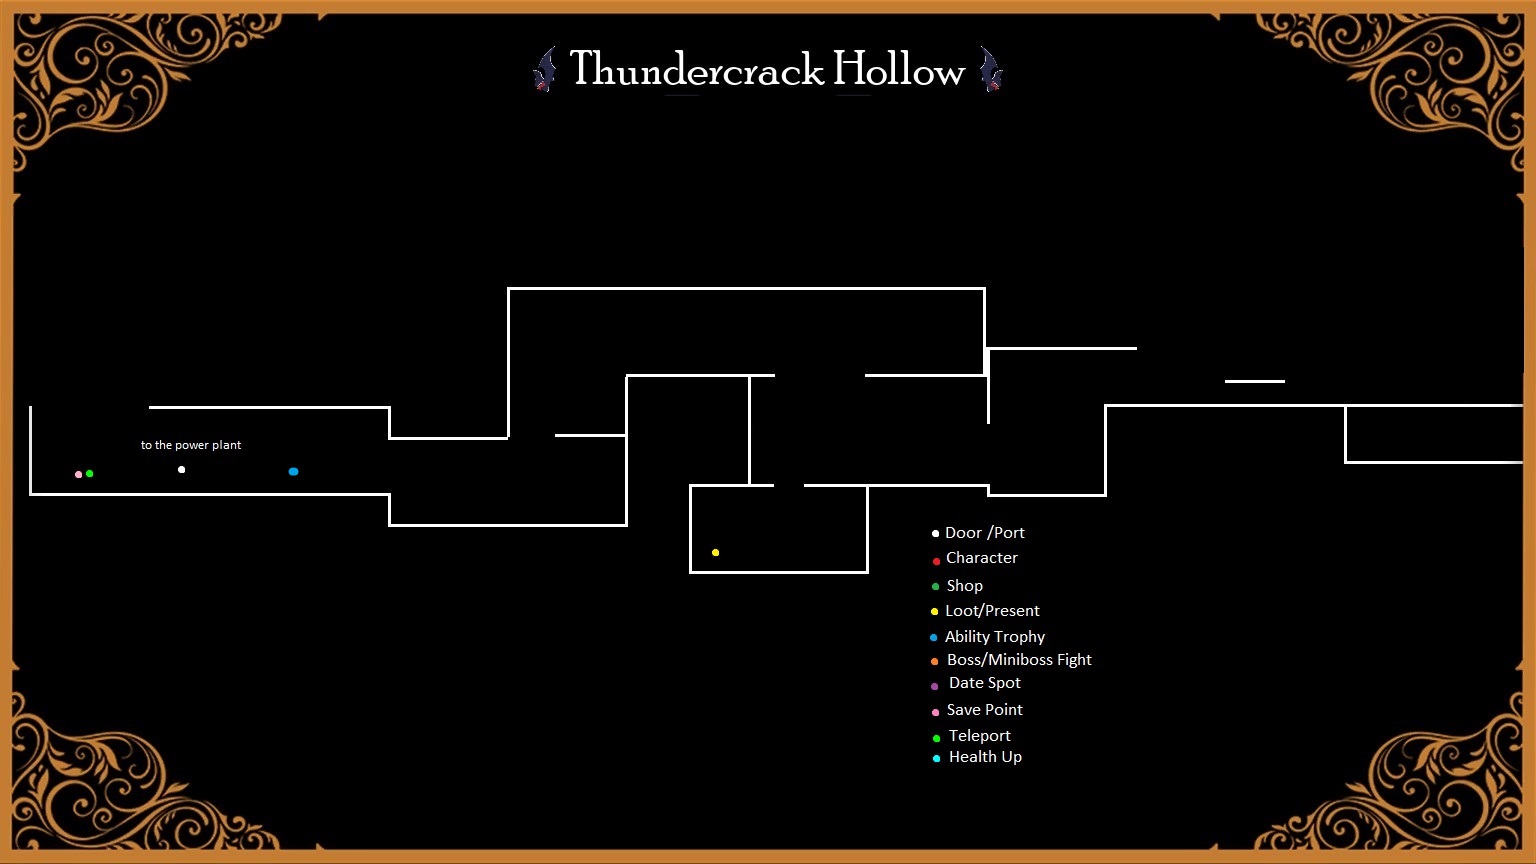
エピソード 3:
This is another area that all I can do is hope its correct XD Any pointers are appreciated and will be properly credited. I broke up the map to make it easier to reference the locations of things. このセクションは不完全です:
Two Locations:
- ドック? Bottom-right of Map 2. Currently non-functional.
- 発電所? Far-left of Map 3. Currently non-functional.
One Character Location?:
- FrankenFriend? 発電所? 時間だけがわかります…
__ Loot spots:
- Two Chests: Upper-middle of Map 1 Bat Blast?, Lower-middle of Map 1,
- Four Gifts: Bottle of Lightning (Upper-right of Map 1 above the entrance), Weight Set (Bottom-left of Map 1, upper-right of Map 2), Cellphone (Bottom-right of Map 2, at the Docks), Designer Sunglasses (Lowest chamber in the middle of Map 3)
- __ Crystals:
- One Ability Trophy: 稲妻 (Left side of Map 3)
- __ Treats:
- __ Quest Items:
- __ Moneybags:
One Production Assistant Location:
- The middle-right of Map 2
Personal Quests + World Map Locations
Personal Quests
このセクションは不完全です
Vess:
Garnishing Love: Get Ice for Vess. Quick and Dirty option awards ???? One Up option costs $86 in STIFFS (Goyle’s Den) and awards ????
Rubbed the Wrong Way: Find Vess’ bottle in Akkadian Drift. +15 +200
Brocifer:
Brocifer’s New Groove: Find a new sound for Brocifer. Little Italy, House of O, バックステージ. Must defeat the Phantom of the Oprah. +15 +200
メデューサ:
Find Medusa’s Body: Self-Explanatory. Grecian Sewers. Avoid Cerberus with some sick skills. +15 +200. Choose any for +15
P. S. エル:
The Sloppy Jalopy: Find the Key to the Sloppy Jalopy for P. S. エル. Little Italy, House of O, バックステージ. Must defeat the Phantom of the Oprah. Backstage Piano.
Ilessa:
Retrieve tools or spend $1000
ソル:
Sol’s Reflection: Retrieve the Blood Mirror for Sol. Growing Woods, Goyle’s Den, Inner Demon. +200
Van Helsings:
Van Helping: Visit Van Helsing after Grim offers concern. Offer to be of aid to unlock the next quest.
Relic Retrieval: Retrieve the Holy Cow from Drac’s old castle (Grounds, 東). +200 +15
ルル:
????
????
Leira:
????
????
ロバート:
????
????
Fenton:
Fetch Fenton:
Strength in Fiction:
Nefret:
Heart of the Matter: Retrieve Nefret’s Heart. De Nile, Treasure Room, locked room to the right. +200 +10
World Map Locations
トランシルヴァニア
おい, we’ve been here before! Map is in a section above.
De Nile
私からしてみれば, the Obelisk stands out as the most convenient fast travel point on the world map. This is because it offers the shortest distance from a Transylvania travel point to a port. You can find the map in the section above, but please note that you can only access it if you still have Nefret.
Little Italy Map:

There’s a couple of personal quest items, and a couple of boss fights too!
Two Locations:
- Meatball Garden
- The House of O
Two Shopping Areas:
- Treat Shop (by the port)
- ギフトショップ (Meatball Garden)
One Date Location:
- Table for Two (Meatball Garden): Two Dates available. 料金 $25.
One Loot spot:
- Health Bottles: Next to the port. These respawn.
Two Boss Battle spots:
- The Phantom of the Oprah (House of O)
- The Flying Spaghetti Monster (Meatball Garden, after the Finale)
House of O Map
Home of the most painful boss, 私の意見では:
Four Loot spots:
- One Ability Trophy: Unholy Hand Grenade III OR Bats III (Backstage after beating the Phantom of the Oprah, just past the piano)
- Two Quest Items: Brocifer’s Inspiration (Backstage after beating the Phantom of the Oprah. On the piano), Key to the Sloppy Jalopy (Backstage after beating the Phantom of the Oprah, far-right of the map)
- One Moneybag: Drops after defeating the Phantom of the Oprah.
One Boss Battle spot:
- The Phantom of the Oprah
Meatball Garden Map

A new date spot, some gifts, and a boss fight (後で):
One Shopping Area:
- ギフトショップ: Just inside
One Date Location:
- Table for Two (Meatball Garden): Two Dates available. 料金 $25.
Two Loot spots:
- Two Gifts: Champagne Flutes ($49), Dinner and Movie Gift Certificate ($49)
One Boss Battle spot:
- The Flying Spaghetti Monster
Akkadian Drift Map
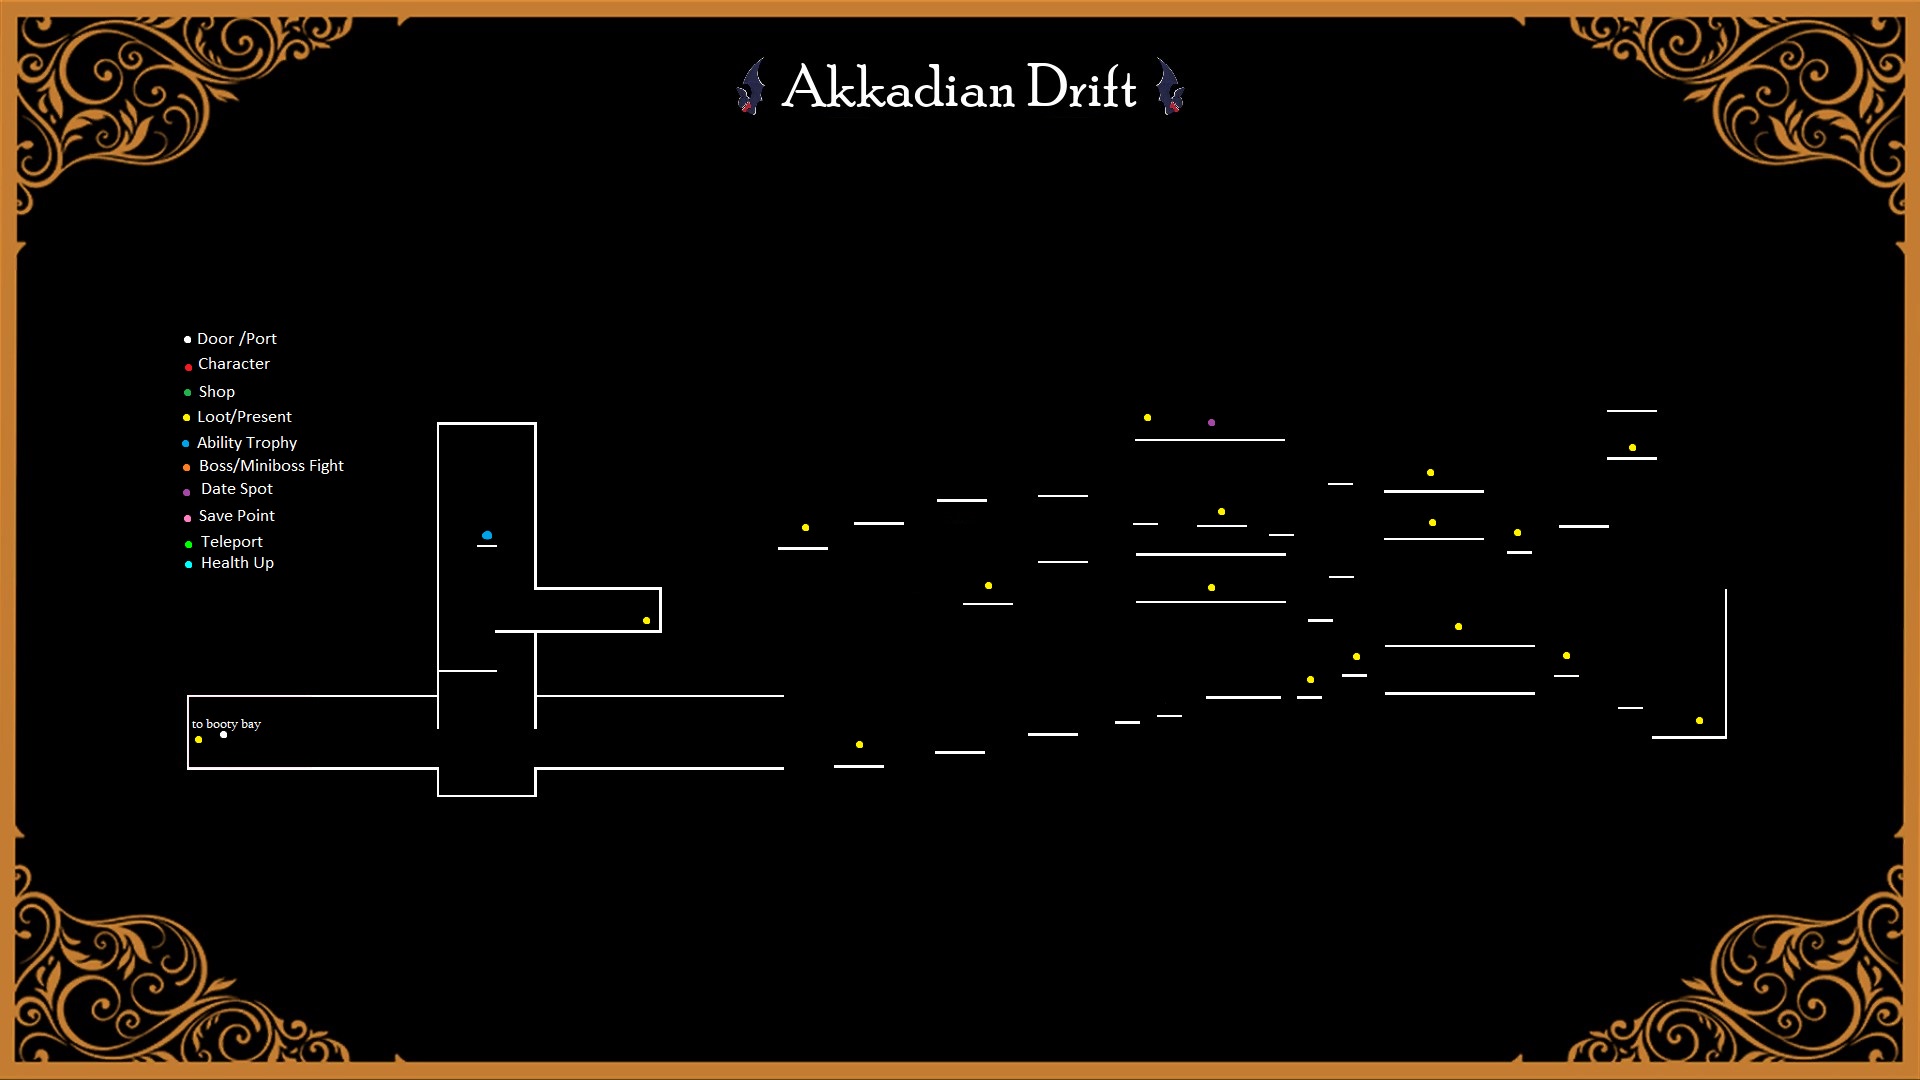
If you fall it’s not game over. You can only visit if you still have Vess. There’s a weird crystal ball on one of the platforms and I’m not sure what it really does:
One Date Location:
- Warm and Bubbly (Akkadian Drift): Three Dates available. 料金 $30.
18 Loot spots:
- Seven Gifts: Hot Air Balloon (Up the cave column, all the way to the right), Handheld Massager (ずっと右へ, in tent), Diamond Encrusted Handcuffs (start on the platform Vess’ bottle was on, platform on the far left), シルクパジャマ (start on the platform Vess’ bottle was on, two platforms to the left), Charcuterie Board (On the date platform), Handmade Postcards (Five from the upper-right), Silk Bandages (upper-right platform)
- Seven Crystals: Left of the starting point, on the first platform, on the seventh platform, on the eighth platform, on the tenth platform, start on the platform Vess’ bottle was on (one up), three to the right from the Diamond Encrusted Handcuffs
- One Ability Trophy: Damage Increase (Up the cave column, Bat Blast up),
- Two Quest Items: Vess’ ボトル (eight platforms to the right, one up, one to the left), 水晶玉? it’s two to the right and up from the platform Vess’ bottle was on
- One Moneybag: on top of the ninth platform
Gift Guide (部 1)
I got these values while owning Gift Giver and Love Bonus. Values found through trial and error. If anyone is able to provide exact values, please contact me and I will properly link + credit you. Gifts shown are the ones that more than just a slight increase to your relationship. Best ones with unique dialogue are marked with , Hated ones are marked with so you can avoid them. このセクションは不完全です
Vess:
Margarita Blender, Comfy Sweatshirt
Aged Barrel of Spiced Rum, Gold Chain, Book of 500 Dad Jokes, Name Written in the Sky, Crystal Ball, 宝箱, Blood Cooler, Designer Sunglasses, Trip to the Moon, Daywalker Sunscreen, Matching Tattoos, Hot Air Balloon, Silk Bandages, Champagne Flutes
Chocolates, Belgian Hot Chocolate Set, Cherry’s Berries, Chocolate Fountain, Diamond Encrusted Handcuffs, Charcuterie Board
Suggestions for Additions:
Bubble Bath Gift Set, Small Zen Garden, Massage Stones, Spa Machine, Lavender Bouquet, ハンモック, Quilt, ダイヤモンドリング, Incense Set, Lava Lamp, Heart Locket, Heart of the Ocean Necklace, Giant Teddy Bear, Velvet Bathrobe, Silk Eye Mask, Succulent Plant, Yoga Mat, シルクパジャマ, Handheld Massager
Brocifer:
Temptation Cologne, Swag Bag, A Song Written For You, Matching Tattoos, Weight Set,
Marble Sculpture of Character, Margarita Blender, Aged Barrel of Spiced Rum, Leg Lamp, Gold Chain, Book of 500 Dad Jokes, Name Written in Sky, TNT!, Crystal Ball, 宝箱, BFF Bracelet, Massage Stones, Samurai Swords, Sports Rackets, Canister of Balls, Blood Cooler, Fluffy Slippers, Live Orchestra, 携帯電話, Designer Sunglasses, ダイヤモンドリング, Trip to the Moon, 宝の地図, Heart Locket, 真珠, Heart of the Ocean Necklace, Daywalker Sunscreen, Hot Air Balloon, Diamond Encrusted Handcuffs, シルクパジャマ
Makeup
Suggestions for Additions:
Sports Tickets, Lava Lamp, Pouka Shell Necklace, Hemp Necklace, Concert Tickets
メデューサ:
TNT!,
P. S. エル:
Book of 500 Dad Jokes, Heart Locket, Diamond Encrusted Handcuffs
Aged Barrel of Spiced Rum, Name Written in the Sky, Crystal Ball, Self Portrait, 宝箱, Sports Tickets, BFF Bracelet, Massage Stones, Samurai Swords, Spa Machine, Canister of Balls, Laser Engraved Photo, ハンモック, Blood Cooler, Heated Blanket, Tick Repellant, Guy Firey Cookbook, Fluffy Slippers, Disco Ball, Live Orchestra, 携帯電話, ダイヤモンドリング, Trip to the Moon, コンパス, 宝の地図, Heart of the Ocean Necklace, Water Heater, Daywalker Sunscreen, Hot Air Balloon, Silk Bandages
Darjeeling Tea, Earrings
Suggestions for Additions:
Board Game of Death (Ouija Board?), Crystal Ball, Tick Repellant (As a Favorite for her), Essential Oils, Bottle of Lightning, Incense Set, Handheld Massager
Ilessa:
Lock Pick Set
Marble Sculpture of Character, Aged Barrel of Spiced Rum, Leg Lamp, Book of 500 Dad Jokes, Name Written in the Sky, Crystal Ball, Temptation Cologne, Self Portrait, 宝箱
Teapot, Darjeeling Tea
ソル:
何もない
Marble Sculpture of Character, Aged Barrel of Spiced Rum, Leg Lamp, Teapot Set, Gold Chain, Book of 500 Dad Jokes, Name Written in the Sky, TNT!, Fondue Set, Crystal Ball, Temptation Cologne, 宝箱
Chocolates,
Gift Guide (部 2)
このセクションは不完全です
Van Helsings:
Blood of Thine Enemy, Field Guide to Monster Hunting
Marble Sculpture of Character, Margarita Blender, Aged Barrel of Spiced Rum, Leg Lamp, Gold Chain, Book of 500 Dad Jokes, Name Written in the Sky, TNT!, Fondue Set, Crystal Ball, Temptation Cologne, Self Portrait, Sports Tickets, BFF Bracelet, Samurai Swords, ハンモック, Blood Cooler, Tick Repellant, A Song Written for You, Designer Sunglasses, ダイヤモンドリング, Trip to the Moon, パール, Heart of the Ocean Necklace, Daywalker Sunscreen, Matching Tattoos
Bubble Bath Set, Make Up, Decorative Soaps, Velvet Bathrobe
Suggestions for Additions:
Small Zen Garden, Electric Toothbrush, Bottle of Lightning, Incense Set, Horsetail Brush
ルル:
Name Written in the Sky, Name On a Constellation, Trip to the Moon, Heart of the Ocean Necklace
Chocolates, Marble Sculpture of Character, Margarita Blender, Aged Barrel of Spiced Rum, Leg Lamp, Blood of Thine Enemy, Teapot Set, Gold Chain, Book of 500 Dad Jokes, TNT!, Crystal Ball, 宝箱, Sports Tickets, BFF Bracelet, Canister of Balls, Tick Repellant, A Song Written for You, Fluffy Slippers, Designer Sunglasses, ダイヤモンドリング, 香水, コンパス, 真珠, Water Heater, Matching Tattoos
何もない
Suggestions for Additions:
Board Game of Death (Ouija Board?), Garden Tools, Leatherbound Tome, Bottle of Lightning, Love Message in a Bottle, ピクニックバスケット
Leira:
Bubble Bath Gift Set, Love Message in a Bottle, Water Heater
Margarita Blender, Aged Barrel of Spiced Rum, Leg Lamp, Teapot Set, Gold Chain, Book of 500 Dad Jokes, Name Written in the Sky, Fondue Set, Crystal Ball, Self Portrait, 宝箱, Samurai Swords, Blood Cooler, Tick Repellant, A Song Written For You, Live Orchestra, 携帯電話, Designer Sunglasses, ダイヤモンドリング, 香水, Trip to the Moon, Pouka Shell Necklace, コンパス, Heart Locket, 真珠, Heart of the Ocean Necklace, Daywalker Sunscreen, Horsetail Brush, ピクニックバスケット
Garden Tools, Fluffy Slippers
Suggestions for Additions:
Heart of the Ocean Necklace (As a Favorite for her), Luxurious Bath Salts (As a Favorite for her)
ロバート:
Aged Barrel of Spiced Rum, 宝箱, 宝の地図, Bird Treats
Marble Sculpture of Character, Margarita Blender, Leg Lamp, Teapot Set, Gold Chain, Book of 500 Dad Jokes, Name Written in the Sky, Fondue Set, Crystal Ball, Temptation Cologne, Self Portrait, Sports Tickets, Canister of Balls, Boot Polish, Blood Cooler, Tick Repellant, Guy Firey Cookbook, A Song Written For You, Fluffy Slippers, Matching Tattoos, Live Orchestra, Bottle of Lightning, Designer Sunglasses, ダイヤモンドリング, Trip to the Moon, コンパス, Hemp Necklace, Heart Locket, 真珠, Heart of the Ocean Necklace, Water Heater, Daywalker Sunscreen, Horsetail Brush, Silver Chain, Hot Air Balloon, Diamond Encrusted Handcuffs, Charcuterie Board, Silk Bandages, Champagne Flutes
Garden Tools, Makeup, Decorative Soaps, Yoga Mat
Suggestions for Additions:
Field Guide to Monster Hunting, Samurai Swords, パイプ, Flagon, Pouka Shell Necklace, Homemade Ale, Matching Tattoos
Fenton:
Fondue Set, Leatherbound Tome
Marble Sculpture of Character, Margarita Blender, Leg Lamp, Garden Tools, Teapot Set, Gold Chain, Book of 500 Dad Jokes, Name Written in the Sky, TNT!, Crystal Ball, Temptation Cologne, Self Portrait, 宝箱, Sports Tickets, Boot Polish, ハンモック, Blood Cooler, Tick Repellant, A Song Written For You, Matching Tattoos, Live Orchestra, Designer Sunglasses, ダイヤモンドリング, Trip to the Moon, Pouka Shell Necklace, コンパス, Heart Locket, 真珠, Heart of the Ocean Necklace, Lil Black Book, Silk Eye Mask, Water Heater, Daywalker Sunscreen, Horsetail Brush, Bird Treats, Hot Air Balloon, Diamond Encrusted Handcuffs
Aged Barrel of Spiced Rum, Make-Up, Flagon, ワイン, Homemade Ale, Champagne Flutes
Suggestions for Additions:
Margarita Blender (As a Hated item for him), Darjeeling Tea, Electric Toothbrush, パイプ, Exotic Coffee, Fluffy Slippers, Charcuterie Board (As a favorite for him)
Nefret:
Crystal Ball, Silk Bandages
Marble Sculpture of Character, Margarita Blender, Aged Barrel of Spiced Rum, Leg Lamp, Blood of Thine Enemy, Tomahawk, Garden Tools, Teapot Set, Gold Chain, Book of 500 Dad Jokes, Name Written in the Sky, Temptation Cologne, 宝箱, Makeup, Swag Bag, Sports Tickets, Sports Rackets, BFF Bracelet, Massage Stones, Spa Machine, Canister of Balls, Laser Engraved Photo, Boot Polish, ハンモック, Blood Cooler, Tick Repellant, Guy Firey Cookbook, A Song Written For You, Weight Set, 携帯電話, Designer Sunglasses, ダイヤモンドリング, Lava Lamp, 香水, Trip to the Moon, Pouka Shell Necklace, コンパス, Hemp Necklace, 宝の地図, Love Message in a Bottle, Heart Locket, 真珠, Heart of the Ocean Necklace, Action Figure, Lil Black Book, Silk Eye Mask, Water Heater, Daywalker Sunscreen, Horsetail Brush, Horse Buggy Ride, Yoga Mat, ピクニックバスケット, Disco Ball, Fluffy Slippers, Luxurious Bath Salts, Live Orchestra, Matching Tattoos, Hot Air Balloon, Champagne Flutes
Diamond Encrusted Handcuffs
Suggestions for Additions:
Bottle of Lightning,
Gift Guide (部 3)
このセクションは不完全です
Complete list of gifts (In the order I found them):
- Chocolates
- Marble Sculpture of Character
- Garden Tools
- Blood of Thine Enemy
- Tomahawk
- キャンドル
- Leg Lamp
- Aged Barrel of Spiced Rum
- Margarita Blender
- Teapot Set
- Darjeeling Tea
- Earrings
- Gold Chain
- Book of 500 Dad Jokes
- Fondue Set
- Lockpick Set
- Bubble Bath Gift Set
- Field Guide to Monster Hunting
- Name Written in the Sky
- TNT!
- Crystal Ball
- Comfy Sweatshirt
- Temptation Cologne
- Self Portrait
- 宝箱
- Small Zen Garden
- Windchimes
- Massage Stones
- Samurai Swords
- Makeup
- Swag Bag
- Sports Tickets
- Horse Buggy Ride
- Spa Machine
- Exotic Coffee
- ピクニックバスケット
- Silver Chain
- Sports Rackets
- Canister of Balls
- Laser Engraved Photo
- Disco Ball
- Lavender Bouquet
- Boot Polish
- ハンモック
- Blood Cooler
- Heated Blanket
- Tick Repellant
- Fluffy Slippers
- Belgian Hot Chocolate Set (1 の 2)
- Electric Toothbrush
- パイプ
- Guy Firey Cookbook
- A Song Written For You
- Leatherbound Tome
- Cherry’s Berries
- 香水
- Flagon
- Trip to the Moon
- Decorative Soaps
- Pouka Shell Necklace
- コンパス
- Hemp Necklace
- 宝の地図
- Action Figure
- Quilt
- Love Message in a Bottle
- パール (1 の 2)
- Heart Locket
- Luxurious Bath Salts
- Live Orchestra
- Heart of the Ocean Necklace
- パール (2 の 2)
- ワイン (1 の 2)
- ワイン (2 の 2)
- Homemade Ale
- Concert Ticket
- Giant Teddy Bear
- Lil Black Book
- Velvet Bath Robe
- Silk Eye Mask
- Chocolate Fountain
- Friendship Cupcakes
- Belgian Hot Chocolate Set (2 の 2)
- Succulent Plant
- Water Heater
- Daywalker Sunscreen
- Horsetail Brush
- Bird Treats
- Bottle of Lightning
- Weight Set
- 携帯電話
- Designer Sunglasses
- Name on a Constellation
- ダイヤモンドリング
- Incense Set
- Lava Lamp
- Essential Oils
- Board Game of Death
- BFF Bracelet
- Matching Tattoos
- Yoga Mat
- Hot Air Balloon
- Handheld Massager
- Diamond Encrusted Handcuffs
- シルクパジャマ
- Charcuterie Board
- Handmade Postcards
- Silk Bandages
- Dinner and Movie Certificate
- Champagne Flutes
Not Great Gifts (Gifts that only two or less people like):
- Chocolates
- キャンドル
- Board Game of Death
- Darjeeling Tea
- Earrings
- Small Zen Garden
- Windchimes
- Lavender Bouquet
- Electric Toothbrush
- パイプ
- Essential Oils
- Quilt
- Bottle of Lightning
- Incense Set
- Lava Lamp
- Cherry’s Berries
- Flagon
- Decorative Soaps
- Action Figure
- ワイン
- Homemade Ale
- Concert Tickets
- Giant Teddy Bear
- Velvet Bathrobe
- Chocolate Fountain
- Friendship Cupcakes
- Belgian Hot Chocolate Set
- Succulent Plant
- Horse Buggy Ride
- Yoga Mat
- Exotic Coffee
Production Assistant Locations
Use my maps if you need to:
- Drac’s New Castle (主要), Ability Trophy Shop: Buy all Damage Up trophies to unlock.
- 城, ギャラリー: Requires Double Jump. Located upper-right of map.
- 城, ダンジョン: Requires Ilessa. Return her tools and the PA will be top level, center of platform.
- 城, セット (西): In the large room in the upper-left of map, top of room.
- 城, セット (Accounting): After defeating Richard, go left until you reach a locked room. 中に入ってください.
- 城, セット (Hokkaido, Sol’s Castle): Requires Double Jump. Second building. In the chamber just below Sol.
- Growing Woods, Smashmounds: Requires Double Jump. Inside Barn, on loft to the left.
- Growing Woods, Goyle’s Den: Requires Dungeon Key (STIFFS $100). Far-right of chamber.
- Growing Woods (東): Far-right of map. Bat Blast up and go into cave, all the way to the right.
- Growing Woods, The All-Seeing Swamp: Near entrance to the Bay. Bat Blast up to the platform.
- The Real Booty Bay: Requires Booty Bay Cell Key (Salty Sea Weasel inside cell). Locked inside cell left of the Carriage.
- The Real Booty Bay, Salty Sea Weasel: In the Basement. You can only visit this area once.
- The Grotto of Ennui: Bottom-right of map, behind bars and in a clam.
- Coldheart Caverns: Requires Key from the Chateau. Locked in a room directly to the left of the entrance to the Growing Woods.
- Coldheart Caverns: Left large chamber, upper boughs of the tree. Bat Blast up to the platform.
- Thundercrack Hollow: 地図 2. In the chamber above the port.
- The Growing Woods (西), De Nile: In the vertical chamber to the left of the treasure room, Bat Blast on the top platform.
Ability Awards Locations
Use my maps if you need to. このセクションは不完全です
DRAC’S CASTLE
- Damage Increase x4 (Ability Trophy Shop, $200 それぞれ)
- Damage Increase x2 (Benefactor Wing)
- Damage Increase (Benefactor Wing, Double Jump required)
- Blood Tornado (禅の庭, must speak with Sol)
- Rat Darts III (禅の庭, requires Double Jump. Jump on beams above until you enter a hidden window and go all the way to the right)
- Double Jump (Love at First Bite Set after Golden Hour)
GALLERY
- Headouken (Lower-middle, must talk to Medusa first)
THE SET
- Wolf Dash (Main stage, End of Episode 1)
- Double Jump (Main stage, End of Episode 2)
- Damage Increase (TV room, Defeat Richard, エピソード 1)
- Damage Increase (TV room, Defeat Pumpkink, エピソード 2)
- Damage Increase (TV room, Defeat Glocktopus Episode 3)
- Bat II OR Holy Hand Grenade II (unlocked in the room where you argued with Grim about the budget. エピソード 2)
- Impale II OR Lightning II (unlocked in the room where you argued with Grim about the budget. エピソード 3)
- Mist Form (get it from the PA that told you about the ones in red after speaking with Grim)
- Damage Increase (Once you have Mist Form, the upper-left room with flames)
- Durable Drac (unlocked after recruiting P. S. エル, Ilessa, and Sol; it’s located between the Blood Bath and the Trick Shop)
- Double Jump (given just before the Black Rose Ceremony)
- インペイル (in the room two to the left from the date spot)
SOL’S CASTLE
- Damage Increase (in the upper-right room of the first building. Requires Double Jump)
GROWING WOODS
- Weapon Master I (on a platform above the entrance to Smashmounds)
GOYLE’S DEN
- Masochist I (up and to the right from STIFFS entrance),
- Damage Increase (Hexed, second room, 料金 $200)
スワンプ
- Rat Darts II (in the Shacked Up shop, defeat Mud Mother)
STACKS
- Weapon Master II (Defeat the Thesaurus)
- Unholy Hand Grenade Stacks (In the room above the entrance)
BOOTY
- Damage Increase (to the right of the date spot, two levels up. 料金 $200)
- Damage Increase (after getting Hemp Necklace Gift, Wolf Dash + Double jump to the left)
Don’t Forget!
わーい! You’re almost finished!
This section of the guide focuses on aspects that can be easily overlooked, especially as they occur towards the end of the game. These spots may not initially seem important or may necessitate using Bat Jump or Wolf Dash abilities. Some of them are things I personally missed during my initial playthrough, and I trust you’ll find this information valuable. Please be aware that this section is not yet finished.
- Booty Bay: The cutscene where the parrot says the password to the Salty Sea Weasel only plays if you try to Set Sail on your first trip to Booty Bay.
- You cannot revisit The Neighborhood OR the Dessert Desert, so make sure you collect everything the first go-round.
- Growing Woods: The Obelisk to De Nile is the best fast travel point in the game.
Bat Blast locations (Some have two):
- Thundercrack Hollow
- Castle Ruins
- All-Seeing Swamp
- The Stacks
- Coldheart Caverns
- The Dessert Desert
これが今日私たちがこの目的で共有するすべてです Romancelvania ガイド. このガイドは元々、次の者によって作成および執筆されました。 Fire Flurries. このガイドを更新できなかった場合, これに従って最新のアップデートを見つけることができます リンク.