- タイトル: Nova Drift
- 発売日:
- 開発者:
- 出版社:
Information about Nova Drift is still incomplete. これを使用してゲームの詳細を記入するのにご協力ください。 お問い合わせフォーム.
このガイドでは, I’ll explain how to achieve the Serenity Now milestone, どれの, I must admit, required a considerable amount of time and effort.
Basic Rundown
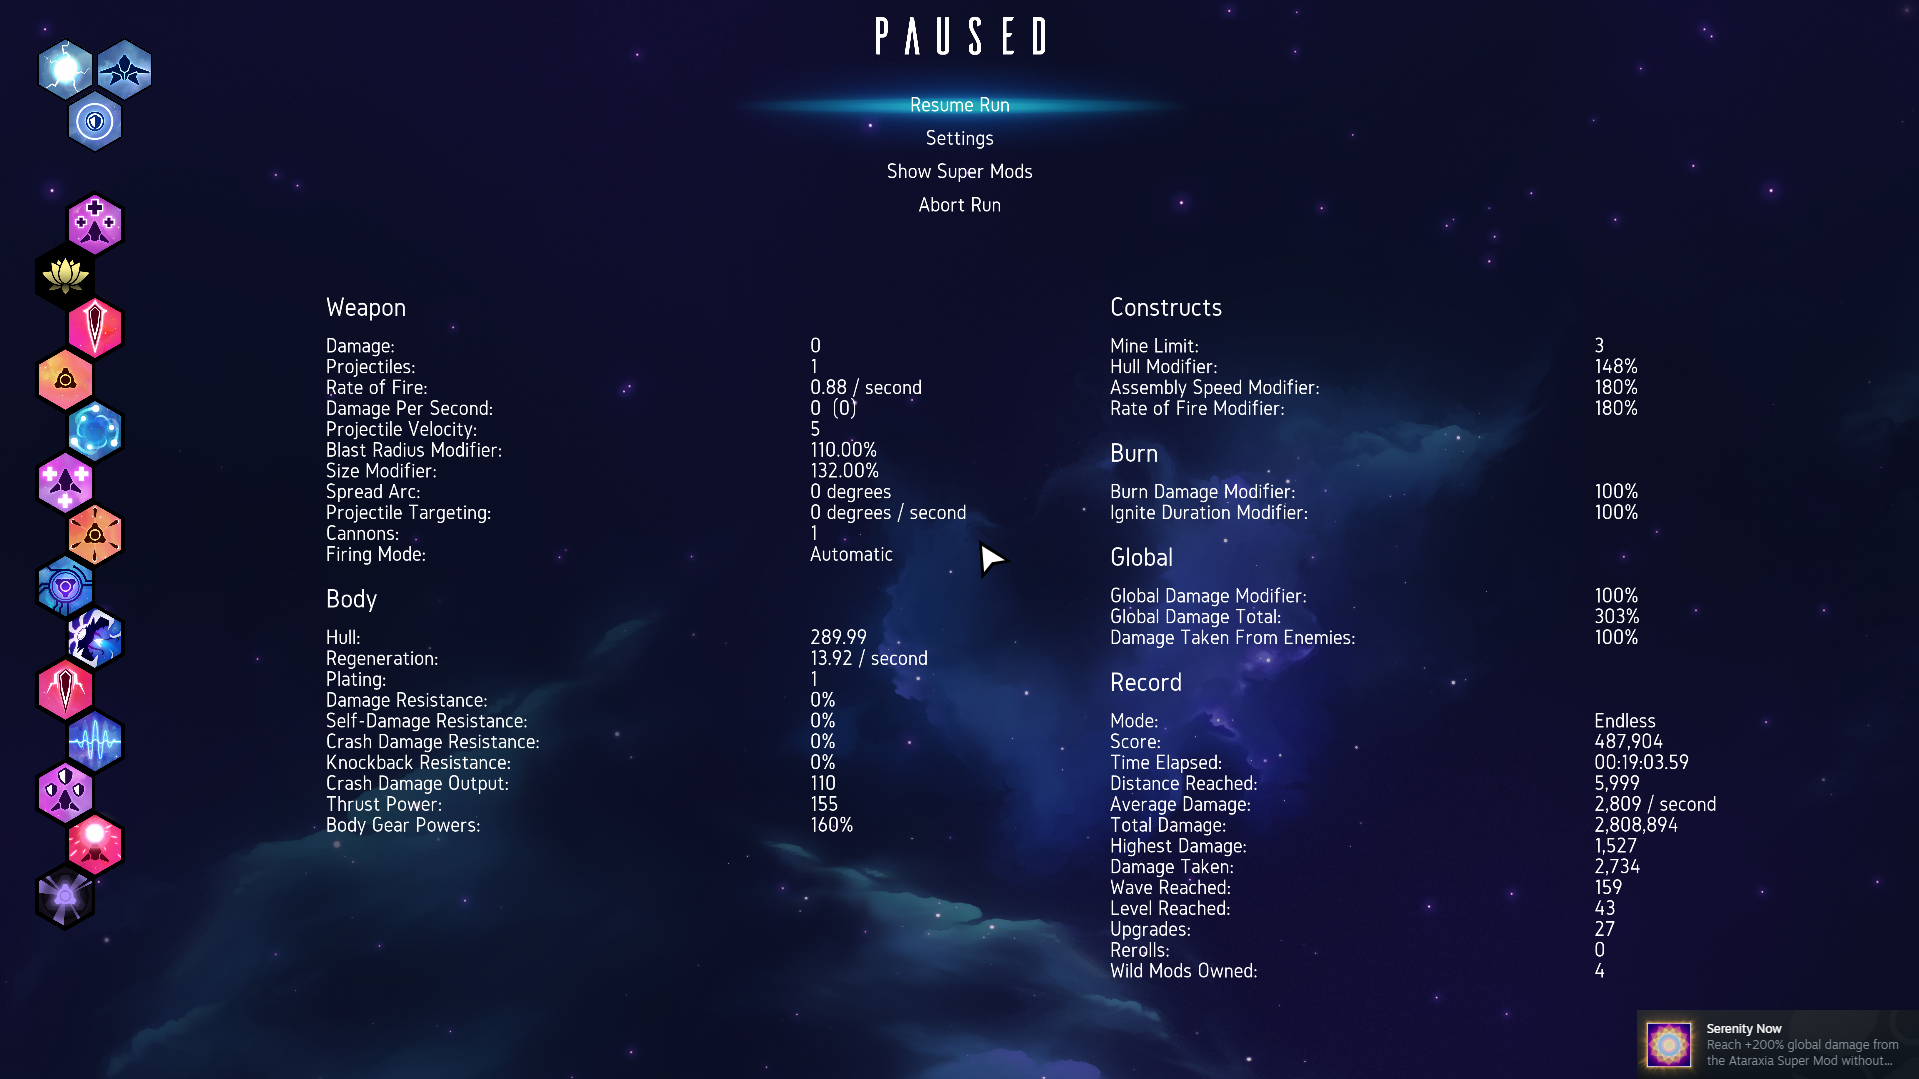
セレニティ・ナウ
到着 +200% global damage from the Ataraxia Super Mod without Draft Mode
それで, the Serenity Now achievement is quite straightforward in theory: reach a 200% global damage level with Ataraxia, all without resorting to draft mode. To be precise, you’ll need a minimum of 27 unallocated upgrade points to reach this milestone with Ataraxia. 理論的には, this can be accomplished with any character build if you manage to survive long enough. しかし, considering the increasing difficulty as time passes and the fact that leveling up requires exponentially more XP after a certain point, it becomes essential to devise a build that demands minimal investment but can endure for an extended period.
Build Rundown
I’d recommend using a Starchitect build for this achievement:
The Starchitect build centers around utilizing loaded mines in combination with a charged weapon to wreak havoc across the entire screen. When it comes to selecting mods, you have some flexibility, but bear in mind that the more mods you choose, the longer you’ll need to survive in the game, so make your choices wisely.
For your gear, you can opt for either the Thermal Lance or Vortex as your weapon. Both are viable, but Vortex tends to perform better with minimal investment. You might consider skipping a shield in favor of Rapid Reconstruction, although this decision ultimately depends on your preferences. Your body should be Architect.
Once you’ve settled on your gear, I’d suggest holding onto your upgrade points until you accumulate 4 または 5 彼らのうちの. Acquiring Ataraxia as early as possible is crucial. また, if you refrain from opening the menu before you have 4 ポイント, you’ll have a chance for Ataraxia to appear immediately. The bonuses provided by Ataraxia are significant, and having it active ensures continuous improvement without the need to spend upgrade points. It’s somewhat essential for achieving the achievement.
After obtaining Ataraxia, your next focus should be on acquiring Mines and Loaded Mines. Ensure that you have set your mines to MANUAL deployment. This allows you to control when they explode, ensuring they reach full strength before detonation.
These are the essential mods, but I’d suggest getting a few more for added effectiveness:
- 再生 と Rapid Reconstruction significantly enhance your survivability, and given Ataraxia’s inherent health boost, these might be the only two defensive mods you need.
- Mine Specialist, a Wild Mod, is incredibly effective. Just one mod increases all aspects of your mine by 15%, which is especially noticeable when using Thermal Lance to generate additional beams.
- Magnitude, Payload, Charged Shot, と Charged Mines offer substantial damage boosts and are worth the investment. Charged Mines, 特に, is highly useful, greatly increasing the power and size of your mines’ 効果. Note that Charged Shot alone isn’t as impactful.
- Bravado is a useful Wild Mod, boosting your stats by 10% and Architech’s unique powers by 15%. This is especially valuable for increasing Mine damage and build speed, and it complements the bonuses from Ataraxia at 5 と 10 ポイントをアップグレードします. Be aware that it also makes future enemies stronger.
- Vital Bond can extend the lifespan and charge duration of your mines, increasing their effectiveness, especially when you’ve placed a mine strategically and want it to last longer. しかし, it requires a completed construct upgrade tree, so you’ll need to pick up 報復 それにアクセスするために.
- Grandeur grants 2 additional levels, which can be a good idea. Keep in mind that the thrust and rotation speed penalties can make it challenging to dodge fast attacks that appear later in the game.
- Quantum Decoherence provides 5 additional levels at the cost of no longer being able to reroll. Only choose this if you have all the necessary mods and most of the others you want, or if you’re confident in your RNG. If you already have all the mods you desire, consider using any rerolls you acquire to try and obtain this, as it provides free upgrade points at that stage.
その後, there are some mods that can offer benefits but might not be worth the investment:
- Candescence と 精製 increase burn damage, which is the primary source of damage for both of these weapons. If you decide to go for Purification, 選択する パージ as your route to it instead of Corrosion, as Corrosion penalizes weapon damage.
- Orbs of Discord are decent but not game-changing; they don’t have any downsides but might not be the most efficient use of upgrade points.
- 爆発半径 and the other mods in its tree can provide some benefits, particularly for Thermal Lance size and damage, but they might not be the best use of upgrade points.
- Apex Machinery is an option if you didn’t choose Rapid Reconstruction and significantly boosts the power of your mines, especially Thermal Lance, as it increases the number of lances generated. しかし, それが必要です Shielded Constructs と Elegant Construction, which is a substantial investment and removes your shield entirely. There could be some synergy with Bastion, but that would require even more investment to be effective. Only opt for this if you truly want the extra lance.
- Movement mods in the 推力 と Stabilization trees can aid in dodging, but remember that at 20 upgrade points stored, you gain infinite hyperboost, and each point saved grants +1% 推力.
- Defensive mods can enhance survivability, but avoid overinvesting. Keep in mind that Ataraxia provides +1% Hull and Shields per saved upgrade point, とで 20 ポイント, you gain Infinite Hyperboost.
ゲームプレイ的に, remember that you don’t need all of these mods; you just need enough to carry you to 27 stockpiled upgrade points.
The general gameplay strategy for the Starchitect is to strategically place your mines on the screen and allow their charged effects to obliterate enemies. With the Thermal Lance, this means a spinning star slicing through foes, while with the Vortex, you’ll create short-lived gravity wells that explode into large, devastating areas. If you’ve chosen Vortex, you’ll be launching mines more frequently, while with Thermal Lance, you’ll want to focus on positioning and maximizing the use of a well-placed mine’s uptime. Be cautious about deploying mines too close to enemies, especially without Charged Mines, as they might explode prematurely.
Best of luck to everyone pursuing the Serenity Now achievement, and I hope this guide proves helpful. This is the build I used when I successfully achieved the achievement:
これが今日私たちがこの目的で共有するすべてです Nova Drift ガイド. このガイドは元々、次の者によって作成および執筆されました。 Lord Ocram. このガイドを更新できなかった場合, これに従って最新のアップデートを見つけることができます リンク.