- タイトル: Mordheim: City of the Damned
- 発売日:
- 開発者:
- 出版社:
Information about Mordheim: City of the Damned is still incomplete. これを使用してゲームの詳細を記入するのにご協力ください。 お問い合わせフォーム.
This guide is intended for people who are new to Mordheim, or who played a few years back and want a recap on the essentials. This provides a quick run-down of key game mechanics, unit skills, 戦略, and statistics.
簡単な紹介
Mordheim: City of the Damned is a turn-based tactics game in which you fight an enemy warband of equal size and strength while trying to collect resources. This guide is focused exclusively on the single-player game.
On each mission, your warband’s strength, calculated from the stats, スキル, and gear of all units sent into the city, will be matched point for point. To beat the AI, you need to design better units and use them more effectively in the field. When starting a new warband, あなたのレベル 0 units will tend to get clobbered, being at the mercy of a decidedly unmerciful random number generator. As the game progresses the AI’s poorly-specialized units and clumsy tactics become easier to defeat.
There are a large number of stats and skills, and after being away from the game for a while it’s easy to forget which ones are useful. I’ve gathered general build advice and a few other things into one place for easy reference. I don’t cover any of the specialized builds or tactics here; this is just general advice.
This guide assumes you’re somewhat familiar with the game, 例えば. have played through the tutorials and understand the basic mechanics, or maybe played heavily 5 years back and are returning.
Unit Builds – 財団
New players: play as Mercenaries or Sisters. (I think Mercenaries is more fun.)
As units level up, they receive points that can be allocated to stats in Physical, メンタル, and Martial categories. The key factor in deciding where to allocate them isn’t usually the increases to dependent stats that they provide, which tend to be small, but rather the skills that they allow. 例えば, increasing strength from 11 に 12 increases melee damage by 3%, which isn’t much, but also enables the unit to learn Armor Proficient Mastery. (Exception: Agility increases dodge chance by 5% ポイントごと, making it immediately useful.)
全体, your goal is to keep your units from going “out of action” (OOA), as doing so can lead to death or permanent injuries that render the unit useless (例えば. a dedicated archer who loses an arm). There are three basic defensive strategies:
- Don’t get hit
- ドッジ
- パリー
Every physical attack rolls against melee resistance or ranged resistance. If the defender is parrying or dodging, melee attackers must also roll against the parry or dodge skill, いくつかの例外を除いて. It’s difficult to get melee resistance high enough to consistently avoid attacks, so having parry and dodge as a second line of defense is essential. The basic parry/dodge only works for the first attack each round, but advanced skills allow defending two or three attacks.
Successful physical attacks also check for a critical hit, by rolling against the crit resist. With around 20% crit resist the unit will become impervious to critical hits from basic attacks. これは重要です, because critical hits (melee or ranged) have a chance to stun the target, if they fail a roll against their stun resist.
Many units can choose to specialize in either parry or dodge. Never try to do both. In some cases the choice of parry vs. dodge is strongly indicated by character bonuses and limitations. 例えば, a Sister Superior can’t raise Agility above 10, making it a poor candidate for dodging. Novices can raise Agility to 15 and get a bonus to dodge chance whenever they hit, making dodge specialization ideal.
Getting dodge / parry above 95% is useful, because some skills allow the attacker to bypass some of the dodge / parry chance.
オプション #1: Don’t get hit
A non-dodge, non-parry character makes sense in certain situations, 例えば. the Sisters of Sigmar impressive, which can wear heavy armor but can’t wield a sword. They could parry if they wore a shield, but they give up significant offensive ability if they aren’t using both hands for weapons.
Simply keeping the character off the front lines can be viable for spell casters and ranged units, but isn’t always possible with certain deployments (例えば. ambush).
Active skills:
- Defensive Stance (+10%/+20% melee resist)
パッシブスキル:
- 意識 (+5%/+10% melee resist)
- 回復力 (+10%/+20% crit resist)
オプション #2: ドッジ
Dodging requires a high Agility stat, and works best without armor. Dodge chance maxes out at 95%, allowing the unit to totally avoid incoming melee damage unless the RNG gets feisty, but this only works when actively dodging. If the character is stunned or uses up all their movement, they will be vulnerable, and dodging does not help avoid ranged attacks.
Because most physical stat points will be put into agility rather than toughness, they can be more vulnerable to critical hits and stuns.
Characters that dodge will either want a two-handed weapon, or a single-handed weapon with an empty off-hand (+10% かわす). Two-handers are usually the preferred option, because you don’t need to dodge dead enemies.
Active skills:
- サイドステップ (2/3 dodge attempts)
- Prowl (ambush + かわす)
- Entrenched (overwatch + かわす)
パッシブスキル:
- 避ける (+10%/+20% かわす)
- 意志の力 (+20%/+45% stun resist)
オプション #3: パリー
Parry chance is determined by the Weapon Skill stat, the equipped shield, and certain skills. A successful parry allows a cheap counter-attack. Parrying works very well against most opponents, but anything that fights without a weapon (つまり. has claws or wears armbands) will totally ignore parry. Unlike dodging, parry chance is not affected by armor, so units that dress in heavy armor will generally want to parry.
Active skills:
- Web of Steel (2/3 parry attempts)
パッシブスキル:
- Armor Proficient (+1/+2 speed in heavy armor)
- 回復力 (+10%/+20% crit resist)
- Shield Specialist (+5%/+10% melee resist and parry chance)
- Flash Parry (+10%/+20% parry chance)
Unit Builds – Specifics
Units have different roles. Specialization is important. The general idea is to figure out which skills you want and then allocate stat points to allow those skills.
Melee Fighters
Fighters need to be able to take a few hits. These units need to be fully specialized into parry or dodge.
Single-handed weapons require two OP per swing. Two-handed and dual-wielded weapons increase the OP each time they’re swung, so you need 2+3=5 OP for two swings, and 2+3+4=9 OP for three swings. Henchmen should start two-handed, then switch to single-handed + shield when they get 4 OP. (Dodge units can omit the shield, トレーディング 5% melee resist for 10% dodge chance.) で 5 OP you can either go back to a two-hander, or add in a special attack like Strong Blow.
Look for strategy-point skills that increase hit chance (like Insult), since you can use them without decreasing your offensive output. Striking skills that increase damage require more offense points, but can increase overall damage output when you have an odd number of OP. (Strong Blow can be useful for max-level impressives with two-handed weapons, なぜなら 3 strong blows do more than 4 normal blows, especially when considering the per-swing damage reduction.)
Active skills (pick one or two):
- Insult (-10%/-20% melee resist)
- Kidney Strike (-15%/-30% melee resist)
- Strong Blow (+50% ダメージ, -20%/-50% parry chance)
パッシブスキル (pick one or two):
- 鋼の神経 (+20%/+40% Fear and Terror tests)
- Demoralize (-5%/-10% to All Alone tests)
- 知識: 戦術 (+5%/+15% dodge/parry chance)
Somewhat dubious:
- Mighty Charge – big alpha strike, not totally terrible if you master it and have a two-handed weapon
- Overpower – one strike for the price of two, with bad odds of hitting but potential to stun; useful if you have melee resist reduction skills, high weapon skill, and are fighting heavily-armored enemies that take a long time to knock down
- Vital Strike – increased crit chance, but only useful if combined with other crit enhancers
統計:
- 物理的な: Agility+Strength for dodgers, Toughness+Strength for parry
- メンタル: リーダーシップ (fear/terror checks), then Awareness (initiative, ranged resist)
- Martial: Weapon Skill, then Accuracy
Ranged Fighters
Ranged fighters need melee defense for emergencies, but not otherwise. Reloading weapons consumes strategy points, so they won’t be able to fire multiple times and then dodge/parry. Light armor is therefore recommended for dodgers, and having a sword or spear/shield combo as a secondary weapon is prudent. The Entrenched skill, which provides some defense while overwatching, is intended for dodgy shooters.
Active skills:
- Hand Shot (-10%/-20% ヒットチャンス)
- Crippling Shot (-1/-2 offence points)
- Entrenched (overwatch + かわす)
パッシブスキル:
- クイックリロード (-1/-2 strategy points needed to reload)
- Trick Shooter (bypass 5%/10% ranged resistance)
- ブルズアイ (+10% to hit with Aim skill; -1 SP for AIM)
Somewhat dubious:
- Head Shot – chance to stun target, but reduced to-hit chance makes it chiefly of use when the target is not engaged… useful for slowing enemy advance, but unreliable otherwise
統計:
- 物理的な: Agility+Toughness for dodgers, Toughness+Strength for parry
- メンタル: 意識, then Leadership
- Martial: Ballistic Skill, then Accuracy
Casters
Arcane casters can’t wear armor, even helms, without spoiling their casting. Divine casters can wear armor, but need to wield weapons that reduce the blowback odds. Look for gear enchantments that help, 例えば. Helm of Piety for Sisters.
Arcane casters can generally be trained as ranged units, which is helpful given their poor defenses and the high risk of casting at low levels. The Quick Reload skill is recommended, but save the other passive slots for caster skills.
Active skills:
- 集中 (+5%/+15% arcane casting chance)
パッシブスキル:
- 献身 / Channeling (reduce blowback chance by 5%/15%)
- Piety / Expert Casting (increase range by 5m/10m)
- Improved Prayer / Improved Casting (magic resist -5%/-15%)
統計: max Intelligence, then allocate as appropriate for defensive strategy.
Leaders
Leaders will generally be built as one of the above categories, but they have some leader-only skills available to them. Note that one hero type in each faction can become a leader with the Born Leader skill, allowing for a little flexibility.
Active skills:
- 注文 (nearby unit attacks again)
- 雄叫び (all nearby units get +10%/+20% 近接ダメージ)
統計: リーダーシップ, for the leader-only skills, then allocate as appropriate for type.
Impressives
The job of the impressive is to hit things until they fall down. They should be using two-handed or dual-wield melee weapons, because they can swing them without the +1 OP penalty. Some can parry (with a sword), some can wear armor, so the situation is a little different for each of them.
Mission Tips
The golden rule of Mordheim: keep everyone together, keep everyone alive.
Always try to fight at least 2-on-1. Most units will have to pass an All Alone check, which can cause them to freeze up or flee. Units that can parry or dodge can only do so for a limited number of attacks, so having a large number of attacks per round is essential for hurting strong units. さらに, the AI will often split attacks between adjacent units, spreading the damage and allowing you to make the most of your own limited dodge / parry attempts.
If your scouts don’t find a mission with a favorable deployment type and difficulty, take a pass and try again the next day.
When the warband is new, don’t worry too much about chasing down wyrdstone. You’ll get a decent amount of the uncollected stuff, and the fast-moving enemies that pick up wyrdstone in the first couple of rounds tend to be the ones that you kill / loot first.
Deployment Type
The deployment type can have a huge impact on the number of body bags that get filled. The deployments that divide you into 3 teams generally have a set of 4 near the wagon and two sets of three. Bringing only 4 または 7 units can make this much safer, because either they all start together or they can move directly toward each other.
Scattered deployments are often fatal.
Deployments in rough order of difficulty:
- Rivals in the Ruins – both warbands start very near wagon. 率直な.
- A Walk in the Fog – both warbands start a bit spread out from wagon. 率直な.
- スカベンジャー – one warband near wagon, the other in buildings. Deploy everybody on the first floor, then move them together.
- Pillagers – one warband in buildings, one warband in 3 チーム.
- Hunters and Prey – both warbands in 3 チーム.
- The Cache – one warband near wagon, one in 3 チーム. This can put the teams very close together. (The 3-team side seems to allow for 5 units near the wagon.)
- Vision of Dread – one warband near wagon, one scattered.
- Horrors of Mordheim – one warband in 3 チーム, one scattered.
- The Haunter in the Darkness – both scattered.
残忍な / Deadly, the deployment has a 10% chance of turning into Ambush or Ambushed. This puts one warband in buildings, and the other just outside those buildings, with a first-round combat penalty for the ambushed side.
Mission Difficulty
A mission’s difficulty level determines the bonuses awarded to the AI’s units. Higher difficulties also award additional XP and a higher percentage of unclaimed wyrdstone and items. Brutal and Deadly missions have the possibility of Ambush scenarios, as well as a 20% chance of a visitation from Daemons.
This does not apply to the story missions, which have a fixed difficulty. Low-level warbands should do strictly Normal missions, but Hard is doable at an early stage.
The computer will match your warband’s rating, so experienced warbands hoping to scavenge high-level weapons from fallen opponents may want to artificially inflate their rating by equipping two sets of weapons and bringing extra gear in the item slots. (The gear can be unloaded into the wagon at the start of the mission.)
Strategy vs. AI
At the start of the encounter, the AI units will head toward the wyrdstone, using different paths. As soon as they catch sight of you, they come straight at you with everything they have. Mostly. Sometimes they get hung up, sometimes their ranged units get obsessed with overwatch, sometimes they just decide they can’t get there from here and wander aimlessly.
When they do manage to come at you, they will target the most vulnerable unit. If you have a line of level 10 melee fighters in heavy armor with a level 5 Warlock in the back, the enemy unit will run around and between fighters to get to that Warlock. This is especially dangerous when you bring an impressive, as the gank potential is very high.
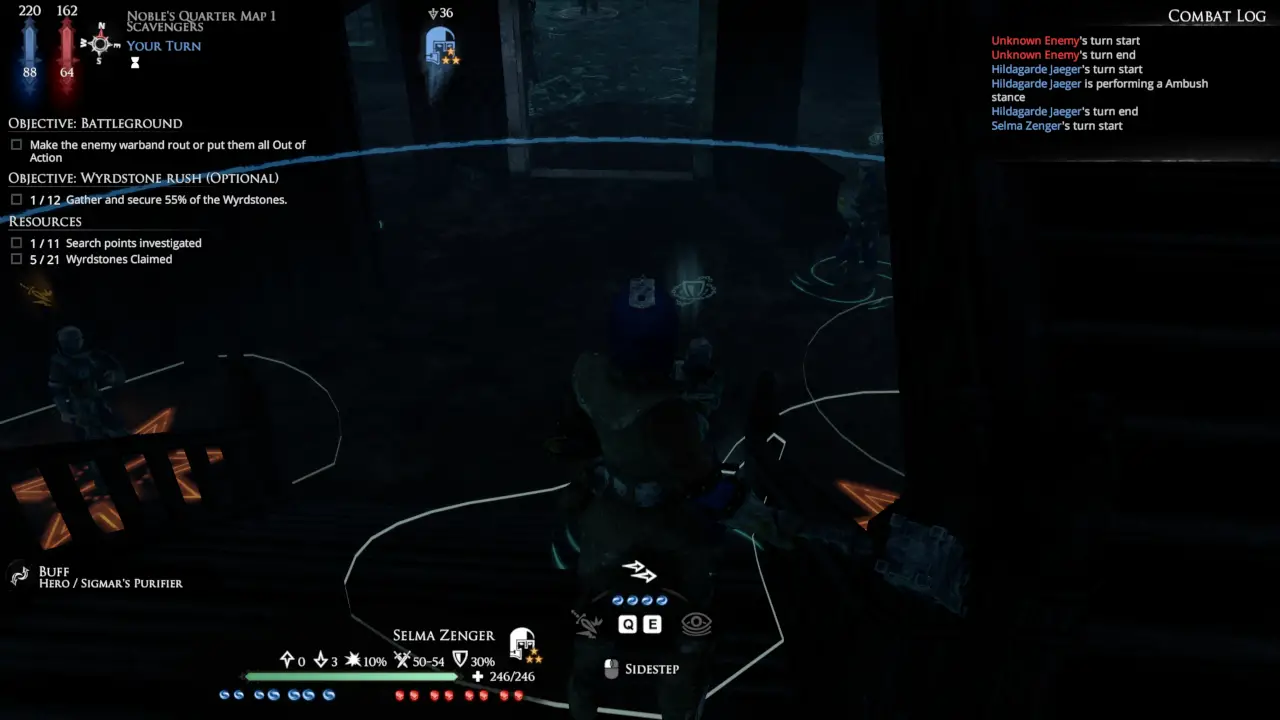
An easy way to exploit this is to position vulnerable units behind a line with gaps that allows the enemy unit an open path but doesn’t allow them a straight line for a charge. A second back-line unit is set to ambush. When the enemy unit tries to run through, it gets ambushed right in the middle of your troops.
The first screenshot shows setting up a nice juicy cloth-wearing purifier on a staircase, standing behind a tank with a pair of ambushers at the bottom of the stairs. You can see the incoming enemy’s feet at the top of the screen.
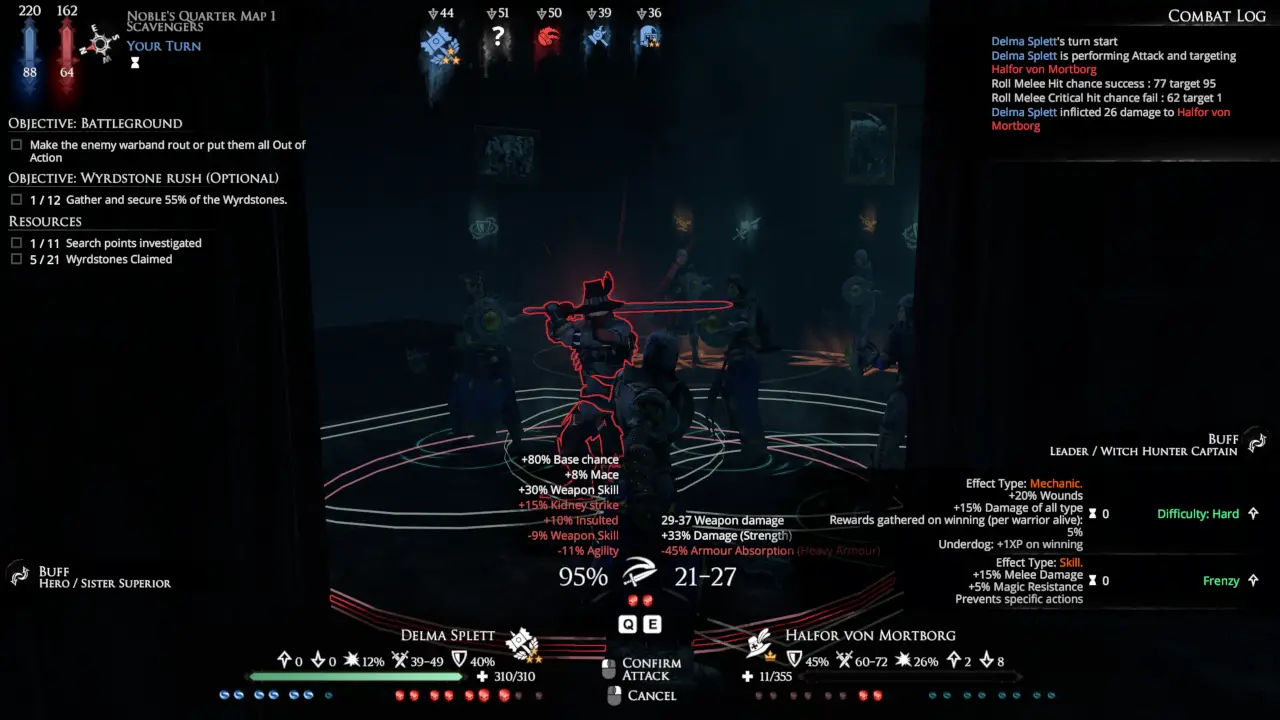
The second image shows the state of the enemy unit later that turn.
Scary Things
One of the easiest ways to lose a young warband is to fight an Undead opponent. The Vampire leader causes Terror, which reduces Offence and Strategy points by 3, effectively neutralizing any low-level henchman it comes in contact with. Ranged units could be helpful, but in practice low-level Marksmen struggle to damage an engaged opponent.
There’s a full guide for dealing with this on the ウィキ. The short version is: only attack with leader/hero units that can still do damage when terrorized. Let the henchmen take care of everything else until the Vampire goes down.
The problem can happen later in the game when fighting daemons and some impressives. In that case you will generally have your own impressive, which is immune to fear/terror, so it’s not so bad, and your units will have higher Leadership and total OP/SP by that point. Investing skill points into Nerves of Steel can help your heavy tanks pass the fear/terror check.
Impressive or Not?
Impressives can chew up low-level and lightly-armored units very quickly. They’re straightforward to deal with if you see them coming, but until you know where they are, the potential for getting ganked is very high. If you want to collect lots of wyrdstone or items, leaving the impressive at home can be wise, because it allows your units to spread out without fear of getting shredded.
Warband Management Tips
Don’t go crazy hiring a full warband right away. The enemy will always match your unit count one-for-one, and it can be easier to manage a smaller group. Being able to tuck all but 4 units into reserve slots will allow you to do any of the 3-team deployments safely.
Wait until your units reach level 3 before buying skills for them. They’re way too fragile up to that point.
Don’t invest in ranged or spell-caster units until you have a fairly competent warband. These units are pretty useless for a while, so the rest of the warband will be carrying them. あるいは, just recruit the units directly once level 3+ hirelings become available (just remember to check for injuries before hiring).
Don’t forget about warband-specific skills. There are some useful unique abilities in each.
If you build all units of a given type the same way, it’s easier to keep track of who does what. 例えば, if your melee heroes have Insult, and your melee henchmen have Kidney Strike, you know that any hero/henchman pair can significantly drop an enemy’s melee resistance.
早い段階で, buy helmets whenever you see them in the store. They’re surprisingly rare.
The most useful Veteran Skills are:
- エクスプローラ – reduces costs of scouts, and improves the chances of finding juicy missions.
- Contact: 図書館員 – adds a chance of receiving an enchantment recipe. There are a lot of these and they’re pretty rare, so having them trickle in over time by themselves is a big help.
- 学者 – reduces cost of training skills and spells. Skill training is where all your money goes, so this is very handy.
- Negotiator – increases time between wyrdstone requests. Running out of time won’t normally be an issue, but the mandatory deliveries earn you less money, so making them less frequent means more cash for you.
Some others that are useful:
- Renowned – reduces cost of hiring new warriors. Somewhat handy early on when you’re broke, more useful later on when hiring high-level units.
- Contact: 商人 – receive a free consumable. Some of these are useful.
- Contact: [鎧] – getting the occasional bit of kit is handy. 例えば, Sisters could sign up for free Heavy Armor, since most of their units wear it. Others might want the helms + shields contact, because helms are rare. Getting armor is more useful than getting weapons because you can’t strip armor from fallen enemy units.
これが今日私たちがこの目的で共有するすべてです Mordheim: City of the Damned ガイド. このガイドは元々、次の者によって作成および執筆されました。 VoidGrazer. このガイドを更新できなかった場合, これに従って最新のアップデートを見つけることができます リンク.