Here’s a guide to modding ヒューマニッツ, based on the latest update. In this comprehensive walkthrough, you’ll pick up the skills needed to create different kinds of mods, following what I’ve discovered thus far. 覚えておいてください, I’ll continue to add new insights as I delve deeper into modding HumanitZ. それで, keep an eye out for future updates!
はじめる
To kick off your HumanitZ modding journey, gather the following tools and software:
I suggest organizing all these tools within a dedicated folder, for easier and more efficient access. Since I’ve installed the game on my D: drive, I’ve placed all the tools under a folder named “HumanitZ Modding”.
基本
Before diving into the actual modding process, there are crucial aspects of modding Unreal Engine games, particularly HumanitZ, that you should grasp. Let’s delve into them:
- No Addition of New Files: Presently, adding new custom files to the game as part of a mod isn’t feasible. Your mod must function by overwriting existing files within the game. さらに, it’s imperative that the file structure remains identical. We’ll delve deeper into this shortly.
- Unpacking and Packing: Modding HumanitZ necessitates frequent unpacking and packing of files. This is where tools like UModel and the Unreal Engine come into play. Unpacking involves extracting the game’s base files, while packing entails assembling your custom mod files.
- Adherence to File Structure: This is paramount. Your mod won’t function unless you meticulously adhere to the game’s file structure. It’s critical to follow it precisely. 例えば, if you unpack a file located in:
[...]\HumanitZ\TSSGame\Content\VehicleVarietyPack\TexturesIn the Unreal Engine, your file must be placed in:[...]\YourProjectFolder\Content\VehicleVarietyPack\Textures
覚えて, strict adherence to these rules is non-negotiable for a successful mod. Pay keen attention to these guidelines!
Unreal Project Setup
If you’re making a mod for a game built in Unreal Engine, it’s likely best to create your mod within an Unreal project to ensure compatibility.
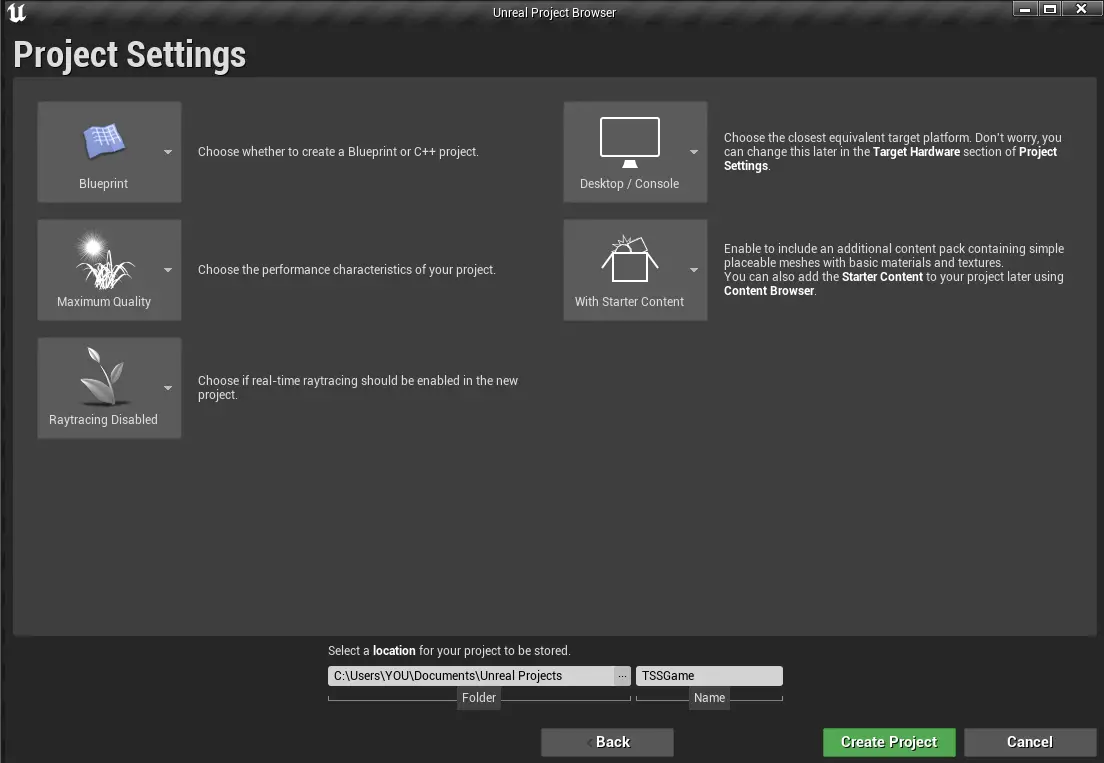
はじめに, start by creating your Unreal Project. It’s important to maintain the same file structure for compatibility reasons. それで, when naming your project, stick to the established file structure to keep things organized.
Creating the Project
When creating your project, を選択してください “ゲーム” category from the options provided.

次, decide on a template that suits your preferences and experience level. You can opt for the “空白” template for a more organized approach, or if you’re new or don’t mind additional files, consider either Third Person または Top Down.
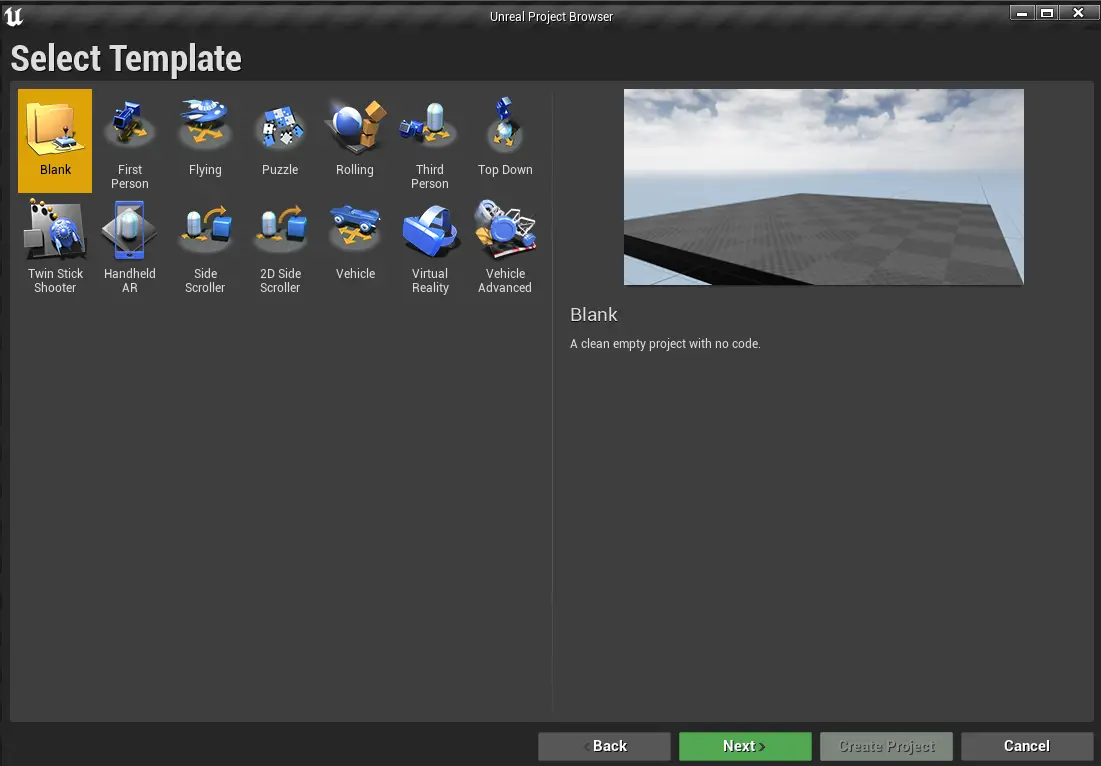
Ensure to name your project “TSSGame” to maintain consistency with the developers’ naming conventions. This step is crucial for proper organization and compatibility.
Project Configuration
After creating your Unreal Engine project, the next step is to perform some basic configuration.
- Open your project and locate the big gear button labeled “設定” at the center of the top of the screen. それをクリックしてください.
- From the dropdown menu, 選択する “Project Settings“. This action will open a new window with a list of items on the left.
- Find the section titled “プロジェクト” and look for a subsection labeled “Packaging“. それをクリックしてください.
- 内で “Packaging” カテゴリ, scroll down to the bottom until you locate a tab named “プロジェクト“.
- Look for the second option from the top to the bottom, which is a dropdown labeled “Build Configuration“.
- Click on the dropdown and select “Shipping“.
- Close the window to save the changes. Your project is now configured and ready to proceed.


Unpacking the Game files
Let’s keep your Unreal Project open. 今, we need the files you want to modify. Remember where you stored them?
わかった, so now we need to unpack those files. Do you recall how to do that? Let’s find out below!
The Methods
There are two methods to unpack game files:
- 方法 #1: This method will unpack the entire game into a folder. 準備をしてください, as this will require approximately 32.5GB of disk space. If you’re okay with dedicating this much space and want everything unpacked, this is the way to go.
- 方法 #2: If you’re short on space or don’t want to bother with unpacking every new update, you can opt for this method instead.
Creating your folder
推奨ディレクトリ内に新しいフォルダーを作成しましょう, すべてのツールなどを保持する場所. 名前を付けることができます “未払いのファイル” またはあなたが好むものは何でも.
方法 #1 – すべてを開梱します:
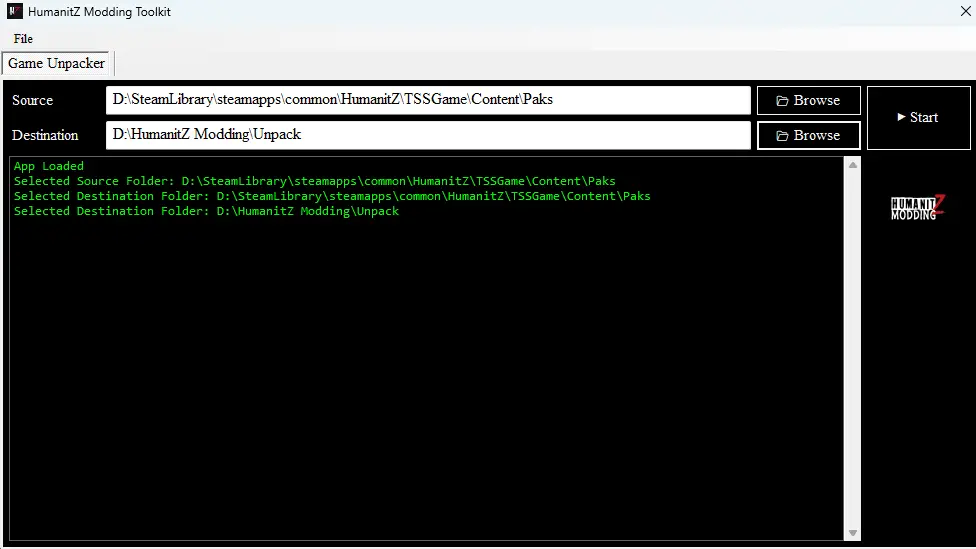
この方法の場合, ファンタスティックを使用します 改造ツールキット によって開発されました Zangal88. ゲーム全体を開梱することが簡単になります!
- ツールキットをインストールして開きます.
- 画面が表示されます “ソース” そして “行き先“.
- ソースディレクトリ用, に移動します:
[...]\HumanitZ\TSSGame\Content\Paks. - 目的地の場合, 作成したばかりのフォルダーを選択します (またはあなたが好むどんなフォルダーでも).
- ソースディレクトリ用, に移動します:
- 両方のディレクトリが選択されたら, クリック “始める” そして、それをやらせてください.
それでおしまい! プロセスが完了したら, すべてのゲームファイルは、選択したフォルダに開梱され、きちんと保存されます.
方法 #2 – 特定のファイルを開梱します:
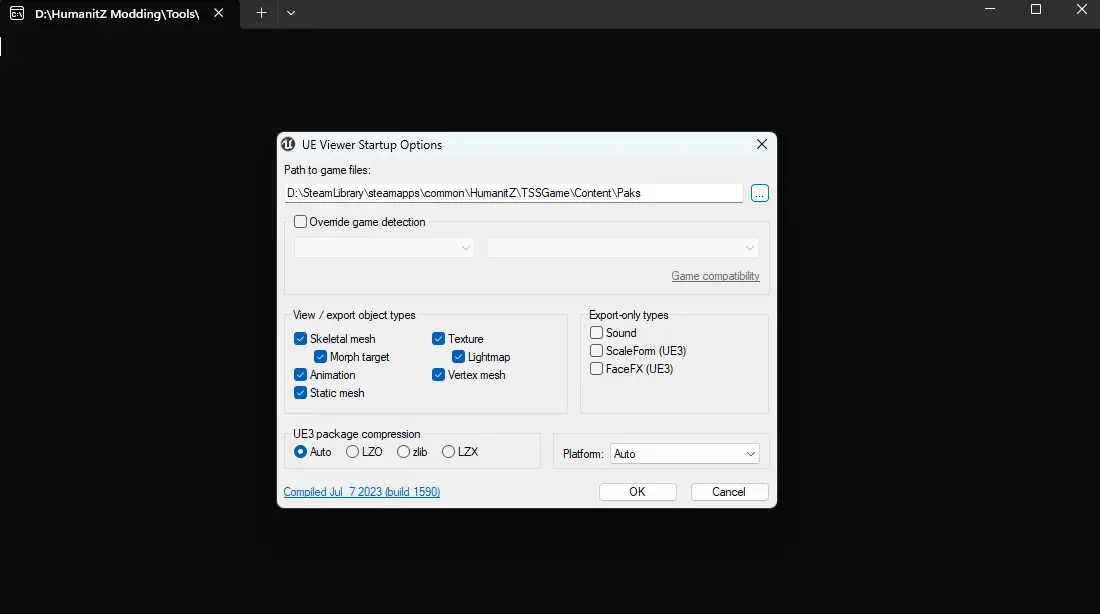
この方法の場合, 必要になります UModel 前に言及したツール.
- Umodelをインストールして開きます.
- 画面が表示されます “ゲームファイルへのパス“.
- Set the path to the game files to be exactly:
[...]\HumanitZ\TSSGame\Content\Paks.
- Set the path to the game files to be exactly:
- Once set, proceed with the unpacking process.
Don’t worry if a prompt or CMD window pops up; it’s just for displaying logs of what’s happening. 無視しても問題ありません.
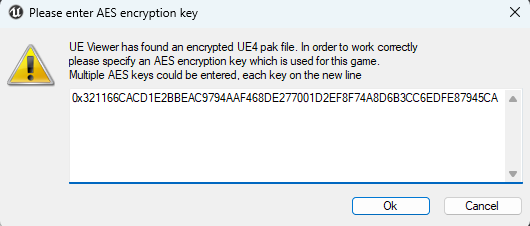
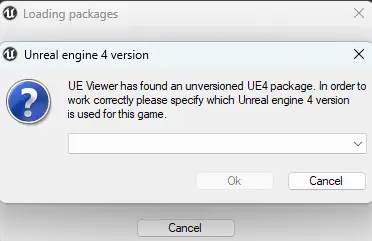
AES Encryption Key
If you encounter a warning screen stating that the app has found an encrypted file and requires an AES encryption key to view it, 心配ない! お世話になりました. Just paste the following encryption key into the prompt and hit “わかりました”: 0x321166CACD1E2BBEAC9794AAF468DE277001D2EF8F74A8D6B3CC6EDFE87945CA
Exploring the Game Files
大丈夫, so you’ve got all your game files ready to unpack. 今, it’s time to tidy up the file hierarchy. Close those submenus of each folder so it looks neat and organized. Head straight for the ゲーム フォルダ, でも覚えておいてください, in this context, “ゲーム” actually means “Content.” Sneaky, 右?
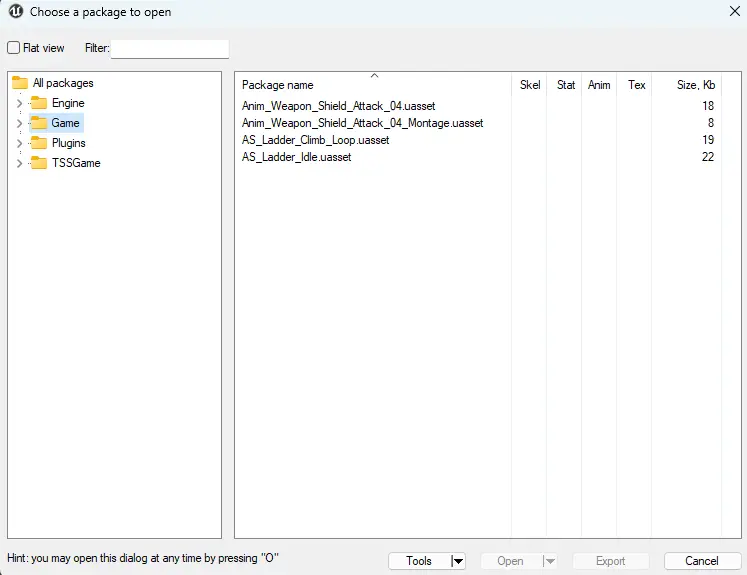
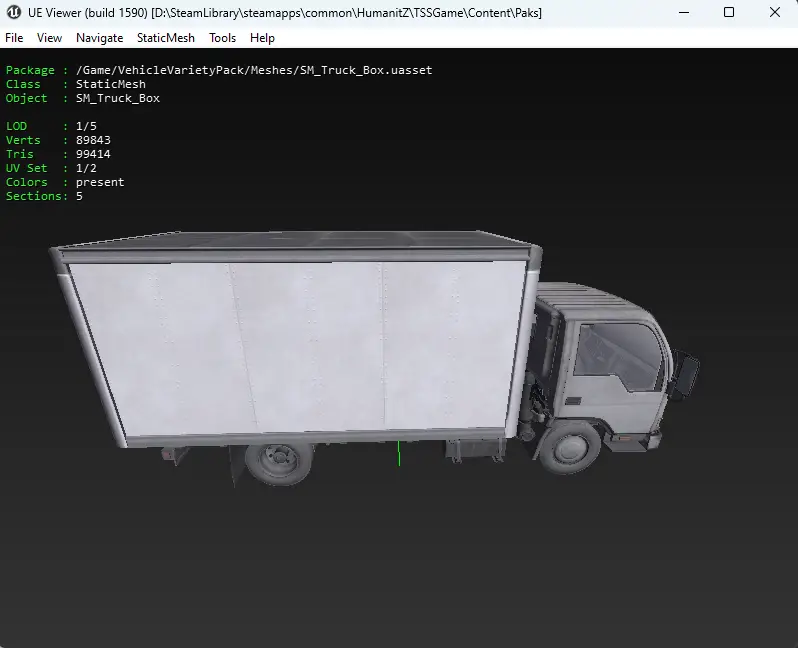
今, to preview an asset, just double click it. The app will try to show you a preview of meshes, 材料, テクスチャ, and animations. 残念ながら, it won’t recognize other stuff. しかし恐れることはありません, in the screenshot provided, the mesh of the white box truck has been found!
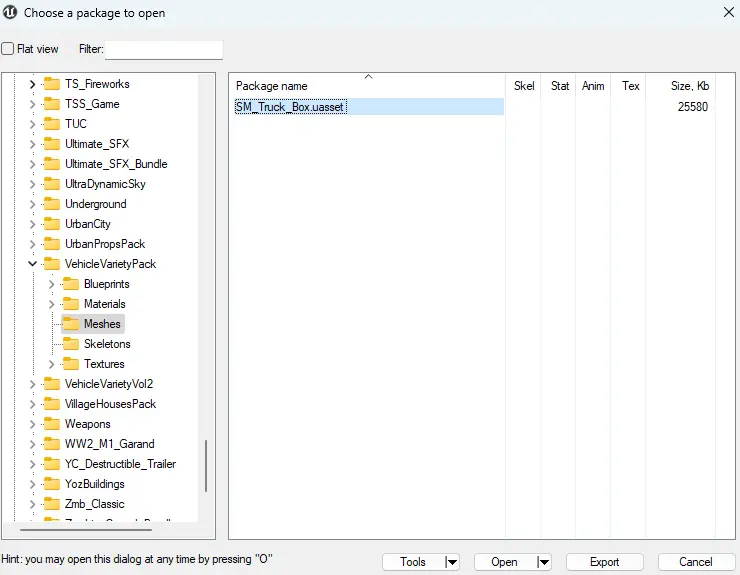
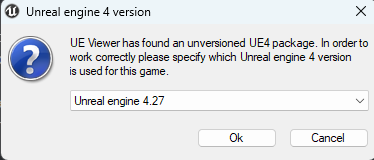
素晴らしい, you’ve found the file you need. Click to preview it and then select version 4.27 at the bottom of the list. 簡単, 右? Once you’re previewing the truck mesh, you’re on the right track. But how to go back? クリックするだけです ファイル on the top left, それから Open Package. That’ll take you back to the window where you can select which files to handle.
今, once you’ve isolated the files or folder you want, just right-click and select 輸出. Choose a folder to put the extracted files in, そして出来上がり! That’s how you unpack specific things instead of everything. Happy unpacking!
改造
確かに, let’s take a moment to recap our progress.
これまでのところ, you’ve set up all the necessary tools for modding the game. This involved creating directories for both the tools themselves and the unpackaged game files. Depending on your preference, you either unpackaged the entire game or selected specific files for extraction.
If you opted for Method #1 for unpackaging the game files, you can still preview them by following Method #2, but this time opening the unpackaged folder instead of the game folder, skipping the AES key step.
その後, you’ve also created an Unreal Project where you’ll be working on your mods.
最後に, you revisited “THE BASICS” to refresh your memory. 今, when it comes to actually modding, it varies depending on what you want to modify.
Since this guide is getting quite extensive, it’s time to break it down into smaller, more focused guides. Each mini-guide will explain how to mod a specific aspect of the game. Once you’ve reached the packaging section of any of these guides, you can return here for further instructions.
Modifying Materials (Reskins, 等)
Feel free to refer to this ガイド.
To clarify, make sure you return to the guide 後 reaching its final section for the specific modding instructions.
Here’s the breakdown for packaging your mod:
初め, after creating your mod and locating the files, paste them into the directory where Unrealpak is stored, which in your case seems to be “D:\HumanitZ Modding\Tools\Unrealpak”.
Ensure you maintain the correct file structure by creating a folder named “TSSGame-WindowsNoEditor” inside the Unrealpak folder.
Within this folder, 追加 “_P” to the end of the folder name to prioritize loading this directory, その結果 “TSSGame-WindowsNoEditor_P”.
This folder should be structured like this: “[…]\Unrealpak\TSSGame-WindowsNoEditor_P”.
次, 内部 “TSSGame-WindowsNoEditor_P”, create a folder with the project name (おそらく “TSSGame”).
Inside this new folder, create another folder named “コンテンツ”.
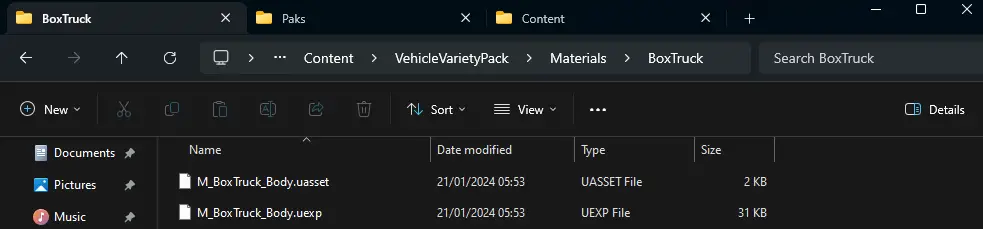
Following the developer’s file structure, place your cooked files inside the Content folder. 例えば, if you’re adding the VehicleVarietyPack, ensure the directory looks like this:
TSSGame-WindowsNoEditor_P
  └─ TSSGame
      └─ コンテンツ
          └─ 材料
              └─ BoxTruck
                  └─ M_BoxTruck_Body.uasset
                  └─ M_BoxTruck_Body.uexp
          └─ テクスチャ
              └─ BoxTruck
                  └─ TX_Truck_Box_Diffuse.uasset
                  └─ TX_Truck_Box_Diffuse.uexp
Return to your Unrealpak folder and locate the TSSGame-WindowsNoEditor_P folder. Drag it gently over to the UnrealPak-With-Compression.bat file.
A prompt or command window will pop up, converting your folder into a .pak file. 完了したら, close the prompt.
おめでとう, your mod is now ready! 万歳! Simply navigate to the location of the original .pak file of the game:
[...]\HumanitZ\TSSGame\Content\Paks
そこにtssgame-windowsnoeditor_pファイルを貼り付けます. ファイルをお気軽に変更してください, ただし、_Pを最後に保持してください!
それだけです! ゲームを開始して、あなたの改造された体験をお楽しみください! 🥳 💖