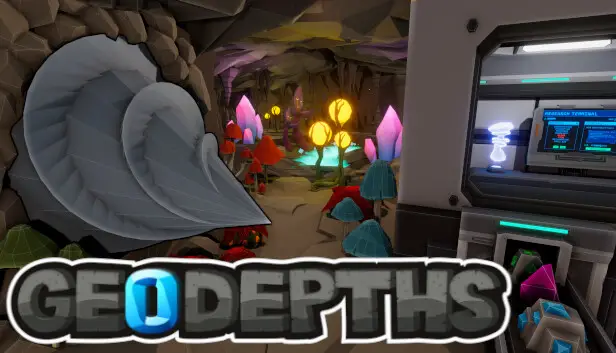
- タイトル: GeoDepths
- 発売日:
- 開発者:
- 出版社:
Information about GeoDepths is still incomplete. これを使用してゲームの詳細を記入するのにご協力ください。 お問い合わせフォーム.
The guide has a summary of the technologies, 材料, アップグレード, manufacturable items, drill tech, and the encyclopedia. I made it so I could see a list of things on one screen while I played on another, so I can remember what’s needed next. I shared my spreadsheet here so others can use it if they find it helpful. 注意してください, it has spoilers since it shows some late-game items you can make.
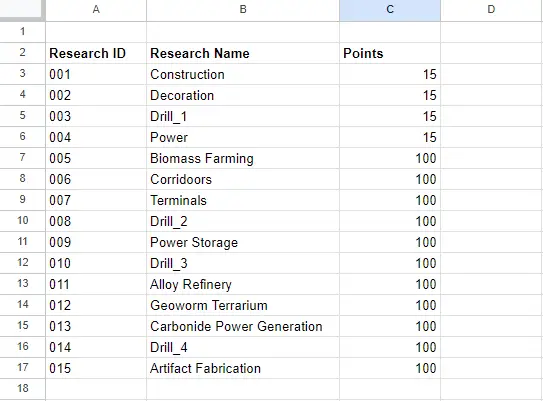
Technologies
This table displays the technologies you can unlock gradually, often by getting research points from scanning ores at your base or scanning items found in caves. The list is in numeric order, でも覚えておいてください, it’s not the order in which you unlock them – that’s a fun discovery for you to make on your own.
Refining
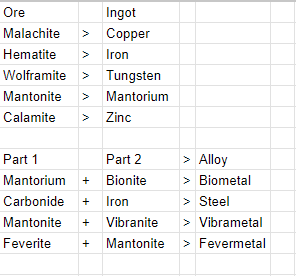
These tables present:
- The ores you can dig up
- The ingots you can make
- The alloys you can craft
You can only mine ores if your drill has the right toughness technology. These technologies improve as you research items, like lower tier ores. The tables aren’t sorted in any particular order, except to make the following sections easier to understand (but that’s just my opinion).
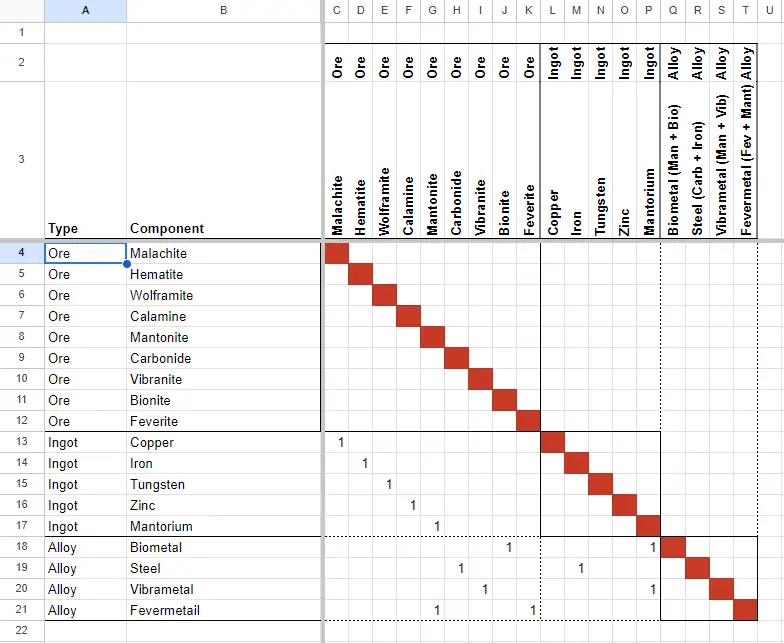
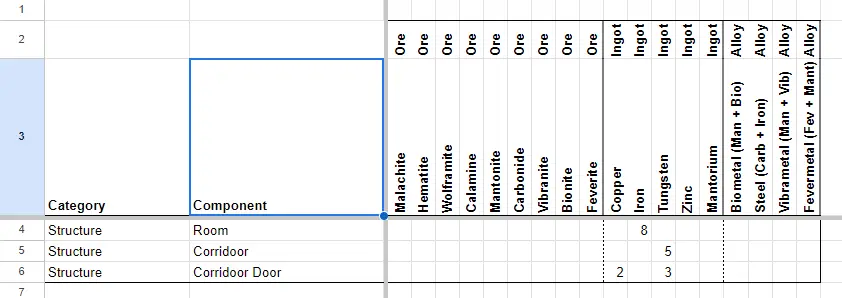
テーブル 1
Presents a summary of how materials can be refined or alloyed.
テーブル 2
Lists all the mineable items and how many are needed to create the next item in the chain.
- 1 x Copper (B13) is refined from 1 x Malachite (C13)
- 1 x Steel (B19) is produced by alloying 1 x Carbonide (H20) と 1 ×鉄 (M20)
ご注意ください: Some ores such as Bionite and Feverite don’t undergo the refining process, but they are utilized in other procedures.
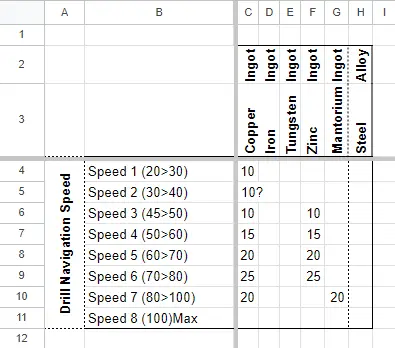
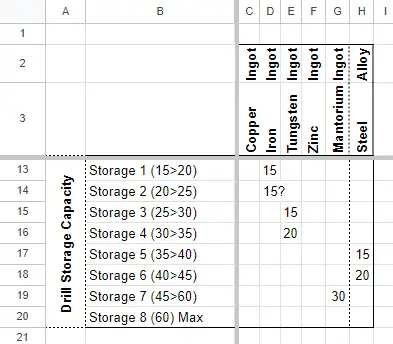
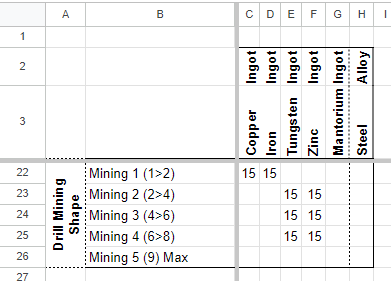
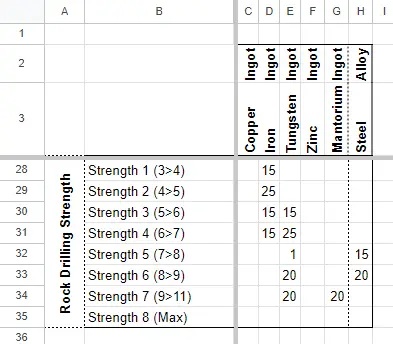
Drill upgrades
The next tables detail the drill upgrades accessible in the game and the costs to apply them. Upgrades become available when enough research points are earned and can be applied to your drill once the right resources are created.
ノート:
- Some Tier 2 items might be listed incorrectly (indicated with ‘?』) due to lost screenshots.
- You must progress through each tier of upgrades in order.
- When the research is unlocked, you can create the technology by building it with the required ingots and alloys. 例えば, when Tier 7 Navigation speed is unlocked, build it using 20 Copper and 20 Mantorium.
Drill Navigation Speed
This impacts how fast your rig can move across open ground, not how quickly it can mine. Keep in mind that Level 8 is the maximum speed.
Drill Storage Capacity
This influences how much ore and manually gathered biomass your rig can hold together. 持っている場合 10 ores in a tier 1 ドリル, you can only gather an additional 5 バイオマス. Two things to remember: レベル 8 is the highest capacity, and having a large capacity and many drones allows you to stay out for a long time. Load up your drones (or have them mine), then send them home while you continue drilling.
Drill Mining Shape
This determines the shape and size of your mining area (1×1, 2×1, 2×2, 3×2, 4×2, 3×3). Note that Level 5 is the maximum size, and you can rotate the shape using ‘R’ when needed.
Rock Drilling Strength
This affects which rock tiers you can drill through with your rig. As your drilling strength increases:
- You can start drilling through tougher rock.
- Your drilling speed through softer rock improves.
レベル 8 is the maximum toughness, but it doesn’t mean you can drill through everything. Some ground remains too tough to drill through.
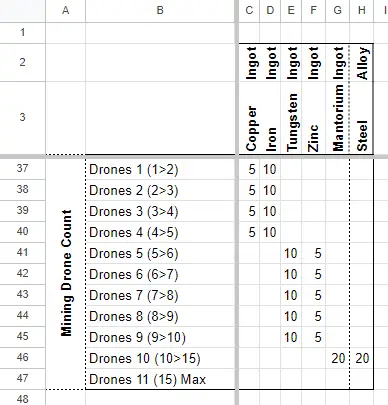
Mining Drone Count
This determines how many drones your rig can carry and is available once you find the right drill technology (ヒント: it’s in one of the caves).
Two important points to note: レベル 11 is the highest strength (and the highest tier item), and having a large capacity and many drones lets you stay out for extended periods. Load up your drones (or have them mine), then send them back home while you continue drilling.
Manufacturing
This part outlines the items that can be made inside or just outside your base. Each item includes its resource requirements. The sections listed match the order they appear in your crafting device.
構造
プレス 1 while holding the crafting gun.
A tip: To put a door, place the corridor first, then the door over it.
機械 / 端子
プレス 2 with your crafting gun. 覚えておいてください, not all items are accessible immediately; some require research.

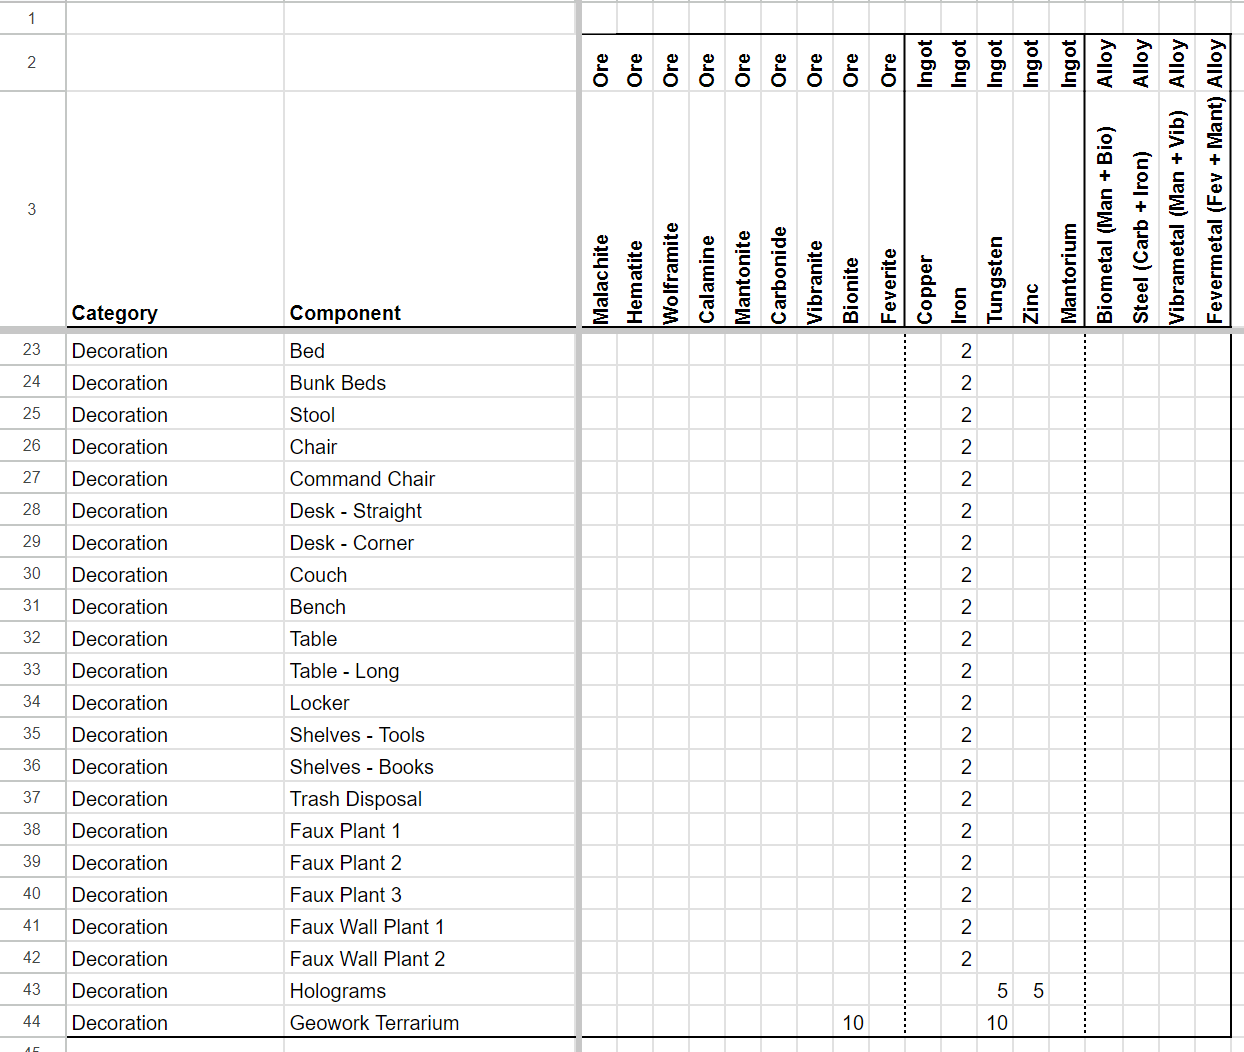
装飾
プレス 3 when holding the crafting gun.
- ノート 1: Some items aren’t immediately available; they need research.
- ノート 2: Certain items must be discovered and scanned before you can craft them.
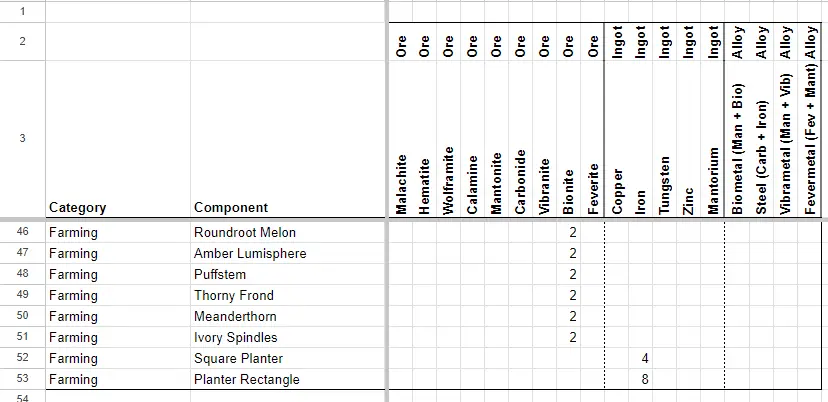
農業
プレス 4 when you have the crafting gun.
Remember that not all scannable flora can be planted. To plant flora, あなたが必要です 2 Bionite per item. If you want to plant outside, you need to be near the glowing pool by your base.
百科事典
The list below features the items that can show up in the encyclopedia (コンソール) once you’ve researched or discovered them. I contemplated putting them behind a spoiler block, but if you’ve read this much, you’ve likely perused everything else here. それで, spoilers might not bother you, or perhaps you’re curious to know what you might have overlooked.
- Lantern Bulb
- Trapdoor Spire
- Antenna Pod
- Crimson Stool
- Vaporspit
- Pyrodrip
- Titanshroom
- Neoncap
- Magishroom
- Sentinal Fungus
- Emberheart Enclosure
- Amber Lumisphere
- Puffstem
- Roundroot Melon
- Meanderthorn
- Thorny Frond
- Tangle Bulb
- Fossilised Arbor
- Crystalflora
- Ivory Spindles
Drill Tech and Other Technologies
This part compiles some of the technologies that can be located, unlocked, or applied to your rig. I’ve completed the game entirely, but there might be a missing item or two from this list because some screenshots got corrupted. さらに, this section requires some rewriting to make it more understandable.
Drill Tech:
- Drill Overdrive: Unlocks the rig’s ability to boost speed for a short time, followed by a cooldown period.
- Drill Autopilot Home: Enables you to instruct the rig to head home via the shortest route, drilling if necessary, using the same pathing algorithm as the drones.
Drone Tech:
- Drone Capacity: Increases the maximum number of drones you can deploy.
- Drone Mining: Unlocks the ability to command a drone to start mining in front of the drill. Different deployment options are available:
- ライン (1): One drone mines in front of the drill. You can deploy more for additional drones.
- Cone (3): Drones mine in a small triangle in front of the drill.
- Cone (5): Drones mine in a larger triangle in front of the drill.
- 丸 (>=4): Drones mine from all points around the drill.
- Drone Mine Resources: Instructs drones to mine nearby resources. When sent, the drill identifies a resource pile and the maximum number of ores it can mine. Drones choose the nearest ore, and you can’t select which ore they mine. Each press sends one more drone (まで 15 ドローンと 60 リソース).
- Drone Return Home: Allows drones to retrieve up to 4 resources from the rig, navigate home, drop them off, and return to your rig. Each deployment sends another drone and up to 4 more resources (まで 15 ドローンと 60 リソース).
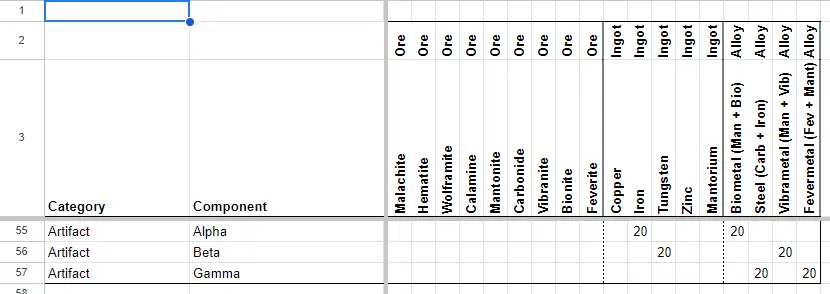
アーティファクト
To complete the main quest, you’ll need to create and deliver three artifacts to a specific location. These artifacts are crafted using the “Artifact Fabricator,” and it requires a considerable amount of high-tier resources.
What might not be immediately clear in the game, despite some text on the fabricator:
- Once you create an artifact, pick it up and carry it to your rig.
- As you enter the rig, the cupboard to the left of the main door console will open, allowing you to deposit the artifact onto one of the shelves.
- Repeat these steps for each of the three artifacts. You can only build and store one artifact at a time.
今, take your rig to the aliens’ 洞窟. For each artifact, place it on the matching colored pedestal. When all three artifacts are in place, the doorway to the chamber will open.
ノート: This room is where both possible endings are triggered. I’m including this note because I spent an hour searching for a way to trigger the second ending, thinking I had to deposit the artifacts elsewhere. しかし, そうする必要はありません; the endings are triggered from this room.